- Access Rights Workflow Dependencies
- User Access, Authentication, and Accounting
- Configuring a Local User
- Configuring a Remote User
- Configuring Windows Server 2008 LDAP for APIC Access
- Configuring APIC for LDAP Access
- Changing the Default Behavior for Remote Users with Missing or Bad Cisco AV Pairs
- Changing Default Behavior for Remote Users with Missing or Bad Cisco AV Pairs Using the NX-OS Style CLI
- About Signature-Based Transactions
- Accounting
- Routed Connectivity to External Networks as a Shared Service Billing and Statistics
User Access,
Authentication, and Accounting
This chapter contains the following sections:
- Access Rights Workflow Dependencies
- User Access, Authentication, and Accounting
- Configuring a Local User
- Configuring a Remote User
- Configuring Windows Server 2008 LDAP for APIC Access
- Configuring APIC for LDAP Access
- Changing the Default Behavior for Remote Users with Missing or Bad Cisco AV Pairs
- Changing Default Behavior for Remote Users with Missing or Bad Cisco AV Pairs Using the NX-OS Style CLI
- About Signature-Based Transactions
- Accounting
- Routed Connectivity to External Networks as a Shared Service Billing and Statistics
Access Rights Workflow Dependencies
The Cisco ACI RBAC rules enable or restrict access to some or all of the fabric. For example, in order to configure a leaf switch for bare metal server access, the logged in administrator must have rights to the infra domain. By default, a tenant administrator does not have rights to the infra domain. In this case, a tenant administrator who plans to use a bare metal server connected to a leaf switch could not complete all the necessary steps to do so. The tenant administrator would have to coordinate with a fabric administrator who has rights to the infra domain. The fabric administrator would set up the switch configuration policies that the tenant administrator would use to deploy an application policy that uses the bare metal server attached to an ACI leaf switch.
User Access, Authentication, and Accounting
APIC policies manage the access, authentication, and accounting (AAA) functions of the Cisco ACI fabric. The combination of user privileges, roles, and domains with access rights inheritance enables administrators to configure AAA functions at the managed object level in a very granular fashion. These configurations can be implemented using the REST API, the CLI, or the GUI.
Multiple Tenant Support
A core APIC internal data access control system provides multitenant isolation and prevents information privacy from being compromised across tenants. Read/write restrictions prevent any tenant from seeing any other tenant’s configuration, statistics, faults, or event data. Unless the administrator assigns permissions to do so, tenants are restricted from reading fabric configuration, policies, statistics, faults, or events.
User Access: Roles, Privileges, and Security Domains
The ACI fabric manages access privileges at the managed object (MO) level. A privilege is an MO that enables or restricts access to a particular function within the system. For example, fabric-equipment is a privilege bit. This bit is set by the APIC on all objects that correspond to equipment in the physical fabric.
A role is a collection of privilege bits. For example, because an “admin” role is configured with privilege bits for “fabric-equipment” and “tenant-security,” the “admin” role has access to all objects that correspond to equipment of the fabric and tenant security.
A security domain is a tag associated with a certain subtree in the ACI MIT object hierarchy. For example, the default tenant “common” has a domain tag common. Similarly, the special domain tag all includes the entire MIT object tree. An administrator can assign custom domain tags to the MIT object hierarchy. For example, an administrator could assign the “solar” domain tag to the tenant named solar. Within the MIT, only certain objects can be tagged as security domains. For example, a tenant can be tagged as a security domain but objects within a tenant cannot.
Creating a user and assigning a role to that user does not enable access rights. It is necessary to also assign the user to one or more security domains. By default, the ACI fabric includes two special pre-created domains:
-
All—allows access to the entire MIT
-
Infra— allows access to fabric infrastructure objects/subtrees, such as fabric access policies
 Note | For read operations to the managed objects that a user's credentials do not allow, a "DN/Class Not Found" error is returned, not "DN/Class Unauthorized to read." For write operations to a managed object that a user's credentials do not allow, an HTTP 401 Unauthorized error is returned. In the GUI, actions that a user's credentials do not allow, either they are not presented, or they are greyed out. |
A set of pre-defined managed object classes can be associated with domains. These classes should not have overlapping containment. Examples of classes that support domain association are as follows:
-
Layer 2 and Layer 3 network managed objects
-
Network profiles (such as physical, Layer 2, Layer 3, management)
-
QoS policies
When an object that can be associated with a domain is created, the user must assign domain(s) to the object within the limits of the user's access rights. Domain assignment can be modified at any time.
If a virtual machine management (VMM) domain is tagged as a security domain, the users contained in the security domain can access the correspondingly tagged VMM domain. For example, if a tenant named solar is tagged with the security domain called sun and a VMM domain is also tagged with the security domain called sun, then users in the solar tenant can access the VMM domain according to their access rights.
Configuring a Local User
In the initial configuration script, the admin account is configured and the admin is the only user when the system starts. The APIC supports a granular, role-based access control system where user accounts can be created with various roles including non-admin users with fewer privileges.
- Configuring a Local User Using the GUI
- Configuring a Local User Using the NX-OS Style CLI
- Configuring a Local User Using the NX-OS Style CLI
Configuring a Local User Using the GUI
Note | To watch an example video of this task, see Videos Webpage. |
-
The ACI fabric is installed, APIC controllers are online, and the APIC cluster is formed and healthy.
-
As appropriate, the security domain(s) that the user will access are defined. For example, if the new use account will be restricted to accessing a tenant, the tenant domain is tagged accordingly.
-
An APIC user account is available that will enable the following:
-
Creating the TACACS+ and TACACS+ provider group.
-
Creating the local user account in the target security domain(s). If the target domain is all, the login account used to create the new local user must be a fabric-wide administrator that has access to all. If the target domain is a tenant, the login account used to create the new local user must be a tenant administrator that has full read write access rights to the target tenant domain.
-
Configuring a Local User Using the NX-OS Style CLI
In the initial configuration script, the admin account is configured and the admin is the only user when the system starts. The APIC supports a granular, role-based access control system where user accounts can be created with various roles including non-admin users with fewer privileges.
Configuring a Local User Using the NX-OS Style CLI
Configuring a Remote User
Instead of configuring local users, you can point the APIC at the centralized enterprise credential datacenter. The APIC supports Lightweight Directory Access Protocol (LDAP), active directory, RADIUS, and TACACS+.
To configure a remote user authenticated through an external authentication provider, you must meet the following prerequisites:
- AV Pair on the External Authentication Server
- Configuring APIC for TACACS+ Access
- Configuring APIC for RADIUS Access
- Configuring A Cisco Secure Access Control Server for RADIUS and TACACS+ Access to the APIC
AV Pair on the External Authentication Server
You can add a Cisco attribute/value (AV) pair to the existing user record to propagate the user privileges to the APIC controller. The Cisco AV pair is a single string that you use to specify the Role-Based Access Control (RBAC) roles and privileges for an APIC user. An example configuration for an open RADIUS server (/etc/raddb/users) is as follows:
aaa-network-admin Cleartext-Password := "<password>"
Cisco-avpair = "shell:domains = all/aaa/read-all(16001)"
Best Practice for Assigning AV Pairs
As best practice, Cisco recommends that you assign unique UNIX user ids in the range 16000-23999 for the AV Pairs that are assigned to users when in bash shell (using SSH, Telnet or Serial/KVM consoles). If a situation arises when the Cisco AV Pair does not provide a UNIX user id, the user is assigned a user id of 23999 or similar number from the range that also enables the user's home directories, files, and processes accessible to remote users with a UNIX ID of 23999.
Configuring an AV Pair on the External Authentication Server
The numerical value within the parentheses in the attribute/value (AV) pair string is used as the UNIX user ID of the user who is logged in using Secure Shell (SSH) or Telnet.
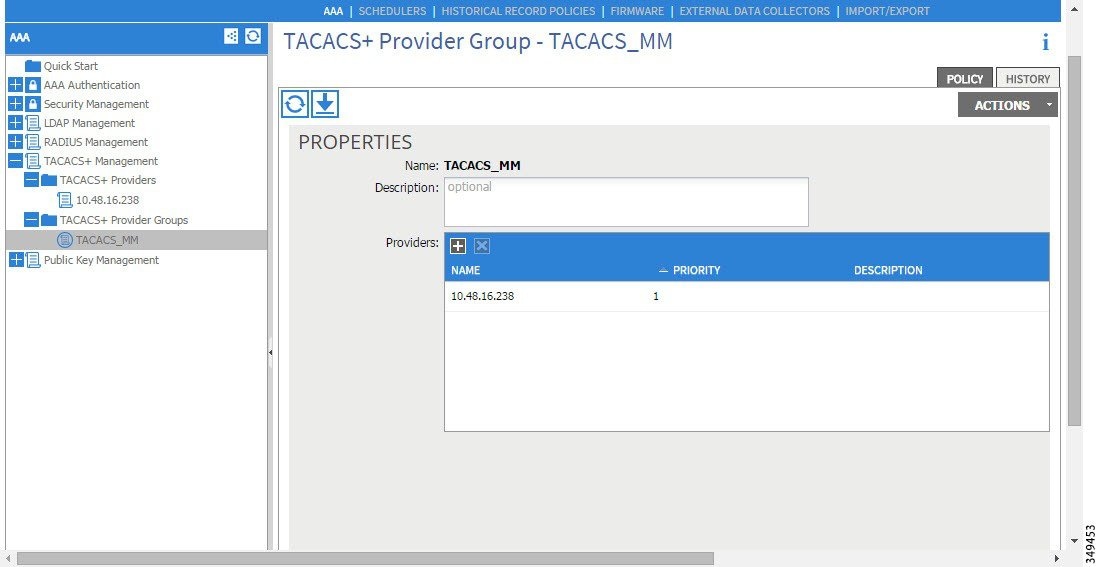
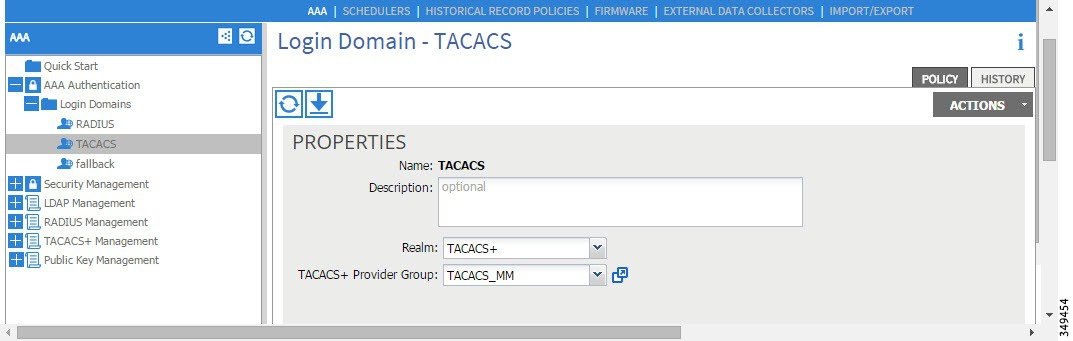
Configuring APIC for TACACS+ Access
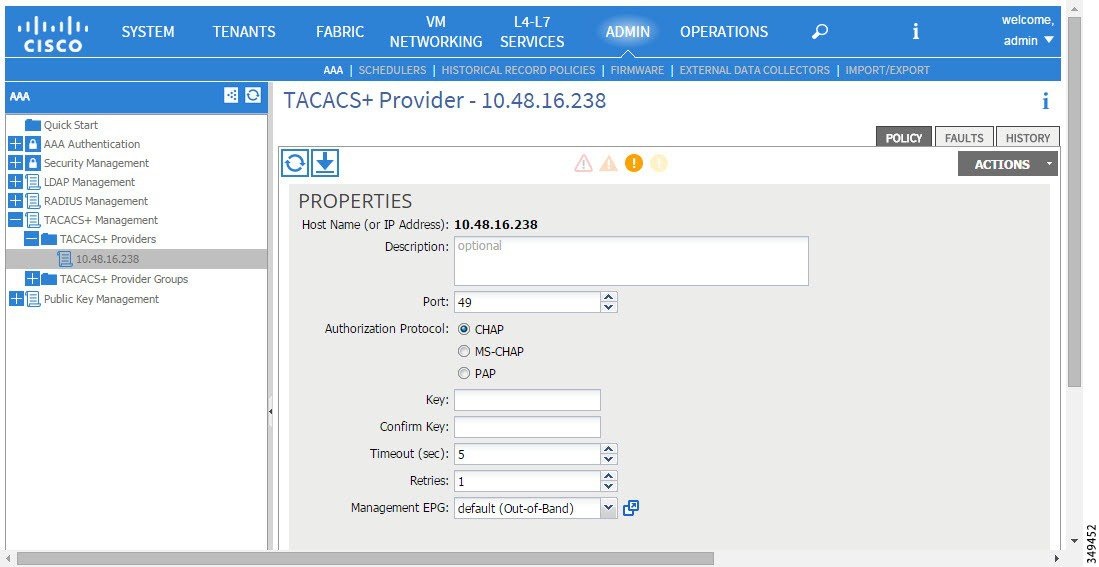
What to Do Next
This completes the APIC TACACS+ configuration steps. Next, if a RAIDUS server will also be used, configure the APIC for RADIUS. If only a TACACS+ server will be used, go to the ACS server configuration topic below.
Configuring APIC for RADIUS Access
-
The ACI fabric is installed, APIC controllers are online, and the APIC cluster is formed and healthy.
-
The RADIUS server host name or IP address, port, authorization protocol, and key are available.
-
The APIC management EPG is available.
-
An APIC user account is available that will enable the following:
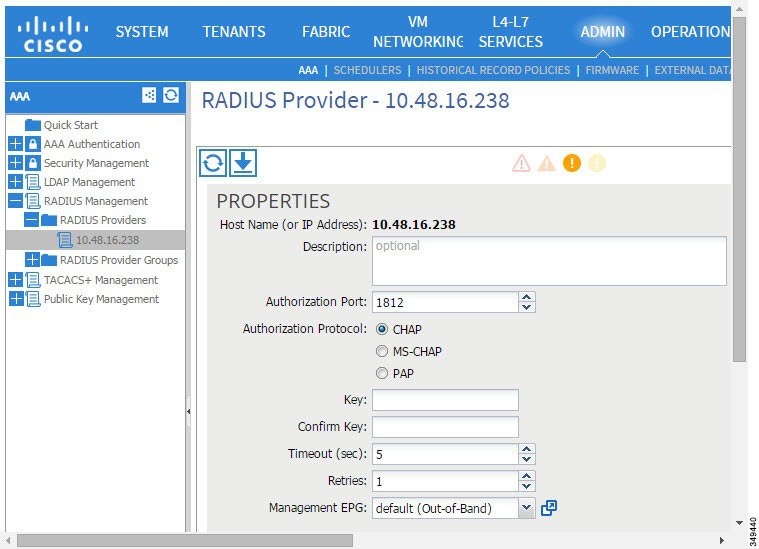
What to Do Next
This completes the APIC RADIUS configuration steps. Next, configure the RADIUS server.
Configuring A Cisco Secure Access Control Server for RADIUS and TACACS+ Access to the APIC
-
The Cisco Secure Access Control Server (ACS) version 5.5 is installed and online.
Note
ACS v5.5 was used to document these steps. Other versions of ACS might support this task but the GUI procedures might vary accordingly.
-
The APIC RADIUS or TACACS+ keys are available (or keys for both if both will be configured).
-
The APIC controllers are installed and online; the APIC cluster is formed and healthy.
-
The RADIUS or TACACS+ port, authorization protocol, and key are available.
What to Do Next
Use the newly created RADIUS and TACACS+ users to login to the APIC. Verify that the users have access to the correct APIC security domain according to the assigned RBAC roles and privileges. The users should not have access to items that have not been explicitly permitted. Read and write access rights should match those configured for that user.
Configuring Windows Server 2008 LDAP for APIC Access
-
First, configure the LDAP server, then configure the APIC for LDAP access.
-
The Microsoft Windows Server 2008 is installed and online.
-
The Microsoft Windows Server 2008 Server Manager ADSI Edit tool is installed. To install ADSI Edit, follow the instructions in the Windows Server 2008 Server Manager help.
-
AciCiscoAVPair attribute specifications: Common Name = AciCiscoAVPair, LDAP Display Name = AciCiscoAVPair, Unique X500 Object ID = 1.3.6.1.4.1.9.22.1, Description = AciCiscoAVPair, Syntax = Case Sensitive String.
Note
For LDAP configurations, best practice is to use AciCiscoAVPair as the attribute string. This avoids problems related to the limitation of common LDAP servers that do not allow overlapping object identifiers (OID); that is, the ciscoAVPair OID is already in use.
-
A Microsoft Windows Server 2008 user account is available that will enable the following:
The LDAP server is configured to access the APIC.
What to Do Next
Configure the APIC for LDAP access.
Configuring APIC for LDAP Access
-
The ACI fabric is installed, APIC controllers are online, and the APIC cluster is formed and healthy.
-
The LDAP server host name or IP address, port, Bind DN, Base DN, and password are available.
-
The APIC management EPG is available.
-
An APIC user account is available that will enable the following:
-
Creating the LDAP provider and LDAP provider group.
Figure 7. LDAP Provider 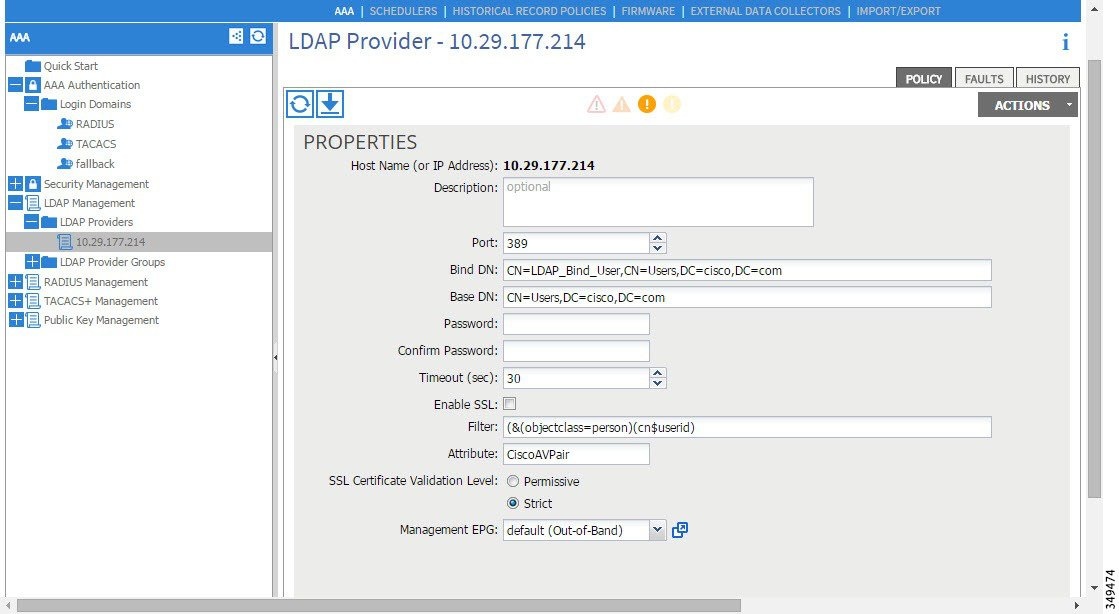
Note
The Bind DN is the string that the APIC uses to log in to the LDAP server. The APIC uses this account to validate the remote user attempting to log in. The Base DN is the container name and path in the LDAP server where the APIC searches for the remote user account. This is where the password is validated. Filter is used to locate the attribute that the APIC requests to use for the cisco-av-pair. This contains the user authorization and assigned RBAC roles for use on the APIC. The APIC requests the attribute from the LDAP server.
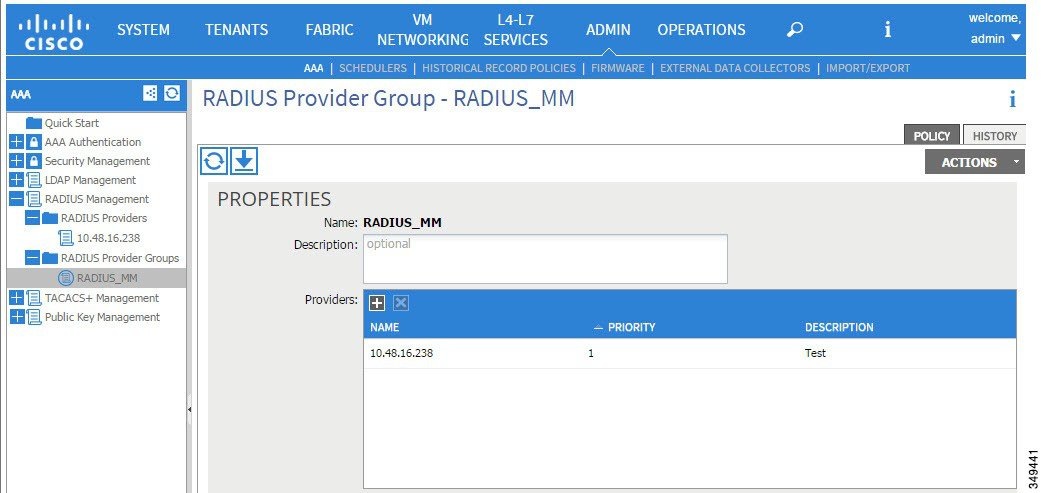
Figure 8. LDAP Provider Group 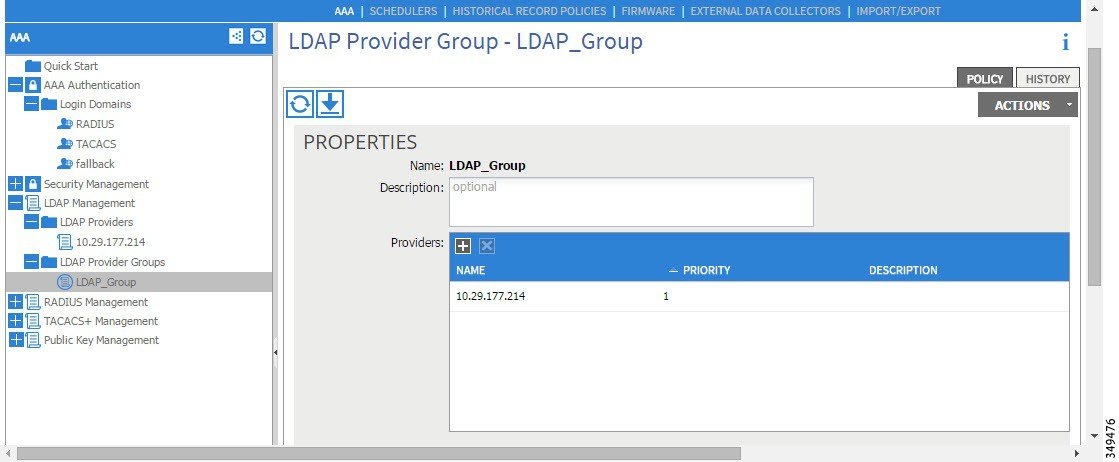
-
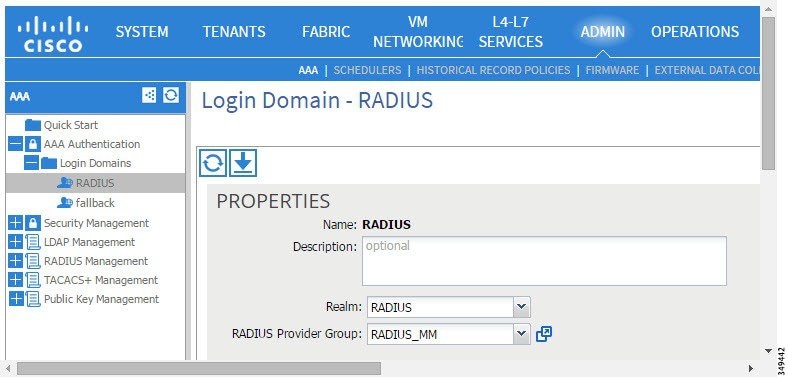
Creating the LDAP login domain.
Figure 9. AAA Login Domain for LDAP 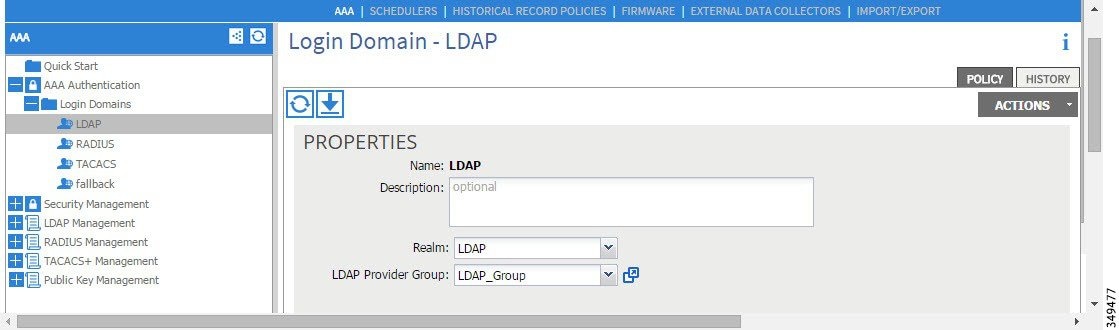
-
What to Do Next
This completes the APIC LDAP configuration steps. Next, test the APIC LDAP login access.
Changing the Default Behavior for Remote Users with Missing or Bad Cisco AV Pairs
Changing Default Behavior for Remote Users with Missing or Bad Cisco AV Pairs Using the NX-OS Style CLI
To change the default behavior for remote users with missing or bad Cisco AV pairs using the NX-OS CLI:
About Signature-Based Transactions
The APIC controllers in a Cisco ACI fabric offer different methods to authenticate users.
The primary authentication method uses a username and password and the APIC REST API returns an authentication token that can be used for future access to the APIC. This may be considered insecure in a situation where HTTPS is not available or enabled.
Note | Additionally, you must use HTTPS to prevent replay attacks. |
Before you can use X.509 certificate-based signatures for authentication, verify that the following pre-requisite tasks are completed:
- Guidelines and Limitations
- Generating an X.509 Certificate and a Private Key
- Configuring a Local User
- Using a Private Key to Calculate a Signature
Guidelines and Limitations
Follow these guidelines and limitations:
Generating an X.509 Certificate and a Private Key
Configuring a Local User
Creating a Local User and Adding a User Certificate Using the GUI
| Step 1 | On the menu bar, choose . |
| Step 2 | In the Navigation pane, click AAA Authentication. |
| Step 3 | In the Work pane, verify that in the default Authentication field, the Realm field displays as Local. |
| Step 4 | In the
Navigation pane, expand
.
The admin user is present by default. |
| Step 5 | In the Navigation pane, right-click Local Users and click Create Local User. |
| Step 6 | In the Security dialog box, choose the desired security domain for the user, and click Next. |
| Step 7 | In the
Roles dialog box, click the radio buttons to
choose the roles for your user, and click
Next.
You can provide read-only or read/write privileges. |
| Step 8 | In the User Identity dialog box, perform the following actions: |
| Step 9 | In the Navigation pane, click the name of the user that you created. In the Work pane, expand the + sign next to your user in the Security Domains area. The access privileges for your user are displayed. |
| Step 10 | In the Work pane, in the User Certificates area, click the user certificates + sign, and in the Create X509 Certificate dialog box, perform the following actions: The X509 certificate is created for the local user. |
Creating a Local User and Adding a User Certificate Using the REST API
Example: method: POST
url: http://apic/api/node/mo/uni/userext/user-userabc.json
payload:
{
"aaaUser": {
"attributes": {
"name": "userabc",
"firstName": "Adam",
"lastName": "BC",
"phone": "408-525-4766",
"email": "userabc@cisco.com",
},
"children": [{
"aaaUserCert": {
"attributes": {
"name": "userabc.crt",
"data": "-----BEGIN CERTIFICATE-----\nMIICjjCCAfegAwIBAgIJAMQnbE <snipped content> ==\n-----END CERTIFICATE-----",
},
"children": []
},
"aaaUserDomain": {
"attributes": {
"name": "all",
},
"children": [{
"aaaUserRole": {
"attributes": {
"name": "aaa",
"privType": "writePriv",
},
"children": []
}
}, {
"aaaUserRole": {
"attributes": {
"name": "access-admin",
"privType": "writePriv",
},
"children": []
}
}, {
"aaaUserRole": {
"attributes": {
"name": "admin",
"privType": "writePriv",
},
"children": []
}
}, {
"aaaUserRole": {
"attributes": {
"name": "fabric-admin",
"privType": "writePriv",
},
"children": []
}
}, {
"aaaUserRole": {
"attributes": {
"name": "nw-svc-admin",
"privType": "writePriv",
},
"children": []
}
}, {
"aaaUserRole": {
"attributes": {
"name": "ops",
"privType": "writePriv",
},
"children": []
}
}, {
"aaaUserRole": {
"attributes": {
"name": "read-all",
"privType": "writePriv",
},
"children": []
}
}, {
"aaaUserRole": {
"attributes": {
"name": "tenant-admin",
"privType": "writePriv",
},
"children": []
}
}, {
"aaaUserRole": {
"attributes": {
"name": "tenant-ext-admin",
"privType": "writePriv",
},
"children": []
}
}, {
"aaaUserRole": {
"attributes": {
"name": "vmm-admin",
"privType": "writePriv",
},
"children": []
}
}]
}
}]
}
}
|
Creating a Local User Using Python SDK
Example:
#!/usr/bin/env python
from cobra.model.pol import Uni as PolUni
from cobra.model.aaa import UserEp as AaaUserEp
from cobra.model.aaa import User as AaaUser
from cobra.model.aaa import UserCert as AaaUserCert
from cobra.model.aaa import UserDomain as AaaUserDomain
from cobra.model.aaa import UserRole as AaaUserRole
from cobra.mit.access import MoDirectory
from cobra.mit.session import LoginSession
from cobra.internal.codec.jsoncodec import toJSONStr

APIC = 'http://10.10.10.1'
username = ‘admin’
password = ‘p@$$w0rd’

session = LoginSession(APIC, username, password)
modir = MoDirectory(session)
modir.login()

def readFile(fileName=None, mode="r"):
   if fileName is None:
      return ""
   fileData = ""
   with open(fileName, mode) as aFile:
      fileData = aFile.read()
   return fileData

# Use a dictionary to define the domain and a list of tuples to define
# our aaaUserRoles (roleName, privType)
# This can further be abstracted by doing a query to get the valid
# roles, that is what the GUI does

userRoles = {'all': [
               ('aaa', 'writePriv'),
               ('access-admin', 'writePriv'),
               ('admin', 'writePriv'),
               ('fabric-admin', 'writePriv'),
               ('nw-svc-admin', 'writePriv'),
               ('ops', 'writePriv'),
               ('read-all', 'writePriv'),
               ('tenant-admin', 'writePriv'),
               ('tenant-ext-admin', 'writePriv'),
               ('vmm-admin', 'writePriv'),
           ],
}

uni = PolUni('') # '' is the Dn string for topRoot
aaaUserEp = AaaUserEp(uni)
aaaUser = AaaUser(aaaUserEp, 'userabc', firstName='Adam',
                  email='userabc@cisco.com')

aaaUser.lastName = 'BC'
aaaUser.phone = '555-111-2222'
aaaUserCert = AaaUserCert(aaaUser, 'userabc.crt')
aaaUserCert.data = readFile("/tmp/userabc.crt")
# Now add each aaaUserRole to the aaaUserDomains which are added to the
# aaaUserCert
for domain,roles in userRoles.items():
   aaaUserDomain = AaaUserDomain(aaaUser, domain)
   for roleName, privType in roles:
       aaaUserRole = AaaUserRole(aaaUserDomain, roleName,
                                 privType=privType)
print toJSONStr(aaaUser, prettyPrint=True)

cr = ConfigRequest()
cr.addMo(aaaUser)
modir.commit(cr)
# End of Script to create a user
|
Using a Private Key to Calculate a Signature
You must have the following information available:
| Step 1 | Concatenate the
HTTP method, REST API URI, and payload together in this order and save them to
a file.
This concatenated data must be saved to a file for OpenSSL to calculate the signature. In this example, we use a filename of payload.txt. Remember that the private key is in a file called userabc.key. Example:GET example: GET http://10.10.10.1/api/class/fvTenant.json?rsp-subtree=childrenPOST example: POST http://10.10.10.1/api/mo/tn-test.json{"fvTenant": {"attributes": {"status": "deleted", "name": "test"}}}
| ||
| Step 2 | Calculate a
signature using the private key and the payload file using OpenSSL.
Example: openssl dgst -sha256 -sign userabc.key payload.txt > payload_sig.binThe resulting file has the signature printed on multiple lines. | ||
| Step 3 | Strip the
signature of the new lines using Bash.
Example: $ tr -d '\n' < payload_sig.base64 P+OTqK0CeAZjl7+Gute2R1Ww8OGgtzE0wsLlx8fIXXl4V79Zl7 Ou8IdJH9CB4W6CEvdICXqkv3KaQszCIC0+Bn07o3qF//BsIplZmYChD6gCX3f7q IcjGX+R6HAqGeK7k97cNhXlWEoobFPe/oajtPjOu3tdOjhf/9ujG6Jv6Ro=
| ||
| Step 4 | Place the
signature inside a string to enable the APIC to verify the signature against
the payload.
This complete signature is sent to the APIC as a cookie in the header of the request. Example: APIC-Request-Signature=P+OTqK0CeAZjl7+Gute2R1Ww8OGgtzE0wsLlx8f IXXl4V79Zl7Ou8IdJH9CB4W6CEvdICXqkv3KaQszCIC0+Bn07o3qF//BsIplZmYChD6gCX3f 7qIcjGX+R6HAqGeK7k97cNhXlWEoobFPe/oajtPjOu3tdOjhf/9ujG6Jv6Ro=; APIC-Certificate-Algorithm=v1.0; APIC-Certificate-Fingerprint=fingerprint; APIC-Certificate-DN=uni/userext/user-userabc/usercert-userabc.crt
| ||
| Step 5 | Use the
CertSession class in the Python SDK to communicate with an APIC using
signatures.
The following script is an example of how to use the CertSession class in the ACI Python SDK to make requests to an APIC using signatures. Example:
#!/usr/bin/env python
# It is assumed the user has the X.509 certificate already added to
# their local user configuration on the APIC
from cobra.mit.session import CertSession
from cobra.mit.access import MoDirectory

def readFile(fileName=None, mode="r"):
    if fileName is None:
        return ""
    fileData = ""
    with open(fileName, mode) as aFile:
        fileData = aFile.read()
    return fileData

pkey = readFile("/tmp/userabc.key")
csession = CertSession("https://ApicIPOrHostname/",
                       "uni/userext/user-userabc/usercert-userabc.crt", pkey)

modir = MoDirectory(csession)
resp = modir.lookupByDn('uni/fabric')
pring resp.dn
# End of script
|
Accounting
ACI fabric accounting is handled by these two managed objects (MO) that are processed by the same mechanism as faults and events:
-
The aaaSessionLR MO tracks user account login/log-out sessions on the APIC and switches, and token refresh. The ACI fabric session alert feature stores information such as the following:
-
Username
-
IP address initiating the session
-
Type (telnet, https, REST etc.)
-
Session time and length
-
Token refresh – a user account login event generates a valid active token which is required in order for the user account to exercise its rights in the ACI fabric.
Note
Token expiration is independent of login; a user could log out but the token expires according to the duration of the timer value it contains.
-
-
The aaaModLR MO tracks the changes users make to objects and when the changes occurred.
Both aaaSessionLR and aaaModLR event logs are stored in APIC shards. Once the data exceeds the pre-set storage allocation size, it overwrites records on a first-in first-out basis.
Note | In the event of a destructive event such as a disk crash or a fire that destroys an APIC cluster node, the event logs are lost; event logs are not replicated across the cluster. |
The aaaModLR and aaaSessionLR MOs can be queried by class or by distinguished name (DN). A class query will give you all the log records for the whole fabric. All aaaModLR records for the whole fabric are available from the GUI at the Fabric -> Inventory -> pod-1 -> history -> audit log section, The GUI => History => Log options enable viewing event logs for a specific object identified in the GUI context.
The standard syslog, callhome, REST query, and CLI export mechanism are fully supported for aaaModLR and aaaSessionLR MO query data. There is no default policy to export this data.
There are no pre-configured queries in the APIC that report on aggregations of data across a set of objects or for the entire system. A fabric administrator can configure export policies that periodically export aaaModLR and aaaSessionLR query data to a syslog server. Exported data can be archived periodically and used to generate custom reports from portions of the system or across the entire set of system logs.
Routed Connectivity to External Networks as a Shared Service Billing and Statistics
The APIC can be configured to collect byte count and packet count billing statistics from a port configured for routed connectivity to external networks (an l3extInstP EPG) as a shared service. Any EPG in any tenant can share an l3extInstP EPG for routed connectivity to external networks. Billing statistics can be collected for each EPG in any tenant that uses an l3extInstP EPG as a shared service. The leaf switch where the l3extInstP is provisioned forwards the billing statistics to the APIC where they are aggregated. Accounting policies can be configured to periodically export these billing statics to a server.
 Feedback