- CGDS - Substation Workbench Release 1.0 Installation Guide
- Installing the CGDS - Substation Workbench Server Hardware
- Installing the CGDS - Substation Workbench Server Software
- Installing the CG-DS Substation Workbench Monitoring System (Release 1.0)
- Installing the CGDS - Substation Workbench Client Software (Substation Designer)
Installing the CGDS - Substation Workbench Server Software
Tips on Performing the CGDS - Substation Workbench Base Software Installation
This section will cover how to install the server software, repair an installation, or make an installation on a server platform not yet validated or certified by Cisco. The arrangement of software in the CGDS - Substation Server Software Stack is shown here:
Figure 2-1
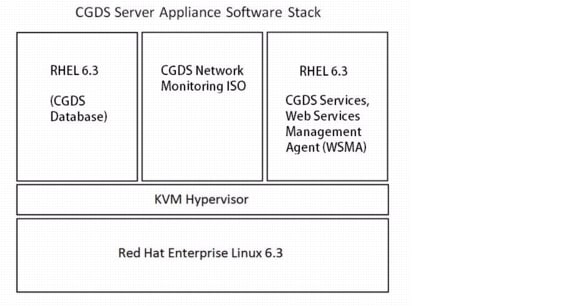
CGDS - Substation Server Software Stack
As shown in the figure:
•![]() The base installation of Red Hat Enterprise Linux (RHEL) 6.3 interacts with the hardware.
The base installation of Red Hat Enterprise Linux (RHEL) 6.3 interacts with the hardware.
•![]() The Red Hat KVM Hypervisor is part of the base RHEL 6.3 install.
The Red Hat KVM Hypervisor is part of the base RHEL 6.3 install.
•![]() The KVM Hypervisor acts as the host for guest operating systems.
The KVM Hypervisor acts as the host for guest operating systems.
–![]() One guest operating system is an additional copy of RHEL 6.3. This hosts the CGDS - Substation Workbench server software. This includes a database management system,
One guest operating system is an additional copy of RHEL 6.3. This hosts the CGDS - Substation Workbench server software. This includes a database management system,
–![]() Another guest operating system hosts the CGDS Network Monitoring System.
Another guest operating system hosts the CGDS Network Monitoring System.
•![]() The CGDS - Substation Designer client software will also need to be installed on the client computers that will communicate with the CGDS - Substation Workbench server.
The CGDS - Substation Designer client software will also need to be installed on the client computers that will communicate with the CGDS - Substation Workbench server.
Making the Base Install
The installation for the base Red Hat Enterprise Linux, version 6.3, is very conventional. An excellent resource can be found at the Red Hat site. It is titled: Red Hat Enterprise Linux 6 Installation Guide
https://access.redhat.com/knowledge/docs/en-US/Red_Hat_Enterprise_Linux/6/pdf/Installation_Guide/Red_Hat_Enterprise_Linux-6-Installation_Guide-en-US.pdf
Chapters 9 and 10 of this guide deal with using Anaconda, a Graphical User Interface installer to install the base version of RHEL.
Another excellent resource, one that concerns the KVM Hypervisor, is Red Hat Enterprise Linux 6 Hypervisor Deployment Guide;
https://access.redhat.com/knowledge/docs/en-US/Red_Hat_Enterprise_Linux/6/pdf/Hypervisor_Deployment_Guide/Red_Hat_Enterprise_Linux-6-Hypervisor_Deployment_Guide-en-US.pdf
The installation of the guest operating systems, as well as applications that run under them, is a little more detailed. Specialized instructions are provided in the following sections of this Installation Guide to guide you through those installations.
Hardware Compatibility
Red Hat has validated several server platforms as being capable of running Red Hat Enterprise Linux 6.3. It is recommended that CGDS - Substation Workbench customers access the Red Hat Hardware Compatibility site and look up your server.
https://hardware.redhat.com/list.cgi?version=6
For instance, the non-hardened CGDS Server is listed as being hardware compatible, but the hardened server is not listed. However, Cisco has validated the hardened server as being capable for use with CGDS - Substation Work, just as Cisco can certify a customer's server for the CGDS - Substation Workbench.
Install Media Test
The recommended installation method is to use Anaconda, a graphical user interface that allows the user to insert needed installation questions without having to result to the command line. Anaconda typically makes Linux installations very simple.
Anaconda also has the ability to test the integrity of the installation media. Anaconda can examine DVDs, hard drive ISO, and NFS ISO installation methods. Test all installation media before starting the installation process. To use this utility, type this command at the boot prompt:
linux mediacheck
Installation Process
Information to gather before you start your installation:
•![]() The make and model numbers of the network adapters on your system.
The make and model numbers of the network adapters on your system.
•![]() IP, DHCP, and BOOT IP addresses
IP, DHCP, and BOOT IP addresses
•![]() Netmask
Netmask
•![]() Gateway IP address
Gateway IP address
•![]() One or more name server IP addresses (DNS)
One or more name server IP addresses (DNS)

Note ![]() By default, anaconda uses DHCP to provide network settings automatically for IPv4 and automatic neighbor discovery to provide network settings for IPv6. If you choose to configure T CP/IP manually, anaconda will prompt you to provide the details in the Manual T CP/IP Configuration dialog
By default, anaconda uses DHCP to provide network settings automatically for IPv4 and automatic neighbor discovery to provide network settings for IPv6. If you choose to configure T CP/IP manually, anaconda will prompt you to provide the details in the Manual T CP/IP Configuration dialog
Note ![]() If any of these networking requirements or terms are unfamiliar to you, contact your network administrator for assistance.
If any of these networking requirements or terms are unfamiliar to you, contact your network administrator for assistance.
Tips on Selecting a Root Password
Setting up a root account and password is one of the most important steps during your installation. The root account is used to install packages, upgrade RPMs, and perform most system maintenance. Logging in as root gives the user complete control over the system.
You should make the root password something you can remember, but not something that is easy for someone else to guess. Your name, your phone number, qwerty, password, root, 123456, and anteater are all examples of bad passwords. Good passwords mix numerals with upper and lower case letters and do not contain dictionary words: Aard387vark or 420BMttNT, for example. The root password must be at least six characters long; the password you type is not echoed to the screen. You must enter the password twice; if the two passwords do not match, the installation program asks you to enter them again.
Remember that the password is case-sensitive. If you write down your password, keep it in a secure place. However, it is recommended that you do not write down this or any password you create.
Note ![]() It is normally best practice to avoid using passwords that appear in printed materials that come with software or hardware. However, in the first installation, Cisco recommends that you use any default passwords that appear in printed materials and guides. In production installations, always use passwords that conform to rules as above.
It is normally best practice to avoid using passwords that appear in printed materials that come with software or hardware. However, in the first installation, Cisco recommends that you use any default passwords that appear in printed materials and guides. In production installations, always use passwords that conform to rules as above.
Direct Internet Connection
If your Red Hat Enterprise Linux system is connected directly to the Internet, you must pay attention to
additional considerations to avoid service interruptions or risk action by your upstream service provider. A full discussion of these issues is beyond the scope of this document.
Using the Keyboard to Navigate
Navigation through the installation dialogs is performed through a simple set of keystrokes.
•![]() To move the cursor, use the Left, Right, Up, and Down arrow keys.
To move the cursor, use the Left, Right, Up, and Down arrow keys.
•![]() Use Tab, and Shift-Tab to cycle forward or backward through each widget on the screen. Along the bottom, most screens display a summary of available cursor positioning keys.
Use Tab, and Shift-Tab to cycle forward or backward through each widget on the screen. Along the bottom, most screens display a summary of available cursor positioning keys.
•![]() The + and - keys expand and collapse lists,
The + and - keys expand and collapse lists,
•![]() You can use the Alt+X key command combination as a way of clicking on buttons or making other screen selections, where X is replaced with any underlined letter appearing within that screen.
You can use the Alt+X key command combination as a way of clicking on buttons or making other screen selections, where X is replaced with any underlined letter appearing within that screen.
•![]() To "press" a button, position the cursor over the button (using Tab, for example) and press Space or Enter.
To "press" a button, position the cursor over the button (using Tab, for example) and press Space or Enter.
•![]() To select an item from a list of items, move the cursor to the item you wish to select and press Enter.
To select an item from a list of items, move the cursor to the item you wish to select and press Enter.
•![]() To select an item with a checkbox, move the cursor to the checkbox and press Space to select an item.
To select an item with a checkbox, move the cursor to the checkbox and press Space to select an item.
•![]() To deselect, press Space a second time.
To deselect, press Space a second time.
•![]()
•![]() Pressing F12 accepts the current values and proceeds to the next dialog; it is equivalent to pressing the OK button.
Pressing F12 accepts the current values and proceeds to the next dialog; it is equivalent to pressing the OK button.
•![]()
Note ![]() Unless a dialog box is waiting for your input, do not press any keys during the installation process (doing so may result in unpredictable behavior).
Unless a dialog box is waiting for your input, do not press any keys during the installation process (doing so may result in unpredictable behavior).
The CGDS Install Process
To start the installation program from the CGDS Linux DVD, follow this procedure:
Step 1 ![]() Disconnect any external FireWire or USB disks that you do not need for installation. These are subject to auto-discovery by the Anaconda installer, and may not report correctly during the registration process.
Disconnect any external FireWire or USB disks that you do not need for installation. These are subject to auto-discovery by the Anaconda installer, and may not report correctly during the registration process.
Step 2 ![]() 2. Power on your computer system.
2. Power on your computer system.
Step 3 ![]() 3. Insert the media in your computer.
3. Insert the media in your computer.
Step 4 ![]() 4. Power off your computer with the boot media still inside.
4. Power off your computer with the boot media still inside.
Step 5 ![]() 5. Power on your computer system.
5. Power on your computer system.
Resetting the Boot Order
You might need to press a specific key or combination of keys to boot from the CGDS installation DVD. On most computers, a message appears briefly on the screen very soon after you turn on the computer. Typically, it is worded something like Press F10 to select boot device, although the specific wording and the key that you must press varies widely from computer to computer. Consult the documentation for your computer or motherboard, or seek support from the hardware manufacturer or vendor.
If your server does not allow you to select a boot device as it starts up, you might need to configure the system's Basic Input/Output System (BIOS) to boot from the media. To change your BIOS settings on an x86, AMD64, or Intel 64 system, watch the instructions provided on your display when your computer first boots. A line of text appears, telling you which key to press to enter the BIOS settings.
Once you have entered your BIOS setup program, find the section where you can alter your boot sequence. The default is often drive C, A or A, C (depending on whether you boot from your hard drive [C] or a diskette drive [A]). Change this sequence so that the DVD is first in your boot order and that C or A (whichever is your typical boot default) follows. This instructs the computer to first look at the DVD drive for bootable media.
To Cancel an Installation
T o stop an installation, either press Ctrl +Alt+Del or power off your computer with the power switch. You may abort the installation process without consequence at any time prior to selecting Write changes to disk on the Write partitioning to disk screen. Red Hat Enterprise Linux makes no permanent changes to your computer until that point. Please be aware that stopping the installation after partitioning has begun can leave your computer unusable.
Note ![]() To stop the installation process at this time, reboot your machine and then eject the boot media. You can safely cancel the installation at any point before the Write changes to disk screen.
To stop the installation process at this time, reboot your machine and then eject the boot media. You can safely cancel the installation at any point before the Write changes to disk screen.
Note ![]() If the DVD drive is found and the driver loaded, the installer will present you with the option to perform a media check on the DVD. This will take some time, and you may opt to skip over this step. Earlier in this procedure is was suggested that should reboot and perform the media check before beginning the installation.
If the DVD drive is found and the driver loaded, the installer will present you with the option to perform a media check on the DVD. This will take some time, and you may opt to skip over this step. Earlier in this procedure is was suggested that should reboot and perform the media check before beginning the installation.
Tips on Using the Root Password
The root user (also known as the superuser) has complete access to the entire system; for this reason, logging in as the root user is best done only to perform system maintenance or administration.
Use the root account only for system administration. Create a non-root account for your general use and use the su command to change to root only when you need to perform tasks that require superuser authorization. These basic rules minimize the chances of a typo or an incorrect command doing damage to your system.
Note ![]() T o become root, type su - at the shell prompt in a terminal window and then press Enter. Then,enter the root password and press Enter.
T o become root, type su - at the shell prompt in a terminal window and then press Enter. Then,enter the root password and press Enter.
The installation program will prompt you to set a root password for your system. You cannot proceed to the next stage of the installation process without entering a root password.
To change your root password after you have completed the installation, use the Root Password Tool.Type the system -config-users command in a shell prompt to launch the User Manager, a powerful user management and configuration tool. If you are not root, it prompts you for the root password to continue.
Enter the root password into the Root Password field. Red Hat Enterprise Linux displays the characters as asterisks for security. Type the same password int
o the Confirm field to ensure it is set correctly. After you set the root password, select Next to proceed.
Enabling Virtualization (KVM Hypervisor)
In order for the RHEL 6.3 base install to host guest operating systems, the KVM Hypervisor must be enabled. This requires adding packages to your list of Red Hat Network entitlements. You need these entitlements enabled to install and update the virtualization packages on Red Hat Enterprise Linux. You will require a valid Red Hat Network account in order to install virtualization packages on Red Hat Enterprise Linux.
•![]() If you do not have a valid Red Hat subscription, visit the Red Hat online store.
If you do not have a valid Red Hat subscription, visit the Red Hat online store.
•![]() In addition, your server must be registered with RHN. To register an unregistered installation of Red Hat Enterprise Linux, run the rhn_register command and follow the prompts.
In addition, your server must be registered with RHN. To register an unregistered installation of Red Hat Enterprise Linux, run the rhn_register command and follow the prompts.
Once you have a valid registration, follow these steps to add virtualization:
Step 1 ![]() Log in to RHN using your RHN username and password.
Log in to RHN using your RHN username and password.
Step 2 ![]() Select the system on which you want to install virtualization.
Select the system on which you want to install virtualization.
Step 3 ![]() In the System Properties section the present systems entitlements are listed next to the Entitlements header. Use the (Edit These Properties) link to change your entitlements.
In the System Properties section the present systems entitlements are listed next to the Entitlements header. Use the (Edit These Properties) link to change your entitlements.
Step 4 ![]() Select the Virtualization checkbox.
Select the Virtualization checkbox.
Your system is now entitled to receive the virtualization packages. For actual installation procedures, please refer to the Red Hat Virtualization Library family of documents.
https://access.redhat.com/knowledge/docs/Red_Hat_Enterprise_Virtualization/
The actual virtualization software packages to be installed include the following:
1. ![]() python-virtinst
python-virtinst
Provides the virt-install command for creating virtual machines.
2. ![]() libvirt
libvirt
The libvirt package provides the server and host side libraries for interacting with hypervisors and host systems. The libvirt package provides the libvirtd daemon that handles the library calls, manages virtualizes guests and controls the hypervisor.
3. ![]() libvirt-python
libvirt-python
The libvirt-python package contains a module that permits applications written in the Python programming language to use the interface supplied by the libvirt API.
4. ![]() virt-manager
virt-manager
virt-manager, also known as Virtual Machine Manager, provides a graphical tool for administering virtual machines. It uses libvirt-client library as the management API.
5. ![]() libvirt-client
libvirt-client
The libvirt-client package provides the client-side APIs and libraries for accessing libvirt servers. The libvirt-client package includes the virsh command line tool to manage and control virtualized guests and hypervisors from the command line or a special virtualization shell.
Downloading the CGDS Database Program
At some point in the installation, it will be necessary to download and install a a copy of the database management system used within CGDS - Substation Workbench. For CGDS - Substation Workbench 1.0, this will be Oracle 11g, Standard Edition, which is available on line. It is expected that this will be installed by your IT staff. The installation instructions are beyond scope of this CGDS Installation Guide.
 Feedback