Create Decryption Policies to Control HTTPS Traffic

This chapter contains the following sections:

Overview of Create Decryption Policies to Control HTTPS Traffic

Decryption policies define the handling of HTTPS traffic within the web proxy:

  • When to decrypt HTTPS traffic.
  • How to handle requests that use invalid or revoked security certificates.

You can create decryption policies to handle HTTPS traffic in the following ways:

  • Pass through encrypted traffic
  • Decrypt traffic and apply the content-based access policies defined for HTTP traffic. This also makes malware scanning possible.
  • Drop the HTTPS connection
  • Monitor the request (take no final action) as the web proxy continues to evaluate the request against policies that may lead to a final drop, pass through, or decrypt action.

Caution

Handle personally identifiable information with care: If you choose to decrypt an end-user’s HTTPS session, the Web Security appliance access logs and reports may contain personally identifiable information. The Administrator can configure how much URI text is stored in the logs using the advancedproxyconfig CLI command and the HTTPS subcommand. You can log the entire URI, or a partial form of the URI with the query portion removed. However, even when you choose to strip the query from the URI, personally identifiable information may still remain.


Managing HTTPS Traffic through Decryption Policies Task Overview

Step

Task List for Managing HTTPS Traffic through Decryption Policies

Links to Related Topics and Procedures

1

Enabling the HTTPS proxy

Enabling the HTTPS Proxy

2

Upload or Generate a certificate and key

3

Configuring Decryption options

Configuring Decryption Options

5

(Optional) Configure invalid certificate handling

Configuring Invalid Certificate Handling

6

(Optional) Enabling real-time revocation status checking

Enabling Real-Time Revocation Status Checking

7

(Optional) Manage trusted and blocked certificates

Trusted Root Certificates

Managing HTTPS Traffic through Decryption Policies Best Practices

Create fewer, more general Decryption Policy groups that apply to all users or fewer, larger groups of users on the network. Then, if you need to apply more granular control to decrypted HTTPS traffic, use more specific Access Policy groups.

Decryption Policies

The appliance can perform any of the following actions on an HTTPS connection request:

Option

Description

Monitor

Monitor is an intermediary action that indicates the Web Proxy should continue evaluating the transaction against the other control settings to determine which final action to ultimately apply.

Drop

The appliance drops the connection and does not pass the connection request to the server. The appliance does not notify the user that it dropped the connection.

Pass through

The appliance passes through the connection between the client and the server without inspecting the traffic content.

However, with a standard pass-through policy, the WSA does check the validity of the requested server by initiating an HTTPS handshake with the server. This validity check includes server certificate validation. If the server fails the check, the transaction is blocked.

You can skip validation checks for specific sites by configuring policies that incorporate custom categories which include these sites, thereby indicating that these sites are trustworthy—these sites are passed through without validity checks. Exercise care when configuring policies that allow validity checks to be skipped.

Decrypt

The appliance allows the connection, but inspects the traffic content. It decrypts the traffic and applies Access Policies to the decrypted traffic as if it were a plaintext HTTP connection. By decrypting the connection and applying Access Policies, you can scan the traffic for malware.

All actions except Monitor are “final actions” the Web Proxy applies to a transaction. A final action is an action that causes the Web Proxy to stop evaluating the transaction against other control settings. For example, if a Decryption Policy is configured to monitor invalid server certificates, the Web Proxy makes no final decision on how to handle the HTTPS transaction if the server has an invalid certificate. If a Decryption Policy is configured to block servers with a low Web reputation score, then any request to a server with a low reputation score is dropped without considering the URL category actions.

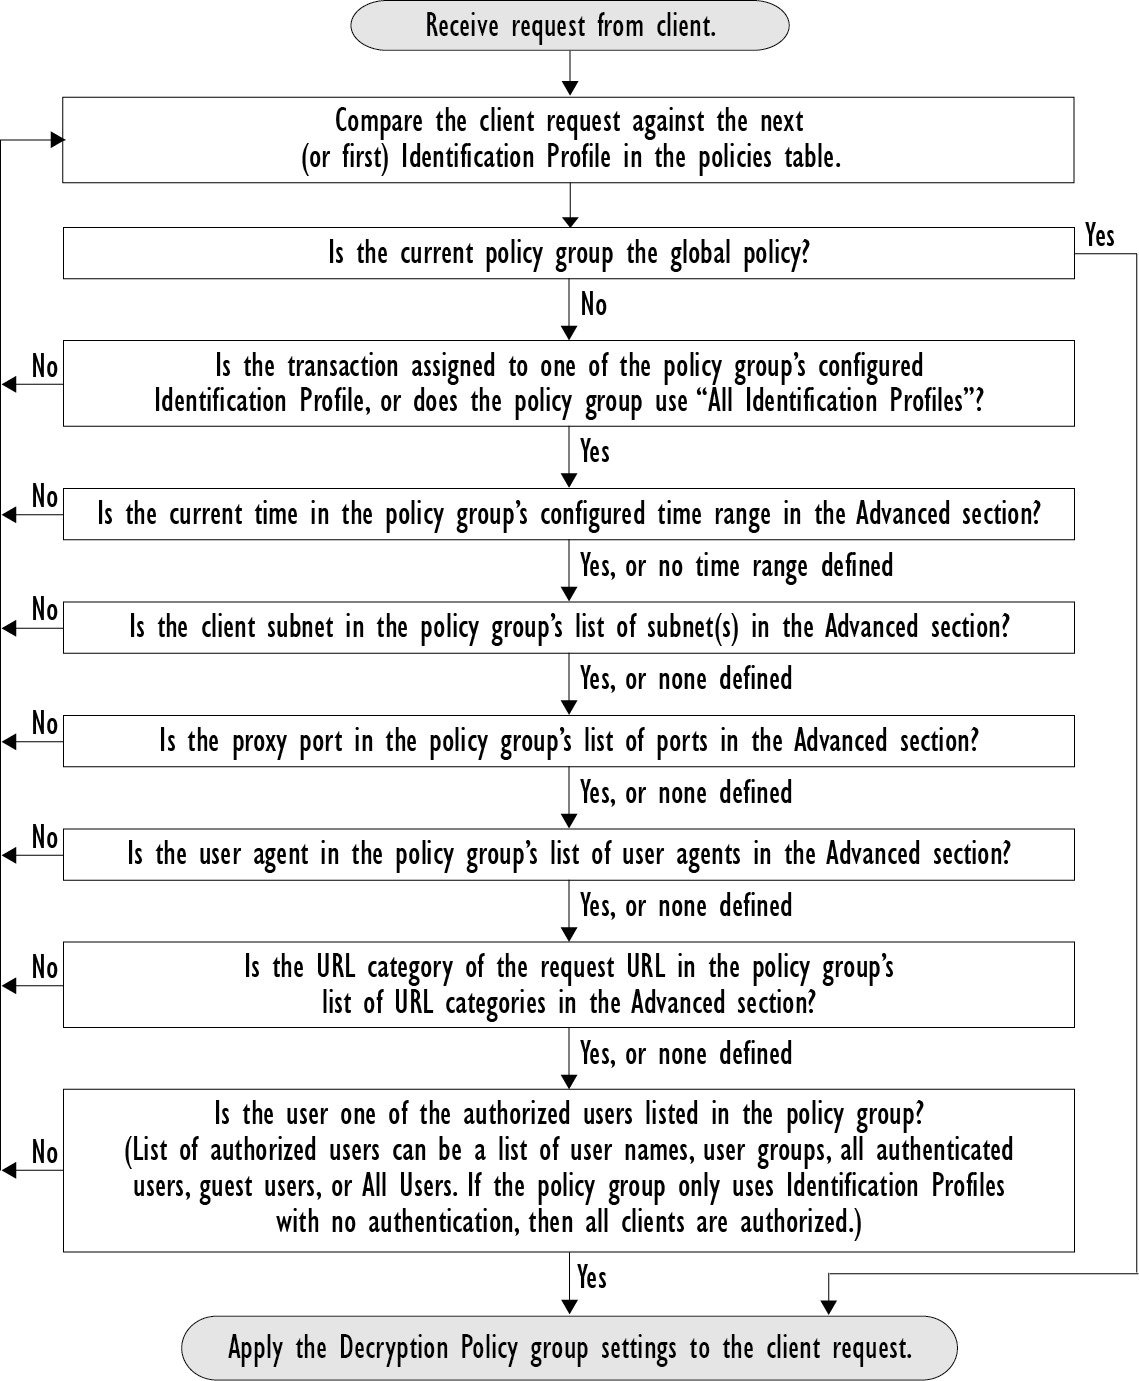
The following diagram shows how the Web Proxy evaluates a client request against the Decryption Policy groups. Applying Decryption Policy Actions shows the order the Web Proxy uses when evaluating control settings for Decryption Policies. Applying Access Policy Actions shows the order the Web Proxy uses when evaluating control settings for Access Policies.

Figure 1. Policy Group Transaction Flow for Decryption Policies


Enabling the HTTPS Proxy

To monitor and decrypt HTTPS traffic, you must enable the HTTPS Proxy. When you enable the HTTPS Proxy, you must configure what the appliance uses for a root certificate when it sends self-signed server certificates to the client applications on the network. You can upload a root certificate and key that your organization already has, or you can configure the appliance to generate a certificate and key with information you enter.

Once the HTTPS Proxy is enabled, all HTTPS policy decisions are handled by Decryption Policies. Also on this page, you can configure what the appliance does with HTTPS traffic when the server certificate is invalid.

Before you begin

When the HTTPS proxy is enabled, HTTPS-specific rules in access policies are disabled and the web proxy processes decrypted HTTPS traffic using rules for HTTP.

Procedure


Step 1

Security Services > HTTPS Proxy, click Enable and Edit Settings.

The HTTPS Proxy License Agreement appears.

Step 2

Read the terms of the HTTPS Proxy License Agreement, and click Accept.

Step 3

Verify the Enable HTTPS Proxy field is enabled.

Step 4

In the HTTPS Ports to Proxy field, enter the ports the appliance should check for HTTPS traffic. Port 443 is the default port.

Note 
The maximum number of ports for which the Web Security appliance can serve as proxy is 30, which includes both HTTP and HTTPS.
Step 5

Upload or generate a root/signing certificate to use for decryption.

Note 
If the appliance has both an uploaded certificate and key pair and a generated certificate and key pair, it only uses the certificate and key pair currently selected in the Root Certificate for Signing section.
Step 6

In the HTTPS Transparent Request section, select one of the following options:

  • Decrypt the HTTPS request and redirect for authentication

  • Deny the HTTPS request

This setting only applies to transactions that use IP address as the authentication surrogate and when the user has not yet been authenticated.

Note 
This field only appears when the appliance is deployed in transparent mode.
Step 7

In the Applications that Use HTTPS section, choose whether to enable decryption for enhanced application visibility and control.

Note 
Decryption may cause some applications to fail unless the root certificate for signing is installed on the client. For more information on the appliance root certificate, see Managing Certificate Validation and Decryption for HTTPS.
Step 8

Submit and commit your changes.


What to do next

Related Topics

Controlling HTTPS Traffic

After the Web Security appliance assigns an HTTPS connection request to a Decryption Policy group, the connection request inherits the control settings of that policy group. The control settings of the Decryption Policy group determine whether the appliance decrypts, drops, or passes through the connection:

Option

Description

URL Categories

You can configure the action to take on HTTPS requests for each predefined and custom URL category. Click the link under the URL Filtering column for the policy group you want to configure.

Note 
If you want to block (with end-user notification) a particular URL category for HTTPS requests instead of drop (with no end-user notification), choose to decrypt that URL category in the Decryption Policy group and then choose to block the same URL category in the Access Policy group.

Web Reputation

You can configure the action to take on HTTPS requests based on the web reputation score of the requested server. Click the link under the Web Reputation column for the policy group you want to configure.

Default Action

You can configure the action the appliance should take when none of the other settings apply. Click the link under the Default Action column for the policy group you want to configure.

Note 
The configured default action only affects the transaction when no decision is made based on URL category or Web Reputation score. If Web Reputation filtering is disabled, the default action applies to all transactions that match a Monitor action in a URL category. If Web Reputation filtering is enabled, the default action is used only if the Monitor action is selected for sites with no score.

To bypass encrypted traffic having a good web reputation score, make sure that you disable the Decrypt for Application Detection option in the Decryption Options section of the HTTPS Proxy Settings page.

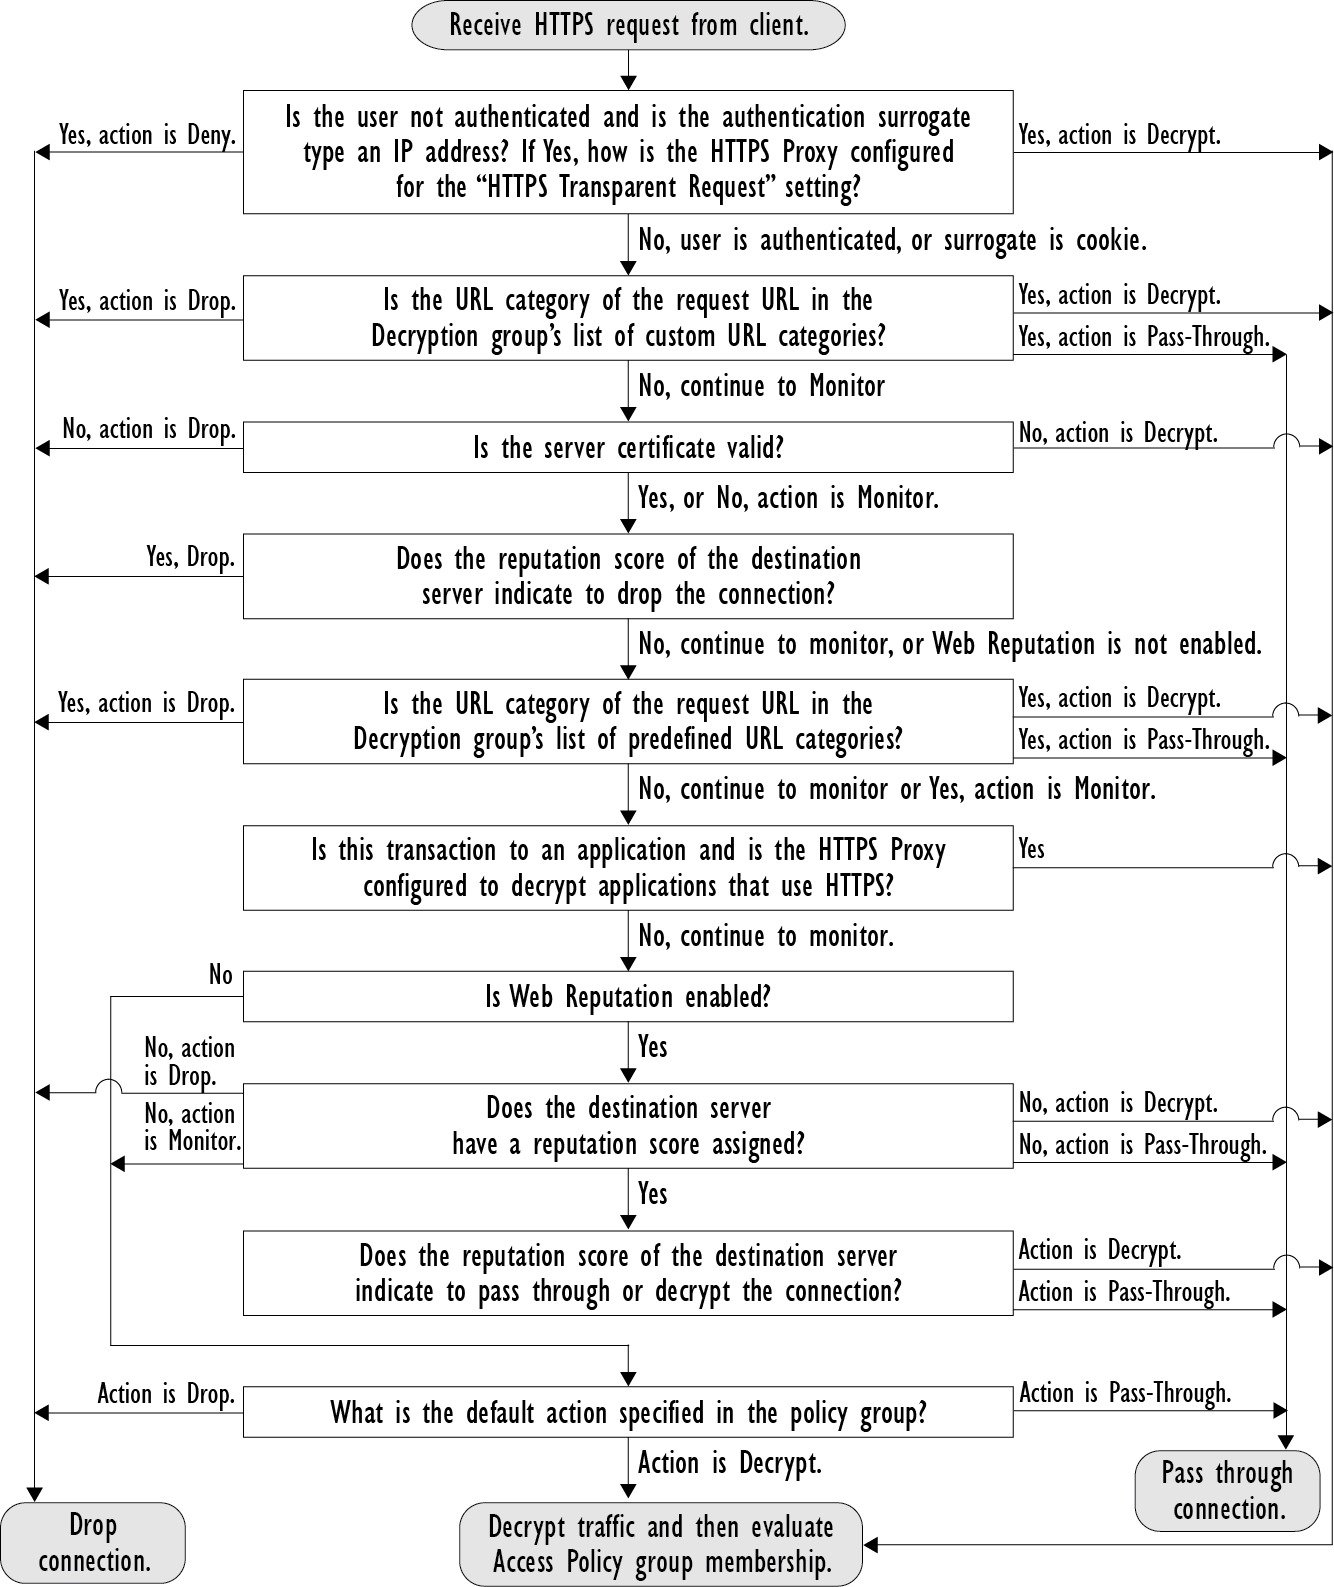
The following diagram shows how the appliance determines which action to take on an HTTPS request after it has assigned a particular Decryption Policy to the request. The Web reputation score of the destination server is evaluated only once, but the result is applied at two different points in the decision flow. For example, note that a Web reputation score Drop action overrides any action specified for predefined URL categories.

Figure 2. Applying Decryption Policy Actions


Configuring Decryption Options

Before you begin

Verify that the HTTPS proxy is enabled as described in Enabling the HTTPS Proxy.

Procedure


Step 1

Security Services > HTTPS Proxy.

Step 2

Click Edit Settings.

Step 3

Enable the decryption options.

Decryption Option

Description

Decrypt for Authentication

For users who have not been authenticated prior to this HTTPS transaction, allow decryption for authentication.

Decrypt for End-User Notification

Allow decryption so that AsyncOS can display the end-user notification.

Note 
If the certificate is invalid and invalid certificates are set to drop, when running a policy trace, the first logged action for the transaction will be “decrypt”.

Decrypt for End-User Acknowledgment

For users who have not acknowledged the web proxy prior to this HTTPS transaction, allow decryption so that AsyncOS can display the end-user acknowledgment.

Decrypt for Application Detection

Enhances the ability of AsyncOS to detect HTTPS applications.


Authentication and HTTPS Connections

Authentication at the HTTPS connection layer is available for these types of requests:

Option

Description

Explicit requests

  • secure client authentication disabled or
  • secure client authentication enabled and an IP-based surrogate

Transparent requests

  • IP-based surrogate, decryption for authentication enabled or
  • IP-based surrogate, client previously authenticated using an HTTP request

Root Certificates

The HTTPS proxy uses the root certificates and private key files that you upload to the appliance to decrypt traffic. The root certificate and private key files you upload to the appliance must be in PEM format; DER format is not supported.

You can enter root certificate information in the following ways:

  • Generate. You can enter some basic organization information and then click a button so the appliance generates the rest of the certificate and a private key.
  • Upload. You can upload a certificate file and its matching private key file created outside of the appliance.

Note

You can also upload an intermediate certificate that has been signed by a root certificate authority. When the Web Proxy mimics the server certificate, it sends the uploaded certificate along with the mimicked certificate to the client application. That way, as long as the intermediate certificate is signed by a root certificate authority that the client application trusts, the application will trust the mimicked server certificate, too. See About Certificates and Keys for more information.

You can choose how to handle the root certificates issued by the Web Security appliance:

  • Inform users to accept the root certificate. You can inform the users in your organization what the new policies are at the company and tell them to accept the root certificate supplied by the organization as a trusted source.
  • Add the root certificate to client machines. You can add the root certificate to all client machines on the network as a trusted root certificate authority. This way, the client applications automatically accept transactions with the root certificate.

Procedure


Step 1

Security Services > HTTPS Proxy.

Step 2

Click Edit Settings.

Step 3

Click the Download Certificate link for either the generated or uploaded certificate.

Note 

To reduce the possibility of client machines getting a certificate error, submit the changes after you generate or upload the root certificate to the Web Security appliance, then distribute the certificate to client machines, and then commit the changes to the appliance.


Managing Certificate Validation and Decryption for HTTPS

The Web Security appliance validates certificates before inspecting and decrypting content.

Valid Certificates

Qualities of a valid certificate:

  • Not expired. The certificate’s validity period includes the current date.
  • Recognized certificate authority. The issuing certificate authority is included in the list of trusted certificate authorities stored on the Web Security appliance.
  • Valid signature. The digital signature was properly implemented based on cryptographic standards.
  • Consistent naming. The common name matches the hostname specified in the HTTP header.
  • Not revoked. The issuing certificate authority has not revoked the certificate.
Related Topics

Invalid Certificate Handling

The appliance can perform one of the following actions for invalid server certificates:

  • Drop.
  • Decrypt.
  • Monitor.
Certificates that are Invalid for Multiple Reasons

For server certificates that are invalid due to both an unrecognized root authority and an expired certificate, the HTTPS proxy performs the action that applies to unrecognized root authorities.

In all other cases, for server certificates that are invalid for multiple reasons simultaneously, the HTTPS Proxy performs actions in order from the most restrictive action to the least restrictive action.

Untrusted Certificate Warnings for Decrypted Connections

When the Web Security appliance encounters an invalid certificate and is configured to decrypt the connection, AsyncOS creates an untrusted certificate that requires the end-user to accept or reject the connection. The common name of the certificate is “Untrusted Certificate Warning.”

Adding this untrusted certificate to the list of trusted certificates will remove the end user’s option to accept or reject the connection.

When AsyncOS generates one of these certificates, it creates a proxy log entry with the text “Signing untrusted key” or “Signing untrusted cert”.

Uploading a Root Certificate and Key

Before you begin

Enable the HTTPS Proxy. Enabling the HTTPS Proxy.

Procedure


Step 1

Security Services > HTTPS Proxy.

Step 2

Click Edit Settings.

Step 3

Select Use Uploaded Certificate and Key.

Step 4

Click Browse for the Certificate field to navigate to the certificate file stored on the local machine.

If the file you upload contains multiple certificates or keys, the Web Proxy uses the first certificate or key in the file.

Step 5

Click Browse for the Key field to navigate to the private key file.

Note 
The key length must be 512, 1024, or 2048 bits.
Step 6

Select Key is Encrypted if the key is encrypted.

Step 7

Click Upload Files to transfer the certificate and key files to the Web Security appliance.

The uploaded certificate information is displayed on the Edit HTTPS Proxy Settings page.

Step 8

(Optional) Click Download Certificate so you can transfer it to the client applications on the network.


Generating a Certificate and Key for the HTTPS Proxy

Before you begin

Enable the HTTPS Proxy. Enabling the HTTPS Proxy.

Procedure


Step 1

Security Services > HTTPS Proxy.

Step 2

Click Edit Settings.

Step 3

Select Use Generated Certificate and Key.

Step 4

Click Generate New Certificate and Key.

Step 5

In the Generate Certificate and Key dialog box, enter the information to display in the root certificate.

You can enter any ASCII character except the forward slash ( / ) in the Common Name field.

Step 6

Click Generate.

Step 7

The generated certificate information is displayed on the Edit HTTPS Proxy Settings page.

Step 8

(Optional) Click Download Certificate so you can transfer it to the client applications on the network.

Step 9

(Optional) Click the Download Certificate Signing Request link. so you can submit the Certificate Signing Request (CSR) to a certificate authority (CA).

Step 10

(Optional) Upload the signed certificate to the Web Security appliance after receiving it back from the CA. You can do this at anytime after generating the certificate on the appliance.

Step 11

Submit and Commit Changes.


Configuring Invalid Certificate Handling

Before you begin

Verify that the HTTPS proxy is enabled as described in Enabling the HTTPS Proxy.

Procedure


Step 1

Security Services > HTTPS Proxy.

Step 2

Click Edit Settings.

Step 3

For each type of certificate error, define the proxy response: Drop, Decrypt, or Monitor.

Certificate Error Type

Description

Expired

The current date falls outside of the range of validity for the certificate.

Mismatched hostname

The hostname in the certificate does not match the hostname the client was trying to access.

Note 
The Web Proxy can only perform hostname match when it is deployed in explicit forward mode. When it is deployed in transparent mode, it does not know the hostname of the destination server (it only knows the IP address), so it cannot compare it to the hostname in the server certificate.

Unrecognized root authority/issuer

Either the root authority or an intermediate certificate authority is unrecognized.

Invalid signing certificate

There was a problem with the signing certificate.

Invalid leaf certificate

There was a problem with the leaf certificate, for example, a rejection, decoding, or mismatch problem.

All other error types

Most other error types are due to the appliance not being able to complete the SSL handshake with the HTTPS server. For more information about additional error scenarios for server certificates, see http://www.openssl.org/docs/apps/verify.html.

Step 4

Submit and Commit Changes.


Options for Certificate Revocation Status Checking

To determine whether the issuing certificate authority has revoked a certificate, the Web Security appliance can check with the issuing certificate authority in these ways:

  • Certificate Revocation List (Comodo certificates only). The Web Security appliance checks Comodo’s certificate revocation list. Comodo maintains this list, updating it according to their own policies. Depending on when it was last updated, the certificate revocation list may be out of date at the time the Web Security appliance checks it.
  • Online Certificate Status Protocol (OCSP). The Web Security appliance checks the revocation status with the issuing certificate authority in real time. If the issuing certificate authority supports OCSP, the certificate will include a URL for real-time status checking. This feature is enabled by default for fresh installations and disabled by default for updates.

Note

The Web Security appliance only performs the OCSP query for certificates that it determines to be valid in all other respects and that include the OCSP URL.
Related Topics

Enabling Real-Time Revocation Status Checking

Before you begin

Ensure the HTTPS Proxy is enabled. See Enabling the HTTPS Proxy.

Procedure

Step 1

Security Services > HTTPS Proxy.

Step 2

Click Edit Settings.

Step 3

Select Enable Online Certificate Status Protocol (OCSP).

Step 4

Configure the OCSP Result Handling properties,

Cisco recommends configuring the OCSP Result Handling options to the same actions as Invalid Certificate Handling options. For example, if you set Expired Certificate to Monitor, configure Revoked Certificate to monitor.

Step 5

(Optional) Expand the Advanced configuration section and configure the settings described below.

Field Name

Description

OCSP Valid Response Cache Timeout

Time to wait before rechecking a valid OCSP response in seconds (s), minutes (m), hours (h), or days (d). Default unit is seconds. Valid range is from 1 second to 7 days.

OCSP Invalid Response Cache Timeout

Time to wait before rechecking an invalid OCSP response in seconds (s), minutes (m), hours (h), or days (d). Default unit is seconds. Valid range is from 1 second to 7 days.

OCSP Network Error Cache Timeout

Time to wait before attempting to contact the OCSP responder again after failing to get a response in seconds (s), minutes (m), hours (h), or days (d). Valid range from 1 second to 24 hours.

Allowed Clock Skew

Maximum allowed difference in time settings between the Web Security appliance and the OCSP responder in seconds (s) or minutes (m). Valid range from 1 second to 60 minutes.

Maximum Time to Wait for OCSP Response

Maximum time to wait for a response from the OCSP responder. Valid range is from 1 second to 10 minutes. Specify a shorter duration to reduce delays in end user access to HTTPS requests in the event that the OCSP responder is unavailable.

Use upstream proxy for OCSP checking

Group Name of the upstream proxies.

Servers exempt from upstream proxy

IP addresses or hostnames of the servers to exempt. May be left blank.

Step 6

Submit and Commit Changes.


Trusted Root Certificates

The Web Security appliance ships with and maintains a list of trusted root certificates. Web sites with trusted certificates do not require decryption.

You can manage the trusted certificate list, adding certificates to it and functionally removing certificates from it. While the Web Security appliance does not delete certificates from the primary list, it allows you to override trust in a certificate, which functionally removes the certificate from the trusted list.

Adding Certificates to the Trusted List

Before you begin

Verify that the HTTPS Proxy is enabled. See Enabling the HTTPS Proxy.

Procedure

Step 1

Security Services > HTTPS Proxy.

Step 2

Click Manage Trusted Root Certificates.

Step 3

Click Import.

Step 4

Click Browse and navigate to the certificate file.

Step 5

Submit and Commit Changes.

Look for the certificate you uploaded in the Custom Trusted Root Certificates list.


Removing Certificates from the Trusted List

Procedure

Step 1

Select Security Services > HTTPS Proxy.

Step 2

Click Manage Trusted Root Certificates.

Step 3

Select the Override Trust checkbox corresponding to the certificate you wish to remove from the list.

Step 4

Submit and Commit Changes.


Routing HTTPS Traffic

The ability of AsyncOS to route HTTPS transactions based on information stored in client headers is limited and is different for transparent and explicit HTTPS.

Option

Description

Transparent HTTPS

In the case of transparent HTTPS, AsyncOS does not have access to information in the client headers. Therefore, AsyncOS cannot enforce routing policies if any routing policy or identification profile relies on the information in client headers.

Explicit HTTPS

In the case of explicit HTTPS, AsyncOS has access to the following information in client headers:

  • URL

  • Destination port number

Therefore, for explicit HTTPS transactions, it is possible to match a routing policy based on URL or port number.