Classify End-Users for Policy Application

This chapter contains the following sections:

Overview of Classify Users and Client Software

Identification Profiles let you classify users and user agents (client software) for these purposes:

  • Group transaction requests for the application of policies (except SaaS)
  • Specification of identification and authentication requirements

AsyncOS assigns an Identification Profile to every transaction:

  • Custom Identification Profiles — AsyncOS assigns a custom profile based on that identity’s criteria.
  • The Global Identification Profile — AsyncOS assigns the global profile to transactions that do not meet the criteria for any custom profile. By default, the global profile does not require authentication.

AsyncOS processes Identification Profiles sequentially, beginning with the first. The global profile is the last profile.

An Identification Profile may include only one criterion. Alternately, Identification Profiles that include multiple criteria require that all the criteria are met.

One policy may call on multiple Identification Profiles:
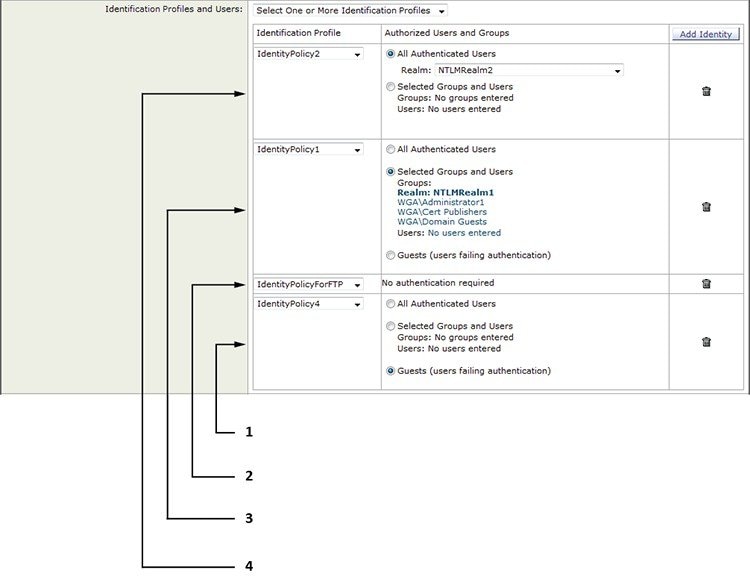
1

This Identification Profile allows guest access and applies to users who fail authentication.

2

Authentication is not used for this Identification Profile.

3

The specified user groups in this Identification Profile are authorized for this policy.

4

This Identification Profile uses an authentication sequence and this policy applies to one realm in the sequence.

Classify Users and Client Software: Best Practices

  • Create fewer, more general Identification Profiles that apply to all users or fewer, larger groups of users. Use policies, rather than profiles, for more granular management.
  • Create Identification Profiles with unique criteria.
  • If deployed in transparent mode, create an Identification Profile for sites that do not support authentication. See Bypassing Authentication.

Identification Profile Criteria

These transaction characteristics are available to define an Identification Profile:

Option

Description

Subnet

The client subnet must match the list of subnets in a policy.

Protocol

The protocol used in the transaction: HTTP, HTTPS, SOCKS, or native FTP.

Port

The proxy port of the request must be in the Identification Profile’s list of ports, if any are listed. For explicit forward connections, this is the port configured in the browser. For transparent connections, this is the same as the destination port.

User Agent

The user agent (client application) making the request must be in the Identification Profile’s list of user agents, if any are listed. Some user agents cannot handle authentication, therefore creating an profile that does not require authentication is necessary. User agents include programs such as updaters and browsers, such as Internet Explorer and Mozilla Firefox.

URL Category

The URL category of the request URL must be in the Identification Profile’s list of URL categories, if any are listed.

Authentication requirements

If the Identification Profile requires authentication, the client authentication credentials must match the Identification Profile’s authentication requirements.

Classifying Users and Client Software

Before you begin

Procedure


Step 1

Choose Web Security Manager > Identification Profiles.

Step 2

Click Add Profile to add a profile.

Step 3

Use the Enable Identification Profile check box to enable this profile, or to quickly disable it without deleting it.

Step 4

Assign a unique profile Name.

Step 5

A Description is optional.

Step 6

From the Insert Above drop-down list, choose where this profile is to appear in the table.

Note 

Position Identification Profiles that do not require authentication above the first Identification Profile that requires authentication.

Step 7

In the User Identification Method section, choose an identification method and then supply related parameters; displayed options vary according to the method chosen.

  1. Choose an identification method from the User Identification Method drop-down list.

    Option

    Description

    Exempt from authentication/ identification

    Users are identified primarily by IP address. No additional parameters are required.

    Authenticate users

    Users are identified by the authentication credentials they enter.

    Transparently identify users with ISE

    Available when the ISE service is enabled (Network > Identity Services Engine). For these transactions, the user name and associated Secure Group Tags will be obtained from the Identity Services Engine. In ISE-PIC deployments, ISE groups and users information is received. For more information, see Tasks for Integrating the ISE/ISE-PIC Service.

    Transparently identify users with authentication realm

    This option is available when one or more authentication realms are configured to support transparent identification.

    Note 
    When at least one Identification Profile with authentication or transparent identification is configured, the policy tables will support defining policy membership using user names, directory groups, and Secure Group Tags.
  2. Supply parameters appropriate to the chosen method. Not all of the sections described in this table are visible for each choice.

    Fallback to Authentication Realm or Guest Privileges

    If user authentication is not available from ISE:

    • Support Guest Privileges – The transaction will be allowed to continue, and will match subsequent policies for Guest users from all Identification Profiles.

    • Block Transactions – Do not allow Internet access to users who cannot be identified by ISE.

    • Support Guest privileges – Check this box to grant guest access to users who fail authentication due to invalid credentials.

    Authentication Realm

    Select a Realm or Sequence—Choose a defined authentication realm or sequence.

    Select a Scheme—Choose an authentication scheme:

    • Kerberos—The client is transparently authenticated by means of Kerberos tickets.

    • Basic – The client always prompts users for credentials. After the user enters credentials, browsers typically offer a check box to remember the provided credentials. Each time the user opens the browser, the client either prompts for credentials or resends the previously saved credentials.

      Credentials are sent unsecured as clear text (Base64). A packet capture between the client and Web Security appliance can reveal the user name and passphrase.

    • NTLMSSP—The client transparently authenticates using its Windows login credentials. The user is not prompted for credentials.

      However, the client prompts the user for credentials under the following circumstances:

      • The Windows credentials failed.

      • The client does not trust the Web Security appliance because of browser security settings.

      Credentials are sent securely using a three-way handshake (digest style authentication). The passphrase is never sent across the connection.

    • Support Guest privileges – Check this box to grant guest access to users who fail authentication due to invalid credentials.

    Realm for Group Authentication

    • Select a Realm or Sequence – Choose a defined authentication realm or sequence.

    Authentication Surrogates

    Specify how transactions will be associated with a user after successful authentication (options vary depending on Web Proxy deployment mode):

    • IP Address – The Web Proxy tracks an authenticated user at a particular IP address. For transparent user identification, select this option.

    • Persistent Cookie – The Web Proxy tracks an authenticated user on a particular application by generating a persistent cookie for each user per application. Closing the application does not remove the cookie.

    • Session Cookie – The Web Proxy tracks an authenticated user on a particular application by generating a session cookie for each user per domain per application. (However, when a user provides different credentials for the same domain from the same application, the cookie is overwritten.) Closing the application removes the cookie.

    • No Surrogate – The Web Proxy does not use a surrogate to cache the credentials, and it tracks an authenticated user for every new TCP connection. When you choose this option, the web interface disables other settings that no longer apply. This option is available only in explicit forward mode and when you disable credential encryption on the Network > Authentication page.

    • Apply same surrogate settings to explicit forward requests – Check to apply the surrogate used for transparent requests to explicit requests; enables credential encryption automatically. This option appears only when the Web Proxy is deployed in transparent mode.

    Note 
    • You can define a timeout valve for the authentication surrogate for all requests in Global Authentication Settings.

Step 8

In the Membership Definition section, supply membership parameters appropriate to the chosen identification method. Note that all of the options described in this table are not available to every User Identification Method.

Membership Definition

Define Members by User Location

Configure this Identification Profile to apply to: Local Users Only, Remote Users Only, or Both. This selection affects the available authentication settings for this Identification Profile.

Define Members by Subnet

Enter the addresses to which this Identification Profile should apply. You can use IP addresses, CIDR blocks, and subnets.

Note 
If nothing is entered, the Identification Profile applies to all IP addresses.

Define Members by Protocol

Select the protocols to which this Identification Profile should apply; select all that apply:

  • HTTP/HTTPS – Applies to all requests that use HTTP or HTTPS as the underlying protocol, including FTP over HTTP, and any other protocol tunneled using HTTP CONNECT.

  • Native FTP – Applies to native FTP requests only.

  • SOCKS – Applies to SOCKS Policies only

Define Members by Machine ID

  • Do Not Use Machine ID in This Policy – The user is not identified by machine ID.

  • Define User Authentication Policy Based on Machine ID – The user is identified primarily by machine ID.

    Click the Machine Groups area to display the Authorized Machine Groups page.

    For each group you want to add, in the Directory Search field, start typing the name of the group to add and then click Add. You can select a group and click Remove to remove it from the list.

    Click Done to return to the previous page.

    Click the Machine IDs area to display the Authorized Machines page.

    In the Authorized Machines, field, enter the machine IDs to associate with the policy then click Done.

Note 
Authentication using Machine ID is supported only in Connector mode and requires Active Directory.

Advanced

Expand this section to define additional membership requirements.

  • Proxy Ports – Specify one or more proxy ports used to access the Web Proxy. Enter port numbers separated by commas. For explicit forward connections, the proxy port is configured in the browser.

    For transparent connections, this is the same as the destination port.

    Defining identities by port works best when the appliance is deployed in explicit forward mode, or when clients explicitly forward requests to the appliance. Defining identities by port when client requests are transparently redirected to the appliance may result in some requests being denied.

  • URL Categories – Select user-defined or predefined URL categories. Membership for both is excluded by default, meaning the Web Proxy ignores all categories unless they are selected in the Add column.

    If you need to define membership by URL category, only define it in the Identity group when you need to exempt from authentication requests to that category.

  • User Agents – Defines policy group membership by the user agents found in the client request. You can select some commonly defined agents, or define your own using regular expressions.

    Also specify whether these user-agent specifications are inclusive or exclusive. In other words, whether membership definition includes only the selected user agents, or specifically excludes the selected user agents

Step 9

Submit and Commit Changes.


What to do next

Enable/Disable an Identity

Before you begin

  • Be aware that disabling an Identification Profile removes it from associated policies.
  • Be aware that re-enabling an Identification Profile does not re-associate it with any policies.

Procedure


Step 1

Choose Web Security Manager > Identification Profiles.

Step 2

Click a profile in the Identification Profiles table to open the Identification Profile page for that profile.

Step 3

Check or clear Enable Identification Profile immediately under Client/User Identification Profile Settings.

Step 4

Submit and Commit Changes.


Identification Profiles and Authentication

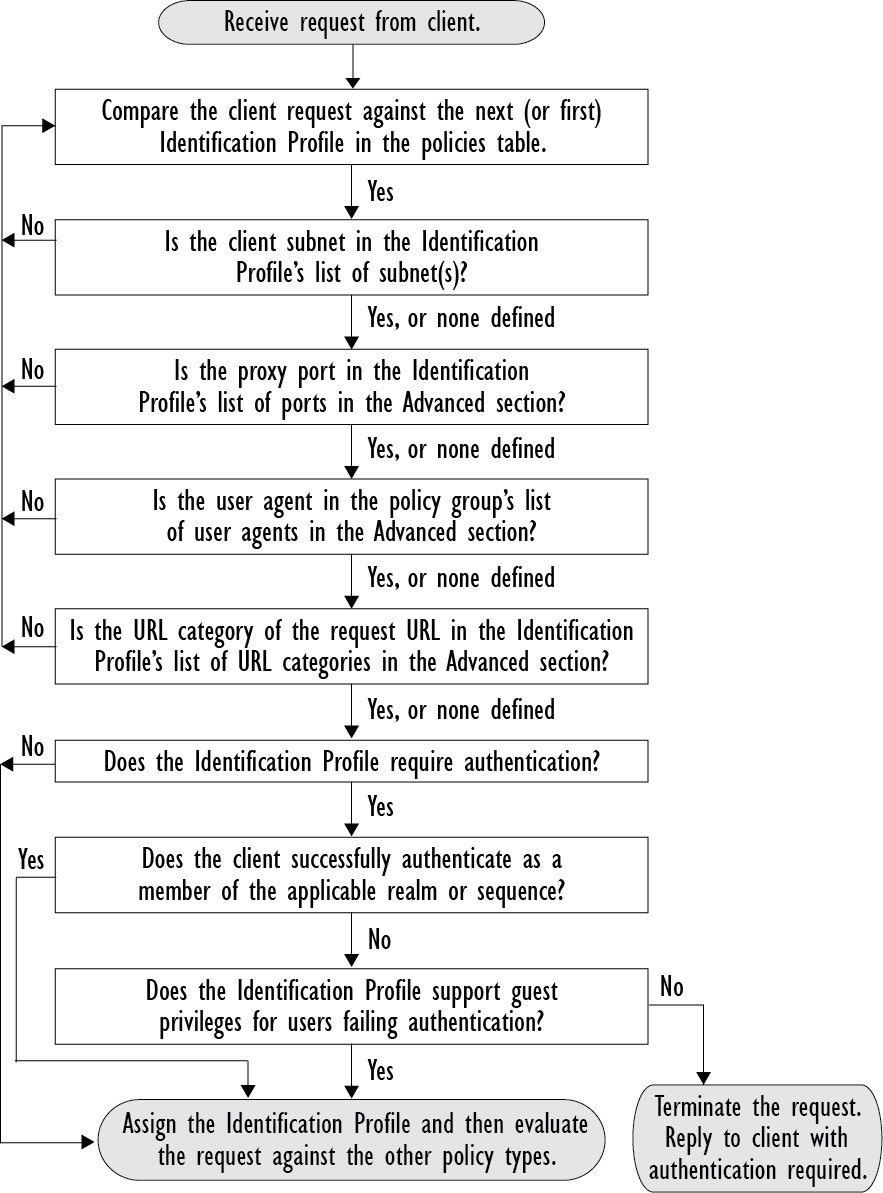
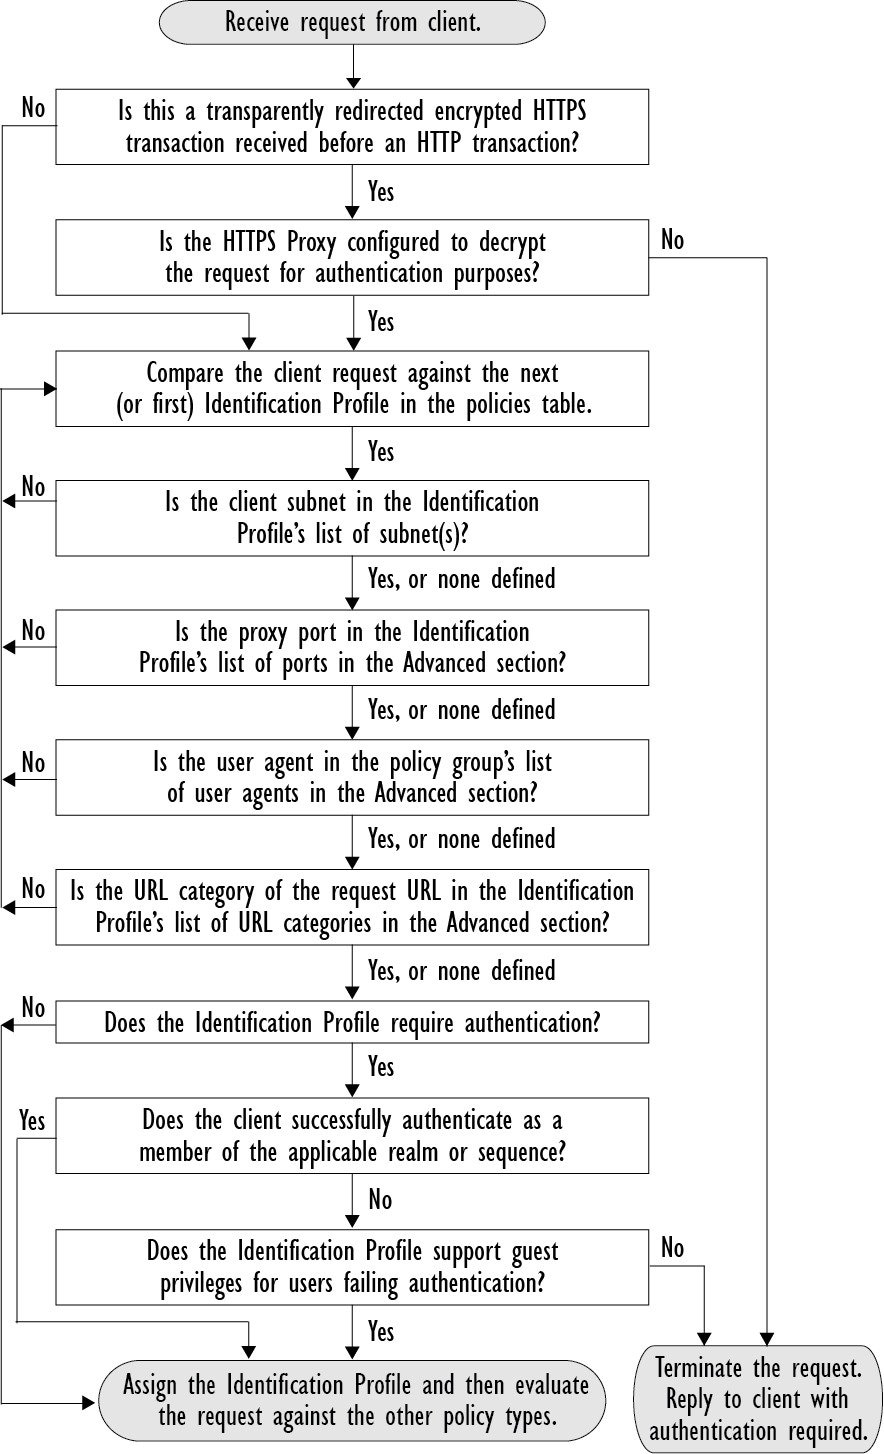
The following diagram shows how the Web Proxy evaluates a client request against an Identification Profile when the Identification Profiles is configured to use:

  • No authentication surrogates
  • IP addresses as authentication surrogates
  • Cookies as authentication surrogates with transparent requests
  • Cookies as authentication surrogates with explicit requests and credential encryption is enabled
Figure 1. Identification Profiles and Authentication Processing – No Surrogates and IP-based Surrogates


The following diagram shows how the Web Proxy evaluates a client request against an Identification Profile when the Identification Profile is configured to use cookies as the authentication surrogates, credential encryption is enabled, and the request is explicitly forwarded.

Figure 2. Identification Profiles and Authentication Processing – Cookie-based Surrogates