Deploy the Remediation Module

Download and Install the APIC/Secure Firewall Remediation Module

Before you begin

Make sure you're using compatible versions as shown in the following table.

Table 1. Compatibility with the remediation module, Management Center and APIC

Remediation module version compatible with....

Management Center version

APIC version

2.0.2

7.0 and later

5.1(1h)

Procedure


Step 1

Download the APIC/Secure Firewall Remediation Module (link to download) to a machine on which you'll connect to the management center.

Step 2

If you haven't done so already, log in to the management center.

Step 3

Click Policies > Actions > Modules.

Step 4

In the Install a New Module section, click Browse.

Step 5

Follow the prompts to upload the remediation module.

Step 6

Click Install.

Step 7

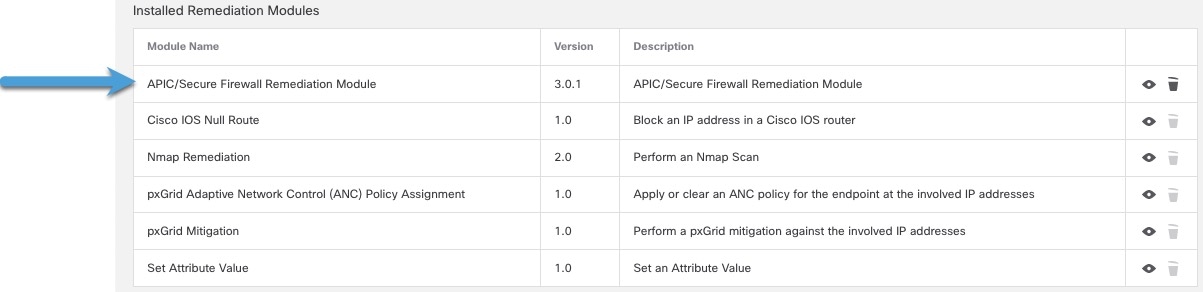
When successfully installed, the APIC/Secure Firewall Remediation Module is displayed in the list of installed remediation modules:

Verify the Secure Firewall Remediation Module installed correctly


The Remediation and Quarantine Process

The following topics discuss the process of creating a remediation and quarantining an endpoint.

Optionally Create a Management Contract and Contract EPG

You can optionally predefine an APIC traffic filtering contract in the common tenant and a management EPG in the mgmt tenant to initiate a connection to the quarantined uSeg EPG. To use this optional configuration, you must define a management EPG in APIC in its mgmt tenant, and you must define a contract in the common tenant.

For more information, see the Cisco APIC Basic Configuration Guide.

If you do not wish to create contracts, skip this section and continue with Create a Remediation Module Instance and Type.

Procedure


Step 1

Log in to APIC.

Step 2

Click Tenants.

Step 3

Double-click mgmt.

Step 4

Expand Application Profiles > mgmt Profile > Application EPGs.

Step 5

Click mgmtEPG.

Step 6

In the right pane, click Policy > General.

The following figure shows an example.

To set up an ooptional management contract and management EPG, start by defining a policy

Step 7

Click ALL TENANTS.

Step 8

Double-click common.

Step 9

Expand Contracts > Standard.

Step 10

Click useg_filter_contract.

Step 11

In the right pane, click the Policy tab.

The following figure shows an example.

Next define a uSeg filter contract

Step 12

Under the common tenant, expand the name of your filter; for example, Filters > SSH2.

The following figure shows an example

Finally, define a filter


What to do next

See Create a Remediation Module Instance and Type.

Create a Remediation Module Instance and Type

For the Secure Firewall Management Center to be able to detect and quarantine threats, you must configure on the Secure Firewall Management Center a remediation module instance and type. For more information about remediations, see the Cisco Secure Firewall Management Center Administration Guide.

Procedure


Step 1

If you haven't done so already, log in to the management center.

Step 2

Click Policies > Actions > Instances.

Step 3

From the Select a module type list, click APIC/Secure Firewall Remediation Module (2.0.2).

Step 4

Click Add.

The Edit Instance page is displayed as follows.

The Secure Firewall Remediation Module enables you to set up the connection to the APIC server or cluster, to exclude IPs from being quarantined, and to specify a management contract and EPG name

Step 5

Enter the following information:

Item

Description

Instance name

Enter a name to identify this instance. (Spaces are not allowed in the name.)

Description

(Optional.) Enter a description.

APIC server username

Enter the user name of an APIC user with admin privileges.

APIC server password

Enter and re-enter the user's password

APIC cluster instance 1 IP

Enter the IP address of the APIC server or of the first server in the cluster.

APIC cluster instance x IP

(Optional.) If your APIC cluster has more than one server, enter additional IP addresses in the provided fields.

IP addresses NOT to quarantine

(Optional.) Enter a list of IP addresses to always exclude from the quarantine. Separate IP addresses with Enter.

Management Contract Name

(Optional.) Enter the name of the management contract you created in APIC.

For more information, see the Cisco APIC Basic Configuration Guide.

Management EPG Name

(Optional.) Enter the name of the EPG with which the management contract is associated.

Step 6

In the Configured Remediation section at the bottom of the page, click one of the following then click Add:

  • Quarantine the destination End Point on APIC

  • Quarantine the source End Point on APIC

Step 7

On the Edit Remediation page, enter the following information:

  • Remediation Name: Enter a name to identify the remediation instance.

  • (Optional.) Description: Enter a description of the remediation instance.

Step 8

Click Create.

Step 9

Click Done.

Step 10

On the Edit Instance page, optionally configure another remediation.


What to do next

See Configure an Access Control Rule for the Remediation.

Configure an Access Control Rule for the Remediation

This example shows how to create an access control rule that blocks the SSH protocol. After creating this rule, any endpoint that attempts to SSH to another endpoint in an monitored EPG, the offending node or nodes are quarantined.

Procedure


Step 1

If you haven't done so already, log in to the management center.

Step 2

Click Policies > Access Control .

Step 3

Create a new access control policy or click Add Rule to add a rule to an existing policy.

Enter the following information.

Create an access control rule to trigger a remediation event that in turn causes an infected endpoint to be quarantined

Item

Description

Name field

Enter a name to identify this rule. Write down the name because you'll need it later.

Action list

Click Block.

Ports tab page

From the Available Ports list, scroll to SSH and click Add to Destination.

Logging tab page

Select the Log at Beginning of Connection check box.

For more information about access control rules, see the Cisco Secure Firewall Management Center Device Configuration Guide.

Step 4

Click Add.

Step 5

At the top of the page, click Save.


What to do next

See Configure a Correlation Rule for the Remediation.

Configure a Correlation Rule for the Remediation

A correlation rule provides conditions in which the system responds to threats. The following task discusses how to set up a correlation rule that is triggered at any point in the connection when your access control rule conditions are met. In particular, the sample access control policy and rule are triggered when SSH traffic is passed between a source and destination endpoint.

For more information about correlation policies and rules, see the Cisco Secure Firewall Management Center Administration Guide.

Procedure


Step 1

If you haven't done so already, log in to the management center.

Step 2

Click Policies > Correlation.

Step 3

Click the Rule Management tab.

Step 4

Click Create Rule.

Step 5

Enter a name to identify the rule and an optional description.

Step 6

In the Select the type of event for this rule section, click a connection event occurs and at any point of the connection.

Step 7

Set up the rest of the rule as shown in the following figure.

The correlation rule is triggered by your access control rule and causes the endpoint to be quarantined by APIC

Substitute the name of your access control policy and rule name for those shown in the preceding figure.

Step 8

Set other options as desired and click Save.


What to do next

See Associate the Correlation Rule with the Remediation Module Instance.

Associate the Correlation Rule with the Remediation Module Instance

The final step in configuring the management center for remediation and quarantine is to associate your correlation rule with your remediation policy. After you do this, when the management center detects a threat, the offending endpoints are quarantined in APIC.

Procedure


Step 1

If you haven't done so already, log in to the management center.

Step 2

Click Policies > Correlation.

Step 3

Click the Policy Management tab.

Step 4

Click Create Policy.

Step 5

Enter a policy name and optional policy description.

Step 6

Do not change Default Priority.

Step 7

Click Add Rules.

Step 8

Select the check box next to the name of the correlation rule you created earlier.

Step 9

Click Add.

Step 10

Click Responses (comment icon).

Step 11

From the Unassigned Responses list, double-click the name of your remediation policy to move it to Assigned Responses.

Step 12

Click Update.

Step 13

At the top of the page, click Save.

Step 14

Move the slider for the remediation policy to Slider enabled (slider enabled).


Verify the Remediation in the Management Center

Because remediations can fail for various reasons, complete the following steps to verify that no error messages are listed for the remediation status on the management center.

Procedure


Step 1

If you haven't done so already, log in to the management center.

Step 2

Click Analysis > Correlation > Status.

Step 3

In the Remediation Status table, find the row for your policy and view the result message.

The following figure shows an example

Verify in the Secure Firewall Management Center that your remediation has no errors

Step 4

If the remediation was successful, see Verify the Quarantine in APIC.

Step 5

If an error is displayed, the endpoint might still be quarantined if subsequent remediation events are successful.

Step 6

If you see an error, see Verify the Quarantine in APIC to verify whether or not the quarantine was successful. If the quarantine was eventually successful, you can ignore all of its error messages.


What to do next

See Verify the Quarantine in APIC.

Verify the Quarantine in APIC

Before you begin

Complete the tasks discussed in Verify the Remediation in the Management Center.

Procedure


Step 1

Log in to APIC.

Step 2

Click the Tenants tab page.

Step 3

Click ALL TENANTS.

Step 4

Double-click the name of the tenant that is infected.

Step 5

Expand the infected application in the left pane.

Step 6

Click uSeg EPGs

Step 7

Click the EPG quarantine for the quarantined endpoint.

Step 8

In the right panel, click Policies > General.

Step 9

Verify that one or more uSeg attributes were created on the APIC server.

The following figure shows an example.

In APIC, verify that one or more uSeg attributes were created

The figure shows that a device at IP address 192.168.100.21 has been quarantined.

Note 

For VMware DVS and Bare Metal (in bridged mode), two attributes (filters) are automatically created when an endpoint is quarantined, one attribute for the IP address and one attribute for the MAC address. Therefore, to remove the quarantine, you must delete both attributes.

Step 10

If no uSeg attributes were created, but you know that the conditions set by a correlation rule were met, the quarantine failed. To manually quarantine the IP address, see Manually Quarantine an IP Address.


What to do next

See Verify the Remediation in the Management Center.

Manually Quarantine an IP Address

You can try to manually quarantine an IP address if the quarantine discussed earlier in this chapter failed.

Procedure


Step 1

Find the IP address of the endpoint to quarantine.

  1. If you haven't done so already, log in to the management center.

  2. Click Analysis > Correlation > Status.

  3. Find the timestamp of entry for the unsuccessful quarantine and make note of the source IP address.

  4. On the Operations tab page, click EP Tracker, enter the IP address, and press Enter.

  5. If no information is displayed, the endpoint cannot be quarantined. If more than one IP address is displayed, look for the one in the offending tenant.

Step 2

If you can identify the EPG of the endpoint that you want to quarantine, create a uSeg EPG attribute corresponding to this endpoint.

  1. To find the MAC address of the IP address to quarantine, go to the APIC Object Store Browser at https://apic_IP_address/visore.html . Use the IP address of the endpoint to run a query and display the MAC address.

    The following figure shows an example.

    Find MAC addresses for the devices you want to quarantine manually

  2. Right-click Domains (VMs and Bare Metals) under the newly created uSeg EPG, and add a domain association with the same name and domain type as the original EPG.

  3. For Bare Metal, right-click Static Leafs, and click Statically Link With Node.

  4. Log in to APIC.

  5. Click Tenants > ALL TENANTS.

  6. Double-click the tenant that contains the endpoint to be quarantined.

  7. Expand Networking > Bridge Domains.

  8. Make note of the EPG bridge domain.

  9. Expand Application Profiles > profile-name > Application EPGs > epg-name and make note of the domain profile name.

  10. Expand Application Profiles and right-click uSeg EPG.

  11. Click Create uSeg EPG.

  12. Enter a name for the uSeg EPG, in the format uSegEPGendpoint-name . (For example, uSegEPG-EPG1 .)

  13. From the Bridge Domain list, click the EPG's bridge domain.

  14. Click Next.

  15. On the Domains page, click Add (add icon).

  16. From the Domain Profiles list, click the domain profile.

  17. Set the Deployment Immediacy to Immediate.

  18. Set the Resolution Immediacy to Immediate.

  19. Add an IP filter attribute by clicking Add (add icon) on the lower right and entering the IP address for the name and filter.

  20. Click Update and then click Finish.

    If the uSeg EPG is not displayed, refresh your browser page.

  21. Click uSeg Attributes.

  22. Click Add (add icon)

  23. Add attributes for the quarantined host's IP address and MAC address with an operator of Match Any.

    For the IP filter, use the IP address as the name. For MAC filter, use the IP address plus an underscore and the last three octets of the MAC address as a name.

  24. Click Submit.

Step 3

Verify that no traffic can go into or out from the quarantined endpoint.

For example, after an IP address is quarantined, pinging it should fail.