Create a Connector
A connector is an interface with a cloud service. The connector retrieves network information from the cloud service so the network information can be used in access control policies on the management center.
We support the following:
|
CSDAC version/platform |
A.W.S. |
Git- Hub |
Google Cloud |
Azure |
Azure Service Tags |
Microsoft Office 365 |
VMware vCenter |
|---|---|---|---|---|---|---|---|
|
Version 1.1 (on-premises) |
Yes |
No |
No |
Yes |
Yes |
Yes |
Yes |
|
Version 2.0 (on-premises) |
Yes |
Yes |
Yes |
Yes |
Yes |
Yes |
Yes |
|
Cloud-delivered (Cisco Defense Orchestrator) |
Yes |
Yes |
Yes |
Yes |
Yes |
Yes |
No |
See one of the following sections for more information.
Amazon Web Services Connector—About User Permissions and Imported Data
The Cisco Secure Dynamic Attributes Connector imports dynamic attributes from AWS to the management center for use in access control policies.
Dynamic attributes imported
We import the following dynamic attributes from AWS:
-
Tags, user-defined key-value pairs you can use to organize your AWS EC2 resources.
For more information, see Tag your EC2 Resources in the AWS documentaiton
-
IP addresses of virtual machines in AWS.
Minimum permissions required
The Cisco Secure
Dynamic Attributes Connector requires a user at minimum with a policy that permits ec2:DescribeTags and ec2:DescribeInstances to be able to import dynamic attributes.
Create an AWS User with Minimal Permissions for the Cisco Secure Dynamic Attributes Connector
This task discusses how to set up a service account with minimum permissions to send dynamic attributes to the management center. For a list of these attributes, see Amazon Web Services Connector—About User Permissions and Imported Data.
Before you begin
You must already have set up your Amazon Web Services (AWS) account. For more information about doing that, see this article in the AWS documentation.
Procedure
| Step 1 |
Log in to the AWS console as a user with the admin role. |
||
| Step 2 |
From the Dashboard, click . |
||
| Step 3 |
Click . |
||
| Step 4 |
Click Add Users. |
||
| Step 5 |
In the User Name field, enter a name to identify the user. |
||
| Step 6 |
Click Access Key - Programmatic Access. |
||
| Step 7 |
At the Set permissions page, click Next without granting the user access to anything; you'll do this later. |
||
| Step 8 |
Add tags to the user if desired. |
||
| Step 9 |
Click Create User. |
||
| Step 10 |
Click Download .csv to download the user's key to your computer.
|
||
| Step 11 |
Click Close. |
||
| Step 12 |
At the Identity and Access Management (IAM) page in the left column, click . |
||
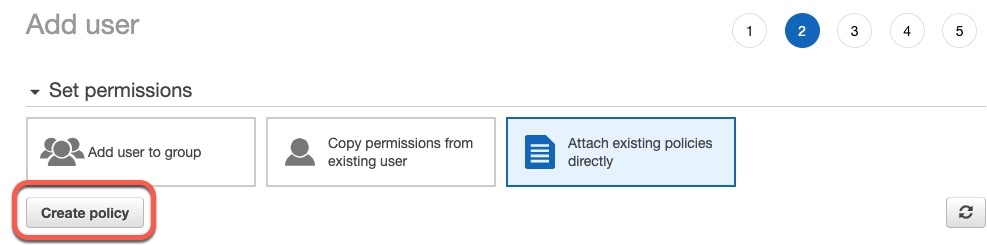
| Step 13 |
Click Create Policy. |
||
| Step 14 |
On the Create Policy page, click JSON.
|
||
| Step 15 |
Enter the following policy in the field: |
||
| Step 16 |
Click Next. |
||
| Step 17 |
Click Review. |
||
| Step 18 |
On the Review Policy page, enter the requested information and click Create Policy. |
||
| Step 19 |
On the Policies page, enter all or part of the policy name in the search field and press Enter. |
||
| Step 20 |
Click the policy you just created. |
||
| Step 21 |
Click . |
||
| Step 22 |
If necessary, enter all or part of the user name in the search field and press Enter. |
||
| Step 23 |
Click Attach Policy. |
What to do next
Create an AWS Connector
This task discusses how to configure a connector that sends data from AWS to the management center for use in access control policies.
Before you begin
Procedure
| Step 1 |
Log in to the dynamic attributes connector. |
||||||||||||||
| Step 2 |
Click Connectors. |
||||||||||||||
| Step 3 |
Do any of the following:
|
||||||||||||||
| Step 4 |
Enter the following information.
|
||||||||||||||
| Step 5 |
Click Test and make sure the test succeeds before you save the connector. |
||||||||||||||
| Step 6 |
Click Save. |
||||||||||||||
| Step 7 |
Make sure Ok is displayed in the Status column. |
 )
) )
)What to do next
Azure Connector—About User Permissions and Imported Data
The Cisco Secure Dynamic Attributes Connector imports dynamic attributes from Azure to the management center for use in access control policies.
Dynamic attributes imported
We import the following dynamic attributes from Azure:
-
Tags, key-value pairs associated with resources, resource groups, and subscriptions.
For more information, see this page in the Microsoft documentation.
-
IP addresses of virtual machines in Azure.
Minimum permissions required
The Cisco Secure Dynamic Attributes Connector requires a user at minimum with the Reader permission to be able to import dynamic attributes.
Create an Azure User with Minimal Permissions for the Cisco Secure Dynamic Attributes Connector
This task discusses how to set up a service account with minimum permissions to send dynamic attributes to the management center. For a list of these attributes, see Azure Connector—About User Permissions and Imported Data.
Before you begin
You must already have a Microsoft Azure account. To set one up, see this page on the Azure documentation site.
Procedure
| Step 1 |
Log in to the Azure Portal as the owner of the subscription. |
| Step 2 |
Click Azure Active Directory. |
| Step 3 |
Find the instance of Azure Active Directory for the application you want to set up. |
| Step 4 |
Click . |
| Step 5 |
In the Name field, enter a name to identify this application. |
| Step 6 |
Enter other information on this page as required by your organization. |
| Step 7 |
Click Register. |
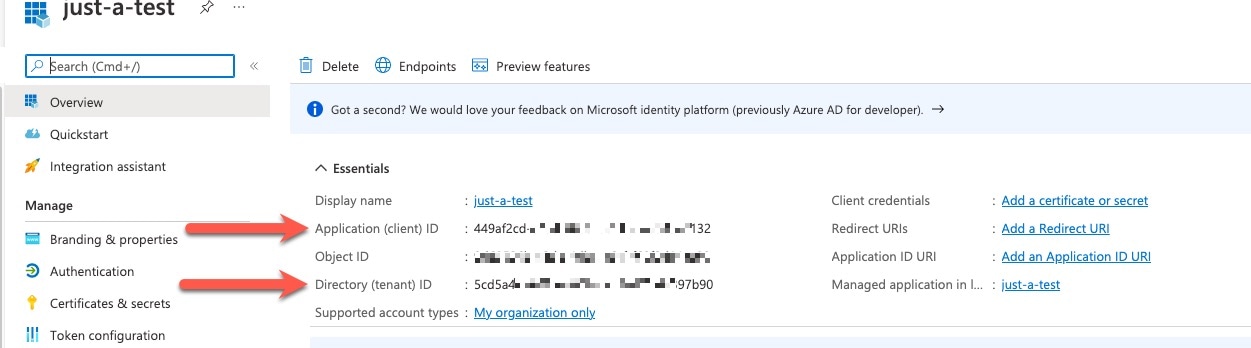
| Step 8 |
On the next page, make note of the Client ID (also referred to as application ID) and the tenant ID (also referred to as the directory ID). A sample follows.
|
| Step 9 |
Click Add a certificate or secret. |
| Step 10 |
Click New Client Secret. |
| Step 11 |
Enter the requested information and click Add. |
| Step 12 |
Copy the client secret ID to the clipboard because you'll need it to set up the Azure connector.
|
| Step 13 |
Go back to the main Azure Portal page and click Subscriptions. |
| Step 14 |
Copy the subscription ID to the clipboard. |
| Step 15 |
On the subscriptions page, click the name of the subscription. |
| Step 16 |
Click Access Control (IAM). |
| Step 17 |
Click . |
| Step 18 |
Click Reader and click Next. |
| Step 19 |
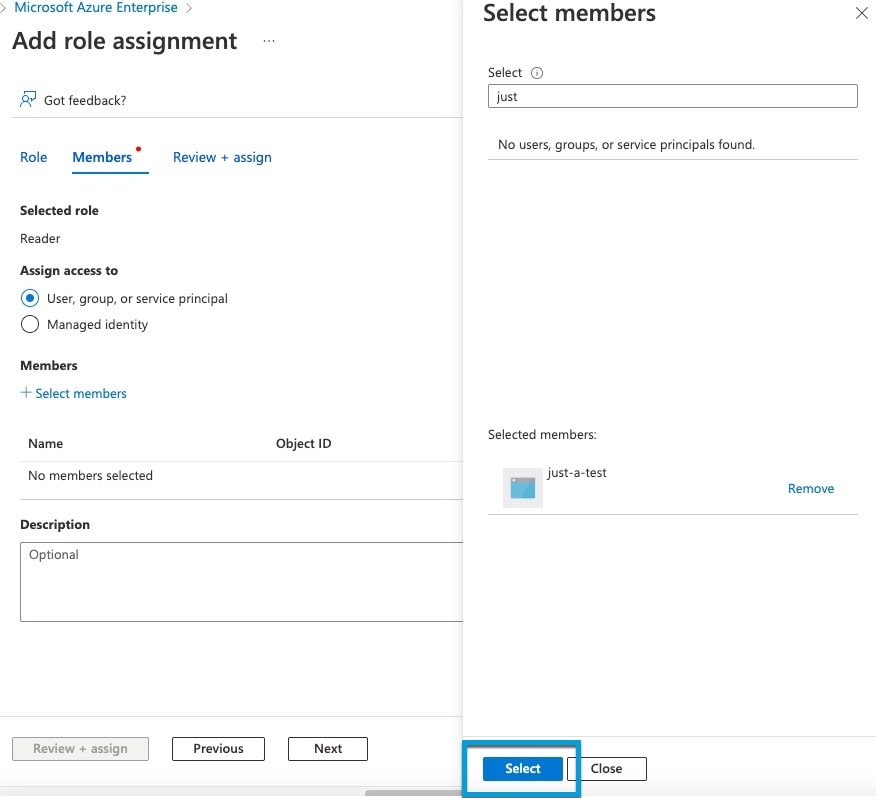
Click Select Members. |
| Step 20 |
On the right side of the page, click the name of the app you registered and click Select.
|
| Step 21 |
Click Review + Assign and follow the prompts to complete the action. |

What to do next
Create an Azure Connector
This task discusses how to create a connector to send data from Azure to management center for use in access control policies.
Before you begin
Procedure
| Step 1 |
Log in to the dynamic attributes connector. |
||||||||||||||||
| Step 2 |
Click Connectors. |
||||||||||||||||
| Step 3 |
Do any of the following:
|
||||||||||||||||
| Step 4 |
Enter the following information.
|
||||||||||||||||
| Step 5 |
Click Test and make sure Test connection succeeded is displayed before you save the connector. |
||||||||||||||||
| Step 6 |
Click Save. |
||||||||||||||||
| Step 7 |
Make sure Ok is displayed in the Status column. |
What to do next
Create an Azure Service Tags Connector
This topic discusses how to create a connector for Azure service tags to the management centerfor use in access control policies. The IP addresses association with these tags are updated every week by Microsoft.
For more information, see Virtual network service tags on Microsoft TechNet.
Procedure
| Step 1 |
Log in to the dynamic attributes connector. |
||||||||||||||||
| Step 2 |
Click Connectors. |
||||||||||||||||
| Step 3 |
Do any of the following:
|
||||||||||||||||
| Step 4 |
Enter the following information.
|
||||||||||||||||
| Step 5 |
Click Test and make sure Test connection succeeded is displayed before you save the connector. |
||||||||||||||||
| Step 6 |
Click Save. |
||||||||||||||||
| Step 7 |
Make sure Ok is displayed in the Status column. |
What to do next
Create a GitHub Connector
This section discusses how to create a GitHub connector that sends data to the management centerfor use in access control policies. The IP addresses associated with these tags are maintained by GitHub. You do not have to create a dynamic attributes filters.
For more information, see About GitHub's IP addresses.
 Note |
Do not change the URL because doing so will fail to retrieve any IP addresses. |
Procedure
| Step 1 |
Log in to the dynamic attributes connector. |
| Step 2 |
Click Connectors. |
| Step 3 |
Do any of the following:
|
| Step 4 |
Enter a Name and an optional description. |
| Step 5 |
(Optional.) In the Pull Interval field, change the frequency, in seconds, at which the dynamic attributes connector retrieves IP addresses from GitHub. The default is 21,600 seconds (6 hours). |
| Step 6 |
Click Test and make sure the test succeeds before you save the connector. |
| Step 7 |
Click Save. |
| Step 8 |
Make sure Ok is displayed in the Status column. |
What to do next
Google Cloud Connector—About User Permissions and Imported Data
The Cisco Secure Dynamic Attributes Connector imports dynamic attributes from Google Cloud to the management center for use in access control policies.
Dynamic attributes imported
We import the following dynamic attributes from Google Cloud:
-
Labels, key-value pairs you can use to organize your Google Cloud resources.
For more information, see Creating and Managing Labels in the Google Cloud documentation.
-
Network tags, key-value pairs associated with an organization, folder, or project.
For more information, see Creating and Managing Tags in the Google Cloud documentation.
-
IP addresses of virtual machines in Google Cloud.
Minimum permissions required
The Cisco Secure Dynamic Attributes Connector requires a user at minimum with the permission to be able to import dynamic attributes.
Create a Google Cloud User with Minimal Permissions for the Cisco Secure Dynamic Attributes Connector
This task discusses how to set up a service account with minimum permissions to send dynamic attributes to the management center. For a list of these attributes, see Google Cloud Connector—About User Permissions and Imported Data.
Before you begin
You must already have set up your Google Cloud account. For more information about doing that, see Setting Up Your Environment in the Google Cloud documentation.
Procedure
| Step 1 |
Log in to your Google Cloud account as a user with the owner role. |
| Step 2 |
Click . |
| Step 3 |
Enter the following information:
For more information about service accounts, see Understanding Service Accounts in the Google Cloud documentation. |
| Step 4 |
Click Create and Continue. |
| Step 5 |
Follow the prompts on your screen until the Grant users access to this service account section is displayed. |
| Step 6 |
Grant the user the role. |
| Step 7 |
Click Done. A list of service accounts is displayed. |
| Step 8 |
Click More ( |
| Step 9 |
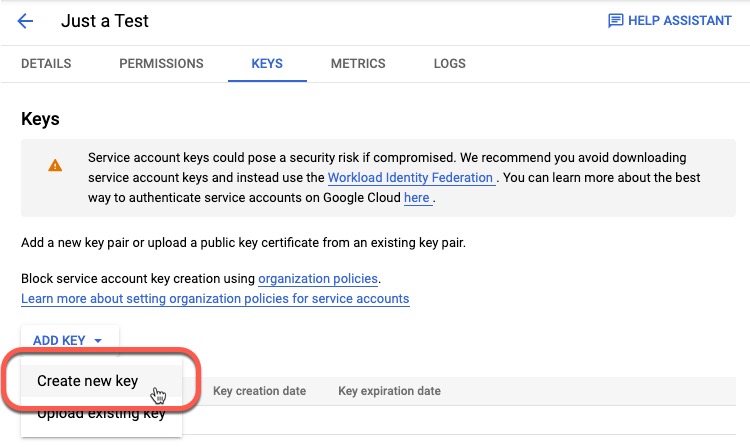
Click Manage Keys. |
| Step 10 |
Click .
|
| Step 11 |
Click JSON. |
| Step 12 |
Click Create. The JSON key is downloaded to your computer. |
| Step 13 |
Keep the key handy when you configure the GCP connector. |
What to do next
Create a Google Cloud Connector
Before you begin
Have your Google Cloud JSON-formatted service account data ready; it's required to set up the connector.
Procedure
| Step 1 |
Log in to the dynamic attributes connector. |
||||||||||||
| Step 2 |
Click Connectors. |
||||||||||||
| Step 3 |
Do any of the following:
|
||||||||||||
| Step 4 |
Enter the following information.
|
||||||||||||
| Step 5 |
Click Test and make sure the test succeeds before you save the connector. |
||||||||||||
| Step 6 |
Click Save. |
||||||||||||
| Step 7 |
Make sure Ok is displayed in the Status column. |
What to do next
Create an Office 365 Connector
This task discusses how to create a connector for Office 365 tags to send data to the management center for use in access control policies. The IP addresses associated with these tags are updated every week by Microsoft. You do not have to create a dynamic attributes filter to use the data.
For more information, see Office 365 URLs and IP address ranges on docs.microsoft.com.
Procedure
| Step 1 |
Log in to the dynamic attributes connector. |
||||||||||||||
| Step 2 |
Click Connectors. |
||||||||||||||
| Step 3 |
Do any of the following:
|
||||||||||||||
| Step 4 |
Enter the following information.
|
||||||||||||||
| Step 5 |
Click Save. |
||||||||||||||
| Step 6 |
Make sure Ok is displayed in the Status column. |
What to do next
vCenter Connector—About User Permissions and Imported Data
The Cisco Secure Dynamic Attributes Connector imports dynamic attributes from vCenter to the management center for use in access control policies.
Dynamic attributes imported
We import the following dynamic attributes from vCenter:
-
Operating system
-
MAC address
-
IP addresses
-
NSX tags
Minimum permissions required
The Cisco Secure Dynamic Attributes Connector requires a user at minimum with the Read Only permission to be able to import dynamic attributes.
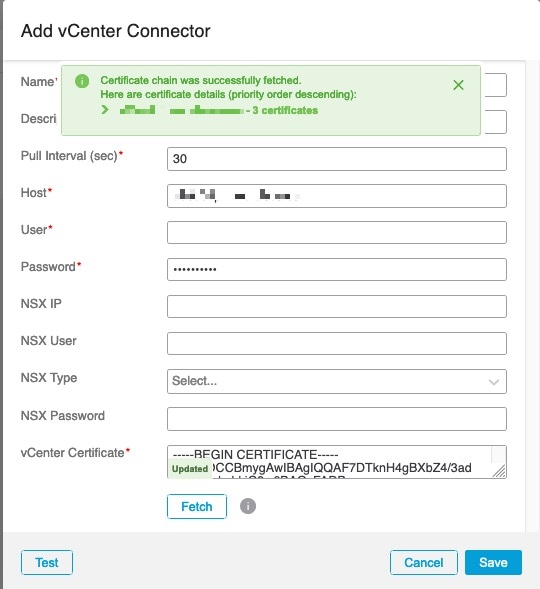
Fetch a Certificate Authority (CA) Chain for a vCenter Connector
This topic discusses how to automatically fetch the certificate authority change for a connector or an adapter. The certificate authority chain is the root certificate and all subordinate certificates; it is required to connect securely with vCenter or the management center.
The dynamic attributes connector enables you to automatically fetch the certificate authority chain but if this procedure does not work for some reason, see Manually Get a Certificate Authority (CA) Chain.
Procedure
| Step 1 |
Log in to the dynamic attributes connector. |
| Step 2 |
Do any of the following:
|
| Step 3 |
In the Name field, enter a name to identify the connector or adapter. |
| Step 4 |
In the Host field, enter the connector or adapter's host name or IP address without the scheme (such as https:// ). For example, myvcenter.example.com or 192.0.2.100:9090 The host name or IP you enter must exactly match the Common Name of the CA certificate used to securely connect to it. No other information is required to fetch the certificate CA chain. |
| Step 5 |
Click Fetch. |
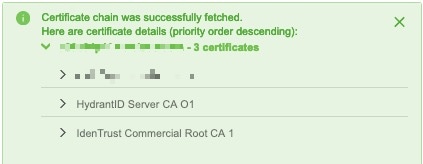
| Step 6 |
(Optional.) Expand the certificates in the certificate CA chain to verify them. |
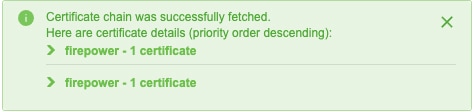
Example
Expanding the certificate CA chain at the top of the dialog box displays the certificates similar to the following.
Create a vCenter Connector
This task discusses how to create a connector for VMware vCenter to send data to the management center for use in access control policies.
Before you begin
If you use non-trusted certificates to communicate with vCenter, see Manually Get a Certificate Authority (CA) Chain.
Procedure
| Step 1 |
Log in to the dynamic attributes connector. |
||||||||||||||||||||||||
| Step 2 |
Click Connectors. |
||||||||||||||||||||||||
| Step 3 |
Do any of the following:
|
||||||||||||||||||||||||
| Step 4 |
Enter the following information.
|
||||||||||||||||||||||||
| Step 5 |
Click Test and make sure Test connection succeeded is displayed before you save the connector. |
||||||||||||||||||||||||
| Step 6 |
Click Save. |

 Feedback