- New and Changed Information
- Preface
- Documentation Roadmap
- Introduction
- Getting Started
- Licensing Requirements
- Using configTOOL
- Using perfectHOST
- Ports and Protocols
- KNX Deployment
- Getting Started with Mediator Web Client
- Managing Events
- Managing Security
- Managing Trends
- Managing Schedules
- Customizing HTML Pages with Web Express
- Energywise Manager
- Using Enterprise Navigation Tree
- Global Setpoints
- ADR Client
Managing Security
The Mediator web client supports access by multiple users over the Internet, but access to resources is defined and managed using the Role-Based Access Control (RBAC) function.
RBAC refers to the method of regulating access to network resources based on the roles of individual users within an enterprise. Using RBAC, you can assign logins and restrict control using security levels. You can authorize and control the ability of users to view information, modify settings, add, modify, and delete files.
The security levels are easy to configure and allow maximum flexibility while maintaining complete control over access to resources on the Mediator. Access is controlled based on the roles that individual users are assigned.
This chapter includes the following sections:
About Security Elements
The elements of RBAC are defined as follows:
User—A user is an agent who interacts with the system. Users are identified by their usernames and passwords.

Note ![]() Agents who have not provided verifiable username and password information are treated as a special user (Anonymous). By default, the Anonymous user does not have access to any resources.
Agents who have not provided verifiable username and password information are treated as a special user (Anonymous). By default, the Anonymous user does not have access to any resources.
Role—A role refers to responsibilities and the authority conferred on the user assigned to a role. Every user is assigned one or more roles. Policies associate roles with resource access permissions.
Policy—A policy is a named set of access rules.
Policy context—The context identifies the resource to which the policy controls access. Users having roles also have the resource access permissions in the context of the policy.
Permission—A permission is a right to perform a certain action or set of actions on a resource. Access rules are specified by granting permissions to roles.
You need to define users, roles, and policies, and specify the relationship between these elements to configure security access levels. Users can be assigned multiple roles, and roles can be affected by multiple policies. This functionality allows you to achieve the control you want over resources with complete precision.
This section includes the following topics:
About Roles
Roles comprise operations and actions that are permitted for the user the role is assigned to. Each user can have multiple roles and each role can be defined by multiple policies. For example, if role_1 allows access to viewing operations and role_2 allows access to configuring operations, then users who belong to role_1 and role_2 can configure and view.
The following default roles are provided:
•![]() Unknown
Unknown
•![]() Operator
Operator
•![]() Manager
Manager
•![]() System Administrator
System Administrator
Note ![]() You cannot edit or delete the default roles.
You cannot edit or delete the default roles.
You can assign the following types of permissions to roles:
•![]() View—Allows a user to only view data. The user cannot create or edit or delete nodes, and perform user management tasks, such as add or edit or delete users, roles, and policies.
View—Allows a user to only view data. The user cannot create or edit or delete nodes, and perform user management tasks, such as add or edit or delete users, roles, and policies.
•![]() Configure—Allows a user to create, edit, and delete nodes. For example, create an alarm, delete an alarm, and so on.
Configure—Allows a user to create, edit, and delete nodes. For example, create an alarm, delete an alarm, and so on.
•![]() Override—Allows a user to override the value of an existing node. For example, override the value of a relay node.
Override—Allows a user to override the value of an existing node. For example, override the value of a relay node.
•![]() Manage Users—Allows a user to perform user management tasks, such as add or edit or delete users, roles, and policies.
Manage Users—Allows a user to perform user management tasks, such as add or edit or delete users, roles, and policies.
Table 10-1 outlines the default permissions that are assigned to the default roles.
|
|
|
|||
|---|---|---|---|---|
|
|
|
|
|
|
Unknown |
- |
- |
- |
- |
Operator |
¸ |
- |
- |
- |
Manager |
¸ |
¸ |
¸ |
- |
System Administrator |
¸ |
¸ |
¸ |
¸ |
Note ![]() The System Administrator role is also required to log into the configTOOL and perfectHOST applications; access the System page in the Mediator web client to configure the Mediator settings, and back up and restore the Mediator.
The System Administrator role is also required to log into the configTOOL and perfectHOST applications; access the System page in the Mediator web client to configure the Mediator settings, and back up and restore the Mediator.
The Roles tab appears as shown in Figure 10-1.
Figure 10-1 Roles Tab
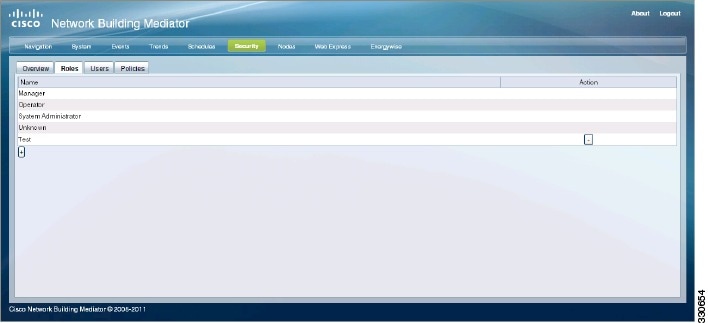
Table 10-2 describes the buttons that are shown on the Roles tab.
|
|
|
|---|---|
+ |
Allows you to add roles. |
- |
Allows you to delete roles. |
To know more about managing roles, see the "Managing Roles" section.
About Users
When you add a user, you assign a username and a password. You may configure a default homepage for the user, such as a personalized web page. You can also assign one or more roles to the user. The roles you assign are used by policies to specify the resources the user can access.
The following default users are assigned:
•![]() mpxadmin
mpxadmin
•![]() Anonymous
Anonymous
The mpxadmin user has full access to the system resources.
The Users tab appears as shown in Figure 10-2.
Figure 10-2 Users Tab
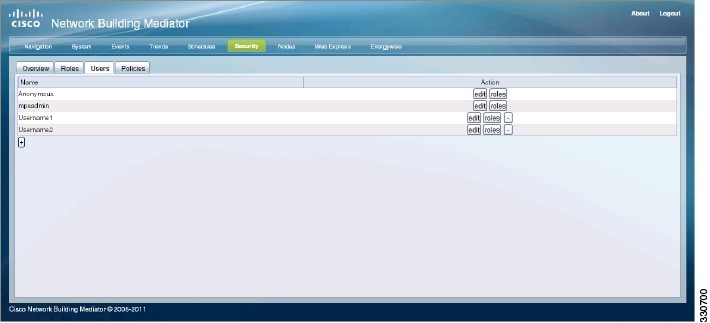
Table 10-3 describes the buttons shown on the Users tab.
|
|
|
|---|---|
+ |
Allows you to add users. |
- |
Allows you to delete users. |
edit |
Allows you to edit the user settings. Note: You cannot edit the names of users. |
To know more about managing users, see the "Managing Users" section.
About Policies
You can define policies to limit the resources that the user can access. A policy comprises policy context and permissions. The policy context refers to the path where you want the policy to be implemented, for example, /alias/location/building1. The permissions refer to the controls and actions that the user can perform in that particular context, for example, configuring and viewing configurations.
To add a policy on the Mediator, you specify a resource that you want to control (for example, access to HTTP Files). You then grant access permissions to the role for the specified resource.
The following system-defined policies are provided:
•![]() Default
Default
Note ![]() Use the Default policy against each role that is created, so that users can view the navigation tree, schedules, events, trends, and so on.
Use the Default policy against each role that is created, so that users can view the navigation tree, schedules, events, trends, and so on.
•![]() HTTP Files
HTTP Files
•![]() HTTPS Files
HTTPS Files
Note ![]() You cannot edit or delete the system-defined policies.
You cannot edit or delete the system-defined policies.
The Policies tab appears as shown in Figure 10-3.
Figure 10-3 Policies Tab
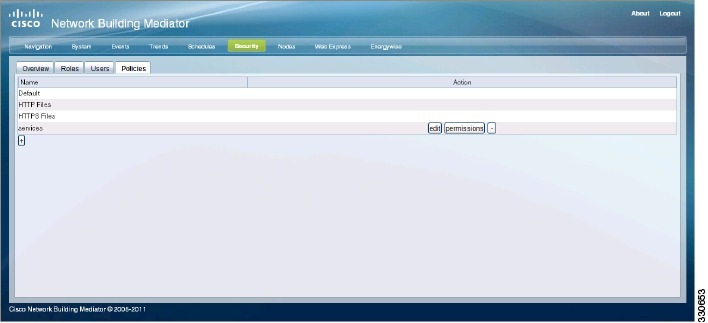
describes the buttons shown on the Policies tab.
To know more about managing polices, see the "Managing Policies" section.
Managing Roles
This section includes the following topics:
Note ![]() You must be assigned the System Administrator role or a role that is granted the Manage Users privilege to perform the actions outlined in this section.
You must be assigned the System Administrator role or a role that is granted the Manage Users privilege to perform the actions outlined in this section.
Adding Roles
To add a role, perform the following steps:
Step 1 ![]() In the Mediator web client, click Security.
In the Mediator web client, click Security.
Step 2 ![]() Click the Roles tab.
Click the Roles tab.
The Roles tab appears listing the configured roles.
Step 3 ![]() Click the plus symbol (+) button to add a role.
Click the plus symbol (+) button to add a role.
The Add Role dialog box appears.
Step 4 ![]() In the Add Role dialog box, perform the following steps:
In the Add Role dialog box, perform the following steps:
a. ![]() In the Name text box, enter a name for the role.
In the Name text box, enter a name for the role.
You should choose a descriptive name that identifies a job function or position requiring authorization to access resources on the Mediator at a defined level.
Note ![]() You cannot include spaces in the name of a role.
You cannot include spaces in the name of a role.
b. ![]() Click commit to save the new role.
Click commit to save the new role.
The new role is added to the list on the Roles tab.
Deleting Roles
To delete a role, perform the following steps:
Note ![]() You cannot delete the default roles—Unknown, Operator, Manager, and System Administrator.
You cannot delete the default roles—Unknown, Operator, Manager, and System Administrator.
Step 1 ![]() Click the Roles tab.
Click the Roles tab.
The Roles tab appears listing the configured roles.
Step 2 ![]() Click the minus symbol (-) button next to the name of the role that you want to delete.
Click the minus symbol (-) button next to the name of the role that you want to delete.
The Remove Roles dialog box appears asking you to confirm the operation.
Step 3 ![]() Click commit.
Click commit.
The role is removed from the list on the Roles tab.
Managing Users
This section describes how to create, edit, and delete users; change password restrictions and edit user roles. It includes the following topics:
•![]() Changing Password Restrictions
Changing Password Restrictions
Creating Users
To create a user, perform the following steps:
Step 1 ![]() In the Mediator web client, click Security.
In the Mediator web client, click Security.
Step 2 ![]() Click the Users tab.
Click the Users tab.
The Users tab appears listing the configured users.
Step 3 ![]() Click the plus symbol (+) button to add a user.
Click the plus symbol (+) button to add a user.
The Add User dialog box appears.
Step 4 ![]() In the Add User dialog box, perform the following steps:
In the Add User dialog box, perform the following steps:
a. ![]() In the Username text box, enter a name for the user.
In the Username text box, enter a name for the user.
You should choose a descriptive name that identifies an individual user.
b. ![]() In the Password text box, enter the password.
In the Password text box, enter the password.
c. ![]() In the Confirm Password text box, re-enter the password that you entered in the Password text box.
In the Confirm Password text box, re-enter the password that you entered in the Password text box.
d. ![]() In the Homepage text box, click Select.
In the Homepage text box, click Select.
The File Selector dialog box appears.
e. ![]() In the File Selector dialog box, perform the following steps:
In the File Selector dialog box, perform the following steps:
1. ![]() Navigate to and select the homepage. The file path appears in the File name text box.
Navigate to and select the homepage. The file path appears in the File name text box.
2. ![]() Click SAVE.
Click SAVE.
The File Selector dialog box closes. The homepage refers to the page that appears the next time the user logs into the Mediator web client.
f. ![]() To assign the System Administrator role to this user, select the System Administrator check box.
To assign the System Administrator role to this user, select the System Administrator check box.
g. ![]() Click commit to save the new user.
Click commit to save the new user.
The new user is added to the list on the Users tab.
Note ![]() If you do not assign the System Administrator role to the new user, the Unknown role is assigned by default. To assign a different role to the user, see the "Editing User Roles" section.
If you do not assign the System Administrator role to the new user, the Unknown role is assigned by default. To assign a different role to the user, see the "Editing User Roles" section.
Changing Password Restrictions
The Mediator uses a strong password policy to enforce the use of complex passwords for secure access. However, you can modify the password restrictions using the configTOOL.
To edit the password policy, perform the following steps:
Step 1 ![]() Connect to the Mediator using the configTOOL.
Connect to the Mediator using the configTOOL.
Step 2 ![]() Navigate to and select /services/Security Manager.
Navigate to and select /services/Security Manager.
The Security Manager tab appears in the data entry pane.
Step 3 ![]() On the Security Manager tab, perform the following steps:
On the Security Manager tab, perform the following steps:
a. ![]() In the Password min length text box, enter the minimum number of characters that the password must contain.
In the Password min length text box, enter the minimum number of characters that the password must contain.
b. ![]() In the Admin password min length text box, enter the minimum number of characters that the password for the admin user must contain.
In the Admin password min length text box, enter the minimum number of characters that the password for the admin user must contain.
c. ![]() In the Password max length text box, enter the maximum number of characters that are permitted in the password.
In the Password max length text box, enter the maximum number of characters that are permitted in the password.
d. ![]() Select the Require complex password check box to enforce the use of complex passwords for secure access.
Select the Require complex password check box to enforce the use of complex passwords for secure access.
e. ![]() Select the Forbid repeated characters in password check box to prevent the use of recurring characters in the password.
Select the Forbid repeated characters in password check box to prevent the use of recurring characters in the password.
f. ![]() Select the Forbid password equal username check box to to prevent the use of the username as the password.
Select the Forbid password equal username check box to to prevent the use of the username as the password.
g. ![]() Select the Forbid password equal to `cisco' check box to prevent the use of the term `cisco' as the password.
Select the Forbid password equal to `cisco' check box to prevent the use of the term `cisco' as the password.
h. ![]() Select the Forbid password equal to `mpxadmin' check box to prevent the use of the term `mpxadmin' as the password.
Select the Forbid password equal to `mpxadmin' check box to prevent the use of the term `mpxadmin' as the password.
Step 4 ![]() Click Save to save the configuration.
Click Save to save the configuration.
Editing Users
To edit a user, perform the following steps:
Step 1 ![]() In the Mediator web client, click Security.
In the Mediator web client, click Security.
Step 2 ![]() Click the Users tab.
Click the Users tab.
The Users tab appears listing the configured users.
Step 3 ![]() Click edit next to the name of the user that you want to edit.
Click edit next to the name of the user that you want to edit.
The Edit Users dialog box appears with the Username text box disabled because you cannot edit the names of users.
Step 4 ![]() In the Edit Users dialog box, perform the following steps:
In the Edit Users dialog box, perform the following steps:
a. ![]() In the Old Password text box, enter the current password.
In the Old Password text box, enter the current password.
b. ![]() In the New Password text box, enter the new password.
In the New Password text box, enter the new password.
c. ![]() In the Confirm Password text box, re-enter the new password.
In the Confirm Password text box, re-enter the new password.
d. ![]() In the User Homepage text box, click Select.
In the User Homepage text box, click Select.
The File Selector dialog box appears displaying a list of preconfigured homepages.
e. ![]() In the File Selector dialog box, perform the following steps:
In the File Selector dialog box, perform the following steps:
1. ![]() Navigate to and select the user homepage. The file path appears in the File name text box.
Navigate to and select the user homepage. The file path appears in the File name text box.
2. ![]() Click SAVE.
Click SAVE.
The File Selector dialog box closes. The user homepage refers to the page that appears the next time the user logs into the Mediator web client.
f. ![]() Click commit to save the changes.
Click commit to save the changes.
Editing User Roles
To edit a user role, perform the following steps:
Step 1 ![]() In the Mediator web client, click Security.
In the Mediator web client, click Security.
Step 2 ![]() Click the Users tab.
Click the Users tab.
The Users tab appears listing the configured users.
Step 3 ![]() Click roles next to the user whose role you want to edit.
Click roles next to the user whose role you want to edit.
The Roles dialog box displaying a list of roles appears.
Note ![]() If the user was assigned the System Administrator role at the time of creation, you cannot edit the role. If the user was assigned any other role, you can assign a different role to the user. However, you will not be able to assign the System Administrator role.
If the user was assigned the System Administrator role at the time of creation, you cannot edit the role. If the user was assigned any other role, you can assign a different role to the user. However, you will not be able to assign the System Administrator role.
Step 4 ![]() In the Roles dialog box, perform the following steps:
In the Roles dialog box, perform the following steps:
a. ![]() To assign a different role to the user, select the check box next to the role name.
To assign a different role to the user, select the check box next to the role name.
b. ![]() Click commit to save the role assignments.
Click commit to save the role assignments.
Deleting Users
To delete a user, perform the following steps:
Note ![]() You cannot delete the default users—mpxadmin and Anonymous.
You cannot delete the default users—mpxadmin and Anonymous.
Step 1 ![]() In the Mediator web client, click Security.
In the Mediator web client, click Security.
Step 2 ![]() Click the Users tab.
Click the Users tab.
The Users tab appears listing the configured users.
Step 3 ![]() Click the minus symbol (-) button next to the user that you want to delete.
Click the minus symbol (-) button next to the user that you want to delete.
The Remove Users dialog box appears asking you to confirm the operation.
Note ![]() When you attempt to delete a user that has active sessions, the Remove Users dialog box that appears notifies you that the user you are deleting is an active user.
When you attempt to delete a user that has active sessions, the Remove Users dialog box that appears notifies you that the user you are deleting is an active user.
Step 4 ![]() Click commit.
Click commit.
The user is removed from the list on the Users tab.
Managing Policies
This section describes how to add, edit, and delete policies and change policy permissions. It includes the following topics:
Note ![]() You must be assigned the System Administrator role or a role that is granted the Manage Users privilege to perform the actions outlined in this section.
You must be assigned the System Administrator role or a role that is granted the Manage Users privilege to perform the actions outlined in this section.
Adding Policies
To create a policy, perform the following steps:
Step 1 ![]() In the Mediator web client, click Security.
In the Mediator web client, click Security.
Step 2 ![]() Click the Policies tab.
Click the Policies tab.
The Policies tab appears listing the configured policies.
Step 3 ![]() Click the plus symbol (+) button to add a policy.
Click the plus symbol (+) button to add a policy.
The Add Policy dialog box appears.
Step 4 ![]() In the Add Policy dialog box, perform the following steps:
In the Add Policy dialog box, perform the following steps:
a. ![]() In the Name text box, enter a name for the policy.
In the Name text box, enter a name for the policy.
You should choose a descriptive name to identify the resource on the Mediator controlled by the policy.
b. ![]() In the Policy Context text box, click Select. The Node Selector dialog box appears.
In the Policy Context text box, click Select. The Node Selector dialog box appears.
Note ![]() You cannot create more than one policy with the same context.
You cannot create more than one policy with the same context.
c. ![]() In the Node Selector dialog box, perform the following steps:
In the Node Selector dialog box, perform the following steps:
1. ![]() Navigate to and select the node that is the location of the resource controlled by the policy.
Navigate to and select the node that is the location of the resource controlled by the policy.
2. ![]() Click SAVE.
Click SAVE.
The Node Selector dialog box closes.
Note ![]() If the Policy Context points to a service, then no authorizations are required.
If the Policy Context points to a service, then no authorizations are required.
d. ![]() Click commit to save the policy.
Click commit to save the policy.
Note ![]() Policies that are created on the Mediator Manager do not get applied on downstream Mediators.
Policies that are created on the Mediator Manager do not get applied on downstream Mediators.
Editing Policies
To edit the policy, perform the following steps:
Step 1 ![]() In the Mediator web client, click Security.
In the Mediator web client, click Security.
Step 2 ![]() Click the Policies tab.
Click the Policies tab.
The Policies tab appears listing the configured policies.
Step 3 ![]() Click edit next to the name of the policy that you want to edit.
Click edit next to the name of the policy that you want to edit.
The Edit Policies dialog box appears with the Policy Name text box disabled because you cannot edit the names of policies.
Step 4 ![]() In the Edit Policies dialog box, perform the following steps:
In the Edit Policies dialog box, perform the following steps:
a. ![]() In the Policy Context text box, click Select. The Node Selector dialog box appears.
In the Policy Context text box, click Select. The Node Selector dialog box appears.
Note ![]() You cannot create more than one policy with the same context.
You cannot create more than one policy with the same context.
b. ![]() In the Node Selector dialog box, perform the following steps:
In the Node Selector dialog box, perform the following steps:
1. ![]() Navigate to and select the node that is the location of the resource controlled by the policy.
Navigate to and select the node that is the location of the resource controlled by the policy.
2. ![]() Click SAVE.
Click SAVE.
The Node Selector dialog box closes.
c. ![]() Click commit to save the changes to the policy.
Click commit to save the changes to the policy.
Changing Policy Permissions
To change the permissions of the policy, perform the following steps:
Step 1 ![]() In the Mediator web client, click Security.
In the Mediator web client, click Security.
Step 2 ![]() Click the Policies tab.
Click the Policies tab.
The Policies tab appears listing the configured policies.
Step 3 ![]() Click permissions next to the name of the policy that you want to edit.
Click permissions next to the name of the policy that you want to edit.
The Permissions dialog box appears listing the roles for which you want to configure permissions. Each role appears as a button, which when clicked displays a collapsible pane with four check boxes—View, Override, Configure, and Manage Users.
Step 4 ![]() In the Permissions dialog box, perform the following steps:
In the Permissions dialog box, perform the following steps:
a. ![]() Click the role for which you want to configure permissions.
Click the role for which you want to configure permissions.
b. ![]() Select one or more check boxes for the role. To deny all permissions to a role, leave the check boxes unselected.
Select one or more check boxes for the role. To deny all permissions to a role, leave the check boxes unselected.
c. ![]() Repeat Step 4a through Step 4b for each role whose permissions you want to configure.
Repeat Step 4a through Step 4b for each role whose permissions you want to configure.
d. ![]() Click commit to save the policy permissions.
Click commit to save the policy permissions.
Deleting Policies
To delete an existing policy, perform the following steps:
Note ![]() You cannot delete the system-defined policies—Default, HTTP Files, and HTTPS Files.
You cannot delete the system-defined policies—Default, HTTP Files, and HTTPS Files.
Step 1 ![]() In the Mediator web client, click Security.
In the Mediator web client, click Security.
Step 2 ![]() Click the Policies tab.
Click the Policies tab.
The Policies tab appears listing the configured policies.
Step 3 ![]() Click the minus symbol (-) button next to the name of the policy that you want to delete.
Click the minus symbol (-) button next to the name of the policy that you want to delete.
The Remove Policies dialog box appears asking you to confirm the operation.
Step 4 ![]() Click commit to delete the policy.
Click commit to delete the policy.
The policy is removed from the list on the Policies tab.
 Feedback