- New and Changed Information
- Preface
- Documentation Roadmap
- Introduction
- Getting Started
- Licensing Requirements
- Using configTOOL
- Using perfectHOST
- Ports and Protocols
- KNX Deployment
- Getting Started with Mediator Web Client
- Managing Events
- Managing Security
- Managing Trends
- Managing Schedules
- Customizing HTML Pages with Web Express
- Energywise Manager
- Using Enterprise Navigation Tree
- Global Setpoints
- ADR Client
- Overview
- perfectHOST Templates
- Installing perfectHOST
- Creating perfectHOST Applications
- Connecting to the Mediator with perfectHOST
- Templates and Macro Groups
- Default Templates and Macro Groups
- Most Frequently Used Templates
- absolute
- add
- alarm
- and
- _ao
- _ao_v
- db-cool
- db-heat
- delayon
- delayoff
- _di_on
- div
- dlystart
- _do
- edgedet
- gtthan
- _hoa
- hours
- latch
- latchmax
- latchmin
- ltthan
- minon
- minutes
- multiply
- not
- or
- override1hr
- _p593-3h20
- pid-cool
- pid-heat
- reset
- select
- _setpnt10k
- _st-s3
- _setpntspl
- _st-s3ao
- setresest
- sqrt
- sub
- timeclok
- timepro2at
- trigger
- trimmer
perfectHOST
This chapter provides a description of the supervisory control capabilities of the Cisco Network Building Mediator (Mediator), and describes how to use the perfectHOST graphical programming software.
This chapter includes the following topics:
•![]() Creating perfectHOST Applications
Creating perfectHOST Applications
•![]() Connecting to the Mediator with perfectHOST
Connecting to the Mediator with perfectHOST
•![]() Saving and Compiling a perfectHOST Application
Saving and Compiling a perfectHOST Application
•![]() Creating HTML Monitor Drawings
Creating HTML Monitor Drawings
•![]() Downloading the perfectHOST Application and HTML Drawing to the Mediator
Downloading the perfectHOST Application and HTML Drawing to the Mediator
•![]() Viewing perfectHOST HTML Drawings on the Mediator
Viewing perfectHOST HTML Drawings on the Mediator

Note ![]() Before you install, operate, or service the system, read the Regulatory Compliance and Safety Information for the Cisco Network Building Mediator document for important safety information.
Before you install, operate, or service the system, read the Regulatory Compliance and Safety Information for the Cisco Network Building Mediator document for important safety information.
Overview
perfectHOST is graphical programming software used for creating complex and sophisticated building automation and control programs. Graphical programming is the creation of a schematic drawing of the desired control scheme, using a library of symbols called Templates. These templates are placed on the computer screen and interconnected by lines, which direct the flow of data. The control scheme is drawn from the inputs, through the control logic. The control logic directs inputs to the outputs.
When the drawing is completed, it is converted into a computer program, which is downloaded into the Mediator. perfectHOST programming gives the Mediator the ability to act as a powerful supervisory control platform incorporating any integrated system, device, or protocol into intelligent business applications.
The perfectHOST application that runs on the Mediator is also known as the Templates Inside Mediator (TIM) application.
perfectHOST Templates
This section includes the following topics:
Programming Graphics
In perfectHOST, the control logic and programs are created by placing logical elements within a drawing. These logical elements are called perfectHOST templates. You can connect the inputs and outputs of these templates to control the data flow through a program.
You can place the templates on your drawing workspace and interconnect them by lines, which direct the flow of the data. The control scheme is drawn from the inputs, through the control logic. The control logic directs inputs to the outputs.
When the drawing is completed, it is converted into a computer program, which is downloaded into the Mediator. The perfectHOST programming tool gives the Mediator its ability to act as a powerful supervisory control platform, incorporating any integrated system, device, or protocol into intelligent business applications.
Templates and Macros
A template is a self-contained logical element. It is externally comprised of a graphical symbol with input and output connection points.The graphical symbol should serve as a visual mnemonic of the function performed by the template. Input points receive data from other templates and output points send their values to other templates.
Each template is represented by a logical element and is associated to a system action and default variables attached to it. These system actions and default variables perform various basic functions. In this way, although you do not create variables for each template, you can control the logic and program within the system.
Macros are sets of instructions or drawings that perform specific operations on target devices. The perfectHOST macros contain an application drawing that contains other templates. It has inputs and outputs like a regular template and associates them with the inputs and outputs of templates contained in the drawing. Macro templates can contain other Macro templates. All macros have predefined functionalities.
Installing perfectHOST
The Mediator perfectHOST software should be installed on your computer.
This section includes the following topics:
Prerequisites
The prerequisites for perfectHOST programming for the Mediator are as follows:
•![]() IP address of the Mediator
IP address of the Mediator
•![]() PC with perfectHOST installed
PC with perfectHOST installed
•![]() PC with a web browser
PC with a web browser
For a PC running the perfectHOST software, we recommend that you use Windows-based platforms (95 or later) with 2 GB of RAM and 10 GB of free disk space.
Installation Instructions
To install this software, access Cisco.com at the following website:
http://www.cisco.com/en/US/products/ps10454/index.html
This software is available in the Support section at this website.
Note ![]() To download this software, you need to have a valid CCO username and password.
To download this software, you need to have a valid CCO username and password.
To download and install the software on your workstation, perform the following steps:
Step 1 ![]() Click Download Software.
Click Download Software.
Step 2 ![]() Choose Smart Connected Building Software > Cisco Network Building Mediator.
Choose Smart Connected Building Software > Cisco Network Building Mediator.
Step 3 ![]() Choose the appropriate hardware platform.
Choose the appropriate hardware platform.
Step 4 ![]() Click Network Building Mediator Programming Software to download perfectHOST.
Click Network Building Mediator Programming Software to download perfectHOST.
Step 5 ![]() Choose the appropriate release, click the release number, and click Download Now.
Choose the appropriate release, click the release number, and click Download Now.
The Download Cart page appears.
Step 6 ![]() Click Publish.
Click Publish.
The Cisco End-User Software License Agreement page appears.
Step 7 ![]() Click Agree to accept the software download rules specified in the Cisco End-User Software License Agreement page. Click Disagree to cancel the download process.
Click Agree to accept the software download rules specified in the Cisco End-User Software License Agreement page. Click Disagree to cancel the download process.
The download software page appears with two options to download perfectHOST.
–![]() Download Manager Option
Download Manager Option
–![]() Non-Java Download Option
Non-Java Download Option
Note ![]() The Download Manager Option requires a working Java version of 1.4.2.xx and later. If you choose this option to download the perfectHOST software, the file is saved on your PC and you are allowed to run this file to install this software.
The Download Manager Option requires a working Java version of 1.4.2.xx and later. If you choose this option to download the perfectHOST software, the file is saved on your PC and you are allowed to run this file to install this software.
Step 8 ![]() Click Non-Java Download Option to proceed with the download.
Click Non-Java Download Option to proceed with the download.
Step 9 ![]() Click Download URL to download perfectHOST.
Click Download URL to download perfectHOST.
The file download dialog box appears.
Step 10 ![]() Click Run.
Click Run.
You see the welcome message in the perfectHOST Installer window.
Step 11 ![]() Click Next and follow the instructions to install perfectHOST. Alternatively, click Cancel to cancel the download process.
Click Next and follow the instructions to install perfectHOST. Alternatively, click Cancel to cancel the download process.
Step 12 ![]() Once you install perfectHOST, you can start this application from Start > All Programs > Cisco Systems > perfectHOST.
Once you install perfectHOST, you can start this application from Start > All Programs > Cisco Systems > perfectHOST.
Creating perfectHOST Applications
Note ![]() The following procedure assumes that you have installed perfectHOST on your PC.
The following procedure assumes that you have installed perfectHOST on your PC.
To create a new perfectHOST application on your PC, perform the following steps:
Step 1 ![]() Choose Start > All Programs > Cisco Systems > perfectHOST.
Choose Start > All Programs > Cisco Systems > perfectHOST.
The perfectHOST homepage appears.
Step 2 ![]() Click Application Editor.
Click Application Editor.
The Select Application dialog box appears.
Step 3 ![]() Click New.
Click New.
The Prompter dialog box appears.
Step 4 ![]() In the Enter Job Name text box, enter the new job name, and click OK.
In the Enter Job Name text box, enter the new job name, and click OK.
The Please Confirm dialog box appears.
Step 5 ![]() Click Yes to create a new application.
Click Yes to create a new application.
Connecting to the Mediator with perfectHOST
To connect to the Mediator with perfectHOST, perform the following steps:
Step 1 ![]() Perform the tasks described in Creating perfectHOST Applications.
Perform the tasks described in Creating perfectHOST Applications.
Step 2 ![]() Choose System > Com Settings.
Choose System > Com Settings.
The Communication Settings dialog box appears. By default, the Direct radio button is selected.
Step 3 ![]() Select the Mediator/M2 radio button.
Select the Mediator/M2 radio button.
Step 4 ![]() In the IP text box, enter the hostname or the IP address of your Mediator, and click OK.
In the IP text box, enter the hostname or the IP address of your Mediator, and click OK.
Note ![]() All IP addresses are subject to change, based on the location where the Mediator is installed.
All IP addresses are subject to change, based on the location where the Mediator is installed.
Step 5 ![]() Choose File > Save Application.
Choose File > Save Application.
Step 6 ![]() Choose System > Communications and Administration.
Choose System > Communications and Administration.
The Perfect Host Communication dialog box appears.
Step 7 ![]() Click Get Broadway.xml File.
Click Get Broadway.xml File.
If prompted to accept, click Yes. You will see a flashing command prompt, while the file is downloaded. When the command prompt stops flashing, the download of the broadway.xml file is complete.
Templates and Macro Groups
This section includes the following topics:
•![]() Default Templates and Macro Groups
Default Templates and Macro Groups
•![]() Most Frequently Used Templates
Most Frequently Used Templates
Default Templates and Macro Groups
The perfectHOST programming tool provides you with predefined templates and macros, which are grouped based on their functionalities. Table 5-1 describes the types of templates and macros that are grouped together.
Most Frequently Used Templates
This section describes the function of the most frequently used templates.
This section includes the following topics:
•![]() add
add
•![]() and
and
•![]() _ao
_ao
•![]() div
div
•![]() _do
_do
•![]() _hoa
_hoa
•![]() not
not
•![]() or
or
•![]() sqrt
sqrt
•![]() sub
sub
absolute
This section includes the following topics:
Symbol
Figure 5-1 shows the absolute template.
Figure 5-1 absolute Template

Function
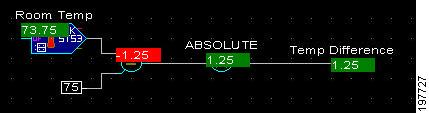
This template accepts a negative or positive number as an input value and converts it to a positive value.
Example
In the following example, the negative value of 125 passes through the absolute template and shows a positive value 125 (see Figure 5-2).
Figure 5-2 Example - absolute Template
add
This section includes the following topics:
Symbol
Figure 5-3 shows the add template.
Figure 5-3 add Template

Function
This template adds all the input values and displays the end output result.
Example
In the following example, the input numbers are added and the output values display the total sum of the input numbers (see Figure 5-4).
Figure 5-4 Example - add Template

alarm
This section includes the following topics:
Symbol
Figure 5-5 shows the alarm template.
Figure 5-5 alarm Template

Function
This template alerts you if there is a problem in your Mediator network. All the associated warnings are displayed on your PC, which monitors this system.
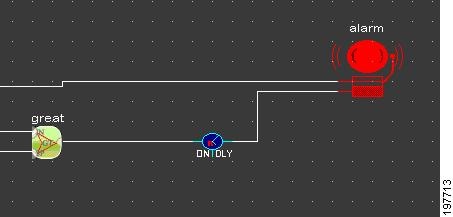
Example
The following example shows the template displaying an alarm, when it received an input value of one (see Figure 5-6).
Figure 5-6 Example - alarm Template
and
This section includes the following topics:
Symbol
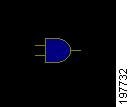
Figure 5-7 shows the and template.
Figure 5-7 and Template
Function
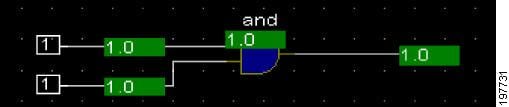
This template is one of the basic logic templates. The output value is one only if both the input values are one. If either of the input values is zero, the output value displays as zero.
Example
In the following example, the input values are one which results in the output value of one (see Figure 5-8).
Figure 5-8 Example - and Template
_ao
This section includes the following topics:
Symbol
Figure 5-9 shows the _ao template.
Figure 5-9 _ao Template

Function
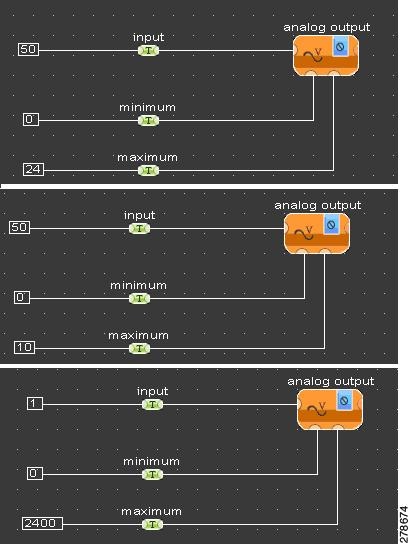
The _ao template generates scalable output. The input percentage is scaled between the minimum and maximum voltages, and converted to voltage produced at as analog output.
Example
In the following example, the input values are in a range of 0- 24 VDC, an input of 50% produces an output voltage of 12 V at the analogue output (see Figure 5-10).
Figure 5-10 Example- _ao Template
_ao_v
This section includes the following topics:
Symbol
Figure 5-11 shows the _ao_v template.
Figure 5-11 _ao_v Template
Function
This template converts an input value to an output voltage. This template can convert an input value to an output voltage of a maximum value of 24 VDC. If you connect a value of 100 to this template, it converts this value to an output voltage of 24 VDC.
Example
The following example shows how the template produces a voltage of 12 V at the analog output in which it is assigned (see Figure 5-12).
Figure 5-12 Example - _ao_v Template

db-cool
This section includes the following topics:
Symbol
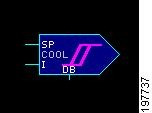
Figure 5-13 shows the db-cool template.
Figure 5-13 db-cool Template
Function
This template is used for the deadband control loop cooling. It produces an ON/OFF output in response to the input variable (normally the controlled space temperature) differing from the setpoint by more than the deadband range. The deadband is user-selectable.
Example
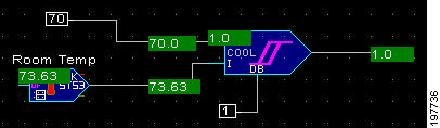
The following example shows a setpoint of 70 and a deadband of one, which in turn makes the deadband range from 69 to 71. The ouput value of the template does not go to zero until the input variable goes below 69, and does not go to one until the input variable goes above 71 (see Figure 5-14).
Figure 5-14 Example - db-cool Template
db-heat
This section includes the following topics:
Symbol
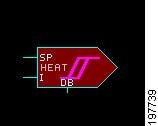
Figure 5-15 shows the db-heat template.
Figure 5-15 db-heat Template
Function
This template is used for deadband control loop heating. It produces an ON/OFF output in response to the input variable (normally the controlled space temperature) differing from the setpoint by more than the deadband range. The deadband is user-selectable.
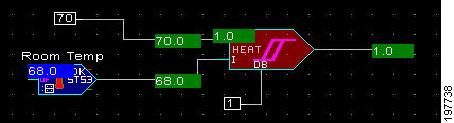
Example
The following example shows a setpoint of 70 and a deadband of one, which in turn takes the deadband range from 69 to 71. The output of the template does not reach zero until the input variable goes above 71, and does not reach one until the variable reaches a value below 69 (see Figure 5-16).
Figure 5-16 Example - db-heat Template
delayon
This section includes the following topics:
Symbol
Figure 5-17 shows the delayon template.
Figure 5-17 delayon Template

Function
The timing template changes an input value from zero to one. When the input value transitions from zero to one, the output value changes to one only after the delay time. When the input value transitions from one to zero, the output value changes to zero immediately.
Example
The following example shows how the delayon template retains the input value till the specified timeout (see Figure 5-18).
Figure 5-18 Example - delayon Template
delayoff
This section includes the following topics:
Symbol
Figure 5-19 shows the delayoff template.
Figure 5-19 delayoff Template

Function
The timing template changes an input value from one to zero. When the input value transitions from one to zero, the output value changes to zero only after the delay time. When the input value transitions to one, the output value changes to one immediately.
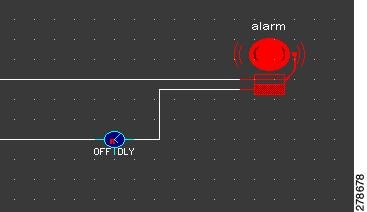
Example
The following example shows that the input value is overridden to a value of zero while the delayoff template displays a value of one until the specified delayoff period (see Figure 5-20).
Figure 5-20 Example - delayoff Template
_di_on
This section includes the following topics:
Symbol
Figure 5-21 shows the _di_on template.
Figure 5-21 _di_on Template

Function
A digital input (DI) senses whether a circuit is open or closed. A DI sources high voltages to one side of a set of contacts, and detects the presence of voltage on the other side of the contacts. Digital inputs are used to determine if equipment is working.
Example
The following example shows how a fan relay when connected to this template, displays an output value as zero when the relay contacts open (see Figure 5-22).
Figure 5-22 Example - _di_on Template

div
This section includes the following topics:
Symbol
Figure 5-23 shows the div template.
Figure 5-23 div Template

Function
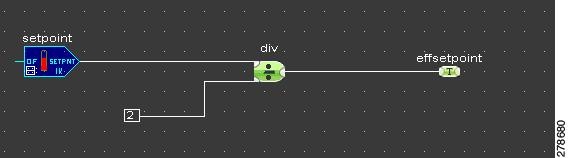
This template divides the upper input by the lower input and shows the resulting output value. The output result displays a maximum value of two decimal places.
Example
The following example shows how the room setpoint when divided by two, displays an output value that is the dividend of the input value (see Figure 5-24).
Figure 5-24 Example - div Template
dlystart
This section includes the following topics:
Symbol
Figure 5-25 shows the dlystart template.
Figure 5-25 dlystart Template

Function
This is a timing template. When an application is downloaded to a controller, or if the controller has just
been powered on, this template does not show an output value of one, until the specified delay period is over.
Example
In the following example, the dlystart template is used to delay equipment, such as a fan, for a specified period. This template acts as a timer and times out at one second over the specified period and an output value of one second (see Figure 5-26).
Figure 5-26 Example - dlystart Template

_do
This section includes the following topics:
Symbol
Figure 5-27 shows the _do template.
Figure 5-27 _do Template

Function
A digital output (DO) template closes an electrical circuit, typically with a set of contacts in a relay mounted on a controller. The closing of the circuit connects the power to a device, such as connecting power to a fan to start it.
Example
The following example shows how you can use this template to enable or disable equipment, such as a fan that is connected to a digital output template (see Figure 5-28).
Figure 5-28 Example - _do Template

edgedet
This section includes the following topics:
Symbol
Figure 5-29 shows the edgedet template.
Figure 5-29 edgedet Template

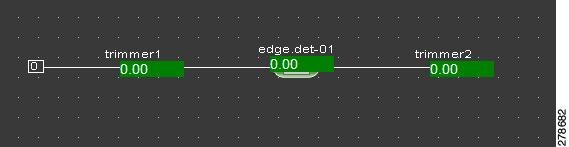
Function
This template is sued to freeze a value within your application until some other condition arises.
Example
In the following example, the output value is true for one second when the input value changes from zero to one or from one to zero (see Figure 5-30).
Figure 5-30 Example - edgedet Template
gtthan
This section includes the following topics:
Symbol
Figure 5-31 shows the gtthan template.
Figure 5-31 gtthan Template

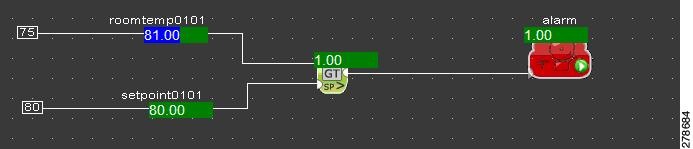
Function
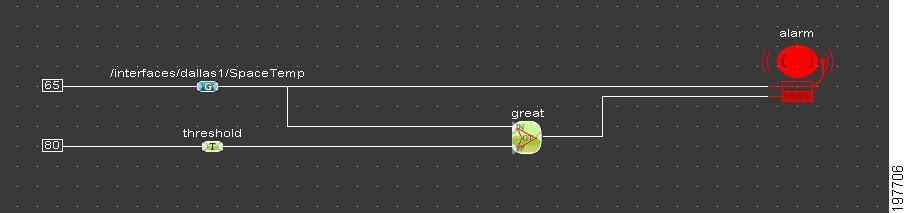
This is a maths template that is an abbreviation for greater than. This displays an output value of one if the upper input value is greater than the value on the lower input. If both the input values are equal, or if the value of the lower input is greater, then the output is zero.
Example
In the following example, the gtthan template compares the room temperature to a setpoint and triggers an alarm when the room temperature is greater than the setpoint (see Figure 5-32)
Figure 5-32 Example - gtthan Template
_hoa
This section includes the following topics:
Symbol
Figure 5-33 shows the _hoa template.
Figure 5-33 _hoa Template

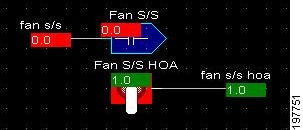
Function
This template displays an output number that corresponds to the position of the HOA switch. An HOA switch allows manual control over digital output. This three-position switch can manually override the relay on when in the hand position; manually override the relay off when in the off position; or it can allow the relay to be controlled by the application logic when it is in the auto position.
Example
In the following example, the _hoa template reports that the HOA switch on the board is in the auto position. The relay is not switched on because the logic does not call for it to be on (see Figure 5-34).
Figure 5-34 Example - _hoa Template
hours
This section includes the following topics:
Symbol
Figure 5-35 shows the hours template.
Figure 5-35 hours Template

Function
This is a time conversion template. The seconds value is the standard value, thus the necessity for inputs values to be in seconds.
Example
In the following example, the template shows the conversion from two hours to 7200 seconds. If you prefer to use hours, you can use the hours template to convert hours to seconds (see Figure 5-36).
Figure 5-36 Example - hours Template

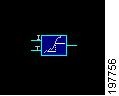
latch
This section includes the following topics:
Symbol
Figure 5-37 shows the latch template.
Figure 5-37 latch Template
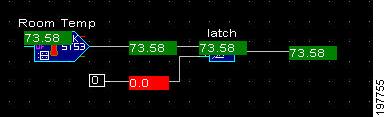
Function
This template latches the input values when the trigger goes from a low value to higher value.
Example
The following example shows the Room Temp value passing through the latch template. When the trigger value goes to a zero, the next value is not latched until the trigger turns true (see Figure 5-38).
Figure 5-38 Example - latch Template
latchmax
This section includes the following topics:
Symbol
Figure 5-39 shows the latchmax template.
Figure 5-39 latchmax Template

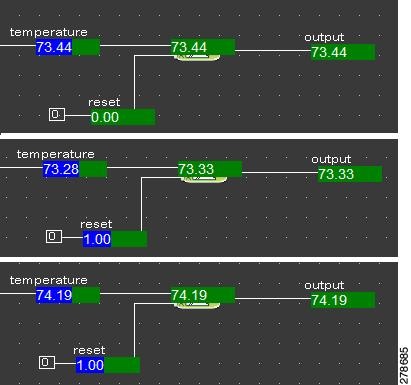
Function
This template continuously stores the maximum value in a given period of time until you reset the value.
Example
In the following example, the room temperature of 73.44°C passes through the latchmax templates. When the reset value is set at two, this template passes through the minimum value that was latched at the stipulated time. In this case, although the room temperature drops to 72.38°C, the trimmer value is 73.33°C (see Figure 5-40).
Figure 5-40 Example - latchmax Template
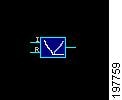
latchmin
This section includes the following topics:
Symbol
Figure 5-41 shows the latchmin template.
Figure 5-41 latchmin Template
Function
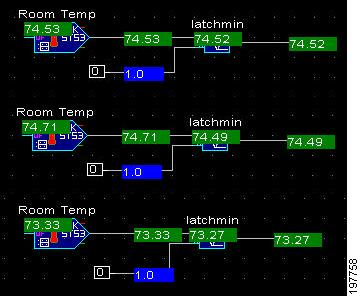
This template continuously stores the minimum value in a given period of time until you reset the value.
Example
The following example shows that the room temperate is at a minimum value. But when you reset the value, it sets the room temperature at the next minimum value (see Figure 5-42).
Figure 5-42 Example - latchmin Template
ltthan
This section includes the following topics:
Symbol
Figure 5-43 shows the ltthan template.
Figure 5-43 ltthan Template

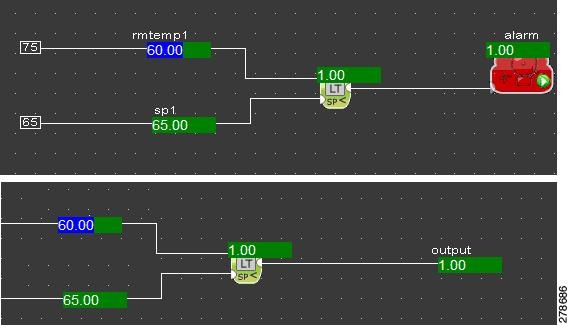
Function
This template produces an output value of one when the upper input value is less than the lower input value. The output value is zero when the upper input value is greater. If both the inputs values are equal, then the output value is one.
Example
The following example shows how this template compares the room temperature to a setpoint and sends out an alarm when the room temperature is less than the defined setpoint (see Figure 5-44).
Figure 5-44 Example - ltthan Template
minon
This section includes the following topics:
Symbol
Figure 5-45 shows the minon template.
Figure 5-45 minon Template

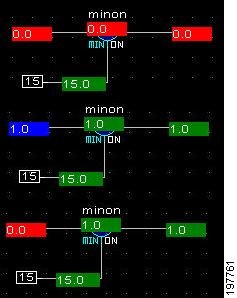
Function
This is a minimum runtime template. When the input goes off, the output does not go off unless it has been on for the minimum specified time. This prevents the short-cycling of devices.
Example
In the following example, when the input value transitions from zero to one, the output value is one only if the output value has been one for the minimum specified period (see Figure 5-46).
Figure 5-46 Example - minon Template
minutes
This section includes the following topics:
Symbol
Figure 5-47 shows the minutes template.
Figure 5-47 minutes Template

Function
This is a time conversion template where the second is a standard value.
Example
In the following example, the seconds are converted to minutes using this template (see Figure 5-48).
Figure 5-48 Example - minutes Template
multiply
This section includes the following topics:
Symbol
Figure 5-49 shows the multiply template.
Figure 5-49 multiply Template

Function
This template produces an output value that is the result of its upper input value multiplied by its lower input value.
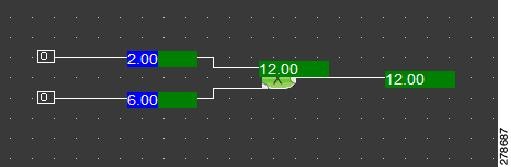
Example
The following example shows how two input values are multiplied to produce an output value of 12 (see Figure 5-50).
Figure 5-50 Example - multiply Template
not
This section includes the following topics:
Symbol
Figure 5-51 shows the not template.
Figure 5-51 not Template

Function
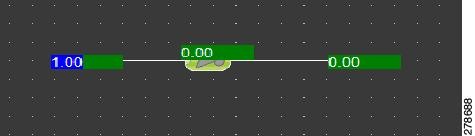
This template produces the logical inverse of the input. If this template receives an input of value one, then it produces an output value of zero. If it receives an input of value zero, then it produces an output value of one.
Example
The following example shows the input value of one flows through the not template and produces an output value of zero (see Figure 5-52).
Figure 5-52 Example - not Template
or
This section includes the following topics:
Symbol
Figure 5-53 shows the or template.
Figure 5-53 or Template

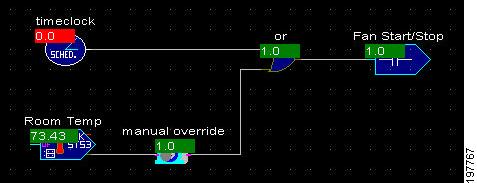
Function
The absolute template takes any negative or positive number as the input value and converts it to a positive value.
Example
The following example shows that the template makes a decision to switch the fan ON. This depends on whether the schedule is on or the override button has been pressed on the room temperature sensor (see Figure 5-54).
Figure 5-54 Example - or Template
override1hr
This section includes the following topics:
Symbol
Figure 5-55 shows the override1hr template.
Figure 5-55 override1hr Template

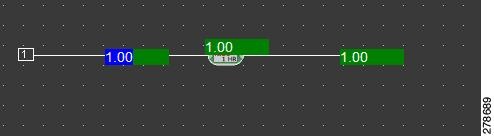
Function
When the input to the override1hr macro receives a value of one for two seconds, it produces an output of one for one hour. If the input receives a value of one for seven seconds, then it produces an output of zero.
Example
The following example shows how the input value of one is produced as an output value of one hour (see Figure 5-55).
Figure 5-56 Example - override1hr Template
_p593-3h20
This section includes the following topics:
Symbol
Figure 5-57 shows the _p593-3h20 template.
Figure 5-57 _p593-3h20 Template
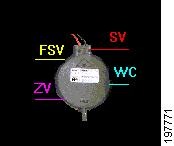
Function
This template measures the differential pressure within the Mediator system.
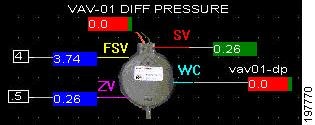
Example
In the following example, the _p593-3h20 template sources a power of 5 VDC from an analog output to power the airflow sensor. The template then reads the voltage from the sensor with an analog input, and produces the output (see Figure 5-58).
Figure 5-58 Example - _p593-3h20 Template
pid-cool
This section includes the following topics:
Symbol
Figure 5-59 shows the pid-cool template.
Figure 5-59 pid-cool Template

Function
This template produces a numeric output from 0-100% based on the setpoint, input variable, and pid parameters. If a pid parameter is not used or set equal to zero, then it is not used in the computation.
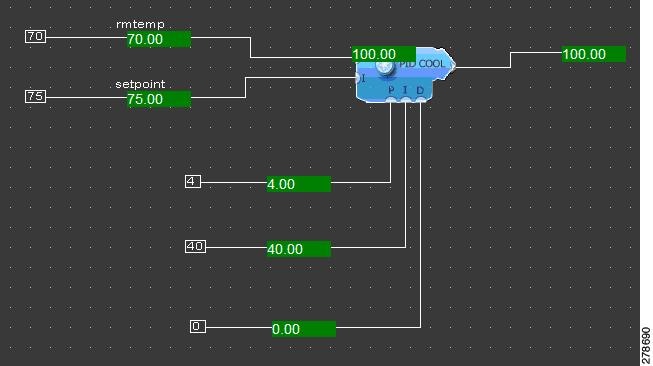
Example
The following example shows the room sensor value and the room sensor setpoint attached to a pid-cool template produce an output value in percentage (see Figure 5-60).
Figure 5-60 Example - pid-cool Template
pid-heat
This section includes the following topics:
Symbol
Figure 5-61 shows the pid-heat template.
Figure 5-61 pid-heat Template

Function
The percentage output value increases as the input value decreases below the setpoint. It produces a numerical output from 0-100% based on the setpoint, input variable, and pid parameters. If a pid parameter is not used or set equal to zero then it is not used in the computation.
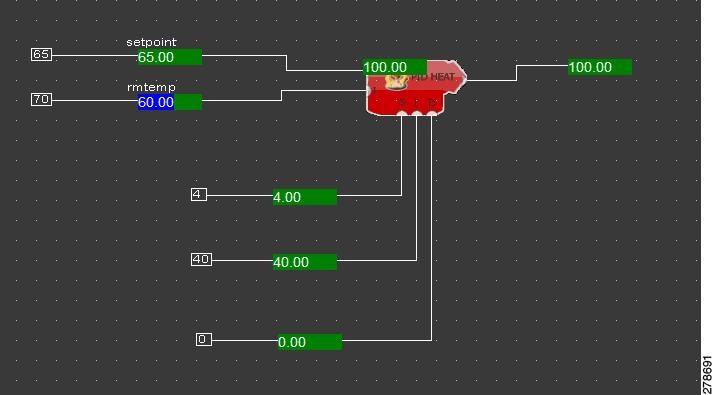
Example
The following example shows the room sensor value and the room sensor setpoint attached to a pid-heat template produce an output value in percentage (see Figure 5-62).
Figure 5-62 Example - pid-heat Template
reset
This section includes the following topics:
Symbol
Figure 5-63 shows the reset template.
Figure 5-63 reset Template
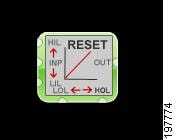
Function
This template is used to rest existing input and output values.
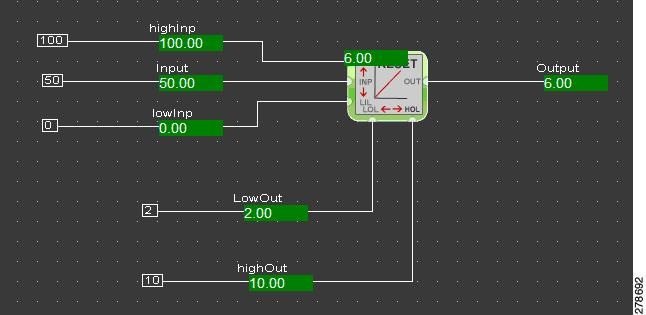
Example
In the following example, the input value of 50 is between the zero and 100 input values. This means that the output value is six. If the input value is zero, then the output value is two (see Figure 5-64).
Figure 5-64 Example - reset Template
select
This section includes the following topics:
Symbol
Figure 5-65 shows the select template.
Figure 5-65 select Template

Function
This template enables you to choose between two existing conditions.
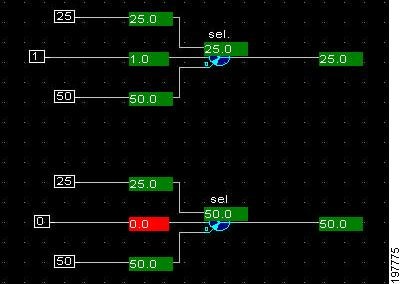
Example
The following example shows how the input value chooses an appropriate condition (see Figure 5-66).
Figure 5-66 Example - select Template
_setpnt10k
This section includes the following topics:
Symbol
Figure 5-67 shows the _setpnt10k template.
Figure 5-67 _setpnt10k Template
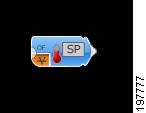
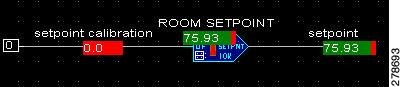
Function
This template converts the resistance in a 10-11 Kohm slidepot to a temperature between 55°F and 85°F.
Example
The following example shows how this template is applied to the application and assigned to a given universal analog point to control the setpoint of the temperature sensor, and to show the monitored value on the computer (see Figure 5-68).
Figure 5-68 Example - _setpnt10k Template
_st-s3
This section includes the following topics:
Symbol
Figure 5-69 shows the _st-s3 template.
Figure 5-69 _st-s3 Template

Function
This template controls a 10 Kohm type III thermistor temperature sensor.
_setpntspl
This section includes the following topics:
Symbol
Figure 5-70 shows the _setpntspl template.
Figure 5-70 _setpntspl Template
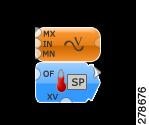
Function
This template is a combination of an analog output template and a 10-11 Kohm slidepot analog input.
_st-s3ao
This section includes the following topics:
Symbol
Figure 5-71 shows the _st-s3ao template.
Figure 5-71 _st-s3ao Template

Function
This template uses one output to source all the temperature sensors on the same controller. This frees up the other outputs to drive other devices, such as damper actuators.
setresest
This section includes the following topics:
Symbol
Figure 5-72 shows the setreset template.
Figure 5-72 setreset Template

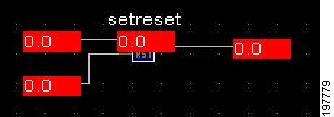
Function
This templates reset the input and output to a low value. The reset input values must be returned to low values to allow a set input of edge detect.
Example
The following example shows how the input and output values are reset to a low value (see Figure 5-73).
Figure 5-73 Example - setreset Template
sqrt
This section includes the following topics:
Symbol
Figure 5-74 shows the sqrt template.
Figure 5-74 sqrt Template

Function
This template takes the square root of the input values and produces an output value to a maximum of two decimal places.
Example
The following example shows that the sqrt template converts the input value of nine and produces an output value of three (see Figure 5-75).
Figure 5-75 Example - sqrt Template

sub
This section includes the following topics:
Symbol
Figure 5-76 shows the sub template.
Figure 5-76 sub Template

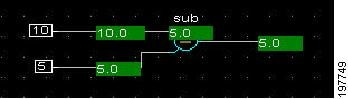
Function
In this template, the upper input values are subtracted by the lower input values to produce output values. If the upper input value is greater than the lower input value, then the output value is a negative number.
Example
The following example shows that the upper input value is subtracted by the lower input value to display an output value on the right side of the template (see Figure 5-77).
Figure 5-77 Example - sub Template
timeclok
This section includes the following topics:
Symbol
Figure 5-78 shows the timeclok template.
Figure 5-78 timeclok Template

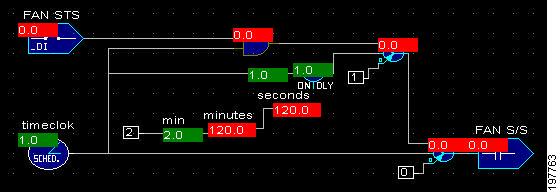
Function
This template enables you to perform all the scheduling for your programs.
Example
The following example shows how the template produces an output of one during the scheduled ON time and an output of zero during the scheduled OFF time (see Figure 5-79).
Figure 5-79 Example - timeclok Template

timepro2at
This section includes the following topics:
Symbol
Figure 5-80 shows the timepro2at template.
Figure 5-80 timepro2at Template
Function
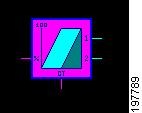
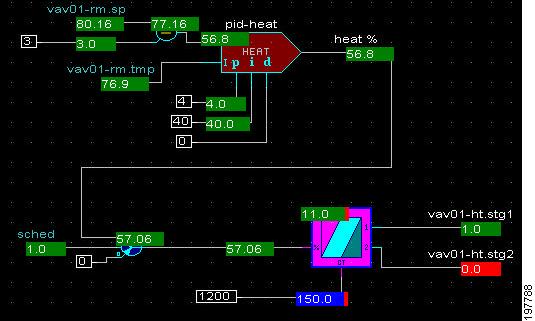
A valve can be adjusted to 100 or more different positions. This provides smooth, precise control. A two-stage electric heater can be in one of only three positions (both stages off, one stage on, two stages on). Cycling the stages of the heater to provide smooth, precise control can be achieved with the timepro2.at template. This template might also be used for the two stages of a compressor.
Example
The following example shows the two separate stages of the timepro2at template being controlled by a pid-heat template. As the pid outputs a percentage according to the room temperature and setpoint values, it inputs a percentage into the timepro2at template, which in turn decides which stage should be controlled. In this example, the input value is 57.06%, which only turns on Stage 1 (see Figure 5-81).
Figure 5-81 Example - timepro2at Template
trigger
This section includes the following topics:
Symbol
Figure 5-82 shows the trigger template.
Figure 5-82 trigger Template

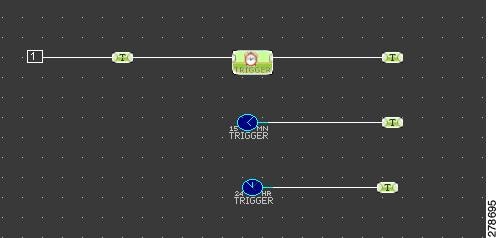
Function
The trigger templates produce an output value of one and zero on an even time period. The basic trigger has a seconds input that customizes the time period of its output. This trigger is on for half the time, and then off for half the time.
trimmer
This section includes the following topics:
Symbol
Figure 5-83 shows the trimmer template.
Figure 5-83 trimmer Template

Function
This template generates the input and output by itself. This enables you to override the points on your PC.
Example
In the following example, the input value of the trimmer is passed on to the trimmer output value, thus the number 1999 is attached to the input of the trimmer, an output of 1999 is produced at the output of the trimmer, and sent as an input to trimmer 2 (see Figure 5-84).
Figure 5-84 Example - trimmer Template
Adding Templates
This section describes how to add templates in perfectHOST and includes the folowing topics:
MPX_GET Template
To add MPX_GET as a template in perfectHOST, perform the following steps:
Step 1 ![]() Perform the tasks described in Creating perfectHOST Applications and Connecting to the Mediator with perfectHOST.
Perform the tasks described in Creating perfectHOST Applications and Connecting to the Mediator with perfectHOST.
Step 2 ![]() Choose Add > Node > MPX_GET.
Choose Add > Node > MPX_GET.
Note ![]() MPX_GET(s) and MPX_SET(s) enable you to view and override nodes in the Mediator Framework with perfectHOST.
MPX_GET(s) and MPX_SET(s) enable you to view and override nodes in the Mediator Framework with perfectHOST.
The Open Broadway Xml File dialog box appears.
Step 3 ![]() Click OK.
Click OK.
By default, perfectHOST will search the application directory for the broadway.xml file.
Step 4 ![]() In the Add Mediator Node Reference dialog box, double-click the parent node to view the options.
In the Add Mediator Node Reference dialog box, double-click the parent node to view the options.
Choose the child node from the list.
Step 5 ![]() Select the Direction by selecting the appropriate radio button. You can select the Get FROM Mediator Node or Set To Mediator Node radio button.
Select the Direction by selecting the appropriate radio button. You can select the Get FROM Mediator Node or Set To Mediator Node radio button.
Step 6 ![]() Click to select the desired child node, and then click OK.
Click to select the desired child node, and then click OK.
The Add Mediator Node Reference dialog box closes, and a template representing the node appears in the window.
The template is attached to the cursor.
Step 7 ![]() Move the template to the desired position, and click to place the template on the canvas.
Move the template to the desired position, and click to place the template on the canvas.
The Add Mediator Node Reference dialog box appears again.
Step 8 ![]() Click Cancel.
Click Cancel.
MPX_SET Template
To add MPX_SET as a template in perfectHOST, perform the following steps:
Step 1 ![]() Perform the tasks described in Creating perfectHOST Applications and Connecting to the Mediator with perfectHOST.
Perform the tasks described in Creating perfectHOST Applications and Connecting to the Mediator with perfectHOST.
Step 2 ![]() Choose Add > Node > MPX_SET.
Choose Add > Node > MPX_SET.
Step 3 ![]() In the Add Mediator Node Reference dialog box, double-click the parent node to view the options.
In the Add Mediator Node Reference dialog box, double-click the parent node to view the options.
To select the child node from the list, drag the scroll bar.
Step 4 ![]() Click relay1, and click OK.
Click relay1, and click OK.
The Add Mediator Node Reference dialog box closes, and a template representing the node appears in the window.
The template is attached to the cursor.
Step 5 ![]() Move the template to the desired position, and click to place the template on the canvas.
Move the template to the desired position, and click to place the template on the canvas.
The Add Mediator Node Reference dialog box appears again.
Step 6 ![]() Click Cancel.
Click Cancel.
Trimmer Template
To add Trimmer as a template in perfectHOST, perform the following steps:
Step 1 ![]() Perform the tasks described in Creating perfectHOST Applications and Connecting to the Mediator with perfectHOST.
Perform the tasks described in Creating perfectHOST Applications and Connecting to the Mediator with perfectHOST.
Step 2 ![]() Choose Add > Template.
Choose Add > Template.
The select template dialog box displays eight template folders.
Step 3 ![]() Choose a folder to view the list of available templates. To do so, double-click the desired folder. For example, 1_io >.
Choose a folder to view the list of available templates. To do so, double-click the desired folder. For example, 1_io >.
The list of templates available in the folder appears.
Note ![]() You can enter the first few letters of the desired template in the selection template, to view the list of templates.
You can enter the first few letters of the desired template in the selection template, to view the list of templates.
Step 4 ![]() Click the desired template, and then click OK.
Click the desired template, and then click OK.
Note ![]() A description of the template functionality appears in the drop-down list at the bottom of the dialog box.
A description of the template functionality appears in the drop-down list at the bottom of the dialog box.
The select template dialog box closes, with the template attached to the cursor.
Step 5 ![]() Move the template to the desired position, and click the template to place it on the canvas.
Move the template to the desired position, and click the template to place it on the canvas.
The Prompter dialog box appears.
Step 6 ![]() In the template name text box, enter the name of the template, and click OK.
In the template name text box, enter the name of the template, and click OK.
The select template dialog box appears, prompting you to add another template.
Step 7 ![]() To add a trimmer as your template, enter trimmer in the selection text box, and then click OK.
To add a trimmer as your template, enter trimmer in the selection text box, and then click OK.
Note ![]() As you enter the word trimmer, the letters appear in the selection text box. Use the Backspace key to delete a letter. The list of options disappears when you enter the name of the template.
As you enter the word trimmer, the letters appear in the selection text box. Use the Backspace key to delete a letter. The list of options disappears when you enter the name of the template.
Step 8 ![]() Move the trimmer to the desired position by clicking the trimmer to place it on the canvas.
Move the trimmer to the desired position by clicking the trimmer to place it on the canvas.
The prompter dialog box appears.
Step 9 ![]() In the Template Name text box, enter a name, and click OK.
In the Template Name text box, enter a name, and click OK.
The select template dialog box appears, prompting you to add another template.
Step 10 ![]() Click Cancel.
Click Cancel.
Number Template
To add Number as a template in perfectHOST, perform the following steps:
Step 1 ![]() Perform the tasks described in Creating perfectHOST Applications and Connecting to the Mediator with perfectHOST.
Perform the tasks described in Creating perfectHOST Applications and Connecting to the Mediator with perfectHOST.
Step 2 ![]() Choose Add > Number.
Choose Add > Number.
The Prompter dialog box appears.
Step 3 ![]() In the enter constant text box, enter the desired value, and then click OK.
In the enter constant text box, enter the desired value, and then click OK.
For example, when you enter 65, a number template containing the number 65 appears in the text box.
Step 4 ![]() Move the number template to the desired position, and click the number template to place it on the canvas.
Move the number template to the desired position, and click the number template to place it on the canvas.
The prompter dialog box appears.
Step 5 ![]() In the Template Name text box, enter a name, and click OK.
In the Template Name text box, enter a name, and click OK.
The select template dialog box appears, prompting you to add another template.
Step 6 ![]() Click Cancel.
Click Cancel.
Alarm Template
To add Alarm as a template in perfectHOST, perform the following steps:
Step 1 ![]() Perform the steps described in Creating perfectHOST Applications and Connecting to the Mediator with perfectHOST.
Perform the steps described in Creating perfectHOST Applications and Connecting to the Mediator with perfectHOST.
Step 2 ![]() Choose Add > Template.
Choose Add > Template.
Step 3 ![]() Create an Alarm using the alarm.1 template.
Create an Alarm using the alarm.1 template.
Step 4 ![]() Move the alarm template to the desired position, and click the alarm template to place it on the canvas.
Move the alarm template to the desired position, and click the alarm template to place it on the canvas.
The prompter dialog box appears.
Step 5 ![]() In the Template Name text box, enter a name, and click OK.
In the Template Name text box, enter a name, and click OK.
The select template dialog box appears, prompting you to add another template.
Click Cancel.
Schedule Template
To add schedules as a perfectHOST template, perform the following steps:
Step 1 ![]() Perform the steps described in Creating perfectHOST Applications and Connecting to the Mediator with perfectHOST
Perform the steps described in Creating perfectHOST Applications and Connecting to the Mediator with perfectHOST
Step 2 ![]() Choose Add > Template.
Choose Add > Template.
Step 3 ![]() Create a schedule using the timeclok template.
Create a schedule using the timeclok template.
Step 4 ![]() Move the timeclok template to the desired position, and click the timeclok template to place it on the canvas.
Move the timeclok template to the desired position, and click the timeclok template to place it on the canvas.
The prompter dialog box appears.
Step 5 ![]() In the Template Name text box, enter a name, and click OK.
In the Template Name text box, enter a name, and click OK.
The select template dialog box appears, prompting you to add another template.
Step 6 ![]() Click Cancel.
Click Cancel.
Connecting Templates
This section describes how to connect templates and numbers in the perfectHOST application.
Use the following guidelines to draw connection lines in the perfectHOST application:
•![]() You must draw lines in vertical and horizontal line segments.
You must draw lines in vertical and horizontal line segments.
•![]() You must draw connection lines right to left, from inputs to outputs.
You must draw connection lines right to left, from inputs to outputs.
•![]() Connection points are located on the left and right sides of templates, commonly at peaks or at radius.
Connection points are located on the left and right sides of templates, commonly at peaks or at radius.
Note ![]() If you click within five pixels of a connection point, the line automatically finds the connection point and attaches to it.
If you click within five pixels of a connection point, the line automatically finds the connection point and attaches to it.
To connect templates in perfectHOST, perform the following steps:
Step 1 ![]() Choose Add > Connect.
Choose Add > Connect.
You are now in Connect mode. You will see a checkmark by the Connect selection in the Add menu indicating this. You can now connect the created templates (see Adding Templates).
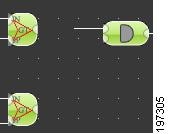
Step 2 ![]() Connect the templates by dragging the input nib of the first template to the output nib of the second template. (See Figure 5-85.)
Connect the templates by dragging the input nib of the first template to the output nib of the second template. (See Figure 5-85.)
Figure 5-85 Dragging the Input Nib
Step 3 ![]() To change the line direction, drag the cursor in a new direction.
To change the line direction, drag the cursor in a new direction.
If the templates are successfully connected, this is indicated by a tone. (See Figure 5-86.)
Figure 5-86 Connected Templates

Saving and Compiling a perfectHOST Application
To save and compile a perfectHOST application, perform the following steps:
Step 1 ![]() Perform the tasks described in Creating perfectHOST Applications and Connecting Templates.
Perform the tasks described in Creating perfectHOST Applications and Connecting Templates.
Step 2 ![]() Choose File > Save Application.
Choose File > Save Application.
The Prompter dialog box appears.
Step 3 ![]() In the save new drawing- enter name text box, enter the new drawing name, and click OK.
In the save new drawing- enter name text box, enter the new drawing name, and click OK.
Step 4 ![]() Choose System > Compile and Build Application.
Choose System > Compile and Build Application.
The Build Options dialog box appears.
Step 5 ![]() In the Mediator area, unselect all the check boxes to deactivate the options, and click OK.
In the Mediator area, unselect all the check boxes to deactivate the options, and click OK.
If errors are found in the compile process, the COMPILE ERROR dialog box appears with error details.
Step 6 ![]() Click OK.
Click OK.
Step 7 ![]() To fix errors, click Cancel in the Build Options dialog box and repeat Step 4.
To fix errors, click Cancel in the Build Options dialog box and repeat Step 4.
Creating HTML Monitor Drawings
HTML monitor drawings are graphical representations of the system configured on the Mediator. After you finish creating a monitor drawing, you can publish it to the Mediator in HTML format, so that you can access it using a web browser.
To create HTML monitor drawings in perfectHOST, perform the following steps:
Step 1 ![]() Perform the tasks described in the procedure in Creating perfectHOST Applications through Saving and Compiling a perfectHOST Application.
Perform the tasks described in the procedure in Creating perfectHOST Applications through Saving and Compiling a perfectHOST Application.
Step 2 ![]() Choose Drawing > Make Monitor Drawings.
Choose Drawing > Make Monitor Drawings.
The Select Drawings dialog box appears.
Step 3 ![]() From the drawings list, choose the drawing you want to export, and click OK.
From the drawings list, choose the drawing you want to export, and click OK.
Step 4 ![]() Choose Drawing > Export HTML Drawings for Mediator.
Choose Drawing > Export HTML Drawings for Mediator.
The selected HTML drawings are exported to the Mediator.
Downloading the perfectHOST Application and HTML Drawing to the Mediator
To download the perfectHOST application and HTML drawing to the Mediator, perform the following steps:
Step 1 ![]() Perform the procedures described in Creating perfectHOST Applications through Creating HTML Monitor Drawings.
Perform the procedures described in Creating perfectHOST Applications through Creating HTML Monitor Drawings.
Step 2 ![]() Choose System > Communication and Administration.
Choose System > Communication and Administration.
Step 3 ![]() To download the perfectHOST application, select the Send Application to System check box.
To download the perfectHOST application, select the Send Application to System check box.
Step 4 ![]() Click Perform Selected Commands, and click Done.
Click Perform Selected Commands, and click Done.
The perfectHOST application downloads.
Step 5 ![]() To download the HTML drawing to the Mediator, select the Send HTML to Mediator check box.
To download the HTML drawing to the Mediator, select the Send HTML to Mediator check box.
Step 6 ![]() Click Perform Selected Commands, and click Done.
Click Perform Selected Commands, and click Done.
The choose images and pages to send to mediator dialog box appears.
Step 7 ![]() Click the desired images and .htm pages to send to the Mediator, and then click OK.
Click the desired images and .htm pages to send to the Mediator, and then click OK.
Step 8 ![]() When the Done button appears in the dialog box, click Done.
When the Done button appears in the dialog box, click Done.
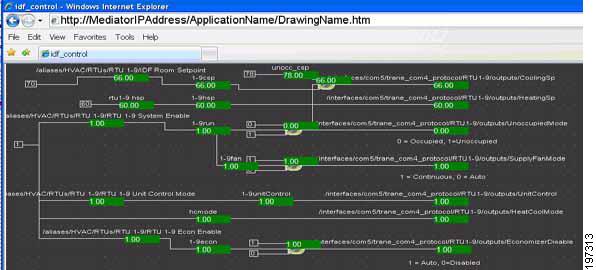
Viewing perfectHOST HTML Drawings on the Mediator
All perfectHOST HTML drawings sent to the Mediator are stored in a new directory with the same name as the application.
For example, /application name/drawing name.htm
To view the drawing, open a web browser and enter the following URL:
http://<MediatorIPAddress>/<ApplicationName>/<DrawingName>.htm
The drawing appears in the web browser as shown in Figure 5-87.
Figure 5-87 idf_control -Windows Internet Explorer
Uninstalling perfectHOST
To uninstall the Mediator perfectHOST application, perform the following steps:
Step 1 ![]() Close all running instances of perfectHOST.
Close all running instances of perfectHOST.
Step 2 ![]() Choose Start > All Programs > Cisco Systems > Uninstall perfectHOST to run the uninstall script.
Choose Start > All Programs > Cisco Systems > Uninstall perfectHOST to run the uninstall script.
Step 3 ![]() When you are prompted with the following message, type Y.
When you are prompted with the following message, type Y.
You are presented with the following message:
Are you sure you want to Uninstall?
Press Y to uninstall, or N to exit.
 Feedback