Integrate Microsoft Endpoint Manager Intune

Introduction to Integrating Microsoft Intune with Cisco ISE

Cisco ISE supports Microsoft Intune, an endpoint management solution, as an MDM integration. Communications between the two systems are governed by Microsoft's NAC integration designs as detailed in Network access control (NAC) integration with Intune.

From 2024-03-24, Microsoft no longer supports the Intune NAC service API for MAC address and UDID-based queries. Only the Microsoft Compliance Retrieval API (NAC 2.0 API) is supported, allowing both GUID and MAC address-based queries, starting 2023-07-31.

After 2024-03-24, you must upgrade to one of the following Cisco ISE releases to continue using your Microsoft Intune integrations:

  • Cisco ISE release 3.1 patch 8

  • Cisco ISE release 3.2 patch 4

The earlier patches of these releases cannot retrieve device registration and compliance information from connected Microsoft Intune servers from March 24, 2024.

With Microsoft's NAC 2.0 API, Cisco ISE can only retrieve these endpoint attribute information:

  • Compliance status

  • Managed by Intune

  • MAC address

  • Registered status

Configure Microsoft Endpoint Manager Intune

These steps list the configurations to carry out in Microsoft Endpoint Manager Intune. Choose the steps that your organization needs. If you use Cisco ISE release 3.1 or a later release, you can enable Cisco ISE MDM API v3 support to receive GUID from Microsoft Intune. To enable this support, configure the subject alternative name (SAN) in your certificate profiles. Configuring the SAN allows Cisco ISE to receive a unique GUID for an endpoint from the Intune server. This helps address issues caused by random and changing MAC addresses.

If your organization does not use the standard commercial Microsoft Azure environment, see the Microsoft National Cloud Deployments document for a list of Graph API endpoints for national clouds operated by Microsoft.

Procedure


Step 1

Configure certificates for endpoint authentication in Microsoft Intune.

Step 2

Configure either SCEP or PKI certificate management protocols and the appropriate certificate profiles, according to your organizational needs:

For Simple Certificate Enrollment Protocol (SCEP):

  1. Configure infrastructure to support SCEP with Microsoft Intune.

  2. Create and assign SCEP certificate profiles in Microsoft Intune.

For Private and public key infrastructure (PKI):

  1. Configure and use PKCS certificates with Microsoft Intune.

  2. Create a PKCS certificate profile.

Note


When you configure an SCEP or a PKI profile, in the Subject Alternative Name area, choose URI as the Attribute, and ID:Microsoft Endpoint Manager:GUID:{{DeviceId}} as the Value.

Step 3

For Wi-Fi and wired endpoints, create a profile and choose the SCEP or PKI certificate profile you configured earlier to include the GUID value in the Subject Alternative Name field.

For more details on configuring Wi-Fi settings in Microsoft Intune, see Add and use Wi-Fi settings on your devices in Microsoft Intune.

If you create VPN profiles to connect to VPN servers in Intune, you must choose the certificate-based authentication type to share the GUID value with Cisco ISE.


Manage VPN-Connected Mobile Devices with Microsoft Intune

To manage VPN-connected mobile devices, these configurations are required in Microsoft Intune.

  • Configure VPN-Connected Android Device Settings in Microsoft Intune

    1. Configure settings for VPN-connected Android endpoints according to the requirements detailed in Android enterprise device settings to configure VPN in Intune.

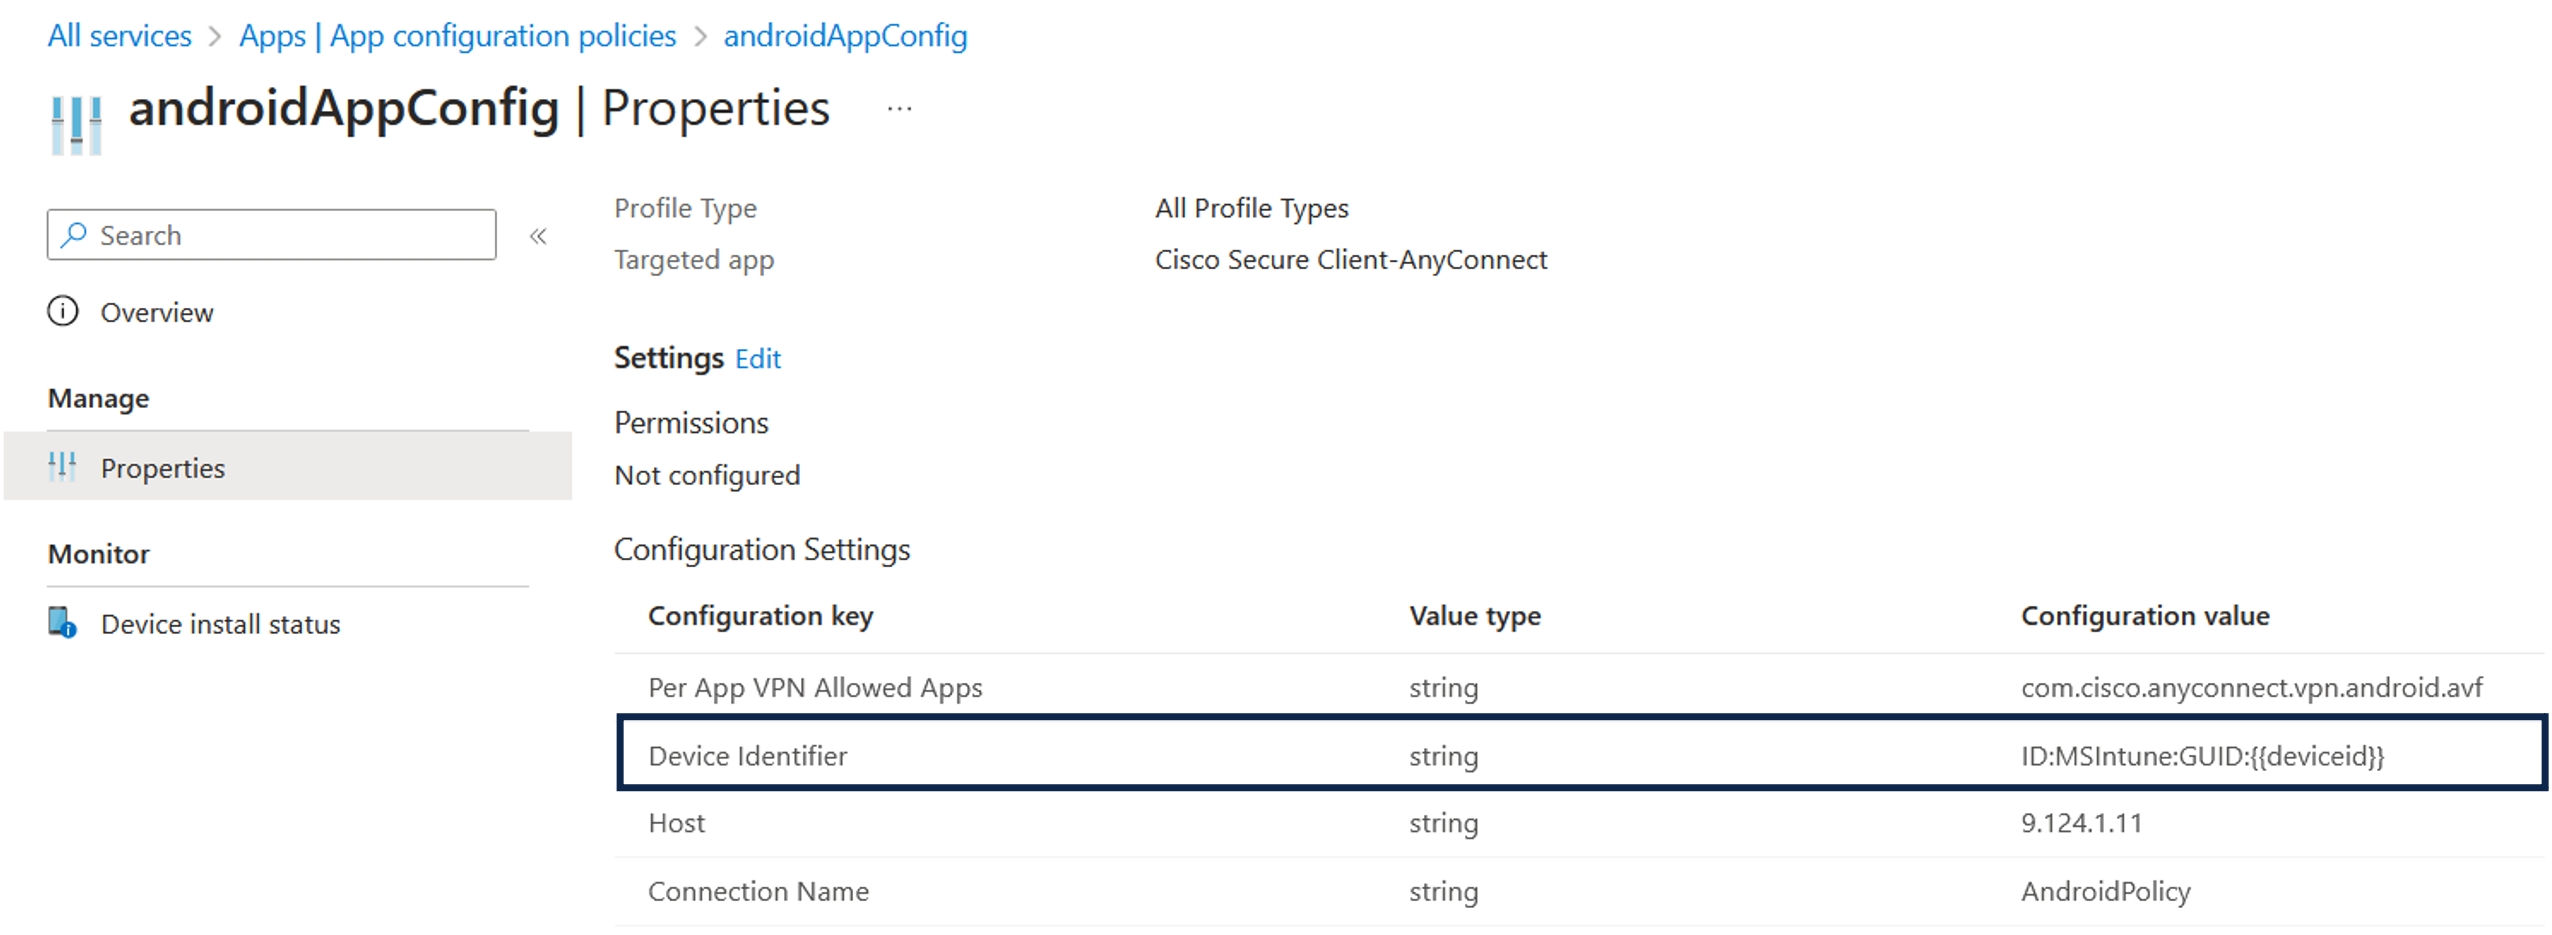
    2. Create an app configuration policy in Microsoft Intune for endpoints that use the Cisco Secure Client-AnyConnect app. Include the Device Identifier configuration key in the Configuration Settings for this policy.

      Figure 1. App Configuration Policy Settings in Microsoft Intune
  • Configure VPN-Connected iOS Device Settings in Microsoft Intune

    For VPN-connected iOS devices, you can find the required VPN settings for Microsoft Intune in Add VPN settings on iOS and iPad OS devices in Microsoft Intune.

    Note that when you create a VPN profile for iOS or iPadOS devices, you must choose the Enable network access control (NAC) setting to allow Microsoft Intune to include a device ID for the endpoint.

After you complete the configurations, Cisco AnyConnect logs the device identifier in the format ID:Intune:DeviceID:<device id>. Cisco ISE APIs retrieve this device ID for the endpoint. The system uses the device ID instead of the endpoint’s MAC address to check compliance.

Connect Microsoft Intune to Cisco ISE as a Mobile Device Management Server

Microsoft Intune retired support for Azure AD Graph Applications on June 30, 2023. You must migrate any integrations that use Azure AD Graph to Microsoft Graph. Cisco ISE typically uses the Azure AD Graph for integration with the endpoint management solution Microsoft Intune.

Before you begin

You must upgrade to one of these Cisco ISE releases that support Microsoft Graph applications for successful integration with Microsoft Intune:

  • Cisco ISE release 3.1 patch 3 and later releases

  • Cisco ISE release 3.2 and later releases

For more information on the migration from Azure AD Graph to Microsoft Graph, see the following resources:

After you update Cisco ISE to one of the supported versions, in each Microsoft Intune server integration in Cisco ISE, manually update the Auto Discovery URL.

Replace https://graph.windows.net<Directory (tenant) ID> with https://graph.microsoft.com.

Procedure


Step 1

Log in to the Microsoft Azure portal, and navigate to Azure Active Directory.

Step 2

Choose Manage > App registrations.

Step 3

Click New registration.

Step 4

In the Register an application window that is displayed, enter a value in the Name field.

Step 5

In the Supported Account Types area, click the Accounts in this organizational directory only radio button.

Step 6

Click Register.

The Overview window of the newly registered application is displayed. With this window open, log in to the Cisco ISE administration portal.

Step 7

For each of the four certificates that you have downloaded, carry out the following steps:

  1. Click Import.

  2. Click Choose File and choose the corresponding downloaded certificate from your system.

  3. Allow the certificate to be trusted for use by Infrastructure and Cisco Services. In the Usage area, check the Trust for authentication within ISE and Trust for authentication of Cisco Services check boxes.

  4. Click Save.


Export Cisco ISE Certificate

Procedure


Step 1

In the Cisco ISE GUI, click the Menu icon () and choose Administration > System > Certificates > System > Certificates.

Step 2

From the list of certificates, check the check box next to the Default self-signed server certificate, or next to any other certificate you have configured for Admin usage, and click Export.

Step 3

In the dialog box displayed, click the Export Certificate Only radio button, then click Export.

Step 4

Click View to see the details of this certificate. Scroll down the displayed Certificate Hierarchy dialog box to the Fingerprints area and note the values.


Upload Cisco ISE certificate to Azure

Procedure


Step 1

In the Microsoft Azure Active Directory portal, click Certificates and Secrets in the left pane.

Step 2

Click Upload certificate and upload the exported Cisco ISE certificate.

Note


If there is any change in the status of the Cisco ISE self-signed certificate, you must perform Disable and enable the MDM server status after uploading the certificate in Intune procedure on the Cisco ISE side.

Step 3

After the certificate is uploaded, verify that the Thumbprint value that is displayed in the window matches the Fingerprint value in the Cisco ISE certificate.

Step 4

Navigate to Manifest on the left pane.

Confirm that the displayName value matches the common name in the Cisco ISE certificate.


Set API Permissions and Collect Application Details

Procedure


Step 1

In the Azure portal, click API permissions.

Step 2

Click Add a permission and add these permissions.

API / Permission Name

Type

Description

Intune

get_device_compliance

Application

Obtain device state and compliance information from Microsoft Intune.

Microsoft Graph

Application.Read.All

Application

Read all applications.

Step 3

Click Grant admin consent for <tenant name>.

Note the Application (client) ID and the Directory (tenant) ID from the Overview window of the application.

Step 4

Click Endpoints in the Overview window. Note the value in the Oauth 2.0 token endpoint (V2) field.


Download and import Microsoft Intune certificates into Cisco ISE

Procedure


Step 1

Download the Microsoft Intune certificates from DigiCert Root Certificates in the PEM certificate (chain) format.

If you see the error “Connection Failed to the MDM server: There is a problem with the server Certificates or Cisco ISE trust store,”. This message indicates that the Cisco ISE does not trust the Microsoft Intune certificates. To resolve this issue, capture network traffic on the Cisco ISE Primary Administration Node (PAN) to identify the certificates used by Microsoft. Download the certificates from the Microsoft PKI repository and import them into Cisco ISE’s Trusted Certificates store. After you update, disable the MDM server status in Cisco ISE and then re-enable it to refresh the connection and restore trust.

Note


To ensure a successful connection between Microsoft Intune and Cisco ISE, you might need to import new root certificates. For more information, see Intune certificate updates: Action may be required for continued connectivity.

Step 2

In the Cisco ISE administration portal, click the Menu icon () and choose Administration > System > Certificates > Trusted Certificates.

Step 3

For each downloaded certificate:

  1. Click Import.

  2. Click Choose File and choose the corresponding downloaded certificate from your system.

  3. In the Usage area, check the Trust for authentication within Cisco ISE and Trust for authentication of Cisco Services check boxes.

  4. Click Save.


Add Intune as an External MDM Server

Procedure


Step 1

In the Cisco ISE administration portal, click the Menu icon () and choose Administration > Network Resources > External MDM.

Step 2

Click Add and enter a value in the Name field.

Step 3

From the Authentication Type drop-down list, choose OAuth – Client Credentials.

Step 4

Enter these details in the respective fields:

  • Auto Discovery URL: https://graph.microsoft.com.

    Note


    The URL https://graph.windows.net<Directory(tenant) ID> was used when Microsoft Intune supported Azure AD Graph Applications. However, Microsoft Intune retired support for Azure AD Graph Applications on 2023-06-30. Upgrade to a Cisco ISE release that supports Microsoft Graph for successful integration.

    These are the Cisco ISE releases that support Microsoft Graph applications:

    • Cisco ISE release 3.1 patch 3 and later

    • Cisco ISE release 3.2 and later releases

  • Client ID: Enter the Application (client) ID value from the Microsoft Intune application.

  • Token Issuing URL: Enter the Oauth 2.0 Token Endpoint (V2) value.

  • Token Audience: Enter https://api.manage.microsoft.com//.default if you use these releases of Cisco ISE:

    • Cisco ISE release 3.1 patch 8 and later releases

    • Cisco ISE release 3.2 patch 3 and later releases, and

    • Cisco ISE release 3.3 and later releases

    Note


    In the listed Cisco ISE releases, when you create a new integration, the new token audience value is automatically filled when you choose OAuth–Client Credentials. If you upgrade to these releases with existing integrations, you must update the token audience field manually to continue receiving updates from the integrated servers.

    This is because Microsoft mandates that applications that use the Azure Active Directory Authentication Library (ADAL) for authentication and authorization must migrate to the Microsoft Authentication Library (MSAL). For more information, see Migrate applications to the Microsoft Authentication Library (MSAL).

    For other releases of Cisco ISE, enter https://api.manage.microsoft.com/.

Step 5

Enter the required values for the Polling Interval and Time Interval For Compliance Device ReAuth Query fields.

Step 6

Click Test Connection to ensure that Cisco ISE can connect to the Microsoft server.

Step 7

When the connection test is successful, choose Enabled from the Status drop-down list and click Save.


In the Cisco ISE administration portal, click the Menu icon () and choose Administration > Network Resources > External MDM. The Microsoft Intune server that is added must be displayed in the list of MDM Servers displayed.

Disable and enable the MDM server status after uploading the certificate in Intune

If you upload a new certificate to Microsoft Intune, disable the MDM server status. After that, enable the MDM server status.

Procedure


Step 1

Click the Menu icon() and choose Administration > Network Resources > External MDM.

Step 2

Click Edit.

Step 3

Click Test Connection to ensure that Cisco ISE can connect to the Microsoft server.

Step 4

When the connection test succeeds, choose Disabled from the Status drop-down list and click Save.

Step 5

Click Edit, then click Test Connection .

Step 6

When the connection test succeeds, choose Enabled from the Status drop-down list and click Save.