- Title Page
- Introduction & Preface
- Logging into the FireSIGHT System
- Using Objects and Security Zones
- Managing Devices
- Setting Up an IPS Device
- Setting Up Virtual Switches
- Setting Up Virtual Routers
- Setting Up Aggregate Interfaces
- Setting Up Hybrid Interfaces
- Using Gateway VPNs
- Using NAT Policies
- Getting Started with Access Control Policies
- Blacklisting Using Security Intelligence IP Address Reputation
- Tuning Traffic Flow Using Access Control Rules
- Controlling Traffic with Network-Based Rules
- Controlling Traffic with Reputation-Based Rules
- Controlling Traffic Based on Users
- Controlling Traffic Using Intrusion and File Policies
- Understanding Traffic Decryption
- Getting Started with SSL Policies
- Getting Started with SSL Rules
- Tuning Traffic Decryption Using SSL Rules
- Understanding Intrusion and Network Analysis Policies
- Using Layers in Intrusion and Network Analysis Policies
- Customizing Traffic Preprocessing
- Getting Started with Network Analysis Policies
- Using Application Layer Preprocessors
- Configuring SCADA Preprocessing
- Configuring Transport & Network Layer Preprocessing
- Tuning Preprocessing in Passive Deployments
- Getting Started with Intrusion Policies
- Tuning Intrusion Rules
- Tailoring Intrusion Protection to Your Network Assets
- Detecting Specific Threats
- Limiting Intrusion Event Logging
- Understanding and Writing Intrusion Rules
- Blocking Malware and Prohibited Files
- Logging Connections in Network Traffic
- Working with Connection & Security Intelligence Data
- Analyzing Malware and File Activity
- Working with Intrusion Events
- Handling Incidents
- Configuring External Alerting
- Configuring External Alerting for Intrusion Rules
- Introduction to Network Discovery
- Enhancing Network Discovery
- Configuring Active Scanning
- Using the Network Map
- Using Host Profiles
- Working with Discovery Events
- Configuring Correlation Policies and Rules
- Using the FireSIGHT System as a Compliance Tool
- Creating Traffic Profiles
- Configuring Remediations
- Using Dashboards
- Using the Context Explorer
- Working with Reports
- Understanding and Using Workflows
- Using Custom Tables
- Searching for Events
- Managing Users
- Scheduling Tasks
- Managing System Policies
- Configuring Appliance Settings
- Licensing the FireSIGHT System
- Updating System Software
- Monitoring the System
- Using Health Monitoring
- Auditing the System
- Using Backup and Restore
- Specifying User Preferences
- Importing and Exporting Configurations
- Purging Discovery Data from the Database
- Viewing the Status of Long-Running Tasks
- Command Line Reference
- Security, Internet Access, and Communication Ports
- Third-Party Products
- glossary
FireSIGHT System User Guide Version 5.4.1
Bias-Free Language
The documentation set for this product strives to use bias-free language. For the purposes of this documentation set, bias-free is defined as language that does not imply discrimination based on age, disability, gender, racial identity, ethnic identity, sexual orientation, socioeconomic status, and intersectionality. Exceptions may be present in the documentation due to language that is hardcoded in the user interfaces of the product software, language used based on RFP documentation, or language that is used by a referenced third-party product. Learn more about how Cisco is using Inclusive Language.
- Updated:
- February 23, 2015
Chapter: Managing Users
- Understanding Cisco User Authentication
- Managing Authentication Objects
- LDAP Authentication
- RADIUS Authentication
- Understanding RADIUS Authentication
- Creating RADIUS Authentication Objects
- Configuring RADIUS Connection Settings
- Configuring RADIUS User Roles
- Configuring Administrative Shell Access
- Defining Custom RADIUS Attributes
- Testing User Authentication
- RADIUS Authentication Object Examples
- Editing RADIUS Authentication Objects
- Deleting Authentication Objects
- Managing User Accounts
- Viewing User Accounts
- Adding New User Accounts
- Managing Command Line Access
- Managing Externally Authenticated User Accounts
- Managing User Login Settings
- Configuring User Roles
- Managing Custom User Roles
- Modifying User Privileges and Options
- Understanding Restricted User Access Properties
- Modifying User Passwords
- Deleting User Accounts
- User Account Privileges
Managing Users
If your user account has Administrator access, you can manage the user accounts that can access the web interface on your Defense Center or managed device. On the Defense Center, you can also set up user authentication via an external authentication server, rather than through the internal database.
Understanding Cisco User Authentication
When a user logs into the web interface, the appliance looks for a match for the user name and password in the local list of users. This process is called authentication . There are two kinds of authentication: internal and external. If the user’s account uses internal authentication , the authentication process checks the local database for this list. If the account uses external authentication , the process checks the local database to see if the user exists there and, if the user is not found locally, it queries an external server, such as a Lightweight Directory Access Protocol (LDAP) directory server or a Remote Authentication Dial In User Service (RADIUS) authentication server, for a list of users.
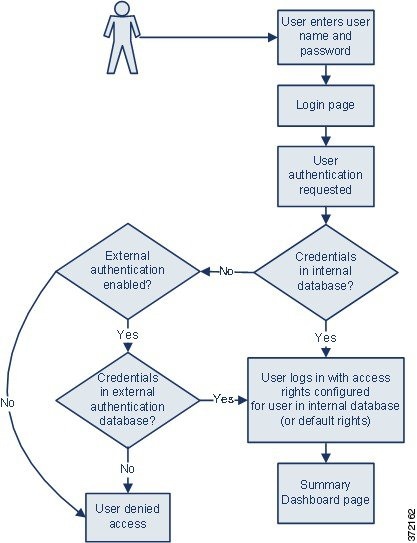
For users with either internal or external authentication, you can control user permissions. Users with external authentication receive the permissions either for the group or access list they belong to, or based on the default user access role you set in the server authentication object or in a system policy on the managing Defense Center, unless you change the user permissions manually.
For more information, see the following sections:
- Understanding Internal Authentication
- Understanding External Authentication
- Understanding User Privileges
Understanding Internal Authentication
By default, the FireSIGHT System uses internal authentication to check user credentials when a user logs in. Internal authentication occurs when the user name and password are verified against records in the internal FireSIGHT System database. If you do not enable external authentication when you create a user, the user credentials are managed in the internal database.
Because you manually create each internally authenticated user, you set the access rights when you create the user and you do not need to set default settings.

Note Note that an internally authenticated user is converted to external authentication if you enable external authentication, the same user name exists for the user on the external server, and the user logs in using the password stored for that user on the external server. After an internally authenticated user converts to an externally authenticated user, you cannot revert to internal authentication for that user.
Understanding External Authentication
External authentication occurs when the Defense Center or managed device retrieves user credentials from an external repository, such as an LDAP directory server or RADIUS authentication server. LDAP authentication and RADIUS authentication are types of external authentication. Note that you can only use one form of external authentication for an appliance.
If you want to use external authentication, you must configure an authentication object for each external authentication server where you want to request user information. The authentication object contains your settings for connecting to and retrieving user data from that server. You can then enable that object in a system policy on the managing Defense Center and apply the policy to an appliance to enable authentication. When any externally authenticated user logs in, the web interface checks each authentication server to see if that user is listed, in the order the servers are listed in the system policy.
When you create a user, you can specify whether that user is internally or externally authenticated.
Note Before enabling external authentication on Series 3 managed devices, remove any internally-authenticated shell users that have the same user name as externally-authenticated users included in your shell access filter.
You can push a system policy to a managed device to enable external authentication on that device, but you cannot control the authentication object from the device’s web interface. The only configuration of external authentication on the device occurs when you select the type of authentication for a new user. If you want to disable external authentication on a managed device, disable it in the system policy on the managing Defense Center and reapply the policy to the device. If you apply a local system policy (created on the managed device) to the device itself, external authentication is also disabled.

Tip You can use the Import/Export feature to export system policies. When you export a policy with external authentication enabled, the authentication objects are exported with the policy. You can then import the policy and object on another Defense Center. Do not import policies with authentication objects onto managed devices.
For more information on specific types of external authentication, see the following sections:
Understanding User Privileges
The FireSIGHT System lets you allocate user privileges based on the user’s role. For example, an analyst typically needs access to event data to analyze the security of monitored networks, but might never require access to administrative functions for the FireSIGHT System itself. You can grant analysts predefined roles such as Security Analyst and Discovery Admin and reserve the Administrator role for the network administrator managing the FireSIGHT System. You can also create custom user roles with access privileges tailored to your organization’s needs.
In the system policy on the Defense Center, you set a default access role for all users who are externally authenticated. After an externally authenticated user logs in for the first time, you can add or remove access rights for that user on the User Management page. If you do not modify the user’s rights, the user has only the rights granted by default. Because you create internally authenticated users manually, you set the access rights when you create them.
If you configured management of access rights through LDAP groups, the access rights for users are based on their membership in LDAP groups. They receive the default access rights for the group that they belong to that has the highest level of access. If they do not belong to any groups and you have configured group access, they receive the default user access rights configured in the authentication object for the LDAP server. If you configure group access, those settings override the default access setting in the system policy.
Similarly, if you assign a user to specific user role lists in a RADIUS authentication object, the user receives all assigned roles, unless one or more of those roles are mutually incompatible. If a user is on the lists for two mutually incompatible roles, the user receives the role that has the highest level of access. If the user does not belong to any lists and you have configured a default access role in the authentication object, the user receives that role. If you configure default access in the authentication object, those settings override the default access setting in the system policy.
The FireSIGHT System supports the following predefined user roles, listed in order of precedence, depending on the features you have licensed:
- Access Admins can view and modify access control and file policies, but cannot apply their policy changes.
- Administrators can set up the appliance’s network configuration, manage user accounts and Collective Security Intelligence Cloud connections, and configure system policies and system settings. Users with the Administrator role have all rights and privileges of all other roles (with the exception of lesser, restricted versions of those privileges).
- Discovery Admins can review, modify and delete network discovery policies, but cannot apply their policy changes.
- External Database users can query the FireSIGHT System database using an external application that supports JDBC SSL connections. On the web interface, they can access the online help and user preferences.
- Intrusion Admins have access to all intrusion policy, intrusion rule, and network analysis policy features. Intrusion Admins have access to intrusion-related options in the Policies menu. Note that Intrusion Admins cannot apply intrusion or network analysis policies as part of access control policies.
- Maintenance Users can access monitoring functions (including health monitoring, host statistics, performance data, and system logs) and maintenance functions (including task scheduling and backing up the system).
Note that maintenance users do not have access to the functions in the Policies menu and can only access the dashboard from the Analysis menu.
- Network Admins can review, modify, and apply device configurations as well as review and modify access control policies.
- Security Approvers can view and apply, but not create, configuration and policy changes.
- Security Analysts can review, analyze, and delete intrusion, discovery, user activity, connection, correlation, and network change events. They can review, analyze, and (when applicable) delete hosts, host attributes, services, vulnerabilities, and client applications. Security Analysts can also generate reports and view (but not delete or modify) health events.
- Security Analysts (Read Only) have all the same rights as Security Analysts, except that they cannot delete events.
In addition to the above predefined roles, you can also configure custom user roles with specialized access privileges. Any role can be the default access role for externally authenticated users.
You can grant user role escalation privileges to externally authenticated user accounts; you can also use an externally authenticated user’s password as the escalation password. For more information, see Managing User Role Escalation.
Managing Authentication Objects
Authentication objects are server profiles for external authentication servers, containing connection settings and authentication filter settings for those servers. You can create, configure, and delete authentication objects on the Defense Center and use them to manage external authentication to LDAP or RADIUS servers. See the following sections for details:
LDAP Authentication
LDAP, or the Lightweight Directory Access Protocol, allows you to set up a directory on your network that organizes objects, such as user credentials, in a centralized location. Multiple applications can then access those credentials and the information used to describe them. If you ever need to change a user's credentials, you can change them in one place, rather than having to change them on each FireSIGHT System appliance.
Understanding LDAP Authentication
You can create LDAP authentication objects on a Defense Center, but not on other FireSIGHT System appliances. However, you can use the external authentication object on any appliance (except virtual devices or Cisco NGIPS for Blue Coat X-Series) by applying a system policy where the object is enabled to the appliance. When you apply the policy, the object is copied to the appliance.
Note Before enabling external authentication on Series 3 managed devices, remove any internally-authenticated shell users that have the same user name as externally-authenticated users included in your shell access filter.
Note that you can use LDAP naming standards for address specification and for filter and attribute syntax in your authentication object. For more information, see the RFCs listed in the Lightweight Directory Access Protocol (v3): Technical Specification, RFC 3377. Examples of syntax are provided throughout this procedure. Note that when you set up an authentication object to connect to a Microsoft Active Directory Server, you can use the address specification syntax documented in the Internet RFC 822 (Standard for the Format of ARPA Internet Text Messages) specification when referencing a user name that contains a domain. For example, to refer to a user object, you might type
JoeSmith@security.example.com
rather than the equivalent user distinguished name of
cn=JoeSmith,ou=security, dc=example,dc=com
when using Microsoft Active Directory Server.
Note Currently, the FireSIGHT System supports LDAP external authentication on LDAP servers running Microsoft Active Directory on Windows Server 2008, Oracle Directory Server Enterprise Edition 7.0 on and Windows Server 2008, or OpenLDAP on Linux. However, the FireSIGHT System does not support external authentication for virtual devices or Cisco NGIPS for Blue Coat X-Series.
For more information, see the following sections:
- Understanding Defaults
- Understanding Base DNs
- Understanding Base Filters
- Understanding Impersonation Accounts
- Understanding Your LDAP Connection
- Understanding User Name Templates
- Understanding Connection Timeouts
- Understanding Attributes to Manage Access
- Understanding Group Membership to Manage Access
- Understanding Shell Access
Understanding Defaults
You can populate several fields using default values based on the server type you plan to connect to. Default values propagate the User Name Template, UI Access Attribute, Shell Access Attribute, Group Member Attribute, and Group Member URL Attribute fields when you select a server type and set defaults.
Understanding Base DNs
When the local appliance searches the LDAP server to retrieve user information on the authentication server, it needs a starting point for that search. You can specify the tree that the local appliance should search by providing a base distinguished name, or base DN .
Typically, the base DN has a basic structure indicating the company domain and operational unit. For example, the Security organization of the Example company might have a base DN of
ou=security,dc=example,dc=com
.
After you identify a primary server, you can automatically retrieve a list of available base DNs from it and select the appropriate base DN.
Understanding Base Filters
You can add a
base filter
(maximum 450 characters, including the enclosing parentheses) that sets a specific value for a specific attribute. The base filter focuses your search by only retrieving objects in the base DN that have the attribute value set in the filter. Enclose the base filter in parentheses. For example, to filter for only users with a common name starting with F, use the filter
(cn=F*)
.
To test your base filter more specifically by entering a test user name and password, see Testing User Authentication.
Understanding Impersonation Accounts
To allow the local appliance to access the user objects, you must supply user credentials for an impersonation account. The impersonation account is a user account with appropriate rights to browse the directory named by the base DN and retrieve the user objects you want to retrieve. Remember that the distinguished name for the user you specify must be unique to the tree for the server.
Understanding Your LDAP Connection
You can manage the encryption method for your LDAP connection. You can choose no encryption, Transport Layer Security (TLS), or Secure Sockets Layer (SSL) encryption.
Note that if you are using a certificate to authenticate when connecting via TLS or SSL, the name of the LDAP server in the certificate
must
match the name that you use in the Host Name/IP Address field. For example, if you enter
10.10.10.250
in the external authentication settings and
computer1.example.com
in the certificate, the connection fails. Changing the name of the server in the external authentication settings to
computer1.example.com
causes the connection to succeed.
Understanding User Name Templates
Selecting a user name template lets you indicate how user names entered on login should be formatted, by mapping the string conversion character (
%s
) to the value of the UI access attribute or shell access attribute for the user. The user name template is the format for the distinguished name used for authentication. When a user enters a user name into the login page, the name is substituted for the string conversion character and the resulting distinguished name is used to search for the user credentials.
For example, to set a user name template for the Security organization of the Example company, you might enter
%s@security.example.com
. If you want to use an object for CAC authentication and authorization, you
must
enter a value for the user name template that corresponds with your UI access attribute value. For more information, see Understanding LDAP Authentication With CAC.
Understanding Connection Timeouts
If you specify a backup authentication server, you can set a timeout for the connection attempt to the primary server. If the timeout period elapses without a response from the primary authentication server, the appliance then queries the backup server. For example, if the primary server has LDAP disabled, the appliance queries the backup server.
If LDAP is running on the port of the primary LDAP server and for some reason refuses to service the request (due to misconfiguration or other issues), however, the failover to the backup server does not occur.
Understanding Attributes to Manage Access
Different types of LDAP servers use different attributes to store user data. See the following sections for an explanation of UI and shell access attributes.
If your LDAP server uses a UI access attribute of
uid
, the local appliance checks the
uid
attribute value for each object in the tree indicated by the base DN you set. If you do not set a specific UI access attribute, the local appliance checks the distinguished name for each user record on the LDAP server to see if it matches the user name. If one of the objects has a matching user name and password, the user login request is authenticated.
You can substitute a different LDAP attribute to make the local appliance match a user name with that attribute rather than the value of the distinguished name. Selecting a server type and setting defaults fills in a UI access attribute appropriate for that type of server. If one of the objects has a matching user name and, for non-CAC objects, a password as a value for the attribute you specify, the user login request is authenticated. You can use any attribute, if the value of the attribute is a valid user name for the FireSIGHT System web interface. Valid user names are unique, and can include underscores (
_
), periods (
.
), hyphens (
-
), and alphanumeric characters. If you want to use an object for CAC authentication and authorization, you
must
enter a value for the UI access attribute that corresponds with the user name template value. For more information, see Understanding LDAP Authentication With CAC.
If your LDAP server uses
uid
as your shell access attribute, the local appliance checks the user name entered on login against the attribute value of
uid
. You can also set a custom shell access attribute other than
uid
.
Note that selecting a server type and setting defaults prepopulates a shell access attribute typically appropriate for that type of server. You can use any attribute, if the value of the attribute is a valid user name for shell access. Valid user names are unique, and can include underscores (_), periods (.), hyphens (-), and alphanumeric characters.
Understanding Group Membership to Manage Access
If you prefer to base default access rights on a user’s membership in an LDAP group, you can specify distinguished names for existing groups on your LDAP server for each of the access roles used by your FireSIGHT System. When you do so, you can configure a default access setting for those users detected by LDAP that do not belong to any specified groups. When a user logs in, the FireSIGHT System dynamically checks the LDAP server and assigns access rights according to the user’s current group membership.
When a user authenticated by an LDAP server logs into a local FireSIGHT System appliance for the first time, the user receives the access rights for groups the user belongs to, or if groups are not configured, the default access setting you selected in the system policy.
You can then modify those settings, unless the settings are granted through group membership.
Understanding Shell Access
You can use the LDAP server to authenticate accounts for shell access on a managed device or Defense Center. Specify a search filter that retrieves entries for users to whom you want to grant shell access. Note that you can only configure shell access for the first authentication object in your system policy. For more information on managing authentication object order, see Enabling External Authentication.
With the exception of the admin account, shell access is controlled entirely though the shell access attribute you set. Shell users are configured as local users on the appliance. The filter you set here determines which set of users on the LDAP server can log into the shell.
Note that a home directory for each shell user is created on login, and when an LDAP shell access user account is disabled (by disabling the LDAP connection), the directory remains, but the user shell is set to
/bin/false
in
/etc/password
to disable the shell. If the user then is re-enabled, the shell is reset, using the same home directory.
If all users qualified in the base DN are also qualified for shell access privileges, you can configure the shell access filter to search more efficiently by selecting Same as Base Filter . Normally, the LDAP query to retrieve users combines the base filter with the shell access filter. If you type the same shell access filter as the base filter, the same query runs twice, which is unnecessarily time-consuming.
Shell users can log in using user names with lowercase letters.Login authentication for the shell is case sensitive.

Caution On Series 3 Defense Centers, all shell users have
sudoers privileges. Make sure that you restrict the list of users with shell access appropriately. On Series 3 and virtual devices, shell access granted to externally authenticated users defaults to the Configuration level of command line access, which also grants sudoers privileges.Understanding LDAP Authentication With CAC
If your organization uses Common Access Cards (CACs), you can configure LDAP authentication to authenticate users logging into the web interface and authorize access to specific functionality based on group membership or default access rights. With CAC authentication and authorization configured, users have the option to log in directly without providing a separate username and password for the appliance.
Note You must have a valid user certificate present in your browser (in this case, a certificate passed to your browser via your CAC) to enable user certificates as part of the CAC configuration process. After you configure CAC authentication and authorization, users on your network must maintain the CAC connection for the duration of their browsing session. If you remove or replace a CAC during a session, your web browser terminates the session and the system logs you out of the web interface.
For more information about configuring and managing CAC authentication and authorization, see the following sections:
Configuring CAC Authentication and Authorization
Supported Devices: Any except virtual or X-Series
Supported Defense Centers: Any except virtual or X-Series
Before users on your network can log in using their CAC credentials, a user with appropriate permissions must complete the multi-step configuration process for CAC authentication and authorization.
To configure and enable CAC authentication and authorization:
Step 1 Insert a CAC as directed by your organization.
Step 2 Direct your browser to
https://
hostname
/
, where
hostname
corresponds to the host name of your Defense Center.
Step 3 If prompted, enter the PIN associated with the CAC you inserted in step 1 .
Step 4 If prompted, select the appropriate certificate from the drop-down list.
The browser accepts your selection and the Login page appears.
Step 5 In the Username and Password fields, log in as a user with Administrator privileges. User names are case sensitive.
Tip You cannot log in using your CAC credentials until you have fully configured CAC authentication and authorization.
The default start page appears.
Step 6 Navigate to System > Local > User Management and click the External Authentication tab. Create an LDAP authentication object exclusively for CAC authentication and authorization, following the procedures outlined in Preparing to Create an LDAP Authentication Object and Creating Advanced LDAP Authentication Objects. You must configure the following:
- the User Name Template in the advanced options of the LDAP-Specific Parameters section. For more information, see Understanding User Name Templates.
- the UI Access Attribute in the Attribute Mapping section. For more information, see Understanding Attributes to Manage Access.
- the distinguished names for existing LDAP groups in the Group Controlled Access Roles section, if you want to preconfigure access rights through LDAP group membership. For more information, see Understanding Group Membership to Manage Access.
Tip Note that you cannot configure both CAC authentication and shell access in the same authentication object. If you also want to authorize users for shell access, create separate authentication objects and enable them separately in your system policy.
The External Authentication page appears, with the new object listed.
Step 8 Navigate to System > Local > System Policy . Enable external authentication, then CAC authentication in your system policy, following the procedure outlined in Enabling External Authentication.
Caution Your changes do not take effect until you apply the system policy to the Defense Center and its managed devices. See Applying a System Policy for more information.
Step 9 Navigate to System > Local > Configuration and click HTTPS Certificate . Import a HTTPS server certificate, if necessary, following the procedure outlined in Uploading Server Certificates.
Note The same certificate authority (CA) must issue the HTTPS server certificate and the user certificates on the CACs you plan to use for authentication and authorization.
The Current HTTPS Certificate Page updates to reflect the new certificate.
Step 10 Under HTTPS User Certificate Settings , select Enable User Certificates . For more information, see Requiring User Certificates.
Step 11 Optionally, after a user logs in for the first time, navigate to System > Local > User Management to manually add or remove access rights for that user. If you do not modify the user’s rights, the user has only the rights granted by default. For more information, see Understanding User Privileges and Modifying User Privileges and Options.
For more information about changing a CAC user’s role after their initial login, see the following section, Managing CAC Authentication and Authorization.
Managing CAC Authentication and Authorization
After you configure and enable CAC authentication and authorization, users on your network can log into the web interface of an appliance using their CAC credentials. For more information, see Logging into the Appliance.
CAC-authenticated users are identified in the system by their electronic data interchange personal identifier (EDIPI) numbers. After users log in using their CAC credentials for the first time, you can manually add or remove access privileges for those users on the User Management page. If you did not preconfigure a user’s privileges using group-controlled access roles, the user has only the privileges granted by default in your system policy. For more information, see Understanding User Privileges, Understanding Group Membership to Manage Access, and Modifying User Privileges and Options.
Note that the system purges manually configured access privileges when it purges CAC-authenticated users from the User Management page after 24 hours of inactivity. The users are restored to the page after each subsequent login, but you must reconfigure any manual changes to their access privileges.
Preparing to Create an LDAP Authentication Object
Before you configure a connection to your LDAP server, you should collect the information that you need to create the LDAP authentication object. For more information on specific aspects of configuration, see Understanding LDAP Authentication.
You need the following for any authentication object:
- the server name or IP address for the server where you plan to connect
- the server type of the server where you plan to connect
- the user name and password for a user account with sufficient privileges to browse the LDAP tree
- if there is a firewall between the appliance and the LDAP server, an entry in the firewall to allow outgoing connections
- if possible, the base distinguished name for the server directory where the user names reside
Note that you can use a third-party LDAP client to browse the LDAP tree and see base DN and attribute descriptions. You can also use that client to confirm that your selected user can browse the base DN you select. Ask your LDAP administrator to recommend an approved LDAP client for your LDAP server.
Depending on how you plan to customize your LDAP authentication object configuration, you might also need the information in the following table.
Creating Basic LDAP Authentication Objects
You can set up an LDAP authentication object where you customize many of the values. However, if you just want to authenticate all the users in a particular directory, you can create a basic authentication object with the base DN for that directory. If you set defaults to those for your server type and supply authentication credentials for the account used to retrieve user data from the server, you can quickly create an authentication object. Follow the procedure below to do so.
Note If you prefer to consider and possibly customize each authentication setting when creating the authentication object (to configure CAC authentication and authorization, for example), use the procedure in Creating Advanced LDAP Authentication Objects to create the object. You should also use the advanced procedure if you plan to encrypt your connection to the server, set user timeouts, customize the user name template, or assign FireSIGHT System user roles based on LDAP group membership.
Before you configure a connection to your LDAP server, you should collect the information that you need to create the LDAP authentication object. For more information on specific aspects of configuration, see Understanding LDAP Authentication.
To create a basic authentication object, you need the following:
- the server name or IP address for the server where you plan to connect
- the server type of the server where you plan to connect
- the user name and password for a user account with sufficient privileges to browse the LDAP tree; Cisco recommends that you use a domain admin user account for this purpose
Optionally, if you want to constrain your user search further, you can add a base filter to set a specific value for a specific attribute. The base filter focuses your search by only retrieving objects in the base DN that have the attribute value set in the filter. Enclose the base filter in parentheses. For example, to filter for only users with a common name starting with F, use the filter
(cn=F*)
. When you save the authentication object, the local appliance queries using the base filter to test it and indicates whether or not the filter appears to be correct.
To create an LDAP authentication object:
Step 1 Select System > Local > User Management .
The User Management page appears.
Step 2 Click the External Authentication tab.
The External Authentication page appears.
Step 3 Click Create External Authentication Object .
Step 4 Select LDAP from the Authentication Method drop-down list.
LDAP configuration options appear.
Step 5 Type a name and description for the authentication server in the Name and Description fields.
Step 6 Select your server type from the Server Type drop-down list, then click the Set Defaults button to configure default settings for that type. You have the following options:
- If you are connecting to a Microsoft Active Directory Server, select MS Active Directory , then click Set Defaults .
- If you are connecting to a Sun Java Systems Directory Server or Oracle Directory Server, select Oracle Directory , then click Set Defaults .
- If you are connecting to an OpenLDAP server, select OpenLDAP , then click Set Defaults .
- If you are connecting to a server other than those listed above and want to clear default settings, select Other , then click Set Defaults .
Step 7 Type the IP address or host name for the primary server where you want to obtain authentication data in the Primary Server Host Name/IP Address field.
Note If you are using a certificate to connect via TLS or SSL, the host name in the certificate must match the host name used in this field. In addition, IPv6 addresses are not supported for encrypted connections.
Step 8 To fetch a list of all base DNs, click Fetch DNs and select the appropriate base DN from the drop-down list.
For example, to authenticate names in the Security organization at the Example company, select
ou=security,dc=example,dc=com
.
Step 9 Optionally, to set a filter that retrieves only specific objects within the directory you specified as the Base DN, type the attribute type, a comparison operator, and the attribute value you want to use as a filter, enclosed in parentheses, in the Base Filter field (maximum 450 characters, including the enclosing parentheses).
For example, if the user objects in a tree have a physicalDeliveryOfficeName attribute and users in the New York office have an attribute value of
NewYork
for that attribute, to retrieve only users in the New York office, type
(physicalDeliveryOfficeName=NewYork)
.
Step 10 In the User Name and Password fields, type the distinguished name and password for a user who has sufficient credentials to browse the LDAP server.
For example, if you are connecting to an OpenLDAP server where user objects have a
uid
attribute and the object for the administrator in the Security division at our example company has a
uid
value of
NetworkAdmin
, you might type
uid=NetworkAdmin,ou=security,dc=example,dc=com.
Caution If you are connecting to a Microsoft Active Directory Server, you cannot provide a server user name that ends with the
$ character.Step 11 Retype the password in the Confirm Password field.
Step 12 Optionally, to retrieve users for shell access, type the attribute type you want to filter on in the Shell Access Attribute field.
For example, on a Microsoft Active Directory Server, use the
sAMAccountName
shell access attribute to retrieve shell access users by typing
sAMAccountName
in the
Shell Access Attribute
field.
Note IPv6 addresses are not supported for shell authentication.
Step 13 In the
User Name
and
Password
fields, type the
uid
value or shell access attribute value and password for the user whose credentials should be used to validate access to the LDAP server. Note, again, that server user names associated with a Microsoft Active Directory Server cannot end with the character
$
.
For example, to test to see if you can retrieve the
JSmith
user credentials at the Example company, type
JSmith.
Step 14 Click Test to test the connection.
A message appears, either indicating success of the test or detailing what settings are missing or need to be corrected. If the test succeeds, the test output appears at the bottom of the page, including a list of the users retrieved by the connection. If the number of users that appear in the test output is limited by the number of user records your LDAP server returns, the test output indicates this limitation.
The External Authentication page appears, with the new object listed.
To enable LDAP authentication using the object on an appliance, you must apply a system policy with that object enabled to the appliance. For more information, see Enabling External Authentication and Applying a System Policy.
- If the test fails, or if you want to refine the list of users retrieved, continue with the next section, Tuning Your Basic LDAP Authentication Connection.
Tuning Your Basic LDAP Authentication Connection
If you create an LDAP authentication object and it either does not succeed in connecting to the server you select, or does not retrieve the list of users you want, you can tune the settings in the object.
If the connection fails when you test it, try the following suggestions to troubleshoot your configuration:
- Use the messages displayed at the top of the screen and in the test output to determine which areas of the object are causing the issue.
- Check that the user name and password you used for the object are valid:
- Check that the user has the rights to browse to the directory indicated in your base distinguished name by connecting to the LDAP server using a third-party LDAP browser.
- Check that the user name is unique to the directory information tree for the LDAP server.
- Check that the user name contains only underscores, periods, hyphens, and alphanumeric characters.
- If you see an LDAP bind error 49 in the test output, the user binding for the user failed. Try authenticating to the server through a third-party application to see if the binding fails through that connection as well.
- Check that you have correctly identified the server:
- Check that the server IP address or host name is correct.
- Check that you have TCP/IP access from your local appliance to the authentication server where you want to connect.
- Check that access to the server is not blocked by a firewall and that the port you have configured in the object is open.
- If you are using a certificate to connect via TLS or SSL, the host name in the certificate must match the host name used for the server.
- Check that you have not used an IPv6 address for the server connection if you are authenticating shell access.
- If you used server type defaults, check that you have the correct server type and click Set Defaults again to reset the default values.
For more information, see Identifying the LDAP Authentication Server.
- If you typed in your base distinguished name, click Fetch DNs to retrieve all the available base distinguished names on the server, and select the name from the list.
- If you are using any filters, access attributes, or advanced settings, check that each is valid and typed correctly.
- If you are using any filters, access attributes, or advanced settings, try removing each setting and testing the object without it.
- If you are using a base filter or a shell access filter, make sure that the filter is enclosed in parentheses and that you are using a valid comparison operator. For more information, see Understanding Base Filters and Understanding Shell Access.
- To test a more restricted base filter, try setting it to the base distinguished name for the user to retrieve just that user.
- If you are using an encrypted connection:
- Check that the name of the LDAP server in the certificate matches the host name that you use to connect.
- Check that you have not used an IPv6 address with an encrypted server connection.
- If you are using a test user, make sure that the user name and password are typed correctly.
- If you are using a test user, remove the user credentials and test the object.
- Test the query you are using by connecting to the LDAP server via the command line on the appliance you want to connect from using this syntax:
ldapsearch -x -b 'base_distinguished_name'
-h LDAPserver_ip_address -p port -v -D
'user_distinguished_name' -W 'base_filter'
-h LDAPserver_ip_address -p port -v -D
'user_distinguished_name' -W 'base_filter'
For example, if you are trying to connect to the security domain on
myrtle.example.com
using the
domainadmin@myrtle.example.com
user and a base filter of (
cn=*
), you could test the connection using this statement:
ldapsearch -x -b 'CN=security,DC=myrtle,DC=example,DC=com'
-h myrtle.example.com -p 389 -v -D
'domainadmin@myrtle.example.com' -W '(cn=*)'
-h myrtle.example.com -p 389 -v -D
'domainadmin@myrtle.example.com' -W '(cn=*)'
If you can test your connection successfully but authentication does not work after you apply a system policy, check that authentication and the object you want to use are both enabled in the system policy that is applied to the appliance.
If you connect successfully but want to adjust the list of users retrieved by your connection, you can add or change a base filter or shell access filter or use a more restrictive or less restrictive base DN. For more information, see the following topics:
Creating Advanced LDAP Authentication Objects
You can create LDAP authentication objects to provide user authentication services for an appliance.
When you create an authentication object, you define settings that let you connect to an authentication server. You also select the directory context and search criteria you want to use to retrieve user data from the server. Optionally, you can configure shell access authentication.
Make sure you have TCP/IP access from your local appliance to the authentication server where you want to connect.
Although you can use the default settings for your server type to quickly set up a basic LDAP configuration, you can also customize advanced settings to control whether the appliance makes an encrypted connection to the LDAP server, the timeout for the connection, and which attributes the server checks for user information.
For the LDAP-specific parameters, you can use LDAP naming standards and filter and attribute syntax. For more information, see the RFCs listed in the Lightweight Directory Access Protocol (v3): Technical Specification, RFC 3377. Examples of syntax are provided throughout this procedure. Note that when you set up an authentication object to connect to a Microsoft Active Directory Server, you can use the address specification syntax documented in the Internet RFC 822 (Standard for the Format of ARPA Internet Text Messages) specification when referencing a user name that contains a domain. For example, to refer to a user object, you might type
JoeSmith@security.example.com
rather than the equivalent user distinguished name of
cn=JoeSmith,ou=security, dc=example,dc=com
when using Microsoft Active Directory Server.
Note If you are configuring an LDAP authentication object for use with CAC authentication, do not remove the CAC inserted in your computer. You must have a CAC inserted at all times after enabling user certificates. For more information, see Requiring User Certificates and Understanding LDAP Authentication With CAC.
To create an advanced authentication object:
Step 1 Select System > Local > User Management .
The User Management page appears.
Step 2 Click the External Authentication tab.
The External Authentication page appears.
Step 3 Click Create External Authentication Object .
The Create External Authentication Object page appears.
Step 4 Identify the authentication server where you want to retrieve user data for external authentication. For more information, see Identifying the LDAP Authentication Server.
Step 5 Configure authentication settings to build a search request that retrieves the users you want to authenticate. Specify a user name template to format the user names that users enter on login. For more information, see Configuring LDAP-Specific Parameters.
Step 6 Optionally, configure LDAP groups to use as the basis for default access role assignments. For more information, see Configuring Access Rights by Group.
Tip If you plan to use this object for CAC authentication and authorization, Cisco recommends configuring LDAP groups to manage access role assignments. For more information, see Managing CAC Authentication and Authorization.
Step 7 Optionally, configure authentication settings for shell access. For more information, see Configuring Shell Access.
Step 8 Test your configuration by entering the name and password for a user who can successfully authenticate. For more information, see Testing User Authentication.
Your changes are saved. Remember that you must apply a system policy with the object enabled to an appliance before the authentication changes take place on that appliance. For more information, see Enabling External Authentication and Applying a System Policy.
Identifying the LDAP Authentication Server
When you create an authentication object, you first specify the primary and backup server and server port where you want the managed device or Defense Center to connect for authentication.
To identify an LDAP authentication server:
Step 1 Select System > Local > User Management .
The User Management page appears.
Step 2 Click the External Authentication tab.
The External Authentication page appears.
Step 3 Click Create External Authentication Object .
The Create External Authentication Object page appears.
Step 4 Select LDAP from the Authentication Method drop-down list.
LDAP configuration options appear.
Step 5 Optionally, select the check box for CAC if you plan to use this authentication object for CAC authentication and authorization.
For an overview of configuring CAC authentication and authorization, see Understanding LDAP Authentication With CAC.
Step 6 Type a name and description for the authentication server in the Name and Description fields.
Step 7 Optionally, in the Server Type field, select the type of LDAP server you plan to connect to and click Set Defaults to populate the User Name Template , UI Access Attribute , Shell Access Attribute , Group Member Attribute , and Group Member URL Attribute fields with default values. You have the following options:
- If you are connecting to a Microsoft Active Directory server, select MS Active Directory and click Set Defaults .
- If you are connecting to a Sun Java Systems Directory Server or Oracle Directory Server, select Oracle Directory and click Set Defaults .
- If you are connecting to an OpenLDAP server, select OpenLDAP and click Set Defaults .
- If you are connecting to a LDAP server other than those listed above and want to clear default settings, select Other and click Set Defaults .
Step 8 Type the IP address or host name for the primary server where you want to obtain authentication data in the Primary Server Host Name/IP Address field.
Note If you are using a certificate to connect via TLS or SSL, the host name in the certificate must match the host name used in this field. In addition, IPv6 addresses are not supported for encrypted connections.
Step 9 Optionally, modify the port used by the primary authentication server in the Primary Server Port field.
Step 10 Optionally, type the IP address or host name for the backup server where you want to obtain authentication data in the Backup Server Host Name/IP Address field.
Step 11 Optionally, modify the port used by the primary authentication server in the Backup Server Port field.
Continue with Configuring LDAP-Specific Parameters.
Configuring LDAP-Specific Parameters
The settings in the LDAP-specific parameters section determine the area of the LDAP directory where the appliance searches for user names, and control details of how the appliance connects to the LDAP server.
When configuring these settings, note that valid user names are unique, and can include underscores (_), periods (.), and hyphens (-), but otherwise only alphanumeric characters are supported.
In addition for most LDAP-specific settings, you can use LDAP naming standards and filter and attribute syntax. For more information, see the RFCs listed in the Lightweight Directory Access Protocol (v3): Technical Specification, RFC 3377. Examples of syntax are provided throughout this procedure. Note that when you set up an authentication object to connect to a Microsoft Active Directory Server, you can use the address specification syntax documented in the Internet RFC 822 (Standard for the Format of ARPA Internet Text Messages) specification when referencing a user name that contains a domain. For example, to refer to a user object, you might type
JoeSmith@security.example.com
rather than the equivalent user distinguished name of
cn=JoeSmith,ou=security, dc=example,dc=com
when using Microsoft Active Directory Server.
The following table describes each of the LDAP-specific parameters.
Supplies the base distinguished name of the directory where the appliance searches for user information on the LDAP server. Typically, the base DN has a basic structure indicating the company domain and operational unit. Note that after you identify a primary server, you can automatically retrieve a list of available base DNs from the server and select the appropriate base DN. |
The Security organization of the Example company might have a base DN of |
|
Focuses your search by only retrieving objects in the base DN that have the specific attribute-value pair set in the filter. Note that you must enclose the base filter in parentheses. To test your base filter more specifically by entering a test user name and password, see Testing User Authentication. |
To filter for only users with a common name starting with F, use the filter |
|
Allow the local appliance to access the user objects. Supply user credentials for a user with appropriate rights to the authentication objects you want to retrieve. The distinguished name for the user you specify must be unique to the directory information tree for the LDAP server. Note that server user names associated with a Microsoft Active Directory Server cannot end with the |
The user name for the |
|
Determines whether and how the communications are encrypted. You can choose no encryption, Transport Layer Security (TLS), or Secure Sockets Layer (SSL) encryption. Note that if you are using a certificate to authenticate when connecting via TLS or SSL, the name of the LDAP server in the certificate must match the name that you use to connect. If you change the encryption method after specifying the port, the port resets to the default value for the selected server type. |
If you enter |
|
Indicates the path on your local computer to the certificate to be used for encryption. |
||
Indicates how user names entered on login should be formatted, by mapping the string conversion character ( If you want to use this object for CAC authentication and authorization, you must enter a value that corresponds with your UI Access Attribute value. For more information, see Understanding LDAP Authentication With CAC. |
||
Sets a timeout for the connection attempt to the primary server, so the connection rolls over to the backup server. If the number of seconds indicated in this field (or the timeout on the LDAP server) elapses without a response from the primary authentication server, the appliance then queries the backup server. However, if LDAP is running on the port of the primary LDAP server and for some reason refuses to service the request, the failover to the backup server does not occur. |
If the primary server has LDAP disabled, the appliance queries the backup server. |
|
Tells the local appliance to match the value of a specific attribute rather than the value of the user distinguished name. You can use any attribute, if the value of the attribute is a valid user name for the FireSIGHT System web interface. If one of the objects has a matching user name and password, the user login request is authenticated. Selecting a server type and setting defaults prepopulates the UI Access Attribute with a value typically appropriate for that type of server. If you leave this field blank, the local appliance checks the user distinguished name value for each user record on the LDAP server to see if it matches the user name. If you want to use this object for CAC authentication and authorization, you must enter a value that corresponds with your User Name Template value. For more information, see Understanding LDAP Authentication With CAC. |
||
If you want to check a specific attribute for shell access credentials, you must explicitly set this field to match the attribute. You can use any attribute if the value of the attribute is a valid user name for shell access. If you leave this field blank, the user distinguished name is used for shell access authentication. Note that selecting a server type and setting defaults prepopulates this field with an attribute typically appropriate for that type of server. |
To configure the LDAP-specific parameters for a server:
Step 1 In the LDAP-Specific Parameters section of the Create External Authentication Object page, you have two options for setting the base DN:
For example, to authenticate names in the Security organization at the Example company, type or select
ou=security,dc=example,dc=com
.
Step 2 Optionally, to set a filter that retrieves only specific objects within the directory you specified as the Base DN, type the attribute type, a comparison operator, and the attribute value you want to use as a filter, enclosed in parentheses, in the Base Filter field.
For example, if the user objects in a directory tree have a physicalDeliveryOfficeName attribute and users in the New York office have an attribute value of
NewYork
for that attribute, to retrieve only users in the New York office, type
(physicalDeliveryOfficeName=NewYork)
.
Step 3 Type the distinguished name and password for the user whose credentials should be used to validate access to the LDAP directory in the User Name and Password fields.
For example, if you are connecting to an OpenLDAP server where user objects have a
uid
attribute and the object for the administrator in the Security division at our example company has a
uid
value of
NetworkAdmin
, you might type
uid=NetworkAdmin,ou=security,dc=example,dc=com.
Caution If you are connecting to a Microsoft Active Directory Server, you cannot provide a server user name that ends with the
$ character.Step 4 Retype the password in the Confirm Password field.
Step 5 After you configure the basic LDAP-specific parameters, you have several options:
- To access advanced options, click the arrow next to Show Advanced Options and continue with the next step.
- If you want to configure user default roles based on LDAP group membership, continue with Configuring Access Rights by Group.
- If you are not using LDAP groups for authentication, continue with Configuring Shell Access.
Step 6 Optionally, select one of the following encryption modes:
Note Note that if you change the encryption method after specifying a port, you reset the port to the default value for that method. For none or TLS, the port uses the default value of 389. If you select SSL encryption, the port uses the default of 636.
Step 7 If you selected TLS or SSL encryption and you want to use a certificate to authenticate, click Browse to browse to the location of a valid TLS or SSL certificate or, in the SSL Certificate Upload Path field, type the path to the certificate.
A message appears, indicating a successful certificate upload.
Note If you previously uploaded a certificate and want to replace it, upload the new certificate and reapply the system policy to your appliances to copy over the new certificate.
Step 8 Optionally, in the
User Name Template
field, type the string conversion character (
%s
) used to determine the user name from the value found in the
UI Access Attribute
.
For example, to authenticate all users who work in the Security organization of our example company by connecting to an OpenLDAP server where the shell access attribute is
uid
, you might type
uid=%s,ou=security,dc=example,dc=com
in the
User Name Template
field. For a Microsoft Active Directory server, you could type
%s@security.example.com.
If you want to use CAC credentials for authentication and authorization, you must enter a value in the User Name Template field. For more information, see Understanding LDAP Authentication With CAC.
Step 9 Optionally, in the Timeout field, type the number of seconds that should elapse before rolling over to the backup connection.
Step 10 Optionally, to retrieve users based on an attribute instead of the Base DN and Base Filter, you have two options:
For example, on a Microsoft Active Directory Server, you may want to use the UI Access Attribute to retrieve users, because there may not be a
uid
attribute on Active Directory Server user objects. Instead, you can search the
userPrincipalName
attribute by typing
userPrincipalName
in the
UI Access Attribute
field.
If you want to use CAC credentials for authentication and authorization, you must enter a value in the UI Access Attribute field. For more information, see Understanding LDAP Authentication With CAC.
Step 11 Optionally, to retrieve users for shell access, type the attribute to filter by in the Shell Access Attribute field.
For example, on a Microsoft Active Directory Server, use the
sAMAccountName
shell access attribute to retrieve shell access users by typing
sAMAccountName
in the
Shell Access Attribute
field.
Note You cannot configure CAC authentication and authorization and shell access in the same authentication object. Selecting the CAC check box disables the shell access configuration options on the page. Instead, create separate authentication objects and enable them separately in your system policy. For more information, see Enabling External Authentication.
Step 12 For the next step, you have three choices:
- If you want to configure user default roles based on LDAP group membership, continue with Configuring Access Rights by Group.
- If you are not using LDAP groups for authentication but you want to configure shell access, continue with Configuring Shell Access.
- If you are not using LDAP groups for authentication and you do not want to configure shell access, continue with Testing User Authentication.
Configuring Access Rights by Group
If you prefer to base default access rights on a user’s membership in an LDAP group, you can specify distinguished names for existing groups on your LDAP server for each of the access roles used by your FireSIGHT System. When you do so, you can configure a default access setting for those users detected by LDAP that do not belong to any specified groups. When a user logs in, the FireSIGHT System dynamically checks the LDAP server and assigns default access rights according to the user’s current group membership.
If you plan to use an object for CAC authentication and authorization, Cisco recommends configuring LDAP groups to manage access role assignments for CAC-authenticated users. For more information, see Managing CAC Authentication and Authorization.
Any group you reference must exist on the LDAP server. You can reference static LDAP groups or dynamic LDAP groups. Static LDAP groups are groups where membership is determined by group object attributes that point to specific users, and dynamic LDAP groups are groups where membership is determined by creating an LDAP search that retrieves group users based on user object attributes. Group access rights for a role only affect users who are members of the group.
The access rights granted when a user logs into the FireSIGHT System depend on the LDAP configuration:
- If no group access rights are configured for your LDAP server, when a new user logs in, the FireSIGHT System authenticates the user against the LDAP server and then grants user rights based on the default minimum access role set in the system policy.
- If you configure any group settings, new users belonging to specified groups inherit the minimum access setting for the groups where they are members.
- If a new user does not belong to any specified groups, the user is assigned the default minimum access role specified in the Group Controlled Access Roles section of the authentication object.
- If a user belongs to more than one configured group, the user receives the access role for the group with the highest access as a minimum access role.
You cannot use the FireSIGHT System user management page to remove the minimum access rights for users assigned an access role because of LDAP group membership. You can, however, assign additional rights. When you modify the access rights for an externally authenticated user, the Authentication Method column on the User Management page provides a status of External - Locally Modified .
Note If you use a dynamic group, the LDAP query is used exactly as it is configured on the LDAP server. For this reason, the FireSIGHT System limits the number of recursions of a search to four to prevent search syntax errors from causing infinite loops. If a user’s group membership is not established in those recursions, the default access role defined in the Group Controlled Access Roles section is granted to the user.
To configure default roles based on group membership:
Step 1 On the Create External Authentication Object page, click the down arrow next to Group Controlled Access Roles .
Step 2 Optionally, configure access defaults by group membership.
In the DN fields that correspond to FireSIGHT System user roles, type the distinguished name for the LDAP groups that contain users who should be assigned to those roles.
For example, you might type the following in the
Administrator
field to authenticate names in the information technology organization at the
Example
company:
For more information on user access roles, see Adding New User Accounts.
Step 3 From the Default User Role list, select the default minimum access role for users that do not belong to any of the specified groups.
Tip Press the Ctrl key while clicking role names to select multiple roles.
Step 4 If you used static groups, in the Group Member Attribute field, type the LDAP attribute that designates membership in a static group.
For example, if the
member
attribute is used to indicate membership in the static group you reference for default Security Analyst access, type
member
.
Step 5 If you used dynamic groups, in the Group Member URL Attribute field, type the LDAP attribute that contains the LDAP search string used to determine membership in a dynamic group.
For example, if the
memberURL
attribute contains the LDAP search that retrieves members for the dynamic group you specified for default Admin access, type
memberURL
.
Step 6 Continue with Configuring Shell Access.
Configuring Shell Access
You can also use the LDAP server to authenticate accounts for shell access on your managed device or Defense Center. Specify a search filter that retrieves entries for users you want to grant shell access.
You cannot configure CAC authentication and authorization and shell access in the same authentication object. Instead, create separate authentication objects and enable them separately in your system policy. The authentication object for shell access must be the first authentication object in your system policy. For more information on managing authentication object order, see Enabling External Authentication.
Note Cisco does not support external authentication for virtual devices or Cisco NGIPS for Blue Coat X-Series. In addition, IPv6 is not supported for shell access authentication.
With the exception of the admin account, shell access is controlled entirely though the shell access attribute you set. The shell access filter you set determines which set of users on the LDAP server can log into the shell.
Note that a home directory for each shell user is created on login, and when an LDAP shell access user account is disabled (by disabling the LDAP connection), the directory remains, but the user shell is set to
/bin/false
in
/etc/password
to disable the shell. If the user then is re-enabled, the shell is reset, using the same home directory.
The Same as Base Filter check box allows you to search more efficiently if all users qualified in the base DN are also qualified for shell access privileges. Normally, the LDAP query to retrieve users combines the base filter with the shell access filter. If the shell access filter was the same as the base filter, the same query runs twice, which is unnecessarily time-consuming. You can use the Same as Base Filter option to run the query only once for both purposes.
Shell users can log in using user names with lowercase letters. Login authentication for the shell is case sensitive.
Caution On Series 3 Defense Centers, all shell users have
sudoers privileges. Make sure that you restrict the list of users with shell access appropriately. On Series 3 and virtual devices, shell access granted to externally authenticated users defaults to the Configuration level of command line access, which also grants sudoers privileges.To configure shell account authentication:
Step 1 Optionally, on the Create External Authentication Object page, set a shell access account filter. You have multiple options:
- To retrieve administrative user entries based on attribute value, type the attribute name, a comparison operator, and the attribute value you want to use as a filter, enclosed in parentheses, in the Shell Access Filter field.
- To use the same filter you specified when configuring authentication settings, select Same as Base Filter .
- To prevent LDAP authentication of shell access, leave the field blank. If you choose not to specify a shell access filter, a warning displays when you save the authentication object to confirm that you meant to leave the filter blank.
For example, if all network administrators have a
manager
attribute which has an attribute value of
shell
, you can set a base filter of
(manager=shell)
.
Step 2 Continue with Testing User Authentication.
Testing User Authentication
After you configure LDAP server and authentication settings, you can specify user credentials for a user who should be able to authenticate to test those settings.
For the user name, you can enter the value for the
uid
attribute for the user you want to test with. If you are connecting to a Microsoft Active Directory Server and supplied a shell access attribute in place of
uid
, use the value for that attribute as the user name. You can also specify a fully qualified distinguished name for the user.
The test output lists valid and invalid user names. Valid user names are unique, and can include underscores (_), periods (.), and hyphens (-), but otherwise only alphanumeric characters are supported. Invalid user names are user names containing other non-alphanumeric characters, such as spaces.
Note that testing the connection to servers with more than 1000 users only returns 1000 users because of web interface page size limitations.
Tip If you mistype the name or password of the test user, the test fails even if the server configuration is correct. Test the server configuration without the additional test parameters first. If that succeeds supply a user name and password to test with the specific user.
Step 1 In the
User Name
and
Password
fields, type the
uid
value or shell access attribute value and password for the user whose credentials should be used to validate access to the LDAP server.
For example, to test to see if you can retrieve the
JSmith
user credentials at the Example company, type
JSmith.
A message appears, either indicating success of the test or detailing what settings are missing or need to be corrected. You have two options:
To enable LDAP authentication using the object on an appliance, you must apply a system policy with that object enabled to the appliance. For more information, see Enabling External Authentication and Applying a System Policy.
- If the test fails, see Tuning Your Basic LDAP Authentication Connection for suggestions for troubleshooting the connection. Note that the error message that appears indicates what caused the connection to fail.
LDAP Authentication Object Examples
The following sections provide an example of LDAP configuration using basic settings and an example using more advanced configuration options:
Example: Basic LDAP Configuration
The following figures illustrate a basic configuration of an LDAP login authentication object for a Microsoft Active Directory Server. The LDAP server in this example has an IP address of 10.11.3.4. The connection uses port 389 for access.
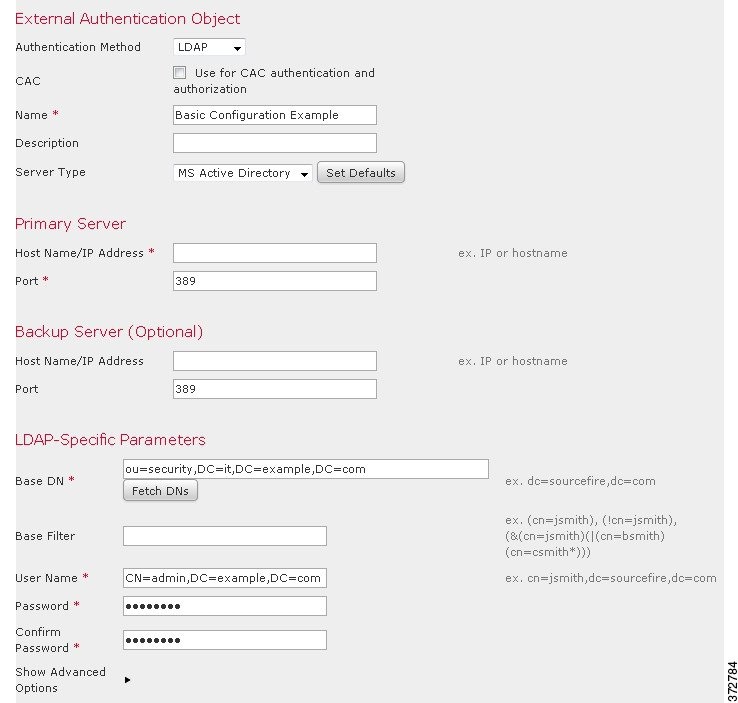
This example shows a connection using a base distinguished name of
OU=security,DC=it,DC=example,DC=com
for the security organization in the information technology domain of the Example company.
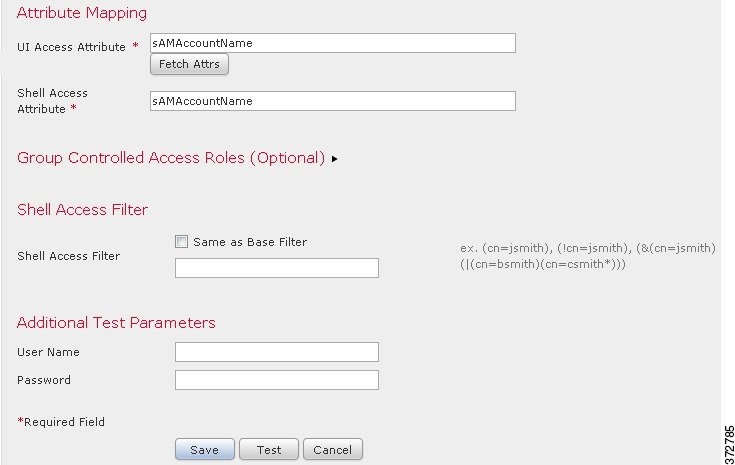
However, because this server is a Microsoft Active Directory server, it uses the
sAMAccountName
attribute to store user names rather than the
uid
attribute. Selecting the MS Active Directory server type and clicking
Set Defaults
sets the UI Access Attribute to
sAMAccountName
. As a result, the FireSIGHT System checks the
sAMAccountName
attribute for each object for matching user names when a user attempts to log into the FireSIGHT System.
In addition, a Shell Access Attribute of
sAMAccountName
causes each
sAMAccountName
attribute to be checked for all objects in the directory for matches when a user logs into a shell account on the appliance.
Note that because no base filter is applied to this server, the FireSIGHT System checks attributes for all objects in the directory indicated by the base distinguished name. Connections to the server time out after the default time period (or the timeout period set on the LDAP server).
Example: Advanced LDAP Configuration
This example illustrates an advanced configuration of an LDAP login authentication object for a Microsoft Active Directory Server. The LDAP server in this example has an IP address of 10.11.3.4. The connection uses port 636 for access.
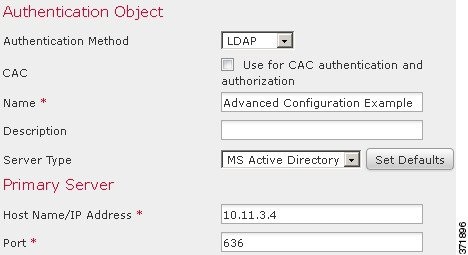
This example shows a connection using a base distinguished name of
OU=security,DC=it,DC=example,DC=com
for the security organization in the information technology domain of the Example company. However, note that this server has a base filter of
(cn=*smith)
. The filter restricts the users retrieved from the server to those with a common name ending in
smith
.
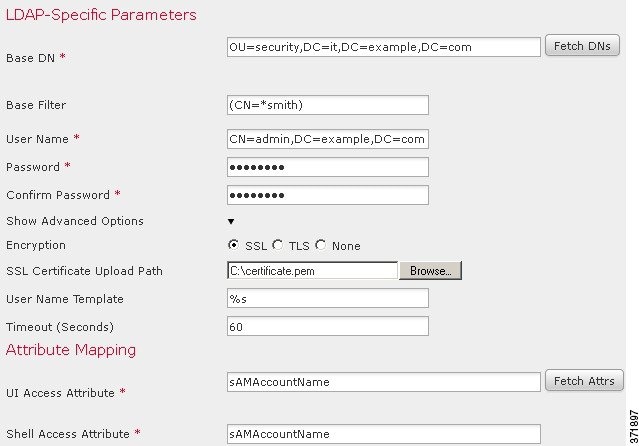
The connection to the server is encrypted using SSL and a certificate named
certificate.pem
is used for the connection. In addition, connections to the server time out after 60 seconds because of the
Timeout
setting.
Because this server is a Microsoft Active Directory server, it uses the
sAMAccountName
attribute to store user names rather than the
uid
attribute. Note that the configuration includes a UI Access Attribute of
sAMAccountName
. As a result, the FireSIGHT System checks the
sAMAccountName
attribute for each object for matching user names when a user attempts to log into the FireSIGHT System.
In addition, a Shell Access Attribute of
sAMAccountName
causes each
sAMAccountName
attribute to be checked for all objects in the directory for matches when a user logs into a shell account on the appliance.
This example also has group settings in place. The Maintenance User role is automatically assigned to all members of the group with a
member
group attribute and the base domain name of
CN=SFmaintenance,DC=it,DC=example,DC=com
.
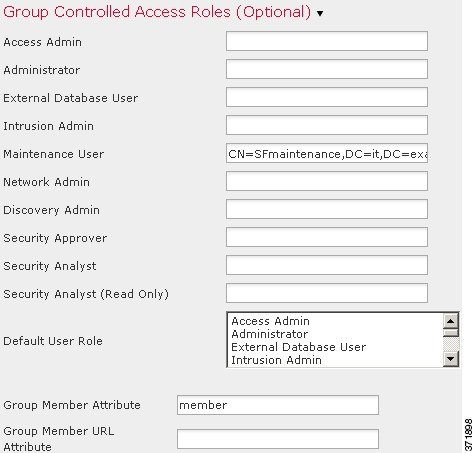
The shell access filter is set to be the same as the base filter, so the same users can access the appliance through the shell as through the web interface.

Editing LDAP Authentication Objects
You can edit an existing authentication object. Your changes do not take effect until you reapply the policy.
To edit an authentication object:
Step 1 Select System > Local > User Management .
The User Management page appears.
Step 2 Click the External Authentication tab.
The External Authentication page appears.
Step 3 Click the edit icon ( ) next to the object you want to edit.
The Create External Authentication Object page appears.
Step 4 Modify the object settings as needed.
A message appears, either indicating success of the test or detailing what settings are missing or need to be corrected. If the test succeeds, the test output appears at the bottom of the page.
If the test fails, see Tuning Your Basic LDAP Authentication Connection for suggestions for troubleshooting the connection. Note that the error message that appears indicates what caused the connection to fail.
Your changes are saved and the External Authentication page appears. Remember that you must apply a system policy with the object enabled to an appliance before the authentication changes take place on that appliance. For more information, see Enabling External Authentication and Applying a System Policy.
RADIUS Authentication
The Remote Authentication Dial In User Service (RADIUS) is an authentication protocol used to authenticate, authorize, and account for user access to network resources. You can create an authentication object for any RADIUS server that conforms to RFC 2865.
Understanding RADIUS Authentication
When a user authenticated on a RADIUS server logs in for the first time, the user receives the roles specified for that user in the authentication object. If the user is not listed for any of the user roles, they receive the default access role you selected in the authentication object. If no default access role is selected in the authentication object, they receive the default access role from the system policy. You can modify a user’s roles, if needed, unless the settings are granted through the user lists in the authentication object. Note that when a user authenticated on a RADIUS server using attribute matching attempts to log in for the first time, the login is rejected as the user account is created. The user must log in a second time.
Note Before enabling external authentication on Series 3 managed devices, remove any internally-authenticated shell users that have the same user name as externally-authenticated users included in your shell access filter.
The FireSIGHT System implementation of RADIUS supports the use of SecurID® tokens. When you configure authentication by a server using SecurID, users authenticated against that server append the SecurID token to the end of their SecurID PIN and use that as their password when they log into a Cisco appliance. As long as SecurID is configured correctly to authenticate users outside the FireSIGHT System, those users can log into a FireSIGHT System appliance using their PIN plus the SecurID token without any additional configuration on the appliance.
Creating RADIUS Authentication Objects
When you create a RADIUS authentication object, you define settings that let you connect to an authentication server. You also grant user roles to specific and default users. If your RADIUS server returns custom attributes for any users you plan to authenticate, you must define those custom attributes. Optionally, you can also configure shell access authentication.
Note that to create an authentication object, you need TCP/IP access from your local appliance to the authentication server where you want to connect.
To create an authentication object:
Step 1 Select System > Local > User Management .
The User Management page appears.
Step 2 Click the External Authentication tab.
The External Authentication page appears.
Step 3 Click Create External Authentication Object .
The Create External Authentication Object page appears.
Step 4 Identify the primary and backup authentication servers where you want to retrieve user data for external authentication and set timeout and retry values. For more information, see Configuring RADIUS Connection Settings.
Step 5 Set the default user role. Optionally, specify the users or user attribute values for users that you want to receive specific FireSIGHT System access roles. For more information, see Configuring RADIUS User Roles.
Step 6 Optionally, configure administrative shell access. For more information, see Configuring Administrative Shell Access.
Step 7 If the profiles for any of the users to authenticate return custom RADIUS attributes, define those attributes. For more information, see Defining Custom RADIUS Attributes.
Step 8 Test your configuration by entering the name and password for a user who should successfully authenticate. For more information, see Testing User Authentication.
Your changes are saved. Remember that you must apply a system policy with the object enabled to an appliance before the authentication changes take place on that appliance. For more information, see Enabling External Authentication and Applying a System Policy.
Configuring RADIUS Connection Settings
When you create a RADIUS authentication object, you first specify the primary and backup server and server port where you want the local appliance (managed device or Defense Center) to connect for authentication.
Note For RADIUS to function correctly, you must open its authentication and accounting ports (by default, 1812 and 1813) on your firewall.
If you specify a backup authentication server, you can set a timeout for the connection attempt to the primary server. If the number of seconds indicated in the Timeout field (or the timeout on the LDAP server) elapses without a response from the primary authentication server, the appliance then re-queries the primary server.
After the appliance re-queries the primary authentication server the number of times indicated by the Retries field and the number of seconds indicated in the Timeout field again elapses without a response from the primary authentication server, the appliance then rolls over to the backup server.
If, for example, the primary server has RADIUS disabled, the appliance queries the backup server. If RADIUS is running on the port of the primary RADIUS server and for some reason refuses to service the request (due to misconfiguration or other issues), however, the failover to the backup server does not occur.
To identify a RADIUS authentication server:
Step 1 Select System > Local > User Management .
The User Management page appears.
Step 2 Click the External Authentication tab.
The External Authentication page appears.
Step 3 Click Create External Authentication Object .
The Create External Authentication Object page appears.
Step 4 Select RADIUS from the Authentication Method drop-down list.
RADIUS configuration options appear.
Step 5 Type a name and description for the authentication server in the Name and Description fields.
Step 6 Type the IP address or host name for the primary RADIUS server where you want to obtain authentication data in the Primary Server Host Name/IP Address field.
Note IPv6 addresses are not supported for shell authentication. To allow shell authentication when using an IPv6 address for your primary RADIUS server, set up an authentication object using an IPv4 address for the server and use that IPv4 object as the first authentication object in your system policy.
Step 7 Optionally, modify the port used by the primary RADIUS authentication server in the Primary Server Port field.
Note If your authentication port and accounting port numbers are not sequential, leave this field blank. The system then determines RADIUS port numbers from the radius and radacct data in your appliance’s /etc/services file.
Step 8 Type the secret key for the primary RADIUS authentication server in the RADIUS Secret Key field.
Step 9 Type the IP address or host name for the backup RADIUS authentication server where you want to obtain authentication data in the Backup Server Host Name/IP Address field.
Step 10 Optionally, modify the port used by the backup RADIUS authentication server in the Backup Server Port field.
Note If your authentication port and accounting port numbers are not sequential, leave this field blank. The system then determines RADIUS port numbers from the radius and radacct data in your appliance’s /etc/services file.
Step 11 Type the secret key for the backup RADIUS authentication server in the RADIUS Secret Key field.
Step 12 Type the number of seconds that should elapse before retrying the connection in the Timeout field.
Step 13 Type the number of times the primary server connection should be tried before rolling over to the backup connection in the Retries field.
Step 14 Continue with Configuring RADIUS User Roles.
Configuring RADIUS User Roles
You can specify the access roles for existing users on your RADIUS server by listing the user names for each of the access roles used by your FireSIGHT System. When you do so, you can also configure a default access setting for those users detected by RADIUS that are not specified for a particular role.
When a user logs in, the FireSIGHT System checks the RADIUS server and grants access rights depending on the RADIUS configuration:
- If specific access rights are not configured for a user and a default access role is not selected, when a new user logs in, the FireSIGHT System authenticates the user against the RADIUS server and then grants user rights based on the default access role (or roles) set in the system policy.
- If a new user is not specified on any lists and default access roles are selected in the Default User Role list of the authentication object, the user is assigned those access roles.
- If you add a user to the list for one or more specific role, that user receives all assigned access roles.
You can also use attribute-value pairs, rather than user names, to identify users who should receive a particular user role. For example, if you know all users who should be Security Analysts have the value
Analyst
for their
User-Category
attribute, you can type
User-Category=Analyst
in the Security Analyst List field to grant that role to those users. Note that you need to define any custom attributes before you use them to set user role membership. For more information, see Defining Custom RADIUS Attributes.
You can assign a default user role (or roles) to be assigned to any users that are authenticated externally but not listed for a specific role. You can select multiple roles on the Default User Role list.
For more information on the user roles supported by the FireSIGHT System, see Configuring RADIUS User Roles.
You cannot remove the minimum access rights for users assigned an access role because of RADIUS user list membership through the FireSIGHT System user management page. You can, however, assign additional rights.
Caution If you want to change the minimum access setting for a user, you must not only move the user from one list to another in the RADIUS Specific Parameters section or change the user’s attribute on the RADIUS server, you must reapply the system policy, and you must remove the assigned user right on the user management page.
Step 1 In the fields that correspond to FireSIGHT System user roles, type the name of each user or identifying attribute-value pair that should be assigned to those roles. Separate usernames and attribute-value pairs with commas.
For example, to grant the Administrator role to the users
jsmith
and
jdoe
, type
jsmith, jdoe
in the
Administrator
field.
As another example, to grant the Maintenance User role to all users with a
User-Category
value of
Maintenance
, type
User-Category=Maintenance
in the
Maintenance User
field.
For more information on user access roles, see Configuring User Roles.
Step 2 Select the default minimum access role for users that do not belong to any of the specified groups from the Default User Role list.
Tip Press the Ctrl key while clicking role names to select multiple roles.
Step 3 Continue with Configuring Administrative Shell Access.
Configuring Administrative Shell Access
You can also use the RADIUS server to authenticate accounts for shell access on your local appliance (managed device or Defense Center). Specify user names for users you want to grant shell access. Note that you can only configure shell access for the first authentication object in your system policy. For more information on managing authentication object order, see Enabling External Authentication.
Note IPv6 addresses are not supported for shell authentication. If you configure a primary RADIUS server with an IPv6 address and also configure administrative shell access, the shell access settings are ignored. To allow shell authentication when using an IPv6 address for your primary RADIUS server, set up another authentication object using an IPv4 address for the server and use that object as the first authentication object in your system policy.
With the exception of the admin account, the shell access list you set on the RADIUS authentication object entirely controls shell access on the appliance. Shell users are configured as local users on the appliance when the system policy is applied. Note that when a user authenticated on a RADIUS server using attribute matching attempts to log in for the first time, the login is rejected as the user account is created. The user must log in a second time.
Note that a home directory for each shell user is created on login, and when an RADIUS shell access user account is disabled (by disabling the RADIUS connection), the directory remains, but the user shell is set to
/bin/false
in
/etc/password
to disable the shell. If the user then is re-enabled, the shell is reset, using the same home directory.
Shell users can log in using user names with lowercase letters. Login authentication for the shell is case sensitive.
Caution On Series 3 Defense Centers, all shell users have
sudoers privileges. Make sure that you restrict the list of users with shell access appropriately. On Series 3 and virtual devices, shell access granted to externally authenticated users defaults to the Configuration level of command line access, which also grants sudoers privileges.To configure shell account authentication:
Step 1 Type the user names, separated by commas, in the Administrator Shell Access User List field.
Note If you choose not to specify a shell access filter, a warning displays when you save the authentication object to confirm that you meant to leave the filter blank.
Step 2 Continue with Defining Custom RADIUS Attributes.
Defining Custom RADIUS Attributes
If your RADIUS server returns values for attributes not included in the
dictionary
file in
/etc/radiusclient/
and you plan to use those attributes to set user roles for users with those attributes, you need to define those attributes in the login authentication object.
You can locate the attributes returned for a user by looking at the user’s profile on your RADIUS server.
When you define an attribute, you provide the name of the attribute, which consists of alphanumeric characters. Note that words in an attribute name should be separated by dashes rather than spaces. You also provide the attribute ID, which should be an integer and should not conflict with any existing attribute IDs in the
etc/radiusclient/dictionary
file. You also specify the type of attribute: string, IP address, integer, or date.
As an example, if a RADIUS server is used on a network with a Cisco router, you might want to use the
Ascend-Assign-IP-Pool
attribute to grant a specific role to all users logging in from a specific IP address pool.
Ascend-Assign-IP-Pool
is an integer attribute that defines the address pool where the user is allowed to log in, with the integer indicating the number of the assigned IP address pool. To declare that custom attribute, you create a custom attribute with an attribute name of
Ascend-IP-Pool-Definition
, an attribute ID of
218
, and an attribute type of
integer
. You could then type
Ascend-Assign-IP-Pool=2
in the
Security Analyst (Read Only)
field to grant read-only security analyst rights to all users with an
Ascend-IP-Pool-Definition
attribute value of
2.
When you create a RADIUS authentication object, a new dictionary file for that object is created on the FireSIGHT System appliance in the
/var/sf/userauth
directory. Any custom attributes you add to the authentication object are added to the dictionary file.
Step 1 Click the arrow to expand the Define Custom RADIUS Attributes section.
Step 2 Type an attribute name consisting of alphanumeric characters and dashes, with no spaces, in the Attribute Name field.
Step 3 Type the attribute ID, in integer form, in the Attribute ID field.
Step 4 Select the type of attribute from the Attribute Type drop-down list.
Step 5 Click Add to add the custom attribute to the authentication object.
Tip You can remove a custom attribute from an authentication object by clicking Delete next to the attribute.
Step 6 Continue with Testing User Authentication.
Testing User Authentication
After you configure RADIUS connection, user role, and custom attribute settings, you can specify user credentials for a user who should be able to authenticate to test those settings.
For the user name, you can enter the user name for the user you want to test with.
Note that testing the connection to servers with more than 1000 users only returns 1000 users because of UI page size limitations.
Tip If you mistype the name or password of the test user, the test fails even if the server configuration is correct. To verify that the server configuration is correct, click Test without entering user information in the Additional Test Parameters field first. If that succeeds, supply a user name and password to test with the specific user.
Step 1 In the User Name and Password fields, type the user name and password for the user whose credentials should be used to validate access to the RADIUS server.
For example, to test to see if you can retrieve the
jsmith
user credentials at our example company, type
jsmith.
Step 2 Select Show Details and click Test .
A message appears, either indicating success of the test or detailing what settings are missing or need to be corrected.
Step 3 If the test succeeds, click Save .
The External Authentication page appears, with the new object listed.
To enable RADIUS authentication using the object on an appliance, you must apply a system policy with that object enabled to the appliance. For more information, see Enabling External Authentication and Applying a System Policy.
RADIUS Authentication Object Examples
This section provides examples of RADIUS server authentication objects to show how FireSIGHT System RADIUS authentication features can be used. See the following sections for more information:
Example: Authenticating a User Using RADIUS
The following figure illustrates a sample RADIUS login authentication object for a server running FreeRADIUS with an IP address of 10.10.10.98. Note that the connection uses port 1812 for access, and note that connections to the server time out after 30 seconds of disuse, then retry three times before attempting to connect to a backup authentication server.
This example illustrates important aspects of RADIUS user role configuration:
-
Users
ewhartonandgsandare granted administrative access to FireSIGHT System appliances where this authentication object is enabled. -
The user
cbronteis granted Maintenance User access to FireSIGHT System appliances where this authentication object is enabled. -
The user
jaustenis granted Security Analyst access to FireSIGHT System appliances where this authentication object is enabled. -
The user
ewhartoncan log into the appliance using a shell account.
The following graphic depicts the role configuration for the example:
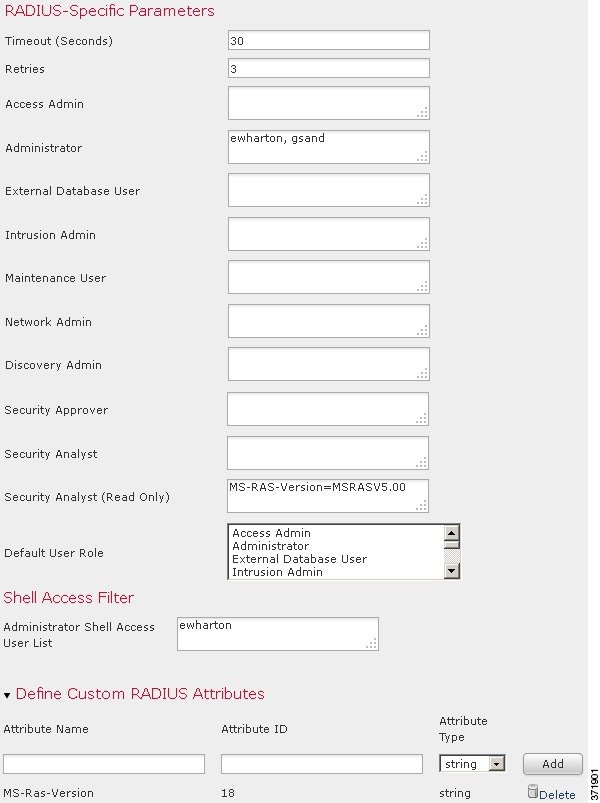
Example: Authenticating a User with Custom Attributes
You can use an attribute-value pair to identify users who should receive a particular user role. If the attribute you use is a custom attribute, you must define the custom attribute.
The following figure illustrates the role configuration and custom attribute definition in a sample RADIUS login authentication object for the same FreeRADIUS server as in the previous example.
In this example, however, the
MS-RAS-Version
custom attribute is returned for one or more of the users because a Microsoft remote access server is in use. Note the
MS-RAS-Version
custom attribute is a string. In this example, all users logging in to RADIUS through a Microsoft v. 5.00 remote access server should receive the Security Analyst (Read Only) role, so you type the attribute-value pair of
MS-RAS-Version=MSRASV5.00
in the
Security Analyst (Read Only)
field.
Editing RADIUS Authentication Objects
You can edit an existing authentication object. If the object is in use in a system policy, the settings in place at the time the policy was applied stay in effect until you reapply the policy.
To edit an authentication object:
Step 1 Select System > Local > User Management .
The User Management page appears.
Step 2 Click the External Authentication tab.
The External Authentication page appears.
Step 3 Click the edit icon (
) next to the object you want to edit.
The Create External Authentication Object page appears.
Step 4 Modify the object settings as needed.
Your changes are saved and the External Authentication page reappears. Remember that you must apply a system policy with the object enabled to an appliance before the authentication changes take place on that appliance. For more information, see Enabling External Authentication and Applying a System Policy.
Deleting Authentication Objects
You can delete an authentication object if it is not currently enabled in a system policy.
To delete an authentication object:
Step 1 Select System > Local > User Management .
The User Management page appears.
Step 2 Click the External Authentication tab.
The External Authentication page appears.
Step 3 Click the delete icon ( ) next to the object you want to delete.
The object is deleted and the External Authentication page appears.
Managing User Accounts
If you have Administrator access, you can use the web interface to view and manage user accounts on a Defense Center or a managed device, including adding, modifying, and deleting accounts. You can also create and modify custom user roles and configure user role escalation. User accounts without Administrator access are restricted from accessing management features. The navigation menu differs in appearance for each type of user.
See the following sections for more information about managing user accounts:
- Viewing User Accounts explains how to access the User Management page, where you can add, activate, deactivate, edit, and delete user accounts.
- Adding New User Accounts describes the different options you can use when you add a new user account.
- Managing Command Line Access describes how to assign command line interface access to local device users on Series 3 or virtual devices.
- Managing Externally Authenticated User Accounts explains how externally authenticated users are added and what aspects of the user configuration you can manage within the FireSIGHT System.
- Modifying User Privileges and Options explains how to access and modify an existing user account.
- Understanding Restricted User Access Properties explains how to restrict the data available to a user account with restricted data access.
- Deleting User Accounts explains how to delete user accounts.
- User Account Privileges contains tables that list the menus and options each type of user account can access.
Viewing User Accounts
From the User Management page, you can view, edit, and delete existing accounts. You can view the type of authentication for a user from the Authentication Method column. The Password Lifetime column indicates the days remaining on each user’s password. The icons in the Action column allow you to edit users in more detail and set users active or inactive. Note that for externally authenticated users, if the authentication object for the server is disabled, the Authentication Method column displays External (Disabled) .
To access the User Management page:
Step 1 Select System > Local > User Management .
The User Management page appears, showing each user, with options to activate, deactivate, edit, or delete the user account.
See the following sections for information about the actions you can perform on the User Management page:
Adding New User Accounts
Supported Devices: feature dependent
When you set up a new user account, you can control which parts of the system the account can access. You can set password expiration and strength settings for the user account during creation. For a local account on a Series 3 device, you can also configure the level of command line access the user will have.
Step 1 Select System > Local > User Management .
The User Management page appears.
Step 3 In the User Name field, type a name for the new user.
New user names must contain alphanumeric or hyphen characters with no spaces, and must be no more than 32 characters. User names are case sensitive.
Step 4 If you want this user to authenticate to an external directory server on login, select Use External Authentication Method .
If you enable this option, the password management options disappear. Skip to step 8 to continue with configuring an access role for the user.
Note that for users to authenticate to an external directory server, you must use the Defense Center to create an authentication object for the server you want to use, then apply a system policy with authentication enabled. In addition, the external authentication server must be available in order for those users to log into FireSIGHT System appliances. For more information, see Managing Authentication Objects and Enabling External Authentication.
Step 5 In the Password and Confirm Password fields, type a password (up to 32 alphanumeric characters).
If you enable password strength checking, the password must be at least eight alphanumeric characters of mixed case and must include at least one numeric character and one special character. It cannot be a word that appears in a dictionary or include consecutive repeating characters.
Note If you enable STIG compliance on an appliance, see the FireSIGHT System STIG Release Notes for more information on password settings for shell access users.
Step 6 Configure the remaining user account login options.
For more information, see the User Account Login Options table.
Step 7 If you are creating a local user through the web interface of a Series 3 device, you can assign the level of Command-Line Interface Access for the user:
- Select None to disable access to the command line for the user.
- Select Basic to allow the user to log into the shell and to access a specific subset of commands.
- Select Configuration to allow the user to log into the shell and use any command line option, including expert mode if that is allowed on the appliance.
For more information on command line access, see Managing Command Line Access.
Step 8 Select access roles to grant to the user.
Note For all physical managed devices, the Cisco-provided predefined user roles are limited to Administrator, Maintenance User, and Security Analyst.
For more information, see Configuring User Roles.
The user is created and the User Management page appears again.
Tip Click the slider next to the name of an internally authenticated user on the User Management page to reactivate a deactivated user, or to disable an active user account without deleting it.
Managing Command Line Access
Supported Devices: Series 3, virtual
On a Series 3 or virtual device, you can assign command line interface access to local device users.
Note that you can also assign command line access for users on a virtual device, but you use commands from the command line interface. For more information, see Command Line Reference.
The commands a user can run depend on the level of access you assign to the user. When you set Command-Line Interface Access to None , the user cannot log into the appliance on the command line. Any session the user starts will close when the user provides credentials. The access level defaults to None on user creation. When you set Command-Line Interface Access to Basic , a specific set of commands can be run by the user
When you set Command-Line Interface Access to Configuration , the user can access any of the command line options. Exercise caution in assigning this level of access to users.
Caution Shell access granted to externally authenticated users defaults to the Configuration level of command line access, granting rights to all command line utilities. For more information on shell access for externally authenticated users, see Understanding Shell Access and Configuring Shell Access.
Managing Externally Authenticated User Accounts
When an externally authenticated user logs into an appliance that has external authentication enabled, the appliance grants the user the default access role you set by specifying group membership in the authentication object. If you did not configure access group settings, the appliance grants the default user role you set in the system policy. However, if you add users locally before they log into the appliance, the user privileges you configure on the User Management page override the default settings.
For more information on selecting a default user role, see Enabling External Authentication and Understanding User Privileges. Note that you can set both predefined and custom user roles as the default user role for externally authenticated users. For more information, see Configuring User Roles.
An internally authenticated user is converted to external authentication when all of the following conditions exist:
- You enable LDAP (with or without CAC) or RADIUS authentication.
- The same user name exists for the user on the LDAP or RADIUS server.
- The user logs in using the password stored for that user on the LDAP or RADIUS server.
Note that you can only enable external authentication in a system policy on a Defense Center. You must use the Defense Center to apply the policy to managed devices if you want to use external authentication on them.
After an externally authenticated user logs in to an appliance for the first time, the appliance associates those credentials with a set of permissions by creating a local user record. For more information about user login, see Logging into the Appliance. After initial login, the permissions for that local user record can be modified unless they are granted through group or list membership, as follows:
- If the default role for externally authenticated user accounts is set to a specific access role, users can log into the appliance using their external account credentials without any additional configuration by the system administrator.
- If an account is externally authenticated and by default receives no access privileges, users can log in but cannot access any functionality. You (or your system administrator) can then change the permissions to grant the appropriate access to user functionality.
Tip The system does not create a local user account for shell access users. Shell access is controlled entirely through either the shell access filter or PAM login attribute set for an LDAP server, or the shell access list on a RADIUS server.
For more information on modifying user access, see Modifying User Privileges and Options. Note that you cannot manage passwords for externally authenticated users or deactivate externally authenticated users through the FireSIGHT System interface. For externally authenticated users, you cannot remove the minimum access rights through the FireSIGHT System user management page for users assigned an access role because of LDAP group or RADIUS list membership or attribute values. On the Edit User page for an externally authenticated user, rights granted because of settings on an external authentication server are marked with a status of Externally Modified .
You can, however, assign additional rights. When you modify the access rights for an externally authenticated user, the Authentication Method column on the User Management page provides a status of External - Locally Modified .
Shell users can log in using user names with lowercase letters. Login authentication for the shell is case sensitive.
Caution On Series 3 Defense Centers, all shell users have
sudoers privileges. Make sure that you restrict the list of users with shell access appropriately. On Series 3 and virtual devices, shell access granted to externally authenticated users defaults to the Configuration level of command line access, which also grants sudoers privileges. For more information on setting up shell access, see Understanding Shell Access and Configuring Shell Access.Managing User Login Settings
You can control how and when the password for each user account is changed, as well as when user accounts are disabled. If you configured a timeout for web interface login sessions, you can exempt users from this timeout. The following table describes some of the options you can use to regulate passwords and account access.
Note that for locally authenticated users on Series 3 managed devices, changing a user’s password for the web interface also changes that password for the command line interface.
If you enable the Check Password Strength option, the minimum password length is automatically set to 8 characters. If you also set a value for Minimum Password Length that exceeds 8 characters, the higher value applies.
Note After you enable Use External Authentication Method, login options no longer appear. Use the external authentication server to manage login settings.
Select this check box if you want this user's credentials to be externally authenticated. Note If you select this option for the user and the external authentication server is unavailable, that user can log into the web interface but cannot access any functionality. |
|
Enter an integer, without spaces, that determines the maximum number of times each user can try to log in after a failed login attempt before the account is locked. The default setting is five tries; use 0 to allow an unlimited number of failed logins. |
|
Enter an integer, without spaces, that determines the minimum required length, in characters, of a user’s password. The default setting is |
|
Enter the number of days after which the user’s password expires. The default setting is |
|
Enter the number of warning days users have to change their password before their password actually expires. The default setting is 0 days.
|
|
Select this option to force users to change their passwords the first time they log in. |
|
Select this option to require strong passwords. A strong password must be at least eight alphanumeric characters of mixed case and must include at least one numeric character and one special character. It cannot be a word that appears in a dictionary or include consecutive repeating characters. |
|
Select this option if you do not want a user’s login sessions to terminate due to inactivity. Users with the Administrator role cannot be made exempt. For more information on session timeouts, see Configuring User Interface Settings. |
Configuring User Roles
Each FireSIGHT System user has an associated user access role or roles. For example, an analyst needs access to event data to analyze the security of your network, but might not require access to administrative functions for the FireSIGHT System itself. Using user roles, you can, for example, grant Security Analyst access to analysts while reserving the Administrator role for the user or users managing the FireSIGHT System. The FireSIGHT System includes ten predefined user roles designed for a variety of administrators and analysts. You can also create custom user roles with specialized access privileges.
The menus and other options in the web interface that users can access depend on their roles. Predefined user roles have a set of predetermined access privileges, while custom user roles have granular access privileges that their creator determines.
You configure user roles on the User Roles page.
To access the User Roles page:
Step 1 Select System > Local > User Management .
The User Management page appears.
Step 2 Click the User Roles tab.
The User Roles page appears, showing all predefined and custom user roles, with options to activate, deactivate, edit, copy, delete, and export roles.
For more information on configuring the two types of user roles, see the following sections:
- Managing Predefined User Roles
- Managing Custom User Roles
- Creating a Custom Copy of a Predefined User Role
- Deleting a Custom User Role
Managing Predefined User Roles
The FireSIGHT System includes ten predefined user roles that provide a range of access privilege sets to meet the needs of your organization. On the User Roles page, predefined user roles are labeled “Cisco Provided”. Note that managed devices have access to only three of the ten predefined user roles: Administrator, Maintenance User, and Security Analyst.
Although you cannot edit predefined user roles, you can use their access privilege sets as the basis for custom user roles. For information on creating and editing custom user roles, see Managing Custom User Roles. In addition, because you cannot edit predefined user roles, you cannot configure them to escalate to another user role. For more information, see Managing User Role Escalation.
The following table briefly describes the predefined roles available to you. For a list of the menus and options available to each role, see User Account Privileges.
Provides access to access control, SSL inspection, and file policy features. Note, however, that Access Admins cannot apply access control policies. Access Admins have access to access control, SSL inspection, and file-related options in the Policies menu. |
|
Provides access to analysis and reporting features, rule and policy configuration, system management, and all maintenance features. Administrators have access to all menu options; their sessions present a higher security risk if compromised, so you cannot make them exempt from login session timeouts. Note that you should limit use of the Administrator role for security reasons. |
|
Provides access to network discovery, correlation, and user activity features. Discovery Admins have access to relevant options in the Policies menu. |
|
Provides read-only access to the FireSIGHT System database using an application that supports JDBC SSL connections. Note that for the third-party application to authenticate to the FireSIGHT System appliance, you must enable database access in the system settings as described in Enabling Access to the Database. On the web interface, External Database Users have access only to online help-related options in the Help menu. Because this role’s function does not involve the web interface, access is provided only for ease of support and password changes. |
|
Provides access to all intrusion policy, intrusion rule, and network analysis policy features. Intrusion Admins have access to intrusion-related options in the Policies menu. Note that Intrusion Admins cannot apply intrusion or network analysis policies as part of access control policies. |
|
Provides access to monitoring and maintenance features. Maintenance Users have access to maintenance-related options in the Health and System menus. |
|
Provides access to access control, SSL inspection, and device configuration features. Network Admins have access to access control, SSL inspection, and device-related options in the Policies and Devices menus. |
|
Provides access to security event analysis features, including event views, reports, hosts, host attributes, services, vulnerabilities, client applications, and read-only access to health events. Security Analysts have access to analysis-related options in the Overview , Analysis , Health , and System menus. |
|
Provides read-only access to security event analysis features, including event views, reports, hosts, host attributes, services, vulnerabilities, client applications, and health events. Security Analysts have access to analysis-related options in the Overview , Analysis , Health , and System menus. |
|
Provides limited access to access control, intrusion, file, SSL, and network discovery policies. Security Approvers can view these policies and apply network discovery, intrusion, and access control policies, but cannot make policy changes. They have access to applicable policy-related options in the Policies menu. |
Along with assigning an event analyst role to a user, you can restrict that user’s deletion rights to only allow deletion of report profiles, searches, bookmarks, custom tables, and custom workflows created by that user. For more information, see Adding New User Accounts.
Note that externally authenticated users, if assigned no other roles, have minimum access rights based on the settings in LDAP or RADIUS authentication objects and in the system policy. You can assign additional rights to these users, but to remove or change minimum access rights, you must perform the following tasks:
- Move the user from one list to another in the authentication object or change the user's attribute value or group membership on the external authentication server.
- Reapply the system policy.
- Use the User Management page to remove the access from that user account.
You cannot delete predefined user roles, but you can deactivate them. Deactivating a role removes that role and all associated permissions from any user who is assigned that role.
Caution If a deactivated role is the only role assigned to a given user, that user can log in and access the User Preferences menu, but is otherwise unable to access the FireSIGHT System.
To activate or deactivate a user role:
Step 1 Select System > Local > User Management .
The User Management page appears.
Step 2 Click the User Roles tab.
Step 3 Click the slider next to the user role you want to activate or deactivate.
Note If you deactivate, then reactivate, a role with Lights-Out Management while a user with that role is logged in, or restore a user or user role from a backup during that user’s login session, that user must log back into the web interface to regain access to IPMItool commands. For more information, see Using Lights-Out Management.
Managing Custom User Roles
In addition to the predefined user roles, you can also create custom user roles with specialized access privileges. Custom user roles can have any set of menu-based and system permissions, and may be completely original or based on a predefined user role. Like predefined user roles, custom roles can serve as the default role for externally authenticated users. Unlike predefined roles, you can modify and delete custom roles.
Selectable permissions are hierarchical, and are based on the FireSIGHT System menu layout. Permissions are expandable if they have sub-pages or if they have more fine-grained permissions available beyond simple page access. In that case, the parent permission grants page view access and the children granular access to related features of that page. For example, the Correlation Events permission grants access to the Correlation Events page, while the Modify Correlation Events check box allows the user to edit and delete the information available on that page. Permissions that contain the word “Manage” grant the ability to edit and delete information that other users create.
Tip For pages or features not included in the menu structure, privileges are granted by parent or related pages. For example, the Modify Intrusion Policy privilege also allows you to modify network analysis policies.
You can apply restricted searches to a custom user role. These constrain the data a user may see in the event viewer. You can configure a restricted search by first creating a private saved search and selecting it from the “Restricted Search” drop-down menu under the appropriate menu-based permission. For more information, see Performing a Search.
When you configure a custom user role on a Defense Center, all menu-based permissions are available for you to grant. When you configure a custom user role on a managed device, only some permissions are available — those relevant to device functions. For more information on the menu-based permissions you can configure and their relationship with predefined user roles, see:
The selectable options under System Permissions allow you to create a user role that can make queries to the external database or escalate to the permissions of a target user role. For more information, see Enabling Access to the Database and Managing User Role Escalation.
Optionally, instead of creating a new custom user role, you can export a custom user role from another appliance, then import it onto your appliance. You can then edit the imported role to suit your needs before you apply it. For more information, see Exporting Configurations and Importing Configurations.
Step 1 Select System > Local > User Management .
The User Management page appears.
Step 2 Click the User Roles tab.
Step 3 Click Create User Role .
The User Role Editor page appears.
Step 4 In the Name field, type a name for the new user role.
You can use alphanumeric or hyphen characters, without spaces. Role names must be no more than 75 characters. User role names are case sensitive.
Step 5 Optionally, add a description for the new role in the Description field.
Role descriptions must be no more than 255 characters.
Step 6 Select permissions for the new role.
When you select an unselected permission, all of its children are selected, and the multi-value permissions choose the first value. If you clear a high-level permission, all of its children are cleared also. Selected permissions without all children selected appear in italic text.
Note that choosing to copy a predefined user role to use as the base for your custom role preselects the permissions associated with that predefined role. For more information on copying predefined user roles, see Creating a Custom Copy of a Predefined User Role.
The current escalation target role is listed beside the role escalation check box. If you select this check box, you can then choose to authenticate escalations either with the assigned user’s password or with the password of another specified user role. For more information, see Managing User Role Escalation.
The custom user role is created and the User Roles page appears again.
Creating a Custom Copy of a Predefined User Role
You can copy an existing role to use as the basis for a new custom role. This preselects the existing role’s permissions in the User Role Editor so you can model one role on another.
To create a custom copy of a predefined user role:
Step 1 Select System > Local > User Management .
The User Management page appears.
Step 2 Click the User Roles tab.
Step 3 Click the copy icon ( ) next to the user role you want to copy.
The User Role Editor page appears with the copied role’s permissions preselected.
Note that you can copy both custom and predefined user roles in this way.
Deleting a Custom User Role
Unlike predefined user roles, you can delete custom roles that are no longer necessary. If you want to disable a custom role without removing it entirely, you can deactivate it instead; for more information, refer to the procedure in Managing Predefined User Roles. Note that you cannot delete your own user role or a role that is set as a default user role in the system policy. For more information, see Enabling External Authentication.
Step 1 Select System > Local > User Management .
The User Management page appears.
Step 2 Click the User Roles tab.
Step 3 Click the delete icon ( ) next to the custom role you want to delete.
If a deleted role is the only role assigned to a given user, that user can log in and access the User Preferences menu, but is otherwise unable to access the FireSIGHT System.
Modifying User Privileges and Options
After adding user accounts to the system, you can modify access privileges, account options, or passwords at any time. Note that password management options do not apply to users who authenticate to an external directory server. You manage those settings on the external server. However, you must configure access rights for all accounts, including those that are externally authenticated.
For externally authenticated users, you cannot remove the minimum access rights through the FireSIGHT System user management page for users assigned an access role because of LDAP group or RADIUS list membership or attribute values. You can, however, assign additional rights. When you modify the access rights for an externally authenticated user, the Authentication Method column on the User Management page provides a status of External - Locally Modified .
Note that if you change the authentication for a user from externally authenticated to internally authenticated, you must supply a new password for the user.
To modify user account privileges:
Step 1 Select System > Local > User Management .
The User Management page appears.
Step 2 Click the edit icon ( ) next to the user you want to modify.
Step 3 Modify the account or accounts as needed:
- See Managing Externally Authenticated User Accounts for a description of how users can be authenticated through external servers.
- See Managing User Login Settings for information on changing password settings for internally authenticated users.
- See Configuring User Roles for more information on configuring roles to grant access for FireSIGHT System functions.
Understanding Restricted User Access Properties
You can restrict the data that a user role can view in the event viewer by applying a restricted search to that role. You can specify this information when creating or editing the role assigned to a user. To create a custom role with restricted access, you must choose the tables you want to restrict from the Menu Based Permissions list, then select private saved searches from the Restrictive Search drop-down lists. For more information, see Managing Custom User Roles.
Modifying User Passwords
You can modify user passwords from the User Management page for internally authenticated users. Note that you must manage externally authenticated user passwords on the LDAP or RADIUS server.
Note If you enable STIG compliance or Lights-Out Management (LOM) on an appliance, different password restrictions apply. For more information on password settings for shell access users on systems with STIG compliance enabled, see the FireSIGHT System STIG Release Notes. For more information on password settings for the system password for LOM users, see Enabling Lights-Out Management User Access.
Step 1 Select System > Local > User Management .
The User Management page appears.
Step 2 Next to the user name, click the edit icon (
).
Step 3 In the Password field, type the new password (up to 32 alphanumeric characters).
Step 4 In the Confirm Password field, retype the new password.
If password strength checking is enabled for the user account, the password must have at least eight alphanumeric characters of mixed case, with at least one number and one special character. It cannot be a word that appears in a dictionary or contain consecutive repeating characters.
Step 5 Make any other changes you want to make to the user configuration:
- For more information on password options, see Managing User Login Settings.
- For more information on user roles, see Configuring User Roles.
The password is changed and any other changes saved.
Deleting User Accounts
You can delete user accounts from the system at any time, with the exception of the admin account, which cannot be deleted.
Step 1 Select System > Local > User Management .
The User Management page appears.
Step 2 Next to the user whose account you want to delete, click the delete icon (
). The account is deleted.
User Account Privileges
The following sections provide a list of the configurable user permissions in the FireSIGHT System and the user roles that can access them. The permissions listed here follow the order of the Menu Based Permissions list that appears when you create a custom user role. Not all permissions are available on managed devices; permissions available only on the Defense Center are marked accordingly. For more information, see Managing Custom User Roles.
Note that because the DC500 Defense Center and Series 2 devices support restricted features sets, not all permissions are applicable to these appliances. See the Supported Access Control Capabilities by Device Model table for a summary of Series 2 appliance features.
For more information on the access notations used in the tables that follow and throughout this documentation, see Access Conventions. The following sections refer to the user role privileges associated with each main menu in the web-based interface:
Overview Menu
The following table lists, in order, the user role privileges required to access each option in the Overview menu and whether the user role has access to the sub-permissions within. The Security Approver, Discovery Admin, Intrusion Admin, Access Admin, Network Admin, and External Database User roles have no permissions in the Overview menu.
Analysis Menu
The following table lists, in order, the user role privileges required to access each option in the Analysis menu and whether the user role has access to the sub-permissions within. Permissions that appear multiple times under different headings will be listed on the table only where they first appear, except to indicate submenu headings. The Security Approver, Intrusion Admin, Access Admin, Network Admin, and External Database User roles have no permissions in the Analysis menu. The Analysis menu is only available on the Defense Center.
Policies Menu
The following table lists, in order, the user role privileges required to access each option in the Policies menu and whether the user roles has access to the sub-permissions within. The External Database User, Maintenance User, Security Analyst, and Security Analyst (Read Only) roles have no permissions in the Policies menu. The Policies menu is only available on the Defense Center.
Note that the Intrusion Policy and Modify Intrusion Policy privileges also allow you to create and modify network analysis policies.
Devices Menu
The Devices menu table lists, in order, the user role privileges required to access each option in the Devices menu and the sub-permissions within. An X indicates that the user role has access. The Access Admin, Discovery Admin, External Database User, Intrusion Admin, Maintenance User, Security Approver, Security Analyst, and Security Analyst (Read Only) have no permissions in the Devices menu. The Devices menu is only available on the Defense Center.
Object Manager
The Object Manager permission is available to the Access Admin, Administrator, and Network Admin user roles. The Object Manager permission is only available on the Defense Center.
FireAMP
The FireAMP permission is available only to the Administrator user role. This permission is only available on the Defense Center.
Health Menu
The following table lists, in order, the user role privileges required to access each option in the Health menu and whether the user role has access to the sub-permissions within. The Access Admin, Discovery Admin, Intrusion Admin, External Database User, Network Admin, and Security Approver roles have no permissions in the Health menu. The Health menu is only available on the Defense Center.
System Menu
The following table lists, in order, the user role privileges required to access each option in the System menu and whether the user role has access to the sub-permissions within. The Access Admin, Discovery Admin, Intrusion Admin, External Database User, and Security Analyst (Read Only) roles have no permissions in the System Menu.
Managing User Role Escalation
You can give custom user roles the permission, with a password, to temporarily gain the privileges of another, targeted user role in addition to those of the base role. This allows you to easily substitute one user for another during an absence, or to more closely track the use of advanced user privileges.
For example, a user whose base role has very limited privileges may escalate to the Administrator role to perform administrative actions. You can configure this feature so that users can use their own passwords, or so they use the password of another user that you specify. The second option allows you to easily manage one escalation password for all applicable users. For more information, see Configuring a Custom User Role for Escalation.
Note that only one user role at a time can be the escalation target role. You can use a custom or predefined user role. Each escalation lasts for the duration of a login session and is recorded in the audit log.
For more information on configuring and using this feature, please see the following sections:
- Configuring the Escalation Target Role
- Configuring a Custom User Role for Escalation
- Escalating Your User Role
Configuring the Escalation Target Role
You can assign any of your user roles, predefined or custom, to act as the system-wide escalation target role. This is the role to which any other role may escalate, if it has the ability.
To configure the escalation target role:
Step 1 Select System > Local > User Management .
The User Management page appears.
Step 3 Click Configure Permission Escalation .
The Configure Permission Escalation dialog box appears.
Step 4 Select a user role from the drop-down list.
Step 5 Click OK to save your changes.
Your changes are saved and the User Roles page appears.
Note Changing the escalation target role is effective immediately. Users in escalated sessions now have the permissions of the new escalation target.
Configuring a Custom User Role for Escalation
To use the user role escalation feature, you must first configure a custom user role with the escalation permission, select its escalation password, and assign that role to a user. For more information, see Adding New User Accounts and Configuring User Roles.
Consider the needs of your organization when you configure the escalation password for a custom role. If you want to easily manage many escalating users, you may want to select another user whose password serves as the escalation password. If you change that user’s password or deactivate that user, all escalating users who require that password are affected. This allows you to manage user role escalation more efficiently, especially if you select an externally authenticated user that you can manage centrally.
To configure a custom user role for escalation:
Step 1 Select System > Local > User Management .
The User Management page appears.
Step 3 Click
Create User Role
to create a new custom user role, or the edit icon (
) next to an existing custom user role.
The User Role Editor page appears.
Step 4 Choose a name, description and menu-based permissions for the custom user role.
For more information, see the procedure in Managing Custom User Roles.
Step 5 In System Permissions, select the Set this role to escalate to: check box.
The escalation password options appear.
Step 6 Select the password that this role uses to escalate. You have two options:
Note When authenticating with another user’s password, you can enter any username, even that of a deactivated or nonexistent user. Deactivating the user whose password is used for escalation makes escalation impossible for users with the role that requires it. You can use this feature to quickly remove escalation powers if necessary.
Your changes are saved and the User Roles page appears again. Users with this role can now escalate to the target user role. For more information on assigning roles to a user, see Adding New User Accounts.
Escalating Your User Role
When a user has an assigned custom user role with permission to escalate, that user may escalate to the target role’s permissions at any time. Note that escalation has no effect on user preferences. The Escalate Permissions option in the User menu does not appear if your assigned user role is not configured for user role escalation.
Step 1 Select Local > User > Escalate Permissions .
The Escalate User Permissions dialog box appears.
Step 2 Enter the authentication password.
You now have all permissions of the escalation target role in addition to your current role.
Note that escalation lasts for the remainder of your login session. To return to the privileges of your base role only, you must log out, then begin a new session.
Configuring Single Sign-on from Cisco Security Manager
Supported Devices: ASA FirePOWER
Single sign-on (SSO) enables integration between Cisco Security Manager (CSM) Version 4.7 or higher and the Defense Center, which allows you to access the Defense Center from CSM without additional authentication to log in. When managing the ASA module of an ASA FirePOWER device, you may want to modify the policies applied to the FirePOWER module of the device. You can select the managing Defense Center in CSM and launch it in a web browser. If the managing Defense Center is a member of a high availability pair, using SSO navigates you to the primary peer.
If you have access based on your user role, the system navigates you to the Device tab of the Device Management page for the device you cross-launched from in CSM. Otherwise, the system navigates you to the Summary Dashboard page ( Overview > Dashboards ), except for user accounts with no dashboard access, which use the Welcome page.
Before you can SSO to a Defense Center, you must set up a one-way, encrypted authentication path from CSM to the Defense Center. In NAT environments, the Defense Center and CSM must reside on the same side of the NAT boundary. To enable communications, you must provide the following criteria for CSM and the Defense Center to recognize each other:
- From CSM, you must generate an SSO shared encryption key that identifies the connection. You must enter this key on the Defense Center.
- On the Defense Center, you provide the CSM server hostname or IP address, along with the server port. If you are using high availability, configure SSO on the primary peer.
- To validate the encrypted authentication parameters, you must set up the same usernames (case insensitive) on CSM and the Defense Center for all users who should have SSO access.
The system disables SSO when STIG compliance is enabled for the Defense Center. See Enabling STIG Compliance for more information.
Note You cannot login with single sign-on if your organization uses CACs for authentication. For more information, see Understanding LDAP Authentication With CAC.
Step 1 From CSM, generate an SSO shared encryption key.
See your CSM documentation for more information.
Step 2 From the Defense Center, select System > Local > User Management .
The User Management page appears.
Step 3 Select CSM Single Sign-on .
The CSM Single Sign-on page appears.
Step 4 Enter the CSM hostname or IP address and the server Port .
Step 5 Enter the Shared key that you generated from CSM.
Step 6 Optionally, if you want to use the Defense Center’s proxy server to communicate with CSM, select the Use Proxy For Connection check box. For more information, see Understanding Management Interface Options.
Step 8 Click Confirm Certificate to save the Certificate.
You can now log in from CSM to the Defense Center without an additional login.
 Feedback