- Title Page
- Introduction & Preface
- Logging into the FireSIGHT System
- Using Objects and Security Zones
- Managing Devices
- Setting Up an IPS Device
- Setting Up Virtual Switches
- Setting Up Virtual Routers
- Setting Up Aggregate Interfaces
- Setting Up Hybrid Interfaces
- Using Gateway VPNs
- Using NAT Policies
- Getting Started with Access Control Policies
- Blacklisting Using Security Intelligence IP Address Reputation
- Tuning Traffic Flow Using Access Control Rules
- Controlling Traffic with Network-Based Rules
- Controlling Traffic with Reputation-Based Rules
- Controlling Traffic Based on Users
- Controlling Traffic Using Intrusion and File Policies
- Understanding Traffic Decryption
- Getting Started with SSL Policies
- Getting Started with SSL Rules
- Tuning Traffic Decryption Using SSL Rules
- Understanding Intrusion and Network Analysis Policies
- Using Layers in Intrusion and Network Analysis Policies
- Customizing Traffic Preprocessing
- Getting Started with Network Analysis Policies
- Using Application Layer Preprocessors
- Configuring SCADA Preprocessing
- Configuring Transport & Network Layer Preprocessing
- Tuning Preprocessing in Passive Deployments
- Getting Started with Intrusion Policies
- Tuning Intrusion Rules
- Tailoring Intrusion Protection to Your Network Assets
- Detecting Specific Threats
- Limiting Intrusion Event Logging
- Understanding and Writing Intrusion Rules
- Blocking Malware and Prohibited Files
- Logging Connections in Network Traffic
- Working with Connection & Security Intelligence Data
- Analyzing Malware and File Activity
- Working with Intrusion Events
- Handling Incidents
- Configuring External Alerting
- Configuring External Alerting for Intrusion Rules
- Introduction to Network Discovery
- Enhancing Network Discovery
- Configuring Active Scanning
- Using the Network Map
- Using Host Profiles
- Working with Discovery Events
- Configuring Correlation Policies and Rules
- Using the FireSIGHT System as a Compliance Tool
- Creating Traffic Profiles
- Configuring Remediations
- Using Dashboards
- Using the Context Explorer
- Working with Reports
- Understanding and Using Workflows
- Using Custom Tables
- Searching for Events
- Managing Users
- Scheduling Tasks
- Managing System Policies
- Configuring Appliance Settings
- Licensing the FireSIGHT System
- Updating System Software
- Monitoring the System
- Using Health Monitoring
- Auditing the System
- Using Backup and Restore
- Specifying User Preferences
- Importing and Exporting Configurations
- Purging Discovery Data from the Database
- Viewing the Status of Long-Running Tasks
- Command Line Reference
- Security, Internet Access, and Communication Ports
- Third-Party Products
- glossary
FireSIGHT System User Guide Version 5.4.1
Bias-Free Language
The documentation set for this product strives to use bias-free language. For the purposes of this documentation set, bias-free is defined as language that does not imply discrimination based on age, disability, gender, racial identity, ethnic identity, sexual orientation, socioeconomic status, and intersectionality. Exceptions may be present in the documentation due to language that is hardcoded in the user interfaces of the product software, language used based on RFP documentation, or language that is used by a referenced third-party product. Learn more about how Cisco is using Inclusive Language.
- Updated:
- February 18, 2015
Chapter: Enhancing Network Discovery
Enhancing Network Discovery
The information about your network traffic collected by the FireSIGHT System is most valuable to you when the system can correlate this information to identify the hosts on your network that are most vulnerable and most important.
As an example, if you have several devices on your network running a customized version of SuSE Linux, the system cannot identify that operating system and so cannot map vulnerabilities to the hosts. However, knowing that the system has a list of vulnerabilities for SuSE Linux, you may want to create a custom fingerprint for one of the hosts that can then be used to identify the other hosts running the same operating system. You can include a mapping of the vulnerability list for SuSE Linux in the fingerprint to associate that list with each host that matches the fingerprint.
The system also allows you to input host data from third-party systems directly into the network map, using the host input feature. However, third-party operating system or application data does not automatically map to vulnerability information. If you want to see vulnerabilities and perform impact correlation for hosts using third-party operating system, server, and application protocol data, you must map the vendor and version information from the third-party system to the vendor and version listed in the vulnerability database (VDB). You also may want to maintain the host input data on an ongoing basis. Note that even if you map application data to FireSIGHT System vendor and version definitions, imported third-party vulnerabilities are not used for impact assessment for clients or web applications.
If the system cannot identify application protocols running on hosts on your network, you can create user-defined application protocol detectors that allow the system to identify the applications based on a port or a pattern. You can also import, activate, and deactivate certain application detectors to further customize the application detection capability of the FireSIGHT System.
You can also replace detection of operating system and application data using scan results from the Nmap active scanner or augment the vulnerability lists with third-party vulnerabilities. The system may reconcile data from multiple sources to determine the identity for an application. For more information on how the system does this, see Understanding Current Identities. For more information on active scanning, see Configuring Active Scanning.
Assessing Your Detection Strategy
Before you make any changes to the system’s default detection capabilities, you should analyze what hosts are not being identified correctly and why, so you can decide what solution to implement. Use the following as a guide for your decision:
- Are Your Managed Devices Correctly Placed?
- Do Unidentified Operating Systems Have a Unique TCP Stack?
- Can the FireSIGHT System Identify All Applications?
- Have You Applied Patches that Fix Vulnerabilities?
- Do You Want to Track Third-Party Vulnerabilities?
Are Your Managed Devices Correctly Placed?
If network devices such as load balancers, proxy servers, or NAT devices reside between the managed device and the unidentified or misidentified host, place a managed device closer to the misidentified host rather than using custom fingerprinting. Cisco does not recommend using custom fingerprinting in this scenario.
Do Unidentified Operating Systems Have a Unique TCP Stack?
If the system misidentifies a host, you should investigate why the host is misidentified to help you decide between creating and activating a custom fingerprint or substituting Nmap or host input data for discovery data.

Caution If you encounter misidentified hosts, contact your support representative before creating custom fingerprints.
If a host is running an operating system that is not detected by the system by default and does not share identifying TCP stack characteristics with existing detected operating systems, you should create a custom fingerprint.
For example, if you have a customized version of Linux with a unique TCP stack that the system cannot identify, you would benefit from creating a custom fingerprint, which allows the system to identify the host and continuing monitoring it, rather than using scan results or third-party data, which require you to actively update the data yourself on an ongoing basis.
Note that many open source Linux distributions use the same kernel, and as such, the system identifies them using the Linux kernel name. If you create a custom fingerprint for a Red Hat Linux system, you may see other operating systems (such as Debian Linux, Mandrake Linux, Knoppix, and so on) identified as Red Hat Linux, because the same fingerprint matches multiple Linux distributions.
You should not use a fingerprint in every situation. For example, a modification may have been made to a host’s TCP stack so that it resembles or is identical to another operating system. For example, an Apple Mac OS X host is altered, making its fingerprint identical to a Linux 2.4 host, causing the system to identify it as Linux 2.4 instead of Mac OS X. If you create a custom fingerprint for the Mac OS X host, it may cause all legitimate Linux 2.4 hosts to be erroneously identified as Mac OS X hosts. In this case, if Nmap correctly identifies the host, you could schedule regular Nmap scans for that host.
If you import data from a third-party system using host input, you must map the vendor, product, and version strings that the third party uses to describe servers and application protocols to the Cisco definitions for those products. For more information, see Managing Third-Party Product Mappings. Note that even if you map application data to FireSIGHT System vendor and version definitions, imported third-party vulnerabilities are not used for impact assessment for clients or web applications.
The system may reconcile data from multiple sources to determine the current identity for an operating system or application. For more information on how the system does this, see Understanding Current Identities.
For Nmap data, you can schedule regular Nmap scans. For host input data, you can regularly run the Perl script for the import or the command line utility. However, note that active scan data and host input data may not be updated with the frequency of discovery data.
Can the FireSIGHT System Identify All Applications?
If a host is correctly identified by the system but has unidentified applications, you can create a user-defined detector to provide the system with port and pattern matching information to help identify the application. For more information, see Creating a User-Defined Application Protocol Detector.
Have You Applied Patches that Fix Vulnerabilities?
If the system correctly identifies a host but does not reflect applied fixes, you can use the host input feature to import patch information. When you import patch information, you must map the fix name to a fix in the database. For more information, see Mapping Third-Party Product Fixes.
Do You Want to Track Third-Party Vulnerabilities?
If you have vulnerability information from a third-party system that you want to use for impact correlation, you can map the third-party vulnerability identifiers for servers and application protocols to vulnerability identifiers in the Cisco database and then import the vulnerabilities using the host input feature. For more information on using the host input feature, see the FireSIGHT System Host Input API Guide . For more information on mapping third-party vulnerabilities, see Mapping Third-Party Vulnerabilities. Note that even if you map application data to FireSIGHT System vendor and version definitions, imported third-party vulnerabilities are not used for impact assessment for clients or web applications.
Enhancing Your Network Map
The FireSIGHT System builds the network map using data it detects by passively analyzing traffic. It also uses data added through active sources such as the host input feature and the Nmap scanner. Understanding how the system decides which data to use for an application or operating system identity can help you decide how best to augment the system’s passive detection capabilities with active input sources.
For more information, see the following topics:
- Understanding Passive Detection
- Understanding Active Detection
- Understanding Current Identities
- Understanding Identity Conflicts
Understanding Passive Detection
Passive detection is the detection of host operating system, client, and application information through analysis of traffic passively collected by the system. The system uses information in the VDB to help it identify your network assets.
If the system cannot identify an operating system on a host, you can manually determine it and then create a custom server or client fingerprint to help the system recognize that operating system on other hosts with similar operating system characteristics.
The system uses all collected passive fingerprints for a host operating system to create a derived fingerprint . The system creates derived fingerprints by applying a formula which calculates the most likely identity using the confidence value of each collected fingerprint and the amount of corroborating fingerprint data between identities. Common elements are identified between identities.
If you use user-defined application detectors on your network, you can augment the system’s application detection capabilities by creating custom detectors that provide the system with the information it needs to identify those applications. NetFlow can also add passively detected application information to the network map.
Note that the system does not use application protocol and operating system data that it classified as
unknown
because it is unable to interpret the data. The managed device reports the identity to the Defense Center as
unknown
and the identity data is not used to derive fingerprints.
Understanding Active Detection
Active detection is addition, to the network map, of data collected by active sources, such as host operating system and application information. For example, you can use the Nmap scanner to actively scan the hosts that you target on your network. Nmap discovers operating systems and applications on hosts.
In addition, the host input feature allows you to actively add host input data to the network map. There are two different categories of host input data:
- You can modify a host’s operating system or application identity through the FireSIGHT System user interface. Data added through the interface is user input data .
- You can also import data using a command line utility. Imported data is host import input data .
The system retains one identity for each active source. When you run an Nmap scan instance, for example, the results of the previous scan are replaced with the new scan results. However, if you run an Nmap scan and then replace those results with data from a client whose results are imported through the command line, the system retains both the identities from the Nmap results and the identities from the import client. Then the system uses the priorities set in the system policy to determine which active identity to use as the current identity.
Note that user input is considered one source, even if it comes from different users. As an example, if UserA sets the operating system through the host profile, and then UserB changes that definition through the host profile, the definition set by UserB is retained, and the definition set by UserA is discarded. In addition, note that user input overrides all other active sources and is used as the current identity if it exists.
Understanding Current Identities
The current identity for an application or an operating system on a host is the identity that the system finds most likely to be correct.
The system uses the current identity for an operating system or application for the following purposes:
- to assign vulnerabilities to a host
- for impact assessment
- when evaluating correlation rules written against operating system identifications, host profile qualifications, and compliance white lists
- for display in the Hosts and Servers table views in workflows
- for display in the host profile
- to calculate the operating system and application statistics on the Discovery Statistics page
The system uses source priorities to determine which active identity should be used as the current identity for an application or operating system.
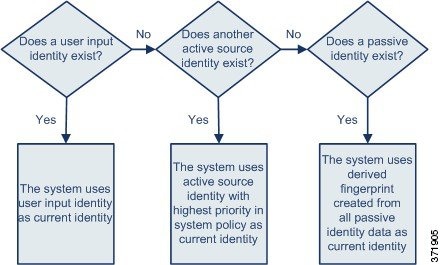
For example, if a user sets the operating system to Windows 2003 Server on a host, Windows 2003 Server is the current identity. Attacks which target Windows 2003 Server vulnerabilities on that host are given a higher impact, and the vulnerabilities listed for that host in the host profile include Windows 2003 Server vulnerabilities.
The database may retain information from several sources for the operating system or for a particular application on a host.
The system treats an operating system or application identity as the current identity when the source for the data has the highest source priority. Possible sources have the following priority order:
2. scanner and application (set in the network discovery policy)
Note that a new higher priority application identity will not override a current application identity if it has less detail than the current identity.
In addition, note that when an identity conflict occurs, the resolution of the conflict depends on settings in the network discovery policy or on your manual resolution, as described in Understanding Identity Conflicts.
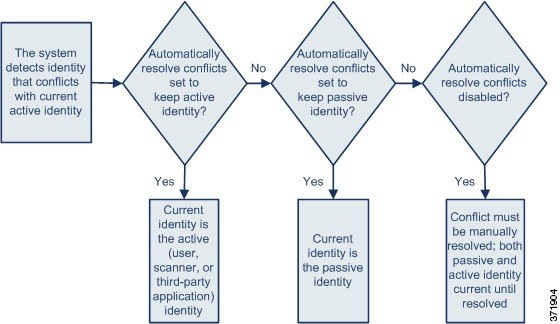
Understanding Identity Conflicts
An identity conflict occurs when the system reports a new passive identity that conflicts with the current active identity and previously reported passive identities. For example, the previous passive identity for an operating system is reported as Windows 2000, then an active identity of Windows XP becomes current. Next, the system detects a new passive identity of Ubuntu Linux 8.04.1. The Windows XP and the Ubuntu Linux identities are in conflict.
When an identity conflict exists for the identity of the host’s operating system or one of the applications on the host, the system lists both conflicting identities as current and uses both for impact assessment until the conflict is resolved.
A user with Administrator privileges can resolve identity conflicts automatically by choosing to always use the passive identity or always use the active identity. Unless you disable automatic resolution of identity conflicts, identity conflicts are always automatically resolved.
A user with Administrator privileges can also configure the system to generate an event when an identity conflict occurs. That user can then set up a correlation policy with a correlation rule that uses an Nmap scan as a correlation response. When an event occurs, Nmap scans the host to obtain updated host operating system and application data.
Using Custom Fingerprinting
The FireSIGHT System includes operating system fingerprints that the system uses to identify the operating system on each host it detects. However, sometimes the system cannot identify a host operating system or misidentifies it because no fingerprints exist that match the operating system. To correct this problem, you can create a custom fingerprint, which provides a pattern of operating system characteristics unique to the unknown or misidentified operating system, to supply the name of the operating system for identification purposes.
If the system cannot match a host’s operating system, it cannot identify the vulnerabilities for the host, because the system derives the list of vulnerabilities for each host from its operating system fingerprint. For example, if the system detects a host running Microsoft Windows, the system has a stored Microsoft Windows vulnerability list that it adds to the host profile for that host based on the detected Windows operating system.
As an example, if you have several devices on your network running a new beta version of Microsoft Windows, the system cannot identify that operating system and so cannot map vulnerabilities to the hosts. However, knowing that the system has a list of vulnerabilities for Microsoft Windows, you may want to create a custom fingerprint for one of the hosts that can then be used to identify the other hosts running the same operating system. You can include a mapping of the vulnerability list for Microsoft Windows in the fingerprint to associate that list with each host that matches the fingerprint.
When you create a custom fingerprint, you can add a customized display of operating system information, and you can select the operating system vendor, product name, and product version for the operating system which the system should use as a model for the vulnerability list for the fingerprint. The Defense Center lists the set of vulnerabilities associated with that fingerprint for any hosts running the same operating system. If the custom fingerprint you create does not have any vulnerabilities mappings in it, the system uses the fingerprint to assign the custom operating system information you provide in the fingerprint. When the system sees new traffic from a host that has already been detected and currently resides in the network map, the system updates the host with the new fingerprint information. the system also uses the new fingerprint to identify any new hosts with that operating system the first time they are detected.
Before attempting to fingerprint a host, you should determine why the host is not being identified correctly to decide whether custom fingerprinting is a viable solution. For more information, see Assessing Your Detection Strategy.
You can create two types of fingerprints with the system:
- Client fingerprints, which identify operating systems based on the SYN packet that the host sends when it connects to a TCP application running on another host on the network.
See Fingerprinting Clients for information about how to obtain a client fingerprint for a host.
- Server fingerprints, which identify operating systems based on the SYN-ACK packet that the host uses to respond to an incoming connection to a running TCP application.
See Fingerprinting Servers for information about how to obtain a server fingerprint for a host.
After creating fingerprints, you must activate them before the system can associate them with hosts. See Managing Fingerprints for more information.

Note If both a client and server fingerprint match the same host, the client fingerprint is used.
Fingerprinting Clients
Client fingerprints identify operating systems based on the SYN packet a host sends when it connects to a TCP application running on another host on the network.
If the Defense Center does not have direct contact with monitored hosts, you can specify a device that is managed by the Defense Center and is closest to the host you intend to fingerprint when specifying client fingerprint properties.
Before you begin the fingerprinting process, obtain the following information about the host you want to fingerprint:
- The number of network hops between the host and the Defense Center or the device you use to obtain the fingerprint. (Cisco strongly recommends that you directly connect the Defense Center or the device to the same subnet that the host is connected to.)
- The network interface (on the Defense Center or the device) that is connected to the network where the host resides.
- The actual operating system vendor, product, and version of the host.
- Access to the host in order to generate client traffic.
To obtain a client fingerprint for a host:
Step 1 Select Policies > Network Discovery , then click Custom Operating Systems .
The Custom Fingerprint page appears.
Step 2 Click Create Custom Fingerprint .
The Create Custom Fingerprint page appears.
Step 3 From the Device drop-down list, select the Defense Center or the device that you want to use to collect the fingerprint.
Step 4 In the Fingerprint Name field, type an identifying name for the fingerprint.
Step 5 In the Fingerprint Description field, type a description for the fingerprint.
Step 6 From the Fingerprint Type list, select Client .
Step 7 In the Target IP Address field, type an IP address of the host you want to fingerprint. Note that the fingerprint will only be based on traffic to and from the host IP address you specify, not any of the host’s other IP addresses (if it has any).
Caution For information on enabling IPv6 on managed devices and Defense Centers, see Configuring Management Interfaces.
Step 8 In the Target Distance field, enter the number of network hops between the host and the device that you selected in step 3 to collect the fingerprint.
Caution This must be the actual number of physical network hops to the host, which may or may not be the same as the number of hops detected by the system.
Step 9 From the Interface list, select the network interface that is connected to the network segment where the host resides.
Caution Cisco recommends that you do not use the sensing interface on a managed device for fingerprinting for several reasons. First, fingerprinting does not work if the sensing interface is on a span port. Also, if you use the sensing interface on a device, the device stops monitoring the network for the amount of time it takes to collect the fingerprint. You can, however, use the management interface or any other available network interfaces to perform fingerprint collection. If you do not know which interface is the sensing interface on your device, refer to the Installation Guide for the specific model you are using to fingerprint.
Step 10 If you want to display custom information in the host profile for fingerprinted hosts (or if the host you want to fingerprint does not reside in the OS Vulnerability Mappings section), select Use Custom OS Display in the Custom OS Display section and provide the values you want to display in host profiles for the following:
- In the Vendor String field, type the operating system’s vendor name. For example, the vendor for Microsoft Windows would be Microsoft.
- In the Product String field, type the operating system’s product name. For example, the product name for Microsoft Windows 2000 would be Windows.
- In the Version String field, type the operating system’s version number. For example, the version number for Microsoft Windows 2000 would be 2000.
Step 11 In the OS Vulnerability Mappings section, select the operating system, product, and versions you want to use for vulnerability mapping.
For example, if you want your custom fingerprint to assign the list of vulnerabilities from Redhat Linux 9 to matching hosts, select Redhat, Inc. as the vendor, Redhat Linux as the product, and 9 as the major version.

Tip When creating a fingerprint, you assign a single vulnerability mapping for the fingerprint. After the fingerprint is created and activated, you can add additional vulnerability mappings for other versions of the operating system. See Editing an Active Fingerprint for more information.
You must specify a Vendor and Product name in this section if you want to use the fingerprint to identify vulnerabilities for matching hosts or if you do not assign custom operating system display information. To map vulnerabilities for all versions of an operating system, specify only the vendor and product name. For example, to add all versions of the Palm OS, you would select PalmSource, Inc. from the Vendor list, Palm OS from the Product list, and leave all other lists at their default settings.
Note Not all options in the Major Version, Minor Version, Revision Version, Build, Patch, and Extension drop-down lists may apply to the operating system you choose. In addition, if no definition appears in a list that matches the operating system you want to fingerprint, you can leave these values empty. Be aware that if you do not create any OS vulnerability mappings in a fingerprint, the system cannot use the fingerprint to assign a vulnerabilities list with hosts identified by the fingerprint.
The Custom Fingerprint status page reappears. The status page refreshes every ten seconds until it receives data from the host in question.
Tip When you click Create, the status briefly shows New, then switches to Pending, where it remains until traffic is seen for the fingerprint, then the status switches to Ready.
Step 13 Using the IP address you specified as the target IP address, access the host you are trying to fingerprint and initiate a TCP connection to the appliance.
For example, access the web interface of the Defense Center from the host you want to fingerprint or SSH into the Defense Center from the host. If you are using SSH, use the following command:
where localIPv6address is the IPv6 address specified in step 7 that is currently assigned to the host and DCmanagementIPv6address is the management IPv6 address of the Defense Center.
The Custom Fingerprint page should then reload with a “Ready” status.
Note To create an accurate fingerprint, traffic must be seen by the appliance collecting the fingerprint. If you are connected through a switch, traffic to a system other than the appliance may not be seen by the system.
Step 14 After the fingerprint is created, you must activate it before the Defense Center can use it to identify hosts. See Managing Fingerprints for more information.
Fingerprinting Servers
Server fingerprints identify operating systems based on the SYN-ACK packet that the host uses to respond to an incoming connection to a running TCP application. Before you begin, you should obtain the following information about the host you want to fingerprint:
- The number of network hops between the host and the appliance you use to obtain the fingerprint. Cisco strongly recommends that you directly connect an unused interface on the appliance to the same subnet that the host is connected to.
- The network interface (on the appliance) that is connected to the network where the host resides.
- The actual operating system vendor, product, and version of the host.
- An IP address that is not currently in use and is authorized on the network where the host is located.
Tip If the Defense Center does not have direct contact with monitored hosts, you can specify a managed device that is closest to the host you intend to fingerprint when specifying server fingerprint properties.
To obtain a server fingerprint for a host:
Step 1 Select Policies > Network Discovery, then click Custom Operating Systems .
The Custom Fingerprint page appears.
Step 2 Click Create Custom Fingerprint .
The Create Custom Fingerprint page appears.
Step 3 From the Device list, select the Defense Center or the managed device that you want to use to collect the fingerprint.
Step 4 In the Fingerprint Name field, type an identifying name for the fingerprint.
Step 5 In the Fingerprint Description field, type a description for the fingerprint.
Step 6 From the Fingerprint Type list, select Server .
Server fingerprinting options appear.
Step 7 In the Target IP Address field, type an IP address of the host you want to fingerprint. Note that the fingerprint will only be based on traffic to and from the host IP address you specify, not any of the host’s other IP addresses (if it has any).
Caution You can capture IPv6 fingerprints only with appliances running Version 5.2 and later of the FireSIGHT System.
Step 8 In the Target Distance field, enter the number of network hops between the host and the device that you selected in step 3 to collect the fingerprint.
Caution This must be the actual number of physical network hops to the host, which may or may not be the same as the number of hops detected by the system.
Step 9 From the Interface list, select the network interface that is connected to the network segment where the host resides.
Caution Cisco recommends that you do not use the sensing interface on a managed device for fingerprinting for several reasons. First, fingerprinting does not work if the sensing interface is on a span port. Also, if you use the sensing interface on a device, the device stops monitoring the network for the amount of time it takes to collect the fingerprint. You can, however, use the management interface or any other available network interfaces to perform fingerprint collection. If you do not know which interface is the sensing interface on your device, refer to the Installation Guide for the specific model you are using to fingerprint.
Step 10 Click Get Active Ports .
If the system has detected any open ports on the host, they appear in the drop-down list.
Step 11 In the Server Port field, type the port that you want the device selected to collect the fingerprint to initiate contact with, or select a port from the Get Active Ports drop-down list.
You can use any server port that you know is open on the host (for instance, 80 if the host is running a web server).
Step 12 In the Source IP Address field, type an IP address that should be used to attempt to communicate with the host.
You should use a source IP address that is authorized for use on the network but is not currently being used, for example, a DHCP pool address that is currently not in use. This prevents you from temporarily knocking another host offline while you create the fingerprint.
In addition, you should exclude that IP address from monitoring in your network discovery policy while you create the fingerprint. Otherwise, the network map and discovery event views will be cluttered with inaccurate information about the host represented by that IP address. For more information, see Understanding Discovery Data Collection.
Step 13 In the Source Subnet Mask field, type the subnet mask for the IP address you are using.
Step 14 If the Source Gateway field appears, enter the default gateway IP address that should be used to establish a route to the host.
The Source Gateway field appears if the target distance (number of hops) is 1 or higher and you are using an interface other than the management interface to connect to the network where the host resides.
Step 15 If you want to display custom information in the host profile for fingerprinted hosts or if the fingerprint name you want to use does not exist in the OS Definition section, select Use Custom OS Display in the Custom OS Display section.
Provide the values you want to appear in host profiles for the following:
- In the Vendor String field, type the operating system’s vendor name. For example, the vendor for Microsoft Windows would be Microsoft.
- In the Product String field, type the operating system’s product name. For example, the product name for Microsoft Windows 2000 would be Windows.
- In the Version String field, type the operating system’s version number. For example, the version number for Microsoft Windows 2000 would be 2000.
Step 16 In the OS Vulnerability Mappings section, select the operating system, product, and versions you want to use for vulnerability mapping. For example, if you want your custom fingerprint to assign the list of vulnerabilities from Redhat Linux 9 to matching hosts, select Redhat, Inc. as the vendor, Redhat Linux as the product, and 9 as the version.
Tip When creating a fingerprint, you assign a single vulnerability mapping for the fingerprint. After the fingerprint is created and activated, you can add additional vulnerability mappings for other versions of the operating system. See Editing an Active Fingerprint for more information.
You must specify a Vendor and Product name in this section if you want to use the fingerprint to identify vulnerabilities for matching hosts or if you do not assign custom operating system display information. To map vulnerabilities for all versions of an operating system, specify only the vendor and product name. For example, to add all versions of the Palm OS, you would select PalmSource, Inc. from the Vendor list, Palm OS from the Product list, and leave all other lists at their default settings.
Note Not all options in the Major Version, Minor Version, Revision Version, Build, Patch, and Extension drop-down lists may apply to the operating system you choose. In addition, if no definition appears in a list that matches the operating system you want to fingerprint, you can leave these values empty. Be aware that if you do not create any OS vulnerability mappings in a fingerprint, the system cannot use the fingerprint to assign a vulnerabilities list with hosts identified by the fingerprint.
Step 18 The Custom Fingerprint status page appears. It reloads every ten seconds and should reload with a “Ready” status.
Note If the target system stops responding during the fingerprinting process, the status shows an ERROR: No Response message. If you see this message, submit the fingerprint again. Wait three to five minutes (the time period may vary depending on the target system), click the edit icon ( ) to access the Custom Fingerprint page, and then click Create.
Step 19 After the fingerprint is created, activate it and, optionally, add vulnerability mappings. See Managing Fingerprints for more information.
Managing Fingerprints
You can activate, deactivate, delete, view, and edit custom fingerprints. When creating a fingerprint, you assign a single vulnerability mapping for the fingerprint. For more information on creating a fingerprint, see Fingerprinting Clients and Fingerprinting Servers. After the fingerprint is created and activated, you can edit the fingerprint to make changes or add vulnerability mappings.
To access the Custom Fingerprints page:
Step 1 Select Policies > Network Discovery , then click Custom Operating Systems .
The Custom Fingerprint page appears.
If the system is awaiting data to create a fingerprint, it automatically refreshes the page every 10 seconds until the fingerprint is created.
Activating Fingerprints
After creating a custom fingerprint, you must activate it before the system can use it to identify hosts. After the new fingerprint is activated, the system uses it to re-identify previously discovered hosts and discover new hosts.
Step 1 Select Policies > Network Discovery , then click Custom Operating Systems .
The Custom Fingerprint page appears.
Step 2 Click the slider next to the fingerprint you want to activate.
Note The activate option is only available if the fingerprint you created is valid. If the slider is not available, try creating the fingerprint again.
The Defense Center activates the fingerprint and propagates it to all managed devices. The icon next to the fingerprint name changes to indicate that the fingerprint is active.
Deactivating Fingerprints
If you want to stop using a fingerprint, you can deactivate it. Deactivating a fingerprint causes a fingerprint to no longer be used, but allows it to remain on the system. When you deactivate a fingerprint, the operating system is marked as unknown for hosts that use the fingerprint. If the hosts are detected again and match a different active fingerprint, they are then identified by that active fingerprint.
Deleting a fingerprint removes it from the system completely. After deactivating a fingerprint, you can delete it.
To deactivate an active fingerprint:
Step 1 Select Policies > Network Discovery , then click Custom Operating Systems .
The Custom Fingerprint page appears.
Step 2 Click the slider next to the active fingerprint you want to deactivate.
The Defense Center deactivates the fingerprint and propagates the deactivation to all managed devices.
Deleting Fingerprints
If you no longer have use for a fingerprint, you can delete it from the system. Note that you must deactivate fingerprints before you can delete them.
Step 1 Select Policies > Network Discovery , then click Custom Operating Systems .
The Custom Fingerprint page appears.
Step 2 If the fingerprints you want to delete are active, click the slider icon next to each one to deactivate it.
Step 3 Click the delete icon ( ) next to the fingerprint you want to delete.
Step 4 Click OK to confirm that you want to delete the fingerprint.
Editing Fi ngerprints
After you create a fingerprint, you can view or edit it. This allows you to make changes and resubmit the fingerprint or add additional vulnerability mappings to it. You can modify fingerprints whether they are active or inactive, but depending on a fingerprint’s state, the things that can be modified differ.
If a fingerprint is inactive , you can modify all elements of the fingerprint and resubmit it to the Defense Center. This includes all properties you specified when creating the fingerprint, such as fingerprint type, target IP addresses and ports, vulnerability mappings, and so on. When you edit an inactive fingerprint and submit it, it is resubmitted to the system and, if it is a client fingerprint, you must resend traffic to the appliance before activating it. Note that you can select only a single vulnerability mapping for an inactive fingerprint. After you activate the fingerprint, you can map additional operating systems and versions to its vulnerabilities list.
If a fingerprint is active , you can modify the fingerprint name, description, custom operating system display, and map additional vulnerabilities to it.
Editing an Inactive Fingerprint
If a fingerprint is inactive, you can modify its properties and resubmit it to the system. This includes making changes such as the type of fingerprint to use, the target system to fingerprint, and so on.
To edit inactive fingerprints:
Step 1 Select Policies > Network Discovery , then click Custom Operating Systems .
The Custom Fingerprint page appears.
Step 2 Click the edit icon (
) next to the fingerprint you want to edit.
The Edit Custom Fingerprint page appears.
Step 3 Make changes to the fingerprint as necessary:
- If you are modifying a client fingerprint, see Fingerprinting Clients for more information about the options you can configure.
- If you are modifying a server fingerprint, see Fingerprinting Servers for more information about the options you can configure.
Step 4 Click Save to resubmit the fingerprint.
Note If you modified a client fingerprint, remember to send traffic from the host to the appliance gathering the fingerprint.
Editing an Active Fingerprint
When a fingerprint is active, you can change its name, description, and display label. In addition, you can manage vulnerability mappings, including adding and deleting vulnerability mappings.
Step 1 Select Policies > Network Discovery , then click Custom Operating Systems .
The Custom Fingerprint page appears.
Step 2 Click the edit icon (
) next to the fingerprint you want to edit.
The Edit Custom Fingerprint Product Mappings page appears.
Step 3 Modify the fingerprint name, description, and custom OS display, if necessary.
Step 4 If you want to delete a vulnerability mapping, click Delete next to the mapping in the Pre-Defined OS Product Maps section of the page.
Step 5 If you want to add additional operating systems for vulnerability mapping, select the Product and, if applicable, the Major Version , Minor Version , Revision Version , Build , Patch , and Extension and then click Add OS Definition .
The vulnerability mapping is added to the Pre-Defined OS Product Maps list.
Step 6 Click Save to save your changes.
Working with Application Detectors
When the FireSIGHT System analyzes IP traffic, it uses detectors to identify the commonly used applications on your network. You use the Detectors page ( Policies > Application Detectors ) to customize the detection capability of the FireSIGHT System.
The page provides information about each detector, including:
- the name of the detector
- the protocol (TCP, UDP, or both) of traffic that the detector inspects
- whether the type of the detector is application protocol, client, web application, or internal detector
- for port-based application detectors, the port used by the application traffic
- details regarding the detected application, including the name, description, risk, business relevance, tags, and categories associated with the application detected by the detector
- the state (active or inactive) of the detector
The system uses only active detectors to analyze application traffic.
You may notice that the listed detectors have different properties. For example, you can view the settings for some detectors but not others. Similarly, you can delete some detectors but not others. This is because there are several different types of Cisco-provided detectors, as described in the following sections.
Cisco-Provided Internal Detectors
Internal detectors are application detectors that are only delivered with updates to the FireSIGHT System. Internal detectors detect client, web application, or application protocol traffic, depending on the detector, but they are categorized as internal detectors rather than one of the other types because they are built-in detectors and cannot be deactivated.
Internal detectors are always on; you cannot deactivate, delete, or otherwise configure them. Examples of internal detectors are the Built-in Amazon detector and the Built-in AppleTalk detector.
Cisco-Provided Client Detectors
Cisco-provided client detectors , which detect client traffic, are delivered via VDB updates but may also be provided with updates to the FireSIGHT System. These detectors may also be provided by Cisco Professional Services as an importable detector.
You can activate and deactivate client detectors according to the needs of your organization. VDB updates may also activate or deactivate client detectors. You can export a client detector only if you import it.
The Google Earth and Immunet detectors are examples of client detectors.
Cisco-Provided Web Application Detectors
Cisco-provided web application detectors , which detect web applications in payloads of HTTP traffic, are delivered via VDB updates but may also be provided with updates to the FireSIGHT System.
You can activate and deactivate web application detectors according to the needs of your organization. VDB updates may activate or deactivate web application detectors. Examples of web application detectors are the Blackboard and LiveJournal detectors.
Cisco-Provided Application Protocol (Port) Detectors
Port-based application protocol detectors , provided by Cisco, are based on detection of network traffic on well-known ports. These detectors are delivered via VDB updates but may also be provided with updates to the FireSIGHT System or provided by Cisco Professional Services as an importable detector.
You can activate and deactivate application protocol detectors according to the needs of your organization. You can also view a detector definition to use it as the basis for a custom detector. VDB updates may activate or deactivate application protocol detectors.
The chargen and finger detectors are examples of port detectors.
Cisco-Provided Application Protocol (FireSIGHT) Detectors
FireSIGHT-based application protocol detectors, provided by Cisco, are based on detection of network traffic using FireSIGHT application fingerprints. These detectors are delivered via VDB updates but may also be provided with updates to the FireSIGHT System.
You can activate and deactivate application protocol detectors according to the needs of your organization. VDB updates may activate or deactivate Cisco-provided application protocol detectors. Examples of FireSIGHT-based application protocol detectors are the Jabber and Steam detectors.
Application Protocol (Pattern) Detectors
Pattern-based application detectors are based on detection of patterns in packets from network traffic. These detectors can be provided by Cisco Professional Services as an importable detector or created by you. This allows you to enhance the system’s detection capabilities with new pattern-based detectors without updating the FireSIGHT System as a whole.
You can activate and deactivate application protocol detectors according to the needs of your organization.
You have full control over imported and user-defined detectors; you can activate, deactivate, edit, import, export, and delete them. An example of a pattern-based detector is a user-defined detector using a pattern in the packet header to detect traffic for a custom application.
Keep in mind that the detector list may change depending on the version of the FireSIGHT System and the VDB you have installed, as well as on any individual detectors you may have imported or created. You should carefully read the release notes for each FireSIGHT System update as well as the advisories for each VDB update for information on updated detectors.
- Understanding Application Detection
- Creating a User-Defined Application Protocol Detector
- Managing Detectors
Creating a User-Defined Application Protocol Detector
If you use custom applications on your network, you can create user-defined application protocol detectors that provide the system with the information it needs to identify those applications. You can base application protocol detection on the port or ports used by application traffic, patterns within the traffic, or on both ports and patterns.
For example, if you expect traffic for a custom application protocol to use port 1180, you can create an application protocol detector that detects traffic on that port. As another example, if you know that the header for any packet containing application protocol traffic has a string of
ApplicationName
in it, you can create a detector that registers the ASCII string of
ApplicationName
as a pattern to match.
You can create user-defined application detectors only for application protocols, not for clients or for web applications. For an explanation of each, see Understanding Application Detection. Client sessions must include a responder packet from the server for the system to begin detecting and identifying application protocols in server traffic. Note that, for UDP traffic, the system designates the source of the responder packet as the server.
User-defined application protocol detectors must use either a port or a pattern match; you cannot create a detector that uses neither, even if you base the detector on an existing detector. You can also create a detector that uses both criteria; this increases the likelihood of correctly identifying traffic for that application protocol.
Tip If you have already created a detector on another Defense Center, you can export it and then import it onto this Defense Center. You can then edit the imported detector to suit your needs. You can export and import user-defined detectors as well as detectors provided by Cisco Professional Services. However, you cannot export or import any other type of Cisco-provided detectors. For more information, see Importing and Exporting Configurations.
To create a user-defined application protocol detector:
Step 1 Select Policies > Application Detectors .
Step 2 Click Create Detector .
The Create Detector page appears.
Step 3 Provide basic detector information, such as the detector name and description.
See Providing Basic Application Protocol Detector Information.
Step 4 Optionally, create a user-defined application for the detector.
See Creating a User-Defined Application.
Step 5 Provide detection criteria, including the protocol of traffic the detector should inspect and the port that the traffic uses.
See Specifying Detection Criteria for Application Protocol Detectors.
Step 6 Optionally, configure the detector to inspect traffic for matches to one or more patterns that occurs in traffic for that application protocol.
See Adding Detection Patterns to an Application Protocol Detector.
Step 7 Optionally, test the new detector against the contents of one or more PCAP files.
See Testing an Application Protocol Detector Against Packet Captures.
The application protocol detector is saved.
Note You must activate the detector before the system can use it to analyze application protocol traffic. For more information, see Activating and Deactivating Detectors. Note that if you include the application in an access control rule, the detector is automatically activated and cannot be deactivated while in use.
Providing Basic Application Protocol Detector Information
You must give each user-defined application protocol detector a name, as well as identify the application protocol you want to detect. Optionally, you can provide a brief description of the detector.
In addition to the information you provide, the Defense Center indicates whether the detector is active or inactive, and whether the detector is a port or pattern detector. If a detector identifies application protocol traffic by port and pattern, the FireSIGHT System considers it a pattern detector.
If you are editing an existing detector, the Defense Center also displays the detector’s author. If you created a user-defined application protocol detector, you are the author. You are also the author for any detector that you import or that you edit and save.
To provide basic application protocol detector information:
Step 1 On the Create Detector page, in the Please enter a name field, type a name for the detector.
Detector names must be unique within the protocol for the traffic you are inspecting. That is, you can create a TCP detector and a UDP detector with the same name, but you cannot create two TCP detectors with the same name.
Step 2 Identify the application protocol you want to detect. You have the following options:
- If you are creating a detector for an existing application protocol (for example, if you want to detect a particular application protocol on a non-standard port), select the application protocol from the Application Protocol drop-down list. Continue with the procedure in Specifying Detection Criteria for Application Protocol Detectors.
- If you are creating a detector for a custom application, continue with the procedure in the next section, Creating a User-Defined Application.
Creating a User-Defined Application
You can create a user-defined application to identify a custom application on your network. You can also create custom categories and custom tags to describe the application. Applications, categories, and tags created here are available in access control rules and in the application filter object manager as well.
For more information on application detection, including a discussion of application protocols and the categories, tags, risk levels, and business relevance used to describe them, see Understanding Application Detection.
To create a user-defined application:
Step 1 On the Create Detector page, click Add .
The Application Editor pop-up window appears.
Step 2 Type a Name for the custom application.
Step 3 Type a Description for the custom application.
Step 4 Select a Business Relevance .
Step 6 Click Add next to Categories to add a category and type a new category name or select an existing category from the Categories drop-down list.
Step 7 Optionally, click Add next to Tags to add a tag and type a new tag name or select an existing tag from the Tags drop-down list.
Click OK to return to the Create Detector page.
Step 8 Continue with the procedure in the next section, Specifying Detection Criteria for Application Protocol Detectors.
Specifying Detection Criteria for Application Protocol Detectors
When creating a user-defined application protocol detector, you must specify the protocol of traffic (TCP, UDP, or both) the detector should inspect. Optionally, you can specify a port that the traffic uses.
Note that if you do not specify a port, you must configure the detector to inspect traffic for matches to one or more patterns, as described in Adding Detection Patterns to an Application Protocol Detector.
To specify detection criteria for an application protocol detector:
Step 1 On the Create Detector page, from the Protocol drop-down list, select the protocol for traffic the detector should inspect.
Detectors can inspect TCP, UDP, or TCP and UDP traffic.
Step 2 Optionally, to identify application protocol traffic based on the port it uses, type a port from 1 to 65535 in the Port(s) field. To use multiple ports, separate them by commas.
Step 3 You have the following options:
- If you want to configure the application protocol detector to inspect traffic for matches to one or more patterns that occurs in traffic for that application protocol, continue with the procedure in the next section, Adding Detection Patterns to an Application Protocol Detector.
- If you want to test the new detector against the contents of one or more PCAP files, skip to Testing an Application Protocol Detector Against Packet Captures.
- If you are done creating the detector, click Save .
The application protocol detector is saved.
Note that you must activate the detector before the system can use it to analyze application protocol traffic. For more information, see Activating and Deactivating Detectors.
Adding Detection Patterns to an Application Protocol Detector
If you know that the header for any packet containing application protocol traffic contains a particular pattern string, you can configure a user-defined application protocol detector to search for that pattern.
Application protocol detectors can search for ASCII or hexadecimal patterns, using any offset. You can also configure detectors to search for multiple patterns; in that case the application protocol traffic must match all of the patterns for the detector to positively identify the application protocol.
Note that if you do not specify a pattern, you must configure the detector to inspect traffic that uses one or more ports, as described in Specifying Detection Criteria for Application Protocol Detectors.
To add a detection pattern to an application protocol detector:
Step 1 On the Create Detector page, in the Detection Patterns section, click Add .
The Add Pattern pop-up window appears.
Step 2 Specify the pattern type you want to detect: Ascii or Hex .
Step 3 Type a string of the type you specified in the Pattern String field.
Step 4 Optionally, specify where in a packet the system should begin searching for the pattern; this is called the offset.
Type the offset (in bytes from the beginning of the packet payload) in the Offset field.
Because packet payloads start at byte 0, calculate the offset by subtracting 1 from the number of bytes you want to move forward from the beginning of the packet payload. For example, to look for the pattern in the fifth bit of the packet, type
4
in the
Offset
field.
Step 5 Optionally, repeat steps 1 to 4 to add additional patterns.
Tip To delete a pattern, click the delete icon ( ) next to the pattern you want to delete.
Step 6 You have the following options:
- If you want to test the new detector against the contents of one or more PCAP files, continue with the procedure in the next section, Testing an Application Protocol Detector Against Packet Captures.
- If you are done creating the detector, click Save .
The application protocol detector is saved.
Note You must activate the detector before the system can use it to analyze application protocol traffic. For more information, see Activating and Deactivating Detectors.
Testing an Application Protocol Detector Against Packet Captures
If you have a packet capture (PCAP) file that contains packets with traffic from the application protocol you want to detect, you can test a user-defined application protocol detector against that PCAP file. Note that PCAP files must be 32KB or smaller; if you try to test your detector against a larger PCAP file, the Defense Center automatically truncates it.
To test an application protocol detector against a PCAP file:
Step 1 On the Create Detector page, in the Packet Captures section, click Add .
Step 2 Browse to the PCAP file and click OK .
The PCAP file appears in the Packet Captures file list.
Step 3 To test your detector against the contents of the PCAP file, click the evaluate icon next to the PCAP file.
A message appears, indicating whether the test succeeded.
Step 4 Optionally, repeat steps 1 to 3 to test the detector against additional PCAP files.
Tip To delete a PCAP file, click the delete icon () next to the file you want to delete.
Step 5 To save the detector, click Save .
Note You must activate the detector before the system can use it to analyze application protocol traffic. For more information, see Activating and Deactivating Detectors.
Managing Detectors
You view and manage detectors on the Detectors page.
From the Detectors page, you can:
- view details about the application the detector identifies
- sort, filter, and browse the list of detectors
- view a list of the Cisco-provided internal detectors
- view the properties of the Cisco-provided application protocol port detectors, and optionally save copies as new, user-defined detectors that you can modify
- create, modify, delete, and export user-defined application protocol detectors
- delete and export any application protocol detectors you individually imported
- activate and deactivate user-defined, imported, or Cisco-provided web application, client, and application protocol detectors
Note that you cannot modify or delete internal or Cisco-provided application protocol, client, or web application detectors and cannot deactivate internal detectors.
Viewing Detector Details
You can view more detail on a detector from the application detectors list.
To view application detector details:
Step 1 Click the information icon ( ) in the Details column.
The information pop-up window for the detector appears.
For more information on risk, business relevance, tags, and categories, see Understanding Application Detection.
Sorting the Detector List
By default, the Detectors page lists detectors alphabetically by name. An up ( ) or down arrow next to a column heading indicates that the page is sorted by that column in that direction.
Step 1 On the Detectors page, click the appropriate column heading.
The detectors are sorted in the direction indicated by the arrow that appears on the column heading. To sort in the opposite direction, click the heading again.
Filtering the Detector List
You can filter the detectors you display on the Detectors page by a single criterion, or a combination of multiple criteria. The filter you construct is shown at the top of the page. You can use several filter groups, separately or in combination, to filter the list of detectors.
Finds detectors with names or descriptions containing the string you type. Strings can contain any alphanumeric or special character.
Finds detectors matching a custom application filter created on the object management page. For more information, see Working with Application Filters.
Finds detectors according to who created the detector. You can filter detectors by:
– any individual user who has created or imported a detector
– Cisco , which represents all Cisco-provided detectors except individually imported add-on detectors; you are the author for any detector that you import
– Any User , which represents all detectors not provided by Cisco
Finds detectors according to their state, that is, Active or Inactive . For more information, see Activating and Deactivating Detectors.
Finds detectors according to the detector type: Application Protocol , Web Application , Client , or Internal Detector .
Application protocol detectors have three subtypes you can use to further filter detectors:
– Port application protocol detectors include the Cisco-provided well-known port detectors, as well as any port-based user-defined application detectors.
– Pattern application protocol detectors include pattern-based or port-and-pattern-based user-defined application detectors.
– FireSIGHT application protocol detectors are application protocol fingerprint detectors provided by Cisco that can be activated and deactivated.
For more information on detector types, see Working with Application Detectors.
Finds detectors according to which traffic protocol the detector inspects. Detectors can inspect TCP, UDP, or TCP and UDP traffic.
Finds detectors according to the categories assigned to the application they detect.
Finds detectors according to the tags assigned to the application they detect.
Finds detectors according to the risks assigned to the application they detect: Very High , High , Medium , Low , and Very Low .
Finds detectors according to the business relevance assigned to the application they detect: Very High , High , Medium , Low , and Very Low .
Step 1 On the Detectors page, expand the filter group you want to use to filter the detectors.
Step 2 Type the name or select the specific filter you want to use. To select all filters in a group, right-click the group name and select Check All .
Step 3 Optionally, if the filter you are using has subfilters, select the subfilter to further filter the detectors.
Step 1 Click the remove icon ( ) in the name of the filter in the
Filters
field or disable the filter in the filter list. To remove all filters in a group, right-click the group name and select
Uncheck All
.
) in the name of the filter in the
Filters
field or disable the filter in the filter list. To remove all filters in a group, right-click the group name and select
Uncheck All
.
The filter is removed and the results update.
Step 1 Click Clear all next to the list of filters applied to the detectors.
Navigating to Other Detector Pages
The Detectors page displays 25 detectors at a time. The following table explains how to view additional pages of detectors using the navigation links at the bottom of the page.
 ).
). ).
). ).
). ).
).Activating and Deactivating Detectors
You must activate a detector before you can use it to analyze network traffic. By default, all Cisco-provided detectors are activated.
You can activate multiple application detectors for each port to supplement the system’s detection capability.
When you include an application in an access control rule in a policy and that policy is applied, if there is no active detector for that application, one or more detectors automatically activate. Similarly, while an application is in use in an applied policy, you cannot deactivate a detector if deactivating leaves no active detectors for that application.
Tip For improved performance, deactivate any application protocol, client, or web application detectors you are not interested in.
To activate or deactivate a detector:
Step 1 Select Policies > Application Detectors .
Step 2 Locate the detector you want to activate or deactivate.
If the detector you want to activate or deactivate is not on the first page, you can find it by paging through the detector list or applying one or more filters. For more information, see Managing Detectors.
Step 3 You have the following options:
- To activate a detector, so that the system will use it when analyzing network traffic, click the deactivated slider (
 ) next to the detector.
- To deactivate a detector so that the system will not use it when analyzing network traffic, click the activated slider (
 ) next to the detector.
Note that some application detectors are required by other detectors. If you deactivate one of these detectors, a warning appears to indicate that the detectors that depend on it are also disabled.
Modifying Application Detectors
Use the following procedure to modify user-defined application detectors.
To modify an application detector:
Step 1 Select Policies > Applications .
Step 2 Locate the detector you want to modify.
If the detector you want to modify is not on the first page, you can find it by paging through the detector list or applying one or more filters. For more information, see Managing Detectors.
Step 3 To modify a user-defined detector, click Edit next to the detector you want to modify.
The Edit Application Detector page appears.
Step 4 Make changes to the detector.
See Creating a User-Defined Application Protocol Detector for information on the various configurations you can change.
Step 5 You have the following options:
- If you are modifying an inactive user-defined detector, either click Save to save your changes, or click Save as New to save the detector as a new, inactive user-defined detector.
- If you are modifying an active user-defined detector, either click Save and Reactivate to save your changes and immediately start using the modified detector, or click Save as New to save the detector as a new, inactive user-defined detector.
Note The system only uses applications with active detectors to analyze application traffic. For more information, see Activating and Deactivating Detectors.
Deleting Detectors
Use the following procedure to delete a detector. You can delete user-defined detectors as well as individually imported add-on detectors provided by Cisco Professional Services. You cannot delete any of the other Cisco-provided detectors, though you can deactivate many of them.
Note While a detector is in use in an applied policy, you cannot deactivate or delete the detector.
Step 1 Select Policies > Application Detectors .
Step 2 Select the check box next to the detector you want to delete and click Delete .
If the detector you want to delete is not on the first page, you can find it by paging through the detector list or applying one or more filters. For more information, see Managing Detectors.
Step 3 Click OK to confirm that you want to delete the detector.
Importing Host Input Data
If your organization has the capability to write scripts or create command line import files to import network map data from third parties, you can import data to augment the information in the network map. You can also use the host input feature by modifying operating system or application identities or deleting application protocols, protocols, host attributes, or clients using the web interface.
The system may reconcile data from multiple sources to determine the current identity of an operating system or application. For more information on how the system does this, see Understanding Current Identities.
Note that all data except third-party vulnerabilities is discarded when the affected host is removed from the network map. For more information on setting up scripts or import files, see the FireSIGHT System Host Input API Guide .
To include imported data in impact correlations, you must map the data to the operating system and application definitions in the database. For more information, see the following sections:
- Enabling the Use of Third-Party Data
- Managing Third-Party Product Mappings
- Mapping Third-Party Vulnerabilities
- Managing Custom Product Mappings
Enabling the Use of Third-Party Data
You can import network map data from third-party systems on your network. However, to enable features where intrusion and discovery data are used together, such as FireSIGHT recommendations, adaptive profiles, or impact assessment, you should map as many elements of it as possible to corresponding definitions. Consider the following requirements for using third-party data:
- If you have a third-party system that has specific data on your network assets, you can import that data using the host input feature. However, because third parties may name the products differently, you must map the third-party vendor, product, and versions to the corresponding Cisco product definition. After you map the products, you must enable vulnerability mappings for impact assessment in the system policy to allow impact correlation. For versionless or vendorless application protocols, you need to map vulnerabilities for the application protocols in the system policy. For more information, see Mapping Third-Party Products.
- If you import patch information from a third party and you want to mark all vulnerabilities fixed by that patch as invalid, you must map the third-party fix name to a fix definition in the database. All vulnerabilities addressed by the fix will then be removed from hosts where you add that fix. For more information, see Mapping Third-Party Product Fixes.
- If you import operating system and application protocol vulnerabilities from a third party and you want to use them for impact correlation, you must map the third-party vulnerability identification string to vulnerabilities in the database. Note that although many clients have associated vulnerabilities, and clients are used for impact assessment, you cannot import and map third-party client vulnerabilities. After the vulnerabilities are mapped, you must enable third-party vulnerability mappings for impact assessment in the system policy. For more information, see Mapping Third-Party Vulnerabilities. To cause application protocols without vendor or version information to map to vulnerabilities, an administrative user must also map vulnerabilities for the applications in the system policy. For more information, see Mapping Vulnerabilities for Servers.
- If you import application data and you want to use that data for impact correlation, you must map the vendor string for each application protocol to the corresponding Cisco application protocol definition. For more information, see Managing Custom Product Mappings.
Managing Third-Party Product Mappings
When you add data from third parties to the network map through the user input feature, you must map the vendor, product, and version names used by the third party to the Cisco product definitions. Mapping the products to Cisco definitions assigns vulnerabilities based on those definitions.
Similarly, if you are importing patch information from a third party, such as a patch management product, you must map the name for the fix to the appropriate vendor and product and the corresponding fix in the database.
Mapping Third-Party Products
If you import data from a third party, you must map the Cisco product to the third-party name to assign vulnerabilities and perform impact correlation using that data. Mapping the product associates Cisco vulnerability information with the third-party product name, which allows the system to perform impact correlation using that data.
If you import data using the host input import feature, you can also use the AddScanResult function to map third-party products to operating system and application vulnerabilities during the import.
As an example, if you import data from a third party that lists Apache Tomcat as an application and you know it is version 6 of that product, you could add a third-party map where
Vendor Name
is set to
Apache
,
Product Name
is set to
Tomcat
,
Apache
is selected from the
Vendor
drop-down list,
Tomcat
is selected from the
Product
drop-down list, and
6
is selected from the
Version
drop-down list. That mapping would cause any vulnerabilities for Apache Tomcat 6 to be assigned to hosts with an application listing for Apache Tomcat.
Note that for versionless or vendorless applications, you must map vulnerabilities for the application types in the system policy. For more information, see Mapping Vulnerabilities for Servers. Note that although many clients have associated vulnerabilities, and clients are used for impact assessment, you cannot import and map third-party client vulnerabilities.
Tip If you have already created a third-party mapping on another Defense Center, you can export it and then import it onto this Defense Center. You can then edit the imported mapping to suit your needs. For more information, see Importing and Exporting Configurations.
To map a third-party product to a Cisco product definition:
Step 1 Select Policies > Application Detectors , then click User Third-Party Mappings .
The User Third-Party Mappings page appears.
The Edit Third-Party Product Mappings page appears.
Step 3 Type a name for the mapping set in the Mapping Set Name field.
Step 4 Type a description in the Description field.
The Add Product Map page appears.
Step 6 Type the vendor string used by the third-party product in the Vendor String field.
Step 7 Type the product string used by the third-party product in the Product String field.
Step 8 Type the version string used by the third-party product in the Version String field.
Step 9 In the Product Mappings section, select the operating system, product, and versions you want to use for vulnerability mapping from the following lists (if applicable):
For example, if you want a host running a product whose name consists of third-party strings to use the vulnerabilities from Red Hat Linux 9, select Redhat, Inc. as the vendor, Redhat Linux as the product, and 9 as the version.
Mapping Third-Party Product Fixes
If you map a fix name to a particular set of fixes in the database, you can then import data from a third-party patch management application and apply the fix to a set of hosts. When the fix name is imported to a host, the system marks all vulnerabilities addressed by the fix as invalid for that host.
To map third-party fixes to Cisco fix definitions:
Step 1 Select Policies > Application Detectors , then click User Third-Party Mappings .
The User Third-Party Mappings page appears.
The Edit Third-Party Product Mappings page appears.
Step 3 Type a name for the mapping set in the Mapping Set Name field.
Step 4 Type a description in the Description field.
Step 6 Type the name of the fix you want to map in the Third-Party Fix Name field.
Step 7 In the Product Mappings section, select the operating system, product, and versions you want to use for fix mapping from the following lists (if applicable):
For example, if you want your mapping to assign the selected fixes from Red Hat Linux 9 to hosts where the patch is applied, select Redhat, Inc. as the vendor, Redhat Linux as the product, and 9 as the version.
Step 8 Click Save to save the fix map.
Mapping Third-Party Vulnerabilities
To add vulnerability information from a third party to the VDB, you must map the third-party identification string for each imported vulnerability to any existing Cisco, Bugtraq, or Snort ID. After you create a mapping for the vulnerability, the mapping works for all vulnerabilities imported to hosts in your network map and allows impact correlation for those vulnerabilities.
Note that you must also enable impact correlation for third-party vulnerabilities to allow correlation to occur. For more information, see Enabling Vulnerability Impact Assessment Mappings. For versionless or vendorless applications, you must also map vulnerabilities for the application types in the system policy. For more information, see Mapping Vulnerabilities for Servers.
Also, although many clients have associated vulnerabilities, and clients are used for impact assessment, you cannot use third-party client vulnerabilities for impact assessment.
Tip If you have already created a third-party mapping on another Defense Center, you can export it and then import it onto this Defense Center. You can then edit the imported mapping to suit your needs. For more information, see Importing and Exporting Configurations.
To map a third-party vulnerability to an existing vulnerability:
Step 1 Select Policies > Application Detectors , then click User Third-Party Mappings .
The User Third-Party Mappings page appears.
The Edit Third-Party Vulnerability Mappings page appears.
Step 3 Click Add Vulnerability Map .
The Add Vulnerability Map pop-up window appears.
Step 4 Type the third-party identification for the vulnerability in the Vulnerability ID field.
Step 5 Type a description in the Vulnerability Description field.
Step 6 Optionally, enter a Signature ID in the Snort Vulnerability ID Mappings field.
Step 7 Optionally, enter an Cisco vulnerability ID in the Cisco Vulnerability ID Mappings field.
Step 8 Optionally, enter a Bugtraq identification number in the Bugtraq Vulnerability ID Mappings field.
Managing Custom Product Mappings
You can use product mappings to ensure that servers input by a third party are associated with the appropriate Cisco definitions. After you define and activate the product mapping, all servers or clients on hosts in your network map that have the mapped vendor strings use the custom product mappings. For this reason, you may want to map vulnerabilities for all servers in the network map with a particular vendor string instead of explicitly setting the vendor, product, and version for the server.
Creating Custom Product Mappings
If the system cannot map a server in the network map to a vendor and product in the VDB, you can manually create the mapping for the system to use when identifying servers. When you activate a custom product mapping, the system maps vulnerabilities for the selected vendor and product to all servers in the network map where that vendor string occurs.
Note Custom product mappings apply to all occurrences of an application protocol, regardless of the source of the application data (such as Nmap, the host input feature, or the FireSIGHT System itself). However, if third-party vulnerability mappings for data imported using the host input feature conflicts with the mappings you set through a custom product mapping, the third-party vulnerability mapping overrides the custom product mapping and uses the third-party vulnerability mapping settings when the input occurs. For more information, see Mapping Third-Party Vulnerabilities.
You create lists of product mappings and then enable or disable use of several mappings at once by activating or deactivating each list. When you select a vendor to map to, the system updates the list of products to include only those made by that vendor.
After you create a custom product mapping, you must activate the custom product mapping list. After you activate a list of custom product mappings, the system updates all servers with occurrences of the specified vendor strings. For data imported through the host input feature, vulnerabilities update unless you have already explicitly set the product mappings for this server.
If, for example, your company modifies the banner for your Apache Tomcat web servers to read
Internal Web Server
, you can map the vendor string
Internal Web Server
to the vendor
Apache
and the product
Tomcat
, then activate the list containing that mapping, all hosts where a server labelled
Internal Web Server
occurs have the vulnerabilities for Apache Tomcat in the database.
Tip You can use this feature to map vulnerabilities to local intrusion rules by mapping the SID for the rule to another vulnerability.
To create a custom product mapping:
Step 1 Select Policies > Application Detectors , and click Custom Product Mappings .
The Custom Product Mappings page appears.
Step 2 Click Create Custom Product Mapping List .
The Edit Custom Product Mappings List page appears.
Step 3 Type a name in the Custom Product Mapping List Name field.
Step 4 Click Add Vendor String .
The Add Vendor String pop-up window appears.
Step 5 In the Vendor String field, type the vendor string that identifies the applications that should map to the selected vendor and product values.
Step 6 Select the vendor you want to map to from the Vendor drop-down list.
Step 7 Select the product you want to map to from the Product drop-down list.
Step 8 Click Add to add the mapped vendor string to the list.
Step 9 Optionally, repeat steps 4 to 8 as needed to add additional vendor string mappings to the list.
Step 10 When you finish, click Save .
The Custom Product Mappings page appears again, with the list you added.
Editing Custom Product Mapping Lists
You can modify existing custom product mapping lists by adding or removing vendor strings or changing the list name.
To edit a custom product mapping:
Step 1 Select Policies > Application Detectors , then click Custom Product Mappings .
The Custom Product Mappings page appears.
Step 2 Click the edit icon (
) next to the product mapping list to edit.
The Edit Custom Product Mappings List page appears.
Step 3 Make changes to the list as needed. For more information, see Creating Custom Product Mappings.
Step 4 When you finish, click Save .
The Custom Product Mappings page appears, with the list you updated.
Managing Custom Product Mapping Activation State
You can enable or disable use of an entire list of custom product mappings at once. After you activate a custom product mapping list, each mapping on that list applies to all applications on hosts in the network map with the specified vendor string, whether detected by managed devices or imported through the host input feature.
To activate or deactivate a custom product mapping list:
Step 1 Select Policies > Application Detectors , then click Custom Product Mappings .
The Custom Product Mappings page appears.
Step 2 Modify the state of custom product mapping lists:
 Feedback