- Title Page
- Introduction & Preface
- Logging into the FireSIGHT System
- Using Objects and Security Zones
- Managing Devices
- Setting Up an IPS Device
- Setting Up Virtual Switches
- Setting Up Virtual Routers
- Setting Up Aggregate Interfaces
- Setting Up Hybrid Interfaces
- Using Gateway VPNs
- Using NAT Policies
- Getting Started with Access Control Policies
- Blacklisting Using Security Intelligence IP Address Reputation
- Tuning Traffic Flow Using Access Control Rules
- Controlling Traffic with Network-Based Rules
- Controlling Traffic with Reputation-Based Rules
- Controlling Traffic Based on Users
- Controlling Traffic Using Intrusion and File Policies
- Understanding Traffic Decryption
- Getting Started with SSL Policies
- Getting Started with SSL Rules
- Tuning Traffic Decryption Using SSL Rules
- Understanding Intrusion and Network Analysis Policies
- Using Layers in Intrusion and Network Analysis Policies
- Customizing Traffic Preprocessing
- Getting Started with Network Analysis Policies
- Using Application Layer Preprocessors
- Configuring SCADA Preprocessing
- Configuring Transport & Network Layer Preprocessing
- Tuning Preprocessing in Passive Deployments
- Getting Started with Intrusion Policies
- Tuning Intrusion Rules
- Tailoring Intrusion Protection to Your Network Assets
- Detecting Specific Threats
- Limiting Intrusion Event Logging
- Understanding and Writing Intrusion Rules
- Blocking Malware and Prohibited Files
- Logging Connections in Network Traffic
- Working with Connection & Security Intelligence Data
- Analyzing Malware and File Activity
- Working with Intrusion Events
- Handling Incidents
- Configuring External Alerting
- Configuring External Alerting for Intrusion Rules
- Introduction to Network Discovery
- Enhancing Network Discovery
- Configuring Active Scanning
- Using the Network Map
- Using Host Profiles
- Working with Discovery Events
- Configuring Correlation Policies and Rules
- Using the FireSIGHT System as a Compliance Tool
- Creating Traffic Profiles
- Configuring Remediations
- Using Dashboards
- Using the Context Explorer
- Working with Reports
- Understanding and Using Workflows
- Using Custom Tables
- Searching for Events
- Managing Users
- Scheduling Tasks
- Managing System Policies
- Configuring Appliance Settings
- Licensing the FireSIGHT System
- Updating System Software
- Monitoring the System
- Using Health Monitoring
- Auditing the System
- Using Backup and Restore
- Specifying User Preferences
- Importing and Exporting Configurations
- Purging Discovery Data from the Database
- Viewing the Status of Long-Running Tasks
- Command Line Reference
- Security, Internet Access, and Communication Ports
- Third-Party Products
- glossary
FireSIGHT System User Guide Version 5.4.1
Bias-Free Language
The documentation set for this product strives to use bias-free language. For the purposes of this documentation set, bias-free is defined as language that does not imply discrimination based on age, disability, gender, racial identity, ethnic identity, sexual orientation, socioeconomic status, and intersectionality. Exceptions may be present in the documentation due to language that is hardcoded in the user interfaces of the product software, language used based on RFP documentation, or language that is used by a referenced third-party product. Learn more about how Cisco is using Inclusive Language.
- Updated:
- February 18, 2015
Chapter: Using Custom Tables
Using Custom Tables
As the FireSIGHT System collects information about your network, the Defense Center stores it in a series of database tables. When you use a workflow to view the resulting information, the Defense Center pulls the data from one of these tables. For example, the columns on each page of the Network Applications by Count workflow are taken from the fields in the Applications table.
If you determine that your analysis of the activity on your network would be enhanced by combining fields from different tables, you can create a custom table. For example, you could combine the host criticality information from the predefined Host Attributes table with the fields from the predefined Connection Data table and then examine connection data in a new context.
Note that you can create custom workflows for either predefined or custom tables. For more information on creating custom workflows, see Creating Custom Workflows.
The following sections describe how to create and use your own custom tables:
Understanding Custom Tables
Custom tables contain fields from two or more predefined tables. The FireSIGHT System is delivered with a number of system-defined custom tables, but you can create additional custom tables that contain only information that matches your specific needs.
For example, the FireSIGHT System is delivered with system-defined custom tables that correlate intrusion event data with host data, so you can search for events that impact critical systems and view the results of that search in one workflow. The following table describes the custom tables provided with the system.
Understanding Possible Table Combinations
License: FireSIGHT + Protection
When you create a custom table, you can combine fields from predefined tables that have related data. The following table lists the predefined tables you can combine to create a new custom table. Keep in mind that you can create a custom table that combines fields from more than two predefined custom tables.
Sometimes a field in one table maps to more than one field in another table. For example, the predefined Intrusion Events with Destination Criticality custom table combines fields from the Intrusion Events table and the Hosts table. Each event in the Intrusion Events table has two IP addresses associated with it—a source IP address and a destination IP address. However, the “events” in the Hosts table each represent a single host IP address (hosts may have multiple IP addresses). Therefore, when you create a custom table based on the Intrusion Events table and the Hosts table, you must choose whether the data you display from the Hosts table applies to the host source IP address or the host destination IP address in the Intrusion Events table.
When you create a new custom table, a default workflow that displays all the columns in the table is automatically created. Also, just as with predefined tables, you can search custom tables for data that you want to use in your network analysis. You can also generate reports based on custom tables, as you can with predefined tables.
Creating a Custom Table
If you determine that your analysis of the activity on your network would be enhanced by combining fields from different tables, you can create a custom table.

Tip Instead of creating a new custom table, you can export a custom table from another Defense Center, then import it onto your Defense Center. You can then edit the imported custom table to suit your needs. For more information, see Importing and Exporting Configurations.
To create a custom table, decide which predefined tables delivered with the FireSIGHT System contain the fields you want to include in your custom table. You can then choose which fields you want to include and, if necessary, configure field mappings for any common fields.
Tip Data involving the Hosts table allows you to view data associated with all IP addresses from one host, rather than one specific IP address.
For example, consider a custom table that combines fields from the Correlation Events table and the Hosts table. You can use this custom table to get detailed information about the hosts involved in violations of any of your correlation policies. Note that you must decide whether to display data from the Hosts table that matches the source IP address or the destination IP address in the Correlation Events table.
If you view the table view of events for this custom table, it displays correlation events, one per row. The following information is included:
- the date and time the event was generated
- the name of the correlation policy that was violated
- the name of the rule that triggered the violation
- the IP address associated with the source, or initiating, host involved in the correlation event
- the source host’s NetBIOS name
- the operating system and version the source host is running
- the source host criticality
Tip You could create a similar custom table that displays the same information for destination, or responding, hosts.
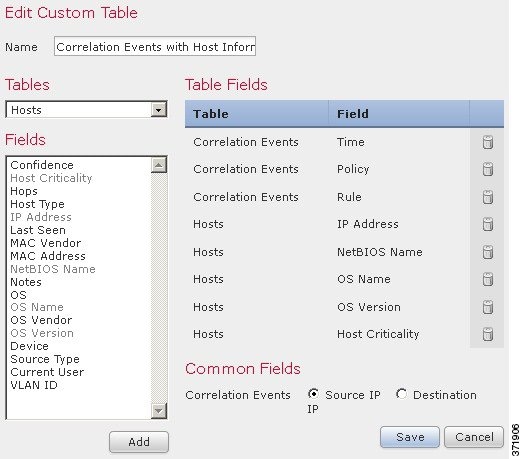
To build the custom table in the previous example:
Step 1 Select Analysis > Custom > Custom Tables .
The Custom Tables page appears.
Step 2 Click Create Custom Table .
The Create Custom Table page appears.
Step 3 In the
Name
field, type a name for the custom table, such as
Correlation Events with Host Information (Src IP)
.
Step 4 From the Tables drop-down list, select Correlation Events .
The fields in the Correlation Events table appear in the Fields list.
Step 5 Under Fields , select Time and click Add to add the date and time when a correlation event was generated.
Step 6 Repeat step 5 to add the Policy and Rule fields.
Tip You can use Ctrl or Shift while clicking to select multiple fields. You can also click and drag to select multiple adjacent values. However, if you want to specify the order the fields appear in the table view of events associated with the table, add the fields one at a time.
Step 7 From the Tables drop-down list, select Hosts .
The fields in the Hosts table appear in the Fields list. For more information on these fields, see Understanding the Hosts Table.
Step 8 Add the IP Address , NetBIOS Name , OS Name , OS Version , and Host Criticality fields to the custom table.
Step 9 Under Common Fields , next to Correlation Events , select Source IP .
Your custom table is configured to display the host information you chose in step 8 for the source, or initiating, hosts involved in correlation events.
Tip You could create a custom table that displays detailed host information for the destination, or responding, hosts involved in a correlation event by following this procedure but selecting Destination IP instead of Source IP.
Modifying a Custom Table
You can add or delete fields in a custom table as your needs change.
Step 1 Select Analysis > Custom > Custom Tables .
The Custom Tables page appears.
Step 2 Click the edit icon ( ) next to the table you want to edit.
The Edit Custom Table page appears. See Creating a Custom Table for information on the various configurations you can change.
Step 3 Optionally, remove fields from the table by clicking the delete icon ( ) next to the fields you want to remove.

Note If you delete fields currently in use in reports, you will be prompted to confirm that you want to remove the sections using those fields from those reports.
Step 4 Make other changes as needed and click Save .
Deleting a Custom Table
You can delete a custom table that you no longer need. If you delete a custom table, saved searches that use the custom table are also deleted.
Step 1 Select Analysis > Custom > Custom Tables .
The Custom Tables page appears.
Step 2 Click the delete icon (
) next to the custom table you want to delete.
Viewing a Workflow Based on a Custom Table
When you create a custom table, the system automatically creates a default workflow for it. The first page of this workflow displays a table view of events. If you include intrusion events in your custom table, the second page of the workflow is the packet view. Otherwise, the second page of the workflow is a hosts page. You can also create your own custom workflows based on your custom table.
Tip If you create a custom workflow based on a custom table, you can specify it as the default workflow for that table. For more information, see Configuring Event View Settings.
You can use the same techniques to view events in your custom table that you use for event views based on predefined tables. See Using Workflow Pages for more information.
To view a workflow based on a custom table:
Step 1 Select Analysis > Custom > Custom Tables .
The Custom Tables page appears.
Step 2 Click the view icon ( ) next to the custom table on which the workflow you want to see is based.
The first page of the default workflow for the custom table appears. To use a different workflow, click (switch workflow) by the workflow title. For information on how to specify a different default workflow, see Configuring Event View Settings. If no events appear and the workflow can be constrained by time, you may need to adjust the time range; see Setting Event Time Constraints.
Searching Custom Tables
You can create and save searches for a custom table. You may want to create searches customized for your network environment, then save them to reuse later. Note that if you delete a custom table, all searches you have saved for that custom table are also deleted.
The search criteria you can use are the same as the criteria for the predefined tables you used to build your custom table. See the sections listed in the following table for detailed information on the search criteria you can use.
To implement these criteria in a table search, see the following procedure.
To perform a search on a custom table:
Step 1 Select Analysis > Custom > Custom Tables .
The Custom Tables page appears.
Step 2 Click the view icon (
) next to the custom table you want to search.
The first page of the default workflow for the custom table appears. To use a different workflow, including a custom workflow, click (switch workflow) by the workflow title. For information on specifying a different default workflow, see Configuring Event View Settings. If no events appear and the workflow can be constrained by time, you may need to adjust the time range; see Setting Event Time Constraints.
The custom table’s search page appears.
Tip To search the database for a different kind of event or data, select it from the table drop-down list.
Step 4 Enter your search criteria in the appropriate fields. For more information about choosing search criteria, see the Table Search Criteria table.
If you enter criteria for multiple fields, the search returns only the records that match search criteria specified for all fields.
Tip Click the object icon ( ) next to a search field to use an object as a search criterion. For more information on searches, including information on special search syntax, using objects in searches, and saving and loading searches, see Performing and Saving Searches.
Step 5 Optionally, if you plan to save the search, you can select the Private check box to save the search as private so only you can access it. Otherwise, leave the check box clear to save the search for all users.
Tip If you want to use the search as a data restriction for a custom user role, you must save it as a private search.
Step 6 Optionally, you can save the search to be used again in the future. You have the following options:
For a new search, a dialog box appears prompting for the name of the search; enter a unique search name and click Save . If you save new criteria for a previously-existing search, no prompt appears. The search is saved (and visible only to your account if you selected Private ) so that you can run it at a later time.
A dialog box appears prompting for the name of the search; enter a unique search name and click Save . The search is saved (and visible only to your account if you selected Private ) so that you can run it at a later time.
Step 7 Click Search to start the search.
Your search results appear in the default workflow for the custom table, constrained by the current time range (if applicable). To use a different workflow, including a custom workflow, click (switch workflow) by the workflow title. For information on specifying a different default workflow, see Configuring Event View Settings.
 Feedback