Overview of Sending Email

You can send encrypted messages from your Cisco Secure Email Encryption Service account. When you sign up for an Encryption Service account, you can receive as well as send encrypted messages. When you send encrypted messages using Secure Email Encryption Service, the encryption server encrypts the outbound email and routes it to its intended destination. You can also save the frequently contacted email addresses in the Encryption Service address book, and choose from those addresses when you compose emails.


Note


Account administrators can disable access to Secure Compose. If your account administrator has disabled this functionality, you will not see the Compose Message link in the left-hand navigation menu and will not be able to send a secure message from the Encryption Service website.

Important


If JavaScript is disabled on your web browser, the functionality of some of the web pages will not work.

Important


If you are using Internet Explorer to access the web pages, it might cause alignment issues. It is recommended to switch to any one of the following supported browsers:
  • Google Chrome

  • Mozilla Firefox

  • Safari (for MAC operating system)


Composing and Sending an Email

To compose and send a secure message from the Encryption Service website, click Compose Message in the left-hand navigation menu.

When you send a secure message through the Encryption Service, the recipient receives a Secure Message containing the encrypted content. If the recipient does not already have an Encryption Service user account, they will need to enroll and set up a free account to open the message.


Note


If you have logged in using a non-corporate email address, you can send secure messages to both corporate and non-corporate recipients, except for some public domains, such as gmail.com, yahoo.com, aol.com, etc.

You cannot forward a secure message to other non-corporate accounts if the Forward functionality is disabled in the secure email gateway or Secure Email Encryption Add-In.


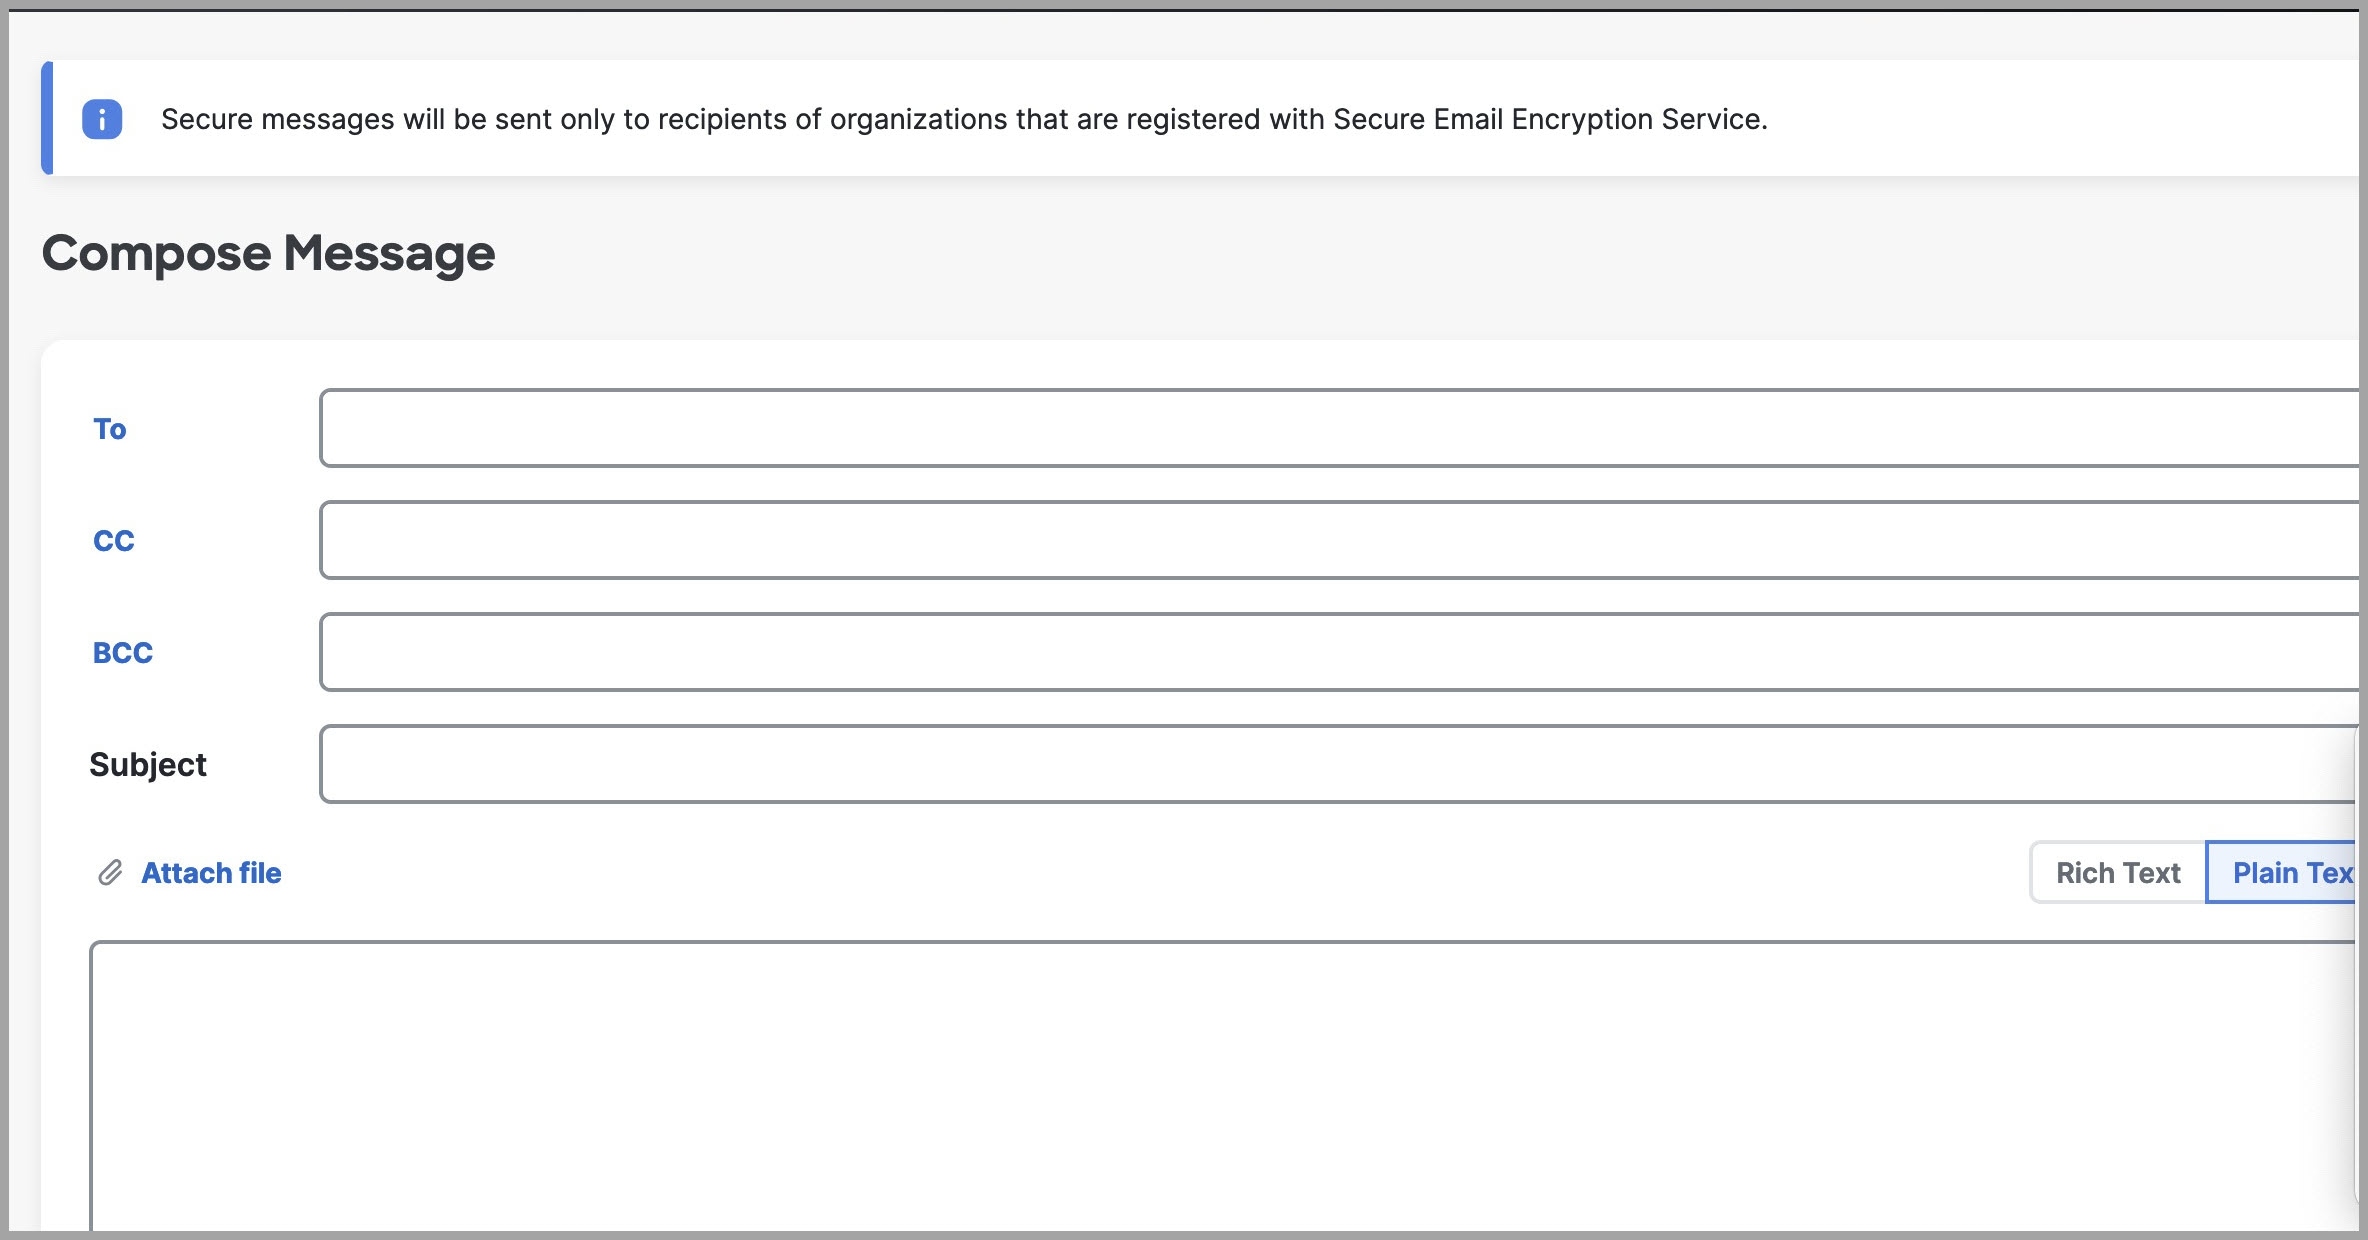
If you have logged in using a non-corporate email address, a notification banner is displayed as shown below:

Procedure


Step 1

Begin creating a message from the Compose Message page. Enter an email address, click the To: field, or click the Address Book icon in the left pane to open the Address Book.

For more information about using the Address Book, see the Using the Address Book

Step 2

Complete the appropriate address fields (To, CC, and BCC) on the Compose Message page.

For more information about the BCC option, see the Using the Automatically BCC me on this Email Option

Step 3

Optionally, complete the Subject field.

Step 4

Optionally, click the Attachments button to include file attachments.

The maximum file size of all attachments is 25 MB. If your email administrator has enabled the support for large file attachments, you can attach up to 100 MB.

Step 5

Enter the body of your encrypted message in the Message field. To format your message, click the Rich Text link. Use the formatting options to format your text as needed.

Step 6

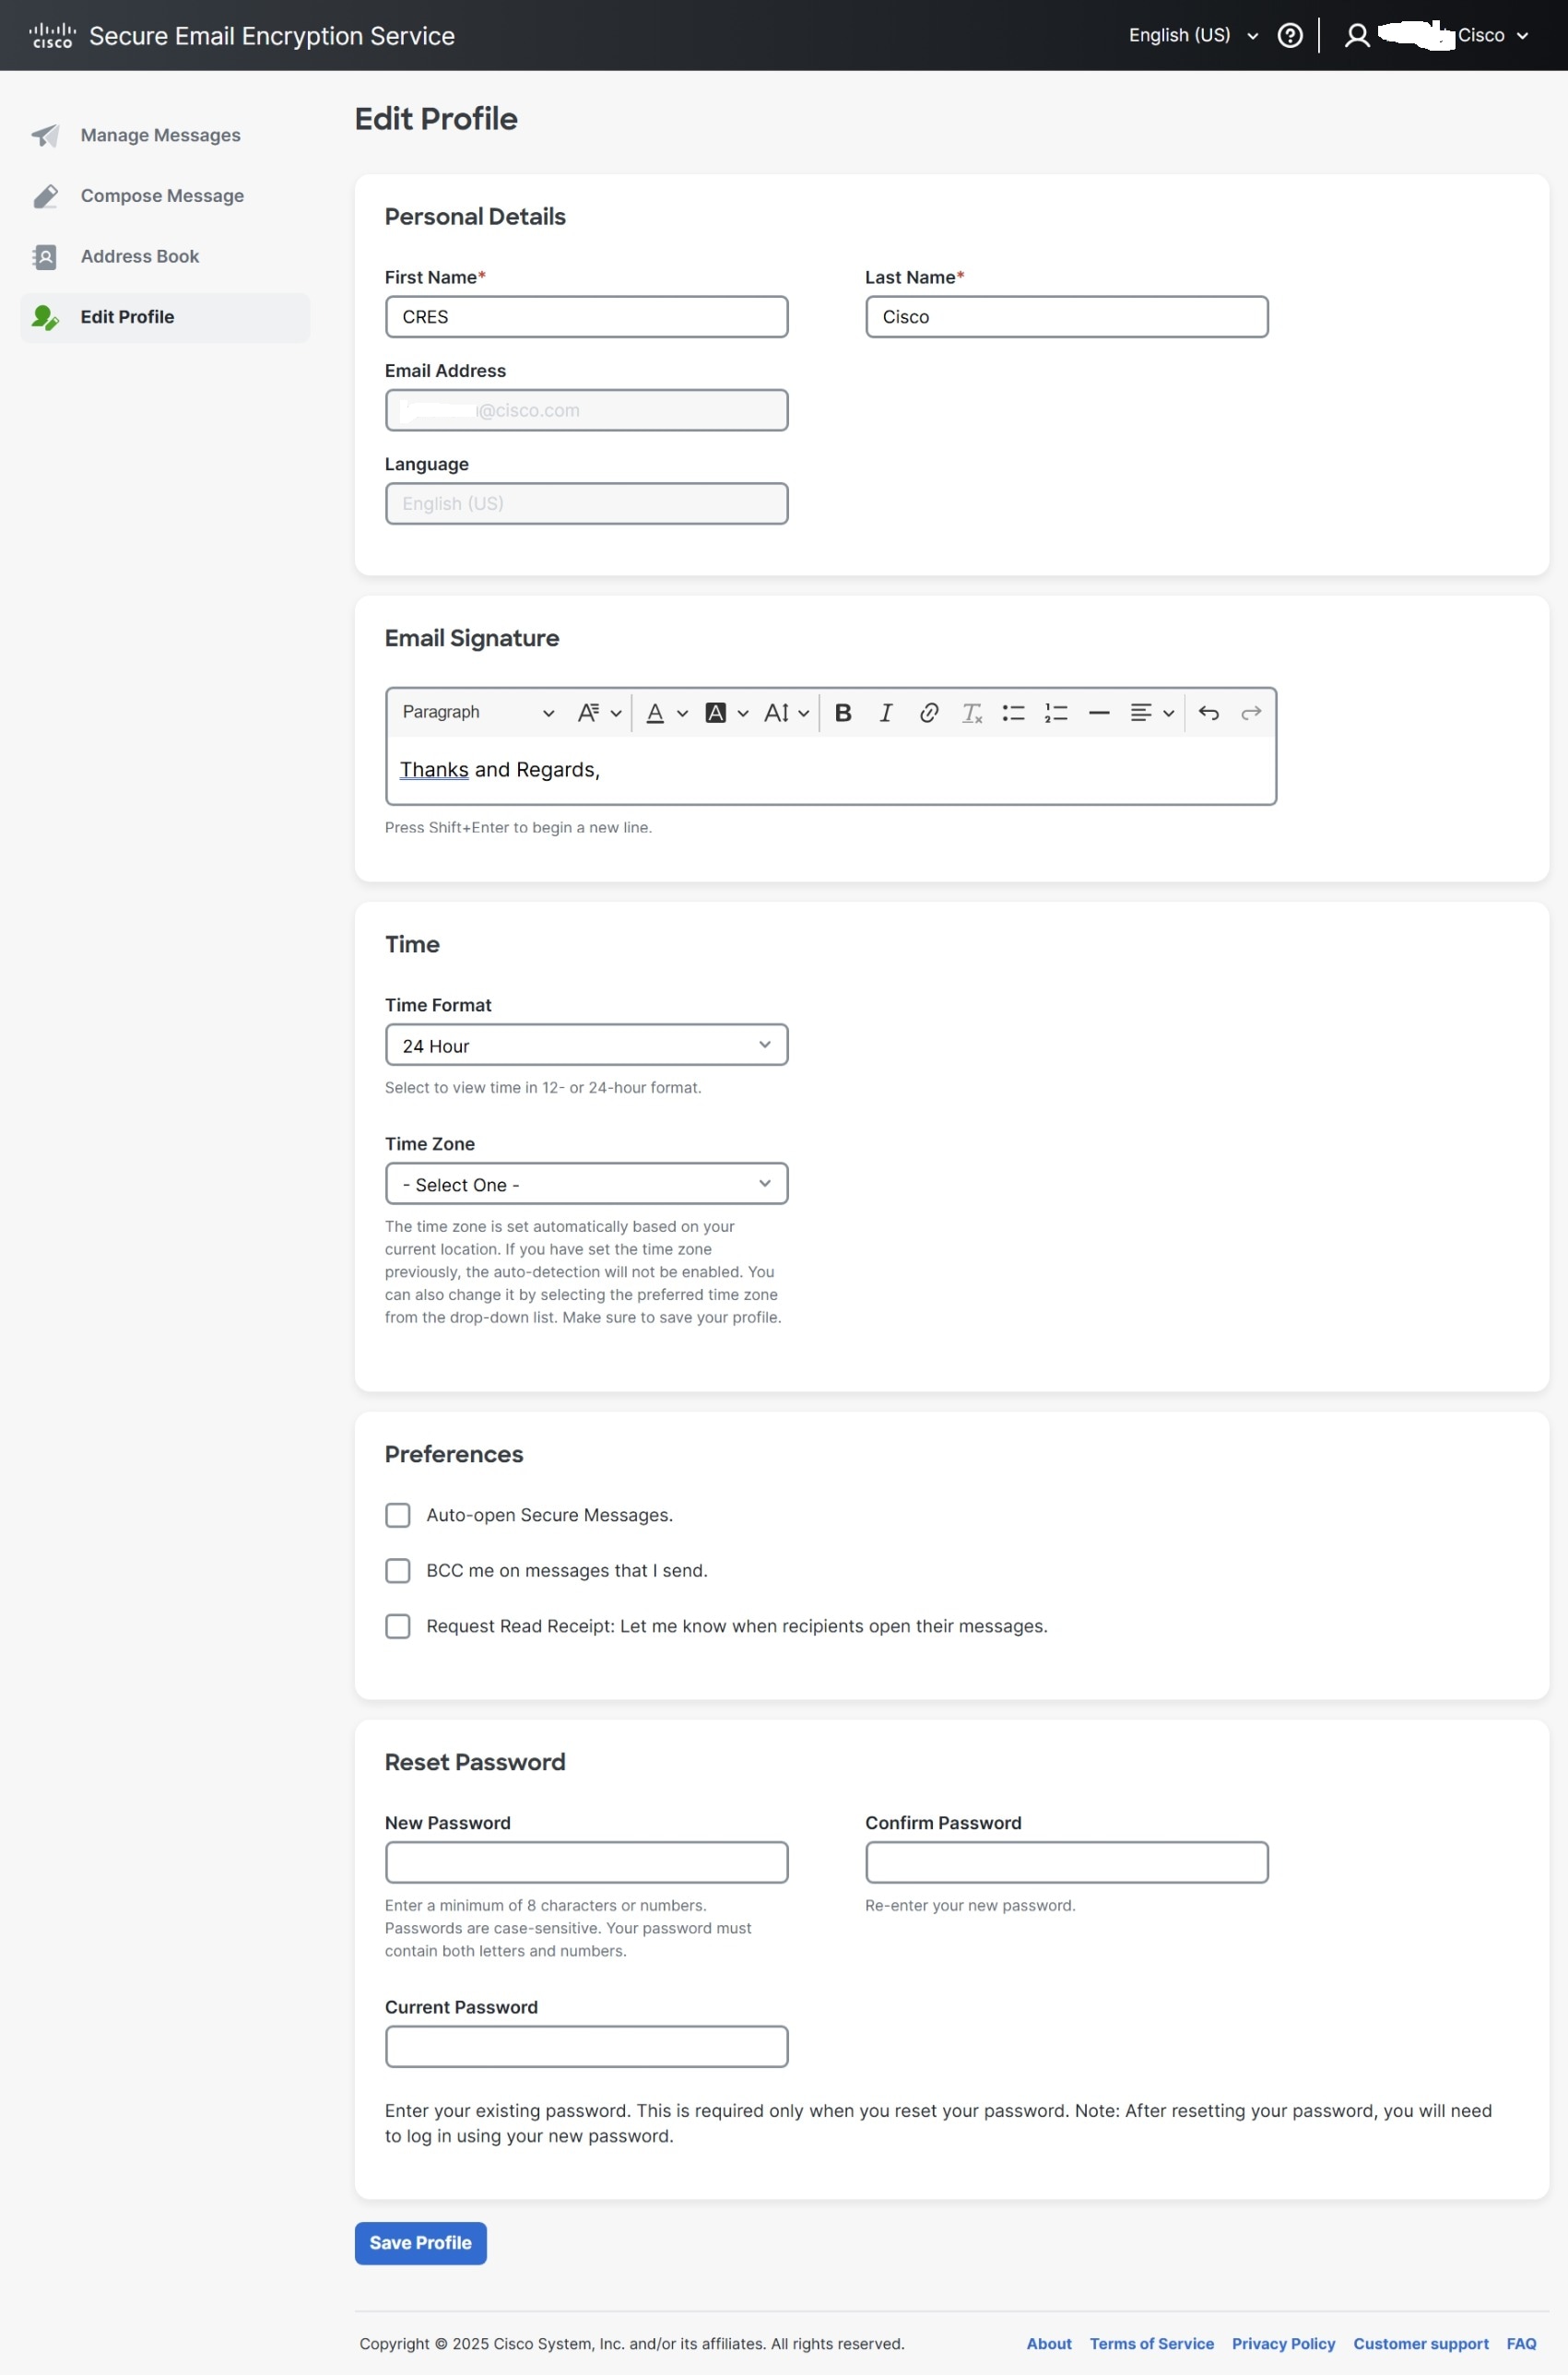
Optionally, select the check box to send yourself a copy of the message as a BCC recipient.

Step 7

Optionally, select the check box to receive a read receipt the first time each recipient opens the message.

For more information about read receipts, see the Requesting Read Receipts

Step 8

Click Send

A notice appears at the top of the Compose Message page indicating that the message has been sent.

Note

 
While you are composing a secure message, your web browser session might expire if you stop typing for a period of 20 minutes or longer. If the browser session times out, an error is displayed when you click Send. To send your message, you must log in to the Encryption Service website again.

Using the Automatically BCC me on this Email Option

When you send a secure message, you can select the Automatically BCC me on this email check box to receive a copy of this message on your email account.


Note


You can set the default value for this option by selecting the Bcc me on messages that I send check box on the Edit Profile page in the Preferences section.

Requesting Read Receipts

When you send a secure message, you can select a check box to request a read receipt. A read receipt is a notification email message that alerts you when a recipient first opens a secure message that you have sent.


Note


Because the configuration of some recipients’ email systems can prevent read receipts from reaching you, read receipts are not guaranteed. To verify the date and time when a recipient first opened your message, use the Manage Messages feature of the Encryption Service website to view the message details.

Using the Address Book

When you send a secure message, you may want to store frequently used email addresses in your address book so that you can access them easily. You can perform the following using the address book:

Adding an Address to the Address Book

Procedure


Step 1

Click the Address Book icon in the left pane to open the address book.

Step 2

Enter a first name, last name, and email address for the contact.

Step 3

Click Save.

Step 4

The new address is added to your address book.


Deleting an Address from the Address Book

Procedure


Step 1

Click the Address Book icon in the left pane to open the address book.

Step 2

Click the trash icon next to the address that you want to remove.

Step 3

Or, select the check box next to the address that you want to remove and click Delete Contact.


Editing an Address

Procedure


Step 1

Click the Address Book icon in the left pane to open the address book.

Step 2

Click the Edit icon next to the address you want to edit.

Step 3

Modify the first name, last name, or email address of the contact, and click Save.


Adding an Email Address to a Message from the Address Book

Procedure


Step 1

Click the To: field or click the Address Book icon in the left pane to open the address book.

When you click the To field, the Address Book opens, where you can add an email address to a message.

Note

 
You can also click the CC and BCC fields to display the Address book and add an email address to a message.

Step 2

Click the email address for the contact you want to send an email. The Compose Message page opens and populates the To: field with your selected address.

Step 3

Enter your message (and complete any other desired fields), and click Send.


Managing Messages

You can select Manage Messages in the left-hand navigation menu to manage the encrypted messages that you have sent. When you manage messages, you first run a search to retrieve your sent messages.Then, you use the search results to view message details, lock and unlock messages, or specify message expiration dates. You can:


Note


When you manage messages, you can view message details and control access to sent messages. You cannot view the content of sent messages.

Retrieve All Sent Messages

To retrieve a list of all the secure messages that you have sent:

Procedure


Step 1

Select Manage Messages in the left-hand navigation menu. The Search Sent Messages page opens.

Step 2

Leave the Keyword field blank.

Step 3

Click the Search button.

The results list at the bottom of the page displays the sent messages. Click the column headings to change the sort order. The results list displays up to 25 sent messages on a page. To view more messages, click the link for additional messages.


Retrieve Specific Messages

You can run a basic or advanced search to retrieve a subset of secure messages that you have sent.

Basic Search

When you run a basic search, you enter a keyword text string to find messages with that text string in the To or Subject fields. The keyword text string is not case-sensitive, and it can be any combination of characters, such as a partial word, a word, or a phrase.

To run a basic search:

Procedure

Step 1

Select Manage Messages in the left-hand navigation menu.

Step 2

Enter a text string in the Keyword field.

Step 3

Click the Search button.

The results list displays the messages that match the search criteria. A message matches the search

criteria if the keyword text string appears anywhere in the To or Subject field. For example, if you search for the keyword test, the results list could include messages with the following text strings in the To or Subject field:

  • test

  • TESTS

  • testing

  • smartest


Advanced Search

When you run an advanced search, you can narrow the search results in several ways using keywords, date ranges, and message status.

To run an advanced search:

Procedure

Step 1

Select Manage Messages in the left-hand navigation menu.

Step 2

Click the Advanced Search link.

Step 3

Complete the fields for the search criteria you want to specify.

Step 4

Click the Search button.

The following table describes the criteria that you can use in an advanced search.

Table 1.

Field

Description

Keyword 1

Enter a keyword text string, similar to the text string for a basic search. Use the corresponding drop-down list to specify theMessage data to search. You can search the To field, the Subject field, the Locked Reason text, or the Failed Attempts data forMessages.

For example, enter Confidential and select Subject to search for sentMessages with the word "Confidential" in the Subject field.

Keyword 2

Enter a keyword text string and use the corresponding drop-down list to specify theMessage data to search. You can search the To field, the Subject field, the Locked Reason text, or the Failed Attempts data.

For example, enter 3 and select Failed Attempts to search for lockedMessages with recipients who made three unsuccessful attempts to open them.

Date From and Date To

To specify a date range for the search criteria, enter dates in the Date From and Date To fields, and then select the message status in the corresponding drop-down list. You can search for messages that were sent, opened, or expired in the specified date range. By default, an advanced search returns messages that were sent during the preceding month.

Status

Select a message status to limit the search results based on status. Options are All, Opened, Unopened, Locked, and Expired. The default is All.

You can use a combination of advanced search criteria to narrow your search results. Leave fields blank to exclude them from the search criteria. Only the Status field is required.

An advanced search uses an AND operator rather than an OR operator to join search criteria. For example, if you use the Keyword 1 and the Keyword 2 fields together, the search returns Messages that meet both criteria, not one or the other.


Viewing Message Details

After you run a search, the results list displays details about the messages that match the search criteria.The details include recipient email addresses, subject lines, and the dates and times when messages weresent and first opened. The details also indicate message locking status and expiration dates. All times are displayed in Greenwich Mean Time (GMT).

The results list contains a separate row for each recipient of a secure message. For example, if you sent an encrypted message to three recipients, the results list contains three rows for the message.

You can use the results list to control message locking and expiration. For more information about locking, see Locking Messages and Unlocking Messages. For more information about expiration, see Setting Message Expiration Dates

Viewing Message Details in Single-Message View

To view details for an individual message, click the subject line in the results list. The Update Sent Message page is displayed. It includes much of the same information about the message as the results list, plus additional information about message locking.

The Update Sent Message page displays the first-opened time for the particular recipient listed in the To field. If the recipient has not opened the message, the Opened Date field is blank.

In single-message view, you can click the padlock icon to change the lock status for the recipient in the To field. You can also click the calendar icon to set an expiration date for that recipient. After you update the lock status or expiration date, click Save to save your changes.

Locking and Unlocking Messages

This topic provides information on the following:

Locking Messages

You can lock sent messages to prevent recipients from opening them. After you lock a message, the recipient cannot open the message to access the encrypted content. When you lock messages, you lock them for individual message recipients. You can lock a message for some recipients and leave it unlocked for others.

To lock one or more messages:

Procedure

Step 1

Select Manage Messages in the left-hand navigation menu.

Step 2

Click Search to retrieve all sent Message, or else run a basic or advanced search to retrieve specific messages.

Step 3

In the results list, select the check boxes for the messages you want to lock.

Note

 
If you sent a message to multiple recipients, the same message might appear in several rows. Select the check box for each recipient you want to prevent from opening the message.

Step 4

Click the Lock/Unlock Message icon above the results list. The Update Sent Messages page opens.

Step 5

Verify that the Lock all selected messages option is selected.

Step 6

Optionally, enter your reason for locking the messages.

The lock reason is displayed to recipients when they view the secure message.

Step 7

Click Update.

Note

 
If you specify a reason for the lock, the reason is displayed to recipients when they view the Secure Message. To change the lock reason notification, follow the steps to lock the message, and enter a new reason before you click Update.

When a secure message is locked, a padlock icon appears in the Locked column of the results list.


Unlocking Messages

To unlock messages:

Procedure

Step 1

Select Manage Messages in the left-hand navigation menu.

Step 2

Click Search to retrieve all sent Messages, or else run a basic or advanced search to retrieve specific messages.

Step 3

In the results list, select the check boxes for the messages you want to unlock.

Step 4

If you sent a message to multiple recipients, select the check box for each recipient's row, as appropriate.

Step 5

Click the Lock/Unlock Message icon above the results list. The Update Sent Messages page opens.

Step 6

Select the Unlock selected messages option.

Step 7

Click Update.

Note

 
You can also change the lock status of a message when you view details in the single-message view. After you update the lock status, click Save to save your changes. For more information about using the single-message view, see Viewing Message Details in Single-Message View.

Setting Message Expiration Dates

You can set a message expiration date to prevent recipients from opening a message after the specified date. You typically set expiration dates for a future time. After a message expires, the recipient cannot open the message to access the encrypted content. When the recipient views the message, a notification displays indicating that the message has expired.

When you manage messages, you can set, modify, and remove message expiration dates. When you view message information in the results list, expiration dates for expired messages appear in red text. All times are displayed in Greenwich Mean Time (GMT).

To set or modify a message expiration date:

Procedure


Step 1

Select Manage Messages in the left-hand navigation menu.

Step 2

Click Search to retrieve all sent Messages, or else run a basic or advanced search to retrieve specific messages.

Step 3

In the results list, select the check boxes for the messages you want to update. If you sent a message to multiple recipients, select the check box for each recipient's row, as appropriate.

Step 4

Click the Update Expiration For Messages icon above the results list. The Update Sent Messages page opens.

Step 5

Enter an expiration date and time for the messages, or click the calendar icon and select the expiration date.

Step 6

Remember, the time you enter is GMT, not local time.

Step 7

Click Update. The message expiration date appears in the Expires column of the results list.


Removing a message expiration date:

To remove a message expiration date:

Procedure

Step 1

Select Manage Messages in the left-hand navigation menu.

Step 2

Click Search to retrieve all sent Messages, or else run a basic or advanced search to retrieve specific messages.

Step 3

In the results list, select the check boxes for the messages you want to update.

Step 4

If you sent a message to multiple recipients, select the check box for each recipient's row, as appropriate.

Step 5

Click the Update Expiration For Messages icon above the results list. The Update Sent Messages page opens.

Step 6

Delete the text in the New expiration date field.

Step 7

Click Update.

Note

 
NoteYou can also set or remove the expiration date of a message when you view details in the single-message view. After you enter or delete the expiration date, click Save to save your changes. For more information about using the single-message view, see Viewing Message Details in Single-Message View.

Editing Your Profile

You can select Edit Profile in the left-hand navigation menu to update your user account information with Cisco Secure Email Encryption Service (Encryption Service). After updating the Edit Profile page, click Save Profile to save your changes.

Task you can perform include:

Editing Your Personal Details

You can edit your personal details, such as your First name, Last name. The Language field specifies your preferred language for viewing the Secure Email Encryption Service website.

Procedure


Step 1

Click Edit Profile on the left pane.

Step 2

In the Personal Details section, enter your First Name and Last Name. By default, your first name and last name is taken from your Encryption Service account.

Note

 
  • The Email Address and Language field are non-editable.

  • You cannot change the email address associated with your account. If you receive secure messages in multiple email addresses, you must set up a separate user account for each address.

  • To change the language, use the drop-down list in the upper-right corner of the page.

Step 3

Click Save Profile to save your changes.


Setting Your Email Signature

An email signature allows you to add a personalized text that automatically appears at the bottom of your emails when composing a secure message.

To set up your email signature:

Procedure


Step 1

Log in to the Websafe portal.

Step 2

Click Edit Profile on the left pane.

Step 3

In the Email Signature field, enter the text that you want to use.

Step 4

Click Save Profile to save your changes.

Once saved, this email signature will automatically appear in the email body when you compose a new secure message next time onwards.


Setting Your Local Time Zone

The time zone is set automatically based on your current location. If you set the time zone previously, the auto-detection is not enabled. You can also change it by choosing the preferred time zone from the Time Zone drop-down menu.

You can set the time zone to your local time zone and to your desired format (12 hours or 24 hours) for all messages that you send.

To set your local time zone:

Procedure


Step 1

Click the Edit Profile icon in the left pane. The Edit Profile page opens.

Step 2

Choose the appropriate value from the Time Zone drop-down menu.

Step 3

Choose 12 hours or 24 hours from the Time Format drop-down menu.

Step 4

Click Save Profile to save your changes.


Setting Your Preferences

In the Preferences section, you can manage how your secure messages are handled.

To set your preferences:

Procedure


Step 1

Click Edit Profile on the left pane.

Step 2

Select or deselect the checkboxes based on your preferences:

  • Auto-open Secure Messages: This option allows secure messages to open automatically in certain cases when you access the encrypted message file attachment.

    To use the auto-open feature, you must first select the 'Remember Me on This Computer' option to create a cookie for opening Secure Messages on your computer. Additionally, the security level of the Secure Message must be set to either Low or Medium. If the security level is set to High, you will be required to enter a password to open the Secure Message.

  • BCC me on messages that I send: This option allows you to include yourself as a BCC recipient on all encrypted messages you send. When you select this option, you will receive a copy of the message, appearing as if you were listed in the To or CC field.

  • Request Read Receipt: A read receipt is an email notification that informs you when a recipient opens a secure message for the first time.

Step 3

Click Save Profile to save your changes.


Resetting Your Password

The Password Reset option allows you to change your existing password to a new one.

To reset your password:

Procedure


Step 1

Click Edit Profile on the left pane.

Step 2

Go to Password Reset section.

Step 3

In the New Password field, type your new password.

Note


The password must be a minimum of 8 characters, include both letters and numbers, and are case-sensitive.

Step 4

In the Confirm Password field, re-enter the same new password

Step 5

In the Current Password field, enter your existing password

Step 6

Click Save Profile to save your changes.

When you reset your Encryption Service password and click Save Profile, your Encryption Service account will be logged out. You need to re-login to your Encryption Service account using your new password.