Set Up Cisco Cyber Vision Docker Sensor

Cisco Cyber Vision Docker Compose Creation

The Cisco Cyber Vision Docker Sensor deployment requires two steps:

  1. Compose file generation.

  2. Container creation.

Procedure


Step 1

If it’s not already done, create some new deployment tokens.

See Create Deployment Tokens from Cisco Cyber Vision Administration Guide.

Step 2

From the main menu, choose Admin > Sensors > Sensor Explorer.

Step 3

Click New sensor.

Step 4

Click Docker sensors from the drop-down list.

Step 5

Fill in the details in the Sensor Application page.

  1. Enter the name of your sensors in the Name field.

    Note


    The name of your sensors, treated as a Serial Number, must be unique for each center.

  2. Click the drop-down arrow in the Deployment token field and select your deployment token name.

  3. Click the drop-down arrow in the Sensor Mode field and select your Sensor Mode: Passive or Active Discovery.

  4. Check the Use insecure pull mode check box.

    The center IP address replaces the center FQDN.

  5. Check the Center is behind NAT checkbox if applicable to add another Center IP address.

Step 6

Click Next.

The Capture Configuration page appears.

Step 7

Fill out the Capture Configuration form with the capture interface configuration.

Note


The form changes based on the mirrored traffic type: SPAN, RSPAN, ERSPAN2, or ERSPAN3.

  1. For SPAN configuration:

    • Click the drop-down arrow and select the Mirrored traffic type from the list.

    • Enter the host interface in the Capture Interface field that will receive the capture (for example, eth2, enp7s0).

    • Click the drop-down arrow of the Capture Mode field and select sensor filter (for example, Optimal (default), All, Industrial, Custom). See Set a Capture Mode.

  2. For RSPAN configuration:

    • Click the drop-down arrow and select the Mirrored traffic type from the list.

    • Add the host interface in the Capture Interface field that will receive the capture (for example, eth2, enp7s0).

    • Click the drop-down arrow of the Capture Mode field and select sensor filter (for example, Optimal (default), All, Industrial, Custom). See Set a Capture Mode.

    • Add a VLAN ID configured for the SPAN destination.

  3. For ERSPAN configuration:

    • Click the drop-down arrow and select the Mirrored traffic type from the list.

    • Add the host interface in the Capture Interface field that will receive the capture (for example, eth2, enp7s0).

    • Click the drop-down arrow of the Capture Mode field and select sensor filter (for example, Optimal (default), All, Industrial, Custom). See Set a Capture Mode.

    • Enter the Capture IP address of the interface in the Capture IP field that will receive the spanned traffic.

    • Add a VLAN ID if needed.

Step 8

Click Continue with interfaces.

The Active Discovery page appears.

Step 9

Fill in the details on the Active Discovery page.

  • Enter the host interface in the Active Discovery Interface field that will be used for active discovery (for example, eth2, enp7s0).

  • Enter an IP address for active discovery in the IP field under Target Interface.

  • If needed, add a VLAN.

  • To add a new target, click Add a new target.

Step 10

Click Continue with target interface.

The Docker Compose page appears.

Step 11

The Docker Compose page provides the compose file needed to deploy sensor applications. Users need to download or copy it and add the file to their Linux system where Docker is running.
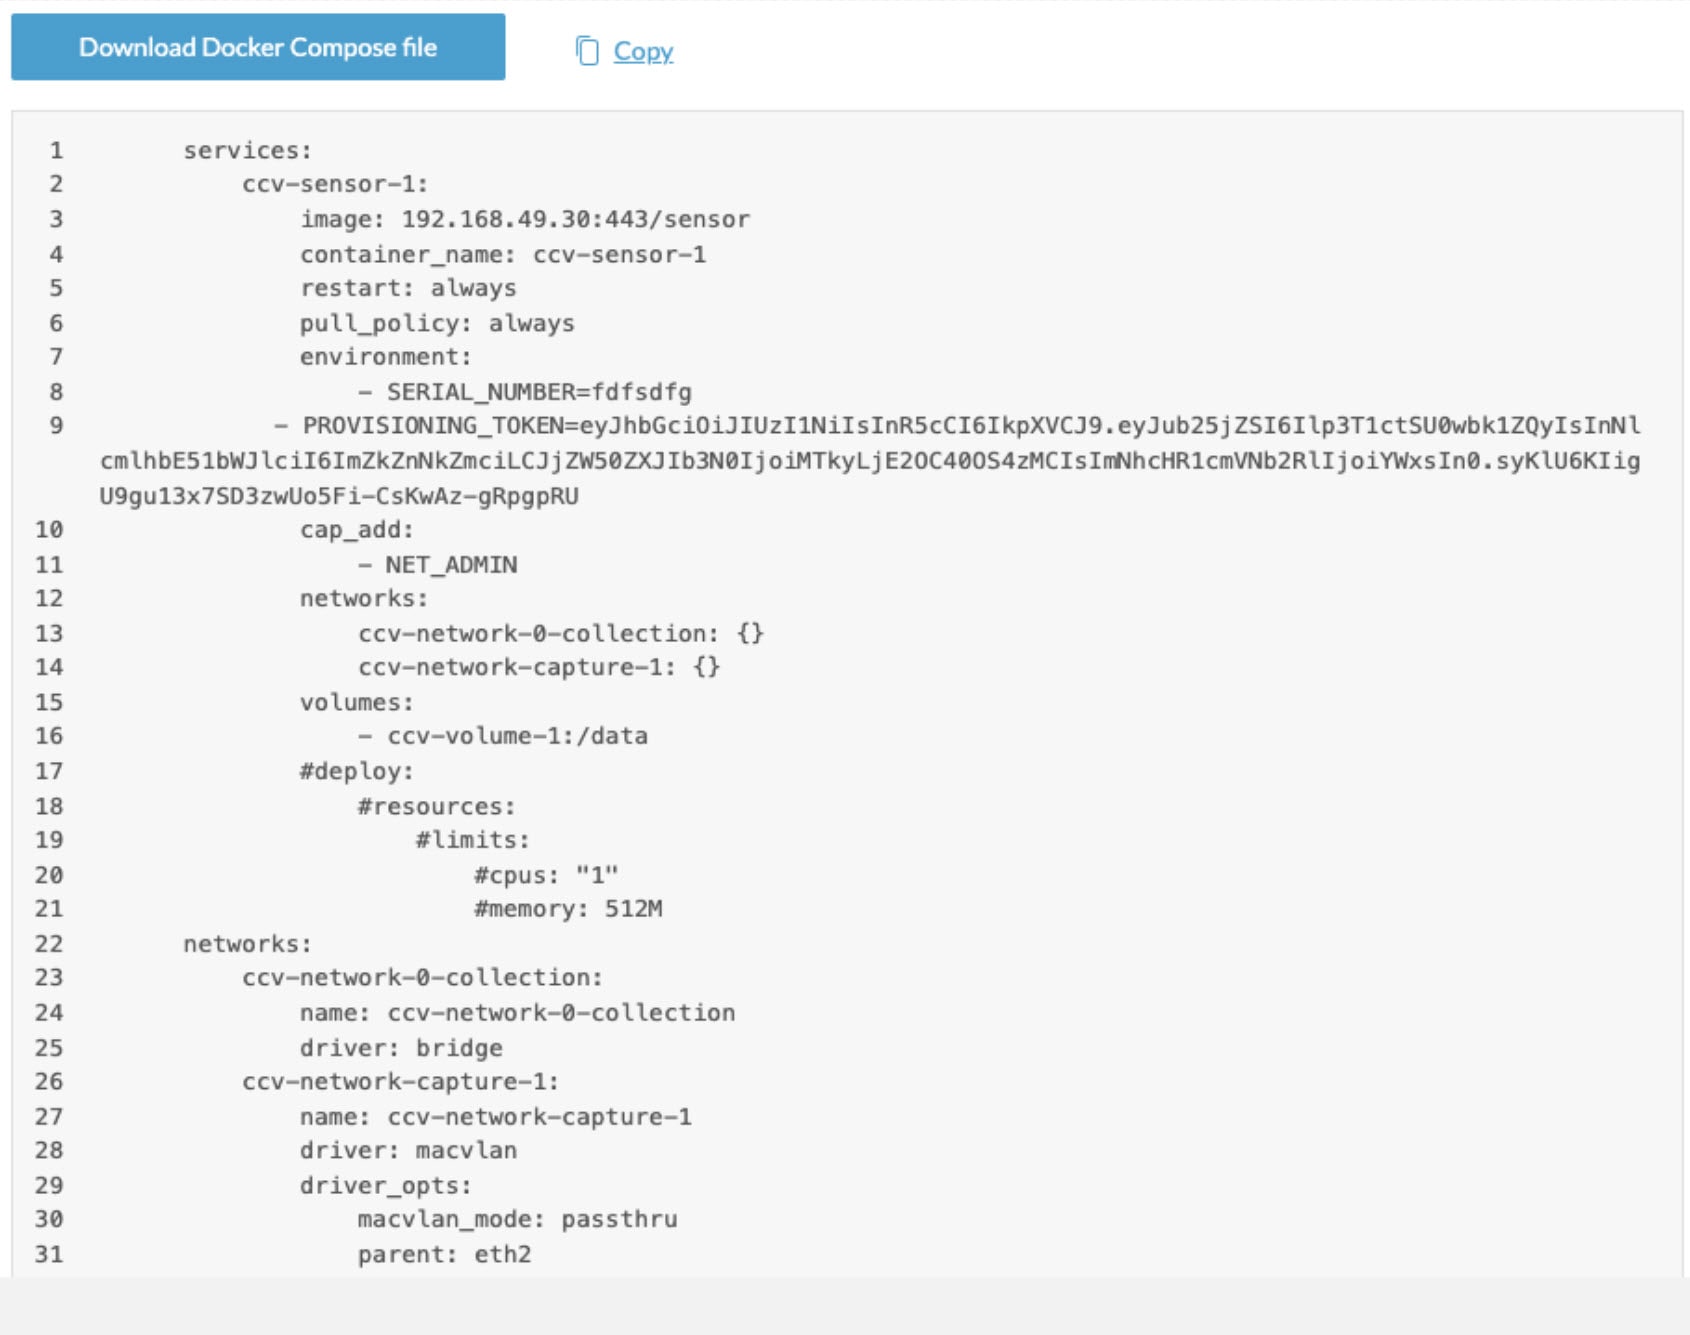

Cisco Cyber Vision Docker Container Deployment

After creating the compose file on the Linux system, use the command docker compose to launch and create the container.

Execute the command from the folder with the compose file named compose.yml. This way, you do not need to specify the file name in the command. Use the option -f if the file has a different name or is in another folder (for example, -f compose2.yml).

  • To test the creation, use the command: sudo docker compose up. The system displays container logs. Press Ctrl+C to stop the container.

  • To create and launch the container while leaving it running, use: sudo docker compose up -d.

  • To force the recreation of the container, use: sudo docker compose -f compose3.yml up --force-recreate -d.

Once launched, the command creates the sensor container and configures it.

  1. The system pulls the sensor application from the Center.

  2. It configures the sensor application by creating networks and volumes.

  3. It adds a provisioning token to the application.

  4. When the container starts, the provisioning token creates the sensor on the Center side.

  5. The Center sends the enrollment package to provide the sensor with its configuration and all necessary elements for communication, including certificates.

The sensor appears as Connected on the Cisco Cyber Vision Center's sensor list if the network configuration is correct. To see the sensor, select Admin > Sensors > Sensor Explorer from the main menu.

Cisco Cyber Vision Docker Sensor Additional Commands

  • sudo docker ps: lists Docker containers

  • sudo docker exec -it ccv-sensor-1 /bin/bash: accesses the command line of container ccv-sensor-1

  • sudo docker stop <sensor-name>: stops the sensor container

  • sudo docker ps –a: lists all containers, including stopped ones

  • sudo docker start <sensor-name>: starts a sensor container

  • sudo docker rm -fv <agent-name>: removes a sensor container

  • sudo docker compose logs: displays Docker Compose logs

To delete a running container and its volume, use the appropriate command.

  • sudo docker rm -f ccv-sensor-1: stops and kills the container

  • sudo docker volume ls: lists the different volumes on your system

  • sudo docker volume rm documents_ccv-volume-1: removes a specific volume

  • sudo docker images: lists all images available on your system

  • sudo docker rmi [Image]: deletes one selected image

  • sudo docker system prune -a: removes unused images, containers, volumes, and networks

To completely clean up the system of all running images, containers, volumes, and networks, use the appropriate command:

  • sudo docker stop $(sudo docker ps -a -q)

  • sudo docker system prune -a

  • sudo docker volume prune -a