- Introduction
- Setup, Installation, and Basic Configuration
- Working With Reports on the Legacy Web Interface
- Using Centralized Email Security Reporting on the Legacy Web Interface
- Working With Reports on the Cloud Email Security Management Console
- Using Centralized Email Security Reporting on the Cloud Email Security Management Console
- Tracking Messages
- Spam Quarantine
- Centralized Policy, Virus, and Outbreak Quarantines
- Monitoring System Status
- Integrating With LDAP
- Configuring SMTP Routing
- Distributing Administrative Tasks
- Common Administrative Tasks
- Logging
- Troubleshooting
- IP Interfaces and Accessing the Appliance
- Assigning Network and IP Addresses
- Firewall Information
- Additional Resources
- End User License Agreement
- Index
- Performing Administrative Tasks
- Working with Feature Keys
- Performing Maintenance Tasks Using CLI Commands
- Enabling Remote Power Cycling
- Monitoring System Health Using SNMP
- Backing Up Security Management Appliance Data
- What Data Is Backed Up
- Restrictions and Requirements for Backups
- Backup Duration
- Availability of Services During Backups
- Interruption of a Backup Process
- Prevent the Target Appliance From Pulling Data Directly from Managed Appliances
- Receiving Alerts About Backup Status
- Scheduling Single or Recurring Backups
- Starting an Immediate Backup
- Checking Backup Status
- Other Important Backup Tasks
- Making a Backup Appliance the Primary Appliance
- Disaster Recovery on the Security Management Appliance
- Upgrading Appliance Hardware
- Upgrading AsyncOS
- Batch Commands for Upgrades
- Determining Network Requirements for Upgrades and Updates
- Choosing an Upgrade Method: Remote vs. Streaming
- Configuring Upgrade and Service Update Settings
- Before You Upgrade: Important Steps
- Upgrading AsyncOS
- Viewing Status of, Canceling, or Deleting a Background Download
- After Upgrading
- About Reverting to an Earlier Version of AsyncOS
- About Updates
- Configuring the Return Address for Generated Messages
- Managing Alerts
- Changing Network Settings
- Specifying a Secure Communication Protocol
- Configuring the System Time
- About SSO and SAML 2.0
- SAML 2.0 SSO Workflow
- Guidelines and Limitations for SAML 2.0
- How to Configure SSO for Spam Quarantine
- Prerequisites
- Configure Cisco Content Security Management Appliance as a Service Provider
- Configure the Identity Provider to Communicate with Cisco Content Security Management Appliance
- Configure Identity Provider Settings on Cisco Content Security Management Appliance
- Enable SSO for Spam Quarantine
Common
Administrative Tasks
This chapter contains the following sections:
- Performing Administrative Tasks
- Working with Feature Keys
- Performing Maintenance Tasks Using CLI Commands
- Enabling Remote Power Cycling
- Monitoring System Health Using SNMP
- Backing Up Security Management Appliance Data
- Disaster Recovery on the Security Management Appliance
- Upgrading Appliance Hardware
- Upgrading AsyncOS
- About Reverting to an Earlier Version of AsyncOS
- About Updates
- Configuring the Return Address for Generated Messages
- Managing Alerts
- Changing Network Settings
- Specifying a Secure Communication Protocol
- Configuring the System Time
- Configuration File Page
- Saving and Importing Configuration Settings
- Managing Disk Space
- Adjusting the Reference Threshold in System Health Graphs for Email Security Appliances
- SSO Using SAML 2.0
- Customizing Your View
Performing Administrative Tasks
You can perform most system administration tasks by using the System Administration menu in the graphical user interface (GUI). Some system administration features, however, are available only in the command-line interface (CLI).
In addition, you access the status-monitoring features of the appliance on the Monitor menu, which is described in chapter Monitoring System Status
 Note | Several of the features or commands described in this chapter can affect routing precedence. For more information, see IP Addresses, Interfaces, and Routing. |
Working with Feature Keys
Keys are specific to the serial number of your appliance and specific to the feature that you enable. You cannot reuse a key from one system on another system.
To perform the tasks described in this section from the command-line prompt, use the featurekey command.
Virtual Appliance Licensing and Feature Keys
For information about appliance behavior upon license and feature key expiration, see the Cisco Content Security Virtual Appliance Installation Guide available from http://www.cisco.com/c/en/us/support/security/content-security-management-appliance/products-installation-guides-list.html
To view license information, use the show license command in the command-line interface (CLI.)
Performing Maintenance Tasks Using CLI Commands
The operations and commands described in this section enable you to perform maintenance-related tasks on the Security Management appliance. This section describes the following operations and commands:
- Shutting Down the Security Management Appliance
- Rebooting the Security Management Appliance
- Taking the Security Management Appliance Out of Service
- Resuming from a Suspended State
- Resetting the Configuration to Factory Defaults
- Displaying the Version Information for AsyncOS
Shutting Down the Security Management Appliance
To shut down your Security Management appliance, do the folliwng:
-
[New Web Interface Only] On the Cloud Email Security Management Console, click on the gear
 icon to load the legacy web interface.
 -
Use the Management Appliance > System Administration > Shutdown/Reboot page.
or
-
Use the shutdown command at the command-line prompt.
Shutting down an appliance exits AsyncOS, which allows you to safely power down the appliance. You may restart the appliance at a later time without losing any messages in the delivery queue. You must enter a delay for the appliance to shut down. The default delay is 30 seconds. AsyncOS allows open connections to complete during the delay, after which it forcefully closes open connections.
Rebooting the Security Management Appliance
To reboot your Security Management appliance, use the Shutdown/Reboot page available on the System Administration menu in the GUI, or use the r eboot command in the CLI.
Rebooting your appliance restarts AsyncOS, which allows you to safely power down and reboot the appliance. You must enter a delay for the appliance to shut down. The default delay is 30 seconds. AsyncOS allows open connections to complete during the delay, after which it forcefully closes open connections. You may restart the appliance without losing any messages in the delivery queue.
Taking the Security Management Appliance Out of Service
If you want to take the appliance offline, for example to perform system maintenance, use one of the following commands:
You must enter a delay for the appliance when using these commands. The default delay is 30 seconds. AsyncOS allows open connections to complete during the delay, after which it forcefully closes open connections. If there are no open connections, service is suspended immediately.
To re-activate services that were halted by the suspend or suspendtransfers commands, use the resume or resumetransfers commands, respectively.
To determine the current online/suspended status of the management appliance, select Management Appliance > System Administration > Shutdown/Reboot in the web interface.
See also:
- “Suspending Email Delivery,” “Resuming Email Delivery,” “Suspending Receiving,” and “Resuming Receiving” in the documentation or online help for your Email Security appliance.
CLI Examples: suspend and suspendtransfers Commands
sma.example.com> suspend
Enter the number of seconds to wait before abruptly closing connections.
[30]> 45
Waiting for listeners to exit...
Receiving suspended.
Waiting for outgoing deliveries to finish...
Mail delivery suspended.
sma.example.com>
sma.example.com> suspendtransfers

Transfers suspended.
sma.example.com>
Resuming from a Suspended State
The resume command returns the appliance to normal operating state after using the suspend or suspenddel command.
The resumetransfers command returns the appliance to normal operating state after using the suspendtransfers command.
CLI Examples: resume and resumetransfers Commands
sma.example.com> resume
Receiving resumed.
Mail delivery resumed.
sma.example.com>
sma.example.com> resumetransfers

Receiving resumed.
Transfers resumed.
sma.example.com>
Resetting the Configuration to Factory Defaults
When physically transferring the appliance, or as a last resort for solving configuration issues, you may want to reset the appliance to factory defaults.
 Caution | Resetting the configuration will disconnect you from the CLI, disable services that you used to connect to the appliance (FTP, Telnet, SSH, HTTP, HTTPS), and remove user accounts. |
|
To |
Do This |
||
|---|---|---|---|
|
But |
|
||
|
Use the diagnostic > reload CLI command.
|
The resetconfig Command
mail3.example.com> suspend
Delay (seconds, minimum 30):
[30]> 45
Waiting for listeners to exit...
Receiving suspended.
Waiting for outgoing deliveries to finish...
Mail delivery suspended.
mail3.example.com> resetconfig
Are you sure you want to reset all configuration values? [N]> Y
All settings have been restored to the factory default.
Displaying the Version Information for AsyncOS
Enabling Remote Power Cycling
The ability to remotely reset the power for the appliance chassis is available only on 80- and 90- series hardware.
If you want to be able to remotely reset appliance power, you must enable and configure this functionality in advance, using the procedure described in this section.
- Cable the dedicated Remote Power Cycle (RPC) port directly to a secure network. For information, see hardware documentation for your model, available from the location listed in Documentation.
- Ensure that the appliance is accessible remotely; for example, open any necessary ports through the firewall.
- This feature requires a unique IPv4 address for the dedicated Remote Power Cycle interface. This interface is configurable only via the procedure described in this section; it cannot be configured using the ipconfig command.
- In order to cycle appliance power, you will need a third-party tool that can manage devices that support the Intelligent Platform Management Interface (IPMI) version 2.0. Ensure that you are prepared to use such a tool.
- For more information about accessing the command-line interface, see the CLI reference guide.
What to Do Next
Monitoring System Health Using SNMP
AsyncOS supports system status monitoring via Simple Network Management Protocol (SNMP) versions v1, v2, and v3.
-
To enable and configure SNMP, use the snmpconfig command in the command-line interface.
-
MIBs are available from http://www.cisco.com/c/en/us/support/security/content-security-management-appliance/tsd-products-support-series-home.html use the latest available files.
-
The use of SNMPv3 with password authentication and DES Encryption is mandatory to enable this service. (For more information on SNMPv3, see RFCs 2571-2575.) You are required to set a SNMPv3 passphrase of at least 8 characters to enable SNMP system status monitoring. The first time you enter a SNMPv3 passphrase, you must re-enter it to confirm. The snmpconfig command “remembers” this phrase the next time you run the command.
-
When setting up SNMP to monitor connectivity:
When entering the url-attribute while configuring a connectivityFailure SNMP trap, determine whether the URL is pointing at a directory or a file.
- Additional information about using SNMP with AsyncOS is available in the online help for your email security appliance.
Example: snmpconfig Command
sma.example.com> snmpconfig
Current SNMP settings:
SNMP Disabled.
Choose the operation you want to perform:
- SETUP - Configure SNMP.
[]> SETUP
Do you want to enable SNMP?
[Y]>
Please choose an IP interface for SNMP requests.
1. Management (198.51.100.1: sma.example.com)
[1]>
Which port shall the SNMP daemon listen on interface "Management"?
[161]>
Please select SNMPv3 authentication type:
1. MD5
2. SHA
[1]> 2
Please select SNMPv3 privacy protocol:
1. DES
2. AES
[1]> 2
Enter the SNMPv3 authentication passphrase.
[]>
Please enter the SNMPv3 authentication passphrase again to confirm.
[]>
Enter the SNMPv3 privacy passphrase.
[]>
Please enter the SNMPv3 privacy passphrase again to confirm.
[]>
Service SNMP V1/V2c requests?
[N]> Y
Enter the SNMP V1/V2c community string.
[ironport]> public
Shall SNMP V2c requests be serviced from IPv4 addresses?
[Y]>
From which IPv4 networks shall SNMP V1/V2c requests be allowed? Separate
multiple networks with commas.
[127.0.0.1/32]>
Enter the Trap target as a host name, IP address or list of IP
addresses separated by commas (IP address preferred). Enter "None" to disable traps.
[127.0.0.1]> 203.0.113.1
Enter the Trap Community string.
[ironport]> tcomm
Enterprise Trap Status
1. CPUUtilizationExceeded       Disabled
2. FIPSModeDisableFailure       Enabled
3. FIPSModeEnableFailure        Enabled
4. FailoverHealthy              Enabled
5. FailoverUnhealthy            Enabled
6. RAIDStatusChange             Enabled
7. connectivityFailure          Disabled
8. fanFailure                   Enabled
9. highTemperature              Enabled
10. keyExpiration               Enabled
11. linkUpDown                  Enabled
12. memoryUtilizationExceeded   Disabled
13. powerSupplyStatusChange     Enabled
14. resourceConservationMode    Enabled
15. updateFailure               Enabled
Do you want to change any of these settings?
[N]> Y
Do you want to disable any of these traps?
[Y]> n
Do you want to enable any of these traps?
[Y]> y
Enter number or numbers of traps to enable.  Separate multiple numbers with
commas.
[]> 1,7,12
What threshold would you like to set for CPU utilization?
[95]>
What URL would you like to check for connectivity failure?
[http://downloads.ironport.com]>
What threshold would you like to set for memory utilization?
[95]>
Enter the System Location string.
[Unknown: Not Yet Configured]> Network Operations Center - west; rack #30, position 3
Enter the System Contact string.
[snmp@localhost]> SMA.Administrator@example.com
Current SNMP settings:
Listening on interface "Management" 198.51.100.1  port 161.
SNMP v3: Enabled.
SNMP v1/v2: Enabled, accepting requests from subnet 127.0.0.1/32 .
SNMP v1/v2 Community String: public
Trap target: 203.0.113.1
Location: Network Operations Center - west; rack #30, position 3
System Contact: SMA.Administrator@example.com
Choose the operation you want to perform:
- SETUP - Configure SNMP.
[]>
sma.example.com> commit
Please enter some comments describing your changes:
[]> Enable and configure SNMP
Changes committed: Fri Nov 06 18:13:16 2015 GMT
sma.example.com>
Backing Up Security Management Appliance Data
- What Data Is Backed Up
- Restrictions and Requirements for Backups
- Backup Duration
- Availability of Services During Backups
- Interruption of a Backup Process
- Prevent the Target Appliance From Pulling Data Directly from Managed Appliances
- Receiving Alerts About Backup Status
- Scheduling Single or Recurring Backups
- Starting an Immediate Backup
- Checking Backup Status
- Other Important Backup Tasks
- Making a Backup Appliance the Primary Appliance
What Data Is Backed Up
You can choose to back up all data, or any combination of the following data:
-
Spam quarantine, including messages and meta data
-
Centralized policy, virus, and outbreak quarantines, including messages and meta data
-
Email tracking (message tracking), including messages and meta data
-
Reporting (Email )
-
Safelist/blocklist
After the data transfer is finished, the data on the two appliances will be identical.
Configurations and logs are not backed up using this process. To back up those items, see Other Important Backup Tasks.
Each backup after the first backup copies only the information generated since the last backup.
Restrictions and Requirements for Backups
Be sure to address the following restrictions and requirements before you schedule a backup:
|
Restriction |
Requirement |
|---|---|
|
AsyncOS version |
The AsyncOS version of the source and target Security Management appliances must be the same. If there is a version incompatibility, upgrade appliances to the same release before scheduling a backup.
|
|
Target appliance on the network |
The target appliance must be set up on the network. If the target appliance is new, run the System Setup Wizard to enter the necessary information. For instructions, see Setup, Installation, and Basic Configuration |
|
Communication between source and target appliances |
The source and target Security Management appliances must be able to communicate using SSH. Therefore: |
|
Target appliance must not be in service |
Only the primary appliance should pull data from managed email security appliances. To ensure this, see Prevent the Target Appliance From Pulling Data Directly from Managed Appliances. Also, cancel any scheduled configuration publishing jobs on the backup appliance. |
|
Appliance capacity |
The disk space capacity of the target appliance must be the same as or greater than the capacity of the source appliance. Disk space allocated to each type of data (reporting, tracking, quarantine, etc.) on the target appliance cannot be less than the corresponding allocation on the source appliance. You can schedule a backup from a larger source to a smaller target Security Management appliance as long as there is enough space on the target appliance for all of the data being backed up, for each type of data. If the source appliance is larger than the target appliance, you must reduce the space allocated on the source appliance to match the space available on the smaller target appliance. To view and manage disk space allocations and capacity, see Managing Disk Space. For disk capacity of virtual appliances, see the Cisco Content Security Virtual Appliance Installation Guide . |
|
Multiple, concurrent, and chained backups |
Only one backup process can run at a time; a backup that is scheduled to run before a previous backup has been completed will be skipped and a warning sent. Data from a Security Management appliance can be backed up to a single Security Management appliance. Chained backup (a backup to a backup) is not supported. |
Backup Duration
During a full initial backup, a backup of 800GB may take up to 10 hours. Daily backups, may take up to 3 hours each. Weekly and monthly backups may take longer. These numbers may vary.
After the initial backup, the backup process transfers only files that have changed since the last backup. Thus, subsequent backups should take less time than the initial backup. The time required for subsequent backups depends on the amount of data accumulated, how many files have changed, and to what extent the files have changed since the last backup.
Availability of Services During Backups
Backing up a Security Management appliance copies the active data set from the ‘source’ Security Management appliance to a ‘target’ Security Management appliance with minimum disruption on the originating ‘source’ appliance.
The phases of the backup process and their effect on the availability of services are as follows:
- Phase 1—Phase 1 of the backup process starts with the data transfer between the source and target appliances. During data transfer, services on the source appliance remain running, therefore data collection can still continue. However, services are shut down on the target appliance. Once the data transfer is complete from the source to target appliance, Phase 2 begins.
- Phase 2—When Phase 2 begins, services on the source appliance are shut down. Any differences that have collected during the data transfer between the source and target appliance since the initial shutdown are copied to the target appliance and services on both the source and the target appliances are returned to the state they were in when backup was initiated. This allows maintain maximum uptime on the source appliance and no data loss for either appliance.
During the backup, data availability reports may not work, and when viewing the message tracking results, the hostname for each message may be labeled as ‘unresolved’.
If you try to schedule a report and forget that a backup is in progress, you can check the system status by choosing Management Appliance > Centralized Services. From this window you can see the warning at the top of the page that a system backup is in progress.
Interruption of a Backup Process
Note | If there is an unexpected reboot of the source appliance while a backup is being performed, the target appliance is unaware of this stoppage. You must cancel the backup on the target appliance. |
If there is an interruption of the backup process and the backup process is not completed, the next time a backup is attempted, the Security Management appliance can start the backup process up from where it was stopped.
Canceling a backup in progress is not recommended, as the existing data will be incomplete and may not be usable until a subsequent backup is completed, especially if you receive an error. If you must cancel a backup in progress, be sure to run a complete backup as soon as possible to ensure that you always have a usable current backup.
Prevent the Target Appliance From Pulling Data Directly from Managed Appliances
| Step 1 | Access the command-line interface of the target appliance. For instructions, see Accessing the Command Line Interface. |
| Step 2 | Run the suspendtransfers command. |
| Step 3 | Wait for the prompt to reappear. |
| Step 4 | Run the suspend command. |
| Step 5 | Wait for the prompt to reappear. |
| Step 6 | Exit the command-line interface of the target appliance. |
Receiving Alerts About Backup Status
To receive alerts when backups are complete and be informed of any issues, configure the appliance to send you alerts of type System, severity Info. See Managing Alerts.
Scheduling Single or Recurring Backups
You can schedule a single or recurring backup to occur at a predetermined time.
Note | A backup process will not start if there are any ongoing backups on the remote machine. |
- Address the items in Restrictions and Requirements for Backups.
- Make sure you disable two-factor authentication temporarily on the target appliance before you begin the backup process. Once the backup process is complete, you can enable two-factor authentication on the target appliance.
| Step 1 | Login, as administrator, to the command-line interface of the source appliance. |
| Step 2 | At the command prompt, type backupconfigand press Enter. |
| Step 3 | If the
connection between source and target appliances is slow, turn on data
compression:
Type setup and enter Y. |
| Step 4 | Type Schedule and press Enter. |
| Step 5 | Type the IP address of the target Security Management appliance. |
| Step 6 | Enter a meaningful name to identify the target appliance (up to 20 characters). |
| Step 7 | Enter the admin user name and password for the target appliance. |
| Step 8 | Respond to prompts about which data you want to back up. |
| Step 9 | To schedule a single backup, type 2 to Schedule a single backup and press Enter. |
| Step 10 | To schedule a
recurring backup:
|
| Step 11 | Type the specific date or day and time that you want the backup to start and press Enter. |
| Step 12 | Type the name of the backup process. |
| Step 13 | Verify that the backup was successfully scheduled: Type View and press Enter at the command prompt. |
| Step 14 | See also Other Important Backup Tasks. |
Starting an Immediate Backup
Note | A backup process will not start if there are any ongoing backups on the target machine. |
Meet all requirements in Restrictions and Requirements for Backups.
| Step 1 | Login, as administrator, to the command-line interface of the source appliance. |
| Step 2 | At the command prompt, type backupconfig and press Enter. |
| Step 3 | If the
connection between source and target appliances is slow, turn on data
compression:
Type setup and enter Y. |
| Step 4 | Type Schedule and press Enter. |
| Step 5 | Type the IP address of the target Security Management appliance. |
| Step 6 | Enter a meaningful name to identify the target appliance (up to 20 characters). |
| Step 7 | Enter the admin user name and password for the target appliance. |
| Step 8 | Respond to prompts about which data you want to back up. |
| Step 9 | Type 3to Start a Single Backup Now and press Enter. |
| Step 10 | Enter a
meaningful name for the backup job.
The backup process begins in a few minutes. |
| Step 11 | (Optional) To see the progress of the backup, type Status at the command-line prompt. |
| Step 12 | See also Other Important Backup Tasks. |
Checking Backup Status
| Step 1 | Log in, as administrator, to the command-line interface of the primary appliance. | ||||||
| Step 2 | At the command
prompt, type
backupconfig and press
Enter.
|
Backup Information in Log Files
Backup logs record the backup process from start to finish.
Information about backup scheduling is in the SMA logs.
Related Topics
Other Important Backup Tasks
Consider doing the following in order to prevent loss of items that are not backed up by the backup processes described in this section, and to speed setup of your replacement Security Management appliance in case of appliance failure:
- To save the settings from your primary Security Management appliance, see Saving and Importing Configuration Settings. Save the configuration file to a safe location separate from your primary Security Management appliance.
- To save log files from your Security Management appliance to an alternate location, see Log Subscriptions.
Additionally, you can set up a log subscription for Backup Logs. See Creating a Log Subscription in the GUI.
Making a Backup Appliance the Primary Appliance
If you are upgrading appliance hardware, or if you need to switch appliances for any other reason, use this procedure.
Review the information in Backing Up Security Management Appliance Data.
| Step 1 | Save a copy of the configuration file from your old/primary/source appliance to a location that you can reach from the new appliance. See Saving and Importing Configuration Settings. |
| Step 2 | Run the System Setup Wizard on the new/backup/target appliance. |
| Step 3 | Meet the requirements in Restrictions and Requirements for Backups. |
| Step 4 | Run a backup from the old/primary/source appliance. See instructions at Starting an Immediate Backup. |
| Step 5 | Wait for the backup to complete. |
| Step 6 | Run the suspendtransfers and suspend commands on the old/primary/source appliance. |
| Step 7 | Run a second backup to transfer last-minute data from the old/primary/source to the new/backup/target appliance. |
| Step 8 | Import the configuration file into the new/backup/target appliance. |
| Step 9 | Run the
resumetransfers and resume commands on the new/backup/target appliance.
Do NOT run this command on the old/original primary/source appliance. |
| Step 10 | Establish the connection between the new/backup/target appliance and the managed email security appliances: |
| Step 11 |
|
| Step 12 | Verify that the
new/target appliance is now functioning as the primary appliance:
Select Management Appliance > Centralized Services > System Status and check the status of data transfers. |
Disaster Recovery on the Security Management Appliance
If your Security Management appliance unexpectedly fails, use the following procedure to restore security management services and your backed-up data, which you regularly save using the information in Backing Up Security Management Appliance Data.
A typical appliance configuration might look as shown in the following figure:
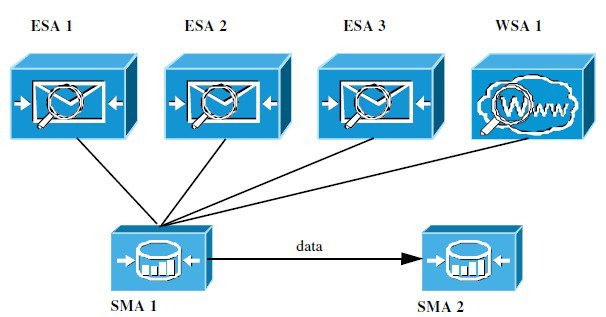
In this environment, SMA 1 is the primary Security Management appliance that is receiving data from ESAs 1-3 and WSA 1. SMA 2 is the backup Security Management appliance receiving backup data from SMA1.
In case of failure, you must configure SMA 2 to be your primary Security Management appliance.
To configure SMA 2 as your new primary Security Management appliance and restore service:
| Command or Action | Purpose | |
|---|---|---|
| Step 1 | If you are using Centralized Policy, Virus, and Outbreak Quarantines: |
See instructions for disabling Centralized Policy, Virus, and Outbreak Quarantines in the Email Security appliance documentation. This will create local quarantines on each Email Security appliance, which you will migrate later to the new Security Management appliance. |
| Step 2 | Load onto your backup Security Management appliance (SMA2) the configuration file that you saved from your primary Security Management appliance (SMA1). | |
| Step 3 | Recreate the IP address from the failed SMA 1 to be the IP address on SMA 2 |
For more information about Adding IP Interfaces, see Configuring IP Interfaces. |
| Step 4 | Submit and commit your changes. | |
| Step 5 | Enable all applicable centralized services on the new Security Management appliance (SMA 2). |
See Configuring Services on the Security Management Appliance. |
| Step 6 | Add all appliances on to the new Security Management appliance (SMA 2). | |
| Step 7 | If you are using Centralized Policy, Virus, and Outbreak Quarantines, configure quarantine migration on the new Security Management appliance, then enable and configure the migration on each applicable Email Security appliance. | |
| Step 8 | If necessary, restore additional data. |
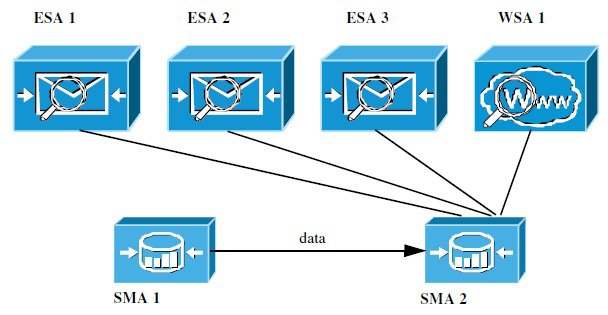
After this process is complete, SMA 2 becomes the primary Security Management appliance. All data from ESAs 1-3 and WSA 1 now goes to SMA 2, as shown in the following figure:
Upgrading Appliance Hardware
Upgrading AsyncOS
- Batch Commands for Upgrades
- Determining Network Requirements for Upgrades and Updates
- Choosing an Upgrade Method: Remote vs. Streaming
- Configuring Upgrade and Service Update Settings
- Before You Upgrade: Important Steps
- Upgrading AsyncOS
- Viewing Status of, Canceling, or Deleting a Background Download
- After Upgrading
Batch Commands for Upgrades
Batch commands for upgrade procedures are documented in the CLI Reference Guide for AsyncOS for Email at http://www.cisco.com/c/en/us/support/security/email-security-appliance/products-command-reference-list.html
Determining Network Requirements for Upgrades and Updates
The update servers for Cisco content security appliances use dynamic IP addresses. If you have strict firewall policies, you may need to configure a static location for AsyncOS upgrades. If you determine that your firewall settings require a static IP for upgrades, contact Cisco Customer support to obtain the required URL addresses.
Note | If you have any existing firewall rules allowing download of legacy upgrades from upgrades.cisco.com ports such as 22, 25, 80, 4766, they will need to be removed and/or replaced with revised firewall rules. |
Choosing an Upgrade Method: Remote vs. Streaming
Cisco provides two methods (or ‘sources’) for upgrading AsyncOS on your appliances:
- Streaming upgrades — Each appliance downloads the AsyncOS upgrades via HTTP directly from the Cisco content security update servers.
- Remote upgrades — You only download the upgrade image from Cisco one time, and then serve it to your appliances. Your appliances then download the AsyncOS upgrades from a server within your network.
You will configure the upgrade method in Configuring Upgrade and Service Update Settings. Optionally, use the updateconfig command in the CLI.
- Streaming Upgrade Overview
- Remote Upgrade Overview
- Hardware and Software Requirements for Remote Upgrades
- Hosting a Remote Upgrade Image
- Important Differences in Remote Upgrading Method
Streaming Upgrade Overview
In Streaming upgrades, each Cisco Content Security appliance connects directly to the Cisco content security update servers to find and download upgrades:
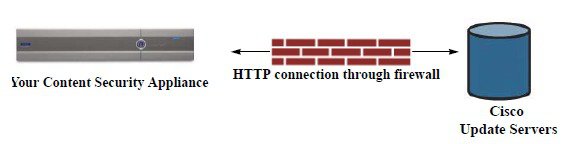
This method requires that your appliance contacts the Cisco content security update servers directly from the network.
Remote Upgrade Overview
You can also download and host updates to AsyncOS locally from within your own network (Remote Upgrade) rather than obtaining updates directly from the Cisco update servers (Streaming Upgrades). Using this feature, an encrypted update image downloaded via HTTP to any server in your network that has access to the Internet. If you choose to download the update image, you can then configure an internal HTTP server (an “update manager”) to host the AsyncOS images to your Security Management appliances.
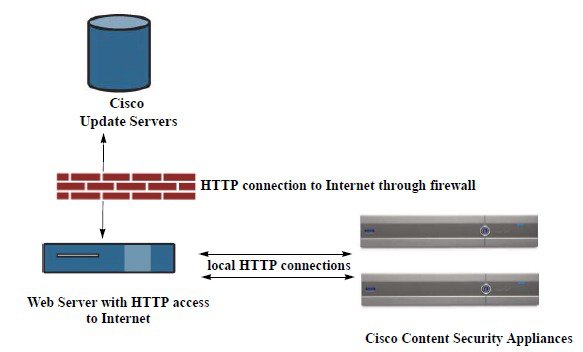
The basic process is as follows:
| Step 1 | Read the information in Hardware and Software Requirements for Remote Upgrades and Hosting a Remote Upgrade Image. | ||
| Step 2 | Configure a local server to retrieve and serve the upgrade files. | ||
| Step 3 | Download the upgrade files. | ||
| Step 4 | [New Web Interface Only] On the Cloud Email Security Management Console, click on the gear icon to load the legacy web interface. | ||
| Step 5 | Choose
Management Appliance > System Administration > Update
Settings
From this page, choose to configure the appliance to use the local server. | ||
| Step 6 | Choose Management Appliance > System Administration > System Upgrade | ||
| Step 7 | Click
Available Upgrades.
For complete information, see Upgrading AsyncOS. |
Hardware and Software Requirements for Remote Upgrades
For downloading AsyncOS upgrade files, you must have a system in your internal network that has:
- Internet access to the update servers for Cisco content security appliances.
- A web browser.
Note | For this release, if you need to configure a firewall setting to allow HTTP access to this address, you must configure it using the DNS name and not a specific IP address. |
For hosting AsyncOS update files, you must have a server in your internal network that has:
-
A web server — for example, Microsoft IIS (Internet Information Services) or the Apache open source server — that:
- supports the display of directory or filenames in excess of 24 characters
- has directory browsing enabled
- is configured for anonymous (no authentication) or basic (“simple”) authentication
- contains at least 350MB of free disk space for each AsyncOS update image
Hosting a Remote Upgrade Image
After setting up a local server, go to http://updates.ironport.com/fetch_manifest.html to download a zip file of an upgrade image. To download the image, enter your serial number and the version number of the Cisco Content Security appliance. You will then be presented with a list of available upgrades. Click the upgrade version that you want to download a zip file of the upgrade image. To use the upgrade image for AsyncOS upgrades, enter the base URL for your local server on the Edit Update Settings page (or use updateconfig in the CLI).
You can also host an XML file on a local server that limits the available upgrades for the Cisco Content Security appliances on your network to the version selected at http://updates.ironport.com/fetch_manifest.html . Your Cisco Content Security appliances still download the upgrade from the Cisco servers. If you want to host the upgrade list on a local server, download the zip file and extract the asyncos/phoebe-my-upgrade.xml file to the root directory of the local server. To use the upgrade list for AsyncOS upgrades, enter the full URL for the XML file on the Edit Update Settings page (or use updateconfig in the CLI).
For more information about remote upgrades, check the Knowledge Base (see Knowledge Base Articles (TechNotes)) or contact your support provider.
Important Differences in Remote Upgrading Method
Note these differences when upgrading AsyncOS from a local server (Remote upgrade) as opposed to the Streaming upgrade method:
Configuring Upgrade and Service Update Settings
You can configure how the Cisco Content Security appliance downloads security services updates (such as time zone rules) and AsyncOS upgrades. For example, you can choose whether to download upgrades and updates dynamically from Cisco servers or from a local server onto which you have made the images available; configure the update interval; or disable automatic updates.
AsyncOS periodically queries the update servers for new updates to all security service components except for new AsyncOS upgrades. To upgrade AsyncOS, you must manually prompt AsyncOS to query for available upgrades.
You can configure upgrade and updates settings in the GUI (see the following two sections) or using the updateconfig command in the CLI.
You can also configure upgrade notification settings.
- Upgrade and Update Settings
- Static Upgrade and Update Server Settings for Environments with Strict Firewall Policies
- Configuring the Update and Upgrade Settings from the GUI
- Upgrade Notifications
Upgrade and Update Settings
The following table describes the update and upgrade settings you can configure.
|
Setting |
Description |
|---|---|
|
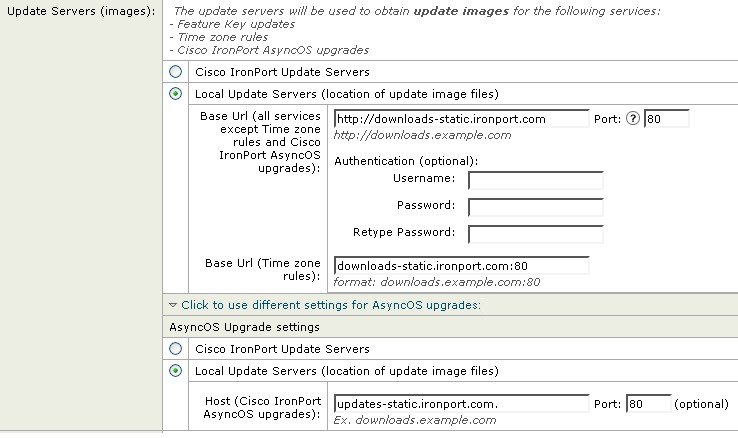
Update Servers (images) |
Choose whether to download AsyncOS upgrade and service update software images, such as time zone rules and Feature Key updates, from the Cisco servers or a from a local web server. The default is the Cisco servers for both upgrades and updates. You might want to use a local web server if :
When you choose a local update server, enter the base URL and port number for the servers used to download the upgrades and updates. If the server requires authentication, you can also enter a valid user name and password. For more information, see Choosing an Upgrade Method: Remote vs. Streaming and Remote Upgrade Overview. |
|
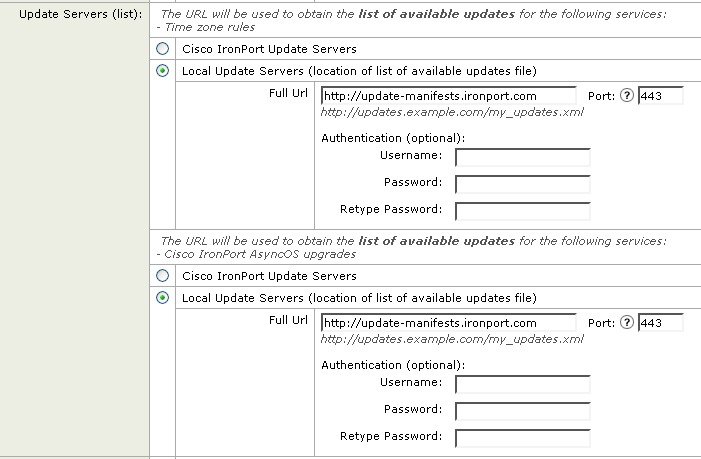
Update Servers (lists) |
Choose whether to download the lists of available upgrades and service updates (the manifest XML files) from the Cisco servers or from a local web server. The default for both upgrades and updates is the Cisco servers. You can choose different settings for upgrades and for updates. If applicable, see Static Upgrade and Update Server Settings for Environments with Strict Firewall Policies. If you choose local update servers, enter the full path to the manifest XML file for each list including the file name and port number for the server. If you leave the port field blank, AsyncOS uses port 80. If the server requires authentication, you can also enter a valid user name and password. For more information, see Choosing an Upgrade Method: Remote vs. Streaming and Remote Upgrade Overview. |
|
Automatic Updates |
Choose whether or not to enable automatic updates for time zone rules. When enabled, enter the time to wait between checks for updates. Add a trailing m for minutes, h for hours, and d for days. |
|
Interface |
Choose which network interface to use when contacting the update servers for time zone rules and AsyncOS upgrades. The available proxy data interfaces are shown. By default, the appliance selects an interface to use. |
|
HTTP Proxy Server |
If an upstream HTTP proxy server exists and requires authentication, enter the server information and user name and password here. Note that if you specify a proxy server, it will be used to access and update the services listed in the GUI. This proxy server is also used to obtain File Analysis report details from the cloud |
|
HTTPS Proxy Server |
If an upstream HTTPS proxy server exists and requires authentication, enter the server information and user name and password here. Note that if you specify a proxy server, it will be used to access and update the services listed in the GUI. This proxy server is also used to obtain File Analysis report details from the cloud. |
Static Upgrade and Update Server Settings for Environments with Strict Firewall Policies
The AsyncOS update servers use dynamic IP addresses. If your environment has strict firewall policies which require static IP addresses, use the following settings on the Update Settings page:
|
Section |
Setting |
Static URL/IP Address and Port |
|---|---|---|
|
Update Servers (images): |
Base URL (all services except Time zone rules and AsyncOS upgrades) |
http://downloads-static.ironport.com 204.15.82.8 Port 80 |
|
Base URL (Time zone rules) |
downloads-static.ironport.com 204.15.82.8 Port 80 |
|
|
Host (AsyncOS upgrades) |
updates-static.ironport.com 208.90.58.25 Port 80 |
|
|
Update Servers (list): |
For updates on physical hardware appliances: Full URL |
update-manifests.ironport.com 208.90.58.5 Port 443 |
|
For updates on virtual appliances: Full URL |
update-manifests.sco.cisco.com Port 443 |
|
|
For upgrades: Full URL |
update-manifests.ironport.com 208.90.58.5 Port 443 |
Configuring the Update and Upgrade Settings from the GUI
| Step 1 | [New Web Interface Only] On the Cloud Email Security Management Console, click on the gear icon to load the legacy web interface. |
| Step 2 | Choose Management Appliance > System Administration > Update Settings. |
| Step 3 | Click
Edit
Update Settings.
Use the descriptions in Upgrade and Update Settings to configure the settings in this procedure. |
| Step 4 | In the Update Servers (images) section, specify the servers from which to download images for updates. |
| Step 5 | Specify the server from which to download images for AsyncOS upgrades: |
| Step 6 | In the
Update
Servers (list) section, specify the servers for obtaining the list
of available updates and AsyncOS upgrades.
The top subsection applies to updates. The bottom subsection applies to upgrades. |
| Step 7 | Specify settings for Time Zone rules and interface. |
| Step 8 | (Optional) Specify settings for Proxy Servers. |
| Step 9 | Submit and commit your changes. |
| Step 10 | Verify that
your results are what you expect:
If you are not already looking at the Update Settings page, choose Management Appliance > System Administration > Update Settings. Some URLs may append an “asyncos” directory to the server URL. You can ignore this discrepancy. |
Upgrade Notifications
By default, users with administrator and technician privileges will see a notification at the top of the web interface when an AsyncOS upgrade is available for the appliance.
|
To |
Do This |
|---|---|
|
View more information about the latest upgrade |
Hover over the upgrade notification. |
|
View a list of all available upgrades |
Click the down arrow in the notification. |
|
Dismiss a current notification. The appliance will not display another notification until a new upgrade becomes available. |
Click the down arrow, then select Clear the notification, then click Close. |
|
Prevent future notifications (Users with Administrator privileges only.) |
Go to Management Appliance > System Administration > System Upgrade. |
Before You Upgrade: Important Steps
See network requirements at Determining Network Requirements for Upgrades and Updates.
| Step 1 | Take steps to
prevent or minimize data loss:
|
| Step 2 | Save the XML
configuration file off the appliance. See caveats at
Saving and Exporting the Current Configuration File.
If you need to revert to the pre-upgrade release for any reason, you will need this file. |
| Step 3 | If you are
using the Safelist/Blocklist feature, export the list off the appliance.
Click Management Appliance > System Administration > Configuration File and scroll down. |
| Step 4 | Suspend the listeners using the suspendlistener command when running the upgrade from the CLI. If you perform the upgrade from the GUI, listener suspension occurs automatically. |
| Step 5 | Drain the mail queue and the delivery queue. |
| Step 6 | Verify that the upgrade settings are configured as you want them. See Configuring Upgrade and Service Update Settings. |
Upgrading AsyncOS
You can download and install in a single operation, or download in the background and install later.
Note | When downloading and upgrading AsyncOS in a single operation from a local server instead of from a Cisco server, the upgrade installs immediately while downloading . A banner displays for 10 seconds at the beginning of the upgrade process. While this banner is displayed, you have the option to type Control-C to exit the upgrade process before downloading starts. |
- Choose whether you will download upgrades directly from Cisco or will host upgrade images from a server on your network. Then set up your network to support the method you choose. Then configure the appliance to obtain upgrades from your chosen source. See Choosing an Upgrade Method: Remote vs. Streaming and Configuring Upgrade and Service Update Settings.
- Before installing the upgrade, follow the instructions in Before You Upgrade: Important Steps.
What to Do Next
-
If the process was interrupted, you must start the process again.
-
If you downloaded but did not install the upgrade:
When you are ready to install the upgrade, follow these instructions from the beginning, including the prerequisites in the Before You Begin section, but choose the Install option.
- If you installed the upgrade, see After Upgrading.
Viewing Status of, Canceling, or Deleting a Background Download
| Step 1 | [New Web Interface Only] On the Cloud Email Security Management Console, click on the gear icon to load the legacy web interface. | ||||||||
| Step 2 | Choose Management Appliance > System Administration > System Upgrade. | ||||||||
| Step 3 | Click Upgrade Options. | ||||||||
| Step 4 | Choose an
option:
|
After Upgrading
After the upgrade is complete, complete the following:
- (For deployments with associated Email Security appliances) Re-enable the listeners.
- Consider saving your configuration. For more information, see Saving and Importing Configuration Settings.
- Before viewing the online help after upgrade, clear your browser cache, exit the browser, then open it again. This clears the browser cache of any outdated content.
About Reverting to an Earlier Version of AsyncOS
You can revert to an to a previous qualified version of AsyncOS for emergency uses.
You can also revert to the currently running build if you want to clear all data on the appliance and start with a new, clean configuration.
Related Topics
Important Note About Reversion Impact
Using the revert command on a Cisco Content Security appliance is a very destructive action. This command permanently destroys all existing configurations and data. In addition, it disrupts mail handling until the appliance is reconfigured.
Reverting does not affect feature key or virtual appliance license expiration dates.
Reverting AsyncOS
- Back up or save any data that you want to preserve to a location off the appliance.
- You must have a configuration file for the version you want to revert to. Configuration files are not backwards-compatible.
- Because this command destroys all configuration, it is highly recommended that you have physical local access to the appliance when reverting.
- If quarantines are enabled on your Email Security appliances, disable centralization so that messages are quarantined locally on those appliances.
| Step 1 | Ensure that you have the configuration file for the version you want to revert to. Configuration files are not backwards-compatible. | ||
| Step 2 | Save a backup copy of the current configuration of your appliance (with passwords unmasked) on another machine. To do this, you can email the file to yourself or FTP the file. A simple way to do this is to run the mailconfig CLI command, which emails the current configuration file on your appliance to the specified email address.
| ||
| Step 3 | If you use the Safelist/Blocklist feature, export the Safelist/Blocklist database to another machine. | ||
| Step 4 | Suspend any listeners on your Email Security appliances. | ||
| Step 5 | Wait for the mail queue to empty. | ||
| Step 6 | Log in to the
CLI of the appliance you want to revert.
When you run the revert command, several warning prompts are issued. Once these warning prompts are accepted, the revert action takes place immediately. Therefore, do not begin the reversion process until after you have completed the prereversion steps. | ||
| Step 7 | From the command-line prompt, type the revert command and respond to the prompts.
The following example shows the revert command: Example: m650p03.prep> revert This command will revert the appliance to a previous version of AsyncOS. WARNING: Reverting the appliance is extremely destructive. The following data will be destroyed in the process: - all configuration settings (including listeners) - all log files - all databases (including messages in Virus Outbreak and Policy quarantines) - all reporting data (including saved scheduled reports) - all message tracking data - all Cisco Spam Quarantine message and end-user safelist/blocklist data Only the network settings will be preseved. Before running this command, be sure you have: - saved the configuration file of this appliance (with passwords unmasked) - exported the Cisco Spam Quarantine safelist/blocklist database to another machine (if applicable) - waited for the mail queue to empty Reverting the device causes an immediate reboot to take place. After rebooting, the appliance reinitializes itself and reboots again to the desired version. Do you want to continue? yes Are you sure you want to continue? yes Available versions ================= 1. 7.2.0-390 2. 6.7.6-020 Please select an AsyncOS version: 1 You have selected "7.2.0-390". Reverting to "testing" preconfigure install mode. The system will now reboot to perform the revert operation. | ||
| Step 8 | Wait for the appliance to reboot twice. | ||
| Step 9 | Log in to the appliance using the CLI. | ||
| Step 10 | Add at least one appliance and wait a few minutes to allow any URL Category updates to be downloaded from that appliance. | ||
| Step 11 | After URL Category updates are completed, load the XML configuration file of the version you are reverting to. | ||
| Step 12 | If you use the Safelist/Blocklist feature, import and restore the Safelist/Blocklist database. | ||
| Step 13 | Reenable any listeners on your Email Security appliances. | ||
| Step 14 | Commit your
changes.
The reverted Cisco Content Security appliance should now run using the selected AsyncOS version.
|
About Updates
Service updates are periodically made available for download. To specify settings for these downloads, see Configuring Upgrade and Service Update Settings
Related Topics
Configuring the Return Address for Generated Messages
You can configure the envelope sender for mail generated by AsyncOS for the following types of cases:
You can specify the display, user, and domain names of the return address. You can also choose to use the Virtual Gateway domain for the domain name.
Use the Return Addresses page available on the System Administration menu in the GUI, or use the addressconfig command in the CLI.
To modify the return address for system-generated email messages in the GUI, click Edit Settings on the Return Addresses page. Make changes to the address or addresses you want to modify, click Submit, and commit your changes.
Managing Alerts
The appliance sends you email alerts about events occurring on the appliance.
|
To |
Do This |
|---|---|
|
Have different types of alerts sent to different administrative users |
[New Web Interface Only] On the Cloud Email Security Management Console, click on the gear Select Management Appliance > System Administration > Alerts If you enabled AutoSupport during system setup, the email address that you specified will receive alerts for all severities and classes by default. You can change the configuration at any time. Separate multiple addresses with commas. |
|
Configure global settings for alerts, including: |
[New Web Interface Only] On the Cloud Email Security Management Console, click on the gear Select Management Appliance > System Administration > Alerts |
|
View a list of recent alerts Manage settings for this list |
|
|
See a list of alerts and their descriptions |
See: |
|
Understand alert delivery mechanisms |
See Alert Delivery |
- Alert Types and Severities
- Alert Delivery
- Viewing Recent Alerts
- About Duplicate Alerts
- Cisco AutoSupport
- Hardware Alert Descriptions
- System Alert Descriptions
Alert Types and Severities
Alert types include:
- Hardware alerts. See Hardware Alert Descriptions.
- System alerts. See System Alert Descriptions.
- Updater alerts.
Alerts can have the following severities:
Alert Delivery
Because alert messages can be used to inform you of problems within your Cisco Content Security appliance, they are not sent using AsyncOS’s normal mail delivery system. Instead, alert messages pass through a separate and parallel email system designed to operate even in the face of significant system failure in AsyncOS.
The alert mail system does not share the same configuration as AsyncOS, which means that alert messages may behave slightly differently from other mail delivery:
Viewing Recent Alerts
|
To |
Do This |
|---|---|
|
View a list of recent alerts |
Users with administrator and operator access can choose Management Appliance > System Administration > Alerts and click the View Top Alerts button. Alerts appear even if there was a problem emailing them. |
|
Sort the list |
Click a column heading. |
|
Specify the maximum number of alerts to save in this list |
Use the alertconfig command in the command-line interface |
|
Disable this feature |
Use the alertconfig command in the command-line interface to set the maximum number of alerts to zero (0). |
About Duplicate Alerts
You can specify the initial number of seconds to wait before AsyncOS will send a duplicate alert. If you set this value to 0, duplicate alert summaries are not sent; instead, all duplicate alerts are sent without any delay (this can lead to a large amount of email over a short amount of time). The number of seconds to wait between sending duplicate alerts (alert interval) is increased after each alert is sent. The increase is the number of seconds to wait plus twice the last interval. So a 5-second wait would have alerts sent at 5 seconds, 15 seconds, 35 seconds, 75 seconds, 155 seconds, 315 seconds, and so on.
Eventually, the interval could become large. You can set a cap on the number of seconds to wait between intervals via the maximum number of seconds to wait before sending a duplicate alert field. For example, if you set the initial value to 5 seconds, and the maximum value to 60 seconds, alerts would be sent at 5 seconds, 15 seconds, 35 seconds, 60 seconds, 120 seconds, and so on.
Cisco AutoSupport
To allow Cisco to better support and design future system changes, the Cisco Content Security appliance can be configured to send Cisco a copy of all alert messages generated by the system. This feature, called ‘AutoSupport’, is a useful way to allow Customer Support to be proactive in supporting your needs. AutoSupport also sends weekly reports noting the uptime of the system, the output of the status command, and the AsyncOS version used.
By default, alert recipients set to receive Information severity level alerts for System alert types receive a copy of every message sent to Cisco. This can be disabled if you do not want to send the weekly alert messages internally. To enable or disable this feature, select Management Appliance > System Administration Alerts and click edit settings.
By default, if AutoSupport is enabled, the weekly AutoSupport report is sent to alert recipients set to receive system alerts at the Information level.
Hardware Alert Descriptions
|
Alert Name |
Description |
Severity |
|---|---|---|
|
INTERFACE.ERRORS |
Sent when interface errors are detected. |
Warning |
|
MAIL.MEASUREMENTS_FILESYSTEM |
Sent when a disk partition is nearing capacity (75%). |
Warning |
|
MAIL.MEASUREMENTS_FILESYSTEM.CRITICAL |
Sent when a disk partition reaches 90% capacity (and at 95%, 96%, 97%, and so on). |
Critical |
|
SYSTEM.RAID_EVENT_ALERT |
Sent when a critical RAID-event occurs. |
Warning |
|
SYSTEM.RAID_EVENT_ALERT_INFO |
Sent when a RAID-event occurs. |
Information |
System Alert Descriptions
|
Alert Name |
Description |
Severity |
|---|---|---|
|
COMMON.APP_FAILURE |
Sent when there is an unknown application failure. |
Critical |
|
COMMON.KEY_EXPIRED_ALERT |
Sent when a feature key has expired. |
Warning |
|
COMMON.KEY_EXPIRING_ALERT |
Sent when a feature key is about to expire. |
Warning |
|
COMMON.KEY_FINAL_EXPIRING_ALERT |
Sent as a final notice that a feature key is about to expire. |
Warning |
|
DNS.BOOTSTRAP_FAILED |
Sent when the appliance is unable to contact the root DNS servers. |
Warning |
|
COMMON.INVALID_FILTER |
Sent when an invalid filter is encountered. |
Warning |
|
IPBLOCKD.HOST_ADDED_TO_WHITELIST IPBLOCKD.HOST_ADDED_TO_BLACKLIST IPBLOCKD.HOST_REMOVED_FROM_BLACKLIST |
Alert messages:
IP addresses that try to connect to the appliance over SSH but do not provide valid credentials are added to the SSH blacklist if more than 10 failed attempts occur within two minutes. When a user logs in successfully from the same IP address, that IP address is added to the whitelist. Addresses on the whitelist are allowed access even if they are also on the blacklist. |
Warning |
|
LDAP.GROUP_QUERY_FAILED_ALERT |
Sent when an LDAP group query fails. |
Critical |
|
LDAP.HARD_ERROR |
Sent when an LDAP query fails completely (after trying all servers). |
Critical |
|
LOG.ERROR.* |
Various logging errors. |
Critical |
|
MAIL.PERRCPT.LDAP_GROUP_QUERY_FAILED |
Sent when an LDAP group query fails during per-recipient scanning. |
Critical |
|
MAIL.QUEUE.ERROR.* |
Various mail queue hard errors. |
Critical |
|
MAIL.RES_CON_START_ALERT.MEMORY |
Sent when RAM utilization has exceeded the system resource conservation threshold. |
Critical |
|
MAIL.RES_CON_START_ALERT.QUEUE_SLOW |
Sent when the mail queue is overloaded and system resource conservation is enabled. |
Critical |
|
MAIL.RES_CON_START_ALERT.QUEUE |
Sent when queue utilization has exceeded the system resource conservation threshold. |
Critical |
|
MAIL.RES_CON_START_ALERT.WORKQ |
Sent when listeners are suspended because the work queue size is too big. |
Critical |
|
MAIL.RES_CON_START_ALERT |
Sent when the appliance enters “resource conservation” mode. |
Critical |
|
MAIL.RES_CON_STOP_ALERT |
Sent when the appliance leaves “resource conservation” mode. |
Critical |
|
MAIL.WORK_QUEUE_PAUSED_NATURAL |
Sent when the work queue is paused. |
Critical |
|
MAIL.WORK_QUEUE_UNPAUSED_NATURAL |
Sent when the work queue is resumed. |
Critical |
|
NTP.NOT_ROOT |
Sent when the appliance is unable to adjust time because NTP is not running as root. |
Warning |
|
PERIODIC_REPORTS.DOMAIN_REPORT. DOMAIN_FILE_ERRORS |
Sent when errors are found in the domain specification file. |
Critical |
|
PERIODIC_REPORTS.DOMAIN_REPORT.FILE_EMPTY |
Sent when the domain specification file is empty. |
Critical |
|
PERIODIC_REPORTS.DOMAIN_REPORT.FILE_MISSING |
Sent when the domain specification file is not found. |
Critical |
|
REPORTD.DATABASE_OPEN_FAILED_ALERT |
Sent if the reporting engine is unable to open the database. |
Critical |
|
REPORTD.AGGREGATION_DISABLED_ALERT |
Sent if the system runs out of disk space. When the disk usage for a log entry exceeds the log usage threshold, reportd disables aggregation and sends the alert. |
Warning |
|
REPORTING.CLIENT.UPDATE_FAILED_ALERT |
Sent if the reporting engine was unable to save reporting data. |
Warning |
|
REPORTING.CLIENT.JOURNAL.FULL |
Sent if the reporting engine is unable to store new data. |
Critical |
|
REPORTING.CLIENT.JOURNAL.FREE |
Sent when the reporting engine is again able to store new data. |
Information |
|
PERIODIC_REPORTS.REPORT_TASK. BUILD_FAILURE_ALERT |
Sent when the reporting engine is unable to build a report. |
Critical |
|
PERIODIC_REPORTS.REPORT_TASK. EMAIL_FAILURE_ALERT |
Sent when a report could not be emailed. |
Critical |
|
PERIODIC_REPORTS.REPORT_TASK. ARCHIVE_FAILURE_ALERT |
Sent when a report could not be archived. |
Critical |
|
SENDERBASE.ERROR |
Sent when an error occurred while processing a response from SenderBase. |
Information |
|
SMAD.ICCM.ALERT_PUSH_FAILED |
Sent if a configuration push failed for one or more hosts. |
Warning |
|
SMAD.TRANSFER.TRANSFERS_STALLED |
Sent if SMA logs are unable to fetch tracking data for two hours or reporting data for six hours. |
Warning |
|
SMTPAUTH.FWD_SERVER_FAILED_ALERT |
Sent when the SMTP Authentication forwarding server is unreachable. |
Warning |
|
SMTPAUTH.LDAP_QUERY_FAILED |
Sent when an LDAP query fails. |
Warning |
|
SYSTEM.HERMES_SHUTDOWN_FAILURE. REBOOT |
Sent when there was a problem shutting down the system on reboot. |
Warning |
|
SYSTEM.HERMES_SHUTDOWN_FAILURE. SHUTDOWN |
Sent when there was a problem shutting down the system. |
Warning |
|
SYSTEM.RCPTVALIDATION.UPDATE_FAILED |
Sent when a recipient validation update failed. |
Critical |
|
SYSTEM.SERVICE_TUNNEL.DISABLED |
Sent when a tunnel created for Cisco Support Services is disabled. |
Information |
|
SYSTEM.SERVICE_TUNNEL.ENABLED |
Sent when a tunnel created for Cisco Support Services is enabled. |
Information |
Changing Network Settings
This section describes the features used to configure the network operation of the appliance. These features give you direct access to the hostname, DNS, and routing settings that you configured using the System Setup Wizard in Running the System Setup Wizard.
The following features are described:
- Changing the System Hostname
- Configuring Domain Name System Settings
- Configuring TCP/IP Traffic Routes
- Configuring the Default Gateway
Changing the System Hostname
The hostname is used to identify the system at the CLI prompt. You must enter a fully qualified hostname. The s ethostname command sets the name of the content security appliance. The new hostname does not take effect until you issue the commit command.
The sethostname Command
oldname.example.com> sethostname
[oldname.example.com]> mail3.example.com
oldname.example.com>
For the hostname change to take effect, you must enter the commit command. After you have successfully committed the hostname change, the new name appears in the CLI prompt:
oldname.example.com> commit
Please enter some comments describing your changes:
[]> Changed System Hostname
Changes committed: Mon Jan 04 12:00:01 2010
The new hostname appears in the prompt as follows: mail3.example.com>
Configuring Domain Name System Settings
You can configure the Domain Name System (DNS) settings for your content security appliance through the Management Appliance > Network > DNS page in the GUI, or via the dnsconfig command.
You can configure the following settings:
- Specifying DNS Servers
- Multiple Entries and Priority
- Using the Internet Root Servers
- Reverse DNS Lookup Timeout
- DNS Alert
- Clearing the DNS Cache
- Configuring DNS Settings via the Graphical User Interface
Specifying DNS Servers
AsyncOS can use the Internet root DNS servers, your own DNS servers, or the Internet root DNS servers and authoritative DNS servers that you specify. When using the Internet root servers, you may specify alternate servers to use for specific domains. Because an alternate DNS server applies to a single domain, it must be authoritative (provide definitive DNS records) for that domain.
AsyncOS supports “splitting” DNS servers when not using the Internet’s DNS servers. If you are using your own internal server, you can also specify exception domains and associated DNS servers.
When setting up “split DNS,” you should set up the in-addr.arpa (PTR) entries as well. For example, if you want to redirect “.eng” queries to the nameserver 1.2.3.4 and all the .eng entries are in the 172.16 network, then you should specify “eng,16.172.in-addr.arpa” as the domains in the split DNS configuration.
Multiple Entries and Priority
For each DNS server that you enter, you can specify a numeric priority. AsyncOS attempts to use the DNS server with the priority closest to 0. If that DNS server is not responding, AsyncOS attempts to use the server at the next priority. If you specify multiple entries for DNS servers with the same priority, the system randomizes the list of DNS servers at that priority every time it performs a query. The system then waits a short amount of time for the first query to expire or “time out” and then a slightly longer amount of time for the second, and so on. The amount of time depends on the exact total number of DNS servers and priorities that have been configured. The timeout length is the same for all IP addresses at any particular priority. The first priority gets the shortest timeout; each subsequent priority gets a longer timeout. Further, the timeout period is roughly 60 seconds. If you have one priority, the timeout for each server at that priority is 60 seconds. If you have two priorities, the timeout for each server at the first priority is 15 seconds, and each server at the second priority is 45 seconds. For three priorities, the timeouts are 5, 10, 45.
For example, suppose you configure four DNS servers, with two of them at priority 0, one at priority 1, and one at priority 2:
|
Priority |
Server(s) |
Timeout (Seconds) |
|---|---|---|
|
0 |
1.2.3.4, 1.2.3.5 |
5, 5 |
|
1 |
1.2.3.6 |
10 |
|
2 |
1.2.3.7 |
45 |
AsyncOS randomly chooses between the two servers at priority 0. If one of the priority 0 servers is down, the other is used. If both of the priority 0 servers are down, the priority 1 server (1.2.3.6) is used, and then, finally, the priority 2 (1.2.3.7) server.
The timeout period is the same for both priority 0 servers, longer for the priority 1 server, and longer still for the priority 2 server.
Using the Internet Root Servers
The AsyncOS DNS resolver is designed to accommodate the large number of simultaneous DNS connections required for high-performance email delivery.
Note | If you choose to set the default DNS server to something other than the Internet root servers, that server must be able to recursively resolve queries for domains for which it is not an authoritative server. |
Reverse DNS Lookup Timeout
The Cisco Content Security appliance attempts to perform a “double DNS lookup” on all remote hosts connecting to a listener for the purposes of sending or receiving email. That is, the system acquires and verifies the validity of the remote host's IP address by performing a double DNS lookup. This consists of a reverse DNS (PTR) lookup on the IP address of the connecting host, followed by a forward DNS (A) lookup on the results of the PTR lookup. The system then checks that the results of the A lookup match the results of the PTR lookup. If the results do not match, or if an A record does not exist, the system uses only the IP address to match entries in the Host Access Table (HAT). This particular timeout period applies only to this lookup and is not related to the general DNS timeout discussed in Multiple Entries and Priority.
The default value is 20 seconds. You can disable the reverse DNS lookup timeout globally across all listeners by entering ‘0’ as the number of seconds. If the value is set to 0 seconds, the reverse DNS lookup is not attempted, and instead the standard timeout response is returned immediately.
DNS Alert
Occasionally, an alert may be generated with the message “Failed to bootstrap the DNS cache” when an appliance is rebooted. The message means that the system was unable to contact its primary DNS servers, which can happen at boot time if the DNS subsystem comes online before network connectivity is established. If this message appears at other times, it could indicate network issues or that the DNS configuration is not pointing to a valid server.
Clearing the DNS Cache
The Clear Cache button from the GUI, or the d nsflush command (for more information about the dnsflush command, see the IronPort AsyncOS CLI Reference Guide, available from the location specified in Documentation), clears all information in the DNS cache. You may choose to use this feature when changes have been made to your local DNS system. The command takes place immediately and may cause a temporary performance degradation while the cache is repopulated.
Configuring DNS Settings via the Graphical User Interface
| Step 1 | [New Web Interface Only] On the Cloud Email Security Management Console, click on the gear icon to load the legacy web interface. |
| Step 2 | Choose Management Appliance > Network > DNS page and click the Edit Settings button. |
| Step 3 | Select whether to use the Internet’s root DNS servers or your own internal DNS server(s), and specify authoritative DNS servers. |
| Step 4 | If you want to use your own DNS server(s) or specify authoritative DNS servers, enter the server ID and click Add Row. Repeat this for each server. When entering your own DNS servers, specify a priority as well. For more information, see Specifying DNS Servers. |
| Step 5 | Choose an interface for DNS traffic. |
| Step 6 | Enter the number of seconds to wait before canceling a reverse DNS lookup. |
| Step 7 | Optionally, clear the DNS cache by clicking Clear Cache. |
| Step 8 | Submit and commit your changes. |
Configuring TCP/IP Traffic Routes
Some network environments require the use of traffic routes other than the standard default gateway. You can manage static routes in the GUI through the Management Appliance > Network > Routing page, or in the CLI by using the routeconfig command.
Managing Static Routes in the GUI
You can create, edit, or delete static routes by using the Management Appliance > Network > Routing page. You can also modify the default gateway from this page.
| Step 1 | [New Web Interface Only] On the Cloud Email Security Management Console, click on the gear icon to load the legacy web interface. |
| Step 2 | On the Management Appliance > Network > Routing page, click Add Route in the route listing. The Enter a name for the route. |
| Step 3 | Enter the destination IP address. |
| Step 4 | Enter the gateway IP address. |
| Step 5 | Submit and commit your changes. |
Modifying the Default Gateway (GUI)
Configuring the Default Gateway
You can configure the default gateway via the GUI through the Management Appliance > Network > Routing page (see Modifying the Default Gateway (GUI)) or via the setgateway command in the CLI.
Specifying a Secure Communication Protocol
-
SSL v3 is not secure and you should not use it.
-
You can choose the communication protocol to be used for each of the following:
-
To view the currently selected protocols and available options, or to change protocols, use the sslconfig command in the command-line interface.
-
Cisco update servers do not support SSL v3.
-
If you are using a local (remote) update server, and for all other services and web browsers, the protocol you choose must be supported by and enabled on the server and tools you are using.
-
One of the available options must be enabled for each service you use.
-
Changes made using the sslconfig command require a Commit.
-
Affected services will be briefly interrupted after you commit changes made using the sslconfig command.
Configuring the System Time
Note | When gathering data for reports, the Security Management appliance applies the time stamp from the information that was set when you configured the time settings on the Security Management appliance. For information, see How the Security Management Appliance Gathers Data for Reports. |
To set time-related settings using the command-line interface, use the ntpconfig , settime , and settz commands.
|
To |
Do This |
|---|---|
|
Set the system time |
[New Web Interface Only] On the Cloud Email Security Management Console, click on the gear Select Management Appliance > System Administration > Time Settings |
|
Set the time zone |
[New Web Interface Only] On the Cloud Email Security Management Console, click on the gear Select Management Appliance > System Administration > Time Zone See also: |
Using a Network Time Protocol (NTP) Server
You can use a Network Time Protocol (NTP) server to synchronize the Security Management appliance system clock with other computers on your network or the internet.
The default NTP server is time.sco.cisco.com .
If you will use an external NTP server, including the default NTP server, open the required port through the firewall. See Firewall Information
Related Topics
Selecting a GMT Offset
| Step 1 | [New Web Interface Only] On the Cloud Email Security Management Console, click on the gear icon to load the legacy web interface. |
| Step 2 | Choose Management Appliance > System Administration > Time Zone. |
| Step 3 | Click Edit Settings. |
| Step 4 | Select GMT Offset from the list of regions. The Time Zone Setting page is updated to include GMT offsets in the Time Zone field. |
| Step 5 | Select an offset in the Time Zone field. The offset refers to the number of hours that you add or subtract to or from Greenwich Mean Time (GMT) — the local time at the prime meridian. Hours preceded by a minus sign (“-”) are west of the prime meridian. A plus sign (“+”) indicates locations east of the prime meridian. |
| Step 6 | Submit and commit your changes. |
Updating Time Zone Files
Whenever there is a change in the time zone rules for any country, Time Zone files on the appliance must be updated.
Automatically Updating Time Zone Files
| Step 1 | [New Web Interface Only] On the Cloud Email Security Management Console, click on the gear icon to load the legacy web interface. |
| Step 2 | Choose Management Appliance > System Administration > Update Settings. |
| Step 3 | Select the Enable automatic updates for Time zone rules check box. |
| Step 4 | Enter an interval. Click the ? help on the page for important information. |
| Step 5 | Submit and commit your changes. |
Manually Updating Time Zone Files
| Step 1 | [New Web Interface Only] On the Cloud Email Security Management Console, click on the gear icon to load the legacy web interface. |
| Step 2 | Choose Management Appliance > System Administration > Time Settings. |
| Step 3 | Look at the Time Zone File Updates section. |
| Step 4 | If there is an available time zone file update, click Update Now. |
Configuration File Page
|
For Information About This Section |
See |
|---|---|
|
Saving the current configuration |
|
|
Loading a saved configuration |
|
|
End-User Safelist/Blocklist Database (Spam Quarantine) |
|
|
Reset Configuration |
Saving and Importing Configuration Settings
Note | The configuration file described in this section is used to configure Security Management appliances. |
Most configuration settings for the Security Management appliance can be managed in a single configuration file. The file is maintained in Extensible Markup Language (XML) format.
You can use this file in several ways:
- In case of unexpected disaster to your primary Security Management appliance, you can quickly configure a second Security Management appliance to restore service.
- You can save the configuration file to a different system to back up and preserve crucial configuration data. If you make a mistake while configuring your appliance, you can “roll back” to the most recently saved configuration file.
- You can download the existing configuration file to view the entire configuration for an appliance quickly. (Many newer browsers include the ability to render XML files directly.) This may help you troubleshoot minor errors (like typographic errors) that may exist in the current configuration.
- You can download an existing configuration file, make changes to it, and upload it to the same appliance. This, in effect, “bypasses” both the CLI and the GUI for making configuration changes.
- You can upload an entire configuration file through FTP, or you can paste portions of a configuration file directly into the CLI.
- Because the file is in XML format, an associated document type definition (DTD) that describes all of the XML entities in the configuration file is also provided. You can download the DTD to validate an XML configuration file before uploading it. (XML validation tools are readily available on the Internet.)
- You can use the configuration file to speed configuration of another appliance, for example a cloned virtual appliance.
Managing Configuration Files
- Saving and Exporting the Current Configuration File
- Loading a Configuration File
- Resetting the Current Configuration
- Rolling Back to a Previously Committed Configuration
Saving and Exporting the Current Configuration File
Using the Current Configuration section of the Management Appliance > System Administration > Configuration File page, you can save the current configuration file to your local machine, save it on the appliance (placed in the configuration directory in the FTP/SCP root), or email it to the address specified.
Masking the password
Optionally, mask the user’s passwords by selecting the check box. Masking a password causes the original, encrypted password to be replaced with “*****” in the exported or saved file.
Note | Configuration files with masked passwords cannot be loaded back into AsyncOS. |
Loading a Configuration File
The configuration file must have been saved from an appliance running the same AsyncOS version as the appliance on which you will load the configuration.
Configuration files with masked passwords cannot be loaded.
Regardless of the method, you must include the following tags at the top of your configuration:
<?xml version="1.0" encoding="ISO-8859-1"?>
<!DOCTYPE config SYSTEM "config.dtd">
<config>
 ... your configuration information in valid XML
</config>
The closing </config> tag should follow your configuration information. The values in XML syntax are parsed and validated against the DTD located in the configuration directory on your Cisco Content Security appliance. The DTD file is named config.dtd . If validation errors are reported at the command line when you use the loadconfig command, the changes are not loaded. You can download the DTD to validate configuration files outside of the appliance before uploading them.
In any import method, you can import an entire configuration file (the information defined between the highest level tags: <config></config> ), or a complete and unique subsection of the configuration file, as long as it contains the declaration tags (above) and is contained within the <config></config> tags.
“Complete” means that the entire start and end tags for a given subsection as defined by the DTD are included. For example, uploading or pasting the following code causes validation errors:
<?xml version="1.0" encoding="ISO-8859-1"?>
<!DOCTYPE config SYSTEM "config.dtd">
<config>
  <autosupport_enabled>0</autosu
</config>
However, uploading or pasting the following code does not cause validation errors:
<?xml version="1.0" encoding="ISO-8859-1"?>
<!DOCTYPE config SYSTEM "config.dtd">
<config>
  <autosupport_enabled>0</autosupport_enabled>
</config>
“Unique” means that the subsection of the configuration file being uploaded or pasted is not ambiguous for the configuration. For example, a system can have only one hostname, so uploading the following code (including the declarations and <config></config> tags) is allowed:
<hostname>mail4.example.com</hostname>
However, a system can have multiple listeners defined, each with different Recipient Access Tables defined, so uploading only the following code is considered ambiguous:
     <rat>
        <rat_entry>
          <rat_address>ALL</rat_address>
          <access>RELAY</access>
        </rat_entry>
      </rat>
Because it is ambiguous, it is not allowed, even though it is “complete” syntax.
Caution | When uploading or pasting a configuration file or subsections of a configuration file, you have the potential to erase uncommitted changes that may be pending. |
- Empty Versus Omitted Tags
- Note About Loading Passwords for Log Subscriptions
- Note About Character Set Encoding
Empty Versus Omitted Tags
Use caution when uploading or pasting sections of configuration files. If you do not include a tag, then its value in the configuration is not modified when you load a configuration file. However, if you include an empty tag, then its configuration setting is cleared.
For example, uploading the following code removes all listeners from the system:
<listeners></listeners>
Caution | When uploading or pasting subsections of a configuration file, you can disconnect yourself from the GUI or CLI and destroy large amounts of configuration data. Do not disable services with this command if you are not able to reconnect to the appliance using another protocol, the Serial interface, or the default settings on the Management port. Also, do not use this command if you are unsure of the exact configuration syntax as defined by the DTD. Always back up the configuration data before loading a new configuration file. |
Note About Loading Passwords for Log Subscriptions
If you attempt to load a configuration file that contains a log subscription that requires a password (for example, one that will use FTP push), the loadconfig command does not warn you about the missing password. The FTP push fails and alerts are generated until you configure the correct password using the logconfig command.
Note About Character Set Encoding
The “encoding” attribute of the XML configuration file must be “ ISO-8859-1 ” regardless of the character set you may be using to manipulate the file offline. The encoding attribute is specified in the file whenever you issue the showconfig , saveconfig , or mailconfig command:
<?xml version="1.0" encoding="ISO-8859-1"?>
Resetting the Current Configuration
Resetting the current configuration causes your Cisco Content Security appliance to revert settings back to the original factory defaults. Save your configuration prior to resetting it.
Rolling Back to a Previously Committed Configuration
You can roll back the configuration to a previously-committed configuration.
Use the rollbackconfig command in the command-line interface to choose one of the ten most recent commits.
If you enter No when prompted to commit a rollback, the rollback will be committed the next time you commit changes.
Only users with Administrator access can use the rollbackconfig command.
Note | No log messages or alerts will be generated when a previous configuration is restored. |
Note | Certain commits, such as re-allocating disk space to a size insufficient to hold existing data, could result in data loss. |
CLI Commands for Configuration Files
The following commands enable you to manipulate the configuration files:
- showconfig
- mailconfig
- saveconfig
- loadconfig
- rollbackconfig
- resetconfig (see Resetting the Configuration to Factory Defaults )
- publishconfig
- backupconfig (see Backing Up Security Management Appliance Data )
- The showconfig, mailconfig, and saveconfig Commands
- The loadconfig Command
- The rollbackconfig Command
- Uploading Configuration Changes Using the CLI
The showconfig, mailconfig, and saveconfig Commands
For the configuration commands showconfig , mailconfig , and saveconfig , you are prompted to choose whether to include passwords in the file that will be mailed or displayed. Choosing not to include passwords leaves any password field blank. You can choose not to include passwords if you are concerned about security breaches. However, configuration files without passwords fail when loaded using the loadconfig command. See Note About Loading Passwords for Log Subscriptions.
Note | When saving, showing, or mailing your configuration file if you choose to include passwords (answer yes to “Do you want to include passwords?”), the passwords are encrypted. However, the private keys and certificates are included in unencrypted PEM format. |
The showconfig command prints the current configuration to the screen.
mail3.example.com> showconfig
Do you want to include passwords? Please be aware that a configuration without passwords will fail when reloaded with loadconfig.
<?xml version="1.0" encoding="ISO-8859-1"?>
<!DOCTYPE config SYSTEM "config.dtd">
<!--
  Product: model number
Messaging Gateway Appliance(tm)
  Model Number: model number
  Version: version of AsyncOS installed
  Serial Number: serial number
  Current Time: current time and date
[The remainder of the configuration file is printed to the screen.]
Use the mailconfig command to email the current configuration to a user. A configuration file in XML format named config.xml will be attached to the message.
mail3.example.com> mailconfig
Please enter the email address to which you want to send
the configuration file.
[]> administrator@example.com
Do you want to include passwords? Please be aware that a configuration without passwords will fail when reloaded with loadconfig.  [N]> y
The configuration file has been sent to administrator@example.com.
The saveconfig command on the Security Management appliance stores and saves all of the configuration master files (ESA) with a unique filename to the configuration directory.
mail3.example.com> saveconfig
Do you want to include passwords? Please be aware that a configuration without passwords will fail when reloaded with loadconfig.  [N]> y
The file C650-00065B8FCEAB-31PM121-20030630T130433.xml has been saved in the configuration directory.
mail3.example.com>
The loadconfig Command
Use the loadconfig command to load new configuration information into the appliance. You can load information using one of two methods:
- Placing information in the configuration directory and uploading it
- Pasting configuration information directly into the CLI
See Loading a Configuration File for more information.
The rollbackconfig Command
Uploading Configuration Changes Using the CLI
| Step 1 | Outside of the CLI, ensure that you are able to access the configuration directory of the appliance. See IP Interfaces and Accessing the Appliance for more information. |
| Step 2 | Place an entire configuration file or subsection of a configuration file in the configuration directory of the appliance, or edit an existing configuration that was created from the saveconfig command. |
| Step 3 | Within the CLI, use the loadconfig command to load the configuration file you placed in the directory from Step 2, or paste the text (XML syntax) directly into the CLI.
In this example, a file named changed.config.xml is uploaded and the changes are committed: Example: mail3.example.com> l oadconfig 1. Paste via CLI 2. Load from file [1]> 2 Enter the name of the file to import: []> changed.config.xml Values have been loaded. Be sure to run "commit" to make these settings active. mail3.example.com> commit In this example, a new configuration file is pasted directly at the command line. (Remember to press Ctrl-D on a blank line to end the paste command.) Then the System Setup Wizard is used to change the default hostname, IP address, and gateway information. (For more information, see Running the System Setup Wizard.) Finally, the changes are committed. Example: mail3.example.com> loadconfig 1. Paste via CLI 2. Load from file [1]> 1 Paste the configuration file now. Press CTRL-D on a blank line when done. [The configuration file is pasted until the end tag </config> . Control-D is entered on a separate line.] Values have been loaded. Be sure to run "commit" to make these settings active. mail3.example.com> commit Please enter some comments describing your changes: []> pasted new configuration file and changed default settings
|
Managing Disk Space
You can allocate available disk space among the features that your organization uses, up to the maximum available.
- (Virtual Appliances Only) Increasing Available Disk Space
- Viewing Disk Space, Quotas and Usage
- About Disk Space Maximums and Allocations
- Ensuring That You Receive Alerts About Disk Space
- Managing Disk Space for the Miscellaneous Quota
- Reallocating Disk Space Quotas
(Virtual Appliances Only) Increasing Available Disk Space
For virtual appliances running ESXi 5.5 and VMFS 5, you can allocate more than 2TB of disk space. For appliances running ESXi 5.1, the limit is 2 TB.
Note | Disk space reduction in ESXi is not supported. See the VMWare documentation for information. |
To add disk space to the virtual appliance instance:
Carefully determine the disk space increase needed.
| Step 1 | Bring down the Cisco Content Security Management appliance instance. |
| Step 2 | Increase disk
space using utilities or administrative tools provided by VMWare.
See information about changing the virtual disk configuration in the VMWare documentation. Information for ESXi 5.5 is available here: http://pubs.vmware.com/vsphere-55/index.jsp?topic=/com.vmware.vsphere.hostclient.doc/GUID-81629CAB-72FA-42F0-9F86-F8FD0DE39E57.html |
| Step 3 | [New Web Interface Only] On the Cloud Email Security Management Console, click on the gear icon to load the legacy web interface. |
| Step 4 | Go to Management Appliance > System Administration > Disk Managementand verify that your change has taken effect. |
Viewing Disk Space, Quotas and Usage
|
To |
Do This |
|---|---|
|
View the total disk space available on the appliance
|
[New Web Interface Only] On the Cloud Email Security Management Console, click on the gear Select Management Appliance > System Administration > Disk Management. Look at the values shown for "Total Space Allocated" - for example, 184G of 204G. |
|
View the amount of disk space allocated to and currently used by each of the Security Management appliance’s monitoring services |
[New Web Interface Only] On the Cloud Email Security Management Console, click on the gear Select Management Appliance > System Administration > Disk Management. |
|
View the percentage of the quotas for quarantines that are currently used |
[New Web Interface Only] On the Cloud Email Security Management Console, click on the gear Select Management Appliance > Centralized Services > System Status and look at the Centralized Services section. |
About Disk Space Maximums and Allocations
Note | Centralized Reporting Disk Space on Security Management appliances is used for Email data. If you enable Centralized Email Reporting, all of the space is dedicated to the enabled feature. If you enable Email reporting data share the space and space is allocated on a first-come basis. |
- Before reducing the Miscellaneous quota below current usage levels, you should delete unneeded data. See Managing Disk Space for the Miscellaneous Quota.
- For more information about how disk space is managed for policy, virus, and outbreak quarantines, see Disk Space Allocation for Policy, Virus, and Outbreak Quarantines and Retention Time for Messages in Quarantines.
- For all other data types, if you reduce the existing allocation below current usage, then the oldest data is deleted until all data fits within the new allocation amount.
- If the new quota is larger than the currently used disk space, you will not lose data.
- If you set the allocation to zero, no data is retained.
Ensuring That You Receive Alerts About Disk Space
You will begin to receive system alerts at warning level when Miscellaneous disk usage reaches 75% of the quota. You should take action when you receive these alerts.
To ensure that you receive these alerts, see Managing Alerts.
Managing Disk Space for the Miscellaneous Quota
The Miscellaneous quota includes System data and User data. You cannot delete System data. User data that you can manage includes the following types of files:
|
To Manage |
Do this |
|---|---|
|
Log files |
[New Web Interface Only] On the Cloud Email Security Management Console, click on the gear Go to Management Appliance > System Administration > Log Subscriptions and: |
|
Packet captures |
Go to Help and Support(near the upper right side of your screen) > Packet Capture. Delete any unneeded captures. |
|
Configuration files (These files are unlikely to consume much disk space.) |
FTP to the /data/pub directory on the appliance. To configure FTP access to the appliance, see Accessing the Appliance via FTP |
|
Quota size |
[New Web Interface Only] On the Cloud Email Security Management Console, click on the gear Go to System Administration > Disk Management. |
Reallocating Disk Space Quotas
If disk space is allocated to features you do not use, or if the appliance frequently runs out of disk space for a particular feature and has excess space for other features, you can reallocate disk space.
If you require more space for all features, consider upgrading your hardware or allocating more disk space to your virtual appliance. See (Virtual Appliances Only) Increasing Available Disk Space.
- Changing disk allocations may impact existing data or feature availability. See information at About Disk Space Maximums and Allocations.
- You can temporarily create space in a quarantine by manually releasing or deleting messages from the quarantine.
| Step 1 | [New Web Interface Only] On the Cloud Email Security Management Console, click on the gear icon to load the legacy web interface. |
| Step 2 | Choose Management Appliance > System Administration > Disk Management |
| Step 3 | Click Edit Disk Quotas. |
| Step 4 | On the Edit Disk Quotas page, enter the amount of disk space (in gigabytes) allocated to each service. |
| Step 5 | Click Submit. |
| Step 6 | In the confirmation dialog box, click Set New Quotas. |
| Step 7 | Click Commit to commit your changes. |
Adjusting the Reference Threshold in System Health Graphs for Email Security Appliances
Note | To receive alerts related to these thresholds, configure the thresholds on each managed Email Security appliance. For information, see information about configuring thresholds for system health in the user guide or online help for your Email Security appliance release. You can also run on-demand system health checks from individual appliances. See information about checking the health of your appliance in the user guide or online help for your Email Security appliance release. |
| Step 1 | [New Web Interface Only] On the Cloud Email Security Management Console, click on the gear icon to load the legacy web interface. | ||||||||
| Step 2 | Click Management Appliance > System Administration > System Health. | ||||||||
| Step 3 | Click Edit Settings. | ||||||||
| Step 4 | Configure
options.
| ||||||||
| Step 5 | Submit and commit your changes. |
SSO Using SAML 2.0
- About SSO and SAML 2.0
- SAML 2.0 SSO Workflow
- Guidelines and Limitations for SAML 2.0
- How to Configure SSO for Spam Quarantine
About SSO and SAML 2.0
Cisco Content Security Management appliance now supports SAML 2.0 SSO so that the end users can access the Spam Quarantine using the same credentials that are used to access other SAML 2.0 SSO enabled services within their organization. For instance, you have enabled Ping Identity as your SAML identity provider (IdP) and has accounts on Rally, Salesforce, and Dropbox which have been SAML 2.0 SSO enabled. When you configure Cisco Content Security Management appliance to support SAML 2.0 SSO as a Service Provider (SP), end users will be able to sign in once and have access to all these services including Spam Quarantine.
SAML 2.0 SSO Workflow
The SAML 2.0 SSO workflow is displayed in the following figure:
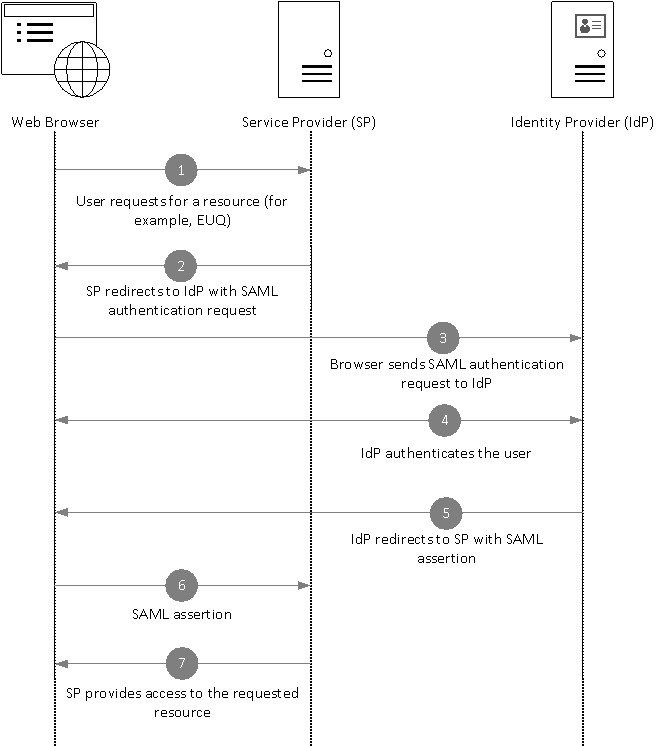
Workflow
-
The end user uses a web browser to request a resource from the service provider (your appliance). For example, the end user clicks on the spam quarantine link in a spam notification.
-
The service provider redirects the request to the web browser with SAML authentication request.
-
The web browser relays the SAML authentication request to the identity provider.
-
The identity provider authenticates the end user. The identity provider displays a login page to the end user and the end user logs in.
-
The identity provider generates the SAML assertion and sends it back to the web browser.
-
The web browser relays the SAML assertion to the service provider.
-
The service provider grants access to the requested resource.
Guidelines and Limitations for SAML 2.0
Logout
When end users log out of Spam Quarantine, they are not logged out of other SAML 2.0 SSO enabled applications.
General
You can configure only one instance of service provider and identity provider on Cisco Content Security Management appliance.
Spam Quarantine Access for Administrators
If you are enabling SSO for Spam Quarantine, keep in mind that the administrators will no longer be able to access the Spam Quarantine using the Spam Quarantine URL ( http://<appliance_hostname>:<port> ). Administrators can access the Spam Quarantine using the web interface (Email > Message Quarantine > Spam Quarantine).
How to Configure SSO for Spam Quarantine
|
|
Do This |
More Info |
|---|---|---|
|
Step 1 |
Review the prerequisites. |
|
|
Step 2 |
Configure your appliance as a service provider. |
Configure Cisco Content Security Management Appliance as a Service Provider |
|
Step 3 |
[On IDP] Configure the identity provider to work with your appliance. |
Configure the Identity Provider to Communicate with Cisco Content Security Management Appliance |
|
Step 4 |
Configure identity provider settings on your appliance. |
Configure Identity Provider Settings on Cisco Content Security Management Appliance |
|
Step 5 |
Enable SSO for Spam Quarantine on your appliance. |
|
|
Step 6 |
Notify the end users about the new authentication mechanism. |
|
- Prerequisites
- Configure Cisco Content Security Management Appliance as a Service Provider
- Configure the Identity Provider to Communicate with Cisco Content Security Management Appliance
- Configure Identity Provider Settings on Cisco Content Security Management Appliance
- Enable SSO for Spam Quarantine
Prerequisites
- Verify whether the identity provider used by your organization is supported by Cisco Content Security Management Appliance. The following are the supported identity providers:
-
Obtain the following certificates that are required to secure the communication between your appliance and the identity provider:
-
If you want your appliance to sign SAML authentication requests or if want your identity provider to encrypt SAML assertions, obtain a self signed certificate or a certificate from a trusted CA and the associated private key.
-
If you want the identity provider to sign SAML assertions, obtain the identity provider’s certificate. Your appliance will use this certificate to verify the signed SAML assertions.
-
Configure Cisco Content Security Management Appliance as a Service Provider
Review the Prerequisites
| Step 1 | [New Web Interface Only] On the Cloud Email Security Management Console, click on the gear icon to load the legacy web interface. | ||||||||||||||||||||||
| Step 2 | Choose Management Appliance > System Administration > SAML. | ||||||||||||||||||||||
| Step 3 | Under the Service Provider section, click Add Service Provider. | ||||||||||||||||||||||
| Step 4 | Enter the following details:
| ||||||||||||||||||||||
| Step 5 | Click Submit. | ||||||||||||||||||||||
| Step 6 | Note down the service provider metadata (Entity ID and Assertion
Customer URL) displayed on the SSO Settings page and the Name ID Format
displayed on the Service Provider Settings page. You will need these details
while configuring the service provider settings on the identity provider.
Optionally, you can export the metadata as a file. Click Export Metadata and save the metadata file. Some identity providers allow you to load service provider details from a metadata file. | ||||||||||||||||||||||
What to Do Next
Configure the identity provider to communicate with your appliance. See Configure the Identity Provider to Communicate with Cisco Content Security Management Appliance
Configure the Identity Provider to Communicate with Cisco Content Security Management Appliance
Make sure that you have:
-
Configured your appliance as a service provider. See Configure Cisco Content Security Management Appliance as a Service Provider.
-
Copied the service provider metadata details or exported the metadata file. See Configure Cisco Content Security Management Appliance as a Service Provider.
| Step 1 | On the identity provider, do one of the following:
If you have configured your appliance to sign the SAML authentication requests or you plan to encrypt SAML assertions, make sure that you add the relevant certificate to the identity provider. For identity provider-specific instructions, see:
|
| Step 2 | Note down the identity provider metadata or export the metadata as a file. |
What to Do Next
Configure the identity provider settings on your appliance. See Configure Identity Provider Settings on Cisco Content Security Management Appliance.
Configure AD FS 2.0 to Communicate with Cisco Content Security Management Appliance
The following are the high level tasks you need to perform to configure AD FS 2.0 to communicate with your appliance. For complete and detailed instructions, see Microsoft documentation.
- Add the service provider’s (appliance’s) Assertion Consumer URL as a relaying party.
- Enter the service provider’s (appliance’s) Entity ID under Relaying Party Trusts > Properties > Identifiers > Relaying Party Identifier. Make sure that this value is same as the Entity ID value in the Service Provider settings on your appliance.
- If you have configured your service provider (appliance) to send signed SAML authentication requests, upload the service provider’s certificate (used to sign authentication requests) in .cer format under Relaying Party Trusts > Properties > Signature.
- If you plan to configure AD FS to send encrypted SAML assertions, upload the service provider’s (appliance’s) certificate in .cer format under Relaying Party Trusts > Properties > Encryption.
-
Set the Secure-hash Algorithm to SHA-1 under Relaying Party Trusts > Properties > Advanced.
-
Edit the Claim Rule and add an Issuance Transform Rule to send the LDAP attribute for email address as an outgoing claim type (email address).
-
Add a custom rule to include SPNameQualifier in the response. The following is a sample custom rule:
c:[Type == "http://schemas.xmlsoap.org/ws/2005/05/identity/claims/emailaddress"] =>
issue(Type = "http://schemas.xmlsoap.org/ws/2005/05/identity/claims/nameidentifier", Issuer =
 c.Issuer, OriginalIssuer = c.OriginalIssuer, Value = c.Value, ValueType = c.ValueType,
Properties["http://schemas.xmlsoap.org/ws/2005/05/identity/claimproperties/format"] =
"urn:oasis:names:tc:SAML:1.1:nameid-format:emailAddress", Properties
["http://schemas.xmlsoap.org/ws/2005/05/identity/claimproperties/spnamequalifier"] =
"https://<appliance-hostname>:83");
Configure PingFederate 7.2 to Communicate with Cisco Content Security Management Appliance
The following are the high level tasks you need to perform to configure PingFederate 7.2 to communicate with your appliance. For complete and detailed instructions, see Ping Identity documentation.
- Add your service provider’s (appliance’s) Assertion Consumer URL as an endpoint under protocol settings.
- Enter the service provider’s (appliance’s) Entity ID under SP Connection > General Info > Partner's Entity ID (Connection ID). Make sure that this value is same as the Entity ID value in the Service Provider settings on your appliance.
- If you have configured your service provider (appliance) to send signed SAML authentication requests, upload the service provider’s certificate under Signature Verification section (SP Connection > Credentials > Signature Verification > Signature Verification Certificate).
- If you plan to configure PingFederate to send encrypted SAML assertions, upload the service provider’s (appliance’s) certificate under Signature Verification section (SP Connection > Credentials > Signature Verification > Select XML Encryption Certificate).
- Edit Attribute Contract to send the LDAP attribute- email address (Attribute Sources & User Lookup > Attribute Contract Fulfillment).
Configure Identity Provider Settings on Cisco Content Security Management Appliance
Make sure that you have:
-
Configured the identity provider to communicate with your appliance. See Configure the Identity Provider to Communicate with Cisco Content Security Management Appliance.
-
Copied the identity provider metadata details or the exported metadata file.
| Step 1 | [New Web Interface Only] On the Cloud Email Security Management Console, click on the gear icon to load the legacy web interface. | ||||||||||||||||
| Step 2 | Choose Management Appliance > System Administration > SAML. | ||||||||||||||||
| Step 3 | Under the Identity Provider section, click Add Identity Provider. | ||||||||||||||||
| Step 4 | Enter the
following details:
| ||||||||||||||||
| Step 5 | Submit and commit your changes. | ||||||||||||||||
What to Do Next
Enable SSO for Spam Quarantine
Make sure that you have:
-
Configured all the settings on Management Appliance > System Administration > SAML page.
-
Enabled Spam Quarantine. See Spam Quarantine.
| Step 1 | [New Web Interface Only] On the Cloud Email Security Management Console, click on the gear icon to load the legacy web interface. |
| Step 2 | Choose Management Appliance > Centralized Services > Spam Quarantine. |
| Step 3 | Click Edit Settings and scroll down to the End-User Quarantine Access section. |
| Step 4 | Make sure that you have enabled End-User Quarantine Access. |
| Step 5 | Set the End-User Authentication method to SAML2.0. |
| Step 6 | (Optional) Specify whether to display message bodies before messages are released. |
| Step 7 | Submit and commit your changes. |
What to Do Next
Notify the end users about the new authentication mechanism.
Customizing Your View
Using Favorite Pages
(Locally-authenticated administrative users only.) You can create a quick-access list of the pages you use most.
|
To |
Do This |
|---|---|
|
Add pages to your favorites list
|
Navigate to the page to add, then choose Add This Page To My Favoritesfrom the My Favorites menu near the top right corner of the window. No commit is necessary for changes to My Favorites.
|
|
Reorder favorites |
Choose My Favorites > View All My Favorites and drag favorites into the desired order. |
|
Edit favorite page, name, or description |
Choose My Favorites > View All My Favorites and click the name of the favorite to edit. |
|
Delete favorites |
Choose My Favorites > View All My Favorites and delete favorites. |
|
Go to a favorite page |
Choose a page from the My Favorites menu near the top right corner of the window. |
|
Return to the main interface |
Choose any favorite, or click the Return to previous page at the bottom of the page. |
Setting Preferences
Administrative users configured on the Security Management appliance
Locally-authenticated users can choose the following preferences, which apply each time the user logs in to the Security Management appliance:
- Language (applies to the GUI)
- Landing page (the page displayed after login)
- Default time range for report pages (available options are a subset of the time ranges available for Email reporting pages)
- Number of rows visible in tables on report pages
Exact options depend on the user role.
To set these preferences, choose Options > Preferences. (The Options menu is at the top right side of the GUI window.) Submit your changes when done. Commit is not required.
 Tip | To return to the page you were viewing before you accessed the Preferences page, click the Return to previous page link at the bottom of the page. |
Externally authenticated users
Externally authenticated users can choose the display language directly in the Options menu.
Improving Web Interface Rendering
For better web interface rendering, Cisco recommends that you enable Internet Explorer Compatibility Mode Override.
Note | If enabling this feature is against your organizational policy, you may disable this feature. |
| Step 1 | [New Web Interface Only] On the Cloud Email Security Management Console, click on the gear icon to load the legacy web interface. |
| Step 2 | Choose Management Appliance > System Administration > General Settings. |
| Step 3 | Select Override IE Compatibility Mode check box. |
| Step 4 | Submit and commit your changes. |
 Feedback