- Introduction
- Setup, Installation, and Basic Configuration
- Working With Reports on the Legacy Web Interface
- Using Centralized Email Security Reporting on the Legacy Web Interface
- Working With Reports on the Cloud Email Security Management Console
- Using Centralized Email Security Reporting on the Cloud Email Security Management Console
- Tracking Messages
- Spam Quarantine
- Centralized Policy, Virus, and Outbreak Quarantines
- Monitoring System Status
- Integrating With LDAP
- Configuring SMTP Routing
- Distributing Administrative Tasks
- Common Administrative Tasks
- Logging
- Troubleshooting
- IP Interfaces and Accessing the Appliance
- Assigning Network and IP Addresses
- Firewall Information
- Additional Resources
- End User License Agreement
- Index
- About Distributing Administrative Tasks
- Assigning User Roles
- Users Page
- About Authenticating Administrative Users
- Changing the Admin User’s Password
- Changing the User’s Password After Expiry
- Managing Locally-Defined Administrative Users
- External User Authentication
- Two-Factor Authentication
Distributing
Administrative Tasks
This chapter contains the following sections:
- About Distributing Administrative Tasks
- Assigning User Roles
- Users Page
- About Authenticating Administrative Users
- Additional Controls on Access to the Security Management Appliance
- Controlling Access to Sensitive Information in Message Tracking
- Displaying a Message for Administrative Users
- Viewing Administrative User Activity
- Troubleshooting Administrative User Access
About Distributing Administrative Tasks
You can distribute administrative tasks on the Cisco Content Security Management appliance to other people based on the user roles that you assign to their user accounts.
To set up to distribute administrative tasks, you will determine whether the predefined user roles meet your needs, create any needed custom user roles, and set up the appliance to authenticate administrative users locally on the security appliance, and/or externally using your own centralized LDAP or RADIUS system.
Additionally, you can specify additional controls on access to the appliance and to certain information on the appliance.
Assigning User Roles
Additional configuration is required for quarantine access. See Access to Quarantines.
- Predefined User Roles
- Custom User Roles
- User Roles with Access to the CLI
- Using LDAP
- Access to Quarantines
Predefined User Roles
Except as noted, you can assign each user a predefined user role with the privileges described in the following table, or a custom user role.
|
User Role Name |
Description |
Scheduled Reports Capability |
||
|---|---|---|---|---|
|
admin |
The admin user is the default user account for the system and has all administrative privileges. The admin user account is listed here for convenience, but it cannot be assigned via a user role, and it cannot be edited or deleted, aside from changing the password. Only the admin user can issue the resetconfig and revertcommands. |
Yes |
||
|
Administrator |
User accounts with the Administrator role have full access to all configuration settings of the system.
|
Yes |
||
|
Operator |
User accounts with the Operator role are restricted from:
Otherwise, they have the same privileges as the Administrator role. |
Yes |
||
|
Technician |
User accounts with the Technician role can initiate system administration activities such as upgrades and reboots, save a configuration file from the appliance, manage feature keys, and so forth. |
Access to System Capacity reports under the Email tabs |
||
|
Read-Only Operator |
User accounts with the Read-Only Operator role have access to view configuration information. Users with the Read-Only Operator role can make and submit most changes to see how to configure a feature, but they cannot commit them or make any change that does not require a commit. Users with this role can manage messages in quarantines, if access is enabled. Users with this role cannot access the following: |
No |
||
|
Guest |
Users accounts with the Guest role can view status information including reports and Tracking, and manage messages in quarantines, if access is enabled. Users with the Guest role cannot access Message Tracking. |
No |
||
|
Email Administrator |
User accounts with the Email Administrator role have access to all configuration settings within the Email menu only, including quarantines. |
No |
||
|
Help Desk User |
User accounts with the Help Desk User role are restricted to: Users with this role cannot access the rest of the system, including the CLI. After you assign a user this role, you must also configure quarantines to allow access by this user. |
No |
||
|
Custom Roles
|
User accounts that are assigned a custom user role can view and configure only policies, features, or specific policy or feature instances that have been specifically delegated to the role. You can create a new Custom Email User Role from the Add Local User page. However, you must assign privileges to this Custom User Role before the role can be used. To assign privileges, go to Management Appliance > System Administration > User Roles and click the user name.
For more information, see Custom User Roles. |
No |
Custom User Roles
The Security Management appliance allows users with Administration privileges to delegate administration capabilities to custom roles. Custom roles provide more flexible control over your users’ access than the predefined user roles do.
Users to whom you assign custom user roles can manage policies or access reports for a subset of appliances, features, or end users. For example, you might allow a delegated administrator for web services to manage policies for an organization’s branch office in a different country, where the acceptable use policies might be different from those at the organization’s headquarters. You delegate administration by creating custom user roles and assigning access permissions to those roles. You determine which policies, features, reports, custom URL categories, etc. that the delegated administrators can view and edit.
For more information, see:
About Custom Email User Roles
You can assign custom roles to allow delegated administrators to access the following on the Security Management appliance:
- All reports (optionally restricted by Reporting Group)
- Mail Policy reports (optionally restricted by Reporting Group)
- DLP reports (optionally restricted by Reporting Group)
- Message Tracking
- Quarantines
Detailed information about each of these items follows this section. In addition, all users granted any of these privileges can see the System Status, available under the Management Appliance tab > Centralized Services menu. Users assigned to custom email user roles cannot access the CLI.
 Note | Custom user roles on the Email Security appliance offer more granular access than do user roles on the Security Management appliance. For example, you can delegate access to mail and DLP policies and content filters. For details, see the “Managing Custom User Roles for Delegated Administration” section in the “Common Administration” chapter of the documentation or online help for your Email Security appliance. |
- Access to Email Reporting
- Access to Message Tracking Data
- Access to Quarantines for Custom User Role
- Creating Custom Email User Roles
- Using Custom Email User Roles
Access to Email Reporting
You can grant custom user roles access to Email reports as described in the following sections.
For complete information about the Email Security Monitor pages on the Security Management appliance, see the chapter on Using Centralized Email Security Reporting on the Legacy Web Interface.
All Reports
If you grant a custom role access to All Reports, users assigned to this role can see the following Email Security Monitor pages either for all Email Security appliances, or for the Reporting Group that you select:
Mail Policy Reports
If you grant a custom role access to Mail Policy Reports, users assigned to this role can see the following Email Security Monitor pages either for all Email Security appliances, or for the Reporting Group that you select:
DLP Reports
If you grant a custom role access to DLP Reports, users assigned to this role can see the following Email Security Monitor pages either for all Email Security appliances, or for the Reporting Group that you select:
-
DLP Incidents
-
Archived Reports
Access to Message Tracking Data
If you grant a custom role access to Message Tracking, users to whom you assign this role can find the status of all messages tracked by the Security Management appliance.
To control access to sensitive information in messages that violate DLP policies, see Controlling Access to Sensitive Information in Message Tracking.
For more information about message tracking, including instructions for setting up your appliances to enable access to message tracking on the Security Management appliance, see Tracking Messages.
Access to Quarantines for Custom User Role
If you grant a custom role access to quarantines, users to whom you assign this role can search for, view, release, or delete messages in all quarantines on this Security Management appliance.
Before users can access quarantines, you must enable that access. See Access to Quarantines.
Creating Custom Email User Roles
You can create custom email user roles for access to Email Reporting, Message Tracking, and quarantines.
For descriptions of the access that each of these options permits, see About Custom Email User Roles and its subsections.
Note | To grant more granular access or access to other features, reports, or policies, create custom user roles directly on each Email Security appliance. |
Using Custom Email User Roles
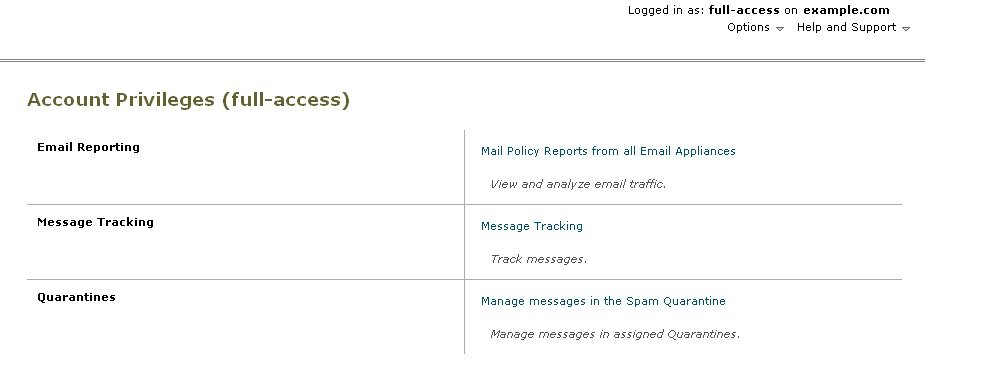
When a user who is assigned a custom email user role logs into the appliance, that user sees only the links to the security features to which that user has access. The user can return to this main page at any time by selecting Account Privileges in the Options menu. These users can also access the features to which they have access by using the menus at the top of the web page. In the following example, the user has access to all features that are available on the Security Management appliance via custom email user roles.
Deleting Custom User Roles
If you delete a custom user role that is assigned to one or more users, you do not receive an error.
User Roles with Access to the CLI
Some roles can access both the GUI and the CLI: Administrator, Operator, Guest, Technician, and Read-Only Operator. Other roles can access the GUI only: Help Desk User, Email Administrator,and custom user.
Using LDAP
If you use an LDAP directory to authenticate users, you assign directory groups to user roles instead of to individual users. When you assign a directory group to a user role, each user in that group receives the permissions defined for the user role. For more information, see External User Authentication.
Access to Quarantines
Before users can access quarantines, you must enable that access. See the following information:
Users Page
|
For Information About This Section |
See |
|---|---|
|
Users Reset Passwords button |
About Distributing Administrative Tasks |
|
Local User Account & Password Settings |
|
|
External Authentication |
|
|
DLP Tracking Privileges |
Controlling Access to Sensitive Information in Message Tracking |
About Authenticating Administrative Users
You can control access to the appliance by defining authorized users locally on the appliance, and/or by using external authentication or two-factor authentication.
- Changing the Admin User’s Password
- Changing the User’s Password After Expiry
- Managing Locally-Defined Administrative Users
- External User Authentication
- Two-Factor Authentication
Changing the Admin User’s Password
Any administrator-level user can change the password for the “admin” user, via the GUI or the CLI.
To change the password via the GUI, do the following:
-
[New Web Interface Only] On the Cloud Email Security Management Console, click on the gear
 icon to load the legacy web interface.
 -
Choose Management Appliance > System Administration > Users page and select the admin user.
To change the password for the admin user in the CLI, use the password command. The password command requires you to enter the old password for security.
If you forget the password for the “admin” user account, contact your customer support provider to reset the password.
Note | Changes to the password take effect immediately and do not require you to commit the change. |
Changing the User’s Password After Expiry
If your account has expired, you will be prompted with the following message “Your password expired. Please change your password by clicking here.”
Click on the link and enter the login details with your expired password, to proceed to the Change Password page. For more information on setting passwords, Setting Password and Login Requirements.
Note | Changes to the password take effect immediately and do not require you to commit the change. |
Managing Locally-Defined Administrative Users
- Adding Locally-Defined Users
- Editing Locally-Defined Users
- Deleting Locally-Defined Users
- Viewing the List of Locally-Defined Users
- Setting and Changing Passwords
- Setting Password and Login Requirements
- Requiring Users to Change Passwords on Demand
- Locking and Unlocking Local User Accounts
Adding Locally-Defined Users
Follow this procedure to add users directly to the Security Management appliance if you are not using external authentication. Alternatively, use the userconfig command in the CLI.
Note | If external authentication is also enabled, be sure that local user names do not duplicate externally-authenticated user names. |
There is no limit to the number of user accounts that you can create on the appliance.
| Step 1 | If you will assign custom user roles, we recommend that you define those roles first. See Custom User Roles. |
| Step 2 | [New Web Interface Only] On the Cloud Email Security Management Console, click on the gear icon to load the legacy web interface. |
| Step 3 | Choose Management Appliance > System Administration > Users. |
| Step 4 | Click Add User. |
| Step 5 | Enter a unique name for the user. You cannot enter words that are reserved by the system (such as “operator” and “root”).
If you also use external authentication, user names should not duplicate externally-authenticated user names. |
| Step 6 | Enter a full name for the user. |
| Step 7 | Select a
predefined role or a custom role. See the table
Descriptions of
User Roles in section
Predefined User Roles
for more information about user roles.
If you add a new Email role role here, enter a name for the role. For naming restrictions, see Creating Custom Email User Roles. |
| Step 8 | Enter a password and reenter it. |
| Step 9 | Submit and commit your changes. |
| Step 10 | If you added a custom user role on this page, assign privileges to that role now. See Custom User Roles. |
Editing Locally-Defined Users
Use this procedure to change a password, for example.
Deleting Locally-Defined Users
Viewing the List of Locally-Defined Users
To view a list of locally-defined users, do the following:
-
[New Web Interface Only] On the Cloud Email Security Management Console, click on the gear
icon to load the legacy web interface. -
Choose Management Appliance > System Administration > Users.
Note | Asterisks indicate users assigned custom user roles for delegated administration. “Unassigned” appears in red if the user’s custom role has been deleted. For more information on custom user roles, see Custom User Roles. |
Setting and Changing Passwords
- When you add a user, you specify an initial password for that user.
- To change passwords for users configured on the system, use the Edit User page in the GUI (see Editing Locally-Defined Users for more information).
- To change the password for the default admin user account for the system, see Changing the Admin User’s Password.
- To force users to change their passwords, see Requiring Users to Change Passwords on Demand.
- Users can change their own passwords by clicking the Options menu at the top right side of the GUI and selecting the Change Password option.
Setting Password and Login Requirements
You can define user account and password restrictions to enforce organizational password policies. The user account and password restrictions apply to local users defined on the Security Management appliance. You can configure the following settings:
- User account locking. You can define how many failed login attempts cause the user to be locked out of the account.
- Password lifetime rules. You can define how long a password can exist before the user is required to change the password after logging in.
- Password rules. You can define what kinds of passwords users can choose, such as which characters are optional or mandatory.
| Step 1 | [New Web Interface Only] On the Cloud Email Security Management Console, click on the gear icon to load the legacy web interface. | ||||||||||||||||||||||||
| Step 2 | Choose Management Appliance > System Administration > Users. | ||||||||||||||||||||||||
| Step 3 | Scroll down to the Local User Account and Password Settings section. | ||||||||||||||||||||||||
| Step 4 | Click Edit Settings. | ||||||||||||||||||||||||
| Step 5 | Configure settings:
| ||||||||||||||||||||||||
| Step 6 | Submit and commit your changes. |
What to Do Next
Require users to change their passwords to new passwords that meet the new requirements. See Requiring Users to Change Passwords on Demand
Requiring Users to Change Passwords on Demand
To require all or selected users to change their passwords at any time on an ad-hoc basis, perform the steps in this procedure. This is a one-time action.
To automate a periodic requirement for changing passwords, use the Password Reset option described in Setting Password and Login Requirements.
| Step 1 | [New Web Interface Only] On the Cloud Email Security Management Console, click on the gear icon to load the legacy web interface. |
| Step 2 | Choose Management Appliance > System Administration > Users. |
| Step 3 | In the Users section, select the check boxes beside the users who will be required to change passwords . |
| Step 4 | Select Enforce Password Changes. |
| Step 5 | Select options.
The global setting for the grace period is configured in Local User Account & Password Settings. |
| Step 6 | Click OK. |
Locking and Unlocking Local User Accounts
Locking a user account prevents a local user from logging into the appliance. A user account can be locked in one of the following ways:
- You can configure all local user accounts to lock after users fail to log in successfully after a configured number of attempts. See Setting Password and Login Requirements.
- Administrators can manually lock user accounts. See Locking User Accounts Manually.
AsyncOS displays the reason why the user account was locked when you view the user account on the Edit User page.
Locking User Accounts Manually
| Step 1 | First time only: Set up the appliance to enable user account locking: | ||
| Step 2 |
| ||
| Step 3 | Go to
Management Appliance > System Administration >
Users and click the user name.
| ||
| Step 4 | Click
Lock
Account.
AsyncOS displays a message saying that the user will be unable to log into the appliance and asks if you want to continue. |
Unlocking User Accounts
To unlock a user account, open the user account by clicking on the user name in the Users listing and click Unlock Account.
Note | If you lock the admin account, you can only unlock it by logging in as the admin through a serial communications connection to the serial console port. The admin user can always access the appliance using the serial console port, even when the admin account is locked. See the “Setup and Installation” chapter in the documentation or online help for your Email Security appliance for more information on accessing the appliance using the serial console port. |
External User Authentication
If you store user information in an LDAP or RADIUS directory on your network, you can configure your Security Management appliance to use the external directory to authenticate users who log in to the appliance.
Note | Some features described in Customizing Your View are not available to externally-authenticated users. |
- If your deployment uses both local and external authentication, local user names must not duplicate externally-authenticated user names.
- If the appliance cannot communicate with the external directory, a user who has both an external and a local account can log in with a local user account on the appliance.
See:
Configuring LDAP Authentication
To configure LDAP authentication, see Configuring External Authentication of Administrative Users Using LDAP.
Enabling RADIUS Authentication
You can use a RADIUS directory to authenticate users and assign groups of users to user roles for administering your appliance. The RADIUS server should support the CLASS attribute, which AsyncOS uses to assign users in the RADIUS directory to user roles.
Note | If an external user changes the user role for their RADIUS group, the user should log out of the appliance and then log back in. The user will have the permissions of their new role. |
The Shared Secret key for access to the RADIUS server must be no more than 48 characters long.
| Step 1 | [New Web Interface Only] On the Cloud Email Security Management Console, click on the gear icon to load the legacy web interface. | ||||||
| Step 2 | Choose Management Appliance > System Administration > Users page and click Enable. | ||||||
| Step 3 | Select the Enable External Authentication check box. | ||||||
| Step 4 | Select RADIUS for the authentication type. | ||||||
| Step 5 | Enter the host name for the RADIUS server. | ||||||
| Step 6 | Enter the port number for the RADIUS server. The default port number is 1812. | ||||||
| Step 7 | Enter the
Shared Secret key for the RADIUS server.
| ||||||
| Step 8 | Enter the number of seconds that the appliance waits for a response from the server before timing out. | ||||||
| Step 9 | Select whether to use Password Authentication Protocol (PAP) or Challenge Handshake Authentication Protocol (CHAP) for the authentication protocol. | ||||||
| Step 10 | (Optional)
Click
Add
Row to add another RADIUS server. Repeat steps 6 and 7 for each
RADIUS server that your appliance uses for authentication.
When you define multiple external servers, the appliance connects to the servers in the order defined on the appliance. You might want to define multiple external servers to allow for failover in case one server is temporarily unavailable. | ||||||
| Step 11 | Enter the
amount of time to store external authentication credentials in the web user
interface.
| ||||||
| Step 12 | Configure Group
Mapping:
| ||||||
| Step 13 | (Optional) Click Add Row to add another group. Repeat step 11 for each group of users that the appliance authenticates. | ||||||
| Step 14 | Submit and commit your changes. |
Two-Factor Authentication
You can enable two-factor authentication for the following user roles:
The feature has been tested with:
-
RSA Authentication Manager v8.2
-
FreeRADIUS v1.1.7 and above
-
ISE v1.4 and above
Related Topics:
- Enabling Two-Factor Authentication
- Disabling Two-Factor Authentication
- Adding an Email or Web Security appliance over SSH with Pre-Shared Keys
Enabling Two-Factor Authentication
Make sure that you get the required RADIUS server details for two-factor authentication from your IT administrator.
| Step 1 | [New Web Interface Only] On the Cloud Email Security Management Console, click on the gear icon to load the legacy web interface. | ||
| Step 2 | Choose System Administration > Users page and click Enable under Two-Factor Authentication. | ||
| Step 3 | Enter the hostname or IP address of the RADIUS server. | ||
| Step 4 | Enter the port number of the RADIUS server. | ||
| Step 5 | Enter the Shared Secret password of the RADIUS server. | ||
| Step 6 | Enter the number of seconds to wait for a response from the server before timing out. | ||
| Step 7 | Select the appropriate authentication protocol. | ||
| Step 8 | (Optional) Click
Add
Row to add another RADIUS server. Repeat steps 2 to 6 for each
RADIUS server.
| ||
| Step 9 | Select the required user roles for which you want to enable two-factor authentication. | ||
| Step 10 | Submit and commit your changes. When two-factor authentication is enabled, the user is prompted to enter a passcode after entering the username and passphrase, to login to the appliance. |
Disabling Two-Factor Authentication
Make sure you have enabled two-factor authentication on your appliance.
| Step 1 | [New Web Interface Only] On the Cloud Email Security Management Console, click on the gear icon to load the legacy web interface. |
| Step 2 | Choose System Administration > Users page and click Edit Global Settings under Two-Factor Authentication |
| Step 3 | Deselect Enable Two-Factor Authentication. |
| Step 4 | Submit and commit your changes. |
Adding an Email or Web Security appliance over SSH with Pre-Shared Keys
The following example demonstrates how to add an Email Security applaince (testesa.example.com) to the Security Management appliance (testsma.example.com) over SSH using pre-shared keys.
To add a Web Security appliance, choose WSA when prompted to enter the type of Cisco appliance.
testsma.example.com> applianceconfig

Choose the operation you want to perform.

ADD - Add SMA Connection Parameters and Keys.
EDIT - Edit an appliance.
DELETE - Remove an appliance.
TEST - Test that an appliance is properly configured.
SERVICES - Configure the centralized services for an appliance.
STATUS - Display the status of centralized services.
PORT - Configure which port is used to communicate with remote appliances.

[]> add

Please enter the type of Cisco appliance that this device is
1. ESA
2. WSA

[1]> 1

Enter the IP address or hostname of an appliance to transfer data with.
(A hostname may be entered in this field, however it will be immediately
resolved to an IP address when the form is submitted.)
[]> IP address entered

Enter a name to identify this appliance

[]> name of appliance

File transfer access via SSH is required to transfer reporting data, message logs,
and quarantine safelist/blocklist data from appliances

Would you like to configure file transfer access for this appliance? [Y]>

Would you like to use a custom ssh port to connect to this appliance? [N]>

Would you like to connect an Email Security appliance using pre-shared keys?
Use this option if you have enabled two-factor authentication on the Email
Security appliance. [N]> yes

To add an Email Security appliance to the Content Security Management appliance
using pre-shared keys, log in to the Email Security appliance,
run the smaconfig > add command, enter the following details.

Host: vm10sma0006.qa

User Key:
AAAAB3NzaC1yc2EAAAADAQABAAABAQDgm3kG9RHc4gVZxRe0orh5DW5Yje5UB9BpJqcTRQJoxUIAv2Xig
8q5geyaWHZcFoUxH61YQbPX3R8CVMYgJ8/QB/iunjkr3jowV/SCuBBikEFgj1zuxlsFhL0L487epEgby1gH0rfJ
gwSa2/6dhfyUayst6pT87CZGOQltgx7s51wc+ve770X3SqlQD5bdYC4x9+gCX0wdwfhTH1+4/82jwYjK1lAEXc
O4k4TuZJEJnyBQ3YyCyVwXuDkXpI6xJDemxcc36e7Wwtpn3mn2VLaTG2/I38XwSvlYB6TcqmWnO10gL+aD
wkKAKcuhYpz4NFr9myej1mhMk7ZAFXmRNxvT
Note | Before you proceed to the next step, ensure that you have added the Host and User Key details to the Email or Web Security appliance. Commit the changes in your Email or Web Security appliance before continuing the process of adding connection parameters in the Security Management appliance. |
Do you want to continue connecting using pre-shared keys? [Y]> yes
Additional Controls on Access to the Security Management Appliance
Configuring IP-Based Network Access
You can control from which IP addresses users access the Security Management appliance by creating access lists for users who connect directly to the appliance and users who connect through a reverse proxy, if your organization uses reverse proxies for remote users.
Direct Connections
You can specify the IP addresses, subnets, or CIDR addresses for machines that can connect to the Security Management appliance. Users can access the appliance from any machine with IP address from the access list. Users attempting to connect to the appliance from an address not included in the list are denied access.
Connecting Through a Proxy
If your organization’s network uses reverse proxy servers between remote users’ machines and the Security Management appliance, AsyncOS allows you create an access list with the IP addresses of the proxies that can connect to the appliance.
Even when using a reverse proxy, AsyncOS still validates the IP address of the remote user’s machine against a list of IP addresses allowed for user connections. To send the remote user’s IP address to the Email Security appliance, the proxy needs to include the x-forwarded-for HTTP header in its connection request to the appliance.
The x-forwarded-for header is a non-RFC standard HTTP header with the following format:
x-forwarded-for: client-ip, proxy1, proxy2,... CRLF .
The value for this header is a comma-separated list of IP addresses with the left-most address being the address of the remote user’s machine, followed by the addresses of each successive proxy that forwarded the connection request. (The header name is configurable.) The Security Management appliance matches the remote user’s IP address from the header and the connecting proxy’s IP address against the allowed user and proxy IP addresses in the access list.
Note | AsyncOS supports only IPv4 addresses in the x-forwarded-for header. |
Creating the Access List
You can create the network access list either via the Network Access page in the GUI or the adminaccessconfig > ipaccess CLI command. The following figure shows the Network Access page with a list of user IP addresses that are allowed to connect directly to the Security Management appliance.
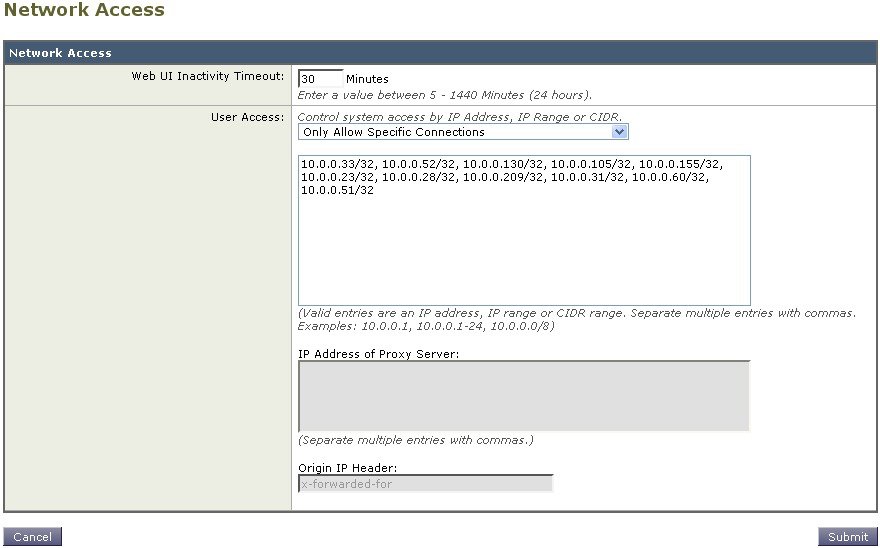
AsyncOS offers four different modes of control for the access list:
-
Allow All. This mode allows all connections to the appliance. This is the default mode of operation.
-
Only Allow Specific Connections. This mode allows a user to connection to the appliance if the user’s IP address matches the IP addresses, IP ranges, or CIDR ranges included in the access list.
-
Only Allow Specific Connections Through Proxy. This mode allows a user to connect to the appliance through a reverse proxy if the following conditions are met:
- The connecting proxy’s IP address is included in the access list’s IP Address of Proxy Server field.
- The proxy includes the x-forwarded-header HTTP header in its connection request.
- The value of x-forwarded-header is not empty.
- The remote user’s IP address is included in x-forwarded-header and it matches the IP addresses, IP ranges, or CIDR ranges defined for users in the access list.
- Only Allow Specific Connections Directly or Through Proxy. This mode allows users to connect through a reverse proxy or directly to the appliance if their IP address matches the IP addresses, IP ranges, or CIDR ranges included in the access list. The conditions for connecting through a proxy are the same as in the Only Allow Specific Connections Through Proxy mode.
Please be aware that you may lose access to the appliance after submitting and committing your changes if one of the following conditions is true:
- If you select Only Allow Specific Connections and do not include the IP address of your current machine in the list.
- If you select Only Allow Specific Connections Through Proxy and the IP address of the proxy currently connected to the appliance is not in the proxy list and the value of the Origin IP header is not in the list of allowed IP addresses.
- If you select Only Allow Specific Connections Directly or Through Proxy and
If you choose to continue without correcting the access list, AsyncOS will disconnect your machine or proxy from the appliance when you commit your changes.
| Step 1 | [New Web Interface Only] On the Cloud Email Security Management Console, click on the gear icon to load the legacy web interface. |
| Step 2 | Choose System Administration > Network Access. |
| Step 3 | Click Edit Settings. |
| Step 4 | Select the mode of control for the access list. |
| Step 5 | Enter the IP
addresses from which users will be allowed to connect to the appliance.
You can enter an IP address, IP address range or CIDR range. Use commas to separate multiple entries. |
| Step 6 | If connecting
through a proxy is allowed, enter the following information:
|
| Step 7 | Submit and commit your changes. |
Configuring the Web UI Session Timeout
You can specify how long a user can be logged into the Security Management appliance’s Web UI before AsyncOS logs the user out due to inactivity. This Web UI session timeout applies to all users, including admin, and it is used for both HTTP and HTTPS sessions.
Once AsyncOS logs a user out, the appliance redirects the user’s web browser to login page.
Note | The Web UI Session Timeout does not apply to spam quarantine sessions, which have a 30 minute timeout that cannot be configured. |
| Step 1 | [New Web Interface Only] On the Cloud Email Security Management Console, click on the gear icon to load the legacy web interface. |
| Step 2 | Use the System Administration > Network Access page. |
| Step 3 | Click Edit Settings. |
| Step 4 | Enter the number of minutes users can be inactive before being logged out. You can define a timeout period between 5 and 1440 minutes. |
| Step 5 | Submit and commit your changes. |
Controlling Access to Sensitive Information in Message Tracking
| Step 1 | [New Web Interface Only] On the Cloud Email Security Management Console, click on the gear icon to load the legacy web interface. |
| Step 2 | Go to the Management Appliance > System Administration > Users page. |
| Step 3 | In the Tracking Privileges section, click Edit Settings. |
| Step 4 | Select the
roles for which you want to grant access to sensitive information in Message
Tracking.
Only custom roles with access to Message Tracking are listed. |
| Step 5 | Submit and
commit your changes.
The Centralized Email Message Tracking feature must be enabled under Management Appliance > Centralized Services for this setting to take effect. |
Displaying a Message for Administrative Users
You can display a message that administrative users will see when they sign in to the appliance.
To set or clear a message:
Viewing Administrative User Activity
- Viewing Active Sessions Using the Web
- Viewing Your Recent Login Attempts
- Viewing Administrative User Activity via the Command Line Interface
Viewing Active Sessions Using the Web
From the Security Management appliance, you can view all active sessions and users logged in to the appliance.
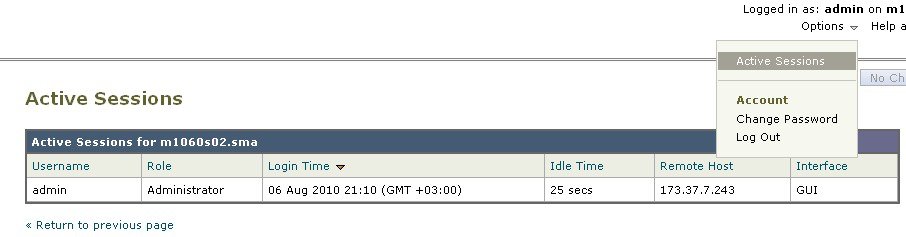 From the Active Sessions page you can view the User name, what role the user has, the time the user logged in, idle time, and whether the user is logging in from the command line or the GUI. |
Viewing Your Recent Login Attempts
To view your last few recent login attempts (failed or successful) via the web interface, SSH, and/or FTP:
Viewing Administrative User Activity via the Command Line Interface
The following commands support multiuser access to the appliance.
- The who command lists all users who are logged in to the system via the CLI or the web user interface, the role of the user, the time of login, the idle time, and the remote host from which the user is logged in.
- The whoami command displays the user name and full name of the user currently logged in, and which groups the user belongs to:
mail3.example.com>
whoami
Username: admin
Full Name: Administrator
Groups: admin, operators, config, log, guest
- The last command displays which users have recently logged into the appliance. The IP address of the remote host, and the login, logout, and total time also appear.
mail3.example.com> last
Username  Remote Host  Login Time        Logout Time       Total Time
========  ===========  ================  ================  ==========
admin     10.1.3.67    Sat May 15 23:42  still logged in   15m
admin     10.1.3.67    Sat May 15 22:52  Sat May 15 23:42  50m
admin     10.1.3.67    Sat May 15 11:02  Sat May 15 14:14  3h 12m
admin     10.1.3.67    Fri May 14 16:29  Fri May 14 17:43  1h 13m
shutdown                                 Fri May 14 16:22
shutdown                                 Fri May 14 16:15
admin     10.1.3.67    Fri May 14 16:05  Fri May 14 16:15  9m
admin     10.1.3.103   Fri May 14 16:12  Fri May 14 16:15  2m
admin     10.1.3.103   Thu May 13 09:31  Fri May 14 14:11  1d 4h 39m
admin     10.1.3.135   Fri May 14 10:57  Fri May 14 10:58  0m
admin     10.1.3.67    Thu May 13 17:00  Thu May 13 19:24  2h 24m
Troubleshooting Administrative User Access
- Error: User Has No Access Privileges Assigned
- User Has No Active Menus
- Externally-Authenticated Users See Preferences Option
Error: User Has No Access Privileges Assigned
Problem
A user to whom you have delegated administration can log in to the Security Management appliance but sees a message that no access privileges are assigned.
Solution
Make sure that you have assigned privileges to the custom user role to which this user is assigned. Look at Management Appliance > System Administration > Users to determine the User Role assigned, then go to Management Appliance > System Administration > User Roles, click the name of the User Role, and assign privileges to the role.
If you have assigned access based on Reporting Group, make sure you have selected a Reporting Group for that user on the Management Appliance > System Administration > User Roles page. To assign a group, click the No groups selected link in the Email Reporting column of the User Roles for Delegated Administration table.
User Has No Active Menus
Problem
A user to whom you have granted Publish privileges has no active menus upon login.
Solution
Make sure you have granted access to at least one Access Policy or Custom URL Category. If you do not want to grant this user privileges to edit either of these, create a custom URL category which is not used in any policy and grant this user role privileges to this category on the Custom User Role page.
Externally-Authenticated Users See Preferences Option
Problem
Externally-authenticated users see the Preferences option.
Solution
Ensure that users that you add directly in the Security Management appliance have unique usernames that are not also used in your external authentication database.
 Feedback