Azure

Service VNet

Azure Service VNet

For the Centralized deployment, Multicloud Defense Gateway is deployed in a new Service VNet. This VNet is called a Service VNet which will peer with other Spoke(application) VNet to create a Hub-and-Spoke model as shown below:

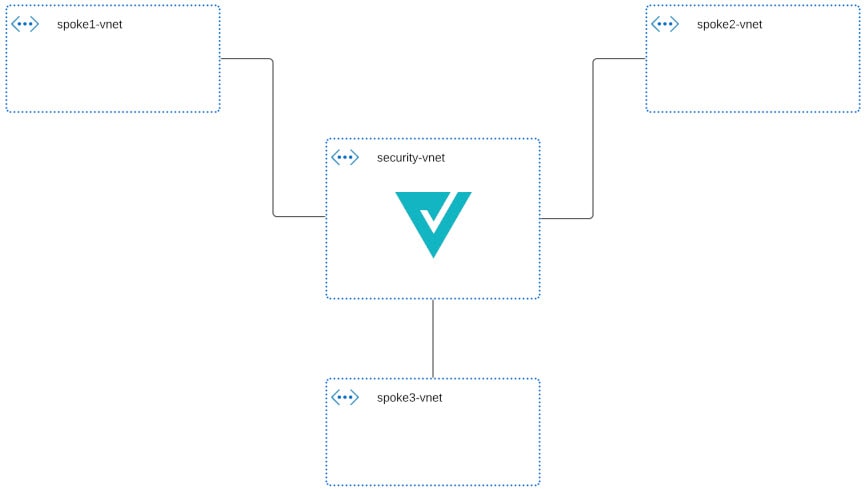
Multicloud Defense orchestrates the creation of the Service VNet and does VNet peering with the Spoke VNets. Multicloud Defense also provides the ability to update the routing in Spoke VNets to route traffic to Service VNet for inspection. For instructions on how to make routing changes with Multicloud Defense in Spoke VNet, see Manage (Protect) Spoke VPCs in Hub Mode.

Create Service VNet

Procedure


Step 1

Click Manage > Gateways > Service VPCs/VNets.

Step 2

Click Create Service VPC/VNet.

Step 3

Input parameter values:

Parameter

Description

Name

Nameof Service VNet.

CSP Account

AzureSubscription to create the Service VNet. This subscription needs to be onboarded to Multicloud Defense Controller.

Region

Azure region to deploy Service VNet.

CIDR Block

TheCIDR Block for Service VNet. This must not overlap with your Spoke(application) VNets.

Availability Zones

Recommenedto select at least two(2) for resiliency. Not all Azure regions have multiple AZs.

Resource Group

TheResource Group to deploy Service VNet.

Note

 
  • Service VNet consist of the following:

    • VNet

    • Two (2) NSG

  • Service VNet CIDR must not overlap with Spoke VNet


Manage (Protect) Spoke VPCs in Hub Mode

Multicloud Defense takes care of all the orchestration of the Service VNet and can perform VNet peering to all your Spoke VNets. Multicloud Defense can make route changes so your Spoke VNets traffic is routed to Multicloud Defense Gateway for inspection. This is a fully managed solution that makes it very easy to deploy and secure workloads.


Note


  • Wait for the Service VPC be created successfully and state is ACTIVE before proceeding with the following steps.

  • Multicloud Defense Gateway can be deployed later in Service VPC that you just created.


To protect Spoke VNets, we need to perform VNet peering between Spoke VNets and Service VNet. This allows Multicloud Defense to orchestrate the routing and VNet peering for Spoke VNet's traffic to be inspected by Multicloud Defense.

When enabling Protected VPCs, Multicloud Defense Controller orchestrates the following:

  • Create VNet peering between Multicloud Defense Service VNet and Spoke VNet

  • Add/Update default route in the spoke route table to point to Multicloud Defense Gateway

There are two ways to associate VNets to the Service VNet.

Add Spoke VPCs from Service VPC Menu

Procedure


Step 1

Navigate to Manage > Service VPCs/VNets.

Step 2

Select Service VNet and click on Manage Spoke VPC/VNet.

Step 3

Add all the Spoke VNets in the Spoke table.

Step 4

Click on View/Edit link under the Route Tables column.

Step 5

Select the route table to update default route to Multicloud Defense Gateway for inspection.

Step 6

Click Save Locally.

Step 7

Click Save.


Add Spoke VPCs from Inventory Menu

Procedure


Step 1

Navigate to Manage > Cloud Accounts > Inventory.

Step 2

Click on VPCs/VNets. This will list all the VNets in your cloud accounts.

Step 3

Click on the Secure button to secureVNet.

Step 4

Select Service VNet.

Step 5

Select the route table to update default route to Multicloud Defense Gateway for inpsection.

Step 6

Click Save.


Azure Centralized Ingress Protection

The Multicloud Defense Gateway is deployed in a VNet to protect the internet facing applications. For Centralized model, deploy Gateway in Service VNet. The Gateway acts as a Reverse Proxy. Users on the internet access the application via theMulticloud Defense Gateway. You configure the backend destination (the original application) as a proxy target on the Multicloud Defense Gateway. The proxy enables Multicloud Defense to decrypt TLS traffic and perform deep packet inspection. The proxied traffic to the backend/target can be sent as plain text HTTP, HTTPS, TCP or TLS.

Multicloud Defense Gateway consist of a Load Balancer that is used to front our Multicloud Defense Gateway instances. This allows for a more scalable design and ensures that traffic is loadbalanced between all the Gateway instances.

Add a Gateway

Procedure


Step 1

Navigate to Manage > Gateways > Gateways.

Step 2

Click Add Gateway.

Step 3

Select the account you previously created.

Step 4

Click Next.

  • Instance Type - Choose the type of cloud service provider. Note that there may be multiple variations of instances depending on which cloud service provider you are using.

  • Gateway Tpe - AutoScaling.

  • Minimum Instances - Select the minimum number of instances that you plan to deploy.

  • Maximum Instances - Select the maximum number instances that you plan to deploy. This is the maximum number that is used for auto-scaling in each availability zone.

  • HealthCheck Port - Default is 65534. The port number used by Multicloud Defense load balancer to check the health of the instances. Datapath security groups assigned to the instance(s) must allow traffic on this port.

  • (Optional) Packet Capture Profile - Packet Capture Profile for threat and flow PCAPs.

  • (Optional) Diagnostics Profile - Diagnostics Profile used to store Technical Support information.

  • (Optional) Log Profile - Log Forwarding Profile used to forward Events/Logs to a SIEM.

Step 5

Click Next.

Step 6

Provide the following parameters:

  • Security - Ingress

  • Gateway Image - Image to be deployed.

  • Policy Ruleset - Select the policy ruleset to associate with this gateway.

  • Region - Select the region this gateway will be deployed into.

  • Resource Groups - Select the resource group to associate the gateway with.

  • SSHPublic Key - Paste the SSH public key. This public key is used by the controller to access the CLI of the deployed gateway instances for debug and monitoring.

  • VNet ID - Select the VNet to associate with the gateway.

  • User Assigned Identity ID - Enter the cloud service provider identity to associate with this gateway.

  • Mgmt. Security Group - Select the security group to associate with the management interface.

  • Datapath Security Group - Select the security group to associate with the datapath interface.

  • Disk Encryption - Select the appropriate option from the drop-down menu. For customer managed encryption key, the user will need to input the resource ID of the encryption key.

Step 7

Select the Availability Zone, the Mgmt Subnet and the Datapath Subnet. The available subnets will be based on the VNet selected above. For high availabilty purposes the gateway instances can be deployed in multiple availability zones. Click the plus button to add a new availability zone and select the parameters for the selected zones.

Note


Using the Azure portal, view the VM instances page and check the gateway instances created. The VMs have a name tag that begins with multicloud defense.

The Check Load Balancers section and note that an internal network load balancer has been created.


Advanced Settings

Advanced Settings allow for customized default settings in Multicloud Defense Gateway. Some of these settings may not be editable after deployment of gateway.

Parameter

Description

UseInternal LoadBalancer

This option will use internal Load Balancer when deploying Multicloud Defense Gateway. This is typically used when your application is used for private use and not intended for public access.

ManagementDNS Server

Users can configure Multicloud Defense Gateway to point to a designated DNS server instead of the default cloud DNS. If DNS is changed, please ensure DNS can resolve the following URL:

  • prod1-dashboard.vtxsecurityservices.com

  • prod1-apiserver.vtxsecurityservices.com

  • prod1-watchserver.vtxsecurityservices.com

These URLs are needed to ensure the Multicloud Defense Gateway is operational.

* Azure DNS settings can only be set when deploying new gateway instances. If you need to edit, please disable the gateway to edit the DNS.

Azure Centralized Egress / East-West Protection

The Multicloud Defense Gateway is deployed in a VNet to protect the outgoing traffic. For Centralized model, the Gateway is deployed in the Service VNet. The Gateway acts as a Forward Proxy. For HTTP or TLS applications with SNI extension header, theMulticloud Defense Gateway can act as a Transparent Forward Proxy. The applications access the internet without any change on their side. Multicloud Defense intercepts the traffic and considers that as proxied traffic. It creates a new session to the internet. For TLS traffic and the certificate to be trusted by the client applications, a trusted root/intermediate certificate must be configured on Multicloud Defense and the root certificate installed on all the client application instances.

Multicloud Defense Gateway consist of a Load Balancer that is used to front our Multicloud Defense Gateway instances. This allows for a more scalable design and ensures that traffic is loadbalanced between all the Gateway instances.

Add a Gateway

Procedure


Step 1

Navigate to Manage > Gateways > Gateways.

Step 2

Click Add Gateway.

Step 3

Select the account you previously created.

Step 4

Click Next.

Step 5

Enter the following information:

  • Instance Type - Choose the type of cloud service provider. Note that there may be multiple variations of instances depending on which cloud service provider you are using.

  • Gateway Tpe - AutoScaling.

  • Minimum Instances - Select the minimum number of instances that you plan to deploy.

  • Maximum Instances - Select the maximum number instances that you plan to deploy. This is the maximum number that is used for auto-scaling in each availability zone.

  • HealthCheck Port - Default is 65534. The port number used by Multicloud Defense load balancer to check the health of the instances. Datapath security groups assigned to the instance(s) must allow traffic on this port.

  • (Optional) Packet Capture Profile - Packet Capture Profile for threat and flow PCAPs.

  • (Optional) Diagnostics Profile - Diagnostics Profile used to store Technical Support information.

  • (Optional) Log Profile - Log Forwarding Profile used to forward Events/Logs to a SIEM.

Step 6

Click Next.

Step 7

Provide the following parameters:

  • Security - Egress

  • Gateway Image - Image to be deployed.

  • Policy Ruleset - Select the policy ruleset to associate with this gateway.

  • Region - Select the region this gateway will be deployed into.

  • Resource Groups - Select the resource group to associate the gateway with.

  • SSHPublic Key - Paste the SSH public key. This public key is used by the controller to access the CLI of the deployed gateway instances for debug and monitoring.

  • VNet ID - Select the VNet to associate with the gateway.

  • User Assigned Identity ID - Enter the cloud service provider identity to associate with this gateway.

  • Mgmt. Security Group - Select the security group to associate with the management interface.

  • Datapath Security Group - Select the security group to associate with the datapath interface.

  • Disk Encryption - Select the appropriate option from the drop-down menu. For customer managed encryption key, the user will need to input the resource ID of the encryption key.

Step 8

Select the Availability Zone, the Mgmt Subnet and the Datapath Subnet. The available subnets will be based on the VNet selected above. For high availabilty purposes the gateway instances can be deployed in multiple availability zones. Click the plus button to add a new availability zone and select the parameters for the selected zones.

Note


Using the Azure portal, view the VM instances page and check the gateway instances created. The VMs have a name tag that begins with multicloud defense.

The Check Load Balancers section and note that an internal network load balancer has been created.

Step 9

(Optional) If you are deploying in distributed model (Multicloud Defense Gateway in the same VNet as application), please follow Manage Spoke VNets to protect VNet. For distributed model, traffic from the apps/subnets in the VNet needs to be routed to the Multicloud Defense Gateway:

  • Add a route table in the Azure portal.

  • Associate the route table with all the subnets.

  • Add a default route for 0.0.0.0/0 with next-hop as the IP address of the Multicloud Defense Gateway Network Load Balancer.


Advanced Settings

Advanced Settings allow for customized default settings in Multicloud Defense Gateway. Some of these settings may not be editable after deployment of gateway.

Parameter

Description

ManagementDNS Server

Userscan configure Multicloud Defense Gateway to point to a designated DNS server instead of the default cloud DNS. If DNS is changed, please ensure DNS can resolve the following URL:

  • prod1-dashboard.vtxsecurityservices.com

  • prod1-apiserver.vtxsecurityservices.com

  • prod1-watchserver.vtxsecurityservices.com

These URLs are needed to ensure the Multicloud Defense Gateway is operational.

Note that the Azure DNS settings can only be set when deploy of new gateway instances. Disable the gateway to edit this setting.