Information about the Cisco Mobility Advantage Proxy Feature
This section contains the following topics:
Cisco Mobility Advantage Proxy Functionality
To support Cisco UMA for the Cisco Mobility Advantage solution, the mobility advantage proxy (implemented as a TLS proxy) includes the following functionality:
-
The ability to allow no client authentication during the handshake with clients.
-
Allowing an imported PKCS-12 certificate to server as a proxy certificate.
The ASA includes an inspection engine to validate the Cisco UMA Mobile Multiplexing Protocol (MMP).
MMP is a data transport protocol for transmitting data entities between Cisco UMA clients and servers. As shown in the following figure, MMP must be run on top of a connection-oriented protocol (the underlying transport) and is intended to be run on top of a secure transport protocol such as TLS. The Orative Markup Language (OML) protocol is intended to be run on top of MMP for the purposes of data synchronization, as well as the HTTP protocol for uploading and downloading large files.
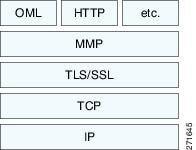
The TCP/TLS default port is 5443. There are no embedded NAT or secondary connections.
Cisco UMA client and server communications can be proxied via TLS, which decrypts the data, passes it to the inspect MMP module, and re-encrypt the data before forwarding it to the endpoint. The inspect MMP module verifies the integrity of the MMP headers and passes the OML/HTTP to an appropriate handler. The ASA takes the following actions on the MMP headers and data:
-
Verifies that client MMP headers are well-formed. Upon detection of a malformed header, the TCP session is terminated.
-
Verifies that client to server MMP header lengths are not exceeded. If an MMP header length is exceeded (4096), then the TCP session is terminated.
-
Verifies that client to server MMP content lengths are not exceeded. If an entity content length is exceeded (4096), the TCP session is terminated.
Mobility Advantage Proxy Deployment Scenarios
The following figures show the two deployment scenarios for the TLS proxy used by the Cisco Mobility Advantage solution. In scenario 1 (the recommended deployment architecture), the ASA functions as both the firewall and TLS proxy. In scenario 2, the ASA functions as the TLS proxy only and works with an existing firewall. In both scenarios, the clients connect from the Internet.
In the scenario 1 deployment, the ASA is between a Cisco UMA client and a Cisco UMA server. The Cisco UMA client is an executable that is downloaded to each smartphone. The Cisco UMA client applications establishes a data connection, which is a TLS connection, to the corporate Cisco UMA server. The ASA intercepts the connections and inspects the data that the client sends to the Cisco UMA server.
 Note |
The TLS proxy for the Cisco Mobility Advantage solution does not support client authentication because the Cisco UMA client cannot present a certificate. The following commands can be used to disable authentication during the TLS handshake. |
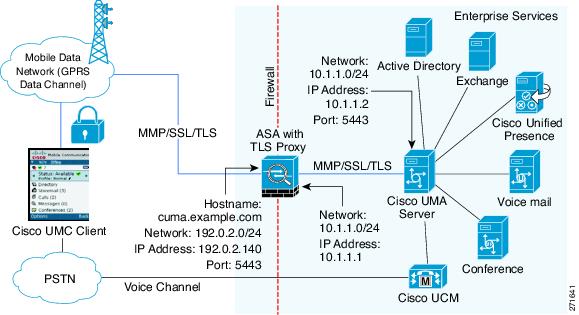
In the above figure, the ASA performs static NAT by translating the Cisco UMA server 10.1.1.2 IP address to 192.0.2.140.
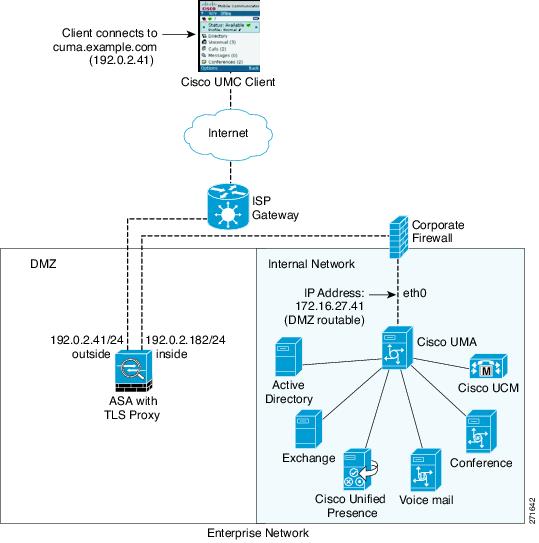
The following figure shows deployment scenario 2, where the ASA functions as the TLS proxy only and does not function as the corporate firewall. In this scenario, the ASA and the corporate firewall are performing NAT. The corporate firewall will not be able to predict which client from the Internet needs to connect to the corporate Cisco UMA server. Therefore, to support this deployment, you can take the following actions:
-
Set up a NAT rule for inbound traffic that translates the destination IP address 192.0.2.41 to 172.16.27.41.
-
Set up an interface PAT rule for inbound traffic translating the source IP address of every packet so that the corporate firewall does not need to open up a wildcard pinhole. The Cisco UMA server receives packets with the source IP address 192.0.12.183.
hostname(config)# object network obj-0.0.0.0-01
hostname(config-network-object)# subnet 0.0.0.0 0.0.0.0
hostname(config-network-object)# nat (outside,inside) dynamic 192.0.2.183
Note |
This interface PAT rule converges the Cisco UMA client IP addresses on the outside interface of the ASA into a single IP address on the inside interface by using different source ports. Performing this action is often referred as “outside PAT”. “Outside PAT” is not recommended when TLS proxy for Cisco Mobility Advantage is enabled on the same interface of the ASA with phone proxy, Cisco Unified Presence, or any other features involving application inspection. “Outside PAT” is not supported completely by application inspection when embedded address translation is needed. |
Mobility Advantage Proxy Using NAT/PAT
In both scenarios, NAT can be used to hide the private address of the Cisco UMA servers.
hostname(config)# access-list cumc extended permit tcp any host 172.16.27.41 eq 5443versus
hostname(config)# access-list cumc extended permit tcp host 192.0.2.183 host 172.16.27.41
eq 5443
Trust Relationships for Cisco UMA Deployments
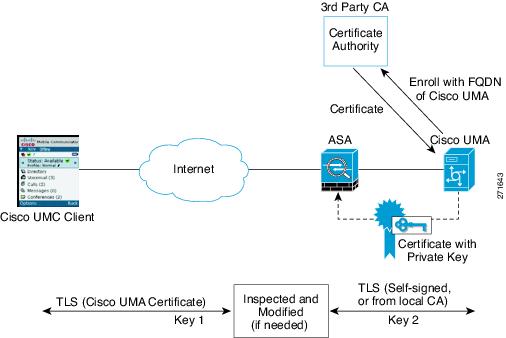
To establish a trust relationship between the Cisco UMC client and the ASA, the ASA uses the Cisco UMA server certificate and keypair or the ASA obtains a certificate with the Cisco UMA server FQDN (certificate impersonation). Between the ASA and the Cisco UMA server, the ASA and Cisco UMA server use self-signed certificates or certificates issued by a local certificate authority.
The following figure shows how you can import the Cisco UMA server certificate onto the ASA. When the Cisco UMA server has already enrolled with a third-party CA, you can import the certificate with the private key onto the ASA. Then, the ASA has the full credentials of the Cisco UMA server. When a Cisco UMA client connects to the Cisco UMA server, the ASA intercepts the handshake and uses the Cisco UMA server certificate to perform the handshake with the client. The ASA also performs a handshake with the server.
The following figure shows another way to establish the trust relationship. The following figure shows a green field deployment, because each component of the deployment has been newly installed. The ASA enrolls with the third-party CA by using the Cisco UMA server FQDN as if the ASA is the Cisco UMA server. When the Cisco UMA client connects to the ASA, the ASA presents the certificate that has the Cisco UMA server FQDN. The Cisco UMA client believes it is communicating to with the Cisco UMA server.
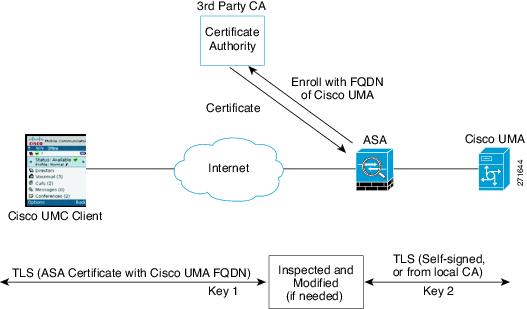
A trusted relationship between the ASA and the Cisco UMA server can be established with self-signed certificates. The ASA's identity certificate is exported, and then uploaded on the Cisco UMA server truststore. The Cisco UMA server certificate is downloaded, and then uploaded on the ASA truststore by creating a trustpoint and using the crypto ca authenticate command.
 Feedback