Deploy Cisco SD-WAN Controller in Microsoft Azure

Table 1. Feature History

Feature Name

Release Information

Description

Deploy Cisco SD-WAN Controllers in Azure

Cisco vManage Release 20.6.1

This feature enables you to deploy the Cisco SD-WAN Controllers (Cisco SD-WAN Manager, Cisco SD-WAN Controller, and Cisco Catalyst SD-WAN Validator) in a Microsoft Azure environment.

Information About Deploying Cisco SD-WAN Controllers in Azure

Minimum supported controller images: Cisco vManage Release 20.6.1, Cisco Catalyst SD-WAN Control Components Release 20.6.1, and Cisco SD-WAN Validator Release 20.6.1

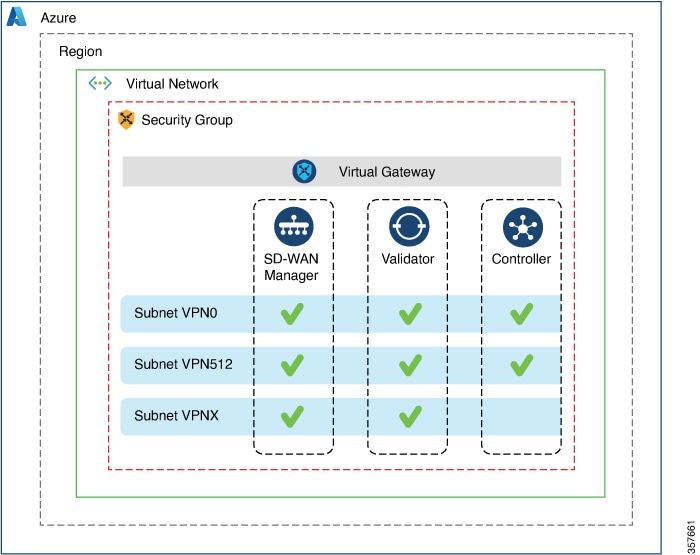
You can deploy the following Cisco SD-WAN Controllers in an Azure environment: Cisco SD-WAN Manager, Cisco SD-WAN Controller, and Cisco SD-WAN Validator.

The following illustration shows the architecture of the Azure region, virtual network, security group, and so on, and it shows where the Cisco SD-WAN Controllers function within the architecture.

Figure 1. Cisco SD-WAN Controllers in Azure
Shows the architecture of the Azure region, virtual network, security group.

Benefits of Deploying Cisco SD-WAN Controllers in Azure

  • Set-up cost: Requires low initial set-up cost, as compared with on-premises hosting, as there is no requirement to purchase additional data center infrastructure

  • Deployment: Ease of cloud-based deployment

  • Management: Ability to manage devices worldwide

  • Stability: Because of its reliability, Azure hosting provides a stable environment for Cisco SD-WAN Controllers.

  • Security: Azure provides a secure hosting environment.

  • Scaling: Azure provides an easy path to increasing the scale of your Cisco Catalyst SD-WAN network.

Prerequisites for Deploying Cisco SD-WAN Controllers in Azure

You must have a valid (and active) Microsoft Azure subscription.

Use Cases for Deploying Cisco SD-WAN Controllers in Azure

For a Cisco Catalyst SD-WAN deployment that is already using Azure, such as for Cisco Catalyst 8000V Edge Software, hosting the Cisco SD-WAN Controllers in Azure is a logical, efficient choice, keeping all services in alignment.

Deploy Cisco SD-WAN Controllers in Azure: Tasks


Note


The procedures described here apply to the three types of Cisco SD-WAN Controllers— Cisco SD-WAN Manager, Cisco SD-WAN Controller, and Cisco SD-WAN Validator. Where applicable, we indicate where the instructions are different for specific controllers.


Note


In DHCP configurations, IPv6 Unique Local Addresses (ULA) are assigned to the interface in some instances. Cisco SD-WAN Validator is designed to drop the packets with source or destination as the ULA addresses. In an Azure setup, to allow packets with these addresses on the device, configure the enable-ipv6-unique-local-address command to enable or disable these addresses.


Task 1: Create a Controller Image in Azure

Before You Begin

On the Cisco Software Download page, download the images for the Cisco SD-WAN Control Components: Cisco SD-WAN Manager, Cisco SD-WAN Controller, and Cisco SD-WAN Validator. Decompress the downloaded files, which are in .tar format. The image file for each controller is in virtual hard disk (VHD) format.

Create a Controller Image in Azure


Note


For definitive information about tasks in Azure, see the Azure documentation.


Perform the following steps in the Azure portal:

  1. If you do not already have a storage account in Azure, create one now.

    • Provide a name, location, and so on, for the storage account.

    • For network connectivity, use the default options for connectivity method, routing preference, data protection, and secure transfer.

    • Optionally, you can enter a tag to categorize the storage account.

  2. Create a new private container in the storage account. Choose a storage account in the region where you intend to deploy the controller.


    Note


    Each controller requires a separate container.


  3. Upload the VHD file of the controller into the container.

    During the upload procedure, choose Page Blob for the blob type.


    Note


    For information about choosing the blob type, see Azure documentation.


  4. Create a new image, selecting the VHD file uploaded in the previous step.

    When creating an image, ensure that you complete the following actions:

    • Choose a valid subscription.

    • Choose an existing resource group or create a new one.

    • Enter a name and region for the image.

    • For OS, choose Linux.

    • For VM generation, choose Gen 1.

    • For account type, choose Premium SSD.

    • For host caching, choose read/write

    • For encryption, choose the default settings.

    • Optionally, you can enter a tag to categorize the image.

Task 2: Create a Virtual Network, Subnets, and Network Security Group in Azure


Note


For definitive information about tasks in Azure, see the Azure documentation.


Perform the following steps in the Azure portal:

  1. Begin the workflow for creating a virtual network.

    When creating a virtual network, ensure that you complete the following actions:

    • Choose a valid subscription.

    • Choose an existing resource group or create a new one.


      Note


      A resource group is a logical construct in Azure that includes all of the resources that you have deployed across regions. We recommend defining one resource group for each Cisco Catalyst SD-WAN overlay.


    • Enter a name and region for the virtual network.

    • Enter an address space for the virtual network.

      Example: 10.0.0.0/16

    • Add a minimum of two subnets to the virtual network, and an additional subnet if you are using a Cisco SD-WAN Manager cluster. For each subnet, provide a name and an address space for the subnet. A later step associates these subnets with VM network interfaces.

      Example:

      • 10.0.1.0/24
      • 10.0.2.0/24
      • 10.0.3.0/24
    • Optionally, you can enter a tag to categorize the virtual network.

  2. Begin the workflow for creating a network security group (NSG).

    When creating a network security group, ensure that you complete the following actions:

    • Choose a valid subscription.

    • Choose the resource group created in the previous step, as part of the workflow for creating a virtual network.

    • Enter a name and region for the NSG.

    • Optionally, you can enter a tag to categorize the NSG.

  3. Associate the newly created NSG with the subnets created in an earlier step.

Task 3: Create a Virtual Machine for the Controller


Note


For definitive information about tasks in Azure, see the Azure documentation.


Perform the following steps in the Azure portal:

  1. Begin the workflow for creating a virtual machine (VM).

    When creating a VM, ensure that you complete the following actions:

    • Deploy the VM in the virtual network created in Task 2.

    • Select the resource group that you created in a previous task, during the workflow for creating a virtual network.

    • Enter a name and region for the VM.

    • For the image, select the uploaded controller image.


      Note


      For information about how to locate custom images, see the Azure documentation.


    • For the VM size, select an option with the number of CPUs and memory that you want to use for the controller.

      For information about Cisco SD-WAN Controller-device compatibility and server requirements, see Cisco SD-WAN Controller Compatibility Matrix and Server Recommendations.

    • Choose an authentication type (for example, SSH public key, or password) and provide the credentials, as required.

    • For disk resources, do one of the following:

      • If you are deploying a Cisco Catalyst SD-WAN Controller or a Cisco Catalyst SD-WAN Validator, no additional disk resources are required beyond the default.

      • If you are deploying a Cisco SD-WAN Manager controller, choose one disk.

    • For networking details, choose the virtual network, the subnets, and the NSG that you created in earlier steps.

    • For the public IP address, choose the following options:

      • SKU: Basic

      • Assignment: static


        Note


        Cisco Catalyst SD-WAN requires a static IP address for controllers.


    • Optionally, you can enable advanced boot diagnostics (a management option) to create an additional storage account in the resource group for storing diagnostics logs.

    • (Controller releases 20.6.1 and later) Optionally, you can use the custom data feature (an advanced option) to enter commands for the VM to execute when rebooting.

    • Optionally, you can add a tag to categorize the controller.

  2. After creating the VM, create additional network interfaces (NICs) for the VM.

    Create the network interfaces in the resource group that you created in an earlier task.

    • If you are deploying a Cisco SD-WAN Controller or Cisco SD-WAN Validator, create one additional network interface.

    • If you are deploying a Cisco SD-WAN Manager controller, create two additional network interfaces.

    • If you are deploying a Cisco SD-WAN Manager controller in a cluster, see Cluster Management and Deploy ​Cisco Catalyst SD-WAN Manager for additional information about Cisco SD-WAN Manager out-of-band interfaces.

    When creating a network interface, ensure that you complete the following actions:

    • Specify the virtual network, subnets, and NSG created in earlier tasks.

    • Associate NIC 1 with subnet 1.

      If you are deploying a Cisco SD-WAN Manager controller, associate NIC 2 with subnet 2.

      If you are using a Cisco SD-WAN Manager cluster, associate NIC 3 with subnet 3.


      Note


      Associating a NIC with a subnet enables the VM to connect to the subnet.


    • For each NIC, enter the tag used for the controller that you are deploying.

  3. Create a static public IP for all of the controllers to use, and associate this public IP with NIC 1.


    Note


    Use the IP configurations option in Azure to create the public IP.


    When creating a public IP, ensure that you complete the following actions:

    • For assignment, choose static.

    • Use the associate option to specify NIC 1.

  4. Stop the VM, and confirm when it has stopped.

  5. Attach the newly created NICs to the VM.

    • If you are deploying a Cisco SD-WAN Controller or Cisco SD-WAN Validator, attach the NIC to the VM.

    • If you are deploying Cisco SD-WAN Manager, attach both of the newly created NICs to the VM.

  6. Restart the VM.

    Confirm in the Azure portal that the VM has restarted.

Task 4: Configure the Network Security Group

Before You Begin

The NSG is related functionally to firewall policy. When configuring the NSG, it is helpful to be aware of firewall port configuration in Cisco Catalyst SD-WAN. For more information on firewall ports, see Firewall Ports for Cisco SD-WAN Deployments.

Configure the Network Security Group


Note


For definitive information about tasks in Azure, see the Azure documentation.


  1. Using the Azure portal, add inbound security rules to the NSG created in an earlier task, to allow inbound traffic from the IP ranges needed for the following:

    • Establishing control connections between each of the Cisco SD-WAN Controller. If the controllers lack connectivity to each other, the control plane and data plane cannot operate.

    • Accessing the controllers using HTTPS or SSH protocols.

    For the NSG, use the option to add inbound security rules. Using the rules, allow all of the controller VM IP addresses, to enable the required connectivity between the Cisco SD-WAN Controller.

    When creating a new inbound security rule, ensure that you complete the following actions:

    • Specify IP ranges, protocol, and so on.

    • For the action of the rule, choose the option to allow the traffic.

  2. To verify connectivity, log in to the VM using the NIC 0 public IP of Cisco SD-WAN Manager.

Verify the Deployment of Cisco SD-WAN Controllers in Azure

  • Infrastructure:

    To verify the deployment of Cisco SD-WAN Controllers within virtual machines in Azure, use the Azure portal to check that the VMs hosting each controller are active.

  • Services:

    To verify that Cisco Catalyst SD-WAN services are operating after deployment of the controllers, use the following steps:

    1. Check for a successful ping to the VM that hosts Cisco SD-WAN Manager.

    2. Log in to Cisco SD-WAN Manager.

    3. Use SSH to connect to Cisco SD-WAN Manager, and use the request nms all status command. The output shows the status of all of the Cisco SD-WAN Manager services. Confirm that the application server is active.

      The following excerpt of the request nms all status command output shows that the application server is active:

      vmanage# request nms all status
      NMS service proxy
              Enabled: true
              Status: running PID:2881 for 9479s
      NMS service proxy rate limit
              Enabled: true
              Status: running PID:4359 for 9521s
      NMS application server
              Enabled: true
              Status:  running PID:6131 for 9419s
      ...
    4. After installing the controllers, follow the steps in Cisco SD-WAN Overlay Network Bring-Up Process to establish the control connections for the controllers and to verify that each controller is operational.

Monitor the Deployment of Cisco SD-WAN Controllers in Azure

To monitor infrastructure status, such as CPU usage and disk usage, use the monitoring tools in the Azure portal.

For information about monitoring the status of Cisco Catalyst SD-WAN services, see the Cisco SD-WAN Monitor and Maintain guide.