UP Geo Redundancy

Feature Summary

Table 1. Feature Summary

Applicable Product(s) or Functional Area

cnBNG

Applicable Platform(s)

SMI

Feature Default Setting

Disabled – Configuration Required

Related Changes in this Release

First Release

Related Documentation

Not Applicable

Revision History

Table 2. Revision History
Revision Details Release

Introduced support for L3 routed subscriber sessions with SRG.

2025.01.0

Introduced support for SRG PPPoE sessions.

2025.01.0

First introduced.

2022.04.0

Feature Description


Note


This feature is Network Services Orchestrator (NSO) integrated.


To provide redundancy for the subscriber sessions, cnBNG supports Geographical Redundancy across multiple User Planes (UPs), without having any L1 or L 2 connectivity between them. The UPs may be located in multiple geographical locations, and they have L3 connectivity over a shared core network through IP or MPLS routing.

The UP Geo redundancy feature supports IPoE DHCP-triggered sessions (IPv4, IPv6 and dual-stack), as well as PPPoE subscriber sessions.

UP Geo Redundancy Architecture

The following figure depicts a UP geo redundancy deployment network model:

Figure 1. UP Geo Redundancy Deployment Network Model


The redundancy pairing between UPs work by synchronizing the subscriber state from cnBNG CP to primary (active) and its subordinate (standby).

Geo redundancy works in conjunction with any of the access technologies. The CPEs are agnostic to redundancy; they see only one UP or gateway. The access nodes are dual or multi-homed for redundancy using a variety of technologies based on the service provider network design and choices. Multi-chassis Link Aggregation (MC-LAG), dual-homed (Multiple Spanning Tree - Access Gateway or MST-AG), Ring (MST-AG or G.8032), xSTP and seamless MPLS (pseudowires) are a few such access networks.

For more information on access technologies supported on UP, see the Broadband Network Gateway Configuration Guide for Cisco ASR 9000 Series Routers guide.

Subscriber Redundancy Group

Geo redundancy for subscribers is delivered by transferring the relevant session state from primary UP to subordinate UP which can then help in failover (FO) or planned switchover (SO) of sessions from one UP to another. Subscriber Redundancy Group (SRG) which is a set of access-interface (or a single access-interface) is introduced in cnBNG, and all subscribers in an SRG would FO or SO as a group.

The SRG has two modes of operation:

  • Hot-standby

  • Warm-standby

Currently UP geo redundancy supports only the hot-standby subordinate mode. This is achieved by a 1:1 mirroring of subscriber session state from the primary to the subordinate where the entire provisioning is done before the FO or SO. The sessions provisioned on subordinate is in sync with the set up on the primary. Because the data plane is already set up for sub-second traffic impact, there is minimal action on switchover in the case of hot-standby mode and therefore, it is suitable for subscribers requiring high service level agreement (SLA). With appropriate capacity planning, the sessions can also be distributed across multiple UPs to achieve an M: N model. The primary-subordinate terminology is always in the context of a specific SRG; not for the UP as a whole.

The following figure depicts a typical subscriber redundancy group (SRG):

Figure 2. Subscriber Redundancy Group


SRG Virtual MAC

For seamless switchover between two UPs, the L2-connected CPE devices must not detect change in gateway MAC and IPv4 or IPv6 addresses. The access technology like MC-LAG uses the same MAC address on both UPs with active-standby roles, providing seamless switchover. Where MAC sharing is not provided by the access technology or protocol (like MST-AG, G.8032), the cnBNG SRG virtual MAC (vMAC) must be used.

For more information on SRG Virtual MAC, see the BNG Geo Redundancy chapter of Broadband Network Gateway Configuration Guide for Cisco ASR 9000 Series Routers guide.

Session Distribution Across SRG

The session distribution across SRGs can be in either of these modes:

  • Active-standby mode:

    In this mode, a dedicated standby UP can be a subordinate for multiple SRGs from different active UPs which are primaries for those respective SRGs.

    This figure shows an active-standby mode of session distribution across SRGs:

    Figure 3. Active-standby Mode of Session Distribution


    In figure A:

    • Sessions are associated with partitions (VLAN 1, 2, 3 and 4) on UP1, with each VLAN mapped to separate SRG configured as primary role.

    • UP2 acts as standby for all VLANs.

    • Each VLAN has 8K sessions terminated on it.

    In figure B:

    • An interface failure gets detected (using object-tracking of the access-interface).

    • SRG for each VLAN on UP2 gets the primary role.

    • All 32K sessions are switched to UP2.

    • UP2 sees a session termination count of 32K.

  • Active-active mode:

    In this mode, an UP can be primary for one SRG and a standby for another SRG at the same time.

    The following figure shows an active-active mode of session distribution across SRGs:

    Figure 4. Active-active Mode of Session Distribution


    In figure A:

    • Sessions are associated with partitions (VLAN 1, 2) on UP1, with each VLAN mapped to separate SRG configured as primary role.

    • Sessions are associated with partitions (VLAN 3, 4) on UP2, with each VLAN mapped to separate SRG configured as primary role.

    • Each VLAN has 8K sessions terminated on it.

    • Each UP has 16K sessions terminated on it.

    In figure B:

    • The interface associated with VLAN 2 on UP1 goes down.

    • Sessions associated with partitions (VLAN 2) on UP1 are switched to UP2.

    • UP1 sees a session termination count of 8K and UP2 sees a session termination count of 24K.

Benefits of UP Geo Redundancy

Major benefits of UP Geo Redundancy include:

  • Supports various redundancy models such as 1:1 (active-active) and M:N, including M:1.

  • Provides flexible redundancy pairing on access-link basis.

  • Works with multiple access networks such as MC-LAG, dual-home and OLT rings.

  • Supports various types of subscribers such as IPv4, IPv6 and dual-stack IPoE sessions.

  • Provides failure protection to access link failures, N4 link failures, LC failures, RP failures and chassis failures.

  • Performs automatic switchovers during dynamic failures or planned events such as maintenance, upgrades and transitions.

  • Co-exists with other high availability (HA) or redundancy mechanisms.

  • Does switchover of the impacted session group only; other session groups remain on the same UP.

  • Provides fast convergence and rapid setup of sessions, with minimal subscriber impact during switchover.

  • Provides automatic routing convergence towards core and efficient address pool management.

  • Provides seamless switchover for subscriber CPE without the need for any signaling.

  • Integrates with RADIUS systems.

  • Does not impact session scale and call-per-second (CPS) during normal operation.

Supported Features in UP Geo Redundancy

These base geo redundancy features are supported:

  • Multiple SRG groups to different peer routers.

  • Hot-standby mode for subordinate (that is, subscribers provisioned in hardware on the subordinate as they are synchronized).

  • Dynamic role negotiation between peers.

  • Manual SRG switchover through command line interface (CLI).

  • Dynamic failure detection using object tracking (link up-down, route and IPSLA tracking).

  • Revertive timer per SRG group.

  • SRG active-active mode without any access protocol.

  • G.8032 (dual-home and ring) access technologies.

These DHCP features are supported:

  • DHCPv6 IA-NA and IA-PD support for L2 connected sessions.

  • DHCPv4 support for L2 connected sessions.

  • DHCPv4 or DHCPv6 dual-stack support.

  • DHCP server mode.

  • Session initiation through DHCPv4 or DHCPv6 protocol.

UP Geo Redundancy Configuration Guidelines

UP Configuration Consistency

  • Geo redundancy feature infrastructure synchronizes individual subscriber session state from primary to subordinate. But, it does not synchronize the UP related configurations (namely dynamic-template, DHCP profiles, policy-maps, access-interface configurations, external RADIUS or DHCP server, and so on).

  • For successful synchronization and setup of subscriber sessions between the two UPs, it is mandatory that the relevant UP configurations must be identical on the two routers and on the access-interfaces pairs in the SRG.

  • While the access-interfaces or their types (or both) may vary between the paired UPs, their outer-VLAN tag (that is, S-VLAN imposed by the access or aggregation devices) must be identical.

  • Inconsistencies in base UP or SRG configurations may result in synchronization failure and improper setup of sessions on the subordinate.

Session Sync

Once the session is up on the primary node, the entire session information gets synced to the subordinate node. This includes dynamic synchronization of updates such as CoA or service logon.

Configuring UP Geo Redundancy

To configure the subscriber redundancy group in the control plane, use the following sample configuration:

config 
   user-plane instance instance_id 
      user-plane user_plane_name 
         subscriber-redundancy 
            group group_name 
               disable 
               domain-identifier domain_name 
               peer-identifier peer_id 
               port-id-map port-name port_name port_number 
               preferred-role-active 
               revertive-timer revertive_timer_value 
               exit 

NOTES:

  • subscriber-redundancy : Configures subscriber geo-redundancy. All SRG groups are configured in this mode.

  • group group_name : Specifies the name of the subscriber redundancy group that is unique to a user plane.

  • disable : Disables an SRG group without deleting the entire configuration of the group. By default, an SRG group is enabled.

  • domain-identifier domain_name : Specifies the domain name to identify all groups between two user planes.

  • peer-identifier peer_id : Identifies the peer user-plane for the group. This identifier must be unique across all groups in the control plane. The same peer-identifier must be configured in the peer user-plane.

  • port-id-map port-name port_name port_number : Specifies the mapping of access interfaces between user planes. At least one port-map-id must be configured.

  • preferred-role-active : This is an optional configuration.

    Sets the preferred role active for user plane. Default value: false.

  • revertive-timer revertive_timer_value : This is an optional configuration.

    Specifies the revertive timer in seconds. revertive_timer_value must be an integer in the range of 60 to 3600 . This command is available only when preferred-role-active is configured.

Configuration Example

The following is a sample configuration for configuring UP Geo Redundancy, as illustrated in Figure 5.

config
  user-plane
   instance 1
    user-plane user-plane1
    peer-address ipv4 {UP1 ipv4-address}
     subscriber-redundancy
      group Group1
       preferred-role-active
       revertive-timer       3600
       domain-identifier     domain1
       peer-identifier       Peer1
       port-id-map port-name Bundle-Ether1.10 1
      exit
     exit
    exit
    user-plane user-plane2
    peer-address ipv4 {UP2 ipv4-address}
     subscriber-redundancy
      group Group1
       domain-identifier domain1
       peer-identifier   Peer1
       port-id-map port-name Bundle-Ether2.10 1
      exit
     exit
    exit
   exit
  exit

The following diagram illustrates the sample configuration.

Figure 5. Sample Configuration

Configuration Verification

To verify the configuration, execute the following commands:

  • show subscriber redundancy [ count | debug | detail | gr-instance gr_instance_id | srg-peer-id srg_peer_id | upf upf_name ] 
  • show subscriber redundancy-sync [ gr-instance gr_instance_id | srg-peer-id srg_peer_id | upf upf_name ] 
  • show subscriber dhcp [ count | detail | filter filter_value | gr-instance instance_id | sublabel sublabel_name ] 
  • show subscriber session [ detail | filter { smupstate { upf_name/smUpSessionCreated } } ] 
  • show subscriber synchronize [ srg-peer-id peer_id | upf upf_name ] 
  • show subscriber pppoe [ detail | filter { srg-peer-id  peer_id  } ] 

For more information on these commands, see the Monitoring Support section.

Configuring IPAM

Dynamic Pool Configuration

Use the following configuration to configure dynamic pool:

config 
   ipam 
      instance instance_id 
      source local 
         address-pool pool_name 
           vrf-name string
           ipv4
             split-size 
               per-cache value 
               per-dp value  
             exit
             address-range start_ipv4_address end_ipv4_address
           exit
           ipv6
             address-ranges
               split-size 
                 per-cache value 
                 per-dp value
               exit
               address-range start_ipv6_address end_ipv6_address
             exit
            prefix-ranges
               split-size 
                 per-cache value 
                 per-dp value }
               exit
               prefix-range prefix_value length prefix_length 
             exit
           exit
         exit 
   

Static Pool Configuration

Use the following configuration to configure static pool:

config 
   ipam 
     instance instance_id
       address-pool pool_name 
          vrf-name string 
          static enable user-plane srg_id
          ipv4
             split-size   
             no-split
             exit
             address-range start_ipv4_address end_ipv4_address
          exit
          ipv6
             address-ranges
               split-size 
                 no-split
               exit
               address-range start_ipv6_address end_ipv6_address
             exit
             prefix-ranges
               split-size 
                 no-split
               exit
               prefix-length prefix_length
               prefix-range prefix_value length prefix_length 
             exit
           exit
         exit 
   

NOTES:

  • ipam : Enters the IPAM Configuration mode.

  • instance instance_id : Configures multiple instances for the specified instance and enters the instance sub-mode.

  • source local : Enters the local datastore as the pool source.

  • address-pool pool_name [ address-quarantine-timer ] [ offline ] [ static user_plane_name ] [ vrf-name string ] : Configures the address pool configuration. pool_name must be the name of the address pool.

  • ipv4 : Enters the IPv4 mode of the pool.

  • split-size { per-cache value | per-dp value } : Specifies the size of the IPv4 range to be split for each IPAM cache allocation. The IPAM server consumes this configuration. The no-split command disables the splitting of the address-ranges into smaller chunks.

    per-cache value : Specifies the size of the IPv4 range to be split for each Data-Plane (User-Plane) allocation. The valid values range from 2 to 262144. The default value is 1024.

    per-dp value : Specifies the size of the IPv4 range to be split for each Data-Plane (User-Plane) allocation. The valid values range from 2 to 262144 The default value is 256.

  • address-range start_ipv4_address end_ipv4_address : Configures the IPv4 address range with the starting and ending IPv4 address.

  • ipv6 : Enters the IPv6 mode of the pool.

  • address-ranges : Enters the IPv6 address ranges sub-mode.

  • prefix-ranges : Enters the prefix ranges mode.

  • prefix-length prefix_length : Specifies the IPv6 prefix length.

  • prefix-range prefix_value length prefix_length : Specifies the IPv6 prefix range, and prefix length.

  • static enable user-plane srg_id : Associates an user plane for the static pool.

L3 Routed Subscriber Sessions with Subscriber Redundancy Group

Table 3. Feature History

Feature Name

Release Information

Description

L3 Routed Subscriber Sessions with SRG

2025.01.0 This feature enhances routing and redundancy for subscriber sessions by allowing subscribers to connect through a routed (L3) access network.

L3 Routed Subscriber Sessions allow subscriber connections via a routed access network, using SRG to provide redundancy. The SRG feature involves grouping access interfaces for failover (FO) and switchover (SO), ensuring continuous service in case of an active unit failure. This enhances network robustness and service continuity for subscribers connected through cnBNG.

The following topology illustrates the L3 routed subscriber sessions with SRG.

Figure 6. SRG Routed subscribers with access IP network

The session type determines the identifiers used for the session. For example, L2 connected sessions always use the MAC address as one of the key identifiers in both the control and data planes. In contrast, routed sessions use the MAC address as the session identifier in the control plane and the RADIUS server to uniquely identify the session. The session IP address is used in the data plane for data forwarding.

Supported Modes

The session distribution across SRGs can be in either of these modes:

  • Active-Active mode: Distributes SRG groups across multiple user planes to balance load and ensure service continuity.

  • Hot-Standby Mode: Uses standby user planes for quick failover, reducing downtime in case of active unit failure.

Figure 7. Active-Active mode with access IP or MPLS network

In this sample topology, two SRG groups, Group1 and Group2, are configured on both UP1 and UP2. For Group1, UP1 is the preferred active unit, while for Group2, UP2 is preferred. Ideally, Group1 should be active on UP1, and Group2 should be active on UP2. In an Active-Active mode setup, at least two SRG groups are required so that 50% of the groups are active on UP1 and the other 50% are active on UP2.

Both UPs have Bundle-Ether10 interfaces that are MPLS-enabled and are part of the same access VRF: access_vrf1. Since cnBNG is not supported on MPLS-enabled interfaces, a looped cable must be used to convert MPLS traffic into IP traffic for cnBNG-enabled access interfaces. Similarly, Bundle-Ether20 is configured on both UPs and is part of access VRF: access_vrf2.

For Group1, one port of looped-cable 1 is connected to Bundle-Ether1, and cnBNG is enabled on this interface. Note that routed subscribers are supported only on the main bundle interfaces. Bundle-Ether1 belongs to Group1, so all subscribers on Bundle-Ether1 are considered Group1 subscribers. The subscriber VRF for Group1 is sub_vrf1.

For Group2, one port of looped-cable 2 is connected to Bundle-Ether2, and cnBNG is enabled on this interface. Bundle-Ether2 is part of Group2, meaning all subscribers on Bundle-Ether2 are Group2 subscribers. The subscriber VRF for Group2 is also sub_vrf1.


Note


The SRG groups can share the same subscriber VRF or have different ones. There are no restrictions on subscriber VRF configuration, but each SRG group must have a unique access VRF.


Traffic Flow:

  • Upstream for Group1: Traffic flows from CPE to the core network via OLTx, R3, R1, Bundle-Ether10, looped-cable 1, and Bundle-Ether1.

  • Downstream for Group1: Traffic returns from the core network to CPE via Bundle-Ether1, looped-cable 1, Bundle-Ether10, R1, R3, OLTx.

  • Upstream for Group2: Traffic flows from CPE to the core network via OLTx, R4, R2, Bundle-Ether20, looped-cable 2, and Bundle-Ether2.

  • Downstream for Group2: Traffic returns from the core network to CPE via Bundle-Ether2, looped-cable 2, Bundle-Ether20, R2, R4, OLTx.

State-Control-Route: This is an aggregate route for each group, requiring configuration on both UPs. Each SRG group can have multiple state-control-routes, with a next hop specified for each. Once a group is created on the UP, these routes are sent from the Control Plane to the UP, where they are installed into the Routing Information Base (RIB). A route policy on the UP must advertise these routes to the core network to receive downstream traffic. The next hop in the state-control-route directs outgoing traffic from the subscriber interface to the access VRF.

Publish Gateway for upstream traffic from CPE

To effectively manage upstream traffic from Customer Premises Equipment (CPE), the IP address of the BNG access interface must be advertised to the IP/MPLS access network. This allows the network to route traffic originating from CPEs.

  • For Group1: When Group1 is active in UP1, the IP address of the access interface on Bundle-Ether1 needs to be advertised to Router R3. This is done via the path: looped cable1 -> Bundle-Ether10 -> R1. The advertisement from UP1 should have higher metrics compared to UP2 to indicate that UP1 is the preferred route for Group1 traffic.

  • For Group2: When Group2 is active in UP2, the IP address of the access interface on Bundle-Ether2 should be advertised to Router R4. This follows the path: looped cable2 -> Bundle-Ether20 -> R2. The advertisement from UP2 should have higher metrics compared to UP1 to make UP2 the preferred path for Group2 traffic.

DHCPv6 Relay Chaining

The DHCPv6 Relay Chaining feature is designed to manage DHCP packets relayed over multiple hops within a network, specifically intended for routed subscribers using DHCP as the First Sign of Life (FSOL).

Relay message processing in DHCPv6 networks

In the case of DHCPv6, each relay hop adds a Relay Forward message as the packet moves forward and removes a Relay Reply header on the return path. For example, if there are two relays between the end subscriber and the Broadband Network Gateway (BNG), the cnBNG control plane's DHCP server will encounter two Relay Forward headers. Typically, the first relay is a Light Weight Relay Agent (LDRA), and the second is an L3 relay agent. Consequently, when cnBNG functions as a DHCPv6 server, incoming packets will contain multiple relay forward headers, and the response packets must include corresponding Relay Reply headers based on these incoming headers.

Packet forwarding and address allocation in multi-hop relay environments

The Optical Line Terminal (OLT), acting as the LDRA, inserts a hop zero relay-forward header with a DHCPv6 circuit-id (interface-id) and remote-id, then sends it to the access router (R3). R3 is configured as a DHCPv6 L3 relay, using the cnBNG UP access interface IP as the helper address. R3 adds its own relay-header with its remote-id and circuit-id before forwarding the packet to cnBNG-UP. If the UP access interface is set as CNBNG routed, the multihop relay forward message is sent to the control plane as a routed DHCP packet of the GPTU type. In the DHCP pod, the hop zero circuit-id/interface-id is used by the cnBNG control plane for address chunk allocation.

Prefix route management and relay binding in multihop DHCPv6 setups

In a multihop relay setup, the L3 relay agent must install a prefix route (IAPD) for routing IAPD traffic. This route is typically installed when the Relay-Reply packet from the BNG confirms prefix allocation by parsing the IA prefix option. The relay agent also maintains a binding for this route, which is removed when a Relay Forward Release packet is received from the LDRA. By default, relay binding and route installation are enabled for IAPD (prefix) and can be configured for IANA if needed. Manual clearing of the relay binding is required for session termination triggers other than a CPE DHCPv6 Release, such as an admin clear on the BNG or a POD from RADIUS.

Address Chunk or Range Allocation

For Layer 2 connected subscribers, the BNG acts as the gateway, and address chunk allocation is based on the access interface or UPF, depending on whether the deployment is SRG or non-SRG. However, in routed scenarios, the gateway IP for subscribers is located at the first L3 hop, such as the Cell Site Switch (CSS) or R3. Therefore, address chunks should be allocated per CSS to ensure subscriber traffic is routable. The first IP in the chunk should be configured on the subscriber-facing interface of the CSS, serving as the gateway for subscribers. For IPv6, the source address of the DHCPv6 response packet, which may be a link-local address, acts as the gateway.

To allocate subnets per CSS (R3), each CSS must be identifiable by a unique identifier shared among its subscribers. In the cnBNG control plane, the identifiers for chunk allocation (DP/Dataplane keys) are:

  • UPF Name for non-SRG L2 deployments

  • SRG peer-id for SRG L2 deployments

  • DHCP option based method, for example, circuit-id .

    The following is a sample configuration for the DHCP option based method:

    profile dhcp DHCP_1
    ipv6
     server
      iana-pool-name iana_1
      ipam-dp-key circuit-id delimiter # substring 0
      exit
     exit
    exit
    

    In this context, the ipam-dp-key is specified as the circuit-id. This means the circuit-id, which is the DHCPv6 option 18 interface-id of the hop zero relay forward header, is used to determine the data plane identifier. There is an option to use the entire interface-id or a portion of it as the DP-key. You can extract a substring of the interface-id by using a delimiter to split the string.

    When configured, DHCP uses the circuit-id as the dp-key information during IP allocation, release, or validation processes. The DHCP pod also sends an indicator to the node manager or IPAM during these processes to help IPAM identify IP interactions related to routed sessions. In routed sessions, aggregate route management is handled at the group level, so during chunk allocation, IPAM does not configure subnet or summary routes to the UP.

Pre-Allocation of Gateway IP and Address Chunks

For detailed information about this feature, see Pre-Allocation of Gateway IP and Address Chunks.

Disabling L3 Routed Subscriber Sessions with SRG

The L3 Routed Subscriber Sessions with SRG feature functions only when BNG is enabled on the access interface in both cnBNG UP and CP. To disable the feature, remove the BNG enablement configuration from the respective access interface. Similarly, to disable SRG, configure disable in the respective SRG group's configuration in the cnBNG CP.

Restrictions for L3 Routed Subscriber Sessions with SRG

These restrictions apply to the L3 Routed Subscriber Sessions with SRG feature:

  • Only IPv6 AFI is supported.

  • Only dynamic IP allocation is supported.

  • The ipam-address-chunk action command is supported only for SRG deployment.

  • There is no impact on groups onboarded before SRG is disabled.

  • Ensure to follow the MOP to remove all address pre-allocations using ipam-address-chunk release command before deleting an SRG group.

  • The control plane does not restrict using the same ipam-dp-key for different pools or pool-group-tags. So, make sure to maintain uniqueness across pools.

  • When associating multiple pools with a profile using a pool-group-tag, ensure that the same tag is used for the ipam-address-chunk allocate command. The ipam-address-chunk release command will release chunks across all pools associated with this tag.

  • The control plane does not restrict using the same ipam-dp-key for different SRG groups. So, make sure to maintain uniqueness across SRG groups.

  • The control plane does not restrict the use of ipam-address-chunk release command even when the IP is currently in use. Performing this action can cause inconsistencies within the system.

  • Make sure that routed and state-control-route configurations on both user-planes are aligned. Otherwise, the system's behavior may become unpredictable.

  • The control plane does not reject conflicting state-control-routes.

  • Marking an address-range or pool offline without freeing address-chunks (via ipam-address-chunk release ) is not supported.

Configure L3 Routed Subscriber Sessions with SRG

To configure L3 Routed Subscriber Sessions with SRG, use the following sample configuration:

Procedure


Step 1

Define SRG groups, assign access interfaces, and configure state-control-routes to manage traffic routing within SRG groups.

Example:

config 
   user-plane instance instance_id 
      user-plane user_plane_name 
         peer-address ipv4 ipv4_address 
         subscriber-profile subs-ipoe 
         subscriber-redundancy 
            group group_name 
               peer-identifier peer_id 
               l3-routed 
               port-id-map port-name port_name port_number 
               state-control-route route_name afi ipv6 aggregate_route vrf vrf_name 
               exit 

Note


Each SRG group can support multiple state-control-routes, and these must be configured on both UPs.

The following is a sample configuration:

user-plane
instance 1
 user-plane asr9k-1
  peer-address ipv4 10.6.1.1
  subscriber-profile subs-routedipoe-1
  subscriber-redundancy
   group Group1
    peer-identifier Peer1
    l3-routed
    port-id-map port-name Bundle-Ether5 1
    state-control-route r1 ipv6 2002:ab::/48 vrf FTTX_SUB 
    state-control-route r2 ipv6 2001:DB8::/112 vrf FTTX_SUB 
   exit
  exit
 exit
 user-plane asr9k-2 
  peer-address ipv4 10.6.1.2
  subscriber-profile subs-routedipoe-1
  subscriber-redundancy
   group Group1
    peer-identifier Peer1
    l3-routed
    port-id-map port-name Bundle-Ether5 1
    state-control-route r1 ipv6 2002:ab::/48 vrf FTTX_SUB 
    state-control-route r2 ipv6 2001:DB8::/112 vrf FTTX_SUB 
   exit
  exit
 exit

NOTES:

  • subscriber-redundancy : Configures subscriber geo-redundancy. All SRG groups are configured in this mode.

  • group group_name : Specifies the name of the subscriber redundancy group that is unique to a user plane.

  • peer-identifier peer_id : Identifies the peer user-plane for the group. This identifier must be unique across all groups in the control plane. The same peer-identifier must be configured on the peer user-plane.

  • port-id-map port-name port_name port_number : Specifies the mapping of access interfaces between user planes. At least one port-map-id must be configured.

  • preferred-role-active : This is an optional configuration.

    Sets the preferred role active for user plane. Default value: false.

  • state-control-route route_name afi ipv6 aggregate_route vrf vrf_name : Programs the route to the UP for a specific routed SRG group based on the active or standby state of the UP.

Step 2

Configure IP pools for SRG groups. One IP pool must be configured per SRG group.

Example:


config 
   ipam 
     instance instance_id
      address-pool pool_name 
         ipv6 
            address-range start_ipv6_address end_ipv6_address 
            exit  

The following is a sample configuration:


ipam
instance 1
  source local
  address-pool dhcp-ipv6-iana
   vrf-name FTTX_SUB
   ipv6
    address-ranges
     split-size
      per-cache 32768
      per-dp 16384
     exit
     address-range 2001:DB8:: 2001:DB8:3::fff 
     exit
    exit
   exit
   address-pool dhcp-ipv6-iapd
    vrf-name FTTX_SUB
    ipv6
     prefix-ranges
      split-size
       per-cache 32768
       per-dp 16384 
      exit
      prefix-range 2002:ab:: length 48 
     exit
    exit
   exit
  exit
 exit

Step 3

Configure the state control route nexthop and access control route on both UPs. For configuration details, see Configure SRG section in the cnBNG User Plane Configuration guide.

The following is a sample configuration:


cnbng-nal location 0/RSP0/CPU0
subscriber-redundancy
 group Group1
  access-tracking track1
  access-control-route ipv6 ::/0 vrf vrf_1 next-hop-address 2001:dB8:4:0:4:4:1:3 active-tag 10 standby-tag 20
  access-interface-list
   interface Bundle-Ether5
   exit
  state-control-next-hop-ip ipv6 2001:dB8:4:0:4:4:1:1 
  exit
 exit
exit

NOTES:

  • access-control-route ipv6 ipv6_address vrf vrf_name next-hop-address next_hop_address active-tag value standby-tag value : Configures the access control route (IPv6) in the hub VRF as access interface IP.

  • state-control-next-hop-ip ipv6 ipv6_address : Configures the specified IPv6 address as the next-hop IP for the state-control route, designating it as the hub VRF IP.

Step 4

Configure the IPAM data plane key.

Example:

profile dhcp dhcp_profile_name
 ipv6
  server
   iana-pool-name ipam_pool_name
   ipam-dp-key circuit-id delimiter value substring value
   end
  end
 end
 

The ipam-dp-key configuration in the DHCP profile specifies how to create the DP key.

The following is a sample configuration:

profile dhcp server-1
 ipv6
  server
   iana-pool-name dhcp-ipv6-iana
   iapd-pool-name dhcp-ipv6-iapd
   dns-servers [ 2001::5 ]
   ipam-dp-key circuit-id delimiter # substring 0 
   domain-name cisco.com
   lease days 1
   lease hours 1
   lease minutes 1
  exit
 exit
exit

NOTES:

  • profile dhcp dhcp_profile_name : Specifies the DHCP profile name.

  • ipv6 : Enters IPv6 configuration mode.

  • server : Specifies the IPv6 server details.

  • iana-pool-name: Specifies the Internet Assigned Numbers Authority (IANA) pool name.

  • ipam-dp-key circuit-id value delimitervalue substring value : Specifies the data plane key for IP management.

    • circuit-id value: The DHCPv6 interface-id found in the hop zero relay header will be used as the key for IPAM in the data plane.

    • delimiter value: The delimiter value must be a single character and can be one of the following: [!@#$%^&*()_+].

    • Substring value: This option can only be set to 0 or 1. It allows the string to be split into two substrings based on the first occurrence of the specified delimiter.

Step 5

Use the ipam-address-chunk action command to configure the pre-allocation of gateway IP and address chunks. For configuration details, see Configure Pre-Allocation of Gateway IP and Address Chunks.

The output of this action command provides information about the chunk and the first IP address that were reserved. For example,

bng# ipam-address-chunk allocate instance-id 1 pool-name dhcp-ipv6-iana ipv6-prefix ipam-dp-key INGJRJKTMDHRTW6001ENBESR001 srg-peer-id Peer1

Sat Aug  24 06:27:29.200 UTC+00:00
result
Gateway Address: 2001:DB8::1/112
bng# ipam-address-chunk allocate instance-id 1 pool-name dhcp-ipv6-iapd ipv6-prefix ipam-dp-key INGJRJKTMDHRTW6001ENBESR001 srg-peer-id Peer1

Sat Aug  24 06:27:29.200 UTC+00:00
result
Gateway Address: 2002:ab::1/48

Step 6

Use the show ipam { dp | dp-tag } value { ipv6-addr | ipv6-prefix | ipv4-addr } command to view the reserved IP address and the summary route of the allocated chunks.

Example:

bng# show ipam dp INGJRJKTMDHRTW600TB2DEVICE11101 ipv6-addr 

=========================================================================================================================================================
Flag  Indication: S(Static) O(Offline) R(For Remote Instance) RF(Route Sync Failed) F(Fixed Chunk for DP)
Other Indication: A+(Waiting for route update response) QT*(Quarantined due to route delete failure)
                  QT+(Waiting for route update response post timeout)
G:N/P Indication: G(Cluster InstId) N(Native NM InstId) P(Peer NM InstId)
========================================================================================================================================================
StartAddress          EndAddress        Route               GatewayAddress        G:N/P    Utilization   Flag      AllocContext 
========================================================================================================================================================
2001:DB8::8000        2001:DB8::bfff   2001:DB8::8000/114    2001:DB8::1/112    1:1/-1   0.01%         F         dhcp-ipv6-iana-11(FTTX_SUB)
========================================================================================================================================================

The flag value F signifies that it is a fixed chunk for the DP, assigned when the ipam-address-chunk allocate command is executed.

Step 7

Configure the gateway address on the access side router.

The following is a sample configuration:


interface TenGigE0/0/0/13.100
 vrf vrf1
 ipv6 nd other-config-flag
 ipv6 nd managed-config-flag
 ipv6 address 2001:DB8::1/112
 ipv6 address 2002:ab::1/48
 ipv6 enable
exit
 encapsulation dot1q 100
exit

In this example, the IPv6 addresses, 2001:DB8::1/112 , and 2002:ab::1/48 are configured as gateway addresses on the access side router.

Step 8

Use the show subscriber session filter command to verify the routed session details.

Example:

bng# show subscriber session filter { mac aa11.0000.0001 } detail       

Thu Jul  11 16:37:30.579 UTC+00:00
subscriber-details 
{
  "subResponses": [
    {
      "subLabel": "16777228",
      "srgPeerId": "Peer1",
      "srgId": "Group1",
      "mac": "aa11.0000.0001",
      "acct-sess-id": "Local_DC_16777228",
      "sesstype": "ipoeRouted",
      "state": "established",
      "subCreateTime": "Thu, 11 Jul 2024 15:59:49 UTC",
      "dhcpAuditId": 2,
      "transId": "1",
<snip>

Step 9

You can also filter sessions based on the session type. Use the show subscriber session filter sesstype ipoeRouted command to filter routed subscriber sessions.

Step 10

Use the show subscriber session filter ipam-dp-key command to filter sessions based on ipam-dp-key.

Step 11

Use the show subscriber dhcp filter ipam-dp-key command to filter sessions based on ipam-dp-key in DHCP profile.


Session Synchronization between UPs

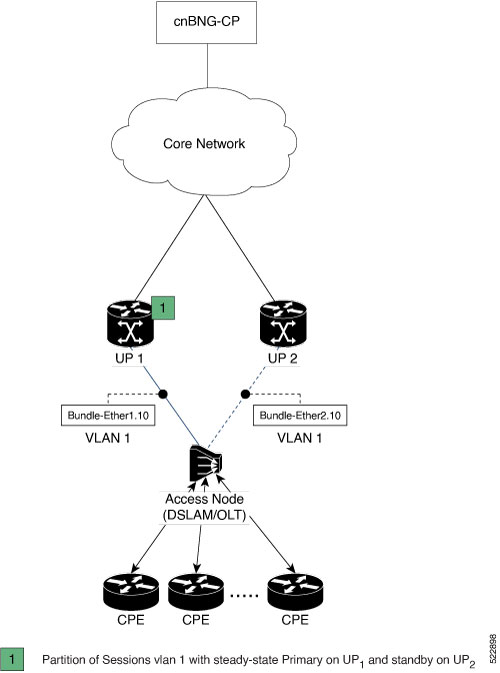
This section describes different scenarios where the subscriber needs to be synchronized to a UP manually.

Scenario 1

One UP in a Subscriber Redundancy group is active, and a session is created. Now, another UP in the same SRG is connected for the first time. All the groups in the second UP become standby. To synchronize the sessions with the second (standby) UP, use the following CLI command:

bng# subscriber redundancy session-synchronize add domain [ domain_ID ] target-upf upf_ID 

You can also use the following CLI command, if there are only two UPs involved (as in Scenario 1):

bng# subscriber redundancy session-synchronize add upf-id [ upf_ID ] target-upf upf_ID 

Example-1:

subscriber redundancy session-synchronize add domain [ Domain12 ] target-upf Upf2

The above CLI command synchronizes all the subscribers from active UP, which are part of Domain12 , to the target UP (Upf2 ).

Or,

subscriber redundancy session-synchronize add upf-id [ Upf1 ] target-upf Upf2

The above CLI command synchronizes all the subscribers from Upf1 to Upf2 .

Example-2:

The following is a sample configuration if two UPs are active, and a third UP is connected later.

subscriber redundancy session-synchronize add domain [ Domain12 Domain13 ] target-upf Upf1

The above CLI command synchronizes all the subscribers from the active UPs, which are part of Domain12 , and Domain13 to the target UP (Upf1 ).

Scenario 2

Initially, a Subscriber Redundancy group is configured on only one UP, and a session is created. Later, the second UP is configured with SRG. Now, to synchronize the session with the second UP in the group, use the following CLI command:

bng# subscriber redundancy session-synchronize add peer-id [ peer_ID ]  target-upf upf_ID 

Example:

subscriber redundancy session-synchronize add peer-id [ Peer1 ] target-upf Upf2

The above CLI command synchronizes subscribers that are part of a group with peer-id Peer1 to target UP (Upf2 ).

Scenario 3

A group is removed from an UP. To remove sessions in the group, use the following CLI command:

bng# subscriber redundancy session-synchronize delete peer-id [ peer_ID ]  target-upf upf_ID 

Example:

subscriber redundancy session-synchronize delete peer-id [ Peer1 ] target-upf Upf2

The above CLI command removes subscribers from target UP (Upf2 ) that are part of the SRG group with peer-id peer1 .

Scenario 4

All groups are removed from an UP. To remove all sessions in an UP, use the following CLI command:

bng# subscriber redundancy session-synchronize delete domain [ domain_list ]  target-upf upf_ID 

Example:

subscriber redundancy session-synchronize delete domain [ domain12 domain13 ] target-upf Upf3

The above CLI command deletes all the subscribers that are part of the domains domain12 , and domain13 from the target UP (Upf3).

Or,

subscriber redundancy session-synchronize delete upf-id [ Upf3 ] target-upf Upf3

The above CLI command deletes all the subscribers that are related to Upf3 from the target UP (Upf3 ).


Note


You can also delete all non-SRG sessions in the UP.


Scenario 5

An UP from a group is replaced with another UP. To synchronize the sessions, use the following CLI commands:

bng# subscriber redundancy session-synchronize delete peer-id [ peer_ID ]  target-upf old_upf_id 
bng# subscriber redundancy session-synchronize add peer-id [ peer_ID ]  target-upf new_upf_id 

Example:

subscriber redundancy session-synchronize delete peer-id [ peer1 ] target-upf Upf1
subscriber redundancy session-synchronize add peer-id [ peer1 ] target-upf Upf2

The above CLI commands remove the sessions in the group with peer-id peer1 from Upf1 , and add the group to Upf2 .

Scenario 6

An UP is replaced with another UP in all the groups in a domain. To synchronize the sessions, use the following CLI commands:

bng# subscriber redundancy session-synchronize delete domain [ domain_ID ]  target-upf upf_ID 
bng# subscriber redundancy session-synchronize add domain [ domain_ID ]  target-upf upf_ID 

Example:

subscriber redundancy session-synchronize delete domain [ domain1 ] target-upf Upf1 
subscriber redundancy session-synchronize add domain [ domain1 ] target-upf Upf2 

The above CLI commands remove the sessions in the groups that are part of domain1 from Upf1 , and add the groups to Upf2 .

Scenario 7

All domain/group/peers are moved from one UP to another. Initially, to delete all subscribers from the UP, use the following CLI command:

bng# subscriber redundancy session-synchronize delete upf [ upf_ID ]  target-upf upf_ID 

Example:

subscriber redundancy session-synchronize delete upf [ Upf1 ] target-upf Upf1

The above CLI command removes all the sessions from Upf1 .

Configure the second UP with the configurations deleted from the first UP. Then, to synchronize the sessions, use the following CLI command:

bng# subscriber redundancy session-synchronize add domain [ domain_list ] target-upf upf_ID 

Example:

subscriber redundancy session-synchronize add domain [ domain1...domainN ] target-upf Upf2

The above CLI command synchronizes all the sessions that are in the list of given domains to the new UP (Upf2).

Route Synchronization between CP and UP

Use the following CLI command to synchronize the routes between the Control Plane and the User Plane.

subscriber route-synchronize upf upf_name 

To check the status of route synchronization, use the following CLI command:

subscriber route-synchronize upf upf-name status 

Order of Reconciliation

It is recommended to perform the reconciliation activity in the following order:

  1. Group reconciliation

  2. Route reconciliation

  3. CP reconciliation (CP-Audit)

  4. CP-UP reconciliation

Monitoring Support

This section describes the monitoring support information for the UP Geo Redundancy feature.

Use the following show and clear commands for troubleshooting. The output of these commands provides specific configuration and status information.

clear subscriber sessmgr

Use this command to clear subscribers.

clear subscriber sessmgr [ gr-instance gr_instance_id | srg-peer-id srg_peer_id | upf upf_name ] 

NOTES:

  • clear subscriber sessmgr srg-peer-id srg_peer_id : Clears subscribers in CP and both UPs.

  • clear subscriber sessmgr upf upf_name srg-group-id srg_group_id : If the group is active, this command clears sessions in CP and both UPs. If the group is standby, this command clears sessions in the standby UP.

clear subscriber pppoe

Use this command to clear PPPoE subscriber sessions.

clear subscriber pppoe { srg-peer-id  srg_peer_id  | upf upf_name } 

NOTES:

  • clear subscriber pppoe srg-peer-id srg_peer_id : Clears PPPoE sessions based on the SRG peer ID.

  • clear subscriber pppoe upf upf_name : Clears PPPoE sessions based on the UPF name.

show subscriber redundancy

Use this command to display the key values of SRG groups.

show subscriber redundancy [ count | debug | detail | gr-instance gr_instance_id | srg-peer-id srg_peer_id | upf upf_name ] 

NOTES:

  • show subscriber redundancy count : Displays the count of SRG groups.

  • show subscriber redundancy detail : Displays the detailed content of SRG groups.

  • show subscriber redundancy upf upf_name : Displays all the groups related to UPF.

  • show subscriber redundancy peer-id peer_id debug : Displays the detailed output with event history.

The following is a sample output of the show subscriber redundancy detail command:

bng# show subscriber redundancy detail 
Fri Apr  29 14:48:36.840 UTC+00:00
subscriber-details
{
  "subResponses": [
    {
      "PeerID": "Peer15993-x",
      "GroupID": "Group-5-3-15993-x",
      "UP List": {
        "asr9k-3": {
          "N4 State": "Connected",
          "Srg State": "Up",
          "RoleChangeInProgress": true,
          "Srg Role": "Active",
          "Interface map": {
            "GigabitEthernet11636": 1,
            "GigabitEthernet11637": 2
          }
        },
        "asr9k-5": {
          "N4 State": "Disconnected",
          "Srg State": "Init",
          "Srg Role": "Standby",
          "Interface map": {
            "GigabitEthernet58174": 1,
            "GigabitEthernet58175": 2
          }
        }
      }
    }
  ]
}

show subscriber redundancy-sync

Use this command to display the subscriber reconciliation details.

show subscriber redundancy-sync [ gr-instance gr_instance_id | srg-peer-id srg_peer_id | upf upf_name ] 

NOTES:

  • gr-instance gr_instance_id : Displays the reconciliation details for the specified GR instance.

  • srg-peer-id srg_peer_id : Displays the reconciliation details for the specified SRG peer ID.

  • upf upf_name : Displays the reconciliation details for the specified UPF.

The following is a sample output of the show subscriber redundancy-sync upf upf_name command:

bng#  show subscriber redundancy-sync upf asr9k-1
Tue Apr  5  17:31:15.659 UTC+00:00
subscriber-details
{
  "Upf": "asr9k-1",
  "State": "Completed",
  "Status": "Passed",
  "Total Number of Groups": 2914,
  "Number of enabled Groups": 2914,
  "Maximum Duration": 180,
  "Started": "2022-04-05 17:31:30 +0000 UTC",
  "Ended": "2022-04-05 17:31:33 +0000 UTC",
  "Time Taken": "3 Seconds"
}

show subscriber dhcp

Use this command to display the DHCP CDL record keys per session.

show subscriber dhcp [ count | detail | filter filter_value | gr-instance instance_id | sublabel sublabel_name ] 

NOTES:

  • show subscriber dhcp detail : Displays the session details from DHCP CDL record.

The following is a sample output of the show subscriber dhcp command:

bng# show subscriber dhcp
Mon Mar  14 09:12:59.135 UTC+00:00
subscriber-details 
{
  "subResponses": [
    {
      "records": [
        {
          "cdl-keys": [
            "aa11.0000.0001:m:100:v1:200:v2:1:p:Peer1:r@dhcp",
            "sublabel:33554433@dhcp",
            "type:dhcp",
            "mac:aa11.0000.0001",
            "srg-peer-id:Peer1",
            "upf:asr9k-2",
            "upf:asr9k-1",
            "port-id:asr9k-1/GigabitEthernet0/0/0/1",
            "port-id:asr9k-2/GigabitEthernet0/0/0/3",
            "vrf:ISP",
            "ipv4-addr:pool-ISP/11.0.96.2",
            "ipv4-pool:pool-ISP",
            "ipv4-range:pool-ISP/11.0.0.1",
            "ipv4-startrange:pool-ISP/11.0.96.0",
            "ipv4-state:bound",
            "ipv6-addr-startrange:pool-ISP/1:2::2000",
            "ipv6-addr:pool-ISP/1:2::2000",
            "ipv6-addr-pool:pool-ISP",
            "ipv6-addr-range:pool-ISP/1:2::1",
            "ipv6-addr-state:bound",
            "afi:dual"
          ]
        }
      ]
    }
  ]
}

show subscriber pppoe

Use this command to display information about PPPoE subscribers.

show subscriber pppoe [ detail | filter { srg-peer-id  srg_peer_id  } ] 

NOTES:

  • show subscriber pppoe detail : Displays detailed information about PPPoE subscriber sessions on a router.

  • show subscriber pppoe filter { srg-peer-id srg_peer_id } : Filters PPPoE sessions based on the SRG peer ID.

Examples

The following is a sample output of the show subscriber pppoe detail command:

bng# show subscriber pppoe detail 

Fri Jun  14 12:44:52.471 UTC+00:00
subscriber-details 
{
  "subResponses": [
    {
      "state": "complete",
      "key": {
        "routerID": "asr9k-1",
        "portID": "GigabitEthernet0/0/0/1",
        "outerVlan": 100,
        "innerVlan": 200,
        "macAddr": "cc11.0000.0001",
        "pppoesessionID": 32771,
        "sublabel": "33554435",
        "upSubID": "4",
        "SrgPeerID": "Peer1",
        "SrgGroupID": "Group1",
        "SrgIntfID": "1"
      },
      "flags": [
        "SM_START_DONE",
        "SM_ACTIVATE_DONE",
        "SM_UPDATE_DONE",
        "PPPOE_UP_DONE",
        "IPCP_UP",
        "IPV6CP_UP"
      ],
      "pppoeInfo": {
        "profileName": "abc",
        "mtu": 1500
      },
      "lcpInfo": {
        "state": "opened",
        "keepAliveInterval": 60,
        "keepAliveRetries": 5,
        "localMru": 1500,
        "peerMru": 1500,
        "localMagic": "0xc23c756",
        "peerMagic": "0x112233",
        "authOption": "PAP",
        "authCompleted": true,
        "username": "cnbng"
      },
      "ipcpInfo": {
        "state": "opened",
        "peerIpv4Pool": "pool-ISP",
        "peerIpv4Address": "11.0.32.2",
        "peerIpv4Netmask": 22,
        "localIpv4Address": "11.0.32.1",
        "isIpamPoolIPaddr": true
      },
      "ipv6cpInfo": {
        "state": "opened",
        "localIntfID": "0x1",
        "peerIntfID": "0xcc11000000010000"
      },
      "sessionType": "pta",
      "vrf": "default",
      "AuditId": 4,
      "slaacInfo": {
        "prefix": "3001:ab::",
        "prefixlength": 64,
        "poolname": "slaac-pool",
        "fsmstate": "connected",
        "profilename": "profile1",
        "otherconfig": true
      }
    }
  ]
}

show subscriber session

Use this command to display the session manager (SM) CDL record keys per session.

show subscriber session [ detail | filter { smupstate { upf_name/smUpSessionCreated } } ] 

NOTES:

  • show subscriber session detail : Displays the session details from SM CDL record.

  • show subscriber session filter { smupstate { upf_name/smUpSessionCreated } } : Use this command to check whether the session is created in the respective UPF for the SRG sessions.

    The session count for both UPFs show up in both SM and DHCP CDL records after SRG is created successfully in the respective UPFs.

The following is a sample output of the show subscriber session command:

bng# show subscriber session
Mon Mar  14 09:12:52.653 UTC+00:00
subscriber-details 
{
  "subResponses": [
    {
      "records": [
        {
          "cdl-keys": [
            "33554433@sm",
            "acct-sess-id:Local_DC_33554433@sm",
            "upf:asr9k-1",
            "port-id:asr9k-1/GigabitEthernet0/0/0/1",
            "feat-template:svc1",
            "feat-template:automation-feature-template-accounting",
            "type:sessmgr",
            "mac:aa11.0000.0001",
            "sesstype:ipoe",
            "sesstype:ipoeRouted"
            "srg-peer-id:Peer1",
            "smupstate:smUpSessionCreated",
            "up-subs-id:asr9k-1/1",
            "smupstate:asr9k-1/smUpSessionCreated",
            "srg-group-id:asr9k-1/Group1",
            "upf:asr9k-2",
            "port-id:asr9k-2/GigabitEthernet0/0/0/3",
            "srg-group-id:asr9k-2/Group1",
            "smstate:established",
            "up-subs-id:asr9k-2/1",
            "smupstate:asr9k-2/smUpSessionCreated",
            "afi:dual"
          ]
        }
      ]
    }
  ]
}

show subscriber synchronize

The subscriber session-synchronize [ srg-peer-id peer_id | upf upf_name ] command is used to synchronize subscriber information on the UP.

To view the status of subscriber information synchronization, use the following CLI command:

show subscriber synchronize [ srg-peer-id peer_id | upf upf_name ] 

The following is a sample output of the show subscriber synchronize command:

bng# show subscriber synchronize srg-peer-id Peer108-x
Tue Apr  5  06:31:51.167 UTC+00:00
subscriber-details
{
  "asr9k-11": {
    "upf": "asr9k-11",
    "sync status": "sync start in progress",
    "sync state": "Start",
    "sync startTIme": "05 Apr 22 06:31 UTC",
    "sync srgGroupId": "Group-11-8-108-x"
  },
  "asr9k-8": {
    "upf": "asr9k-8",
    "sync status": "sync start in progress",
    "sync state": "Start",
    "sync startTIme": "05 Apr 22 06:31 UTC",
    "sync srgGroupId": "Group-11-8-108-x"
  }
}

show ipam dp

Use this command to view the list of UPFs to which the corresponding routes (both static and dynamic) are pushed.

  • show ipam dp peerid { ipv4-address | ipv6-address | ipv6-prefix } 

NOTES:

  • show ipam dp peerid ipv4-address : Displays the UPFs of IPv4 address type

  • show ipam dp peerid ipv6-address : Displays the UPFs of IPv6 address type

  • show ipam dp peerid ipv6-prefix : Displays the UPFs of IPv6 prefix type

The following is a sample output of the show ipam dp peerid ipv4-address :

bng# show ipam dp peer-asr9k2 ipv4-addr
Wed Mar  30 12:43:09.313 UTC+00:00
 
======================================================================================================
Flag  Indication: S(Static) O(Offline) R(For Remote Instance) RF(Route Sync Failed)
G:N/P Indication: G(Cluster InstId) N(Native NM InstId) P(Peer NM InstId)
======================================================================================================
StartAddress          EndAddress      Route            G:N/P    Utilization   Flag      AllocContext
======================================================================================================
7.67.133.0            7.67.133.255    7.67.133.0/24    1:N/A                  S         srg-9k-static2(default)(asr9k-11,asr9k-12)
7.67.134.0            7.67.134.255    7.67.134.0/24    1:N/A                  S         srg-9k-static2(default)(asr9k-11,asr9k-12)
7.67.135.0            7.67.135.255    7.67.135.0/24    1:N/A                  S         srg-9k-static2(default)(asr9k-11,asr9k-12)
7.67.136.0            7.67.136.255    7.67.136.0/24    1:N/A                  S         srg-9k-static2(default)(asr9k-11,asr9k-12)
7.67.137.0            7.67.137.255    7.67.137.0/24    1:N/A                  S         srg-9k-static2(default)(asr9k-11,asr9k-12)
7.67.138.0            7.67.138.255    7.67.138.0/24    1:N/A                  S         srg-9k-static2(default)(asr9k-11,asr9k-12)
7.67.139.0            7.67.139.255    7.67.139.0/24    1:N/A                  S         srg-9k-static2(default)(asr9k-11,asr9k-12)
7.67.140.0            7.67.140.255    7.67.140.0/24    1:N/A                  S         srg-9k-static2(default)(asr9k-11,asr9k-12)
7.67.141.0            7.67.141.255    7.67.141.0/24    1:N/A                  S         srg-9k-static2(default)(asr9k-11,asr9k-12)
7.67.142.0            7.67.142.255    7.67.142.0/24    1:N/A                  S         srg-9k-static2(default)(asr9k-11,asr9k-12)
33.0.0.0              33.0.7.255      33.0.0.0/21      1:0/-1   0.20%                   automation-poolv4(default)(asr9k-11,asr9k-12)
======================================================================================================