Guest Operating System (Guest OS) Installation and Configuration

This chapter details Guest Operating System (Guest OS) installation for the Cisco IR800.

Guest Operating System Overview

The IR800 supports a Hypervisor architecture to support user-specified operating systems within an independent Virtual Machine (VM).

When you install the IR800 IOS software bundle (image) on the router, the image automatically installs the supported Guest OS (Cisco IOS and Linux OS) instance(s). You can use the Linux Guest OS running on a VM on the IR800 to run applications.

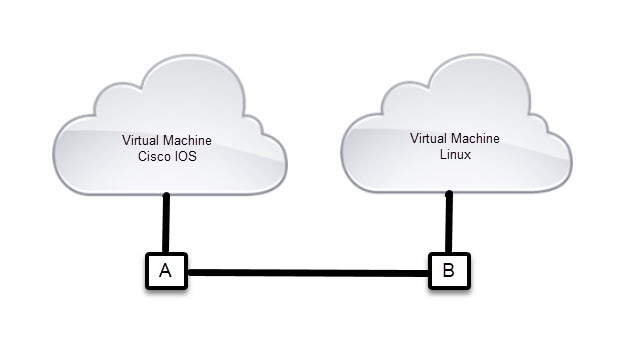
The following example shows connectivity of Guest OS and Cisco IOS. A virtual interface managed by Cisco IOS provides network connectivity to Guest OS. Cisco IOS forwards traffic from Guest OS through regular IP forwarding mechanisms.

Figure 1. Connectivity Between Cisco IOS and Guest OS

In this example, A is the interface being used on the router and B is the interface on the Linux OS.

For the Cisco IR809, A is Gigabit Ethernet 2 and B is Eth 0.

For the Cisco IR829, A is Gigabit Ethernet 5 and B is Eth 0

Additionally, the Virtual Machine Linux has a virtual console, and two virtual serial ports.

Prerequisites

Router must be running Cisco IOS 15.6(2)T or higher.


Note

The IOXVM image delivered in the IOS bundle may not be the most recent. Check Cisco.com for the latest version.

Guidelines and Limitations


Note

Per CDET CSCvh65331, running excessive traffic from an external host to the Guest OS on the IR800 can cause a system hang. Removing the traffic will recover the console access. Apply qos policies to rate-limit traffic to ensure IOS CPU <65%.
  • The bundled Guest OS delivered with the latest IOS version, and is based on Yocto Linux Project Reference Distro, with basic services enabled:

    • IPv4/IPv6

    • DHCP

    • NTP

    • AAA (Radius)

    • Python

    • Basic debugging tools (tcpdump, top, etc)

    • bash

  • Serial relay for Guest OS control of the Serial Interface

    • Async 0 and Async 1 respectively reserve line 1/5 and 1/6 to relay serial data to the corresponding Guest OS /dev/ttyS1 and /dev/ttyS2


Note

Prior to 15.6(3)M, Serial Interface parameters needed to be set through IOS. 15.6(3)M allows setting the parameters directly from the Guest OS, through standard Linux commands.
  • You must configure Cisco IOS to provide Guest OS connectivity.


Note

There is an IOXVM image more recent than IOS bundle, (IOXVM 1.0.4) available on Cisco.com

Default Settings

The bundled Linux Guest OS:

  • Uses DHCP to acquire the IPv4 address.

  • Does not have a default root password.

  • Uses IPv6 stateless auto-configuration to get an IPv6 address.


Note

Without an IPv6 address set on both GXX and ETH0, the Guest OS will never get displayed as registered under show iox host list detail. GXX is defined as GI5 on the IR829 and GI2 on the IR809.

Installation and Upgrade

By default, IR800s ship with a software bundle that includes the latest versions of all of the required images such as Cisco IOS, Guest OS, and Hypervisor.


Note

Before performing a bundle installation, shutdown the Guest OS. Performing a bundle installation on a device with an active Guest OS may result in it not functioning upon reboot.

Use the following procedure to upgrade your router to the latest software bundle. It can take several minutes for the router to upgrade and install all of the images (Hypervisor, Cisco IOS, and Guest OS).

DETAILED STEPS

Procedure


Step 1

Copy the bundle image to the IR800 IOS flash partition using scp or sftp.

Example bundle name: ir800-universalk9-bundle.SPA.< VERSION>

Step 2

Enter the following commands at the IR800 prompt:

Command

Purpose

bundle install flash: <bundle name>.CG

Installs the specified bundle.

copy running-config startup-config

Saves the current running configuration.

reload

Reloads the router.


Improvements in IOS and Guest-OS Clock Time Synchronization

In Cisco IOS releases prior to 15.8(3)M, the Guest-OS clock would synchronize with the IOS clock every 30 seconds. Now with IOS 15.8(3)M and beyond, the synchronize time is 1 second. No user configuration is required to initiate Guest-OS clock synchronization or to modify the clock settings.

IOS can be configured to synchronize to an external NTP server and the Guest-OS will sync with IOS. Additionally, the Guest-OS hardware clock time (hwclock) will be in sync with the Guest-OS (IOx) system time.

The following example shows the Guest-OS system clock and Guest-OS hwclock outputs taken at the same time:

IOS clock time:


IR800#show clock
08:11:18.498 UTC Mon May 7 2018

Guest-OS(IOX) system time and hardware time


IR800-GOS-1:~# date
Mon May  7 08:11:18 UTC 2018
IR800-GOS-1:~# hwclock
Mon May 7 08:11:18 2018  0.000000 seconds

Configuring Cisco IOS

This section describes how to configure the Cisco IOS VM to provide network connectivity to the Guest OS VM.

Guest OS connects to the network through a virtual Network Interface Card (VNIC) provided by the Hypervisor. Network attributes such as IP address, Default gateway, DNS server (as shown in the Configuring DHCP Pool section) on the interface are statically configured or configured for DHCP to dynamically obtain IP addresses. Guest OS network connectivity is only through Cisco IOS, using the virtual network interface provided by the Hypervisor. Network attributes such as IP address, can be configured statistically or dynamically, and are obtained from Cisco IOS using DHCP requests. The bundled Linux Guest OS is configured to use DHCP.

This section outlines the task to configure a Cisco IOS DHCP pool to provision the Linux Guest OS with an IP address, and an external Ethernet interface in Cisco IOS to allow the Guest OS network connectivity.

This section includes the following topics:

Configuring the IR800 Ethernet Interface

You must enable one of the external Ethernet interfaces on the IR800 to provide network connectivity.

Note

The QoS Input Service Policy can only be configured on the WAN interface, not on the SVI interface.

Note

The IR809 uses Gigabit Ethernet 2, and the IR829 uses Gigabit Ethernet 5.

IPv6 Gigabit Ethernet

On Guest OS, IPv6 is enabled by default. The following example configuration uses IPv6 on Guest OS, where Guest OS is automatically assigned an IPv6 address on the Cisco IOS interface GigabitEthernet 5.

Command

Purpose

ipv6 unicast-routing

Enables unicast routing.

ipv6 cef

Enables cef.

interface GigabitEthernet 5

Set the internal virtual interface that connects to the Linux Guest OS.

ipv6 address autoconfig

Sets the IPv6 address.

ipv6 enable

Enables IPv6.

Enabling IPv4 Gigabit Ethernet


Note

Configuring an IPv4 address on a Gigabit port is not a required part of configuring the Guest OS. However, IOS interfaces must be set to enable external devices to communicate with the Guest-OS through IOS.

To enable an external Gigabit Ethernet IPv4 interface on the IR800 to provide network connectivity, enter the following commands:

Command

Purpose

config terminal

Enters global configuration mode.

interface gig 0

Configures an IPv4 address on Gigabit Ethernet interface 0, and enters interface configuration mode.

ip address 10.1.2.1 255.255.255.0

Sets the IP address and subnet mask for Gigabit Ethernet interface 0.

no shutdown

Enables the Gigabit Ethernet interface.

Configuring DHCP Pool

To configure a local DHCP pool, enter the following commands, one per line:


Note

The subnet used for the local DHCP pool must be reachable externally. If you cannot allocate the whole subnet to Guest OS, use a NAT-based configuration. See Configuring Network Address Translation (NAT).

Command

Purpose

config terminal

Enters global configuration mode.

ip dhcp pool gospool

Names the local DHCP pool.

network 10.1.2.0 255.255.255.0

Sets the network address.

default-router 10.1.2.1

Sets the router address.

domain-name utility.com

Sets the subnet address.

dns-server 10.1.1.1

Sets the DNS server address.

lease 5

Sets the duration of the IP address lease to five days.

Configuring Guest OS GigabitEthernet on Cisco IOS

The Guest OS Ethernet port (eth0) connects to a GigabitEthernet interface on Cisco IOS. The IR829 uses GigabitEthernet 5, and the IR809 uses GigabitEthernet 2.

To configure the GigabitEthernet interface with the default gateway address of the DHCP pool, enter the following commands:


Note

IPv6 must always be enabled on the GigabitEthernet interface.

Note

The IR809 uses Gigabit Ethernet 2, and the IR829 uses Gigabit Ethernet 5.

Command

Purpose

interface GigabitEthernet 5

Sets the internal virtual interface that connects to the Linux Guest OS.

ipv6 enable

Enables IPv6.

ipv6 address autoconfig

Sets the IPv6 address.

ipv4 address 10.1.2.1 255.255.255.0

Sets the IPv4 address.

no shutdown

Enables the Ethernet interface, changing its state from administratively down to administratively up.

Configuring Guest OS

This section describes Guest OS Configuration.

Starting Guest OS

The Guest OS starts after installation.

Command

Purpose

show iox host list detail

Displays OS: RUNNING if Guest OS is already running.

guest-os 1 start

Starts Guest OS.

During start up, Guest OS sends a DHCP request and is assigned an IP address from the local DHCP pool and an IPv6 address through IPv6 stateless auto-configuration. Guest OS is then configured with a hostname and sync time from IOS.


Note

It can take a few minutes for the Guest OS to start.

Guest OS persistent logging through reload

Log files related to the Guest OS file system are stored on the /var/log directory of IOx. This is a volatile location because they may be lost when the IOS or IOx receives a reload command. for this reason, the caf.log, daemon.log, tpmc.log and syslog files from /var/log are now moved to a persistent storage location under /software/downloads (i.e. /dev/sdb filesystem) and the data in it will be restored upon multiple reloads. On reinstallation, the files under /software/downloads will be removed.

The command is persistent across IOS reloads unless a new GOS image is loaded or a bundle install to the new GOS image.

Additional CLIs are available for persistent logging:

  • To enable persistent logging from IOS use following command:

    IR800# iox host exec enable_persistent_logging <GOS>

  • To enable persistent logging from IOS use following command:

    IR800# iox host exec disable_persistent_logging <GOS>

  • •To enable persistent logging from Guest-OS use following command:

    IR800-GOS:/etc/scripts# ./enable_persistent_logging

  • •To disable persistent logging from Guest-OS use following command:

    IR800-GOS:/etc/scripts# ./disable_persistent_logging

Guest OS file system corruption detection and recovery

The Guest OS running on the IR800 series have had a higher likelihood for file system corruptions after an abrupt power failure. Upon Guest OS start or restart, a mandatory FSCK is performed on the rootfs and the datafs in order to attempt file system recovery.

This feature can be enabled or disabled using the config command iox recovery-enable <timeout>, where timeout specifies the TPMS timer timeout value in minutes. If unspecified, the default value is 5 and maximum is 15. If no registration request is received from TPMC before the timer expires, the Guest OS will be reinstalled. By default, the feature is disabled so that the customers who do not use Guest OS will not run into a situation where the Guest OS is reinstalled because networking is not configured correctly for Guest OS. The command is persistent across IOS reloads.

IOXVM Graceful Shutdown

On the IR800 router, the Guest OS will now perform a graceful shutdown before a reload of the device. Previously, the GOS would not go through the shutdown command, which sometimes would result in unexpected behavior.

Logrotate of IR8x9 Guest-OS logs

The logrotate feature has been uniformly implemented across all logs in the Guest-OS /var/log path. If persistent-logging is enabled, the specific logs will be saved on /software/downloads and logrotate is implemented on those as well. By default, log-rotate takes effect every day at 7:30am.

IOx Radius authentication

This feature allows for enabling the AAA login to IOx applications. There are different options:

  • If your device shows no aaa new-model in the configuration, it will use local authentication.

  • If your device shows aaa new-model in the configuration, there are two different methods of authentication.

    • If your device shows no iox aaa authentication in the configuration, it will use the default authentication list, for example: "aaa authentication login default..."

    • If your device shows iox aaa authentication WORD in the configuration, it will use the newly created list/group you specify.

    • To create a login authentication group/list, use aaa authentication login WORD. Then specify the name to use for IOX authentication using iox aaa authentication WORD For example

There is a condition in authentication that may case some confusion. The following provides more details:

Scenario: When a user enables a separate AAA Radius server to authenticate and authorize Guest-OS, instead of using local login.

Observation: In such a scenario, when a privilege 15 user logs into the Guest-OS console port 2070 from within IOS, the first login request is for the IOS username/password . The second login prompt is for the AAA Radius credential specific to Guest-OS.


Note

Users will need to configure the aaa iox username in IOS.
IR800# show run | inc aaa
aaa new-model
aaa authentication login default local
aaa authentication login ioxList group radius local <-implies 1st preference radius, 2nd preference: local login
aaa session-id common
iox aaa authentication ioxList <-to apply the newly created list above

IOXVM Storage Partition Enhancement

This enhancement to the IR800 series is to provide more flexibility to provide a customizable disk partitioning. With a smaller partition for system files, the user can put larger applications in the remaining partition.

A new CLI is introduced for this purpose:

IR829# guest-os 1 ?
disk-repartition Guest OS disk repartition
image Guest OS bootable image
restart Restart Guest OS
start Start Guest OS
stop Stop Guest OS
IR829# guest-os 1 disk-repartition ?
<30-90> Percentage Guest OS system partition takes

The user can input a number between 30 and 90 which would be rounded up to multiples of 5.

For example, typing in 30 means the system partition would take 30% of total space.

IOS communicates with VDS, which will actually perform disk repartition for GOS. After the action is completed by VDS, VDS will send a notification message back to IOS to indicate the status of operation.

After the disk repartitioning, the user will need to reinstall the GOS.

IR829# guest-os 1 disk-repartition 1
WARNING - Running this command will delete all application data in IOx. This operation cannot be undone. Continue? [no]: yes
Guest-OS disk repartitioning with option 1................................ Done!

After the repartition is successful, you should see the following syslog message:

%IR800_GOS_DISK_REP-6-SUCCESS_GOS_OPERATION: Successfully performed DISK REPARTITION operation for GOS.

After the disk is repartitioned, the GOS needs to be reinstalled by one of two methods:

IR800# bundle install flash:ir800-universalk9-bundle.SSA.156-3.M1 exclude HV-IOS
-or
IR800# guest-os install flash:ir800-ref-gos.img.1.40.gz

Finally, manually restart the GOS.

IR800# guest-os 1 start

If you have an IR809 or IR829 that was originally configured with an IOS version before 15.6(3)M1, then the GOS was partitioned in a different manner than later releases. For example:

  • If the router was initially booted up (first time power up) with an image older than 15.6(3)M1b, then the GOS is partitioned the old way with: disk1 (1530 MB) and the rest is disk2 (800 MB)

  • If the router was initially booted up (first time power up) with an image at 15.6(3)M1b or newer, then the GOS is initially partitioned with profile 1: disk 1 (500MB) and the rest is disk2 (1800 MB)

In either case, once the router is running 15.6(3)M1b or newer, you can use the following CLI to repartition it with different options:

IR800# guest-os 1 disk-repartition ?
1  disk1: 500MB vs disk2: 1800MB
2  disk1: 700MB vs disk2: 1600MB
3  disk1: 900MB vs disk2: 1400MB
4  disk1: 1100MB vs disk2: 1200MB
5  disk1: 1300MB vs disk2: 1000MB
6  disk1: 1500MB vs disk2: 800MB
7  disk1: 1700MB vs disk2: 600MB

(Note: Actual storage available for apps will be less than the value chosen for disk2 for all profiles.)
Configuring Network Address Translation (NAT)

The following example configuration uses NAT for Guest OS network connectivity, where:

  • 10.1.1.0 is the externally reachable subnet.

  • 10.1.1.131 is the external IP address made available for Guest OS access.

  • 192.168.1.0 is the private subnet created for Guest OS to Cisco IOS connectivity. This is not directly reachable outside the IR800.

  • The IP address acquired by Guest OS through IOS local DHCP pool is 192.168.1.2. This address can be obtained using show iox host list details command from IOS.


Note

This example shows outgoing communications. For incoming communications, proper port mapping will be required.

ip dhcp pool gospool
	network 192.168.1.0 255.255.255.0
	default-router 192.168.1.1
	domain-name utility.com
	dns-server 10.1.1.1
	lease 5
interface gig 5
	ip nat inside
	ip address 192.168.1.1 255.255.255.0
	ipv6 enable
	no shutdown
 
interface gig 0
	ip nat outside
	ip address 10.1.1.5 255.255.255.0
	no shutdown
ip nat inside source static 192.168.1.2 10.1.1.131
! End of configuration

IR800#sh ip nat trans
Pro Inside global	Inside local		Outside local	 Outside global
tcp 10.1.1.131:22	192.168.1.2:22		10.1.1.3:53649	10.1.1.3:53649
tcp 10.1.1.131:60100	192.168.1.2:60100	10.1.1.3:22  	10.1.1.3:22
--- 10.1.1.131		192.168.1.2	 	---		    ---

For more information about NAT, please see the Configuring Network Address Translation: Getting Started Guide.

http://www.cisco.com/c/en/us/support/docs/ip/network-address-translation-nat/13772-12.html

IR800 Guest-OS USB Access from IOS

IR800 IOS releases don’t support an external USB storage directly accessible from IOS. However, USB as external storage is provided as an option during IOx application deployment from Local Manager or Fog Director.

P

New for IOS 15.6(1)T

Guest OS enhancements include:

  • Cisco distribution is based on Yocto Project 1.8 Reference Distro, with basic services enabled:

    • IPv4/IPv6

    • DHCP

    • NTP

    • AAA (Radius)

    • Python 2.7

    • Basic debugging tools (tcpdump, top, etc)

    • bash

  • Serial relay for Guest OS control of the Serial Interface

    • Async 0 and Async 1 respectively reserve line 1/5 and 1/6 to relay serial data to the corresponding Guest OS /dev/ttyS1 and /dev/ttyS2

New for IOS 15.6(3)M

Guest OS enhancements include:

USB Support

Previous to 15.6(3)M, the USB devices, which are connected to external USB port could be emulated on the Guest OS through OHCI mode only. With this feature Hypervisor will be enhanced to support EHCI emulation to Guest OS.

Serial Device Configuration

Previously, the Guest OS could not configure the physical serial port on the device. The serial port configuration (e.g. baud rate change) of the serial port needed to be done in IOS.

With 15.6(3)M, hypervisor and IOS are enhanced so that if the Guest OS changes the virtual serial port configuration, it notifies IOS, and IOS applies the configuration to the physical serial port.

Command line changes consist of the following:

  • A new option is appended to allow the baudrate, databits, stopbits and parity propagation from Guest OS. If "propagation" is present, the control parameters will be passed from Guest OS to IOS physical port. Otherwise it functions as before.

  • The serial port control parameters included in the propagation are: baudrate, databits, stopbits and parity.

    
    relay line <linex > <liney > [propagation] 

Serial Relay Configuration

IR800#conf term
Enter configuration commands, one per line.  End with CNTL/Z.
IR800(config)#inter asyn 0
IR800(config-if)# encap relay-line
IR800(config-if)# end
IR800(config)# line 1
IR800(config-line)# transport input all
IR800(config-line)#
IR800(config)# relay line 1 1/5 propagation
IR800# show line 1/5
Guest OS output for /dev/tty

GOS is installed through the IOX bundle install process and can be started/stopped and upgraded from IOS CLI

Verification for digitally-signed GOS image distributed via Cisco DevNet must be installed using the guest-os image install command only.

Memory Allocation Optimization

Improvements have been made in the memory allocation optimization between VDS, IOS and GOS on the IR800. Previously, the 2GB RAM was allocated as follows:

  • VDS: 512MB

  • IOS: 512MB

  • Guest OS: 725MB

  • Remainder: used by hypervisor (e.g. device share memory)

Now with optimization, the VDS memory was reduced to give at least 1GB to the Guest OS.

New for IOS 15.7(3)M

Guest OS enhancements include:

  • IOx Radius authentication

    This feature allows for enabling the AAA login to IOx applications

  • IOx IPv6 Networking Option

    IOx interfaces on IOS now support IPv6 addressing. See the IOx documentation for further information.

    https://developer.cisco.com/docs/iox/
  • Guest OS persistent logging through reload

    Log files related to the Guest OS file system are stored on the /var/log directory of IOx. This is a volatile location because they may be lost when the IOS or IOx receives a reload command. for this reason, the caf.log, daemon.log, tpmc.log and syslog files from /var/log are now moved to a persistent storage location under /software/downloads (i.e. /dev/sdb filesystem) and the data in it will be restored upon multiple reloads. On reinstallation, the files under /software/downloads will be removed.

  • Guest OS file system corruption detection and recovery

    The Guest OS running on the IR800 series have had a higher likelihood for file system corruptions after an abrupt power failure. Now, upon Guest OS start or restart, a mandatory FSCK is performed on the rootfs and the datafs in order to attempt file system recovery.

  • IOS APIs to Enable Native IOx Applications


    Note

    The IOx Host Device Management service package needs to be installed for this feature to work.

    A new configuration command, hdm-enable, has been added in this release to enable the Host Device Management service.

    ir829-01(config)#iox ?          
      aaa              IOX AAA options
      client           Configure iox client
      hdm-enable       Enable IOX Host Device Management(HDM) service
      hypervisor       Configure hypervisor policy
      recovery-enable  Set Guest OS image recovery

    For more information on IOx, please visit:

    https://www.cisco.com/c/en/us/support/cloud-systems-management/iox/tsd-products-support-series-home.html

Troubleshooting

To determine common causes of configuration failure, enter the following commands:

Command

Purpose

show ip arp

Verifies that Cisco IOS learned Guest OS ARP mapping.The following is example output:


Protocol Address Age (min) Hardware Addr Type Interface
Internet 10.1.1.1 - 0022.bdef.c562 ARPA GigabitEthernet0
Internet 10.1.2.1 - 0022.bdef.c569 ARPA GigabitEthernet2
Internet 10.1.2.2 112 0022.bdef.c56d ARPA GigabitEthernet2
IR800# 

show ipv6 neighbor

Verifies that Cisco IOS learned Guest OS IPv6 neighbor address.The following is example output:


IPv6 Address    Age Link-layer Addr State Interface
FE80::1FF:FE90:8B05    0 0200.0190.8b05  REACH Gi2

show platform guest-os

Guest-OS started


Guest OS status:
Installation: Cisco-GOS,version-1.28
State: RUNNING
IR800# 

show iox host list detail

Guest-OS started, normal operation


IOX Server is running. Process ID: 319
Count of hosts registered: 1
Host registered:
===============
    IOX Server Address: FE80::76A2:E6FF:FEFD:6A6C; Port: 22222
    Link Local Address of Host: FE80::1FF:FE90:8B05
    IPV4 Address of Host:       10.15.15.2
    IPV6 Address of Host:       fe80::1ff:fe90:8b05
    Client Version:             0.1
    Session ID:                 1
    OS Nodename:                IR809-GOS-1
    Host Hardware Vendor:       Cisco Systems, Inc.
    Host Hardware Version:      1.0
    Host Card Type:             not implemented
    Host OS Version:            1.28
    OS status:                  RUNNING
    Interface Hardware Vendor:  None
    Interface Hardware Version: None
    Interface Card Type:        None
    Applications Registered:
    =======================
	Count of applications registered by this host: 0
IR800# 

show iox host list detail

Guest-OS started but no IPv6 address set-up on the GI2 interface


IOX Server is running. Process ID: 319
Count of hosts registered: 0
    IOX Server Address: 0.0.0.0; Port: 22222
IR800# 

Checking Connectivity

Use standard Linux tools (for example, ping and traceroute) to check Guest OS connectivity.

Related Documentation


Note

While some of these references do not apply directly to the Cisco IR800 series of Industrial Routers, they may serve as a source of addition information.

For information on supporting systems referenced in this guide, refer to the following documentation on Cisco.com:

DevNet documentation on IOx. Provides an overview as well as details on the IR800 series by scrolling down the left hand side:

https://developer.cisco.com/site/devnet/support/

Cisco Fog Director Reference Guide:

http://www.cisco.com/c/en/us/support/cloud-systems-management/fog-director/products-technical-reference-list.html

IOx Reference Guide:

http://www.cisco.com/c/en/us/support/cloud-systems-management/iox/products-technical-reference-list.html

Release Notes:

http://www.cisco.com/c/en/us/support/cloud-systems-management/iox/products-release-notes-list.html

Other Sources:

Cisco IOS IP Application Services Command Reference

IPv6 configuration manual