- Defining a Production Day
- Scheduling Based on Agent Time Zone
- Using a Positive Production Day Offset
- Using a Negative Production Day Offset
- Defining a Compile Offset
- Calendars Pane
- Calendars Interface
- Buttons
- Search Field
- Columns
- Calendars Preferences Dialog
- Navigator Context Menu
- Calendars Pane Context Menu
- Calendar Group Definition Dialog
- List Calendar Definition Dialog
- Daily Calendar Definition Dialog
- Weekly Calendar Definition Dialog
- Monthly Calendar with Days Definition Dialog
- Monthly Calendar with Weeks Definition Dialog
- Calendar Subset Definition Dialog
- Condition Dialog
- Calendar Procedures
- Buttons
- Search Field
- Columns
- Resources Preferences Dialog
- Navigator Context Menu
- Resources Pane Context Menu
- Virtual Resource Definition Dialog
- System Resource Definition Dialog
- Related Agents Dialog
- Resource Requirement Definition Dialog
- System Resource Requirement Definition Dialog
- Resources Procedures
Controlling Production
Enterprise Scheduler follows certain concepts when it compiles a production schedule. The concepts are basic but can result in complicated timing scenarios with date shifts that cause confusion among users when put into practice. The most complex timing issues arise from the shifting of the start of the production day through a series of time offsets as scheduled jobs run.
Enterprise Scheduler compiles a production schedule from your job rules for each master. This production schedule covers at least the current day but may extend to multiple days. You determine the duration of each schedule by specifying the number of days to include. Each master in your network has its own production schedule, so schedule durations can vary. The active production schedule for a master includes history data (for dates past), the current date and any remaining days in the schedule (future).
Figure 10-1 Example of a Normal Schedule Length
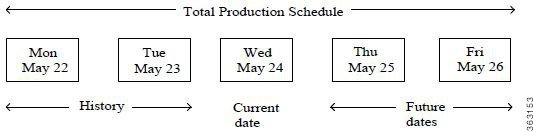
The production day contains all of the job rules that are scheduled to run during the production day. A production day always contains 24 hours and by default starts at midnight and ends at 23:59:59 pm. (For simplicity’s sake, we will use the 24-hour time format in this discussion so 11:59 pm is 2359.) To accommodate all of the processing needs of a business, a production day often differs from the calendar day. You can designate that the production day start at any time. For instance, you might specify that the production day starts at 0500 instead of starting at midnight to allow for the completion of the previous day's jobs. This is called a production day offset.
If the offset is positive, the fiscal day begins at some time after midnight and continues into the next calendar day. If the offset is negative, the fiscal day begins at some time before midnight. The maximum offset that you can define is 23 hours and 55 minutes. Scheduler uses the designated start of the production day to determine when the production day starts, and to select and launch jobs accordingly.
Defining a Production Day
Positive Offset (Late Start)
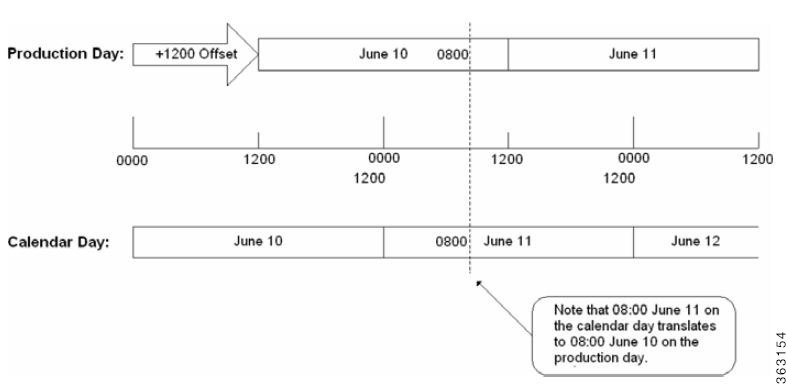
If you want your production day to begin at 1200 noon and continue until 1200 noon the following day, you define the start of the production day as 1200 (+1200). When offsetting the start time, it is important to remember that no time is lost, the hours between the start of the calendar day and the start of the production day are merely shifted from the beginning of the production day to its end. There are still 24 hours in the day.
The following figure compares the calendar day to a production day with an offset of +1200. Using this production offset, a job scheduled to launch at 0800 (8:00 a.m.) on June 10th (production date) will not actually launch until 0800 on June 11th (calendar date).
Figure 10-2 Production Offset Defined As +1200 (Master/Agent in Same Time Zone)
Negative Offset (Early Start)
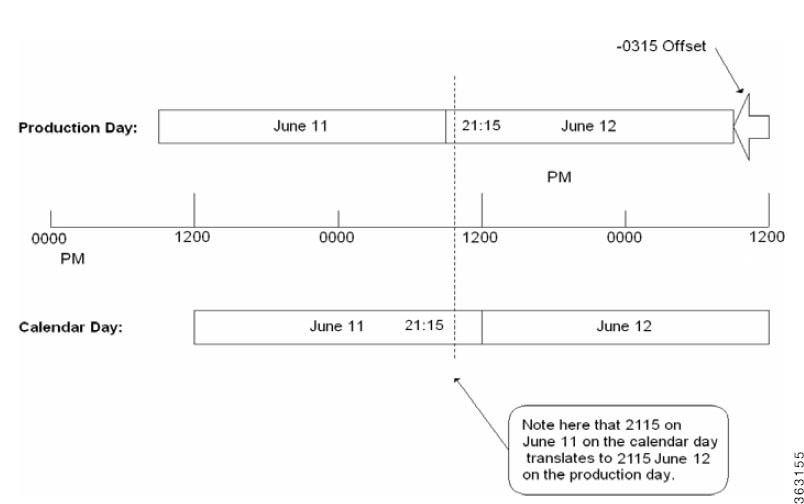
If you want your production day to begin at 2045 (8:45 p.m.), and continue until 2045 the following day, define the production day offset as -0315.
The following figure illustrates the calendar and production days with an offset of -0315. Using this production day offset, a job scheduled to launch at 2115 on June 12th (production date) launches at 2115 on June 11th (calendar date).
Figure 10-3 Production Offset Defined As -0315 (Master and Agent in Same Time Zone)
Scheduling Based on Agent Time Zone
While jobs normally run from the master’s time reference, you can launch jobs according to what time it is in the agent’s time zone. Selecting the Use Agent Time Zone option on the Master tab of the System Configuration dialog will launch jobs according to the time where the agent resides. This change will take effect the next time any schedule is compiled. While the jobs will launch at the intended times in the agent’s time zone, the master’s viewpoint will be compiled in for the job time windows and start time. Since the master will compensate for the offset, users should not think about the difference between the different master and agent time zones when defining jobs rules. In a nutshell, using the master time zone imposes an absolute time reference while using the individual agent time zones imposes a relative time reference.

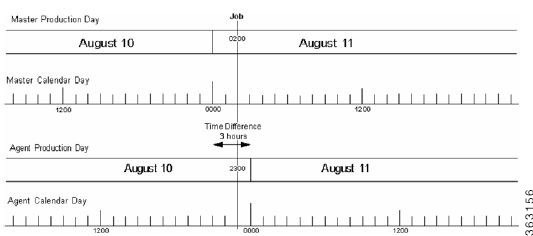
The following example illustrates the differences to be accounted for when the master and the agent reside in different time zones. The master in this example is three time zones ahead of the agent. A job defined to run at 2300 on the production day of August 10th will actually be launched by the master at 0200 on the production day of August 11th to account for the difference in time zones.
Figure 10-4 Agent Residing Three Time Zones Behind Master (No Production Date Offset)
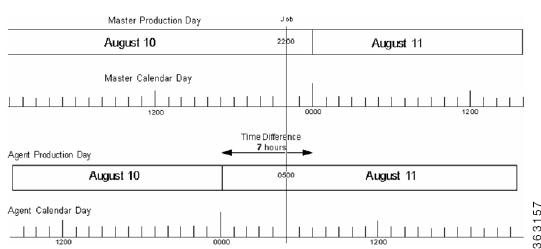
is another example of the master and agent in different time zones without a production offset. This example shows a master that is seven hours behind the agent. A job defined to run at 0500 on the production day of August 11th is actually launched by the master at 2200 on the production day of August 10th to account for the difference in time zones.
Figure 10-5 Agent Residing Seven Time Zones Ahead of Master (No Production Date Offset)
Using a Positive Production Day Offset
Agent Running Ahead of the Master
Setting a positive production day offset moves the start of the production day forward. In the example below, the difference between time zones is shown in a solid line and the production day offset is shown in a dotted line.
Figure 10-6 Positive Production Day Offset With the Agent Running Ahead of the Master
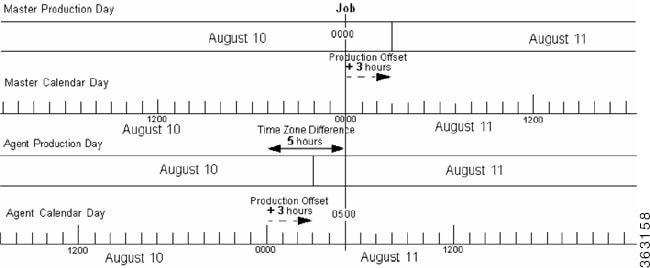
This example shows an agent that is five hours ahead of the master. A production day offset of positive three (+3) shifts the start of the production day (0000) three hours ahead in calendar time for both master and agent. A job defined to run at 0500 on the production day of August 11th launches at 0000 on August 10th on the master’s production day.
Agent Running Behind the Master
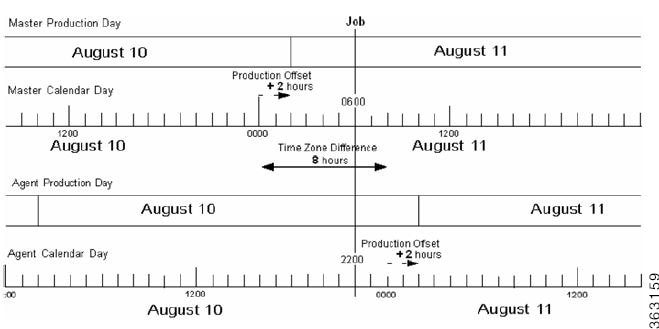
Setting a positive production day offset moves the start of the production day forward. In the example below, the difference between time zones is shown with a solid arrow and the production day offset is shown with a dotted arrow. This example has a positive production day offset of two hours ahead with the agent running eight hours behind the master. Thus a job defined to run at 2200 on the production day of August 10th is launched at 0600 on August 11th due to the difference in time zones.
Figure 10-7 Positive Production Day Offset With Agent Running Behind Master
Using a Negative Production Day Offset
Agent Running Ahead of the Master
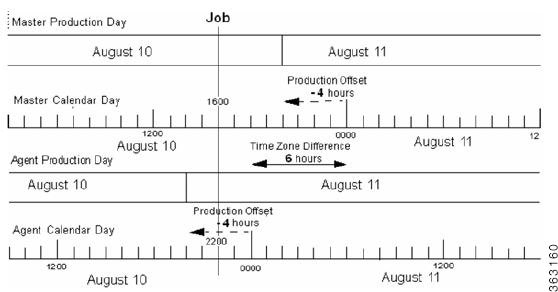
Setting a negative production day offset moves the start of the production day back from midnight. In the example below, the difference between time zones is shown with a solid arrow and the production day offset is shown in a dotted arrow. The example shown below has a negative 4 offset so the start of the production day is moved back four hours behind the start of the calendar day. A job defined to run at 2200 on the production day of August 11th is launched at 1600 on August 10th on the master due to the time difference.
Figure 10-8 Negative Production Day Offset With Agent Running Ahead of Master
Agent Running Behind the Master
Setting a negative production day offset moves the start of the production day back from midnight. In the following example, there is a negative four hour production offset moving the start of the production day four hours behind the start of the calendar day. In the example below, the difference between time zones is shown with a solid arrow and the production day offset is shown with a dotted arrow.
Figure 10-9 Negative Production Day Offset With Agent Running Behind Master

This configuration has an agent that is running five hours behind the master. A job defined to run at 2300 on the production day of August 10th is launched by the master at 0300 on August 11th.
Defining a Compile Offset
Compiling the production schedule may consume enough CPU resources to seriously affect your system’s performance and hinder other work that may be going on concurrently. It may be better to schedule such a resource-intensive operation like compiling your schedule, at a more convenient time when your system has a lighter workload. Once the schedule is compiled, it is saved until needed when the new production day starts. You can manually compile a new schedule at any time by selecting the Create Schedule option in the Activities main menu.
Figure 10-10 Create Schedule Dialog
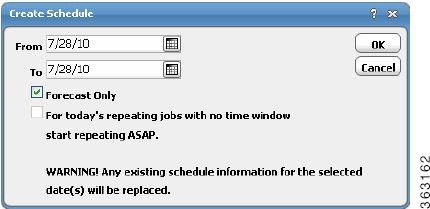
The compile offset is calculated from the start of the production day. The schedule will be compiled for the current day and all days that belong to the future days to include in the schedule. Any future day that was already scheduled (not forecast) will not get recompiled to reflect any job modifications or additions that were not committed to the schedule after the operation. To include any modifications that were not committed to the schedule, we must either recompile the already scheduled days or revert these schedules to a forecast type to force a compile before the day rolls into production.
Calendars Pane
Cisco Tidal Enterprise Scheduler ’s Calendars function enables you to specify dates on which to run jobs on a regular basis. Calendars are the backbone of an automated production schedule. You can create a calendar that holds specific dates of your choice, or a relative calendar that repeats on a daily, weekly, or monthly basis. You can also combine calendars into calendar groups where logic is used to include or exclude the dates of the calendars in the group. You can then use the calendar group as a whole to schedule jobs.
TES provides many pre-defined calendars and calendar groups. Most are Public and belong to the default workgroup Schedulers so that anyone can use them. You can customize these examples or create your own entirely new calendar. Once you select a calendar, TES calculates the matching dates for the remainder of the current year, plus three more years.
All calendars are fully configurable. For example, after specifying the repetitive rules for the calendar, you can forecast the results to ensure that the rules are correct. You can then add or delete special days to the resulting set, giving you full control over the scheduling process.
List Calendars
You can select unique days to run jobs with a list calendar. List calendars are useful when you do not want your job to repeat continually. Once defined, the calendar can then be assigned to a job definition from the Job Definition or Job Group Definition dialogs.
Daily Calendars
With a daily calendar, you can specify your job to run based on an interval of days. Once defined, the calendar can then be assigned to a job definition from the Job Definition or Job Group Definition dialog.
Weekly Calendars
With a weekly calendar, you can specify your job to run based on an interval of weeks. Once defined, the calendar can then be assigned to a job definition from the Job Definition or Job Group Definition dialog.
Monthly Calendars with Days
With a monthly calendar with days, you can specify common days of the week in various months to run your job; for example, the 1st and 15th of January, February and April. You can also add and remove unique days and weeks from the calendar.
Monthly Calendars with Weeks
With a monthly calendar, you can specify common days in various months to run your job. For example, the first and third Wednesday of October and November. You can also add and remove unique days and weeks from the calendar.
Subset Calendar
You can use subset calendars to extract exactly the dates that you need from an existing calendar, “borrowing” the calendar logic already in place.
Fiscal Calendars
TES gives special attention to fiscal calendars, acknowledging their vital role in production in business environments. They are treated in a slightly different way than other types of TES calendars and have a section devoted to them in this chapter.
Calendar Types
The following table lists the types of calendars (other than fiscal calendars) available in TES..

Note The Condition dialog makes it possible to alter the functionality of calendars to precisely satisfy customized needs. For more information about calendar conditions, see “Condition Dialog” section.
Default Calendars
The following table lists all the predefined calendars provided with TES.
Note Be aware that these predefined calendars are only examples of calendars that you can create. They may not include the dates that you may expect because they may use other conditions to illustrate calendar principles. Before using these calendars for production purposes, verify that a calendar includes the dates that you expect and modify it for your needs if necessary.
Calendars Interface
From the Navigator pane, select Definitions>Calendars to display the Calendars pane.
Buttons
- Add —Displays the Add Calendar sub-menu to choose the type of calendar (including group) that you want to create. For more information about the Add Calendar sub-menu, see “Add Calendar Submenu” section .
- Edit Calendar —Displays the Calendar Definition dialog to edit an existing calendar.
- Copy Calendar —Creates a copy of the selected action with the same information as the selected action, except for the name.
- Delete Calendar —Removes the selected calendar definition from the list database.
- Refresh —Updates the data in the current pane.
- Print —Displays the Reports pane to view and print your calendars. For more information, see “Monitoring Production” section .
Search Field
Enter text that you want to search for within the columns displayed into this field.
Note This field at the top right of the grids will only search text columns that are not grayed out and are string-based. See “Searchable Columns” section.
Columns
- Name —The name of the calendar.
- Type —The type of calendar. For more information about calendar types, see “Calendar Types” section .
- Owner —The owner of the calendar.
- Public —Whether or not the calendar is public, that is, available to all TES users.
- Modified —The last time the calendar definition was modified.
Calendars Preferences Dialog
If you select Preferences from the View main menu while viewing the Calendars pane, the Calendars Preferences dialog displays.
From the Calendars Preferences dialog, you can select which columns are displayed in the Calendars pane and in what order they appear.
Navigator Context Menu
When you right-click in the Navigator pane while viewing the Calendars pane, the Navigator context menu displays.
The Calendars Navigator context menu contains the following options:
- Add Calendar —Displays the Add Calendar sub-menu to choose the type of calendar (including group) that you want to create. Has the same function as the Add button. For more information about the Add Calendar sub-menu, see “Add Calendar Submenu” section .
- Refresh —Updates the data in the current pane.
- Print —Displays the Reports pane to view and print your calendar definitions. Has the same function as the Print button on the toolbar. For more information, see “Monitoring Production” section .
- Export —Saves the data in the current pane as an ASCII text file. You can then use the file data in other applications.
- Preferences —Displays the Preferences dialog for the Calendars pane.
- New Root Folder —Allows you to create a new root folder for the Navigator pane.
Calendars Pane Context Menu
When you right-click in the Calendars pane, the Calendars pane context menu displays. The following describes the items in the Calendars pane context menu:
- Add Calendar —Add a calendar definition. Selecting this menu option leads to the Add Calendar sub-menu from which you can choose the type of calendar (including group) that you want to create. For more information about the Add Calendar sub-menu, see “Add Calendar Submenu” section .
- Edit Calendar —Edit the selected calendar definition.
- Delete Calendar —Delete the selected calendar.
- Copy Calendar —Copies the selected calendar.
- Refresh —Refreshes the data on the Calendars pane.
- Print —Prints the calendar(s) in a grid format to a new pane. You can then exit the pane or print the calendar to a printer.
- Print Selected —Prints the selected calendar(s) in a grid format to a new pane. You can then exit the pane or print the calendar to a printer.
- Where Used —Displays a submenu of By Jobs or By Calendars. Selecting By Jobs will display a report of which jobs are associated with the selected calendar. Selecting By Calendars will display a report of which calendars are using the selected calendar, for example, in a subset.
- Change type to —Change the selected calendar’s type to another type.
- Recalculate —Recalculates the dates for all calendars. Useful if dates have been manually added or subtracted from the normal calendar.
Note When you use the Recalculate feature, any days you have manually added or removed from the calendar(s) will be lost. Recalculating calendars do not affect the production schedules that have already been created. You must recompile the existing production schedules before the changes can take effect in those schedules.
Add Calendar Submenu
When you select Add from the Calendars pane context menu, the Add submenu displays. This menu also appears in a context form when you click the Add b utton on the TES toolbar from the Calendars pane.
The following describes the items in the Add Calendars submenu:
- Group —Add a calendar group, combining two or more calendars and including or excluding their associated dates.
- List —Add a list calendar to specify any set of non-repeating dates.
- Daily —Add a calendar that repeats at a daily interval that you specify. For example, every 2 days, every 3 days , etc. You can also exclude certain days, i.e. Saturday or Sunday , from the calendar.
- Weekly —Add a calendar that repeats at a weekly interval that you specify. For example, once a week, every 3 weeks , etc. You can also include the days in the week to run the job, i.e., Monday through Friday .
- Monthly with Days —Add a calendar that repeats in the months you specify. For example, January , April , July , and October . You also specify on which date(s) of the selected months to run jobs. For example, the 1st and the 15th of the specified months.
- Monthly with Weeks —Add a calendar that repeats on the months you specify. For example, January and June . You also specify on which day(s) of the selected months to run jobs. For example, the first and last Friday of each month . You can also specify offsets to the specified date. For example, 3 days before the 1st Monday of each month .
- Subset —Add a new calendar which is a subset of the dates encompassed by existing calendars. You can use calendar logic to target the exact dates that you want to include.
Calenda r Group Definition Dialog
The Calendar Group Definition dialog displays when you add or edit a calendar group fro m the Calendars pane .
Common to All
- Calendar Name —The name of the calendar group (up to 60 characters). The name must be unique.
- Owner —The owner of the calendar group. By default, this is the creator of the calendar group. An owner can be a TES user or Workgroup.
- Public —The Public option makes the calendar accessible by all TES users within the boundaries of their Security Policy. When cleared, only the calendar’s owner can see and use the calendar.
Details Tab
- Inc/Exc —Lists whether the dates of the calendar or calendar group are to be included in or excluded from this calendar group.When TES calculates the calendar, included dates are added first, then excluded dates are removed.
Note When using the Inc/Exc calendar group feature, dates that are excluded have priority. If a date has been both included and excluded, the final result will be that it is excluded.
- Calendar —A calendar or calendar group to be associated with the calendar group, whether included or excluded.
- Include common days only —Includes only the dates that are common to all the calendars selected to be part of the calendar group.
- Add —Associates a calendar or calendar group to this calendar group and defines whether the dates are included or excluded.
- Edit —Changes whether to include or exclude the selected calendar’s or calendar group’s dates from the calendar group and/or changes the calendar associated with the calendar group.
- Delete —Removes the selected calendar from the calendar group.
Note You can include or exclude individual dates by selecting a listed date and right-clicking to display a context menu providing the opposite option for the selected date, e.g., an included date has an Exclude option.
Calendar Dialog
The Calendar dialog displays when you click the Edit or Add button in the Details tab of the Calendar Group Definition dialog.
This dialog contains the following elements:
- Calendar —Offers a drop-down menu to select the calendar for which the dates are included or excluded from the calendar group. Calendar groups cannot be selected.
- Adjust by... days —You can select a positive or negative number to shift the calendar forward or backward (respectively) by the specified number.
- Include Dates —Includes the dates of the selected calendar into the calendar group.
- Exclude Dates —Excludes the dates of the selected calendar into the calendar group.
Note Exclude Dates takes precedence over Include Dates. For example, if “Calendar A” contains January 3rd - 6th and is included, and “Calendar B” contains January 5th and is excluded, the resulting calendar group will contain January 3rd, January 4th and January 6th.
Conditions Tab
This tab contains the following elements:
- If conflicts with —The If Conflicts With column works in tandem with the Action field. If conflicts with means “if a date matches.” In other words, if the calendar definition you are working with (the one named in the Calendar Name field) includes dates that are the same as those in another calendar that you specify, then you can take the action specified in the Action field.
- Action —The Action column works in tandem with the If Conflicts With field. In this field, you specify the action to take if a date included in the calendar definition you are working with (the one named in the Calendar Name field) conflicts with (is the same as) those in the calendar you specify in the If Conflicts With field.
- Add —Displays the Condition dialog to add a condition (to select an If Conflicts With calendar and an action to take). For more information about the Condition dialog, see Condition Dialog .
- Edit —Displays the Condition dialog to change the specifications of the selected condition. For more information about the Condition dialog, see Condition Dialog
- Delete —Removes the selected condition from the calendar group definition.
Forecast Tab
Displays the dates in the calendar that were automatically generated using the settings configured on the Details tab. Dates that appear in red text on the Forecast tab are part of the calendar and are listed in the Selected Dates field. Dates in black text are not part of the calendar. Calendar dates can be added or removed from the calendar by double-clicking that date on the displayed Calendar tab (except on subset calendars).
This tab contains the following elements:
- Calendar Section —Displays the forecasted dates in a calendar format for the calendar. The title bar displays the day, month and year of the present calendar view. Forecasted dates are displayed in red.
- Calendar control bar —Changes the month that displays in the Calendar section. The outer buttons move the dates in one-year increments. The inner buttons move the dates in one-month increments.
- Selected Dates Section —Displays a forecast of dates that are generated from the Details tab.
Selected Dates Context Menu
When you right-click in the Selected Dates section of the Forecast tab in any calendar definition dialog, the Selected Dates context menu displays.
- Delete —Deletes only the date highlighted in the selected dates section.
- Delete All —Deletes all the dates in the selected dates section.
Note The Forecast tab data is regenerated every time there is a change to the Details tab of the calendar definition. Therefore, if you add or remove dates through the Forecast tab, then make further changes from the Details tab, your original edits (from the Forecast tab) will be lost.
List Calendar Definition Dialog
The List Calendar Definition dialog displays when you add or edit a List calendar.
Common to All
- Calendar Name —The name of the calendar (up to 60 characters). The name must be unique.
- Owner —The owner of the calendar. By default, this is the creator of the calendar. An owner can be a TES user or workgroup.
- Public —The Public option makes the calendar accessible to all TES users within the boundaries of their Security Policy. When cleared, only the calendar’s owner can see and use the calendar.
Details Tab
The Details tab () contains the following elements:
- Calendar Section —Displays the forecasted dates in a calendar format for the calendar group. The title bar displays the day, month, and year of the present calendar view. Forecasted dates are displayed in red.
- Calendar control bar —Changes the month that displays in the Calendar section. The outer buttons move the dates in one-year increments. The inner buttons move the dates in one-month increments.
- Selected Dates Section —Displays a forecast of dates that are generated from the Details tab.
- Delete —Deletes dates that are selected in the Selected Dates section.
Daily Calendar Definition Dialog
The Daily Calendar Definition dialog displays when you add or edit a Daily calendar.
Common to All
- Calendar Name —The name of the calendar (up to 60 characters). The name must be unique.
- Owner —The owner of the calendar. By default, this is the creator of the calendar. An owner can be a TES user or workgroup.
- Starting on —Sets the starting date by which the dates are automatically selected for the calendar. Any dates before the starting date are not selected. Though the forecast is limited to a finite period, the calendar has no ending date. TES calculates calendars for the remainder of the current year, plus three more years.
- Public —The Public option makes the calendar accessible to all TES users within the boundaries of their security policy. When cleared, only the calendar’s owner can see and use the calendar.
Details Tab
The Details tab () contains the following elements:
- Frequency —Sets the frequency in days by which the days are automatically selected for the calendar.
- Include the following days —Includes the selected days of the week in the date generation process. Excluded days will not be used as production dates, but will be counted during calendar calculation. When the calendar production date is calculated to fall on an excluded day of the week, the date generation process chooses the next included day and restarts the count starting from that day.
If you set the frequency to 2 days, starting Monday, and exclude Saturday and Sunday, you will get Mon, Wed, Fri, (Sun skipped, go to next available day)
–![]() Although Saturday and Sunday were excluded days of the week, they were counted during date generation.
Although Saturday and Sunday were excluded days of the week, they were counted during date generation.
–![]() Because Saturday and Sunday were excluded, when the next calendar production date was calculated as Sunday, the next non-excluded day of the week (Monday) was selected.
Because Saturday and Sunday were excluded, when the next calendar production date was calculated as Sunday, the next non-excluded day of the week (Monday) was selected.
–![]() Since the count for date generation is restarted after an excluded day is skipped, the next calendar date was Wednesday.
Since the count for date generation is restarted after an excluded day is skipped, the next calendar date was Wednesday.
Conditions Tab
Refer to the Conditions tab for a group calendar on Conditions Tab for a description of the fields on this tab.
Forecast Tab
Refer to the Forecast tab for a daily calendar on Forecast Tab for a description of the fields on this tab.
Weekly Calendar Definition Dialog
The Weekly Calendar Definition dialog displays when you add or edit a weekly calendar.
Common to All
- Calendar Name —The name of the calendar (up to 60 characters). The name must be unique.
- Owner —The owner of the calendar. By default, this is the creator of the calendar. An owner can be a TES user or Workgroup.
- Starting on —Sets the starting date by which the dates are automatically selected for the calendar. Any dates before the starting date are not selected. Though the forecast is limited to a finite period, the calendar has no ending date.
- Public —The Public option makes the calendar accessible by all TES users within the boundaries of their Security Policy. When cleared, only the calendar’s owner can see and use the calendar.
Conditions Tab
Refer to the Conditions tab for a group calendar on for a description of the fields on this tab.
Forecast Tab
Refer to the Forecast tab for a daily calendar on for a description of the fields on this tab.
Monthly Calendar with Days Definition Dialog
The Monthly Calendar Definition dialog displays when you add or edit a monthly calendar with days.
Common to All
- Calendar Name —The name of the calendar (up to 60 characters). The name must be unique.
- Owner —The owner of the calendar. By default, this is the creator of the calendar. An owner can be a TES user or Workgroup.
- Starting On —Sets the starting date by which the dates are automatically selected for the calendar. Any dates before the starting date are not selected. Though the forecast is limited to a finite period, the calendar has no ending date.
- Public —The Public option makes the calendar accessible to all TES users within the boundaries of their Security Policy. When cleared, only the calendar’s owner can see and use the calendar.
Details Tab
The Details tab contains the following elements:
- Months —Select the months for which the calendar will generate dates.
- Days in Month —Select specific date occurrences in the month(s) for which the calendar will generate dates.
Note You must have months selected in the Months section with corresponding dates selected in the Days in Month section in order to automatically generate the dates.
Monthly Calendar Definition Context Menu
The Monthly Calendar Definition dialog context menu displays when you right-click the Details tab of the Monthly Calendar with Days Definition and the Monthly Calendar with Weeks Definition dialogs.
This context menu contains the following options:
- Select All Months —Selects all months in the Months section of the Details tab.
- Clear All Months —Clears all months in the Months section of the Details tab.
- Select All Days —Selects all days in the Dates in Month (or Days in Week ) section of the Details tab.
- Clear All Days —Clears all days in the Dates in Month (or Days in Week ) section of the Details tab.
Conditions Tab
Refer to the Conditions tab for a group calendar on Conditions Tab for a description of the fields on this tab.
Forecast Tab
Refer to the Forecast tab for a daily calendar on Forecast Tab for a description of the fields on this tab.
Monthly Calendar with Weeks Definition Dialog
The Monthly Calendar with Weeks Definition dialog displays when you add or edit a monthly calendar with weeks.
Common to All
- Calendar Name —The name of the calendar (up to 60 characters). The name must be unique.
- Owner —The owner of the calendar. By default, this is the creator of the calendar. An owner can be a TES user or workgroup.
- Starting On —Sets the starting date by which the dates are automatically selected for the calendar. Any dates before the starting date are not selected. Though the forecast is limited to a finite period, the calendar has no ending date.
- Public —The Public option makes the calendar accessible by all TES users within the boundaries of their security policy. When cleared, only the calendar’s owner can see and use the calendar.
Details Tab
The Details tab allows you to control how to automatically generate dates for the calendar.
This tab contains the following elements:
- Months —Allows you to choose the months for which the calendar generates dates.
- Days in Week —Choose the days of the week for which the calendar generates dates.
- Occurrence —Choose which occurrence(s) of the days selected in the Days in Week section for which the calendar will generate dates. For example, if January is selected in the Months section, Monday is selected in the Days in Week section, and 1st is selected in the Occurrence section, the resultant set will be the first Monday in January.
- Adjust By —Allows you to shift the resultant date set forward or backward by the amount shown in this field. You can adjust dates forward and backward up to 31 days.
Note You must have a month(s) selected in the Months section, with a corresponding day(s) selected in the Days in Week section, and an occurrence(s) selected in the Occurrences section in order to automatically generate dates.
Monthly Calendar Definition Context Menu
The Monthly Calendar Definition dialog context menu displays when you right-click the Details tab of the Monthly Calendar with Days Definition and the Monthly Calendar with Weeks Definition dialogs.
This context menu contains the following options:
- Select All Months —Selects all months in the Months section of the Details tab.
- Clear All Months —Clears all months in the Months section of the Details tab.
- Select All Days —Selects all days in the Dates in Month (or Days in Week ) section of the Details tab.
- Clear All Days —Clears all days in the Dates in Month (or Days in Week ) section of the Details tab.
Conditions Tab
Refer to the Conditions tab for a group calendar on Conditions Tab for a description of the fields on this tab.
Forecast Tab
Refer to the Forecast tab for a daily calendar on Forecast Tab for a description of the fields on this tab.
Common to All
- Calendar Name —The name of the calendar (up to 60 characters). The name must be unique.
- Owner —The owner of the calendar. By default, this is the creator of the calendar. An owner can be a TES user or workgroup.
- Starting On —Sets the starting date by which the dates are automatically selected for the calendar. Any dates before the starting date are not selected. Though the forecast is limited to a finite period, the calendar has no ending date.
- Public —The Public option makes the calendar accessible by all TES users within the boundaries of their security policy. When cleared, only the calendar’s owner can see and use the calendar.
Details Tab
The Details tab allows you to control how to automatically generate dates for the calendar.
This tab contains the following elements:
- Occurrence —From the Occurrence drop-down menu, select the instance of the dates of the calendar that you want to use. For example, if you want to use all the days this calendar includes, select Every .
- Calendar —Select the calendar for which this calendar will be a subset. The drop-down menu lists all available calendars.
- Time Frame —From the Time Frame field, you can select the exact time period for your subset calendar to run. For example, you can select the 13th week , or the month of March .
- Based on Fiscal —If you have any Fiscal calendars defined, they are listed and available from the Based on Fiscal field drop-down menu.
- Adjust by... days —The number of days by which to shift the new calendar you created forward (positive numbers) or backward (negative numbers).
Note With subsets, it is important that the source calendar include historic dates where necessary. For example: If you create a calendar called Daily that includes every day of the week, by default that calendar starts today. If you then create a subset that is the 1st Daily of the quarter, the first date in the current quarter ends up being today, since that is the first date in the calendar Daily. In this example, it is necessary to modify Daily's starting date to January 1.
Conditions Tab
Refer to the Conditions tab for a group calendar on Conditions Tab for a description of the fields on this tab.
Forecast Tab
Refer to the Forecast tab for a daily calendar on Forecast Tab for a description of the fields on this tab.
Condition Dialog
The Condition dialog displays when you add or edit a condition from the Conditions tab of any calendar definition dialog.
This tab contains the following elements:
- If conflicts with calendar —Offers a drop-down menu listing all available calendars.
- Take action —The Take action field offers a drop-down menu with the following possible actions:
–![]() Skip
—Skips this date. Essentially, if there is a conflict between the two calendars, skip the date and do not take any action.
Skip
—Skips this date. Essentially, if there is a conflict between the two calendars, skip the date and do not take any action.
–![]() Previous Day
—Use the previous date before the conflicted date.
Previous Day
—Use the previous date before the conflicted date.
–![]() Next Day
—Use the next date after the conflicted date.
Next Day
—Use the next date after the conflicted date.
–![]() Closest Calendar
—Selects the date in the calendar specified in the
Calendar
field that is closest to the conflicted date, whether the date occurs before or after the conflicted date. A calendar offset can also be specified.
Closest Calendar
—Selects the date in the calendar specified in the
Calendar
field that is closest to the conflicted date, whether the date occurs before or after the conflicted date. A calendar offset can also be specified.
–![]() Previous Calendar
—Selects the date in the calendar specified in the
Calendar
field that occurs previous to the conflicted date. A calendar offset can also be specified.
Previous Calendar
—Selects the date in the calendar specified in the
Calendar
field that occurs previous to the conflicted date. A calendar offset can also be specified.
–![]() Next Calendar
—Selects the date in the calendar selected in the
Calendar
field that next occurs after the conflicted date. A calendar offset can also be specified.
Next Calendar
—Selects the date in the calendar selected in the
Calendar
field that next occurs after the conflicted date. A calendar offset can also be specified.
Note The Closest Day, Previous Day and the Next Day action options only apply to a specific day within a conflicting calendar-not to the entire calendar. If there is a conflict with more than one day within the calendar, you must individually apply the appropriate action to each day that conflicts with the calendar.
- Calendar —The first field can optionally be used to select the number of days to offset the calendar selected in the second field. The second field displays a drop-down list of available calendars to be used in conjunction with the Closest Calendar , Previous Calendar and Next Calendar options of the Take Action field.
Adding a Calendar
Step 1![]() From the
Navigator
pane, select
Definitions>Calendars
to display the
Calendars
pane.
From the
Navigator
pane, select
Definitions>Calendars
to display the
Calendars
pane.
Step 2![]() Click the
Add
button on the TES toolbar or right-click and select
Add Calendar
from the context menu.
Click the
Add
button on the TES toolbar or right-click and select
Add Calendar
from the context menu.
Step 3![]() Select the type of calendar you want to add, then follow the instructions for editing a calendar in
“Editing Calendars” section
. For more information about a specific type of calendar, see its definition dialog description:
Select the type of calendar you want to add, then follow the instructions for editing a calendar in
“Editing Calendars” section
. For more information about a specific type of calendar, see its definition dialog description:
–![]() List Calendar
— For more information about list calendars, see “List Calendar Definition Dialog” section.
List Calendar
— For more information about list calendars, see “List Calendar Definition Dialog” section.
–![]() Daily Calendar
—For more information about daily calendars, see “Daily Calendar Definition Dialog” section.
Daily Calendar
—For more information about daily calendars, see “Daily Calendar Definition Dialog” section.
–![]() Weekly Calendar
—For more information about weekly calendars, see “Weekly Calendar Definition Dialog” section.
Weekly Calendar
—For more information about weekly calendars, see “Weekly Calendar Definition Dialog” section.
–![]() Monthly Calendar with Days
—For more information about monthly calendars with days, see “Monthly Calendar with Days Definition Dialog” section.
Monthly Calendar with Days
—For more information about monthly calendars with days, see “Monthly Calendar with Days Definition Dialog” section.
–![]() Monthly Calendar with Weeks
—For more information about monthly calendars with weeks, see “Monthly Calendar with Weeks Definition Dialog” section.
Monthly Calendar with Weeks
—For more information about monthly calendars with weeks, see “Monthly Calendar with Weeks Definition Dialog” section.
–![]() Subset Calendar
—
F
or more information about subset calendars, see “Calendar Subset Definition Dialog” section.
Subset Calendar
—
F
or more information about subset calendars, see “Calendar Subset Definition Dialog” section.
Editing Calendar Groups
A calendar group is a combination of individual calendars each of which have their dates either included into or excluded from the group. The calendar group can then be used for scheduling jobs just like any other calendar.
When combining calendars in a calendar group, date exclusions always take precedence over date inclusions. For example, if in one calendar in a calendar group you include the days Monday - Friday, and in another, you exclude the days Tuesday, Wednesday, and Thursday, the calendar group’s final set of run dates will be Monday and Friday.
Step 1![]() From the
Navigator
pane, select
Definitions>Calendars
to display the
Calendars
pane.
From the
Navigator
pane, select
Definitions>Calendars
to display the
Calendars
pane.
Step 2![]() Double-click the calendar you want to edit or select the calendar and click the
Edit
button or right-click the calendar and select
Edit Calendar
from the context menu.
Double-click the calendar you want to edit or select the calendar and click the
Edit
button or right-click the calendar and select
Edit Calendar
from the context menu.
Step 3![]() To make the calendar public, select the
Public
option. Public calendars can be used by all TES users, within the restrictions of their Security Policy.
To make the calendar public, select the
Public
option. Public calendars can be used by all TES users, within the restrictions of their Security Policy.
Step 4![]() To add a calendar to your calendar group:
To add a calendar to your calendar group:
b.![]() Click
Add
to display the
Calendar
dialog.
Click
Add
to display the
Calendar
dialog.
c.![]() From the
Calendar
field drop-down menu, select the calendar to add to your calendar group.
From the
Calendar
field drop-down menu, select the calendar to add to your calendar group.
d.![]() After selecting a calendar, click either:
After selecting a calendar, click either:
Include Calendar to include the dates in the selected calendar into the calendar group.
Exclude Calendar to exclude the dates in the selected calendar from the calendar group.
e.![]() Click
OK
. The calendar is now a part of the calendar group.
Click
OK
. The calendar is now a part of the calendar group.
Step 5![]() Edit a calendar in your calendar group:
Edit a calendar in your calendar group:
a.![]() Select the calendar to edit in the
Details
tab.
Select the calendar to edit in the
Details
tab.
b.![]() Click the
Edit
button to display the
Calendar
dialog.
Click the
Edit
button to display the
Calendar
dialog.
c.![]() From the
Calendar
field drop-down menu, select the calendar to associate with your calendar group.
From the
Calendar
field drop-down menu, select the calendar to associate with your calendar group.
d.![]() After selecting a calendar, click either:
After selecting a calendar, click either:
Include Calendar to include the dates in the selected calendar into the calendar group.
Exclude Calendar to exclude the dates in the selected calendar from the calendar group.
Step 6![]() Click the
Conditions
tab and set any conditions you want to place on your calendar group. For more information about conditions, see
“Condition Dialog” section
.
Click the
Conditions
tab and set any conditions you want to place on your calendar group. For more information about conditions, see
“Condition Dialog” section
.
Step 7![]() Click the
Forecast
tab to see the resultant dates for the calendar group are shown.
Click the
Forecast
tab to see the resultant dates for the calendar group are shown.
Note You cannot add or delete unique dates from the Calendar Group Definition dialog. To add or delete special dates, do so in the calendar’s individual calendar definition dialog. The group will automatically reflect the updates.
Step 8![]() Click the
Description
tab. You can add or edit a description for the calendar group (up to 255 characters).
Click the
Description
tab. You can add or edit a description for the calendar group (up to 255 characters).
Editing Calendars
Note Whenever you edit a calendar that has already been assigned to a job, or is being used by another calendar (for example, as a subset) you will be presented with a warning message informing you that the calendar is in use.
When you modify a calendar assigned to a job, the Effective Date dialog displays providing options for when the changes to the already compiled production schedule should take effect. You can select a date during the current production schedule for the calendar changes to take effect or let the changes occur during a manual or automatic compilation.
Step 1![]() From the
Navigator
pane, select
Definitions>Calendars
to display the
Calendars
pane.
From the
Navigator
pane, select
Definitions>Calendars
to display the
Calendars
pane.
Step 2![]() Double-click the calendar you want to edit or select the calendar and click the
Edit
button or right-click the calendar and select
Edit Calendar
from the context menu.
Double-click the calendar you want to edit or select the calendar and click the
Edit
button or right-click the calendar and select
Edit Calendar
from the context menu.
Step 3![]() Type the name of the calendar in the
Calendar Name
field (up to 60 characters). The name must be unique.
Type the name of the calendar in the
Calendar Name
field (up to 60 characters). The name must be unique.
Step 4![]() To make the calendar public, select the
Public
option. Public calendars can be used by all TES users, within the restrictions of their Security Policy.
To make the calendar public, select the
Public
option. Public calendars can be used by all TES users, within the restrictions of their Security Policy.
Step 5![]() Select dates for a calendar:
Select dates for a calendar:
a.![]() Use the calendar control bar to select the month for which to add or delete dates.
Use the calendar control bar to select the month for which to add or delete dates.
b.![]() The outer buttons move the calendar in one year increments.
The outer buttons move the calendar in one year increments.
c.![]() The inner buttons move the calendar in one month increments.
The inner buttons move the calendar in one month increments.
d.![]() Double click the dates in the calendar section to select and deselect the dates for your calendar. The date cell text turns red, and the date appears in the
Selected Dates
section.
Double click the dates in the calendar section to select and deselect the dates for your calendar. The date cell text turns red, and the date appears in the
Selected Dates
section.
Step 6![]() Remove dates from a calendar:
Remove dates from a calendar:
b.![]() Select the date to remove from the
Selected Dates
section.
Select the date to remove from the
Selected Dates
section.
c.![]() Click
Delete
. The date moves back to the
Calendar
section and the date cell text turns black.
Click
Delete
. The date moves back to the
Calendar
section and the date cell text turns black.
Note This option is not available for subset calendars.
Step 7![]() Specify repetition in weeks for a calendar (weekly calendar only):
Specify repetition in weeks for a calendar (weekly calendar only):
b.![]() In the
Frequency
drop-down menu, select the frequency of the interval (in weeks).
In the
Frequency
drop-down menu, select the frequency of the interval (in weeks).
c.![]() In the
Starting On
field, type the date that the interval starts.
In the
Starting On
field, type the date that the interval starts.
A seven-day period begins on the date you specify. For example, if you select an interval of every two weeks, starting on Wednesday of this week, and include Monday through Friday, you will get Wednesday through Friday of this week, and Monday and Tuesday of next week, which completes the seven day period. The seven-day period is then repeated every other Wednesday. (You can select a starting date from the calendar pane.) The calendar has no ending date.
d.![]() In the
Include the following days
section, select the days to include in the seven day period.
In the
Include the following days
section, select the days to include in the seven day period.
Step 8![]() Specify common monthly dates for a calendar:
Specify common monthly dates for a calendar:
b.![]() In the
Months
section, select the months when the job should run.
In the
Months
section, select the months when the job should run.
c.![]() In the
Days in Month
section, select the dates in the month(s) when the job should run.
In the
Days in Month
section, select the dates in the month(s) when the job should run.
Step 9![]() Specify repetition in months for a calendar (monthly with weeks):
Specify repetition in months for a calendar (monthly with weeks):
b.![]() In the
Months
section, select the months when the job should run.
In the
Months
section, select the months when the job should run.
c.![]() In the
Days in Week
section, select the days of the week when the job should run.
In the
Days in Week
section, select the days of the week when the job should run.
d.![]() In the
Occurrence
section, select the occurrence for the day(s) selected. For example,
2nd
means the second time the day(s) selected in the
Days of Week
section occurs in the month.
In the
Occurrence
section, select the occurrence for the day(s) selected. For example,
2nd
means the second time the day(s) selected in the
Days of Week
section occurs in the month.
e.![]() In the
Adjust by field
, select the number of days by which to offset all the dates forecasted. For example, three days after the last Friday of each month. If the last Friday is the 31st, the job will run on the 3rd day of the next month.
In the
Adjust by field
, select the number of days by which to offset all the dates forecasted. For example, three days after the last Friday of each month. If the last Friday is the 31st, the job will run on the 3rd day of the next month.
f.![]() Click the
Forecast
tab. The results of the computation from the specification made on the
Details
tab are shown.
Click the
Forecast
tab. The results of the computation from the specification made on the
Details
tab are shown.
Step 10![]() Set the
Details
tab for a subset calendar:
Set the
Details
tab for a subset calendar:
a.![]() From the
Occurrence
drop-down menu, select the instance of the dates of the calendar that you want to use. For example, if you want to use all the days this calendar includes, select
Every
.
From the
Occurrence
drop-down menu, select the instance of the dates of the calendar that you want to use. For example, if you want to use all the days this calendar includes, select
Every
.
b.![]() From the
Calendar
field drop-down menu, select the calendar for which this calendar will be a subset. The drop-down menu lists all available calendars.
From the
Calendar
field drop-down menu, select the calendar for which this calendar will be a subset. The drop-down menu lists all available calendars.
c.![]() From the
Time Frame
field, select the exact time period for your calendar to run. For example, you can select the
13th week
or the month of
March
.
From the
Time Frame
field, select the exact time period for your calendar to run. For example, you can select the
13th week
or the month of
March
.
d.![]() If you want to base your list calendar on a fiscal calendar, you must already have a fiscal calendar defined. If you have any fiscal calendars defined, they will be listed and available from the
Based on Fiscal
field drop-down menu.
If you want to base your list calendar on a fiscal calendar, you must already have a fiscal calendar defined. If you have any fiscal calendars defined, they will be listed and available from the
Based on Fiscal
field drop-down menu.
e.![]() In the
Adjust by... days
field, you select the number of days, if any, by which to shift the list calendar forward (positive numbers) or backward (negative numbers).
In the
Adjust by... days
field, you select the number of days, if any, by which to shift the list calendar forward (positive numbers) or backward (negative numbers).
Step 11![]() Click the
Conditions
tab, and set any conditions you want to place on your calendar. For more information about conditions, see “Condition Dialog” section.
Click the
Conditions
tab, and set any conditions you want to place on your calendar. For more information about conditions, see “Condition Dialog” section.
Step 12![]() To type a description for the calendar, click the
Description
tab. You can add or edit a description for the calendar (up to 255 characters).
To type a description for the calendar, click the
Description
tab. You can add or edit a description for the calendar (up to 255 characters).
Deleting Calendars
You can delete a calendar that is no longer in use. You cannot delete a calendar that is associated with a job. Before deleting a calendar, you must first verify that the calendar is not associated with any jobs.
Step 1![]() From the
Navigator
pane, select
Definitions>Calendars
to display the
Calendars
pane.
From the
Navigator
pane, select
Definitions>Calendars
to display the
Calendars
pane.
Step 2![]() Ensure that the calendar can be deleted.
Ensure that the calendar can be deleted.
a.![]() Right-click the calendar you want to delete and select
Where used
from the context menu to display the
Jobs Using
pane.
Right-click the calendar you want to delete and select
Where used
from the context menu to display the
Jobs Using
pane.
b.![]() If an information dialog confirms that no jobs use the calendar you can delete the calendar.
If an information dialog confirms that no jobs use the calendar you can delete the calendar.
If the calendar is used in any jobs, a Jobs Using Calendar report displays that lists the jobs that use that calendar.
c.![]() Go to the jobs listed in the Jobs Using Calendar report and change the calendar the job uses.
Go to the jobs listed in the Jobs Using Calendar report and change the calendar the job uses.
Step 3![]() When no jobs are using the calendar, right-click the calendar and select
Delete Calendar
from the context menu or select the calendar and either press the
Delete
key on your keyboard or click the
Delete
button on the TES toolbar.
When no jobs are using the calendar, right-click the calendar and select
Delete Calendar
from the context menu or select the calendar and either press the
Delete
key on your keyboard or click the
Delete
button on the TES toolbar.
Step 4![]() Click
Yes
at the
Confirmation
prompt to delete the calendar.
Click
Yes
at the
Confirmation
prompt to delete the calendar.
Determining Which Jobs are Using a Specific Calendar
You can determine which jobs are presently using a calendar. The jobs do not have to be in the production schedule.
To determine which jobs are using a specific calendar:
Step 1![]() From the
Navigator
pane, select
Definitions>Calendars
to display the
Calendars
pane.
From the
Navigator
pane, select
Definitions>Calendars
to display the
Calendars
pane.
Step 2![]() Right-click the calendar and select
Where Used
from the context menu
Right-click the calendar and select
Where Used
from the context menu
Step 3![]() Choose either
By Jobs
or
By Calendars
.
Choose either
By Jobs
or
By Calendars
.
Step 4![]() In the
Information
pane, click
OK
.
In the
Information
pane, click
OK
.
Viewing Calendars
From the Navigator pane, select Definitions>Calendars to display the Calendars pane. This pane displays all the calendars that are Public , owned by you and owned by workgroups to which you belong.
Viewing Calendar Dates
Step 1![]() From the
Navigator
pane, select
Definitions>Calendars
to display the
Calendars
pane.
From the
Navigator
pane, select
Definitions>Calendars
to display the
Calendars
pane.
Step 2![]() Double-click the calendar to view, or right-click and select
Edit Calendar
from the context menu.
Double-click the calendar to view, or right-click and select
Edit Calendar
from the context menu.
Step 3![]() If the calendar is a list calendar, the dates appear in the
Details
tab of the definition dialog. Otherwise, the dates appear in the
Forecast
tab.
If the calendar is a list calendar, the dates appear in the
Details
tab of the definition dialog. Otherwise, the dates appear in the
Forecast
tab.
Fiscal Calendar Pane
Many companies start their financial (fiscal) year on a date other than January 1. They may also have more than one fiscal calendar, for example, one calendar for the accounting department and one calendar for the operations department.
TES’s fiscal calendar functionality allows you to set up one or multiple fiscal calendars. You can then use a fiscal calendar as a base for subsequent calendars that you create, instead of basing your calendars on the January-December year.
Fiscal Calendar Interface
From the Navigator pane, select Definitions>Fiscal Calendars to display the Fiscal Calendars pane.
Buttons
- Add Fiscal Calendar —Displays the Fiscal Calendar Definition dialog to add a fiscal calendar.
- Edit Fiscal Calendar —Displays the Fiscal Calendar Definition dialog to edit a fiscal calendar.
- Copy Fiscal Calendar —Creates a copy of the selected calendar with the same information as the selected calendar, except for the name.
- Delete Fiscal Calendar —Removes the fiscal calendar definition from the TES database.
- Refresh —Updates the data in the current pane.
- Print —Displays the Reports pane to view and print your fiscal calendars. For more information, see “Monitoring Production” section .
Search Field
Enter text that you want to search for within the columns displayed into this field.
Note This field at the top right of the grids will only search text columns that are not grayed out and are string-based. See “Searchable Columns” section.
Fiscal Calendars Preferences Dialog
If you select Preferences from the View main menu while viewing the Fiscal Calendars pane, the Fiscal Calendars Preferences dialog displays.
From this dialog, you can select which columns will be visible in the Fiscal Calendars pane and in what order they will be displayed.
Navigator Context Menu
When you right-click in the Navigator pane while viewing the Fiscal Calendars pane, the Navigator context menu displays.
The Fiscal Calendars Navigator context menu contains the following options:
- Add Fiscal Calendar —Displays the Fiscal Calendar Definition dialog to add a new fiscal calendar. Has the same function as the Add Fiscal Calendar button.
- Preferences —Displays the Preferences dialog for the Fiscal Calendars pane.
- Print —Displays the Reports pane to view and print your fiscal calendar definitions. Has the same function as the Print button on the toolbar. For more information, see “Monitoring Production” section .
- Export —Saves the data in the current pane as an ASCII text file. You can then use the file data in other applications.
- Refresh —Updates the data in the current pane.
Fiscal Calendar Pane Context Menu
When you right-click in the Fiscal Calendar pane, the Fiscal Calendar pane context menu displays.
The Fiscal Calendar pane context menu contains the following options:
- Add Fiscal Calendar —Displays the Fiscal Calendar Definition dialog to add a new fiscal calendar.
- Edit Fiscal Calendar —Displays the Fiscal Calendar Definition dialog to edit an existing fiscal calendar. You can change the dates, whether the calendar is public, and/or the name of the selected calendar.
- Delete Fiscal Calendar —Deletes the fiscal calendar selected.
- Modify Fiscal Year —Displays the Fiscal Year Definition dialog to change the fiscal year. You can select which quarter to add a week to and change how the quarter is broken down.
- Print —Displays the Reports pane to view and print your fiscal calendar definitions. For more information, see “Monitoring Production” section .
Fiscal Calendar Definition Dialog
The Fiscal Calendar Definition dialog displays when you add or edit a fiscal calenda r from the Fiscal Calendars pane .
This dialog contains the following elements:
- Fiscal Calendar Name —The name of your fiscal calendar here.
- Fixed Start —Checking this box ensures that the fiscal year always starts on the same date. Since a 4-4-5 quarter adds up to 91 days and 91 x 4 (quarters) = 364 days, the following fiscal year would begin a day early without an additional day being included. Checking this option also accounts for the additional day during leap years.
- If Fixed Start is not selected (specifying rolling fiscal or no fixed start), then the Effective Year option becomes available.
- Effective Year —This is a read-only field and automatically defaults to the previous year. Effective Year is to allow for the year 2000 dates when compiling calendars that use fiscal years.
- Starting Month —The month when your fiscal calendar begins.
- Starting Day —The day of the month when your fiscal calendar begins.
- Quarter Breakdown (Weeks in each month of quarter) —The number of weeks in each month of each fiscal quarter. A quarter has three months with one month consisting of 5 weeks and the other two months containing four weeks. You can rearrange the sequence of the weeks within the quarter.
The default for the Quarter Breakdown field is 4-4-5 . The 4-4-5 value indicates:
–![]() There are
4
weeks in the first month of a quarter.
There are
4
weeks in the first month of a quarter.
–![]() There are
4
weeks in the second month of a quarter.
There are
4
weeks in the second month of a quarter.
–![]() There are
5
weeks in the last month of a quarter.
There are
5
weeks in the last month of a quarter.
This adds up to 13 weeks per quarter: 13 weeks x 4 (quarters) = 52 weeks (one year).
Adding Fiscal Calendars
Step 1![]() From the
Navigator
pane, select
Definitions>Fiscal Calendars
to display the
Fiscal Calendars
pane.
From the
Navigator
pane, select
Definitions>Fiscal Calendars
to display the
Fiscal Calendars
pane.
Step 2![]() Click the
Add
button on the TES toolbar or right-click and select
Add Fiscal Calendar
from the context menu.
Click the
Add
button on the TES toolbar or right-click and select
Add Fiscal Calendar
from the context menu.
Step 3![]() The
Fiscal Calendar Definition
dialog appears. For more information about the
Fiscal Calendar Definition
dialog, see
“Fiscal Calendar Definition Dialog” section
.
The
Fiscal Calendar Definition
dialog appears. For more information about the
Fiscal Calendar Definition
dialog, see
“Fiscal Calendar Definition Dialog” section
.
Editing Fiscal Calendars
Step 1![]() From the
Navigator
pane, select
Definitions>Fiscal Calendars
to display the
Fiscal Calendars
pane.
From the
Navigator
pane, select
Definitions>Fiscal Calendars
to display the
Fiscal Calendars
pane.
Step 2![]() Select the calendar to edit and click the
Edit
button on the TES toolbar or right-click the calendar and select
Edit Fiscal Calendar
from the context menu to display the
Fiscal Calendar Definition
dialog.
Select the calendar to edit and click the
Edit
button on the TES toolbar or right-click the calendar and select
Edit Fiscal Calendar
from the context menu to display the
Fiscal Calendar Definition
dialog.
For more information about the Fiscal Calendar Definition dialog, see “Fiscal Calendar Definition Dialog” section .
Editing the Fiscal Year
If the Fixed Start option is not selected for a fiscal calendar, the fiscal year must be modified to correct calendar progression. To compensate for the annual loss of a day (two days during leap year), a week must be added to one of the fiscal years.
Step 1![]() From the
Navigator
pane, select
Definitions>Fiscal Calendars
to display the
Fiscal Calendars
pane.
From the
Navigator
pane, select
Definitions>Fiscal Calendars
to display the
Fiscal Calendars
pane.
Step 2![]() Select one of the fiscal calendars and right-click to display a context menu.
Select one of the fiscal calendars and right-click to display a context menu.
Step 3![]() Select
Modify Fiscal Year
to display the
Fiscal Year Definition
dialog.
Select
Modify Fiscal Year
to display the
Fiscal Year Definition
dialog.
Job Classes Pane
Job classes are used to organize and group jobs into categories. Job classes can be used in a queue’s filter to ensure that only jobs belonging to that class will run in that queue. This lets you control how jobs of a certain class run.
For example, if you had a set of payroll jobs and a set of manufacturing jobs, you could categorize those jobs (and job groups) into a Payroll job class and a Manufacturing job class. Define two queues: one that only accepts jobs in the Payroll job class and one that only accepts jobs in the Manufacturing job class.
If the Manufacturing jobs have a higher priority than the payroll jobs, you can set the manufacturing queue’s Queue Priority to a higher value than the Payroll queue.
Note If you assign a job class to a job group, all child jobs within that job group without an assigned job class are automatically assigned the group’s job class.
You can also associate job events to a designated job class so that those job events will apply to all members of the job class. The sequential order of these job events that are assigned to the job class can also be managed. The timing of the job events for the job class can divided into those job events that occur before and after the job’s individual job events. The sequence of these job class events that occur before and after can also be arranged in the order needed.
Job classes cannot be owned by any particular user or workgroup and do not have a Public option since they are intrinsically public; that is, available to all TES users. Anyone can use job classes unless their security policy expressly prohibits it.
TES does not provide any pre-defined or default job classes.
Job Classes Interface
From the Navigator pane, select Definitions>Job Classes to display the Job Classes pane.
Buttons
- Add Job Class —Displays the Job Class Definition dialog to add a new job class.
- Edit Job Class —Displays the Job Class Definition dialog to edit an existing job class definition.
- Copy Job Class —Creates a copy of the selected job class with the same information as the selected job class, except for the name.
- Delete Job Class —Removes the selected job class definition from the TES database.
- Print —Displays the Reports pane to view and print your job class definitions. For more information, see “Monitoring Production” section .
- Refresh —Updates the data in the current pane.
Search Field
Enter text that you want to search for within the columns displayed into this field.
Note This field at the top right of the grids will only search text columns that are not grayed out and are string-based. See “Searchable Columns” section.
Job Classes Preferences Dialog
If you select Preferences from the View main menu while viewing the Job Classes pane, the Job Classes Preferences dialog displays.
From this dialog, you can select which columns are displayed in the Job Classes pane and in what order they appear.
Navigator Context Menu
When you right-click in the Navigator pane while viewing the Job Classes pane, the Navigator context menu displays.
The Job Classes Navigator context menu contains the following elements:
- Add Job Class —Displays the Job Class Definition dialog to add a new job class. Has the same function as the Add Job Class button.
- Preferences —Displays the Preferences dialog for the Job Classes pane.
- Print —Displays the Reports pane to view and print your job class definitions. Has the same function as the Print button on the toolbar. For more information, see “Monitoring Production” section .
- Export —Saves the data in the current pane as an ASCII text file. You can then use the file data in other applications.
- Refresh —Updates the data in the current pane.
Job Classes Pane Context Menu
When you right-click in the Job Classes pane, the J ob Classes pane context menu displays.
The Job Classes pane context menu contains the following options:
- Add Job Class —Displays the Job Class Definition dialog to add a new job class.
- Edit Job Class —Displays the Job Class Definition dialog to edit an existing job class.
- Delete Class —Deletes the selected job class definition.
- Print —Displays the Reports pane to view and print your job class definitions. For more information, see “Monitoring Production” section
Job Class Definition Dialog
The Job Class Definition dialog displays when you add or edit a job class.
This dialog contains the following elements:
- Job Class Name —The name of the job class (up to 60 characters). The name must be unique.
- Before tab —Lists the job events that must occur before the job instance’s own job events. You arrange the order of the job events listed here to specify the sequence that the job events should follow.
- After tab —Lists the job events that must occur after the job instance’s own job events. You arrange the order of the job events listed here to specify the sequence that the job events should follow.
The following fields are available on both tabs.
- Event Name column —The name assigned to the job event.
- Event Trigger column —The condition that triggers the associated job event.
- Insert —This button displays the Select Job Event dialog where you can select one or more predefined job events to assign to the job class. Job events are created from the Job Events pane.
- Edit —This button displays the Job Event Definition dialog to modify the selected job event.
- Delete —This button removes the selected job event from the list.
- Clear —This button deletes all of the defined job events clearing the field.
- Move Up —This button moves the selected job event up in the sequence of job events.
- Move Down —This button moves the selected job event down in the sequence of job events.
- Description —This tab is used to enter a description of the job class and its purpose.
Adding Job Classes
Step 1![]() From the
Navigator
pane, select
Definitions>Job Classes
to display the
Job Classes
pane.
From the
Navigator
pane, select
Definitions>Job Classes
to display the
Job Classes
pane.
Step 2![]() Right-click and select
Add Job Class
from the context menu or click the
Add
button on the TES toolbar to display the
Job Class Definition
dialog.
Right-click and select
Add Job Class
from the context menu or click the
Add
button on the TES toolbar to display the
Job Class Definition
dialog.
Step 3![]() In the
Job Class
field, type a name for your job class. This is the name that you refer to when assigning a job class in the
Job Definition
or
Job Group Definition
dialog.
In the
Job Class
field, type a name for your job class. This is the name that you refer to when assigning a job class in the
Job Definition
or
Job Group Definition
dialog.
Step 4![]() Associate job events with a job class by clicking
Insert
on the
Job Events
tab to display the
Select Job Event
dialog and the defined job events. You can designate that these job events run before or after the job’s own job events. Use the
Move Up
or
Move Down
buttons to arrange the sequence that the job events should run.
Associate job events with a job class by clicking
Insert
on the
Job Events
tab to display the
Select Job Event
dialog and the defined job events. You can designate that these job events run before or after the job’s own job events. Use the
Move Up
or
Move Down
buttons to arrange the sequence that the job events should run.
Step 5![]() Type a description of the job class in the
Description
field (optional).
Type a description of the job class in the
Description
field (optional).
Deleting a Job Class
You cannot delete a job class that is presently in use by a job.
Step 1![]() From the
Navigator
pane, select
Definitions>Job Classes
to display the
Job Classes
pane.
From the
Navigator
pane, select
Definitions>Job Classes
to display the
Job Classes
pane.
Step 2![]() Right-click the job class and select
Delete Job Class
from the context menu or select the job class to delete and click the
Delete
button on the TES toolbar.
Right-click the job class and select
Delete Job Class
from the context menu or select the job class to delete and click the
Delete
button on the TES toolbar.
Editing a Job Class
Step 1![]() From the
Navigator
pane, select
Definitions>Job Classes
to display the
Job Classes
pane.
From the
Navigator
pane, select
Definitions>Job Classes
to display the
Job Classes
pane.
Step 2![]() Double-click the job class whose properties you want to view, or select the job class and click the
Edit
button or right-click the job class and select
Edit Job Class
from the context menu to display the
Job Class Definition
dialog.
Double-click the job class whose properties you want to view, or select the job class and click the
Edit
button or right-click the job class and select
Edit Job Class
from the context menu to display the
Job Class Definition
dialog.
Step 3![]() In the
Job Class
field, you can edit the name of the job class. This is the name that you refer to when assigning a job class in the
Job Definition
or
Job Group Definition
dialog.
In the
Job Class
field, you can edit the name of the job class. This is the name that you refer to when assigning a job class in the
Job Definition
or
Job Group Definition
dialog.
Step 4![]() Edit the description of the job class in the
Description
field (optional).
Edit the description of the job class in the
Description
field (optional).
Viewing the Properties of a Job Class
To view the properties of a job class:
Step 1![]() From the
Navigator
pane, select
Definitions>Job Classes
to display the
Job Classes
pane.
From the
Navigator
pane, select
Definitions>Job Classes
to display the
Job Classes
pane.
Step 2![]() Double-click the job class whose properties you want to view, or select the job class and click the
Edit
button or right-click the job class and select
Edit Job Class
from the context menu.
Double-click the job class whose properties you want to view, or select the job class and click the
Edit
button or right-click the job class and select
Edit Job Class
from the context menu.
Viewing Job Classes
Job classes are displayed in the Job Classes pane using a three-column table in alphabetical order. Job classes can also be viewed from the Job or J ob Group Definition dialogs when assigning a job class to a job or job group.
From the Navigator pane, select Definitions>Job Classes to display the Job Classes pane.
Resources Pane
Jobs often require external resources to run to completion. The term, resources, can be used to refer to any physical or virtual asset that is used during the processing of a job. This resource may be a piece of hardware such as a printer or it may be software like a database. Agents and queues are also considered resources that are used during the processing of a job. By officially designating an asset as a resource, the use of that resource can be quantified to limit how many jobs can use it at once.
It is important to remember that a resource can still be used in TES even if it is not designated as a resource. Designating something as a resource is just a more effective way to manage access to it. While multiple jobs can use the same resource at the same time, a numerical limit is imposed on the resource during its definition to restrict access by quantifying how much of the resource is available to each individual job.
While a job can still use an asset even if it is not specifically assigned to it, access management of that asset is bypassed. The purpose of designating an asset as a resource is to prevent the resource from being overwhelmed by simultaneous demand from multiple jobs and to impose order on the use of the resource. Once an asset is defined as a resource the operator should ensure that the resource is assigned to all jobs that need that resource to ensure that proper management of the resource is enforced. Jobs that use the resource without the constraints imposed by resource management negate the benefits gained from this feature and receive the lowest priority for access.
If a resource is assigned to a job then that job cannot run without the resource. The resource is managed by imposing a limit to the number of jobs that can simultaneously use it, ensuring a more efficient allocation of the resource. A job with an assigned resource is guaranteed the use of that resource until the job completes. When the job runs, it locks up its share of the resource so that no other job can use that portion of the resource until the job is done. When the job completes, its share of the resource is released for other jobs to use. While a job can have multiple resources assigned to it, the job cannot run until all of the resources assigned to it are available. None of the resources are locked up by the job until all of the resources are available and the job can run. This “all or nothing” approach prevents resources from being tied up needlessly if they cannot be used.
Note If you assign a job class to a job group, all child jobs within that job group without an assigned job class are automatically assigned the group’s job class.
System inefficiencies are created when too many jobs try to use a resource at the same time. Assigning a specific amount of a defined quantity of a resource to each job ensures that the resource is not deluged with more work than it can handle. Queues and dependencies can be used to control how many jobs access a resource at the same time but they are insufficient in certain instances.
Queues offer a way to manage access to a resource if the job does not require more than one resource to run to completion. However, queues are ineffective at managing a job's access to a resource if the job requires more than one resource as it processes. On the other hand, if variable dependencies are constructed to control the use of a resource by a job, if the job rolls over to the next production day, then a situation arises where two copies of the job will be updating the variable.
When defining a resource, a limit or numeric quantity is specified. If the limit is one, then the resource is single-threaded and only one job at a time can use it. If the limit is six then up to six jobs can use the resource at once. However, a job may require multiple quantities of the resource at a time. For example, one job may require three licensed connections to a database resource while another job needs two parts of the possible accesses to the resource. Even if a single use is available it is possible that it may go unused even if jobs are waiting to use the resource because the other jobs may require more than one access to the resource.
Resources Interface
From the Navigator pane, select Definitions>Resources and then select either Virtual Resources or System Resources to display the Resources pane.
You can double-click a resource listed in the Resources pane to display its definition dialog to view information about it.
The Resources pane has the following features:
Buttons
- Add Resource —Displays the Resource Definition dialog to can add a new queue.
- Edit Resource —Displays the Resource Definition dialog to edit an existing queue.
- Copy Resource —Creates a copy of the selected resource with the same information as the selected resource, except for the name.
- Delete Resource —Removes the selected resource definition from the TES database.
- Refresh —Updates the data in the current pane.
- Print —Displays the Report window to view and print the defined resources that are listed.
Search Field
Enter text that you want to search for within the columns displayed into this field.
Note This field at the top right of the grids will only search text columns that are not grayed out and are string-based. See “Searchable Columns” section.
Columns
- Name —The name of the resource.
- Owner —The name of the owner of the resource. The user who defines the resource is the default user but ownership can be transferred by modifying the Owner field in the Resource Definition dialog.
- Limit —Indicates the quantity of a defined resource. Usually the limit is one but it can be any quantity. For example, a resource that is a database may be licensed for up to three simultaneous connections. Then that resource would have a limit of three.
- In Use —Indicates how much of the resource's limit is used by a job.
- Enabled —Whether or not the resource is enabled (or active) and available for use.
- Public —Whether or not the resource is available to other users.
- Description —The description of the resource.
Resources Preferences Dialog
If you select Preferences from the View main menu while viewing the Resources pane, the Resources Preferences dialog displays.
From the Resources Preferences dialog, you can select which columns are displayed in the Resources pane and in what order they appear.
Navigator Context Menu
Right-clicking in the Navigator pane while viewing the Resources pane, displays a context menu.
The Navigator context menu contains the following elements:
- Add Virtual Resource —Displays the Virtual Resource Definition dialog to add a new queue. This option has the same function as the Add Resource button.
- Add System Resource —Displays the System Resource Definition dialog to add a new queue. This option has the same function as the Add Resource button.
- Preferences —Displays the Preferences dialog for the Resources pane.
- Print —Displays the Reports pane to view and print your resource definitions. This option has the same function as the Print button on the toolbar.
- Export —Saves the data in the current pane as an ASCII text file. You can then use the file data in other applications.
- Refresh —Updates the data in the current pane.
Resources Pane Context Menu
Right-clicking in the Resources pane, displays the Resources pane context menu.
This context menu contains the following options:
- Add Virtual Resource —Displays the Resource Definition dialog to add a new resource. Once defined, a resource is assigned to a job from the Resources tab of a job definition.
- Add System Resource —Displays the Resource Definition dialog to add a new resource. Once defined, a resource is assigned to a job from the Resources tab of a job definition.
- Edit Virtual Resource —Displays the Virtual Resource Definition dialog to edit the selected queue.
- Edit System Resource —Displays the System Resource Definition dialog to edit the selected queue.
- Delete Virtual Resource —Deletes the selected virtual resource.
- Delete System Resource —Deletes the selected virtual resource.
- Print —Prints the selected resource’s data.
Virtual Resource Definition Dialog
The Virtual Resource Definition dialog displays when adding or editing a virtual resource in the Resources pane.
Common To All Tabs
- Virtual Resource Name —The name of the virtual resource.
- Owner —The owner of the virtual resource. This can be an individual user or a TES workgroup. By default the owner is the user that defined the resource.
From this field, the ownership can be transferred to another owner.
- Limit —Indicates the quantity of a defined resource. By default, the limit is one but it can be any quantity. For example, a resource that is a database may be licensed for three simultaneous connections. Then that resource would have a limit of three.
- In Use —Indicates how much of the resource's limit is currently being used. This is a read-only field.
- Available —Indicates how much of the resource is still available to be used. This is a read-only field.
- Requested —The number of requested resources.
- Actual —The actual number of offline resources.
Description Tab
This tab is used to describe the resource and its purpose. This field can be used for notes about how the resource should be used and any special requirements or prerequisites.
Jobs Tab
The Jobs tab is a read-only tab providing information on the jobs that access this resource.
Locked Virtual Resources Tab
This tab lists the job instance that is currently locking up the virtual resource. When a job has all of its required resources and is ready to run, the job locks up the assigned resources for its exclusive use until the indicated job completes. Once a job starts running the resources assigned to it cannot be modified or deleted until the job completes. Once the job completes, the assigned resources are released to be used by other jobs. Any job listed without a value in this column is not currently running.
System Resource Definition Dialog
The System Resource Definition dialog displays when adding or editing a system resource in the Resources pane.
Agents that support published system resources provide information about those resources when a connection is established. System resource definitions are automatically created for published resources if they do not already exist for that connection type. The command displays “Published”.
You can view a read-only dialog when you double-click a published resource from within the System Resource pane.
You can create new system resource definitions by specifying commands that will periodically run on the agent machine to obtain the resource values.
Common To All Tabs
- Resource Name —The name of the system resource.
- Apply to all connection —Select this option if you want to apply the system resource to all connections.
- Variables —When you are in the Value field, click this button to enter a system, job or job event variable. You can use this function to set the value of the variable to the value of another variable. You can also set the variable to a string based on the values of other variables. The values of the variables are substituted at the time that the action is executed.
Command Tab
In the Command tab, provide the command to be executed, whether to use the command output or the exit code of the command as the resource value, the data type of the resource value, and the refresh rate.
Agents Tab
The Agents tab allows for the selection of an agent(s) to collect the resource for.
- If “Apply to all <type> connections” is selected, then the resource is collected for all agents of this type.
- If “Apply to all <type> connections” is not selected, then the agents to collect this resource for must be selected in this tab.
Agents that support published system resources will provide information about those resources when the connection is established.
Agent Lists Tab
The Agents Lists tab allows for the selection of an agent list(s) to collect the resource from.
- If “Apply to all <type> connections” is selected, then the resource is collected from all agent lists of this type.
- If “Apply to all <type> connections” is not selected, then the agent list(s) to collect this resource from must be selected in this tab.
Agents that support published system resources will provide information about those resources when the connection is established.
Description Tab
This tab is used to describe the resource and its purpose. This field can be used for notes about how the resource should be used and any special requirements or prerequisites.
Related Agents Dialog
The Related Agents dialog is accessed via the context menu on System Resource pane and contains a list of agents related to the selected system resource.
This dialog contains the following elements:
- Agent Name — the name of the agent related to the selected resource
- Current Value — the current value of the selected resource for each agent
- Refresh Rate — the refresh rate for the resource. When the connection to the agent is made, the master will tell the agent what the refresh rate should be for published system resources. The refresh rate will be kept globally for all agents, but this can also be overridden for individual agents.
- Last Refresh — the date of the last refresh for the resource
Resource Requirement Definition Dialog
The
Resource Requirement Definition
dialog is used to add or edit an existing virtual resource to a job from the
Resources
tab of a job definition. From this dialog, you specify which resource and how much of the resource is needed by a job. If the
Enabled
option is not selected in the resource's definition, then the resource does not display in the
drop-down list.
This dialog contains the following elements:
- Resource —The name of the defined resource. Only resources that are enabled are available from this field. Once the resource is selected, its limit displays beside the Amount Needed field.
- Amount Needed —The amount of the resource's specified limit that the job requires. This number cannot exceed the limit of the resource noted as (Max) beside the field.
System Resource Requirement Definition Dialog
The System Resource Requirement Definition dialog is used to add or edit an existing virtual resource to a job from the Resources tab of a job definition. From this dialog, you specify which resource and how much of the resource is needed by a job. If the Enabled option is not selected in the resource's definition, then the resource does not display in the drop-down list.
Defining a Resource
Just about anything can be defined as a resource. The resource can be a physical item like a disk partition or a virtual item like a database. Normally you would not define something as a resource unless you want to manage the amount of access to that resource.
Step 1![]() From the
Navigator
pane, select
Definitions>Resources
to display the
Resources
pane.
From the
Navigator
pane, select
Definitions>Resources
to display the
Resources
pane.
Step 2![]() Click the
Add Resource
button or right-click in the
Resources
pane and select the
Add Resource
option to display the
Resource Definition
dialog.
Click the
Add Resource
button or right-click in the
Resources
pane and select the
Add Resource
option to display the
Resource Definition
dialog.
Step 3![]() In the
Resource Name
field, enter a name for the resource that helps you identify the resource.
In the
Resource Name
field, enter a name for the resource that helps you identify the resource.
Step 4![]() In the
Owner
field, select a user to own the resource.
In the
Owner
field, select a user to own the resource.
Step 5![]() In the
Limit
field, specify a maximum number of shares on the resource. The value entered here will limit access to this resource to no more than the designated amount. The default is one but any number up to 32,767 can be entered here.
In the
Limit
field, specify a maximum number of shares on the resource. The value entered here will limit access to this resource to no more than the designated amount. The default is one but any number up to 32,767 can be entered here.
The In Use field will display the quantity of designated shares of the resource is being currently used while the Available field displays how much of the resource is still available to be used.
Determining Which Jobs are Using a Resource
You can determine which jobs are using a resource by examining the Jobs tab in the Resource Definition dialog. This is handy when you need to determine where a resource’s shares are being used, especially if you have a job that is waiting on access to that resource before it can run.
To determine which jobs are using a resource:
Step 1![]() From the
Navigator
pane, select
Definitions>Resources
to display the
Resources
pane.
From the
Navigator
pane, select
Definitions>Resources
to display the
Resources
pane.
Step 2![]() Double-click the desired resource to display its definition.
Double-click the desired resource to display its definition.
Step 3![]() click the
Jobs
tab to display a list of the jobs that are assigned the resource.
click the
Jobs
tab to display a list of the jobs that are assigned the resource.
Step 4![]() The number of resource shares assigned to the job is listed in the
Amount
column. Only the jobs that are currently running will display a value in the
Locked
column. This value is the job instance ID number.
The number of resource shares assigned to the job is listed in the
Amount
column. Only the jobs that are currently running will display a value in the
Locked
column. This value is the job instance ID number.
Restricting Use of a Resource
To restrict the use of a resource to only designated users, clear the Public option at the bottom of the Resource Definition dialog. You can than assign ownership of the resource to a specific user account or assign it to a workgroup so that only members of that workgroup can access the resource.
Overriding a Locked Up Resource
If a resource is running at its designated limit, no other jobs can run until one of the currently running jobs completes, freeing up its share of the resource. If you are unable to wait until shares of the resource open up, you can always increase the number of shares of the resource.
Queues Pane
TES includes a queue manager to optimize throughput and the allocation of system resources for both scheduled and unscheduled jobs. The queue manager assigns jobs to queues when they are ready to run and makes decisions about when to launch them based on available execution slots. The capacity that is available is determined either by the system queue limit or the sum of the job limit values for each licensed agent, whichever is smaller.
Queues can limit the number of jobs running on a computer (or network of computers) at any given time. The queue manager always decides which jobs to launch based on a priority structure that includes queue hierarchies, queue limit, job limits, queue priority levels and job priority levels.
Queues are the main factor used to control when and how a job runs but there are other factors that influence when a job actually runs. Even if the queue manager releases a job to its queue, the job will not necessarily run at that time unless other factors that restrict the release of jobs are met. If the system is not running at the system queue’s capacity limit, if a slot is available on the job's designated queue, if a slot is available on the job’s designated agent and if any resources the job requires are available, then a job with all its dependencies met can run immediately.
Hierarchical Queue Structure
Queues are hierarchical. You can see the level of each queue in the Queues console pane by observing the level of indentation from the left edge of the pane. System Queue , the default queue, is at the root level of the hierarchy. All other queues fall below the system queue.
You can expand or collapse parts of the queue tree using the collapsed and expanded signs, the same way you use the Navigator pane of the Tidal Web client . Each queue in the hierarchy can contain jobs, job groups and other queues.
A parent queue displays above and to the left of its children on the Queues pane. All queues to the left of a queue are parent queues. A child queue is nested below and to the right of a queue. All queues to the right of the system queue are child queues. Child queues are restricted by the limits and priority level of their parents.
The queue record also shows each queue’s limit and priority level. The limit defines how many jobs can run from that queue at the same time. The priority indicates which queue takes precedence when the Queue Manager searches for the next job to run.
Queue Filters
Queue filters determine how jobs are assigned to queues when they are ready to run. Queue filters include and/or exclude jobs based on the job’s properties. When a job is ready to run, the queue manager uses the filters to find a queue for the job. If there is more than one queue that the job can be assigned to, the queue with the highest priority is chosen. If there is no queue that matches the job’s properties, the job will enter the system queue and will be evaluated with the lowest priority.
How Jobs are Assigned to Queues
The queue manager is responsible for assigning jobs to queues. You cannot directly assign a job to a queue in the job definition, but you can set up queues so that you control which jobs get assigned to them. By setting up queues to accept jobs based on their job class (using job class queue filters), you can indirectly assign jobs to queues by directly assigning them to a job class in the job definition.
When a job is ready to run, the queue manager begins its search through the queue hierarchy to find the most appropriate queue to assign the job to. Starting one level below the system queue, in priority order (high to low) it chooses the first match of job properties with queue filters, then moves to the next level, if any. This process is repeated until there are no more levels, or until there are no more queues that will accept the job. If a job cannot be matched with any queue, it is added to the system queue.
For example, the figure below shows how four jobs are assigned to four different queues. The second level of queues uses queue filters that accept either scheduled jobs or unscheduled jobs. The third level, under the queue that accepts scheduled jobs only (Queue A), has three queues that accept jobs based on their job class. There is a third catch-all queue (Queue E) in this level that accepts all scheduled jobs that are not of the Payroll or Accounting job class. Jobs can be assigned to the parent if no child queue qualifies.
The following table describes the job assignments:
How the Queue Manager Selects the Next Job to Run
The queue manager determines which job to run next according to a series of checks. The following list describes each check in order.
- Launch immediately —The queue manager continually monitors for jobs entering queues with this option set. When a job enters this queue it is run immediately, even if the system is running at full capacity (at the system queue limit, or at an agent’s job limit).
- System queue limit —The queue manager then monitors the total number of jobs running and compares it to the system queue limit value. If the system queue limit value is greater than the number of jobs currently running, the queue manager begins its search for the highest priority job starting with the following search criteria.
–![]() Queue hierarchy
—The queue manager recursively evaluates all active and open queues in priority order to determine whether it can launch jobs that are waiting in the queue. Queues with the same priority are selected at random.
Queue hierarchy
—The queue manager recursively evaluates all active and open queues in priority order to determine whether it can launch jobs that are waiting in the queue. Queues with the same priority are selected at random.
–![]() Queue limit
—The queue manager compares the number of jobs running in the queue with the queue’s limit. Queues running at their limit are skipped. Queues not running at their limit use the job priority check.
Queue limit
—The queue manager compares the number of jobs running in the queue with the queue’s limit. Queues running at their limit are skipped. Queues not running at their limit use the job priority check.
–![]() Job priority
—The job with the highest priority that is to be run on an agent not running at its limit is selected. If two or more jobs exist with the same priority, the job that was ready the earliest is the job that is run first.
Job priority
—The job with the highest priority that is to be run on an agent not running at its limit is selected. If two or more jobs exist with the same priority, the job that was ready the earliest is the job that is run first.
The system queue is used for all default jobs and is the queue with the lowest priority.
Job Selection Examples
The following examples use a simple queue hierarchy made up of four queues. The examples assume that we have not reached the agent limits. The queue principles can apply to hierarchies of any size.
Example 1: Job Selection Based On Queue Hierarchy
In this queue setup, the system queue has a job limit of 10. This means that no more than ten jobs can run at the same time, no matter where they are run. The system queue has no queue priority level setting because no other queue can exist at the same level in the hierarchy. All queue limits and queue priorities are constant throughout the examples. The system is currently running at its limit.
If any one of the running jobs complete, the queue manager selects the highest priority job of the four waiting in Queue C, even though Queue A has a higher queue priority, because Queue C is at the lowest level in the hierarchy, is not running at its limit and has jobs waiting.
Example 2: Job Selection Based On Queue Limits and Queue Priority
Job Selected Based On Queue Limit
If a job completes in Queue B, the next job selected will be the highest priority job in Queue B, even though it is a lower priority queue than Queue C, and Queue C has jobs waiting in it. This is because Queue C is already running at its limit.
Job Selected Based On Queue Priority
Queue B is not running at its limit (10). This is because Queue B has a lower queue priority than Queue C. The queue manager has selected as many jobs as possible from the highest priority queue —up to it’s queue limit (5). What is remaining of the overall system limit is then run from the lower priority queue (10 —5 = 5).
Guidelines for Creating Queues
The following are a set of guidelines to help you create queues that meet your scheduling needs. These guidelines are suggestions, not requirements. The way your queue hierarchy is structured is entirely up to you.
- Queue Names —Use queue names that define what the queue is used for. A queue named Manufacturing Jobs makes more sense than a queue named A1.
- Queue Hierarchies and Queue Filters —Hierarchies, combined with queue filters let you create specific queues for specific types of jobs, giving you more task management control. Hierarchies also help you avoid mistakes by visually organizing how jobs run in the overall schedule. For example, you could have each queue parent only accept jobs of a particular class. You could then subdivide child queues by having each accept jobs that are owned by a particular workgroup or user.
- Child Queue Priority Levels —Give all sibling queues under the same parent different priority levels, otherwise the queues are selected randomly when a job is assigned.
- Job Limits and Queue Limits —The settings that control the number of jobs that run on a machine or network are the agent’s job limit and the queue’s queue limit. Consider these limits carefully. Though the system queue limit controls how many jobs can run overall at any one time, make sure it is large enough to accommodate the sum of all the agents’ job limit values.
You could set queues in hierarchies with limits reflecting the maximum acceptable load for the queue, and then regulate the entire system load by setting the system queue limit to a percentage of its maximum.
For example, suppose the system queue has three child queues only, Queue A, Queue B, and Queue C with a queue limit of 10 each. Thus, the maximum possible load is 30 jobs. However, you could set the system queue with a limit of 20, 66% of maximum, and only 20 jobs will run at one time, but the underlying queue functionality is the same. In effect, you decrease (or increase) your scheduling load with one control.
- Hours Available —You can submit jobs that do not need to be run immediately to a queue that is set to operate after hours. An example is to use this option to free up resources during the day.
When the time comes to operate, the jobs begin to run. When the queue closes, it continues to finish jobs that are being run, and halts all waiting jobs until the next time it is open.
- Launch Immediately —Create one or two queues with the launch immediately queue option for those emergency situations where a user absolutely needs a job to run as fast as possible. You will be able to use this for manually overriding a given assignment or for queue bumping.
- Queue Bumping —Add queue bumping for queues where some jobs never launch or wait too long to launch. The queue that is bumped to should have a higher priority than the previous queue, or the jobs may wait even longer to start.
- Catch All Child Queues —Lower-priority child queues with no queue filters at each family level will catch jobs accepted by the parent queue, but not accepted by its children’s queue filters. This reduces the chances that the system queue (the lowest priority queue) will run these jobs.
- Single Threading —You can use a queue to single-thread jobs that require exclusive access to a particular resource, such as to a database. For example, you can set up a queue with a job name mask queue filter to accept all jobs with the r1_* job name mask and give the queue a limit of 1. When you set up jobs that require the resource, add a job name prefix r1_ before the job name. The jobs with that particular prefix can now safely share the resource.
Compound Queue Filters
You can create compound queue filters by mixing queue filter types. Repeat the steps for creating each queue filter. With compound filters, all filter conditions must be true for a job to qualify for the queue.
If you include multiple queue filters of the same type, a job qualifies for the queue if any one of the conditions match for that type.
Successive Compounding of Child Filters
When jobs are assigned to queues, they pass through each parent filter before they reach their destination queue. The job in the destination queue therefore meets all the criteria of the destination queue’s filter plus each of its parent’s and grandparent’s queue filters. During the search for the right queue to assign to a job, each successive queue filter acts using AND logic, further narrowing down which queue will become its destination queue.
Assigning Jobs to Specific Queues
You cannot directly assign a job to a queue. However, you can configure your definitions to consistently assign jobs to run in specific queues. TES is designed with intelligent queue software that determines the best queue based on each job’s properties. Once the queue structure has been set up for your business cases, jobs will automatically enter the appropriate queue. For details on how to send a job to a specific queue, see “Sending Jobs to a Specific Queue” section .
Queues Interface
From the Navigator pane, select Definitions>Queues to display the Queues pane.
Buttons
- Add Queue —Displays the Queue Definition dialog to create a new queue.
- Edit Queue —Displays the Queue Definition dialog to edit the selected queue.
- Copy Queue —Creates a copy of the selected queue with the same information as the selected queue, except for the name.
- Delete Queue —Removes the selected queue definition from the TES database.
- Refresh —Updates the data in the current pane.
- Print —Displays the Reports pane to view and print your queues. For more information, see “Monitoring Production” section .
Search Field
Enter text that you want to search for within the columns displayed into this field.
Note This field at the top right of the grids will only search text columns that are not grayed out and are string-based. See “Searchable Columns” section.
Columns
- Status Light —Shows whether the queue is accepting jobs or not.
- Name —The name of the queue.
- Priority —The queue’s priority number.
- Limit —The maximum number of jobs the queue will accept.
- Active —How many jobs in the queue are active.
- Waiting —How many jobs in the queue are waiting to run
- Enabled —Whether or not the queue is enabled.
- Modified —The last time the queue definition was modified.
Queues Preferences Dialog
If you select Preferences from the View main menu while viewing the Queues pane, the Queues Preferences dialog displays.
From the Queues Preferences dialog, you can select which columns are displayed in the Queues pane and in what order they appear.
Navigator Context Menu
When you right-click in the Navigator pane while viewing the Queues pane, the Navigator context menu displays.
The Queues Navigator context menu contains the following elements:
- Add Queue —Displays the Queue Definition dialog to add a new queue. Has the same function as the Add Queue button.
- Preferences —Displays the Preferences dialog for the Queues pane.
- Print —Displays the Reports pane so that you can view and print your queue definitions. Has the same function as the Print button on the toolbar.For more information, see “Monitoring Production” section .
- Export —Saves the data in the current pane as an ASCII text file. You can then use the file data in other applications.
- Refresh —Updates the data in the current pane.
Queues Pane Context Menu
When you right-click in the Queues pane, the Queues pane context menu displays.
The following describes the items in the Queues pane context menu:
- Add Queue —Creates a new queue through the Queue Definition dialog. TES will insert the queue as a child of whichever queue is selected at the time. (All queues have a parent, except the system queue.)
- Edit Queue —Edits the selected queue by displaying the Queue Definition dialog.
- Delete Queue —Deletes the selected queue.
- Enable —Reactivates the queue after having been disabled.
- Disable —Prevents the queue from accepting jobs.
- Print —Prints the selected queue’s data.
Queue Definition Dialog
The Queue Definition dialog displays whenever adding or editing a queue. The queue can be available all of the time or it can be limited to operating only during a specified time window.
Common To All Tabs
- Queue Name —The name of the queue (up to 30 characters).
- Parent —The queue one level above in the queue tree. The queues above another queue are called parent queues. Queues below another queue are called child queues. If no queue is named in the parent field, the queue will be a child of the system queue.
- Limit —The number of jobs that can run in the queue at the same time.
Note The limit of the system queue determines the overall number of jobs that TES can run at any time. Limit values are displayed after the queue name in the Queues pane.
- Priority —Sets a queue priority relative to other sibling queues (child queues with the same parent). If all child queue priority values are the same, there is no queue precedence. The job could equally go to any of the child queues.
Priority values are displayed after the queue name in the Queues pane. Jobs in queues with higher priority values will be launched before jobs in queues with lower priority values.
- Hours Available —Sets the time window during which the queue operates. For example, you can set queues to run only at night or only during the day. When a queue closes, the queue manager attempts to reassign jobs in that queue to another qualifying queue that is open. If it cannot reassign the jobs to another queue, the job will remain in the closed queue and will not launch until it reopens.
Specify times by either using am or pm after typing the time (with colon), e.g., 1:15pm for 1:15 pm or using the 24-hour clock (with colon) to separate the hours and minutes, e.g., 13:30 for 1:30 pm.
- Always —Sets the queue’s availability to 24 hours a day. If no times are specified in the From and To fields, the queue is assumed to be available at all times and the Always option is automatically selected.
- Enabled —The Enabled option makes the queue active or inactive. You cannot make a queue that has jobs in it inactive.
Filters Tab
The Filters tab of the Queue Definition dialog displays queue filters associated with the queue. Queue filters define how jobs are assigned to queues. A combination of queue filters can provide precise control of which jobs run in a particular queue.
The Filters field displays queue filters associated with the queue. These queue filters define how jobs are assigned to queues. You can combine queue filters in any way you choose.
Each defined filter is marked with a blue diamond and lists its criteria. If the filter has excluding criteria, it shows a red minus sign. If the filter has including criteria, it displays a green plus sign.
Queue Filter Context Menu
When you right-click in the Filters field on the Filters tab of the Queue Definition dialog, the Queue Filters context menu displays.
The menu options echo the functions of the Add , Edit and Delete buttons.
The Queue Filters context menu contains the following elements:
- Add Filter Condition —Displays the queue filter condition menu to select a queue filter. Selecting one of the queue filters displays its Queue Filter Condition dialog.
- Edit Filter Condition —Displays the Queue Filter Condition dialog to edit the selected queue filter.
- Delete Filter Condition —Deletes the selected queue filter.
Queue Filter Conditions Menu
The Queue Filter Conditions menu displays whenever adding a queue filter. TES provides precise control of which jobs run in a particular queue through the use of queue filters.
This menu contains the following options:
- Job Name —Includes or excludes only jobs with the given job name(s). Jobs need to be defined in the TES database. You can click the Browse button inside the dialog to search for a job name.
- Job Name Mask —Includes or excludes all jobs with the job name mask(s). You can include the wild cards * and? in the job name mask. An asterisk masks one or more characters or numbers, and a question mark masks a single character.
- Job Group —Includes or excludes only jobs that are members of a particular job group. You need to define a job group before you can refer to it in a filter.
- Job Class —Includes or excludes jobs based on their job class. You need to define a class before you can refer to it in a filter.
- Command Name —Includes or excludes all jobs that execute that command.
- Command Name Mask —Includes or excludes all jobs that execute a command that matches this mask.
- Command Path —Includes or excludes all commands that execute from the specified directory or subdirectory. Note that you must specify the full path name; you cannot use relative path names.
- Job Owner —Includes or excludes all jobs owned by a user or workgroup.
- Runtime User —Includes or excludes jobs whose command and environment are owned by the runtime user. The job definition may or may not be owned by that user.
- Agent —Includes or excludes jobs that run on the agent specified. You can use this filter to manage jobs that run on a particular agent.
- Agent List —Include or exclude jobs associated with an agent list. You can use this filter to manage jobs that run on the agents listed in the agent list.
- Priority Range —Includes jobs within a given job priority range. Job priority values range between 0 and 100, where 100 is the highest priority.
- Estimated Duration —Includes jobs that have an estimated duration within a range of two specified values (in minutes).
- Scheduled vs. Unscheduled —Select either scheduled jobs or unscheduled jobs only. You can use this setting to control the submission of unscheduled jobs.
- Operator Release vs. Automatic —Select either jobs that are set to be released by an operator or only jobs that enter the schedule automatically.
- SAP Job (Intercepted) —Selects (or intercepts) SAP jobs according to specified criteria based on the SAP instance, user and/or job name.
Bumping Tab
The Bumping tab of the Queues Definition dialog is used to specify the launch priority of a queue which determines which jobs the queue will launch or dispatch.
- No priority bumping —Disables priority bumping (default).
- Launch immediately —Bypasses other queues, overriding all launch priority criteria and limit tests. Jobs assigned to a queue with this option will launch immediately, regardless of how many jobs are currently running.
- Increase job priority —Ensures lower priority jobs eventually launch if they have been waiting for a long time. Jobs that are waiting in a queue will increase their priority by a designated number of priority points in proportion to the length of time spent in the queue.
When a job’s priority reaches 100, it can optionally bump to a higher priority queue, queue Z, with a job priority of 0. The job then bumps its priority level according to that queue’s bumping allowance.
Note When using this option, make sure that the designated queue where the job is being bumped to has a higher queue priority value than the original queue; otherwise, the jobs will wait even longer to launch.
- Nice Value —Defines the CPU scheduling priority assigned by TES for Unix jobs. TES uses a 0 to 40 scale to rate the nice value. The value of one provides the lowest scheduling priority and 40 the highest priority with 21 as the default value. A value of zero means that TES does not modify the nice value assigned by the process's operating system.
The following formula is used to convert the TES nice value to the Unix nice value as displayed by the
ps
command for the Solaris, HPUX and AIX operating systems:
40-(Scheduler nice value-1) = Unix nice value
. As an example, a TES value of 24 converts to a Unix nice value of 17, 40-(24-1) = 6.
If using the Linux operating system, the formula used by TES is
20-(Schedulernice value-1) = Unix nice value
. As an example, a TES value of 15 converts to a Unix nice value of 6, 20-(15-1) = 6.
Current Jobs Tab
The Current Jobs tab of the Queue Definition dialog displays details on the jobs currently residing in the queue. You can also release unscheduled jobs that are waiting from this tab.
This tab contains the following elements:
- Active Jobs —Selecting this option displays all jobs that are currently active in the queue. The adjacent number indicates the total of jobs currently active in the queue.
- Waiting Jobs —Selecting this option displays all jobs that are currently waiting in the queue to be launched. The adjacent number indicates the total of jobs currently waiting in the queue.
If neither of the options are selected, no jobs are displayed in the Current Jobs field. Each job displayed in the field has a color-coded status light to appraise a job’s status at a glance. The color green indicates a job that is in active or launched status, the color yellow indicates a job in a waiting status and the color red indicates a job unable to run due to an unavailable resource. The field listing the current jobs in the queue has the following columns of information about the jobs:
- ID —The identification number assigned to the job by TES.
- Job —The name of the job.
- Status —The current status of the job in TES.
- Pri —The priority number assigned to the job.
- Duration —The time in minutes that a job has remained in its present status within the queue.
- External ID —The identification number assigned by jobs created in applications other than TES.
- Agent —The name of the agent assigned to the job.
A context menu displays by right-clicking within the list of queued jobs. It has the following options:
Queue Procedures
Queues let you optimize throughput and allocate system resources for scheduled and unscheduled jobs. The TES queue manager assigns jobs to queues when all their dependencies have been met, and decides when to launch jobs based upon the available system resource slots. The maximum number of slots available is determined either by the limit that you set in the system queue, the sum of each queue’s limit or the sum of each licensed agent’s job limit.
Queues can limit the number of jobs running on a computer or a network of computers at a given time.
- If the system is not running at its capacity, a job can run immediately provided that all of its dependencies are met.
- If the system is running at its capacity, the TES Queue Manager decides which jobs launch based on a priority structure that includes the following in order of importance:
Adding a Queue
You can add a queue anywhere in the queue hierarchy. When you add a queue it is positioned under the parent queue that you select. The jobs that the queue can accept must first match the parent’s queue filter.
Step 1![]() From the
Navigator
pane, select
Definitions>Queues
to display the
Queues
pane.
From the
Navigator
pane, select
Definitions>Queues
to display the
Queues
pane.
Step 2![]() Select the parent queue under which you want to place your queue.
Select the parent queue under which you want to place your queue.
Step 3![]() Click the
Add
button on the TES toolbar or right-click and select
Add Queue
from the context menu to display the
Queue Definition
dialog.
Click the
Add
button on the TES toolbar or right-click and select
Add Queue
from the context menu to display the
Queue Definition
dialog.
Step 4![]() Specify values in the
Queue
Name
,
Parent
,
Limit
and
Priority
fields.
For more information, see
“Queue Definition Dialog” section
.
Specify values in the
Queue
Name
,
Parent
,
Limit
and
Priority
fields.
For more information, see
“Queue Definition Dialog” section
.
Note It is best if no two sibling queues have the same queue priority value.
Step 5![]() Specify the queue filter(s) you want to be associated with this queue. For more information, see
“Queue Filters” section
and
“Queue Filter Conditions Menu” section
.
Specify the queue filter(s) you want to be associated with this queue. For more information, see
“Queue Filters” section
and
“Queue Filter Conditions Menu” section
.
a.![]() If you want your queue to launch jobs immediately, select the
Launch
immediately
option. Jobs will launch regardless of whether the system is running at its capacity or not.
If you want your queue to launch jobs immediately, select the
Launch
immediately
option. Jobs will launch regardless of whether the system is running at its capacity or not.
b.![]() If you want jobs to be bumped to different priorities and to different queues if they are waiting for a long time, specify the
Priority
bumping
options. Be sure that the queue to which jobs bump has a higher priority than the current queue.
If you want jobs to be bumped to different priorities and to different queues if they are waiting for a long time, specify the
Priority
bumping
options. Be sure that the queue to which jobs bump has a higher priority than the current queue.
c.![]() If you are running Unix jobs, you can select the
Nice Value
which defines the CPU scheduling priority for jobs from this queue. The value must be an integer from 1 to 40. The default value is 21. Higher nice values result in lower execution priority.
If you are running Unix jobs, you can select the
Nice Value
which defines the CPU scheduling priority for jobs from this queue. The value must be an integer from 1 to 40. The default value is 21. Higher nice values result in lower execution priority.![]()
Step 7![]() In the
Hours
fields at the bottom of the dialog, type the queue’s hours of availability.
In the
Hours
fields at the bottom of the dialog, type the queue’s hours of availability.
Step 8![]() Click the
Description
tab and type a description for the queue.
Click the
Description
tab and type a description for the queue.
Step 9![]() To save the queue, click
OK
. The queue is added to the
Queues
pane and displays below the specified parent queue.
To save the queue, click
OK
. The queue is added to the
Queues
pane and displays below the specified parent queue.
Adding a Queue Filter
Queue filters determine how jobs are assigned to queues. You can add filter criteria (conditions) to a queue at any time.
Step 1![]() From the
Navigator
pane, select
Definitions>Queues
to display the
Queues
pane.
From the
Navigator
pane, select
Definitions>Queues
to display the
Queues
pane.
Step 2![]() Right-click the queue and from the context menu select the
Edit Queue
option or double-click the queue to display the
Queue Definition
dialog.
Right-click the queue and from the context menu select the
Edit Queue
option or double-click the queue to display the
Queue Definition
dialog.
Step 3![]() Click the
Filters
tab and click the
Add
button.
Click the
Filters
tab and click the
Add
button.
Step 4![]() Select the type of queue filter you want to add from the context menu For more information about queue filters, see
“Queue Filter Conditions Menu” section
. The specific queue filter dialog appears. Note that most queue condition dialogs contain an option to exclude the jobs with the specified criteria. This option lets the queue accept all jobs that do not match the criteria.
Select the type of queue filter you want to add from the context menu For more information about queue filters, see
“Queue Filter Conditions Menu” section
. The specific queue filter dialog appears. Note that most queue condition dialogs contain an option to exclude the jobs with the specified criteria. This option lets the queue accept all jobs that do not match the criteria.
Step 5![]() To accept the filter, click
OK
. Click
Cancel
to discard the filter.
To accept the filter, click
OK
. Click
Cancel
to discard the filter.
Step 6![]() The filters you select will be added to the queue definition. They are displayed in the
Filter
field on the
Filter
tab of the
Queue Definition
dialog as follows:
The filters you select will be added to the queue definition. They are displayed in the
Filter
field on the
Filter
tab of the
Queue Definition
dialog as follows:
–![]() The filter name is marked by a diamond symbol.
The filter name is marked by a diamond symbol.
–![]() Included criteria are marked with a plus (+) symbol.
Included criteria are marked with a plus (+) symbol.
Deleting Queues
A queue can only be deleted if no jobs are waiting in it or currently running from it.
a.![]() From the
Navigator
pane, select
Definitions>Queues
to display the
Queues
pane.
From the
Navigator
pane, select
Definitions>Queues
to display the
Queues
pane.
b.![]() Right-click the queue and from the context menu select
Disable Queue
or double-click the queue, and clear the
Enabled
option in the
Queue Definition
dialog.
Right-click the queue and from the context menu select
Disable Queue
or double-click the queue, and clear the
Enabled
option in the
Queue Definition
dialog.
Step 2![]() When the queue is empty of jobs, select the queue to delete.
When the queue is empty of jobs, select the queue to delete.
Step 3![]() Right-click and select
Delete Queue
from the context menu or click the
Delete b
utton on the TES toolbar or press the
Delete
key on your keyboard.
Right-click and select
Delete Queue
from the context menu or click the
Delete b
utton on the TES toolbar or press the
Delete
key on your keyboard.
Step 4![]() Click
OK
in the confirmation dialog to delete the queue.
Click
OK
in the confirmation dialog to delete the queue.
Deleting Queue Filters
Queue filters determine how jobs are assigned to queues. You can delete queue filter criteria from a queue definition at any time.
Step 1![]() From the
Navigator
pane, select
Definitions>Queues
to display the
Queues
pane.
From the
Navigator
pane, select
Definitions>Queues
to display the
Queues
pane.
Step 2![]() Right-click the queue and from the context menu select the
Edit Queue
option or double-click the queue to display the
Queue Definition
dialog.
Right-click the queue and from the context menu select the
Edit Queue
option or double-click the queue to display the
Queue Definition
dialog.
Step 4![]() Select the filter you want to delete and click
Delete
.
Select the filter you want to delete and click
Delete
.
Excluded criteria are marked with a minus (-) symbol.
Disabling Queues
If you disable (deactivate) a queue that is currently in use, it will no longer accept new jobs, but all jobs that are currently running in it will run to completion.
Step 1![]() From the
Navigator
pane, select
Definitions>Queues
to display the
Queues
pane.
From the
Navigator
pane, select
Definitions>Queues
to display the
Queues
pane.
Step 2![]() Right-click the queue and from the context menu select
Disable Queue
or double-click the queue and clear the
Enabled
option in the
Queue Definition
dialog.
Right-click the queue and from the context menu select
Disable Queue
or double-click the queue and clear the
Enabled
option in the
Queue Definition
dialog.
Editing a Queue
You can change the properties of a queue at any time, even while it is in use.
Step 1![]() From the
Navigator
pane, select
Definitions>Queues
to display the
Queues
pane.
From the
Navigator
pane, select
Definitions>Queues
to display the
Queues
pane.
Step 2![]() Double-click the queue whose filters you want to view or right-click and from the context menu select the
Edit Queue
option to display the
Queue Definition
dialog.
Double-click the queue whose filters you want to view or right-click and from the context menu select the
Edit Queue
option to display the
Queue Definition
dialog.
Step 3![]() Edit the
Queue Name
field to change the name of the queue.
Edit the
Queue Name
field to change the name of the queue.
Step 4![]() Edit the
Parent
field to move the queue to the new parent. Remember that jobs must match the parent’s filter before a child queue is evaluated.
Edit the
Parent
field to move the queue to the new parent. Remember that jobs must match the parent’s filter before a child queue is evaluated.
Step 5![]() Edit the
Limit
to increase or decrease the number of jobs that can run in the queue.
Edit the
Limit
to increase or decrease the number of jobs that can run in the queue.
Step 6![]() Edit the
Priority
field to increase or decrease the priority relative to sibling queues. Remember not to assign the same priority to multiple queues with the same parent.
Edit the
Priority
field to increase or decrease the priority relative to sibling queues. Remember not to assign the same priority to multiple queues with the same parent.
Step 7![]() Select the
Enabled
option to enable the queue. Clear this option to disable the queue (make it inactive). Note that inactive queues cannot accept jobs.
Select the
Enabled
option to enable the queue. Clear this option to disable the queue (make it inactive). Note that inactive queues cannot accept jobs.
Step 8![]() In the
Filters
field, add/edit the queue filter(s) as desired.
In the
Filters
field, add/edit the queue filter(s) as desired.
Step 9![]() Click the
Bumping
tab. On this tab, set whether you want your queue to
Launch immediately
or if you want to enable
Priority Bumping
and its parameters.
Click the
Bumping
tab. On this tab, set whether you want your queue to
Launch immediately
or if you want to enable
Priority Bumping
and its parameters.
Step 10![]() If necessary, adjust the queue’s hours of availability in the
Hours
fields.
If necessary, adjust the queue’s hours of availability in the
Hours
fields.
Step 11![]() Click the
Description
tab to edit the queue’s description.
Click the
Description
tab to edit the queue’s description.
Editing a Queue Filter
Queue filters determine how jobs are assigned to queues. You can modify queue filter criteria for a queue at any time.
Step 1![]() From the
Navigator
pane, select
Definitions>Queues
to display the
Queues
pane.
From the
Navigator
pane, select
Definitions>Queues
to display the
Queues
pane.
Step 2![]() Right-click the queue and from the context menu select the
Edit Queue
option or double-click the queue to display the
Queue Definition
dialog.
Right-click the queue and from the context menu select the
Edit Queue
option or double-click the queue to display the
Queue Definition
dialog.
Step 4![]() Select the filter you want to edit and click the
Edit
button.
Select the filter you want to edit and click the
Edit
button.
The Queue Filter Condition dialog for the queue filter displays. You can now edit the filter criteria.
Moving a Queue to a New Parent
You can move a queue to any location in the queue hierarchy below the system queue.
Step 1![]() From the
Navigator
pane, select
Definitions>Queues
to display the
Queues
pane.
From the
Navigator
pane, select
Definitions>Queues
to display the
Queues
pane.
Step 2![]() Double-click the queue that you want to move, or right-click and from the context menu select
Edit Queue
to display the
Queue Definition
dialog.
Double-click the queue that you want to move, or right-click and from the context menu select
Edit Queue
to display the
Queue Definition
dialog.
Step 3![]() Change the name of the parent queue in the
Parent
field using the drop-down menu.
Change the name of the parent queue in the
Parent
field using the drop-down menu.
Note Keep in mind that a child queue can only accept jobs that first pass the filter criteria of its parent.
Sending Jobs to a Specific Queue
You can indirectly send jobs to a queue by using the job class feature.
To send a job to a specific queue, follow this example:
Step 1![]() Define a job class called
To Queue B
.
Define a job class called
To Queue B
.
a.![]() From the
Navigator
pane, select
Definitions>Job Classes
to display the
Job Classes
pane.
From the
Navigator
pane, select
Definitions>Job Classes
to display the
Job Classes
pane.
b.![]() Right-click and select
Add Job Class
from the context menu.
Right-click and select
Add Job Class
from the context menu.
c.![]() In the
Job Class Name
field, type
To Queue B
.
In the
Job Class Name
field, type
To Queue B
.
d.![]() In the
Description
field, type
This Job Class is used to route Jobs to Queue B
.
In the
Description
field, type
This Job Class is used to route Jobs to Queue B
.
Step 2![]() Create
Queue B
with a
To Queue B
job class filter.
Create
Queue B
with a
To Queue B
job class filter.
a.![]() From the
Navigator
pane, select
Definitions>Queues
to display the
Queues
pane.
From the
Navigator
pane, select
Definitions>Queues
to display the
Queues
pane.
c.![]() Right-click and select
Add Queue
from the context menu.
Right-click and select
Add Queue
from the context menu.
d.![]() In the
Queue Name
field, type
Queue B
.
In the
Queue Name
field, type
Queue B
.
e.![]() Set the
Limit
value and queue
Owner
as desired.
Set the
Limit
value and queue
Owner
as desired.
f.![]() Set the
Priority
value to a value higher than the queue that would normally accept the job. For example, if the default queue,
Short Unscheduled Jobs
, normally accepts the job and its priority is at the default of
50
, set
Queue B’s
priority to
55
.
Set the
Priority
value to a value higher than the queue that would normally accept the job. For example, if the default queue,
Short Unscheduled Jobs
, normally accepts the job and its priority is at the default of
50
, set
Queue B’s
priority to
55
.
g.![]() On the
Filters
tab, click
Add
and select
Job Class
from the drop-down menu.
On the
Filters
tab, click
Add
and select
Job Class
from the drop-down menu.
h.![]() Select the
To Queue B
job class.
Select the
To Queue B
job class.
i.![]() Click
OK
to close the
Queue Filter Condition
dialog.
Click
OK
to close the
Queue Filter Condition
dialog.
j.![]() Click
OK
to close the
Queue Definition
dialog and return to the
Queues
pane.
Click
OK
to close the
Queue Definition
dialog and return to the
Queues
pane.
Step 3![]() Edit the definition for your job by associating it with the
To Queue B
job class.
Edit the definition for your job by associating it with the
To Queue B
job class.
a.![]() From the
Navigator
pane, select
Definitions>Jobs
to display the
Jobs
pane.
From the
Navigator
pane, select
Definitions>Jobs
to display the
Jobs
pane.
b.![]() Double-click the job you want to run from
Queue B
.
Double-click the job you want to run from
Queue B
.
c.![]() In the
Job Class
field, select
To Queue B
.
In the
Job Class
field, select
To Queue B
.
The job will now type Queue B , even though you did not directly assign it to the queue.
Viewing a Queue’s Filters
Step 1![]() From the
Navigator
pane, select
Definitions>Queues
to display the
Queues
pane.
From the
Navigator
pane, select
Definitions>Queues
to display the
Queues
pane.
Step 2![]() Double-click the queue whose filters you want to view, or right-click and from the context menu select
Edit Queue
. The
Queue Definition
dialog displays.
Double-click the queue whose filters you want to view, or right-click and from the context menu select
Edit Queue
. The
Queue Definition
dialog displays.
Step 3![]() Click the
Filters
tab. The filters associated with this queue are listed
Click the
Filters
tab. The filters associated with this queue are listed![]() in the
Filters
field.
in the
Filters
field.
Agent Lists Pane
An agent list is any set of licensed nodes in your network. You can assign jobs to run using agent lists similar to the way you assign them to individual agents. With agent lists, however, you have access to useful functions not available with individual agents. You can specify alternate agent(s) to run your jobs if the primary agent is unavailable, you can balance the workload of many jobs among the agents in the list, or you can broadcast jobs to run on all the machines in the agent list at the same time.
The master does not pick an agent from the agent list assigned to a job until that job is ready to run. Because the agent is not assigned to a job until the last minute, if a user looks at a Job Details dialog before the job runs (e.g., the job is in a Waiting on Dependencies state), the Agent field on the Override tab is empty. The master does not select an agent from the agent list displayed in the Agent List field until the job’s dependencies are met and the job is ready to run. Once the job is submitted to run and the agent is selected, the name of the agent displays in the Agent field. If the job reruns, the master may assign a different agent from the agent list according to the demands of the production schedule. If you make a change to the Agent field, then the Agent List field is cleared since you, not the agent list, are selecting the agent.
TES supports Windows, Unix, z/OS (formerly MVS or OS/390) and O/VMS agent platforms, but you cannot combine agents of different platform types in one agent list.
Types of Agent Lists
- Ordered Agent List —You can use an ordered agent list to provide alternative agent(s) in case the primary agent is not available when a job is ready to run. When there is a network or machine failure on the primary agent, the job is automatically routed to the next available alternate agent in the list. Agents are tried in the order that they appear in the list until an operational agent is found. The primary agent is always the first in the list. Alternative agents follow the primary agent.
- Broadcast —Simultaneously runs a job on every agent in the list. For example, you might use a broadcast list to backup each machine’s files.
- Workload Balancing —You can use workload balancing to distribute jobs evenly among all the agents in the list. There are three kinds of agent lists that support workload balancing:
–![]() Balanced
—Launches jobs on the agent which currently has the lightest load. Use this type of list with TES agents on platforms that provide load information.
Balanced
—Launches jobs on the agent which currently has the lightest load. Use this type of list with TES agents on platforms that provide load information.
–![]() Rotation
—Launches jobs by selecting agents successively. When the end of the agent list is reached, TES starts at the beginning of the list again.
Rotation
—Launches jobs by selecting agents successively. When the end of the agent list is reached, TES starts at the beginning of the list again.
–![]() Random
—Launches jobs by selecting agents randomly. Use this type of list to approximate workload balancing with remote shell agents.
Random
—Launches jobs by selecting agents randomly. Use this type of list to approximate workload balancing with remote shell agents.
Agent List Hierarchies
You can manage your agent lists by placing them into hierarchies of parent agent lists and child agent lists. A job using a parent agent list uses all agents belonging to the child agent lists.
Agent list hierarchies are a convenient way to organize a large set of agents into smaller more manageable sets. When a job is slated to run on an agent list, each child agent list in the parent agent list is treated as if it were a single agent list. For example, in a lightest load agent containing four child agent lists, the child agent list with the lightest load is chosen. The job then chooses among the agents with the lightest load inside the child agent list.
An agent list hierarchy can only consist of agent lists of the same type. For example, you can have balanced lists under balanced lists, but not ordered lists under balanced lists.
Agent Lists Interface
From the Navigator pane, select Definitions>Agent Lists to display the Agent Lists pane. Then, select a type of agent folder.
Buttons
Note Buttons will not be available until you open a platform folder.
- Add Agent List —Displays the Agent List Definition dialog to add an agent list.
- Edit Agent List —Displays the Agent List Definition dialog to edit an agent list.
- Delete Agent List —Removes the agent list definition from the TES database.
- Refresh —Updates the data in the current pane.
- Print —Displays the Reports pane to view and print your agent lists. For more information, see “Monitoring Production” section .
Search Field
Enter text that you want to search for within the columns displayed into this field.
Note This field at the top right of the grids will only search text columns that are not grayed out and are string-based. See “Searchable Columns” section
Columns
Note There are no columns in the Agent Lists pane until you open a platform folder.
The console view for each platform type contains the same columns:
- List Type Icon —An icon that represents the type of agent list.
- List Type —The type of agent list: Ordered , Random , Balanced , Broadcast or Rotation .
- (Expand/Collapse) —This column indicates whether or not the agent list is expanded to show all agents in the list, or collapsed to show only the agent list name.
- Name —The name of the agent list.
- Description —A description of the agent list. Since the Description field of the Agent List Definition dialog is optional, this column may be blank.
- Modified —The last time the agent list definition was modified.
Preferences
Note Preferences will not be available until you open a platform folder.
If you select Preferences from the View main menu while viewing an Agent Lists pane, the Agent Lists Preferences dialog displays.
From the Agent Lists Preferences dialog, you can select which columns are displayed in the Agent Lists pane and in what order they appear.
Navigator Context Menu
Right-click in the Navigator pane while viewing the Agent Lists pane, to view the Navigator context menu.
The Agent Lists Navigator context menu contains the following options:
- Add Agent List —Displays the Agent List Definition dialog to add a new agent list. This option has the same function as the Add Agent List button.
- Preferences —Displays the Preferences dialog for the Agent Lists pane.
- Print —Displays the Reports pane to view and print your agent list definitions. This option has the same function as the Print button on the toolbar. For more information, see “Monitoring Production” section .
- Export —Saves the data in the current pane as an ASCII text file. You can then use the file data in other applications.
- Refresh —Updates the data in the current pane.
Agent Lists Pane Context Menu
Right-click in one of the Agent Lists platform panes to display the Agent Lists pane context menu.
The Agent Lists pane context menu contains the following options:
Agent List Definition Dialog
The Agent List Definition dialog displays when adding or editing an agent list definition.
Common to All Tabs
- List Name —The name of the agent list (up to 60 characters). The agent list name must be unique. Note that the type of agent platform (operating system) you initially selected displays next to the List Name field. To select a different platform, cancel the dialog, select the folder of the correct platform type, and Add a new agent list.
- Parent List —From the drop-down menu in the Parent List field, you can select a parent agent list. If you specify a parent agent list, the agent list you are editing will be a child agent list of the parent and will appear below its parent in the agent list hierarchy.
- List Type —The type of agent list based on how you want jobs assigned to the agents in the list:
–![]() Ordered
—TES chooses the first available agent to run the job based on the order in which the agents appear in the
Agents Selected
field. For example, if the first (primary) agent listed is not available, TES tries the second (alternative) agent in the list. You might want to use this list type for critical jobs —specifying substitute agents in case the primary agent becomes unavailable.
Ordered
—TES chooses the first available agent to run the job based on the order in which the agents appear in the
Agents Selected
field. For example, if the first (primary) agent listed is not available, TES tries the second (alternative) agent in the list. You might want to use this list type for critical jobs —specifying substitute agents in case the primary agent becomes unavailable.
–![]() Random
—TES chooses agents from the
Agents Selected
field randomly. This is a form of workload balancing that works well with Unix rsh agents. However, if you are working with TES agents on platforms that track load information, you should choose the
Balanced
option.
Random
—TES chooses agents from the
Agents Selected
field randomly. This is a form of workload balancing that works well with Unix rsh agents. However, if you are working with TES agents on platforms that track load information, you should choose the
Balanced
option.
–![]() Balanced
—TES chooses an agent from the
Agents Selected
field based on lightest load when the job is ready to launch. You can choose this option to balance your workload on all the available agents in the list. If you are working with Unix rsh agents, you should choose the
Random
or
Rotation
option.
Balanced
—TES chooses an agent from the
Agents Selected
field based on lightest load when the job is ready to launch. You can choose this option to balance your workload on all the available agents in the list. If you are working with Unix rsh agents, you should choose the
Random
or
Rotation
option.
–![]() Broadcast
—TES runs the job on every agent in the
Agents Selected
field. For example, you can use this option to schedule backups on each machine in the list using the same job.
Broadcast
—TES runs the job on every agent in the
Agents Selected
field. For example, you can use this option to schedule backups on each machine in the list using the same job.
–![]() Rotation
—TES cycles through the list of agents in the
Agents Selected
field and launches jobs assigned to that list in rotation. When the end of the agent list is reached, the first agent in this list is chosen. This is a form of workload balancing where you can predict where the next job will run.
Rotation
—TES cycles through the list of agents in the
Agents Selected
field and launches jobs assigned to that list in rotation. When the end of the agent list is reached, the first agent in this list is chosen. This is a form of workload balancing where you can predict where the next job will run.
List Tab
- Agents Selected —Displays the list of agents that comprise the agent list selected from the list of licensed agents.
- Agents Available —Displays the list of available licensed agents of the platform type shown in the Platform field. All agents that are inactive have a red X over the agent icon.
- Up Arrow —Click to move the selected agent in the Agents Selected field up in the list (for ordered lists).
- Down Arrow —Click to move the selected agent in the Agents Selected field down in the list (for ordered lists).
- Left Arrow —Click to move the selected agent in the Agents Available field to the Agents Selected field.
- Double Left Arrow —Click to move all agents in the Agents Available field to the Agents Selected field.
- Right Arrow —Click to move the selected agent in the Agents Selected field to the Agents Available field.
- Double Right Arrow —Click to move all agents in the Agents Selected field to the Agents Available field.
Agent List Definition Context Menu
The Agent List Definition context menu displays by right-clicking in the Agents Selected field in the Agent List Definition dialog.
Adding an Agent List
You can add an agent list under a parent agent list of the same type, or under the root platform folder. When you add an agent list under a parent agent list, the parent agent list treats the agent list as if its agents were direct members of the list.
Step 1![]() From the
Navigator
pane, select
Definitions>Agent Lists
to display the
Agent Lists
pane. Then, select a type of agent folder.
From the
Navigator
pane, select
Definitions>Agent Lists
to display the
Agent Lists
pane. Then, select a type of agent folder.
Step 2![]() Right-click and select
Add Agent List
from the context menu to display the
Agent List Definition
dialog. Specify the properties for the agent list. For more information, see
“Agent List Definition Dialog” section
.
Right-click and select
Add Agent List
from the context menu to display the
Agent List Definition
dialog. Specify the properties for the agent list. For more information, see
“Agent List Definition Dialog” section
.
Step 3![]() Click
OK
to add the agent list. The agent list appears in the
Agent Lists
pane.
Click
OK
to add the agent list. The agent list appears in the
Agent Lists
pane.
Changing the Order of the Agents in the List
To change the order of the agents in the list:
Step 1![]() From the
Navigator
pane, select
Definitions>Agent Lists
to display the
Agent Lists
pane. Then, select a type of agent folder.
From the
Navigator
pane, select
Definitions>Agent Lists
to display the
Agent Lists
pane. Then, select a type of agent folder.
Step 2![]() Double-click the agent list you want to edit or right-click the agent list and select
Edit Agent List
from the context menu.
Double-click the agent list you want to edit or right-click the agent list and select
Edit Agent List
from the context menu.
Step 3![]() In the
Agents Selected
field, select the agent whose position you want to change.
In the
Agents Selected
field, select the agent whose position you want to change.
Step 4![]() Click the up-arrow (
^
)or down-arrow (v) button(s) to move the agent up or down in the list or right-click and use the context menu selections to move the agent up or down in the list.
Click the up-arrow (
^
)or down-arrow (v) button(s) to move the agent up or down in the list or right-click and use the context menu selections to move the agent up or down in the list.
Note If you are specifying an ordered list, the first agent in the list is considered the primary agent. All subsequent agents are alternate agents if the primary agent or other alternate agents are unavailable
Deleting an Agent List
You can delete an agent list from an Agent Lists pane. You cannot delete the platform folder that contains the agent lists. If you delete a parent agent list, you also delete its child agent lists.
Step 1![]() From the
Navigator
pane, select
Definitions>Agent Lists
to display the
Agent Lists
pane. Then, select a type of agent folder.
From the
Navigator
pane, select
Definitions>Agent Lists
to display the
Agent Lists
pane. Then, select a type of agent folder.
Step 2![]() Click the agent list to delete and click the
Delete
button on the TES toolbar, or right-click the agent list and select
Delete Agent List
from the context menu.
Click the agent list to delete and click the
Delete
button on the TES toolbar, or right-click the agent list and select
Delete Agent List
from the context menu.
Step 3![]() Click
Yes
in the confirmation dialog to delete the agent list and all its child agent lists (if any) from the TES database.
Click
Yes
in the confirmation dialog to delete the agent list and all its child agent lists (if any) from the TES database.
Editing an Agent List
You can edit an agent list to add or remove agents, to change its name, or to change its parent agent list. You cannot change its platform type, agent list type, nor can you change its parent to a list of a different type.
Step 1![]() From the
Navigator
pane, select
Definitions>Agent Lists
to display the
Agent Lists
pane. Then, select a type of agent folder.
From the
Navigator
pane, select
Definitions>Agent Lists
to display the
Agent Lists
pane. Then, select a type of agent folder.
Step 2![]() Double-click the agent list you want to edit, or right-click the agent list and select
Edit Agent List
from the context menu.
Double-click the agent list you want to edit, or right-click the agent list and select
Edit Agent List
from the context menu.
Step 3![]() Edit the properties for the agent list. For more information, see
“Agent List Definition Dialog” section
.
Edit the properties for the agent list. For more information, see
“Agent List Definition Dialog” section
.
Step 4![]() Click
OK
to update the agent list in the TES database or
Cancel
to discard your changes and close the dialog. The update takes effect the next time the master
Click
OK
to update the agent list in the TES database or
Cancel
to discard your changes and close the dialog. The update takes effect the next time the master![]() is refreshed.
is refreshed.
Moving an Agent List
You can move agent lists to a different location in the agent list tree. You cannot move agent lists from one platform to another, nor can you move agent lists to an agent list of a different list type ( Ordered , Random , Balanced , Broadcast , or Rotation ), nor can you move a parent agent list into one of its own child agent lists.
Step 1![]() From the
Navigator
pane, select
Definitions>Agent Lists
to display the
Agent Lists
pane. Then, select a type of agent folder.
From the
Navigator
pane, select
Definitions>Agent Lists
to display the
Agent Lists
pane. Then, select a type of agent folder.
Step 2![]() Double-click the agent list you want to edit, or right-click the agent list and select
Edit Agent List
from the context menu.
Double-click the agent list you want to edit, or right-click the agent list and select
Edit Agent List
from the context menu.
Step 3![]() In the
Parent List
field, select a new parent agent list from the drop-down menu.
In the
Parent List
field, select a new parent agent list from the drop-down menu.
Selecting Agents for an Agent List
You select the agents that belong to an agent list from the Agent List Definition dialog. You can also order the selected list. This is necessary for ordered list types where you can specify the primary agent by placing it first in the list.
To select an agent for an agent list:
Step 1![]() From the
Navigator
pane, select
Definitions>Agent Lists
to display the
Agent Lists
pane. Then, select a type of agent folder.
From the
Navigator
pane, select
Definitions>Agent Lists
to display the
Agent Lists
pane. Then, select a type of agent folder.
Step 2![]() Double-click the agent list you want to edit, or right-click the agent list and select
Edit Agent List
from the context menu.
Double-click the agent list you want to edit, or right-click the agent list and select
Edit Agent List
from the context menu.
Step 3![]() From the
Agents Available
field drop-down menu, select the agent(s) to include in the agent list. The agents shown in this field are all licensed agents on your system
From the
Agents Available
field drop-down menu, select the agent(s) to include in the agent list. The agents shown in this field are all licensed agents on your system![]() with the specified platform. Note that any agents with a red
X
are not available for use, although they are licensed agents.
with the specified platform. Note that any agents with a red
X
are not available for use, although they are licensed agents.
Step 4![]() To add agents to the agent list, click:
To add agents to the agent list, click:
a.![]() The left arrow button (<) to transfer the selected agent(s) to the
Agents Selected
field.
The left arrow button (<) to transfer the selected agent(s) to the
Agents Selected
field.
b.![]() The double left arrow button (<<) to transfer all agents to the
Agents Selected
field.
The double left arrow button (<<) to transfer all agents to the
Agents Selected
field.
Step 5![]() To remove agents from the agent list, click:
To remove agents from the agent list, click:
a.![]() The right arrow button (>) to transfer the selected agent(s) from the
Agents Selected
field.
The right arrow button (>) to transfer the selected agent(s) from the
Agents Selected
field.
b.![]() The double right arrow button (>>) to transfer all agents from the
Agents Selected
field.
The double right arrow button (>>) to transfer all agents from the
Agents Selected
field.
Viewing Agent Lists
Agent lists are displayed in a hierarchical format in the agent lists panes. Each platform that TES supports has its own agent lists pane. Each agent list displays its associated agents as child nodes, and displays any child agent lists.
From the Navigator pane, select Definitions>Agent Lists to display the Agent Lists pane. Then, select a type of agent folder.
Viewing Agent List Properties
To view an agent list’s properties:
Step 1![]() From the
Navigator
pane, select
Definitions>Agent Lists
to display the
Agent Lists
pane. Then, select a type of agent folder.
From the
Navigator
pane, select
Definitions>Agent Lists
to display the
Agent Lists
pane. Then, select a type of agent folder.
Step 2![]() Double-click the agent list you want to view, or right-click the agent list and select
Edit Agent List
from the context menu.
Double-click the agent list you want to view, or right-click the agent list and select
Edit Agent List
from the context menu.
 Feedback