- Device Sensor
- AAA Double Authentication Secured by Absolute Timeout
- Login Password Retry Lockout
- Throttling of AAA RADIUS Records
- MSCHAP Version 2
- MAC Authentication Bypass
- Configurable MAB Username and Password
- Configuring Accounting
- AAA-SERVER-MIB Set Operation
- Password Strength and Management for Common Criteria
Device Sensor
The Device Sensor feature is used to gather raw endpoint data from network devices using protocols such as Cisco Discovery Protocol (CDP), Link Layer Discovery Protocol (LLDP), and DHCP. The endpoint data that is gathered is made available to registered clients in the context of an access session.
- Finding Feature Information
- Restrictions for Device Sensor
- Information About Device Sensor
- How to Configure Device Sensor
- Configuration Examples for the Device Sensor Feature
- Additional References
- Feature Information for Device Sensor
Finding Feature Information
Your software release may not support all the features documented in this module. For the latest caveats and feature information, see Bug Search Tool and the release notes for your platform and software release. To find information about the features documented in this module, and to see a list of the releases in which each feature is supported, see the feature information table at the end of this module.
Use Cisco Feature Navigator to find information about platform support and Cisco software image support. To access Cisco Feature Navigator, go to www.cisco.com/go/cfn. An account on Cisco.com is not required.
Restrictions for Device Sensor
-
Only Cisco Discovery Protocol, LLDP, DHCP, MDNS, SIP, and H323 protocols are supported.
-
The session limit for profiling ports is 32.
-
The length of one Type-Length-Value (TLV) must not be more than 1024 and the total length of TLVs (combined length of TLVs) of all protocols must not be more than 4096.
-
The sensor profiles devices that are only one hop away.
-
The Device Sensor feature is enabled by default, but cannot be disabled. Disabling device classifier using no device classifier command in global configuration mode does not disable device sensor. This is because device sensor is independent of IP device tracking and device classifier.

Note
In Cisco IOS Release 15.2(1)E and later releases, you can exclude the protocols so that the Device Sensor feature does not analyze the data. To exclude the protocols, use the device-sensor filter-spec protocol exclude all command in global configuration mode.
Information About Device Sensor
Device Sensor
The device sensor is used to gather raw endpoint data from network devices. The endpoint information that is gathered helps in completing the profiling capability of devices. Profiling is the determination of the endpoint type based on information gleaned from various protocol packets from an endpoint during its connection to a network.
The profiling capability consists of two parts:
The device sensor represents the embedded collector functionality. The illustration below shows the Cisco sensor in the context of the profiling system and also features other possible clients of the sensor.
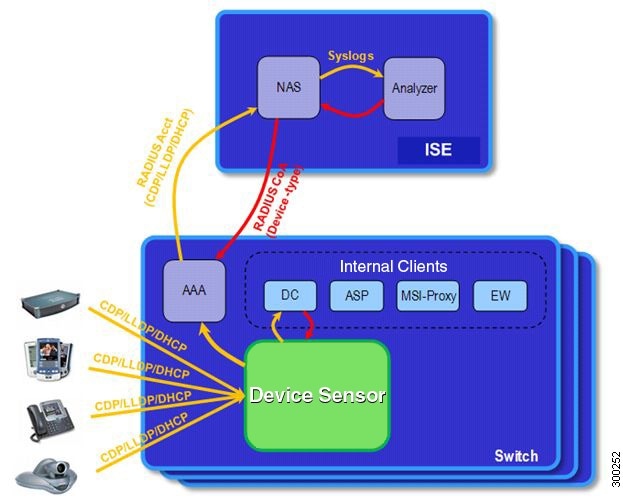
A device with sensor capability gathers endpoint information from network devices using protocols such as Cisco Discovery Protocol, LLDP, and DHCP, subject to statically configured filters, and makes this information available to its registered clients in the context of an access session. An access session represents an endpoint’s connection to the network device.
The device sensor has internal and external clients. The internal clients include components such as the embedded Device Classifier (local analyzer), ATM switch processor (ASP), MSI-Proxy, and EnergyWise (EW). The external client, that is the Identity Services Engine (ISE) analyzer, will use RADIUS accounting to receive additional endpoint data.
Client notifications and accounting messages containing profiling data along with the session events and other session-related data, such as the MAC address and the ingress port, are generated and sent to the internal and external clients (ISE). By default, for each supported peer protocol, client notifications and accounting events are only generated where an incoming packet includes a TLV that has not previously been received in the context of a given session. You can enable client notifications and accounting events for all TLV changes, where either a new TLV has been received or a previously received TLV has been received with a different value using CLI commands.
The device sensor’s port security protects the switch from consuming memory and crashing during deliberate or unintentional denial-of-service (DoS) type attacks. The sensor limits the maximum device monitoring sessions to 32 per port (access ports and trunk ports). In case of lack of activity from hosts, the age session time is 12 hours.
How to Configure Device Sensor
The device sensor is enabled by default.
Note | In Cisco IOS Release 15.2(1)E and later releases, you can exclude the protocols so that the Device Sensor feature does not analyze the data. To exclude the protocols, use the device-sensor filter-spec protocol exclude all command in global configuration mode. |
The following tasks are applicable only if you want to configure the sensor based on your specific requirements.
Note |
- Enabling Accounting Augmentation
- Creating a Cisco Discovery Protocol Filter
- Creating an LLDP Filter
- Creating a DHCP Filter
- Applying a Protocol Filter to the Sensor Output
- Tracking TLV Changes
- Verifying the Device Sensor Configuration
- Troubleshooting Tips
Enabling Accounting Augmentation
Perform this task to add device sensor protocol data to accounting records.
For the sensor protocol data to be added to the accounting messages, you must enable session accounting by using the following standard authentication, authorization, and accounting (AAA), and RADIUS configuration commands:
Device(config)#aaa new-model
Device(config)#aaa accounting dot1x default start-stop group radius
Device(config)#radius-server host{hostname | ip-address}[auth-port port-number][acct-port port-number][timeout seconds][retransmit retries][key string]
Device(config)#radius-server vsa send accounting
1.
enable
2.
configure terminal
3.
device-sensor accounting
4.
end
DETAILED STEPS
Creating a Cisco Discovery Protocol Filter
Perform this task to create a Cisco Discovery Protocol filter containing a list of TLVs that can be included or excluded in the device sensor output.
1.
enable
2.
configure terminal
3.
device-sensor filter-list cdp list
tlv-list-name
4.
tlv {name
tlv-name |
number tlv-number}
5.
end
DETAILED STEPS
Creating an LLDP Filter
Perform this task to create an LLDP filter containing a list of TLVs that can be included or excluded in the device sensor output.
1.
enable
2.
configure terminal
3.
device-sensor filter-list lldp list
tlv-list-name
4.
tlv {name
tlv-name |
number tlv-number}
5.
end
DETAILED STEPS
Creating a DHCP Filter
Perform this task to create a DHCP filter containing a list of options that can be included or excluded in the device sensor output.
1.
enable
2.
configure terminal
3.
device-sensor filter-list dhcp list
option-list-name
4.
option {name
option-name |
number option-number}
5.
end
DETAILED STEPS
Applying a Protocol Filter to the Sensor Output
Perform this task to apply a Cisco Discovery Protocol, LLDP, or DHCP filter to the sensor output. Session notifications are sent to internal sensor clients and accounting requests.
1.
enable
2.
configure terminal
3.
device-sensor filter-spec {cdp |
dhcp |
lldp} {exclude
{all
|
list
list-name}
|
include list
list-name}
4.
end
DETAILED STEPS
Tracking TLV Changes
Perform this task to enable client notifications and accounting events for all TLV changes. By default, for each supported peer protocol, client notifications and accounting events will only be generated where an incoming packet includes a TLV that has not previously been received in the context of a given session.
1.
enable
2.
configure terminal
3.
device-sensor notify all-changes
4.
end
DETAILED STEPS
Verifying the Device Sensor Configuration
Perform this task to verify the sensor cache entries for all devices.
1.
enable
2.
show device-sensor cache mac
mac-address
3.
show device-sensor cache all
DETAILED STEPS
| Step 1 | enable
Enables privileged EXEC mode. Example: Device> enable
|
| Step 2 | show device-sensor cache mac
mac-address
Displays sensor cache entries (the list of protocol TLVs or options received from a device) for a specific device. Example: Device# show device-sensor cache mac 0024.14dc.df4d
Device: 0024.14dc.df4d on port GigabitEthernet1/0/24
--------------------------------------------------
Proto Type:Name Len Value
cdp 26:power-available-type 16 00 1A 00 10 00 00 00 01 00 00 00 00 FF FF FF FF
cdp 22:mgmt-address-type 17 00 16 00 11 00 00 00 01 01 01 CC 00 04 09 1B 65
0E
cdp 11:duplex-type 5 00 0B 00 05 01
cdp 9:vtp-mgmt-domain-type 4 00 09 00 04
cdp 4:capabilities-type 8 00 04 00 08 00 00 00 28
cdp 1:device-name 14 00 01 00 0E 73 75 70 70 6C 69 63 61 6E 74
lldp 0:end-of-lldpdu 2 00 00
lldp 8:management-address 14 10 0C 05 01 09 1B 65 0E 03 00 00 00 01 00
lldp 7:system-capabilities 6 0E 04 00 14 00 04
lldp 4:port-description 23 08 15 47 69 67 61 62 69 74 45 74 68 65 72 6E 65
74 31 2F 30 2F 32 34
lldp 5:system-name 12 0A 0A 73 75 70 70 6C 69 63 61 6E 74
dhcp 82:relay-agent-info 20 52 12 01 06 00 04 00 18 01 18 02 08 00 06 00 24
14 DC DF 80
dhcp 12:host-name 12 0C 0A 73 75 70 70 6C 69 63 61 6E 74
dhcp 61:client-identifier 32 3D 1E 00 63 69 73 63 6F 2D 30 30 32 34 2E 31 34
64 63 2E 64 66 34 64 2D 47 69 31 2F 30 2F 32 34
dhcp 57:max-message-size 4 39 02 04 80
|
| Step 3 | show device-sensor cache all
Displays sensor cache entries for all devices. Example: Device# show device-sensor cache all
Device: 001c.0f74.8480 on port GigabitEthernet2/1
--------------------------------------------------
Proto Type:Name Len Value
dhcp 52:option-overload 3 34 01 03
dhcp 60:class-identifier 11 3C 09 64 6F 63 73 69 73 31 2E 30
dhcp 55:parameter-request-list 8 37 06 01 42 06 03 43 96
dhcp 61:client-identifier 27 3D 19 00 63 69 73 63 6F 2D 30 30 31 63 2E 30 66
37 34 2E 38 34 38 30 2D 56 6C 31
dhcp 57:max-message-size 4 39 02 04 80
Device: 000f.f7a7.234f on port GigabitEthernet2/1
--------------------------------------------------
Proto Type:Name Len Value
cdp 22:mgmt-address-type 8 00 16 00 08 00 00 00 00
cdp 19:cos-type 5 00 13 00 05 00
cdp 18:trust-type 5 00 12 00 05 00
cdp 11:duplex-type 5 00 0B 00 05 01
cdp 10:native-vlan-type 6 00 0A 00 06 00 01
cdp 9:vtp-mgmt-domain-type 9 00 09 00 09 63 69 73 63 6F
|
Troubleshooting Tips
After you have configured AAA Dead-Server Detection, you should verify your configuration using the show running-config command. This verification is especially important if you have used the no form of the radius-server dead-criteria command. The output of the show running-config command must show the same values in the “Dead Criteria Details” field that you configured using the radius-server dead-criteria command.
Configuration Examples for the Device Sensor Feature
Examples: Configuring the Device Sensor
The following example shows how to create a Cisco Discovery Protocol filter containing a list of TLVs:
Device> enable
Device# configure terminal
Device(config)# device-sensor filter-list cdp list cdp-list
Device(config-sensor-cdplist)# tlv name address-type
Device(config-sensor-cdplist)# tlv name device-name
Device(config-sensor-cdplist)# tlv number 34
Device(config-sensor-cdplist)# end
The following example shows how to create an LLDP filter containing a list of TLVs:
Device> enable
Device# configure terminal
Device(config)# device-sensor filter-list lldp list lldp-list
Device(config-sensor-lldplist)# tlv name chassis-id
Device(config-sensor-lldplist)# tlv name management-address
Device(config-sensor-lldplist)# tlv number 28
Device(config-sensor-lldplist)# end
The following example shows how to create a DHCP filter containing a list of options:
Device> enable
Device# configure terminal
Device(config)# device-sensor filter-list dhcp list dhcp-list
Device(config-sensor-lldplist)# option name address-type
Device(config-sensor-lldplist)# option name device-name
Device(config-sensor-lldplist)# option number 34
Device(config-sensor-lldplist)# end
The following example shows how to apply a Cisco Discovery Protocol TLV filter list to the device sensor output:
Device> enable
Device# configure terminal
Device(config)# device-sensor filter-spec cdp include cdp-list1
The following example shows how to enable client notifications and accounting events for all TLV changes:
Device> enable
Device# configure terminal
Device(config)# device-sensor notify all-changes
Additional References
Related Documents
Related Topic |
Document Title |
|---|---|
|
Cisco IOS commands |
|
|
Security commands |
|
Technical Assistance
Description |
Link |
|---|---|
|
The Cisco Support and Documentation website provides online resources to download documentation, software, and tools. Use these resources to install and configure the software and to troubleshoot and resolve technical issues with Cisco products and technologies. Access to most tools on the Cisco Support and Documentation website requires a Cisco.com user ID and password. |
Feature Information for Device Sensor
The following table provides release information about the feature or features described in this module. This table lists only the software release that introduced support for a given feature in a given software release train. Unless noted otherwise, subsequent releases of that software release train also support that feature.
Use Cisco Feature Navigator to find information about platform support and Cisco software image support. To access Cisco Feature Navigator, go to www.cisco.com/go/cfn. An account on Cisco.com is not required.
|
Feature Name |
Releases |
Feature Information |
|---|---|---|
|
Device Sensor |
Cisco IOS 15.2(1)E |
The Device Sensor feature is used to gather raw endpoint data from network devices using protocols such as Cisco Discovery Protocol, Link Layer Discovery Protocol (LLDP), and DHCP. The endpoint data that is gathered is made available to registered clients in the context of an access session. The following commands were introduced or modified: debug device-sensor, device-sensor accounting, device-sensor filter-list cdp, device-sensor filter-list dhcp, device-sensor filter-list lldp, device-sensor filter-spec, device-sensor notify, and show device-sensor cache. |
 Feedback