- Policing and Shaping Overview
- Traffic Policing
- Two-Rate Policer
- Policer Enhancement - Multiple Actions
- Percentage-Based Policing and Shaping Based on Bandwidth
- Modular QoS CLI Three-Level Hierarchical Policer
- ATM Policing by Service Category for SVC and SoftPVC
- Modular QoS CLI Unconditional Packet Discard
- Control Plane Policing
- Control Plane Protection
- Control Plane Logging
- Class-Based Policing
- QoS Percentage-Based Policing
- Finding Feature Information
- Prerequisites for Control Plane Protection
- Restrictions for Control Plane Protection
- Information About Control Plane Protection
- How to Configure Control Plane Protection
- Configuring Queue-threshold Policy
Control Plane Protection
The Control Plane Protection feature is an extension of the policing functionality provided by the existing Control-Plane Policing feature. The Control-Plane Policing feature allows Quality of Service (QoS) policing of aggregate control-plane traffic destined to the route processor. The Control Plane Protection feature extends this policing functionality by allowing finer policing granularity.
The functionality added with Control Plane Protection includes a traffic classifier, which intercepts traffic and classifies it into three control-plane categories. New port-filtering and queue-thresholding features have also been added. The port-filtering feature provides for policing of packets going to closed or nonlistened TCP/UDP ports, while queue-thresholding limits the number of packets for a specified protocol that will be allowed in the control-plane IP input queue.
Finding Feature Information
Your software release may not support all the features documented in this module. For the latest feature information and caveats, see the release notes for your platform and software release. To find information about the features documented in this module, and to see a list of the releases in which each feature is supported, see the Feature Information Table at the end of this document.
Use Cisco Feature Navigator to find information about platform support and Cisco software image support. To access Cisco Feature Navigator, go to www.cisco.com/go/cfn. An account on Cisco.com is not required.
Prerequisites for Control Plane Protection
- You understand the principles of Control-Plane Policing and how to classify control-plane traffic.
- You understand the concepts and general configuration procedure (class map and policy map) for applying QoS policies on a router.
For information about control plane policing and its capabilities, see the "Control Plane Policing" module.
For information about Cisco IOS QoS and the procedure for configuring QoS in your network using the Modular Quality of Service (QoS) Command-Line Interface (CLI) (MQC), see the QoS: Modular QoS: Command-Line Interface Configuration Guide.
Restrictions for Control Plane Protection
Control Plane Protection for IPv4
Control Plane Protection is restricted to IPv4 input path only.
No Support for Direct ACL Configuration
The current release of Control Plane Protection does not support direct access control list (ACL) configuration in the control-plane subinterfaces, but rather can be configured using Modular QoS CLI (MQC) policies.
Requires CEF
Control Plane Protection depends on Cisco Express Forwarding (CEF) for IP packet redirection. If you disable CEF globally, this will remove all active protect and policing policies configured on the control-plane subinterfaces. Aggregate control-plane interface policies will continue to function as normal.
Control-plane Feature Policy Restriction
Policies applicable on the control-plane host subinterface are subject to the following restrictions:
No Support for Distributed or Hardware Switching Platforms
This release does not provide support for distributed or hardware switching platforms.
Control-plane IP Traffic Classification Restrictions
The control-plane host subinterface only supports TCP/UDP-based host traffic. All IP packets entering the control-plane matching any of the following conditions are not classified any further and are redirected to the cef-exception subinterface:
Protocols Auto-detected by the Port-filter
Some Cisco IOS TCP/UDP-based services, when configured, may not be auto-detected by the port-filter. That is, they do not get listed under the show control-plane host open ports output and they are not classified as an open port. This type of port must be manually added to the active port-filter class-map to be unblocked.
Control-plane Policing Subinterface Restrictions
There are no restrictions on existing aggregate control-plane policing policies. New control-plane policing policies that are configured on host subinterface will not process ARP traffic since ARP traffic is processed at the cef-exception and aggregate interfaces.
Information About Control Plane Protection
- Benefits of Control Plane Protection
- Control Plane Protection Architecture
- Control-plane Interface and Subinterfaces
- Control-plane Port-filtering
- Control-plane Queue-thresholding
- Aggregate Control-plane Services
- Control Plane Protection Configuration
Benefits of Control Plane Protection
Configuring the Control Plane Protection feature on your Cisco router provides the following benefits:
- Extends protection against DoS attacks at infrastructure routers by providing mechanism for finer policing granularity for control-plane traffic that allows you to rate-limit each type individually.
- Provides a mechanism for early dropping of packets that are directed to closed or nonlistened IOS TCP/UDP ports.
- Provides ability to limit protocol queue usage such that no single protocol flood can overwhelm the input interface.
- Provides QoS control for packets that are destined to the control-plane of Cisco routers.
- Provides ease of configuration for control plane policies using MQC Infrastructure.
- Provides better platform reliability, security and availability.
- Provides dedicated control-plane subinterface for aggregate, host, transit and cef-exception control-plane traffic processing.
- Is highly flexible: permit, deny, rate-limit.
- Provides CPU protection so it can be used for important jobs, such as routing.
Control Plane Protection Architecture
The figure below shows control-plane architecture with the Control Plane Protection feature.
| Figure 1 | Control-plane Architecture with Control Plane Protection |
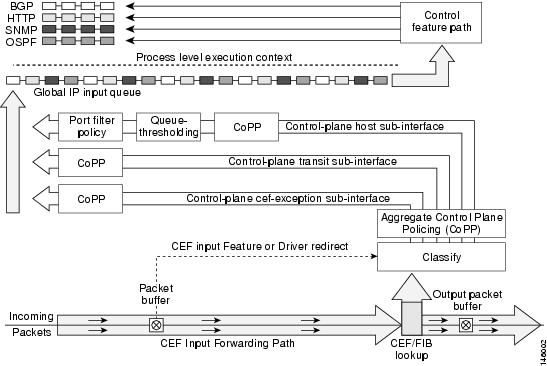
The following sections describe the components of the Control Plane Protections feature.
Control-plane Interface and Subinterfaces
Control Plane Policing (CoPP) introduced the concept of early rate-limiting protocol specific traffic destined to the processor by applying QoS policies to the aggregate control-plane interface. Control Plane Protection extends this control plane functionality by providing three additional control-plane subinterfaces under the top-level (aggregate) control-plane interface. Each subinterface receives and processes a specific type of control-plane traffic. The three subinterfaces are:
- Control-plane host subinterface . This interface receives all control-plane IP traffic that is directly destined for one of the router interfaces. Examples of control-plane host IP traffic include tunnel termination traffic, management traffic or routing protocols such as SSH, SNMP, BGP, OSPF, and EIGRP. All host traffic terminates on and is processed by the router. Most control plane protection features and policies operate strictly on the control-plane host subinterface. Since most critical router control plane services, such as routing protocols and management traffic, is received on the control-plane host subinterface, it is critical to protect this traffic through policing and protection policies. CoPP, port-filtering and per-protocol queue thresholding protection features can be applied on the control-plane host subinterface.
 Note |
Non-IP based Layer 2 protocol packets such as ARP or CDP do not fall within the control-plane host subinterface. These packets are currently classified in the control-plane CEF-exception subinterface traffic. |
- Control-plane transit subinterface . This subinterface receives all control-plane IP traffic that is software switched by the route processor. This means packets that are not directly destined to the router itself but rather traffic traversing through the router. Nonterminating tunnels handled by the router is an example of this type of control-plane traffic. Control Plane Protection allows specific aggregate policing of all traffic received at this subinterface.
- Control-plane CEF-exception subinterface . This control-plane subinterface receives all traffic that is either redirected as a result of a configured input feature in the CEF packet forwarding path for process switching or directly enqueued in the control plane input queue by the interface driver (i.e. ARP, L2 Keepalives and all non-IP host traffic). Control Plane Protection allows specific aggregate policing of this type of control plane traffic.
QoS policies attached on any of the control-plane interfaces or subinterfaces execute at interrupt level prior to packets being enqueued to the IP input queue and sent to the processor.
The transit and CEF-exception control plane subinterfaces exist in parallel to the control plane host subinterface. This release of Control Plane Protection allows for rate-limiting policies to be configured on these paths as Control Plane Policing extensions. The port-filtering and per-protocol queue thresholding features are not available on these control-plane subinterfaces.
All protection features in the control plane are implemented as MQC policies that operate using the control plane class-maps and policy-maps. New class-map and policy-map types have been created for the control plane port-filter and per-protocol queue-threshold features.
Control-plane Port-filtering
The control-plane Port-filtering feature enhances control plane protection by providing for early dropping of packets directed toward closed or nonlistened IOS TCP/UDP ports on the router. The port-filter feature policy can be applied only to the control-plane host subinterface.
The port-filter maintains a global database of all open TCP and UDP ports on the router, including random ephemeral ports created by applications. The port database is dynamically populated with entries provided by the registered applications as they start listening on their advertised ports either by configuration of an application (that is SNMP) or initiation of an application (that is, TFTP transfer). An MQC class-map using the list of open ports can be configured and a simple drop policy can be applied to drop all packets destined to closed or nonlistened ports. Port-filter class-maps also support direct match of any user configured TCP/UDP port numbers.
Control-plane Queue-thresholding
Control-plane protocol Queue-thresholding feature provides a mechanism for limiting the number of unprocessed packets a protocol can have at process-level. This feature can only be applied to the control-plane host subinterface. The intent of this feature is to prevent the input queue from being overwhelmed by any single protocol traffic. Per-protocol thresholding follows a protocol charge model. Each protocol's queue usage is limited such that no single mis-behaving protocol process can jam the interface hold queue. In this release, only a subset of TCP/UDP protocols can be configured for thresholding. Non-IP and Layer 2 protocols such as ARP and CDP cannot be configured. You can set queue limits for the following protocols:
- bgp--Border Gateway Protocol
- dns--Domain Name Server lookup
- ftp--File Transfer Protocol
- http--World Wide Web traffic
- igmp-- Internet Group Management Protocol
- snmp--Simple Network Management Protocol
- ssh--Secure Shell Protocol
- syslog--Syslog Server
- telnet--Telnet
- tftp--Trivial File Transfer Protocol
- host-protocols--A wild card for all TCP/UDP protocol ports open on the router not specifically matched/configured
Aggregate Control-plane Services
Control-plane Policing is an existing Cisco IOS feature that allows QoS policing of aggregate control-plane traffic destined to the route processor. The Control Plane Protection feature enhances protection for the router's control-plane by providing finer granularity of policing of traffic destined to the router's processor entering through any of the three control-plane subinterfaces. The CoPP feature is intended to be the first Control Plane Protection feature encountered by packets before any other features/policies. Existing (aggregate) Control-plane Policing policies will not be affected when the Control Plane Protection functionality is enabled. The aggregate Control-plane Policing policy will be applied on all control-plane traffic types. However, Control Plane Protection allows for additional and/or separate Control-plane Policing policies to be configured and applied on the different types of control-plane subinterfaces (host, transit, CEF-exception).
Control Plane Protection Configuration
The CLI for control-plane (introduced with the Control Plane Policing feature) has been extended to allow for CoPP policies to be applied to individual control-plane subinterfaces (host, transit, CEF-exception). The command syntax for creating CoPP Service Policies remains the same. In addition, the MQC class-map and policy-map CLI was modified to allow for additional types. The port-filter and queue-threshold policy features available in the host subinterface uses these new class-map and policy-map "types".
CoPP leverages MQC to define traffic classification criteria and to specify configurable policy actions for the classified traffic. Traffic of interest must first be identified via class-maps, which are used to define packets for a particular traffic class. Once classified, enforceable policy actions for the identified traffic are created with policy-maps. The control-plane global command allows the control-plane service policies to be attached to the aggregate control-plane interface itself.
The CLI for configuring Control-plane Policing policies on the new control-plane subinterfaces remains basically the same as the CLI introduced for Control-plane Policing. The only difference is in how you apply or attach the CoPP policy to the different control-plane subinterfaces.
How to Configure Control Plane Protection
- Defining Packet Classification Criteria for CoPP
- Defining a CoPP Service Policy
- Entering Control Plane Configuration Mode
- Applying CoPP Service Policy
- Configuring Port-filter Policy
- Configuring Queue-threshold Policy
- Verifying Control Plane Protection
Defining Packet Classification Criteria for CoPP
Perform this task to define the packet classification criteria for CoPP.
Before you attach an existing QoS policy to the control-plane subinterface, you must first create the policy using the MQC to define a class map and policy map for control-plane traffic.
For information about how to classify traffic and create a QoS policy, see the QoS: Modular QoS: Command-Line Interface Configuration Guide.
DETAILED STEPS
Defining a CoPP Service Policy
To define a service policy, use the policy-map global configuration command to specify the service policy name, and use the configuration commands to associate a traffic class that was configured with the class-map command, with the QoS action. The traffic class is associated with the service policy when the class command is used. You must issue the class command after entering policy-map configuration mode. After entering the class command, you are automatically in policy-map class configuration mode.
For information about how to classify traffic and create a QoS policy, see the QoS: Modular QoS: Command-Line Interface Configuration Guide.
DETAILED STEPS
Entering Control Plane Configuration Mode
After you have created a class of traffic and defined the service policy for the control-plane, apply the policy to either the aggregate control-plane interface or one of the subinterfaces.
DETAILED STEPS
Applying CoPP Service Policy
Perform this task to apply CoPP service policies to a control-plane interface.
Before you attach an existing QoS policy to the control-plane, you must first create the policy by using MQC to define a class map and policy map for control-plane traffic.
For information about how to classify traffic and create a QoS policy, see the QoS: Modular QoS: Command-Line Interface Configuration Guide.
DETAILED STEPS
Configuring Port-filter Policy
You can apply the port-filter policy feature to the control-plane host subinterface to block traffic destined to closed or nonlistened TCP/UDP ports. New class-map and service-policy types have been created to accommodate the port-filter configuration. The classification and match criteria for the new port-filter class-maps supports only a constrained subset of the overall global MQC match criteria. Also, the actions supported by the new port-filter service policy is limited as well. that is only the drop action is supported
- Restrictions
- Defining Port-filter Packet Classification Criteria
- Defining Port-filter Service Policy
- Applying Port-filter Service Policy to the Host Subinterface
Restrictions
- The classification and match criteria for the new port-filter class-maps support only a constrained subset of the overall global MQC match criteria.
- The actions supported by the new port-filter service policy is limited. Only the drop action is supported.
- The port-filter feature policy can only be attached on the control-plane host subinterface.
- Some IOS TCP/UDP-based services, when configured, may not be auto-detected by the port filter. That is, they do not get listed under the "show control plane host open ports" output and are not classified as an open port. This type of port must be manually added to the active port filter class-map to be unblocked when using the 'closed-port' match criteria.
There are three required steps to configure a port-filter policy:
Defining Port-filter Packet Classification Criteria
Before you can attach a port-filter service policy to the control-plane host subinterface, you must first create the policy using the modified MQC to define a port-filter class-map and policy-map type for control-plane traffic.
A new MQC class-map type called port-filter was created for the port-filter feature. You must first create one or more port-filter class-map(s) before you can create your port-filter service policy. Your port-filter class-maps will separate your traffic into "classes" of traffic in which your service policy will define actions on.
DETAILED STEPS
Defining Port-filter Service Policy
You can define a port-filter service policy that provides additional control-plane protection. Defining this policy supports early dropping of packets that are directed toward closed on nonlistened TCP/UDP ports on the router.
To configure a Port-filter service policy, use the new policy-map type port-filter global configuration command to specify the port-filter service policy name, and use the following configuration commands to associate a port-filter traffic class that was configured with the class-map type port-filter command, with the port-filter drop action command. The port-filter traffic class is associated with the service policy when the class command is used. The class command must be issued after entering policy-map configuration mode. After entering the class command, you are automatically in policy-map class configuration mode.
Note |
The actions supported by the new port-filter service policy is limited. Only the drop action is supported. |
DETAILED STEPS
Applying Port-filter Service Policy to the Host Subinterface
Perform this task to apply port-filter service policies to a subinterface.
Before you attach a port-filter service policy to the control-plane host subinterface, you must first create the policy using MQC to define a class map and policy map for the required control-plane traffic.
Note |
The port-filter feature can only be applied on the control-plane host subinterface and only as input policy. |
DETAILED STEPS
Examples
The following example shows how to configure a port-filter policy to drop all traffic destined to closed or "nonlistened" TCP/UDP ports:
Router(config)# class-map type port-filter pf-class
Router(config-cmap)# match closed-ports
Router(config-cmap)# exit
Router(config)# policy-map type port-filter pf-policy
Router(config-pmap)# class pf-class
Router(config-pmap-c)# drop
Router(config-pmap-c)# end
Router#
The following example shows how to configure a port-filter policy to drop all traffic destined to closed or "nonlistened" ports except NTP.
Router(config)# class-map type port-filter pf-class
Router(config-cmap)# match not port udp 123
Router(config-cmap)# match closed-ports
Router(config-cmap)# exit
Router(config)# policy-map type port-filter pf-policy
Router(config-pmap)# class pf-class
Router(config-pmap-c)# drop
Router(config-pmap-c)# end
Router#
Configuring Queue-threshold Policy
The Control Plane Protection feature includes a new queue-threshold policy feature that can be applied to the control-plane host subinterface. The queue-threshold feature allows you to limit the number of packets for a given higher level protocol allowed in the control-plane IP input queue. Much like the port-filter feature, new class-map and policy-map types have been created to accommodate the queue-threshold feature. As with the port-filter feature, the queue-threshold feature supports a very specific class-map and policy-map capabilities.
- Restrictions
- Defining Queue-threshold Packet Classification Criteria
- Defining a Queue-threshold Service Policy
- Applying a Queue-threshold Policy to the Host Subinterface
Restrictions
- The classification and match criteria for the new queue-threshold class-maps supports only a constrained subset of the overall global MQC match criteria. That is, only a subset of match protocol option.
- The actions supported by the new queue-threshold service policy is limited. Only the queue-limit action is supported.
- The queue-threshold feature is supported only on the control-plane host subinterface as an input policy.
There are three steps required to configure a Queue-threshold policy:
Defining Queue-threshold Packet Classification Criteria
You can define a queue-threshold service policy when you want to limit the number of unprocessed packets that a protocol can have at process level.
Before you can attach a queue-threshold service policy to the control-plane host subinterface, you must first create the policy using the modified MQC to define a queue-threshold class-map and policy-map type for control-plane traffic.
A new MQC class-map type called queue-threshold was created for the queue-threshold feature. You must first create one or more queue-threshold class-map(s) before you can create your queue-threshold service policy. Your queue-threshold class-maps will separate your traffic into "classes" of traffic in which your service policy will define actions on.
Note |
The classification and match criteria for the new queue-threshold class-map supports only a constrained subset of the overall global MQC match criteria. That is, only a subset of the match protocol criteria is supported. |
DETAILED STEPS
| Command or Action | Purpose | |
|---|---|---|
|
|
Example: Router> enable |
Enables privileged EXEC mode. |
|
|
Example: Router# configure terminal |
Enters the global configuration mode. |
|
|
Example: Router(config)#class-map type queue-threshold match-all cppr-pf |
Applies a class map for the queue-threshold and enables the queue-threshold class-map configuration mode. |
|
|
Example: Router(config-cmap)# match protocol bgp |
Specifies the upper layer protocol match criteria for the class-map.
|
Defining a Queue-threshold Service Policy
To configure a queue-threshold service policy, use the new policy-map type called queue-threshold global configuration command to specify the queue-threshold service policy name, and use the following configuration commands to associate a queue-threshold traffic class that was configured with the class-map type queue-threshold command, with the queue-threshold queue-limit action command. The queue-threshold traffic class is associated with the service policy when the class command is used. The class command must be issued after entering policy-map configuration mode. After entering the class command, you are automatically in policy-map class configuration mode.
Note |
The actions supported by the new queue-threshold service policy is limited. Only the queue-limit action is supported.
|
DETAILED STEPS
| Command or Action | Purpose | |||
|---|---|---|---|---|
|
|
Example: Router> enable |
Enables privileged EXEC mode. |
||
|
|
Example: Router# configure terminal |
Enters the global configuration mode. |
||
|
|
Example: Router(config)# policy-map type queue-threshold cppr-qt-policy |
Enables the queue-threshold service policy configuration mode. |
||
|
|
Example: Router(config-pcmap)# class qt-class |
Enters class map configuration mode used to associate a service policy with a class. |
||
|
|
Example: Router(config-cmap) #queue-limit 75 |
Applies the queue-threshold service policy action on the class.
|
Applying a Queue-threshold Policy to the Host Subinterface
Perform this task to apply queue-threshold service policies to the control-plane host subinterface.
Before you attach a queue-threshold service policy to the control-plane host subinterface, you must first create the policy by using MQC to define a class map and policy map for the required control-plane traffic.
Note |
The queue-threshold feature can only be applied on the control-plane host subinterface as an input policy. |
DETAILED STEPS
| Command or Action | Purpose | |||
|---|---|---|---|---|
|
|
Example: Router> enable |
Enables privileged EXEC mode. |
||
|
|
Example: Router# configure terminal |
Enters the global configuration mode. |
||
|
|
Example: Router(config)# control-plane host |
Attaches a QoS queue-threshold policy that manages traffic to the host subinterface and enters control-plane configuration mode.
|
||
|
|
Example: Router(config-cp)# service-policy input cppr-qt-policy |
Attaches a QoS service policy to the control-plane.
|
Examples
The following example shows how to configure a queue-threshold policy to set the queue limit for SNMP protocol traffic to 50, telnet traffic to 50, and all other protocols to 150.
Router(config)# class-map type queue-threshold qt-snmp-class
Router(config-cmap)# match protocol snmp
Router(config-cmap)# class-map type queue-threshold qt-telnet-class
Router(config-cmap)# match protocol telnet
Router(config-cmap)# class-map type queue-threshold qt-other-class
Router(config-cmap)# match host-protocols
Router(config-cmap)# exit
Router(config)# policy-map type queue-threshold qt-policy
Router(config-pmap)# class qt-snmp-class
Router(config-pmap-c)# queue-limit 50
Router(config-pmap-c)# class qt-telnet-class
Router(config-pmap-c)# queue-limit 50
Router(config-pmap-c)# class qt-other-class
Router(config-pmap-c)# queue-limit 150
Router(config-pmap-c)# end
Router#
Verifying Control Plane Protection
Use the show policy-map control-plane command to verify Control Plane Protection configurations and to view statistics for control-plane service policies.
To display information about the service policy attached to the control-plane, perform the following optional steps.
DETAILED STEPS
| Command or Action | Purpose | |
|---|---|---|
|
|
Example: Router> enable |
Enables privileged EXEC mode. |
|
|
Example: Router# show policy-map control-plane all |
Displays information about the control-plane.
|
Examples
The following example shows that the aggregate CoPP policy map named "copp-transit-policy" is associated with the control-plane transit subinterface and displays the statistics for that policy:
Router# show policy-map control-plane transit

 control-plane Transit
  Service-policy input: copp-transit-policy
    Class-map: copp-transit-class (match-all)
      8 packets, 592 bytes
      5 minute offered rate 0 bps, drop rate 0 bps
      Match: any
      police:
          rate 2000 pps, burst 488 packets
        conformed 8 packets; actions:
          transmit
        exceeded 0 packets; actions:
          drop
        conformed 0 pps, exceed 0 pps
    Class-map: class-default (match-any)
      0 packets, 0 bytes
      5 minute offered rate 0 bps, drop rate 0 bps
      Match: any
The following example shows that the policy map "TEST" is associated with the aggregate control-plane interface. This policy map polices traffic that matches the class map "TEST," while allowing all other traffic (that matches the class map "class-default") to go through as is.
Router# show policy-map control-plane

control-plane
Service-policy input:TEST
Class-map:TEST (match-all)
      20 packets, 11280 bytes
      5 minute offered rate 0 bps, drop rate 0 bps
      Match:access-group 101
      police:
        8000 bps, 1500 limit, 1500 extended limit
        conformed 15 packets, 6210 bytes; action:transmit
        exceeded 5 packets, 5070 bytes; action:drop
        violated 0 packets, 0 bytes; action:drop
        conformed 0 bps, exceed 0 bps, violate 0 bps
Class-map:class-default (match-any)
      105325 packets, 11415151 bytes
      5 minute offered rate 0 bps, drop rate 0 bps
      Match:any
Additional References
Related Documents
| Related Topic |
Document Title |
|---|---|
| QoS commands: complete command syntax, command modes, command history, defaults, usage guidelines, and examples |
Cisco IOS Quality of Service Solutions Command Reference |
| QoS feature overview |
"Quality of Service Overview" module |
Standards
| Standard |
Title |
|---|---|
| No new or modified standards are supported by this feature, and support for existing standards has not been modified by this feature. |
-- |
MIBs
| MIB |
MIBs Link |
||
|---|---|---|---|
|
To locate and download MIBs for selected platforms, Cisco IOS releases, and feature sets, use Cisco MIB Locator, found at the following URL: |
RFCs
| RFC |
Title |
|---|---|
| None |
-- |
Technical Assistance
| Description |
Link |
|---|---|
| The Cisco Technical Support website contains thousands of pages of searchable technical content, including links to products, technologies, solutions, technical tips, and tools. Registered Cisco.com users can log in from this page to access even more content. |
Feature Information for Control Plane Protection
The following table provides release information about the feature or features described in this module. This table lists only the software release that introduced support for a given feature in a given software release train. Unless noted otherwise, subsequent releases of that software release train also support that feature.
Use Cisco Feature Navigator to find information about platform support and Cisco software image support. To access Cisco Feature Navigator, go to www.cisco.com/go/cfn. An account on Cisco.com is not required.
| Table 1 | Feature Information for Control Plane Protection |
| Feature Name |
Releases |
Feature Information |
|---|---|---|
| Control Plane Protection |
12.4(4)T |
The Control Plane Protection feature is an extension of the policing functionality provided by the existing Control-Plane Policing feature. The Control-Plane Policing feature allows QoS policing of aggregate control-plane traffic destined to the route processor. The Control Plane Protection feature extends this policing functionality by allowing finer policing granularity. The following commands were introduced or modified: class-map, control-plane, show policy-map control-plane |
Cisco and the Cisco logo are trademarks or registered trademarks of Cisco and/or its affiliates in the U.S. and other countries. To view a list of Cisco trademarks, go to this URL: www.cisco.com/go/trademarks. Third-party trademarks mentioned are the property of their respective owners. The use of the word partner does not imply a partnership relationship between Cisco and any other company. (1110R)
Any Internet Protocol (IP) addresses and phone numbers used in this document are not intended to be actual addresses and phone numbers. Any examples, command display output, network topology diagrams, and other figures included in the document are shown for illustrative purposes only. Any use of actual IP addresses or phone numbers in illustrative content is unintentional and coincidental.
 Feedback