External Storage Management

External Storage Management Overview

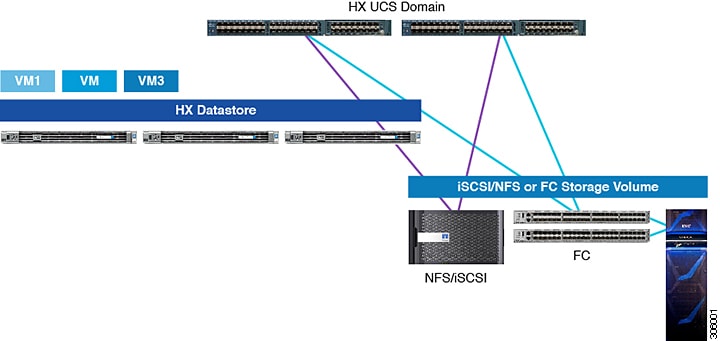
A Cisco HyperFlex System provides consolidated access to both SAN storage and Network Attached Storage (NAS) over the unified fabric. By unifying storage access, a Cisco Unified Computing System can access storage over Ethernet, Fibre Channel, Fibre Channel over Ethernet (FCoE), and iSCSI.

The following image depicts a Cisco HyperFlex System integrated with external storage.

Figure 1. Integrating External Storage with Cisco HyperFlex Systems

External Fiber Channel Storage

Connecting HyperFlex Nodes to External Fibre Channel Storage

This document provides detailed instructions about how to connect a Tier 1 external Fibre Channel (FC) storage array to the HyperFlex nodes. You can connect external FC storage to the HX nodes in FC end-host mode and Ethernet end-host mode as follows:

  • Fabric attach FC storage

  • Fabric attach FCoE storage

Storage Design Considerations

Consider the following design characteristics for HX SAN connectivity:

  • Northbound storage physical connectivity does not support Virtual Port-Channels (vPCs) like LAN connectivity.

  • Port channels or trunking is supported to combine multiple storage uplink ports that provide physical link redundancy.

  • Storage handles the redundancy of storage resources and it varies by vendor.

  • Connecting the external storage directly to the HX domain increases the fabric interconnect physical port's consumption due to additional processing.

  • Software configuration including VSANs and zoning is required for providing access to storage resources.

  • When utilizing external storage connectivity, it is imperative to have each cluster connecting to the storage in its own domain because the LAN connectivity policy likely differs between the two clusters.

  • When integrating HyperFlex with an existing UCS domain that has NetApp IP Storage, modify the default QoS Gold class to 9216 bytes, so COS 4 allows Jumbo Frames. For more information, see NetApp KB Article number 000003500.

Storage Configuration Sequence

To connect HX servers to external storage, perform the following steps:

Procedure


Step 1

Log in to the HX Data Platform Installer using admin level credentials.

Step 2

At the initial workflow selection, click I know what I’m doing, let me customize my workflow.

Step 3

Select only Run UCSM Configuration and Run ESX Configuration.

Step 4

Follow the wizard to complete the configuration.

The wizard creates the HX policies, Service Profile Templates, and the Service Profiles to be associated with the HX Cluster.

For detailed steps, see the Configuring HX Data Platform chapter in the HyperFlex Getting Started Guide.

Note


When the cluster comes online, there will be no vHBA.

Step 5

Attach one or both of the following types of storage to the HX FI Domain:

Step 6

Re-log in to HX Installer, and then click Start Over.

Step 7

At the initial workflow selection, click I know what I’m doing, let me customize my workflow.

Step 8

Select Deploy HX Software, and then follow the wizard to create the HX Cluster.


Attaching Fibre Channel Storage to HX

This procedure describes the high-level steps for attaching Fibre Channel (FC) storage to the HX FI Domain:

Procedure


Step 1

Log in to Cisco UCS Manager GUI.

Step 2

Configure Unified Ports as Fibre Channel. For details, see the LAN Ports and Port Channels chapter of the Cisco UCS Manager Network Management Guide.

Step 3

Create a VSAN for Fibre Channel communication. For details, see Creating VSAN for Fibre Channel.

Step 4

Create WWNN pool and WWNN block for HyperFlex. For details, see Creating WWNN pool.

Step 5

Create fabric-specific (hx-a and hx-b) WWPN pool and WWPN block. For details, see Creating a WWPN Pool.

Step 6

Create a pair of vHBA templates with the previously created WWPN Pool associated with Fabric-A and Fabric-B, respectively.

Step 7

Create HyperFlex SAN connectivity Policy. For details, see Creating SAN Connectivity Policy.

Step 8

Assign the HX SAN connectivity policy to the HX Service Profile Template (SPT) that is used for the cluster. This step triggers a pending-ack to be raised on all nodes within the cluster created from the modified SPT. Acknowledge all pending-acks for all Service Profiles in the cluster to trigger re-configuration of Service Profiles with vHBAs.


Creating VSAN for Fibre Channel

FCoE VLANs in the SAN cloud and VLANs in the LAN cloud must have different IDs. Using the same ID results in a critical fault and traffic disruption for all vNICs and uplink ports that use that FCoE VLAN. Ethernet traffic is dropped on any VLAN with an ID that overlaps with an FCoE VLAN ID.

Procedure

Step 1

In the Navigation pane, click SAN.

Step 2

Click the SAN Cloud > VSAN node.

Step 3

Right-click the VSAN node, and select Create Storage VSAN.

Step 4

In the Create VSAN dialog box, complete the following fields:

Name

Description

Name field

The name assigned to the network.

This name can be between 1 and 32 alphanumeric characters. You cannot use spaces or any special characters other than - (hyphen), _ (underscore), : (colon), and . (period), and you cannot change this name after the object is saved.

FC Zoning* field

Make sure the Disable radio button for the Fabric Interconnects (FIs) in FC end-host mode is selected.

Note


Make sure that the FI is not connected to an upstream switch.

Configuration

Select a configuration for your environment.

  • Click the Common/Global radio button so that VSAN maps to the same VSAN ID in all available fabrics.

  • Click Both Fabrics Configured Differently radio button to create two VSANS, with different IDs for Fabric A and Fabric B.

VSAN ID field

The unique identifier assigned to the network. For FC end-host mode, the range between 3840 to 4079 is also a reserved VSAN ID range.

FCoE VLAN field

The unique identifier assigned to the VLAN used for Fibre Channel connections.

VLAN 4048 is user configurable. However, Cisco UCS Manager uses VLAN 4048 for the following default values. If you want to assign 4048 to a VLAN, you must reconfigure these values.


Creating WWNN Pools

A World Wide Node Name (WWNN) pool is a World Wide Name (WWN) pool that contains only World Wide Node Names. If you include a pool of WWNNs in a service profile, the software assigns the associated server a WWNN from that pool.


Important


A WWN pool can include only WWNNs or WWPNs in the ranges from 20:00:00:00:00:00:00:00 to 20:FF:FF:FF:FF:FF:FF:FF or from 50:00:00:00:00:00:00:00 to 5F:FF:FF:FF:FF:FF:FF:FF. All other WWN ranges are reserved. To ensure the uniqueness of the Cisco UCS WWNNs and WWPNs in the SAN fabric, it is recommended to use the following WWN prefix for all blocks in a pool: 20:00:00:25:B5:XX:XX:XX


Procedure

Step 1

In the Navigation pane, click SAN.

Step 2

Expand SAN > Pools > root > Sub-Organizations > hx-cluster.

Step 3

Expand the hx-cluster sub-organization to create the pool.

Step 4

Right-click WWNN Pools and select Create WWNN Pool.

Step 5

In the Define Name and Description dialog box of the Create WWNN Pool wizard, enter HyperFlex.

Step 6

Click Next.

Step 7

In the Add WWN Blocks page of the Create WWNN Pool wizard, click Add.

Step 8

In the Create WWN Block dialog box, complete the following fields:

Form field: The first WWN in the block.

Size field: The number of WWNs in the block.

For WWN pools, the pool size must be a multiple of ports-per-node + 1. For example, if there are seven ports per node, the pool size must be a multiple of eight. If there are 63 ports per node, the pool size must be a multiple of 64.

Step 9

Click OK.

Step 10

Click Finish.


What to do next

Create WWPN Pool.

Creating a WWPN Pool

To create a WWWPN Pool, perform the following steps.
Procedure

Step 1

In the Navigation pane, click SAN.

Step 2

Expand SAN > Pools > root > Sub-Organizations > hx-cluster.

Step 3

Right-click WWPN Pools and select Create WWPN Pool.

Step 4

In the Define Name and Description dialog box of the Create WWPN Pool wizard, enter hx-a.

Step 5

Click Next.

Step 6

In the Add WWN Blocks page of the Create WWNN Pool wizard, click Add.

Step 7

In the Create WWN Block dialog box, complete the following fields:

Form field: The first WWN in the block.

Size field: The number of WWNs in the block.

For WWN pools, the pool size must be a multiple of ports-per-node + 1. For example, if there are seven ports per node, the pool size must be a multiple of eight. If there are 63 ports per node, the pool size must be a multiple of 64.

Step 8

Click OK.

Step 9

Click Finish.


What to do next

Create WWPN Pool hx-b. Follow the steps above.

Creating a vHBA Template

This template is a policy that defines how a vHBA on a server connects to the SAN. It is also referred to as a vHBA SAN connectivity template. Include this policy in a service profile for it to take effect.
Before you begin

Before creating the vHBA template policy, make sure that one or more of the following resources exist in the system:

  • Named VSAN

  • WWNN pool or WWPN pool

  • SAN pin group

  • Statistics threshold policy

Procedure

Step 1

In the Navigation pane, click SAN.

Step 2

Expand SAN > Policies > root > Sub-Organizations > hx-cluster.

Step 3

Right-click the vHBA Templates node and choose Create vHBA Template.

Step 4

In the Create vHBA Template dialog box, complete the following fields:

Name

Description

Name field

Enter vhba-a.

The name of the virtual HBA template.

This name can be between 1 and 16 alphanumeric characters. You cannot use spaces or any special characters other than hyphen (-), underscore(_), period(.), and colon (:). You cannot change this name after the object is saved.

Description field

Enter up to 256 characters.

A user-defined description of the template.

Fabric ID field

Select A.

Select VSAN drop-down list

Select the VSAN created earlier for Fabric A, to associate with this vHBA.

Template Type field

Select Updating Template.

vHBAs created from this template are updated if the template changes.

Max Data Field Size field

Default: 2048

This the maximum size of the Fibre Channel frame payload bytes that the vHBA supports.

WWPN Pool drop-down list

Assign hx-a.

QoS Policy drop-down list

<Not set>

Pin Group drop-down list

<Not set>

Stats Threshold Policy drop-down list

<Not set>

Step 5

Click Ok.


SAN Connectivity Policy

Connectivity policies determine the connections and the network communication resources between the server and the SAN in the network. These policies use pools to assign MAC addresses, WWNs, and WWPNs to servers and to identify the vNICs and vHBAs that the servers use to communicate with the network.


Note


We do not recommend that you use static IDs in connectivity policies, because these policies are included in service profiles and service profile templates. Also, connectivity policies can be used to configure multiple servers.


Creating SAN Connectivity Policy

Procedure

Step 1

In the Navigation pane, click SAN.

Step 2

Expand SAN > Policies > root > Sub-Organizations > hx-cluster.

Step 3

Right-click SAN Connectivity Policies and choose Create SAN Connectivity Policy.

Step 4

In the Create SAN Connectivity Policy dialog box, enter a Name Hyperflex and optional Description.

Step 5

From the WWNN Assignment drop-down, select the hyperflex pool.

Each pool name is followed by two numbers in parentheses that show the number of WWNs still available in the pool and the total number of WWNs in the pool.

Step 6

Click Add.

Step 7

In the Create vHBAs dialog box, enter the name vhba-a.

Step 8

Check Use vHBA template.

Step 9

Select vHBA template vhba-a from the drop-down list.

Step 10

Select Adapter Policy VMware from the drop-down list.

Step 11

Click Ok.

Step 12

Repeat steps 7- 12 to create vHBA vhba-b and assign vhba-b template to it.


What to do next

Include the SAN connectivity policy to the HX node service profile template.

Including SAN Connectivity Policy to the HX Node Service Profile Template

This procedure causes the Service Profiles associated with this SPT to require user acknowledgement and the HX node to reboot.

Procedure

Step 1

In the Navigation pane, click Server.

Step 2

Expand Servers > Service Profile Template > root > Sub-Organizations > hx-cluster.

Step 3

Select Service Template hx-nodes, select vHBA.

Step 4

In the work pane, on Storage tab, select HyperFlex from the drop-down list under the SAN Connectivity Policy section.

Step 5

Click Save.


Adding Additional vNICs to an Existing Cluster

Before you begin

In order to connect to other storage systems such as FlexPod via iSCSI or NFS, or a FC SAN, it is recommended that the additional vNICs be added during the creation of the HX cluster. The HyperFlex installer prompts for the optional creation of additional iSCSI vNICs or FC HBAs at the time of installation and should be configured if external storage is required now or at some point in the future.

HyperFlex supports adding additional vNICs after cluster creation. To add additional vNICs to an existing cluster, perform the following actions:


Note


Do not reboot multiple nodes at once while making these hardware changes, as it could lead to the storage cluster going offline. Validate the health state of each host, and the HX cluster before moving onto subsequent nodes.


Note


In some rare cases, vmnics in ESXi may re-order and require manual reconfiguration to restore network services. Before beginning this procedure, run and save the output of the following commands on every ESXi host in the cluster via SSH:

esxcli network nic list
esxcli network vswitch standard list
esxcli network vswitch standard policy failover get -v vswitch-hx-inband-mgmt
esxcli network vswitch standard policy failover get -v vswitch-hx-storage-data
esxcli network vswitch standard policy failover get -v vmotion
esxcli network vswitch standard policy failover get -v vswitch-hx-vm-network

Procedure


Step 1

Login to UCSM and click on LAN tab, navigate to Policies > root > Sub-Organizations > Name of the Suborg for this Cluster > vNIC Templates. Right-click and select Create vNIC Template.

Step 2

From the LAN tab, navigate to Policies > root > Sub-Organizations > Name of the Suborg for this Cluster > LAN Connectivity Policies > HyperFlex. Click Add at the bottom of the table. Specify a name, check the box for Use vNIC Template, and then select the template created in Step 1. Finally click Save Changes and review any warnings that may be triggered.

After adding the vNIC template to the LAN connectivity policy, the servers go in to Pending Reboot state and require a reboot to add the new interface.

Note


Do not reboot HX servers at this time.

Step 3

Log in to your vCenter Server as a user with administrative privileges on the cluster.

Step 4

Place one of the existing HX ESXi Hosts in to Maintenance Mode.

Step 5

After the host has entered Maintenance Mode, reboot the associated node to complete the addition of the new hardware.

Step 6

In some configurations, after the node has rebooted, the HXDP software detects that the DirectPath I/O configuration has changed, and must be reconfigured. This results in one additional automatic reboot of the node.

Note


After the second reboot, exit the ESXi host from maintenance mode, the SCVM should start automatically without errors.

Step 7

Check the health status of the cluster, validating that the cluster is healthy before proceeding to reboot the next node. The cluster health status can be viewed from HyperFlex Connect.

Step 8

Repeat steps 3 through 7 for each node in the cluster as necessary, until all of the nodes have been rebooted and the new vNICs are visible to ESXi as new vmnic interfaces.

Step 9

Create a new vSwitch and assign the new vmnics as uplinks. Do not alter the existing HyperFlex vSwitches or vmnics.

Note


Be sure to create new vSwitches for any additional vNICs added to the cluster.


Adding vHBAs to an Existing HyperFlex Cluster

In order to connect to an external block storage system using FC SAN, it is recommended that the FC vHBAs be added during the creation of the HX cluster. The HyperFlex installer prompts for the optional creation of FC vHBAs at the time of installation and should be configured if external storage is required now or at some point in the future.

HyperFlex supports adding new FC HBAs for a new SAN storage connectivity or adding additional vHBAs to an existing SAN Connectivity policy for additional SAN connection after cluster creation with a SAN connectivity policy.


Note


Do not reboot multiple nodes at once while making these hardware changes, as it could lead to the storage cluster going offline. Validate the health state of each host, and the HX cluster before moving onto subsequent nodes.


Creating a SAN Connection Policy without SAN Storage Connected

Use these steps in order to create a new SAN connectivity policy and attach it to existing HyperFlex cluster nodes for connecting new external SAN storage. If your cluster already has a external SAN storage connected, see Creating a FC HBA to an Existing SAN Connection Policy with External Storage Connected.

Procedure

Step 1

Login to UCSM and perform the following steps:

  1. Click on the SAN tab and navigate to Pools > root > Sub-Organizations > Name of the Suborg for this Cluster > WWNN Pools.

  2. Right-click on WWNN Pools and select Create WWNN Pool.

  3. Enter the WWNN Pool name and click Next and the Add at the bottom of the table.

  4. You have the option to edit the last 6 characters of WWNN and select the size.

    Note


    The size should be equal or more than the number of nodes in the HyperFlex cluster.

  5. Click Finish.

Step 2

Create 2 WWPN policies, one for SAN A and one for SAN B by performing the following steps:

  1. Login to your UCSM.

  2. Click on the SAN tab and navigate to Pools > root > Sub-Organizations > Name of the Suborg for this Cluster > WWPN Pools.

  3. Right-click on WWPN Pools and select Create WWPN Pool.

  4. Enter the WWPN Pool name and click Next and the Add at the bottom of the table.

  5. You have the option to edit the last 6 characters of WWPN and select the size.

    Note


    It is recommended to change one or more characters of the last 6 characters of WWPN so that its identified easily for each SAN fabric. The size should be equal or more than the number of nodes in the HyperFlex cluster.

  6. Click Finish and repeat this process for FC SAN B.

Step 3

From the SAN tab, navigate to SAN Cloud > Fabric A > VSANs and perform the following steps:

  1. Right-click and select Create VSAN.

  2. Right-click on WWNN Pools and select Create WWNN Pool.

  3. Enter the VSAN Name and select Fabric A from the radio button options.

  4. Enter the VSAN ID and the corresponding FCoE VSAN ID.

    Note


    FCoE VSAN ID can be the same as the VSAN ID.

Step 4

From the SAN tab, navigate to SAN Cloud > Fabric B > VSANs and perform the following steps:

  1. Right-click and select Create VSAN.

  2. Right-click on WWNN Pools and select Create WWNN Pool.

  3. Enter the VSAN Name and select Fabric B from the radio button options.

  4. Enter the VSAN ID and the corresponding FCoE VSAN ID.

    Note


    FCoE VSAN ID can be the same as the VSAN ID.

    Note


    Make sure to use different VSAN IDs in Fabric A and Fabric B.

Step 5

From the SAN tab, navigate to Policies > root > Sub-Organizations > Name of the Suborg for this Cluster > vHBA Templates and perform the following steps:

  1. Right-click and select Create vHBA Template.

  2. Enter the vHBA Name and select Fabric ID A.

  3. From the Select VSAN drop-down, select the VSAN previously created for SAN A in Step 3.

  4. From the Template Type field, select Updating Template. In the dropdown for WWPN Pool, select the WWPN Pool created for SAN A in Step 2.

Step 6

From the SAN tab, navigate to Policies > root > Sub-Organizations > Name of the Suborg for this Cluster > vHBA Templates and perform the following steps:

  1. Right-click and select Create vHBA Template.

  2. Enter the vHBA Name and select Fabric ID B.

  3. From the Select VSAN drop-down, select the VSAN previously created for SAN B in Step 4.

  4. From the Template Type field, select Updating Template. In the dropdown for WWPN Pool, select the WWPN Pool created for SAN B in Step 2.

Step 7

From the SAN tab, navigate to Policies > root > Sub-Organizations > Name of the Suborg for this Cluster > SAN Connectivity Policies and perform the following steps:

  1. Right-click and select Create SAN Connectivity Policy.

  2. Enter the SAN Connectivity Policy name.

  3. From the WWNN Assignment drop-down, select the WWNN Pool previously created in Step 1.

  4. Click Add at the bottom of the table and enter the WWNN Pool name.

  5. Select Use vHBA Template and in the vHBA Template drop-down, select the vHBA Template for SAN A previously created in Step 5 and click OK.

  6. Click Add at the bottom of the table again and enter the WWNN Pool name.

  7. Select Use vHBA Template and in the vHBA Template drop-down, select the vHBA Template for SAN B previously created in Step 6 and click OK.

Step 8

Navigate to Servers > Service Profiles > root > Sub-Organizations > Name of the Suborg for this Cluster.

  1. Click on one of the service profiles, and from the General tab, click on Template Instance.

  2. From the Service Template pop-up window under Properties, navigate to the Storage > vHBA tab.

  3. In the SAN Connectivity Policy section, select the SAN Connectivity policy created in Step 7 and click Apply. Click Yes in the pop-up window.

    Note


    If you have a cluster with Mixed Node types such as M4/M5/Compute, make sure to identify the Service Profile Template for different node types and update the Service Profile Template to add SAN Connectivity Policy.

  4. After adding the SAN Connectivity Policy to the Service Profile Template, the servers go in to Pending Reboot state and require a reboot to add the new FC HBA interface.

    Note


    Do not reboot HX servers at this time.

Step 9

Log in to your vCenter Server as a user with administrative privileges on the cluster.

Step 10

Place one of the existing HX ESXi Hosts in to Maintenance Mode.

Step 11

After the host has entered Maintenance Mode, reboot the associated node to complete the addition of the new hardware.

Step 12

After the reboot, exit the ESXi host from Maintenance Mode, the SCVM should start automatically without errors.

Step 13

Check the health status of the cluster, validating that the cluster is healthy before proceeding to reboot the next node. The cluster health status can be viewed from HyperFlex Connect.

Step 14

Repeat steps 10 through 13 for each node in the cluster as necessary, until all of the nodes have been rebooted and the new FC HBAs are visible to ESXi as new vHBA interfaces.

Step 15

Check and confirm that there are no more pending acknowledgements after completing the reboot of all hosts in the cluster.


Creating a FC HBA to an Existing SAN Connection Policy with External Storage Connected

Use these steps in order to create a new FC HBA and add to existing SAN connectivity policy. If your cluster doesn’t have a SAN connection policy, see Creating a SAN Connection Policy without SAN Storage Connected.

Procedure

Step 1

Login to UCSM and click on the SAN tab, navigate to Policies > root > Sub-Organizations > Name of the Suborg for this Cluster > vHBA Templates and perform the following steps:

  1. Right-click and select Create vHBA Template.

  2. Enter the vHBA Name and select Fabric ID A.

  3. From the Select VSAN drop-down, select the VSAN for SAN A.

  4. From the Template Type field, select Updating Template. In the dropdown for WWPN Pool, select the WWPN Pool created for SAN A.

Step 2

Login to UCSM and click on the SAN tab, navigate to Policies > root > Sub-Organizations > Name of the Suborg for this Cluster > vHBA Templates and perform the following steps:

  1. Right-click and select Create vHBA Template.

  2. Enter the vHBA Name and select Fabric ID B.

  3. From the Select VSAN drop-down, select the VSAN for SAN B.

  4. From the Template Type field, select Updating Template. In the dropdown for WWPN Pool, select the WWPN Pool created for SAN B.

    Note


    If you want to use a new VSAN for the additional FC HBAs, you can create new VSANs under SAN > SAN Cloud > Fabric A/Fabric B.

Step 3

From the SAN tab, navigate to Policies > root > Sub-Organizations > Name of the Suborg for this Cluster > SAN Connectivity Policies > Hyperflex and perform the following steps:

  1. Click Add at the bottom of the table and enter the WWNN Pool name.

  2. Select Use vHBA Template and in the vHBA Template drop-down, select the vHBA Template for SAN A previously created in Step 1 and click OK.

  3. Repeat this step for vHBA Template for SAN B.

Step 4

Click Save Changes and review any warnings that may be triggered.

Step 5

After adding the SAN Connectivity Policy to the Service Profile Template, the servers go in to Pending Reboot state and require a reboot to add the new FC HBA interface.

Note


Do not reboot HX servers at this time.

Step 6

Log in to your vCenter Server as a user with administrative privileges on the cluster.

Step 7

Place one of the existing HX ESXi Hosts in to Maintenance Mode.

Step 8

After the host has entered Maintenance Mode, reboot the associated node to complete the addition of the new hardware.

Step 9

After the reboot, exit the ESXi host from Maintenance Mode, the SCVM should start automatically without errors.

Step 10

Check the health status of the cluster, validating that the cluster is healthy before proceeding to reboot the next node. The cluster health status can be viewed from HyperFlex Connect.

Step 11

Repeat steps 7 through 10 for each node in the cluster as necessary, until all of the nodes have been rebooted and the new FC HBAs are visible to ESXi as new vHBA interfaces.

Step 12

Check and confirm that there are no more pending acknowledgements after completing the reboot of all hosts in the cluster.


Attaching iSCSI Storage to HX

This procedure describes the high-level steps for attaching iSCSI storage to the HX FI Domain:

Procedure


Step 1

Log in to the Cisco UCS Manager GUI.

Step 2

Create a VLAN.

Step 3

Create MAC Pool Addresses for iSCSI storage. For details, see Creating MAC Address Pools for External Storage.

Step 4

Create a pair of vNIC templates associated with Fabric-A and Fabric-B respectively. See Creating a vNIC Template for iSCSI Storage for detailed steps.

Step 5

Create HyperFlex LAN connectivity Policy. See Creating a LAN Connectivity Policy for detailed steps.

Step 6

Assign the HX LAN connectivity policy to the HX Service Profile Template (SPT) used for the cluster. It triggers a pending-ack to be raised on all nodes within the cluster created from the modified SPT. Acknowledge all pending-ack’s for all Service Profiles in the cluster to trigger re-configuration of Service Profiles with vNICs. For detailed steps, refer to Creating a LAN Connectivity Policy.

Step 7

Add Network and Storage Adaptors. See Adding Network Adapters for detailed steps.


iSCSI SAN Concepts

The iSCSI SANs use Ethernet connections between computer systems, or host servers, and high-performance storage subsystems. SAN components include iSCSI Host Bus Adapters (HBAs) or Network Interface Cards (NICs) in the host servers, switches, and routers that transport the storage traffic, cables, storage processors, and storage disk systems.

The iSCSI SANs use a client-server architecture. The client, called an iSCSI initiator, operates on the host. The client initiates iSCSI sessions by issuing iSCSI commands and transmitting them, encapsulated using the iSCSI protocol, to a server. The server, called an iSCSI target, represents a physical storage system on the network. The target can also be provided by a virtual iSCSI SAN, for example, an iSCSI target emulator running in a virtual machine. The iSCSI target responds to the initiator's commands by transmitting the required iSCSI data.

Discovery, Authentication, and Access Control

You can use several mechanisms to discover your storage and to limit access to it. Configure the host and the internet SCSI (iSCSI) storage system to support your storage access control policy.

How Virtual Machines Access Data on an iSCSI SAN

ESXi stores the disk files from a virtual machine within a VMFS datastore that resides on a SAN storage device. When virtual machine guest operating systems issue iSCSI commands to their virtual disks, the SCSI virtualization layer translates these commands to VMFS file operations. Depending on which port the iSCSI initiator uses to connect to the network, Ethernet switches and routers carry the request to the storage device that the host wants to access.

Using ESXi with iSCSI SAN

Using ESXi together with a SAN provides storage consolidation, improves reliability, and helps with disaster recovery. When you set up ESXi hosts to use iSCSI SAN storage systems, you must be aware of certain special considerations that exist.

Best Practices for iSCSI Storage

When using ESXi with the iSCSI SAN, follow VMware best practices to avoid problems.

Check with your storage representative if your storage system supports Storage API - Array Integration hardware acceleration features. If it does, refer to your vendor documentation for information on how to enable hardware acceleration support on the storage system side.

Preventing iSCSI SAN Problems

When using ESXi with the SAN, follow these specific guidelines to avoid problems with the SAN configuration:

  • Place only one VMFS datastore on each LUN. Multiple VMFS datastores on a LUN is not recommended.

  • Do not change the path policy the system sets, unless you understand the implications of making such a change.

  • Document everything, include information about configuration, access control, storage, switch, server, iSCSI HBA configuration, software and firmware versions, and storage cable plan.

  • Plan for failure. Make several copies of the topology maps. For each element, consider what happens to the SAN if the element fails.

  • Cross off different links, switches, HBAs, and other elements to ensure that you did not miss a critical failure point in your design.

  • Ensure that the iSCSI HBAs are installed in the correct slots in the ESXi host, based on the slot and bus speed. Balance PCI bus load among the available buses in the server.

  • Become familiar with the various monitor points in your storage network, at all visibility points, including ESXi performance charts, Ethernet switch statistics, and storage performance statistics.

  • Be cautious when changing IDs of the LUNs that have VMFS datastores being used by the host. If the ID is changed, the virtual machines running on the VMFS datastore fail. If there are no running virtual machines on the VMFS datastore, after the ID of the LUN is changed, use rescan to reset the ID on your host. For information on using rescan, see Storage Refresh and Rescan Operations.

  • If you need to change the default iSCSI name of your iSCSI adapter, make sure the name used is worldwide unique and properly formatted. To avoid storage access problems, never assign the same iSCSI name to different adapters, even on different hosts.

  • Ensure that the iSCSI traffic and uplinks are segregated on their own dedicated vSwitch.

Creating VLAN to add iSCSI Storage to HX FI Domain

Procedure

Step 1

Open a web browser and enter the IP address for Cisco UCS Manager. Enter the login credentials.

Step 2

Navigate to LAN tab > LAN > LAN Cloud > VLANS.

Step 3

Right-click and select Create VLANs as shown in the following table:

VLAN Name

Description

Multicast Policy Name

VLAN ID (by default)

hx-extstorage-iscsi

Used for adding external storage connectivity

HyperFlex

4201

Note

 
  • Configuration option is Common/Global. It applies to both fabrics and uses the same configuration parameters in both cases.

  • Sharing type is set to None.

Step 4

Click Ok.


What to do next

Create MAC Pool for the external storage.

Creating MAC Address Pools for External Storage

Change the default MAC address blocks to avoid duplicate MAC addresses that already exist. Each block contains 100 MAC addresses by default to allow for up to 100 HX servers for deployment per UCS system. We recommend that you use one MAC pool per vNIC for easier troubleshooting.


Note


The 8th digit is set to A or B. The A is set on vNICs pinned to Fabric Interconnect (FI) A. The B is set on vNICs pinned to FI B.
Procedure

Step 1

Open a web browser and enter the IP address for Cisco UCS Manager. Enter the login credentials.

Step 2

In Cisco UCS Manager, navigate to LAN tab > Pools > root > Sub-org > hx-cluster > MAC Pools.

Step 3

Right-click MAC Pools and select Create MAC Pool.

Step 4

In the Define Name and Description page of the Create MAC Pool wizard, complete the required fields as shown in the following table:

MAC Pool Name

Description

Assignment Order

MAC Address block

hx-extstorage-a

MAC pool for adding external storage to HyperFlex System

Sequential

00:25:B5:XX:01:01-63

Note


Make sure to check the last block of MAC addresses and use next order of block to create the new MAC pools for both fabrics.

Step 5

Click Next.

Step 6

In the Add MAC Addresses page of the Create MAC Pool wizard, click Add.

Step 7

In the Create a Block of MAC Addresses dialog box, complete the following fields:

Name

Description

First MAC Address field

The first MAC address in the block.

Size field

The number of MAC addresses in the block.

Step 8

Click OK.

Step 9

Click Finish.


What to do next

Repeat steps to create MAC Pool - h-extstorage-b for FI b.

Creating a vNIC Template for iSCSI Storage

This template is a policy that defines how the vNIC on a server connects to the LAN. It is also called a vNIC LAN connectivity template. You must include this policy in a service profile for it to take effect.
Before you begin

This policy requires that one or more of the following resources already exist in the system:

  • Named VLAN

  • MAC pool

  • Jumbo MTU

  • QoS policy

Procedure

Step 1

In Cisco UCS Manager, navigate to LAN tab > Policies > root > Sub-Organization > Hyperflex > vNIC Templates.

Step 2

Right-click the vNIC Templates node and choose Create vNIC Template.

Step 3

In the Create vNIC Template dialog box, complete the following fields:

Name

Description

Name field

Enter extstorage_iscsi-a

This name can be between 1 and 16 alphanumeric characters. You cannot use spaces or any special characters other than - (hyphen), _ (underscore), : (colon), and . (period), and you cannot change this name after the object is saved.

Description field

A user-defined description of the template.

Enter up to 256 characters.

Fabric ID field

Select A

Redundancy drop-down list

Primary

Target

Adapter

Template Type field

Select Updating Template.

vNICs created from this template are updated if the template changes.

VLAN field

hx-extstorage-iscsi (what you created above)

CDN Source

vNIC Name

MTU drop-down list

9000

MAC Pool

hx-extstorage-a (created earlier)

QoS Policy drop-down list

Bronze

Connection

Dynamic

Step 4

Click Ok.

Step 5

Repeat the workflow to create a vNIC template with Fabric ID B as primary.


LAN Connectivity Policy

Connectivity policies determine the connections and the network communication resources between the server and the LAN in the network. These policies use pools to assign MAC addresses to servers and to identify the vNICs that the servers use to communicate with the network.


Note


We recommend that you do not use static IDs in connectivity policies, because these policies are included in service profiles and service profile templates. Also, connectivity policies can be used to configure multiple servers.


Creating a LAN Connectivity Policy

Procedure

Step 1

In the Navigation pane, click the LAN tab.

Step 2

On the LAN tab, expand LAN > Sub-Org > hx-cluster > LAN Connectivity Policies> HyperFlex.

Step 3

Click Add vNICs.

Step 4

In the Create vNIC dialog box, enter a name. Check Use vNIC Template and Redundancy Pair.

Example: iscsi-A

Step 5

Enter Peer Name.

Example: iscsi-B

Step 6

Select vNIC Template name iscsi-A from the drop-down list. Click Ok.

Step 7

Repeat steps 3 - 6 to create vNIC iscsi-B and assign vNIC-b template to it.

Step 8

Click Save Changes. In the Save Changes box that displays, click Yes to accept the changes.

Includes the LAN connectivity policy to the HX node service profile template.

Including LAN Connectivity Policy to the HX Node Service Profile Template

Procedure

Step 1

Navigate to the Server tab and expand root > Sub-Org > hx-cluster > Service Template hx-nodes.

Step 2

In the work pane, on the Network tab, select HyperFlex from the drop-down list under the LAN Connectivity Policy section.

Step 3

Click Modify vNIC/HBA Placement. Check the iscsi vNIC for proper order. Make sure they are last in the order. Re-arrange as necessary.

Note


If you are adding both FC and iSCSI storage, then the order of vHBAs precedes the order of the vNICs.

Step 4

Click Save.


This procedure causes the Service Profiles associated with this SPT to require user acknowledgment and the HX node reboot.

Adding Network Adapters

Procedure

Step 1

Go to VMware vCenter.

Step 2

Select the HX node.

Step 3

Navigate to Configuration > Hardware.

Step 4

Click Network Adapters.

Step 5

Make sure the iSCSI vmnics that were created are visible in Network Adapters. Click Networking.

Step 6

Select Create vSphere Standard Switch to create a new vSwitch and select the two vNICs that you added earlier.

Step 7

Click Next.

Step 8

Create a port group with connection type set as VMkernel. Under Port Group Properties, enter the Network Label, VLAN ID, and the Network Type.

Step 9

Click Next and enter the IP Address, which is the address of the iSCSI initiator.

Step 10

Click Finish. The vswitch gets created with one vmkernel port group.

Attention


If you choose to have multipath, add another vmkernel port by clicking Properties of the vswitch you just created and clicking Add. Follow Steps 8 and 9. Click Finish.

If you have multipathing with two vmkernel ports, set the NIC teaming policy.

Click the first vmkernel port > Edit > NIC teaming check box to override the switch failover order. Push one vnic adapter to active and the other to unused. For the second vmkernel port, do the opposite.


Adding Storage Adapters

Procedure

Step 1

Go to VMware vCenter.

Step 2

Select the HX node.

Step 3

Navigate to Configuration > Hardware.

Step 4

Click Storage Adapters.

Step 5

Select the USB Storage Controller.

Step 6

Click Add.

Step 7

Click Add iSCSI Software Adapter.

Step 8

Click Ok.

Step 9

A new Software iSCSI adapter is added to the Storage Adapter list. After it has been added, select the Software iSCSI Adapter from the list.

Step 10

Click Properties > Network Configuration tab.

Step 11

Click Add.

Step 12

You will now see vNIC 10 and vNIC 11. Choose both and click Ok.

Step 13

Navigate to the Dynamic Discovery tab.

It will be blank.

Step 14

Click Add the iSCSI target IP against the iSCSI adapter. Use as default port.

Step 15

Click Ok.

The target is populated. Repeat the above steps for second IP multipathing.

Note


The software asks for rescan. Click Yes. If you already have an iSCSI LUN assigned, it displays under the devices in Software- Configuration (thick client).

Step 16

Navigate to Storage.

Step 17

On the Configuration tab, click Add Storage.

Step 18

Select Storage Type, Disk or LUN. Click Next.

Step 19

The LUN shows up now. Select it and click Next.

Step 20

Enter the Datastore Name and click Finish.


Connecting Cisco HX Servers to External NFS Storage

Network File System

An NFS client built into ESXi uses the Network File System (NFS) protocol over TCP/IP to access a designated NFS volume that is located on a NAS server. The ESXi host can mount the volume and use it for its storage needs.

ESXi supports the following storage capabilities on most NFS volumes:

  • VMotion and Storage vMotion

  • High Availability (HA)

  • Distributed Resource Scheduler (DRS)

NFS Storage Guidelines and Requirements

When using NFS storage, use the following configuration, networking, and NFS datastore guidelines.

NFS Server Configuration Guidelines

  • Make sure that NFS servers you use are listed in the VMware HCL. Use the correct version for the server firmware.

  • When configuring NFS storage, follow the recommendations of your storage vendor.

  • Ensure that the NFS volume is exported using NFS over TCP.

  • Ensure that each host has root access to the volume. If the NAS server does not grant root access, you might still be able to mount the NFS datastore on the host. However, you will not be able to create any virtual machines on the datastore.

  • Make sure that the NFS server does not provide both protocol versions for the same share.

  • If the underlying NFS volume, on which files are stored, is read-only, make sure that the volume is exported as a read-only share by the NFS server, or configure it as a read-only datastore on the ESXi host. Otherwise, the host considers the datastore to be read-write and might not be able to open the files.

NFS Networking Guidelines

  • For network connectivity, the host requires a standard network adapter.

  • ESXi supports Layer 2 and Layer 3 Network switches. If you use Layer 3 switches, ESXi hosts and NFS storage arrays must be on different subnets and the network switch must handle the routing information.

  • Ensure that the NFS traffic and uplinks are segregated on their own dedicated vSwitch.

  • A VMkernel port group is required for NFS storage. Add a VMkernel port group for IP storage on a new virtual switch (vSwitch). The vSwitch can be a vSphere Standard Switch (VSS) or a vSphere Distributed Switch (VDS).

  • If you use multiple ports for NFS traffic, make sure that you correctly configure your virtual switches and physical switches. For information, see the vSphere Networking documentation.


Note


For details on configuring NFS storage, consult your storage vendor documentation.


Creating the vSwitch, Adapter, and Port Group for NFS Storage

Procedure


Step 1

In vCenter web client, go to Inventory > Hosts and Clusters > DC > host and perform the following steps:

  1. Under Configuration tab, click Networking > Add Networking.

  2. In the wizard box, select VMkernel, and then click Next.

Step 2

Select Create vSphere Standard switch and select the available vmnic. Click Next.

Step 3

Enter a name for the Port Group. For example: NFS

For VLAN ID, leave it as default in case your environment has native VLANs.

Step 4

Enter the IP Setting information, click Next, and then click Finish.


Setup NFS Storage Environment

Procedure


Step 1

On the NFS server, configure an NFS volume and export it to be mounted on the ESXi hosts. Note the IP address or the DNS name of the NFS server and the full path, or folder name, for the NFS share.

Note


Make sure that each host that mounts this datastore is a part of an Active Directory domain and its NFS authentication credentials are set.

Step 2

In vCenter thick client, go to Storage. Under Configuration tab, click Add Storage. In the wizard box, select Network File System (NFS). And click Next.

Step 3

You are at the Local NFS wizard. Enter the target server IP address and the path for the address. Give your datastore a name. Click Next and Finish.

Note


Note: No change is required in Cisco UCS Manager for service profile templates, service profiles, and policies. For more information, see the vSphere Networking documentation.


Fibre Channel Zoning

Fibre Channel (FC) zoning allows you to partition the FC fabric into one or more zones. Each zone defines the set of FC initiators and FC targets that can communicate with each other in a VSAN. Zoning also enables you to set up access control between hosts and storage devices or user groups.

Information About Zones

A zone consists of multiple zone members and has the following characteristics:

  • Members in a zone can access each other; members in different zones cannot access each other.

  • Zones can vary in size.

  • Devices can belong to more than one zone.

A physical fabric can have a maximum of 8,000 zones.

Fibre Channel Zoning in Cisco UCS Manager

Cisco UCS Manager supports switch-based Fibre Channel (FC) zoning and Cisco UCS Manager-based FC zoning. You cannot configure a combination of zoning types in the same Cisco UCS domain. You can configure a Cisco UCS domain with one of the following types of zoning:

  • Cisco UCS Manager-based FC zoning — Combines direct attached storage with local zoning. FC or FCoE storage connects directly to the fabric interconnects (FIs). You perform zoning in Cisco UCS Manager, using Cisco UCS local zoning. Disable any existing FC or FCoE uplink connections. Cisco UCS does not currently support active FC or FCoE uplink connections coexisting with the utilization of the Cisco UCS Local Zoning feature.

  • Switch-based FC zoning — Combines direct attached storage with uplink zoning. The FC or FCoE storage connects directly to the FIs. You perform zoning externally to the Cisco UCS domain through an MDS or Nexus 5000 switch. This configuration does not support local zoning in the Cisco UCS domain. With switch-based zoning, a Cisco UCS domain inherits the zoning configuration from the upstream switch.


Note


Zoning is configured on a per-VSAN basis. You cannot enable zoning at the fabric level.


Recommendations

  • If you want Cisco UCS Manager to handle FC zoning, the FIs must be in Fibre Channel Switch mode. You cannot configure FC zoning in End-Host mode.

  • If a Cisco UCS domain is configured for high availability with two FIs, we recommend that you configure both FIs with the same set of VSANs.

Configuring Fibre Channel Zoning

SUMMARY STEPS

  1. If you have not already done so, disconnect the fabric interconnects in the Cisco UCS domain from any external Fibre Channel switches, such as an MDS.
  2. If the Cisco UCS domain still includes zones that were managed by the external Fibre Channel switch, run the clear-unmanaged-fc-zone-all command on every affected VSAN to remove those zones.
  3. Configure the Fibre Channel switching mode for both fabric interconnects in Fibre Channel Switch mode.
  4. Configure the Fiber Channel and FCoE storage ports that you require to carry traffic for the Fibre Channel zones.

DETAILED STEPS

  Command or Action Purpose

Step 1

If you have not already done so, disconnect the fabric interconnects in the Cisco UCS domain from any external Fibre Channel switches, such as an MDS.

Step 2

If the Cisco UCS domain still includes zones that were managed by the external Fibre Channel switch, run the clear-unmanaged-fc-zone-all command on every affected VSAN to remove those zones.

This functionality is not currently available in the Cisco UCS Manager GUI. You must perform this step in the Cisco UCS Manager CLI.

Step 3

Configure the Fibre Channel switching mode for both fabric interconnects in Fibre Channel Switch mode.

You cannot configure Fibre Channel zoning in End-Host mode. See http://www.cisco.com/c/en/us/td/docs/unified_computing/ucs/ucs-manager/GUI-User-Guides/Storage-Mgmt/3-1/b_UCSM_GUI_Storage_Management_Guide_3_1/b_UCSM_GUI_Storage_Management_Guide_3_1_chapter_01110.html#task_B6E0C2A15FE84D498503ADC19CDB160B

Step 4

Configure the Fiber Channel and FCoE storage ports that you require to carry traffic for the Fibre Channel zones.

See Configuring an Ethernet Port as an FCoE Storage Port and Configuring a Fibre Channel Storage Port. Refer the following link:

http://www.cisco.com/c/en/us/td/docs/unified_computing/ucs/ucs-manager/GUI-User-Guides/Storage-Mgmt/3-1/b_UCSM_GUI_Storage_Management_Guide_3_1/b_UCSM_GUI_Storage_Management_Guide_3_1_chapter_01100.html#task_A33D13CA58924EB1AD35EBA473B92625

Direct Attached Storage

A typical Direct Attached Storage (DAS) system is made of a data storage device connected directly to a computer through a host bus adapter (HBA). Between those two points there is no network device (like a switch or router). The main protocols used for DAS connections are ATA, SATA, eSATA, SCSI, SAS, USB, USB 3.0, IEEE 1394 and Fibre Channel.

Cisco UCS Manager allows you to have DAS without the need for a SAN switch to push the zoning configuration. The DAS configuration described assumes that the physical cables are already connected between the storage array ports and the Fabric Interconnects.


Note


VSAN is created in the SAN Cloud tab, even when the storage is directly attached.


Fibre Channel Switching Mode

The Fibre Channel switching mode determines how the fabric interconnect behaves as a switching device between the servers and storage devices. The fabric interconnect operates in either of the following Fibre Channel switching modes:

End-Host Mode

End-host mode allows the fabric interconnect to act as an end host to the connected fibre channel networks, representing all servers (hosts) connected to it through virtual host bus adapters (vHBAs). This behavior is achieved by pinning (either dynamically pinned or hard pinned) vHBAs to Fibre Channel uplink ports, which makes the Fibre Channel ports appear as server ports (N-ports) to the rest of the fabric. When in end-host mode, the fabric interconnect avoids loops by denying uplink ports from receiving traffic from one another.

End-host mode is synonymous with N Port Virtualization (NPV) mode. This mode is the default Fibre Channel Switching mode.


Note


When you enable end-host mode, if a vHBA is hard pinned to an uplink Fibre Channel port and this uplink port goes down, the system cannot re-pin the vHBA, and the vHBA remains down.


Switch Mode

Switch mode is the traditional Fibre Channel switching mode. Switch mode allows the fabric interconnect to connect directly to a storage device. Enabling Fibre Channel switch mode is useful in Pod models where there is no SAN (for example, a single Cisco UCS domain that is connected directly to storage), or where a SAN exists (with an upstream MDS). Switch mode is not the default Fibre Channel switching mode.


Note


In Fibre Channel switch mode, SAN pin groups are irrelevant. Any existing SAN pin groups are ignored.


Configuring Fibre Channel Switching Mode


Important


When you change the Fibre Channel switching mode, Cisco UCS Manager's behaviour depends on its version.

In UCS Manager version 3.1(1) and earlier releases, Cisco UCS Manager restarts both fabric interconnects simultaneously.

When the Fibre Channel switching mode is changed, both Cisco UCS fabric interconnects will reload simultaneously. Reloading of fabric interconnects will cause a system-wide downtime for approximately 10-15 minutes.

In UCS Manager version 3.1(2), when the Fibre Channel switching mode is changed, the UCS fabric interconnects reload sequentially, the second fabric interconnect can take several minutes to complete the change in Fibre Channel switching mode and become system ready.

In UCS Manager Release 3.1(3) and later releases, the subordinate fabric interconnect reboots first as a result of the change in switching mode. The primary fabric interconnect reboots only after you acknowledge it in Pending Activities. The primary fabric interconnect can take several minutes to complete the change in Fibre Channel switching mode and become system ready.

For more information, see the Cisco UCS Manager Storage Management Guide.


Procedure


Step 1

In the Navigation pane, click Equipment.

Step 2

Expand Equipment > Fabric Interconnects > Fabric_Interconnect_Name.

Step 3

In the Work pane, click the General tab.

Step 4

In the Actions area of the General tab, click one of the following links:

  • Set FC Switching Mode

  • Set FC End-Host Mode

    The link for the current mode is dimmed.

Step 5

In the dialog box, click Yes.

Cisco UCS Manager restarts the fabric interconnect, logs you out, and disconnects Cisco UCS Manager GUI.