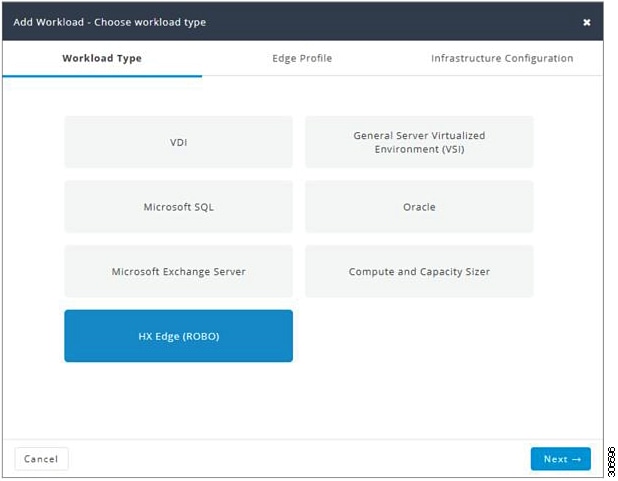
Workloads

Workloads Pane

Clone Workload

You can complete the following actions from the Workloads Pane:

Click the Clone icon of an existing Workload to create a copy of the Workload and complete the following fields.

Edit Workload

Click the Edit icon of an existing Workload to edit the Workload profile.

Delete Workload

Click the Delete icon of an existing Workload to delete the Workload.

Modify Virtual Machine or Desktop Count

To modify the number of desktops or VMs for a Workload, change the value in the Count box. Click Save.

Add VDI Workload

To change the default values, click Customize.


Attention

The recommended values are based on performance tests and should be changed with care.


To add a VDI Workload:

Procedure


Step 1

Click the + icon under Workloads.

Step 2

On the Workload Type page, select VDI, (shown as follows). Click Next.

Step 3

On the Desktop Profile page (shown as follows), complete the following fields:

UI Element

Description

Workload Name field

Name of the Workload

User Type drop-down list

Choose from a list of predefined resource consumption values:

  • Task Worker

  • Knowledge Worker

  • Power User

  • Custom User—If the predefined resource consumption values in the templates listed do not meet your requirements, select the Custom User option to manually enter the Desktop Compute Profile and Desktop Storage Profile values.

Provisioning Type drop-down list

You have the following options for data retention:

  • Persistent Desktops—Retains data on the desktop.

  • Pooled Desktops—Does not retain on the desktop.

OS Type drop-down list

  • Windows 7

  • Windows 10

Number of Desktops field

Enter the total number of desktops.

The limit is 1 - 30,000 desktops.

Concurrency (%) field

Enter percentage relevant to the total number of desktops that should remain powered on concurrently.

Do the desktops require GPU?

Indicate if the desktops need to use GPUs.

Desktop Compute Profile

Depending on the User Type you choose, the recommended values will change.

vCPUs field

  • Task Worker—1 vCPU

  • Knowledge Worker—2 VCPUs

  • Power User—2 VCPUs

Clock (MHz) field

  • Task Worker—325 MHz

  • Knowledge Worker—400 MHz

  • Power User—400 MHz

RAM (GB) field

  • Task Worker—1 GB

  • Knowledge Worker—2 GB

  • Power User—2 GB

Desktop Storage Profile

Average Storage IOPS field

Depending on the User Type you choose, the recommended values will change.

  • Task Worker—6 IOPs

  • Knowledge Worker—8 IOPs

  • Power User—10 IOPs

User / Application Data Size (GB) field

Recommended is 0 GB

OS Image Size (GB) field

Recommended is 20 GB

Number of Snapshots field

Recommended is 0 GB

Working Set Size (%) field

Recommended is 10%

Click Next.

Step 4

On the Infrastructure Configuration page (shown as follows), complete the following fields.

UI Element

Description

Data Replication Factor drop-down list

RF3 is recommended for data redundancy.

Performance Headroom (nodes) drop-down list

Enter the number of nodes used for Fault Tolerance. Recommended is 1 node.

Setting Performance Headroom adds additional nodes to the cluster to ensure that there is enough performance bandwidth in case of a node failure.

Compression Savings (%) field

Recommended is 10%

Deduplication Settings (%) field

Recommended is 30%

Step 5

Click Save.


Add General Server VSI Workload

To change the default values, click Customize.


Attention

The recommended values are based on performance tests and should be changed with care.


To add a General Server Virtualized Environment (VSI) Workload:

Procedure


Step 1

Click the + icon under Workloads.

Step 2

On the Workload Type page, select General Server Virtualized Environment (VSI) (shown as follows). Click Next.

Step 3

On the VM Profile page, complete the following fields:

UI Element

Description

Workload Name field

Enter a name for the Workload.

VM Type drop-down list

Choose from a list of predefined resource consumptions values:

  • Small

  • Medium

  • Large

  • Custom—If the predefined resource consumption values in the templates listed do not meet the requirements, select Custom option to enter profile values on the Infrastructure Configuration page.

Number of VMs field

Enter the number of VMs.

VM Compute Profile

Depending on the VM Type you choose, the recommended values will change.

vCPUs field

  • Small—2 vCPUs

  • Medium—4 vCPUs

  • Large—8 vCPUs

vCPU Overprovisioning Ratio field

Recommended value for all VM Types is 4 vCPUs.

The total number of vCPUs that can be packed per core.

RAM (GB) field

  • Small—8 GB

  • Medium—16 GB

  • Large—32 GB

VM Storage Profile

Depending on the VM Type you choose, the recommended values will change.

Average 8K Storage IOPS field

  • Small—50 IOPS

  • Medium—100 IOPS

  • Large—200 IOPS

User / Application Data Size (GB) field

  • Small—50 GB

  • Medium—200 GB

  • Large—750 GB

OS Image Size (GB) field

Recommended is 20 GB.

Size of the OS image for the VM.

Number of Snapshots field

Recommended is 5 snapshots.

Working Set Size (%) field

Recommended is 10%

Click Next.

Step 4

On the Infrastructure Configuration page, complete the following fields.

UI Element

Description

Cluster Type button

  • Normal

  • Stretch - The Stretch Cluster provides a high-availability cluster for data of high importance. This cluster is spread across two geographic regions and will be available even if one site goes down completely for any reason, such as a natural disaster.

Data Replication Factor drop-down list

RF2 is recommended for better availability.

Performance Headroom (nodes) drop-down list

Enter the number of nodes used for Fault Tolerance. Recommended is 1 node.

Setting Performance Headroom adds additional nodes to the cluster to ensure that there is enough performance bandwidth in case of a node failure.

Compression Savings (%) field

Recommended is 20%

Deduplication Savings (%) field

Recommended is 10%

Enable Remote Replication?

Choose to enable remote replication. You can now set Workload placement and site failure protection as follows:

Primary Workload Placement drop-down list

  • Site A

  • Site B

Site Failure Protection (% Workload)—Recommended is 100.

Step 5

Click Save.


Add Microsoft SQL Workload

To change the default values, click Customize.


Attention

The recommended values are based on performance tests and should be changed with care.


To add a Microsoft SQL Workload:

Procedure


Step 1

Click the + icon under Workloads.

Step 2

On the Workload Type page, select Microsoft SQL (shown as follows). Click Next.

Step 3

On the Database Profile page, complete the following fields:

UI Element

Description

Workload Name field

Enter a name of the Workload.

Database Type drop-down list

You can choose OLTP or OLAP database type.

  • OLTP—Represents transactional workloads. The Sizer assigns a workload that consists of 8K 70% read, 30% write; 100% random, when sizing for the specified number of IOPS for OLTP.

  • OLAP—Represents query, reporting, or analytics workloads. The Sizer assigns a workload that consists of large sequential reads when sizing for the specified throughput for OLAP.

Database Profile drop-down list

Choose from a list of predefined Database Profile values:

  • Small

  • Medium

  • Large

  • Custom—If the predefined values in the templates listed do not meet your requirements, select the Custom option to manually enter Compute Profile and Storage Profile values.

Number of Databases field

Enter the total number of databases.

Compute Profile

Depending on the Database Profile you choose, the recommended values will change.

vCPUs field

  • Small—2 vCPUs

  • Medium—4 vCPUs

  • Large—8 vCPUs

vCPU Provisioning Ratio field

Recommended is 2 vCPUs.

RAM (GB) field

  • Small—8 GB

  • Medium—16 GB

  • Large—32 GB

Storage Profile

Depending on the Database Profile you choose, the recommended values will change.

Database Size (GB) field

  • Small—400 GB

  • Medium—1000 GB

  • Large—4000 GB

IOPS field

IOPS changes based on the Database Type you choose.

For OLTP Database Type, the following values are recommended:

  • Small—1000 IOPS

  • Medium—3000 IOPS

  • Large—10000 IOPS

For OLAP Database Type, the following values are recommended:

  • Small—100 MB/s

  • Medium—200 MB/s

  • Large—800 MB/s

Database Overhead (%) field

  • Small—45%

  • Medium—40%

  • Large—30%

Click Next.

Step 4

On the Infrastructure Configuration page, complete the following fields:

UI Element

Description

Cluster Type button
  • Normal

  • Stretch - The Stretch Cluster provides a high-availability cluster for data of high importance. This cluster is spread across two geographic regions and will be available even if one site goes down completely for any reason, such as a natural disaster.

Data Replication Factor drop-down list

RF3 is recommended for data redundancy.

Performance Headroom (nodes) drop-down list

Enter the number of nodes used for Fault Tolerance. Recommended is 1 node.

Setting Performance Headroom adds additional nodes to the cluster to ensure that there is enough performance bandwidth in case of a node failure.

Compression Savings (%) field

Recommended is 30%

Deduplication Settings (%) field

Recommended is 0%

Enable Remote Replication? check box

Choose to enable remote replication. You can now set Workload placement and site failure protection as follows:

Primary Workload Placement drop-down list

  • Site A

  • Site B

Site Failure Protection (% Workload)—Recommended is 100%

Step 5

Click Save.


Add Oracle Workload

To change the default values, click Customize.


Attention

The recommended values are based on performance tests and should be changed with caution.


Procedure


Step 1

Click the + icon under Workloads.

Step 2

On the Workload Type page, select Oracle (shown as follows). Click Next.

Step 3

On the Database Profile page, complete the following fields:

UI Element

Description

Workload Name field

Enter a name of the Workload.

Database Type drop-down list

You can choose OLTP or OLAP database type.

  • OLTP—Represents transactional workloads. The Sizer assigns a Workload that consists of 8K 70% read, 30% write; 100% random, when sizing for the specified number of IOPS for OLTP.

  • OLAP—Represents query, reporting, or analytics workloads. Sizer assigns a workload that consists of large sequential reads, when sizing for the specified throughput for OLAP.

Database Profile drop-down list

Choose from a list of predefined Database Profile values:

  • Small

  • Medium

  • Large

  • Custom—If the predefined values in the templates listed do not meet your requirements, select the Custom option to manually enter Compute Profile and Storage Profile values.

Number of Databases field

Enter the total number of databases.

Compute Profile

Depending on the Database Profile you choose, the recommended values will change.

vCPUs field

  • Small—4 vCPUs

  • Medium—8 vCPUs

  • Large—16 vCPUs

vCPU Provisioning Ratio field

Recommended is 2 vCPUs.

RAM (GB) field

  • Small—16 GB

  • Medium—64 GB

  • Large—96 GB

Storage Profile

Depending on the Database Profile you choose, the recommended values will change.

Database Size (GB) field

  • Small—400 GB

  • Medium—1000 GB

  • Large—4000 GB

IOPS field

IOPS changes based on the Database Type you choose.

For OLTP Database Type, the following values are recommended:

  • Small—6000 IOPS

  • Medium—10000 IOPS

  • Large—30000 IOPS

For OLAP Database Type, the following values are recommended:

  • Small—200 MB/s

  • Medium—400 MB/s

  • Large—1000 MB/s

Database Overhead (%) field

  • Small—45%

  • Medium—40%

  • Large—30%

Click Next.

Step 4

On the Infrastructure Configuration page, complete the following fields:

UI Element

Description

Cluster Type button

  • Normal

  • Stretch - The Stretch Cluster provides a high-availability cluster for data of high importance. This cluster is spread across two geographic regions and will be available even if one site goes down completely for any reason, such as a natural disaster.

Data Replication Factor drop-down list

RF3 is recommended for data redundancy.

Performance Headroom (nodes) drop-down list

Enter the number of nodes used for Fault Tolerance. Recommended is 1 node.

Setting Performance Headroom adds additional nodes to the cluster to ensure that there is enough performance bandwidth in case of a node failure.

Compression Savings (%) field

Recommended is 30%

Deduplication Settings (%) field

Recommended is 0%

Enable Remote Replication? check box

Choose to enable remote replication. You can now set Workload placement, and site failure protection as follows:

Primary Workload Placement drop-down list

  • Site A

  • Site B

Site Failure Protection (% Workload)—Recommended is 100.

Step 5

Click Save.


Add Microsoft Exchange Server Workload

Procedure


Step 1

Click the + icon under Workloads.

Step 2

On the Workload Type page, select Microsoft Exchange Server (shown as follows). Click Next.

Step 3

On the Workload Profile page, you can choose to enter the values manually or you can import them from a file.

UI Element

Essential Information

Workload Name field

Enter a name for the Workload.

Workload Input Type

Download the Microsoft Exchange Workload modeling spreadsheet from Microsoft Exchange 2013 Server Role Requirements Calculator.

Important 
Ensure that the Microsoft Exchange 2013 Sizing Calculator is filled out properly, refer to the Configure the Microsoft Exchange 2013 Server Role Requirements Calculator.

Upload the completed .XLSM spreadsheet to process workload inputs.

vCPUs field

Total number of cores required for all the MS Exchange Servers after accounting for system overhead. Intel E5-2630 v4 is used as the reference CPU for core count.

vCPU Overprovisioning Ratio field

Total number of vCPUs that can be packed per core.

Total RAM (GB) field

The total RAM required for all guest VMs, after accounting for system overhead.

Effective User Capacity (GB) field

This value depends on the Dedupe or Compression savings. You can change the Deduplication and compression savings on the Infrastructure Configuration Page.

DB IOPS field

Average 16KB IOPS, with 100% random 60/40 read/write ratio.

Log IOPS field

Average 32KB IOPS, with 100% random 60/40 read/write ratio.

Maintenance IOPS field

Average 64KB IOPS, with 100% random 60/40 read/write ratio.

Future Growth (%) field

Specify percentage to allow for future growth of the environment for Physical Cores, RAM, and Effective User Capacity.

Click Next.

Step 4

On the Infrastructure Configuration page, complete the following fields.

UI Element

Essential Information

Cluster Type button

  • Normal

  • Stretch - The Stretch Cluster provides a high-availability cluster for data of high importance. This cluster is spread across two geographic regions and will be available even if one site goes down completely for any reason, such as a natural disaster.

Data Replication Factor field

RF3 is recommended for better availability.

Performance Headroom (# of nodes) field

Number of nodes of Fault Tolerance.

Setting Performance Headroom adds additional nodes to the cluster to ensure that there is enough performance bandwidth in case of node failure.

Compression Savings (%) field

By default is set to 15%.

The allowed range is 0-50%

Deduplication Settings (%) field

By default is set to 15%.

The allowed range is 0-70%

Step 5

Click Save.


Add Compute and Capacity Sizer (RAW) Workloads

Procedure

To add the Compute and Capacity Sizer Workloads:


To add the Compute and Capacity Sizer Workloads:
Step 1

Click the + icon under Workloads.

Step 2

On the Workload Type tab, select Compute and Capacity Sizer (shown as follows). Click Next.

Step 3

On the Workload Profile page, you can choose to enter the values manually or you can import them from a file.

UI Element

Description

Workload Name field

Enter a name for the Workload.

Workload Input Type button

  • Manual—To use default values, choose this option.

  • File—You can import the values from a CSV file. The CSV file can be downloaded from the HxProfiler.

    The File option provides users with the following options:

    • 30-day summary from the HX Profiler tool. (The CSV file can be downloaded from the HX Profiler tool for a 30-day duration period.)

    • RV Tools Output

CPU Unit field

  • Cores by default

  • Clock

Total vCPUs field

Default is 2 vCPUs.

The total number of cores required for all the guest VMs after accounting for system overhead.

CPU Overprovisioning Ratio field

Default is 1 vCPU.

The total number of vCPUs that can be packed per core.

Total RAM (GB) field

Default is 128 GB.

The total RAM required for all guest VMs after accounting for system overhead.

Effective User Capacity (GB) field

Default is 1000 GB.

This value depends on the dedupe or compression savings. You can change the deduplication and compression savings on the Infrastructure Configuration page.

Future Growth (%) field

Specify the percentage to allow for future growth of the environment for Physical Cores, RAM, and Effective User Capacity.

Click Next.

Step 4

On the Infrastructure Configuration page, complete the following fields.

UI Element

Description

Cluster Type button

  • Normal

  • Stretch - The Stretch Cluster provides a high-availability cluster for data of high importance. This cluster is spread across two geographic regions and will be available even if one site goes down completely for any reason, such as a natural disaster.

Data Replication Factor field

RF3 is recommended for better availability.

Performance Headroom (# of nodes) field

Number of nodes of Fault Tolerance.

Setting Performance Headroom adds additional nodes to the cluster to ensure that there is enough performance bandwidth in case of a node failure.

Compression Savings (%) field

By default set to 0%.

The allowed range is 0-50%.

Deduplication Settings (%) field

By default set to 0%.

The allowed range is 0-70%.

Step 5

Click Save.


Add HyperFlex Edge (ROBO) Workload

To change the default values, click Customize.


Attention

The recommended values are based on performance tests and should be changed with care.


To add a HyperFlex Edge (ROBO) Workload:

Procedure


Step 1

Click the + icon under Workloads.

Step 2

On the Workload Type page, select HX Edge (ROBO) (shown as follows). Click Next.

Step 3

On the Edge Profile page, complete the following fields:

UI Element

Description

Workload Name field

Enter a name for the Workload.

VM Type drop-down list

Choose from a list of predefined resource consumptions values:

  • Small

  • Medium

  • Large

  • Custom—If the predefined resource consumption values in the templates listed do not meet the requirements, select the Custom option to enter profile values on the Infrastructure Configuration page.

Number of VMs field

Enter the number of VMs.

VM Compute Profile

Depending on the VM Type you choose, the recommended values will change.

vCPUs field

  • Small—2 vCPUs

  • Medium—4 vCPUs

  • Large—8 vCPUs

vCPU Overprovisioning Ratio field

Recommended value for all VM Types is 4.

The total number of vCPUs that can be packed per core.

RAM (GB) field

  • Small—8 GB

  • Medium—16 GB

  • Large—32 GB

VM Storage Profile

Depending on the VM Type you choose, the recommended values will change.

Average 8K Storage IOPS field

  • Small—50 IOPS

  • Medium—100 IOPS

  • Large—200 IOPS

User / Application Data Size (GB) field

  • Small—50 GB

  • Medium—100 GB

  • Large—750 GB

OS Image Size (GB) field

Recommended is 20 GB.

Size of the OS image for the VM.

Number of Snapshots field

Recommended is 5 snapshots

Working Set Size (%) field

Recommended is 10%

Click Next.

Step 4

On the Infrastructure Configuration page, complete the following fields.

UI Element

Description

Data Replication Factor drop-down list

Caution 

Edge workload is supported only with RF 2.

Performance Headroom (nodes) drop-down list

Enter the number of nodes used for Fault Tolerance. Recommended is 1 node.

Setting Performance Headroom adds additional nodes to the cluster to ensure that there is enough performance bandwidth in case of a node failure.

Compression Savings (%) field

Recommended is 20%

Deduplication Savings (%) field

Recommended is 10%

Step 5

Click Save.


Fixed (Reverse) Configuration Sizing

Fixed Sizing (also referred to as "Reverse Sizing") is a workflow that starts with a fixed configuration and helps validate whether a given set of Workloads will run on it or not. In the case of Regular Sizing, the workflow helps identify the cost-optimal HX configuration for a set of Workloads.

To add a Fixed Configuration Sizing workflow:

Procedure


Step 1

Create a new Scenario, then click I have fixed config (aka "Reverse Sizing"). Click Yes to confirm (shown as follows).

Note 

Once you have changed to a fixed configuration (Fixed Sizing), you cannot revert back to Regular Sizing.

Step 2

The Fixed Config Sizing tab appears with options to select the HyperFlex node and the Compute node (shown as follows). Make your selections, then click Apply. The Scenario page reloads.

Step 3

Click the + icon under Workloads, which prompts a dialogue box with the various Workload types supported (shown as follows). Any greyed-out Workloads are not supported for the chosed fixed configuration. This setting can be changed by selecting the Customize button on the Scenario page.

The other Workloads can be added to the Fixed Configuration Sizing based on the clustering of those Workloads that can be placed into one cluster. The standard clustering formats include:
[VDI], [VSI, DB, ORACLE], [RAW], [EXCHANGE], [ROBO]
Note 

For Fixed Configuration Sizing, the Stretch Cluster and Replication are not supported.


Sizing Calculator

The Sizing Calculator is a tool that calculates the effective resources available after reserve and overhead reductions for a given node configuration.

To use the Sizing Calculator:

Procedure


Step 1

Select the required configurations and click the Calculate button, shown as follows.

Step 2

Click Download Report (shown as follows) if you want to download the Sizing Calculator report.