Installation

Installation Overview


Note


If the HyperFlex cluster nodes were part of any other HyperFlex cluster before (or not factory shipped), follow the node cleanup procedure before starting the cluster deployment. For more information , see HyperFlex Customer Cleanup Guides for FI and Edge.

Refer to the following table that summarizes the installation workflow for Edge deployments. The Steps 1-3 are common between 1GE and 10/25GE deployments. However, Step 4 is applicable for 1GE deployments, while the remaining Steps 5-6 are for 10/25GE deployments.

Step#

Description

Reference

Applicable for 1GE & 10/25GE, 1GE, or 10/25GE

1

Complete preinstallation checklist.

Make a selection from below based on your switch configuration:

2-Node Edge Deployments:

3- and 4-Node Edge Deployments:

1GE & 10/25GE

2

Complete installation prerequisites.

1GE & 10/25GE

3

Download and deploy Cisco HX Data Platform Installer.

Deploying Cisco HX Data Platform Installer

1GE & 10/25GE

4

Deploy HyperFlex Edge cluster.

Complete the following steps to configure your Edge cluster and verify successful installation.

1GE only

6

Deploy HyperFlex Edge cluster.

(10/25GE only) Configuring Your HyperFlex Cluster

10/25GE only

Applicable for 1GE and 10/25GE Switch Configurations

Rack Cisco HyperFlex Nodes

For details on installation of Cisco HX220c M5/M6, HX240c M5/6 and HX225/245c M6 HyperFlex Nodes, review the Cisco Hardware Install Guides.


Important


You can use a console dongle to connect the VGA monitor and keyboard for CIMC configuration. You can also directly connect to the VGA and USB ports on the rear of the server. Alternatively, you can perform a lights-out configuration of CIMC if a DHCP server is available in the network.

Cisco Integrated Management Controller Configuration

Choose one method for CIMC network configuration: static assignment or DHCP assignment.

Configuring CIMC: Static Assignment

To configure Cisco Integrated Management Controller (CIMC), you must enable CIMC standalone mode, configure the CIMC password and settings, and configure a static IP address manually using a KVM. This requires physical access to each server with a monitor and keyboard. Each server must be configured one at a time.

Customers may opt to use the dedicated CIMC management port for out-of-band use. Users should account for this third 1GE port when planning their upstream switch configuration. Additionally, the user should set the CIMC to dedicated mode during CIMC configuration. Follow Cisco UCS C-series documentation to configure the CIMC in dedicated NIC mode. Under NIC properties, set the NIC mode to dedicated before saving the configuration.

Before you begin

  • Ensure that all Ethernet cables are connected as described in the Physical Cabling section of this guide that applies to your deployment.

  • Attach the VGA dongle to the server and connect a monitor and USB keyboard.

Procedure


Step 1

Power on the server, and wait for the screen with the Cisco logo to display.

Step 2

When prompted for boot options, press F8 to enter the Cisco IMC Configuration utility.

Step 3

In CIMC User Details, enter password for the current CIMC password, enter your new CIMC password twice, and press Enter to save your new password.

Important

 
Systems ship with a default password of password that must be changed during installation. You cannot continue installation unless you specify a new user supplied password.

Step 4

For IP (Basic), check IPV4, uncheck DHCP enabled, and enter values for CIMC IP, Prefix/Subnet mask, and Gateway.

Step 5

For VLAN (Advanced), check VLAN enabled, and:

  • If you are using trunk ports, set the appropriate VLAN ID.

  • If you are using access ports, leave this field blank.

Step 6

Leave the rest of the settings as default, press F10 to save your configuration, and press ESC to exit the utility.

Step 7

In a web browser, navigate directly to the CIMC page at https://CIMC IP address.

Step 8

Enter the username admin and your new CIMC password, and click Log In.

Step 9

Manually set the power policy to match the desired operation from Server > Power Policies.

Servers default to the Power Off power-restore policy set at the factory.


What to do next

You can use the virtual KVM console or continue to use the physical KVM. The SD cards have ESXi preinstalled from the factory and boot automatically during installation.

Configuring CIMC: DHCP Assignment

To configure Cisco Integrated Management Controller (CIMC), you must enable CIMC standalone mode, configure the CIMC password and settings, and configure a dynamic IP address obtained through DHCP. This requires more network setup but eases configuration by enabling a lights-out setup of HyperFlex Edge nodes. All servers lease addresses automatically and in parallel, reducing deployment time.

Before you begin

  • Ensure that all Ethernet cables are connected as described in the Physical Cabling section of this guide that applies to your deployment.

  • Ensure the DHCP server is properly configured and running with a valid scope.

  • Ensure the DHCP server is directly listening on the management VLAN or you have an IP helper configured on your switch(es).

  • Decide on inband versus out-of-band CIMC:

    • If using inband CIMC, configure the native VLAN for all HyperFlex Edge switch ports to match the correct DHCP VLAN. This is the only way to ensure that the CIMC can lease an address automatically.

    • If using out-of-band CIMC, configure the dedicated switch port for access mode on the DHCP VLAN.

Procedure


Step 1

Connect power cables.

Step 2

Access the DHCP logs or lease table to determine the CIMC addresses obtained

Step 3

Search the hostnames for C220-<S/N> to find your HyperFlex servers, and make note of the addresses for required inputs into the HX Data Platform Installer.


What to do next

When using DHCP, you must manually set a user defined CIMC password before beginning HyperFlex Data Platform installation. Use either the web UI or a CLI session to set a new password. The default password of password must be changed or installation fails.

Verifying Firmware Versions

You need to view current BIOS, CIMC, SAS HBA, and drive firmware versions, and verify that those versions match data in the Release Notes.

Procedure


Step 1

In your browser, log into the CIMC web UI by navigating to https://<CIMC IP>.

Step 2

In the Navigation pane, click Server.

Step 3

On the Server page, click Summary.

Step 4

In the Cisco Integrated Management Controller (CIMC) Information section of the Server Summary page, locate and make a note of the BIOS Version and CIMC Firmware Version.

Step 5

In CIMC, navigate to Inventory > PCIe Adapters, and locate and make a note of the SAS HBA Version.

Step 6

In CIMC, navigate to Storage depending on which server type you are using, navigate to one of the following:

  1. For M5 and M6, Cisco 12G SAS HBA > Physical Drive Info, and make a note of the drive type, manufacturer, and firmware version.

Step 7

Compare the current BIOS, CIMC, SAS HBA, and drive firmware versions with the versions listed in the Release Notes.

Step 8

If the minimum versions are not met, use the Host Update Utility (HUU) Download Links in the compatibility matrix to upgrade the firmware versions running on the system, including Cisco Virtual Interface Cards (VIC), PCI Adapter, RAID controllers, and drive (HDD/SSD) firmware. You can find current and previous releases of the Cisco HUU User Guide at this location: http://www.cisco.com/c/en/us/support/servers-unified-computing/ucs-c-series-rack-servers/products-user-guide-list.html.


Deploying Cisco HX Data Platform Installer

HX Data Platform Installer can be deployed on an ESXi server, as well as a VMware Workstation, VMware Fusion, or Virtual Box. The HyperFlex software is distributed as a deployable virtual machine, contained in an Open Virtual Appliance (OVA) file format. Use the following procedure to deploy HX Data Platform Installer using a VMware vSphere (thick) Client.

Procedure


Step 1

Download the HX Data Platform Installer OVA from Cisco.com, and save the package locally.

Verify the downloaded version matches the recommended version for your deployment.

Step 2

Log into vCenter using the vSphere client.

Step 3

Select File > Deploy OVF Template.

Step 4

In the Deploy OVF Template wizard, on the Source page, specify the source location, and click Next.

Step 5

On the OVF Template Details page, view the information, and click Next.

Step 6

(Optional) On the Name and Location page, edit the name and location for the virtual appliance, and click Next.

Step 7

On the Host/Cluster page, select the host or cluster on which you want to deploy, and click Next.

Step 8

On the Resource Pool page, select the resource pool where you want to run the OVF template, and click Next.

Step 9

On the Storage page, select a datastore to store the deployed OVF template, and click Next.

Step 10

On the Disk Format page, select the disk format to store the virtual machine virtual disks, and click Next.

Step 11

On the Network Mapping page, for each network specified in the OVF template, right-click the Destination Network column to select a network in your infrastructure, and click Next.

Step 12

Provide the OVF properties for the installer VM, namely: hostname, default gateway, DNS server, IP address, and subnet mask.

Alternatively, leave all of the OVF properties blank for a DHCP assigned address.

Step 13

On the Ready to Complete page, select Power On After Deployment, and click Finish.


Applicable for 1GE Switch Configurations

Configuring Your HyperFlex Cluster

Procedure


Step 1

In your web browser, enter the IP address of the installer VM, and click Accept or Continue to bypass any SSL certificate errors.

Step 2

Verify the HyperFlex installer Build ID in the lower right corner of the login screen.

Step 3

Log into Cisco HX Data Platform Installer using username root and password Cisco123.

Important

 
Systems ship with a default password of Cisco123 that must be changed during installation. The HyperFlex on-premises installer requires changing the root password as part of deployment. You cannot continue installation unless you specify a new password. Use the new password at this point in the configuration procedure.

Step 4

Read the End User Licensing Agreement, check I accept the terms and conditions, and click Login.

Step 5

On the Workflow page, click Cluster Creation with HyperFlex Edge.

Step 6

To perform cluster creation, you can import a JSON configuration file with the required configuration data. The following two steps are optional if importing a JSON file, otherwise you can input data into the required fields manually.

Note


For a first-time installation, contact your Cisco representative to procure the factory preinstallation JSON file.

  1. Click Select a file and choose your JSON file to load the configuration. Select Use Configuration.

  2. An Overwrite Imported Values dialog box displays if your imported values for Cisco UCS Manager are different. Select Use Discovered Values.

Step 7

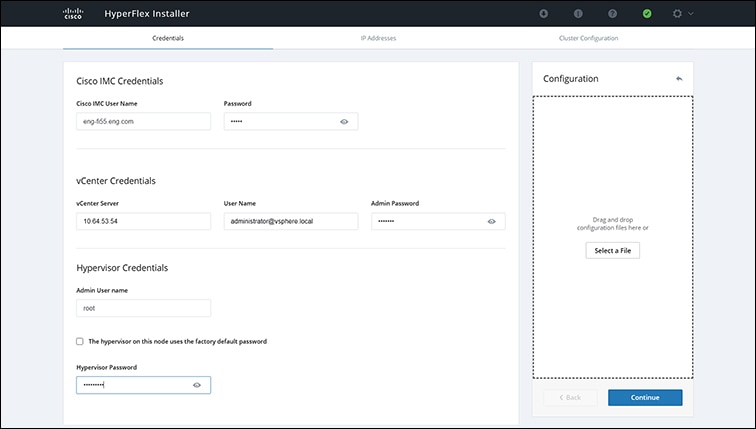
On the Credentials page, complete the following fields, and click Continue.

Name

Description

Cisco IMC Credentials

Cisco IMC User Name

Cisco IMC username. By default, the username is admin.

Password

CIMC password. By default, the password is password.

vCenter Credentials

Configuring Your HyperFlex Cluster Server

FQDN or IP address of the vCenter server. You must use an account with vCenter root-level admin permissions.

User Name

Administrator username.

Admin Password

Administrator password.

Hypervisor Credentials

Admin User Name

Administrator username. By default, the username is root.

Hypervisor Password

Default password is Cisco123.

Important

 
Systems ship with a default password of Cisco123 that must be changed during installation. You cannot continue installation unless you specify a new user supplied password.

Use the following screenshot as a reference to complete the fields in this page.

Step 8

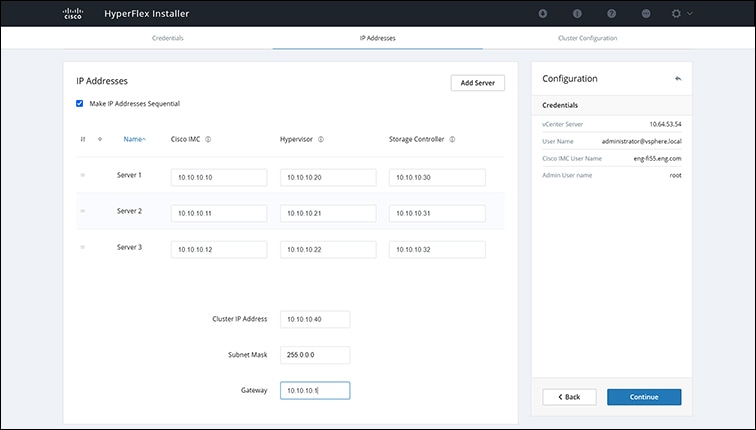
On the IP Addresses page, enter the assigned addresses for each server.

Name

Description

Cisco IMC

IP Address of Cisco IMC

Hypervisor

Management IP for Hypervisor

Storage Controller

Management IP for Storage Controller

Cluster IP Address

Cluster management IP address

Subnet mask

Subnet mask for cluster management

Gateway

Gateway IP address for cluster management IP

Use the following screenshot as a reference to complete the fields in this page.

Step 9

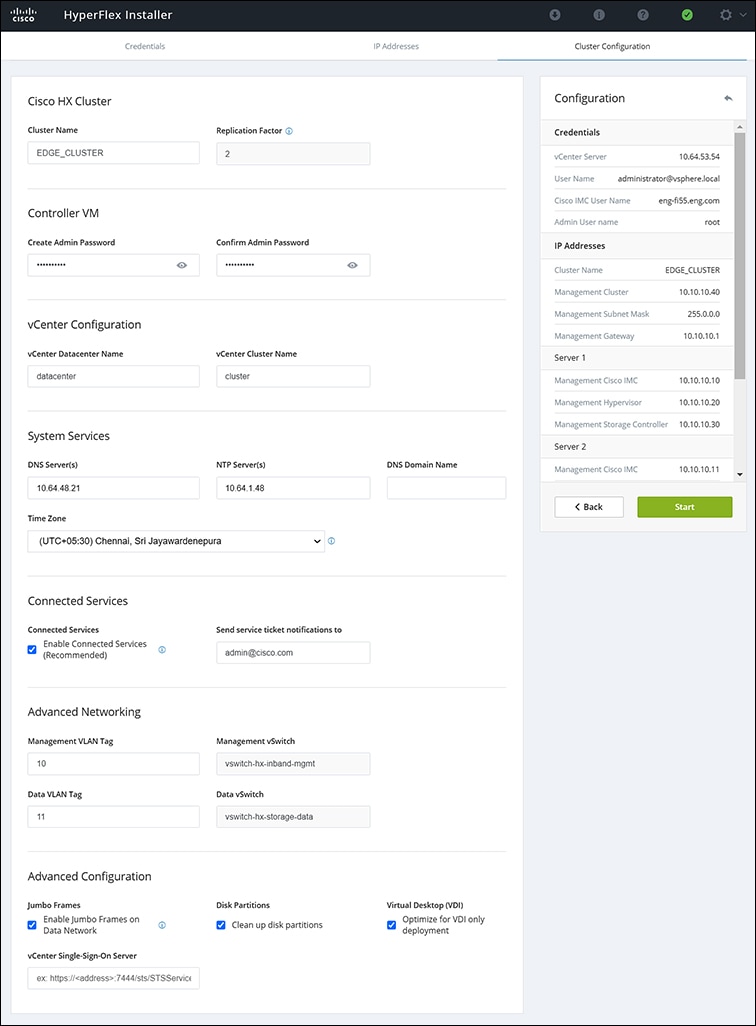
On the Cluster Configuration page, complete the following fields, and click Continue.

Note

 
Complete all the fields using your pre-install worksheet.

Name

Description

Cisco HX Cluster

Cluster Name

User-supplied name for the HyperFlex storage cluster.

Replication Factor

Controller VM

Create Admin Password

There is no default password for the Controller VM. User needs to set this field

Confirm Admin Password

Confirm the Administrator password.

vCenter Configuration

vCenter Datacenter Name

The name of the vCenter datacenter where the HyperFlex hosts were added.

vCenter Cluster Name

The name of the vCenter cluster where the HyperFlex hosts were added.

System Services

DNS Server(s)

A comma-separated list of IP addresses for each DNS Server.

NTP Server(s)

A comma-separated list of IP addresses for each NTP Server.

Important

 
A highly reliable NTP server is required.

Time Zone

The local time zone for the controller VM.

Connected Services

Enable Connected Services (Recommended)

Check to Enable Connected Services.

Note

 
We highly recommend enabling Connected Services to enable sending email alerts to Cisco TAC.
Send service ticket notifications to: Example: admin@cisco.com Email address to receive service request notifications.

Advanced Networking

Management VLAN Tag

Data VLAN Tag

Enter the correct VLAN tags if you are using trunk ports. The VLAN tags must be different when using trunk mode.

Enter 0 for both VLAN tags if you are using access ports.

Note

 
Do not enter 0 if you are using trunk ports.

Management vSwitch

Data vSwitch

Do not change the auto-populated vSwitch name.

Advanced Configuration

Enable Jumbo Frames on Data Network

Do not check to ensure HyperFlex Edge deployments use regularly-sized packets. You may optionally enable jumbo frames for 10/25GE deployments depending on your network configuration. For ease of deployment, it is recommended to uncheck this option.

Clean up disk partitions

Check to remove all existing data and partitions from every node in the HX storage cluster. For example, if this is not the first time installing the software on the cluster.

Optimize for VDi only deployment

Check to optimize VDI deployments. By default HyperFlex is performance optimized for Virtual Server Infrastructure (VSI). Check this box to tune the performance parameters for VDI deployments. This option has no affect on all-flash HX models and only needs to be enabled for hybrid HX clusters. If you are running mixed VDI and VSI workloads, do not select this option.

vCenter Single-Sign-On Server

Fill in this field only if instructed by Cisco TAC.

Use the following screenshot as a reference to complete the fields in this page.

Step 10

After deployment finishes, the Summary Deployment page displays a summary of the deployment details.


What to do next

Confirm HX Data Platform Plug-in installation. See Verifying Cisco HX Data Platform Software Installation

Verifying Cisco HX Data Platform Software Installation

Procedure


Step 1

Launch vSphere, and log into the vCenter Server as an administrator.

Step 2

Under vCenter Inventory Lists, verify that Cisco HX Data Platform displays.

If the entry for Cisco HX Data Platform does not appear, log out of vCenter, close the browser, and log back in. In most cases, the issue is resolved by this action.

If logging out of vCenter does not fix the issue, you may have to restart the vSphere Web Client . SSH to the VCSA and run service vsphere-client restart. For a Windows vCenter, restart VMware vSphere Web Client in the services page in mmc.

Step 3

Ensure that your new cluster is online and registered.


Applicable for 10/25GE Switch Configurations

(10/25GE only) Configuring Your HyperFlex Cluster

Procedure


Step 1

In your web browser, enter the IP address of the installer VM, and click Accept or Continue to bypass any SSL certificate errors.

Step 2

Verify the HyperFlex installer Build ID in the lower right corner of the login screen.

Step 3

Log in to Cisco HX Data Platform Installer using username root and password Cisco123.

Important

 
Systems ship with a default password of Cisco123 that must be changed during installation. The HyperFlex on-premises installer requires changing the root password as part of deployment. You cannot continue installation unless you specify a new password. Use the new password at this point in the configuration procedure.

Step 4

Read the End User Licensing Agreement, check I accept the terms and conditions, and click Login.

Step 5

On the Workflow page, click Cluster Creation with HyperFlex Edge.

Step 6

On the Credentials page, complete the following fields, and click Continue.

Name

Description

vCenter Credentials

vCenter Server

FQDN or IP address of the vCenter server. You must use an account with vCenter root-level admin permissions.

User Name

Administrator username.

Admin Password

Administrator password.

CIMC Credentials

CIMC User Name

CIMC username. By default, the username is admin.

Password

CIMC password. By default, the password is password.

Hypervisor Credentials

Admin User Name

Administrator username. By default, the username is root.

Admin Password

Default password is Cisco123.

Important

 
Systems ship with a default password of Cisco123 that must be changed during installation. You cannot continue installation unless you specify a new user supplied password.

Step 7

On the IP Addresses page, enter the assigned addresses for each server:

Name

Description

Cisco IMC

IP Address of Cisco IMC

Hypervisor

Management IP for Hypervisor

Storage Controller

Management IP for Storage Controller

Cluster IP Address

Cluster management IP address

Subnet mask

Subnet mask for cluster management

Gateway

Gateway IP address for cluster management IP

Step 8

On the Cluster Configuration page, complete the following fields, and click Continue.

Note

 
Complete all the fields using your pre-install worksheet.

Name

Description

Cisco HX Cluster

Cluster Name

User-supplied name for the HyperFlex storage cluster.

Replication Factor

Controller VM

Create Admin Password

Default password is Cisco123.

Important

 
Systems ship with a default password of Cisco123 that must be changed during installation. You cannot continue installation unless you specify a new user supplied password.

Confirm Admin Password

Confirm the Administrator password.

vCenter Configuration

vCenter Datacenter Name

The name of the vCenter datacenter where the HyperFlex hosts were added.

vCenter Cluster Name

The name of the vCenter cluster where the HyperFlex hosts were added.

System Services

DNS Server(s)

A comma-separated list of IP addresses for each DNS Server.

NTP Server(s)

A comma-separated list of IP addresses for each NTP Server.

Important

 
A highly reliable NTP server is required.

Time Zone

The local time zone for the controller VM.

Auto Support

Enable Auto Support (Recommended)

Check to enable Auto Support.

Note

 
We highly recommend enabling Auto Support to enable sending email alerts to Cisco TAC.
Send service tickets notifications to, for example: name@company.com Email address to receive service request notifications.

Step 9

On the Advanced Cluster Configuration page, complete the following fields, and click Start.

Name

Description

Advanced Networking

Uplink Switch Speed

Check the radio button for 10/25GE. The MAC Address Prefix field appears. Provide the MAC Address Prefix.

Note

 
The MAC Address Prefix is used to assign unique MAC addresses to the virtual interfaces of the Cisco VIC. Ensure you select a unique range to avoid any overlap with existing network equipment.

Management VLAN Tag

Data VLAN Tag

Enter the correct VLAN tags if you are using trunk ports. The VLAN tags must be different when using trunk mode.

Enter 0 for both VLAN tags if you are using access ports.

Note

 
Do not enter 0 if you are using trunk ports.

Management vSwitch

Data vSwitch

Do not change the auto-populated vSwitch name.

Advanced Configuration

Enable Jumbo Frames on Data Network

Check to enable Jumbo Frames for 10/25G deployments.

Clean up disk partitions

Check to remove all existing data and partitions from every node in the HX storage cluster. For example, if this is not the first time installing the software on the cluster.

Optimize for VDi only deployment

Check to optimize VDI deployments. By default HyperFlex is performance optimized for Virtual Server Infrastructure (VSI). Check this box to tune the performance parameters for VDI deployments. This option has no affect on all-flash HX models and only needs to be enabled for hybrid HX clusters. If you are running mixed VDI and VSI workloads, do not select this option.

vCenter Single-Sign-On Server

Fill in this field only if instructed by Cisco TAC.

Review the progress for any of the cluster configuration tasks on the Progress page. The deployment can take anywhere between 20-45 minutes to complete.

Step 10

After deployment finishes, the Summary Deployment page displays a summary of the deployment details.


What to do next

Confirm HX Data Platform Plug-in installation.

Logging into HX Connect

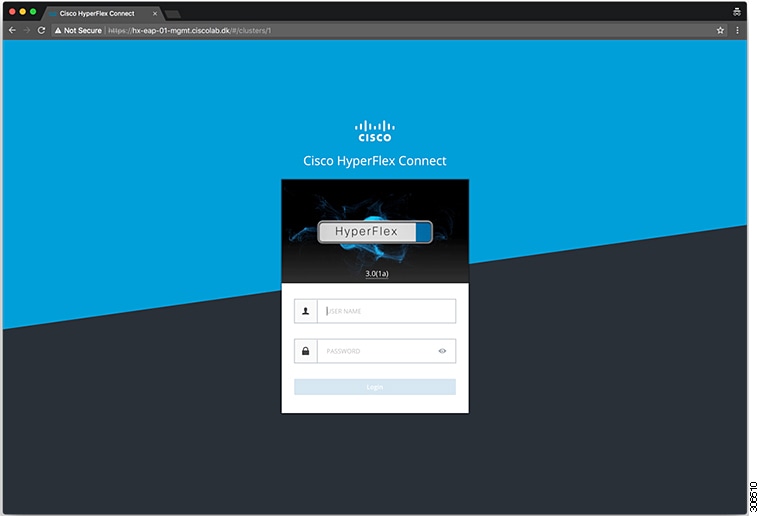
Cisco HyperFlex Connect provides an HTML5 based access to HX Storage monitoring, and replication, encryption, datastore, and virtual machine tasks. This procedure provides a summary on launching and logging into HX Connect. For the detailed procedure on logging in to HX Connect, see the Cisco HyperFlex Data Platform Administration Guide.

Procedure


Step 1

Launch HX Connect UI from a browser of your choice from https://Cluster_IP/ or https://FQDN.

Step 2

Log in with the following credentials:

  • Usernameadmin

  • Password—Use the password set during cluster installation.


What to do next

Run the post install script before the HyperFlex cluster is ready for production use. Depending on whether you are running in a 1GE or 10/25GE switch configuration, see: