Post Installation Tasks

(1GE Only) Run Post Installation Script

Procedure


Step 1

In your web browser, navigate to http://<installer VM IP address>/mssh, and log in using username admin and your password, and run hx_post_install.

Step 2

Press Enter to start post installation tasks in the web-based SSH window.

On execution of the post installation script, choose one of the following options as per the requirement:

  • 1—To run the post installation script on a newly created cluster or on an existing cluster. On selection of this option, the script runs the post installation operations on all the nodes in the cluster.

  • 2—To run the post installation script on expanded nodes or on newly added nodes after executing the expansion workflow. On selection of this option, the script fetches the list of the expanded nodes and runs the post installation operations on the expanded nodes.

  • 3—To have unique SSL certificate in the cluster. On selection of this option, the current certificate is replaced with the newly created SSL certificate. This option is not required for the cluster expansion.

Step 3

Follow the on-screen prompts to complete the installation.

The hx_post_install script completes the following:
  • License the vCenter host.

  • Enable HA/DRS on the cluster per best practices.

  • Suppress SSH/Shell warnings in vCenter.

  • Configure vMotion per best practices.

  • Add additional guest VLANs/portgroups.

  • Perform HyperFlex Edge configuration check.

On successful completion of the post_install workflow, the summary of the configuration executed based on the chosen option is displayed under Cluster Summary.

Sample Post-Install Script is as follows:

Select post_install workflow-

1. New/Existing Cluster
2. Expanded Cluster (for non-edge clusters)
3. Generate Certificate

Note: Workflow No.3 is mandatory to have unique SSL certificate in the cluster. By Generating this certificate, it will replace your current certificate. If you're performing cluster expansion, then this option is not required.

Selection: 1
Logging in to controller localhost
HX CVM admin password:
Getting ESX hosts from HX cluster...
vCenter URL: 10.121.48.111
Enter vCenter username (user@domain): administrator@vsphere.local
vCenter Password:
Found datacenter ucs659_dc
Found cluster ucs659-hx-cluster

post_install to be run for the following hosts:
ucs659.eng.storvisor.com
ucs660.eng.storvisor.com

Enter ESX root password:
HX Edge configuration detected
  Uplink speed is detected as: 1G
  Uplink count is detetec as: 2

Enter vSphere license key? (y/n) n

Enable HA/DRS on cluster? (y/n) y
Successfully completed configuring cluster HA.
Successfully completed configuring cluster DRS.

Disable SSH warning? (y/n) y

Add vmotion interfaces? (y/n) y
Netmask for vMotion: 255.255.240.0
vMotion IP for ucs659.eng.storvisor.com: 10.64.73.131
Adding vmotion to ucs659.eng.storvisor.com
Adding vmkernel to ucs659.eng.storvisor.com
Updating portgroup vmotion on ucs659.eng.storvisor.com
Successfully updated portgroup vmotion on host ucs659.eng.storvisor.com.  activeNic: vmnic0 standbyNic: vmnic1
vMotion IP for ucs660.eng.storvisor.com: 10.64.73.132
Adding vmotion to ucs660.eng.storvisor.com
Adding vmkernel to ucs660.eng.storvisor.com
Updating portgroup vmotion on ucs660.eng.storvisor.com
Successfully updated portgroup vmotion on host ucs660.eng.storvisor.com.  activeNic: vmnic0 standbyNic: vmnic

Add VM network VLANs? (y/n) y

Run health check? (y/n) y

Validating cluster health and configuration...

Cluster Summary:
     Version - 4.0.2f-35930
     Model - HX220C-M5SX
     Health - HEALTHY
     ASUP enabled - False

(10/25GE Only) Run Post Installation Script

Procedure


Step 1

In your web browser, navigate to http://<installer VM IP address>/mssh, and log in using username admin and your password, and run hx_post_install.

Step 2

Press Enter to start post installation tasks in the web-based SSH window.

On execution of the post installation script, choose one of the following options as per the requirement:

  • 1—To run the post installation script on a newly created cluster or on an existing cluster. On selection of this option, the script runs the post installation operations on all the nodes in the cluster.

  • 2—To run the post installation script on expanded nodes or on newly added nodes after executing the expansion workflow. On selection of this option, the script fetches the list of the expanded nodes and runs the post installation operations on the expanded nodes.

  • 3—To have unique SSL certificate in the cluster. On selection of this option, the current certificate is replaced with the newly created SSL certificate. This option is not required for the cluster expansion.

Step 3

Follow the on-screen prompts to complete the installation.

The hx_post_install script completes the following:
  • License the vCenter host.

  • Enable HA/DRS on the cluster per best practices.

  • Remove SSH/Shell warnings in vCenter.

  • Configure vMotion per best practices.

  • Add new VM portgroups

  • Perform HyperFlex Edge health check.

On successful completion of the post_install workflow, the summary of the configuration executed based on the chosen option is displayed under Cluster Summary.

Sample Post-Install Script is as follows:

Select post_install workflow-

1. New/Existing Cluster
2. Expanded Cluster (for non-edge clusters)
3. Generate Certificate

Note: Workflow No.3 is mandatory to have unique SSL certificate in the cluster. By Generating this certificate, it will replace your current certificate. If you're performing cluster expansion, then this option is not required.

Selection: 1
Cluster IP/FQDN : 10.1.22.13
HX CVM admin password:
Getting ESX hosts from HX cluster...
vCenter URL: 10.1.22.150
Enter vCenter username (user@domain): administrator@vsphere.local
vCenter Password:
Found datacenter spiderman
Found cluster spiderman

post_install to be run for the following hosts:
hx-node-1.spiderman.hx.local
hx-node-2.spiderman.hx.local

Enter ESX root password:
HX Edge configuration detected
  Uplink speed is detected as: 10G
  Uplink count is detetec as: 2

Enter vSphere license key? (y/n) n

Enable HA/DRS on cluster? (y/n) y
Successfully completed configuring cluster HA.

Disable SSH warning? (y/n) y

Add vmotion interfaces? (y/n) y
Netmask for vMotion: 255.255.255.0
VLAN ID: (0-4096) 2032
vMotion MTU is set to use jumbo frames (9000 bytes). Do you want to change to 1500 bytes? (y/n) n
Do you wish to enter the range of vMotion IPs (y/n) y
Please enter vMotion Ip range (format: IP_start-IP_end) 10.20.32.16-10.20.32.17
Vmotion ip 10.20.32.16 used for hx-node-1.spiderman.hx.local
Adding vmkernel to hx-node-1.spiderman.hx.local
Vmotion ip 10.20.32.17 used for hx-node-2.spiderman.hx.local
Adding vmkernel to hx-node-2.spiderman.hx.local

Add VM network VLANs? (y/n) y
 Port Group Name to add (VLAN ID will be appended to the name in ESXi host): infra
 VLAN ID: (0-4096) 199
 Adding infra-199 to hx-node-1.spiderman.hx.local
 Adding infra-199 to hx-node-2.spiderman.hx.local
Add additional VM network VLANs? (y/n) n

Run health check? (y/n) y

Validating cluster health and configuration...

Cluster Summary:
Version - 5.0.2a-41212
Model - HXAF220C-M5SX
Health - HEALTHY
ASUP enabled - False
hxshell:~$

Configuring vMotion Automatically

The hx_post_install script automatically configures vMotion based on network topology.

1GE Single Switch Considerations

  • Automated configuration supports only trunk ports and only configurations using a dedicated vMotion VLAN.

  • If using access ports or using a shared vMotion VLAN, you have to manually configure vMotion on the existing management VMkernel port (vmk0).

  • vMotion is shared on the 1GE management and VM network uplink.

  • A new VMKernel port (vmk2) is created with a default 500Mbps traffic shaper to ensure vMotion doesn’t fully saturate the link. This default value may be changed after running hx_post_install. See Configuring Traffic Shaping Manually.

1GE Dual Switch Considerations

  • vMotion is configured on a dedicated 1GE uplink.

  • A new VMKernel port (vmk2) is created. Failover order is auto-configured such that storage data and vMotion are separated under normal network conditions.

  • No traffic shaper is required in this configuration.

10/25GE Switch Considerations

  • vMotion is configured on dedicated vMotion vSwitch with dedicated active/standby vNICs.

  • A new VMKernel port (vmk2) is created. Failover order is auto-configured such that storage data and vMotion are separated under normal network conditions.

  • No traffic shaper is required in this configuration, although bandwidth is shared among management, vMotion, and guest VM port groups. You may apply an optional traffic shaper depending on your networking requirements.

Configuring vMotion Manually

vMotion can be configured in a number of different ways depending on environmental needs. This task covers one possible configuration and variations to this procedure are expected and permitted.

This configuration leverages a unique VLAN for vMotion that is trunked across port 1.

Procedure


Step 1

Launch vSphere, and log into the vCenter Server as an administrator.

Step 2

From the vCenter Inventory Lists, click the HyperFlex host, and navigate to Manage > Networking > Virtual Switches.

Step 3

Click Add Host Networking.

Step 4

On the Add Network Wizard: Connection Type page, click VMkernel, and click Next.

Step 5

Click Use vswitch-hx-inband-mgmt, and click Next.

Step 6

Enter a distinctive Network Label, such as vMotion, enter the correct VLAN ID, check Use this port group for vMotion, and click Next.

Step 7

Click Use the following IP settings, enter a static IPv4 address and Subnet Mask, and click Next.

Step 8

Review the settings, and click Finish.

Step 9

Repeat this procedure for all HyperFlex hosts and compute-only hosts in the HyperFlex storage cluster.


Configuring Traffic Shaping Manually

For 1GE single switch deployments, it is a best practice to enable traffic shaping on the vMotion interface to prevent network congestion on shared uplinks. Failure to configure a traffic shaper could result in vMotion traffic starving management and VM guest traffic sharing the same physical 1GE port. vMotion standard switches only allow for egress traffic shaping.

Procedure


Step 1

Launch vSphere, and log into the vCenter Server as an administrator.

Step 2

From the vCenter Inventory Lists, click the HyperFlex host, and navigate to Manage > Networking > Virtual Switches.

Step 3

Select the vSwitch that contains the vMotion portgroup.

Step 4

Click the vMotion portgroup name, and click Edit Settings (pencil icon).

Step 5

On the left menu, select Traffic shaping.

Step 6

Check the override box to enable the traffic shaper.

Step 7

Set the average and peak bandwidth to meet environmental needs. One possible value to use is 500,000 Kbits/sec for both, representing 50% of total bandwidth available on a 1GE uplink.

Step 8

Select OK to save settings.

Note

 
Be careful to set average bandwidth to the desired setting. Peak bandwidth works only for bursting traffic and is quickly exhausted for vMotion operations.

(10/25GE) Using Additional VIC Ports (Optional)

In cases where uplinks to different switches (for example, different VLANs), or additional dedicated bandwidth is needed for guest VMs, you can connect ports 3 and 4 from the VIC after HX is installed. This section describes the configuration created by default and how you can create additional vNICS on the additional ports.

Default 10GE VIC Configuration:

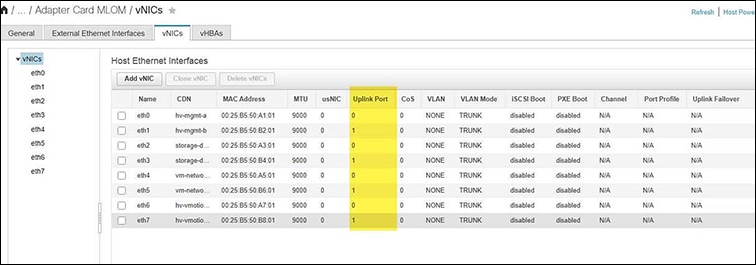
During installation, HyperFlex configures the VIC 1457 as follows:

  • Disables the port channel

  • Configures the 8 vNICs that HyperFlex needs to operate (note the Uplink Port # set to 0 or 1 accordingly which correspond to the first two ports of the VIC)

Creating Additional VIC Ports

Guidelines for creating additional vNICs:

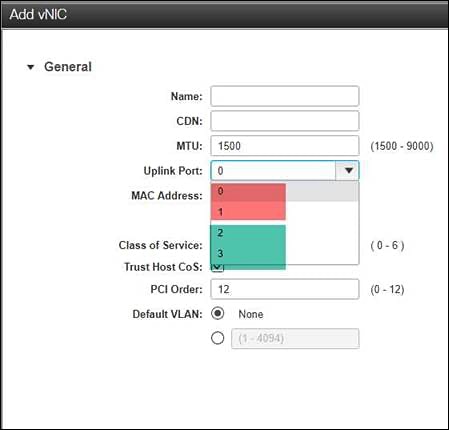
  • You can use the remaining ports to create additional vNICs as required. They will appear in VMware as unused vmnics. You can then create a new vSwitch and use these network ports (for guest VM use).

  • Do not modify any of the existing vNICs, vSwitches, or portgroups that are created automatically by the installer. Create new vNICs, vSwitches and portgroups as needed only to support your requirement.

  • Do not reuse existing HX vSwitches with extra uplinks. Create new vSwitches with these uplinks.

  • When creating new vNICs, do not place them on the same physical 2 ports used for the HX services (for example, mgmt., storage traffic, vmotion, and vm-network). Be sure to create them on the unused physical ports.

Procedure


Step 1

Confirm that the HX cluster is healthy.

Step 2

Place the ESXi host in HX Maintenance Mode.

Step 3

Create the new vNIC(s) and then place them in the corresponding Uplink Port # 2 or 3 which correspond to the last 2 ports of the VIC.

Step 4

Reboot ESXi and then confirm that you see the additional vmnics which you can then add to new vSwitches.

Step 5

Exit HX Maintenance Mode.

Step 6

Repeat this process accordingly for remaining hosts.