GPU Card Installation

This appendix contains configuration rules and installation procedures for the supported GPU cards.

GPU Card Configuration Rules

Note the following rules when populating a node with GPU cards.


Caution

When using NVIDIA Tesla P40 GPU cards in this node, the maximum operating temperature (air inlet temperature) for the node is 32° C (89.6° F).


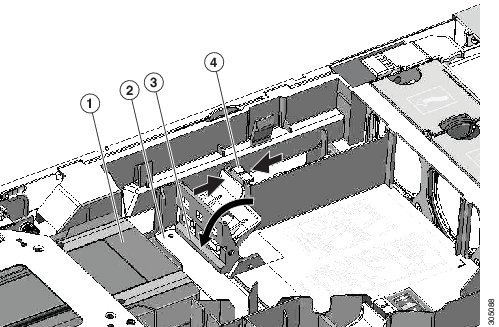
  • Double-wide GPU cards are supported in PCIe riser 1--slot 2 and in PCIe riser 2--slot 5.

  • A double-wide GPU card installed in slot 2 also covers slot 4; a double wide GPU card installed in slot 5 also covers slot 6.

  • Do not mix different brands or models of GPU cards in the node.

  • You can install a GPU card and a Cisco UCS VIC in the same riser. When you install a GPU card in slot 2, NCSI support in riser 1 automatically moves to slot 1. When you install a GPU card in slot 5, NCSI support in riser 2 automatically moves to slot 4.

  • AMD FirePro S7150 X2 GPUs can support only less-than 1 TB memory in the server.

  • NVIDIA M-Series GPUs can support only less-than 1 TB memory in the server.

  • NVIDIA P-Series GPUs can support 1 TB or more memory in the server.

Requirement For All GPUs: Memory-Mapped I/O Greater Than 4 GB

All supported GPU cards require enablement of the BIOS setting that allows greater than 4 GB of memory-mapped I/O (MMIO).

  • Standalone node: If the node is used in standalone mode, this BIOS setting is enabled by default:

    Advanced > PCI Configuration > Memory Mapped I/O Above 4 GB [Enabled]

    If you need to change this setting, enter the BIOS Setup Utility by pressing F2 when prompted during bootup.

  • If the node is integrated with Cisco UCS Manager and is controlled by a service profile, this setting is enabled by default in the service profile when a GPU is present.

    To change this setting manually, use the following procedure.

Procedure


Step 1

Refer to the Cisco UCS Manager configuration guide (GUI or CLI) for your release for instructions on configuring service profiles:

Cisco UCS Manager Configuration Guides

Step 2

Refer to the chapter on Configuring node-Related Policies > Configuring BIOS Settings.

Step 3

In the section of your profile for PCI Configuration BIOS Settings, set Memory Mapped IO Above 4GB Config to one of the following:

  • Disabled—Does not map 64-bit PCI devices to 64 GB or greater address space.

  • Enabled—Maps I/O of 64-bit PCI devices to 64 GB or greater address space.

  • Platform Default—The policy uses the value for this attribute contained in the BIOS defaults for the node. Use this only if you know that the node BIOS is set to use the default enabled setting for this item.

Step 4

Reboot the node.

Note 

Cisco UCS Manager pushes BIOS configuration changes through a BIOS policy or default BIOS settings to the Cisco Integrated Management Controller (CIMC) buffer. These changes remain in the buffer and do not take effect until the node is rebooted.


Installing a Double-Wide GPU Card

Use the following procedure to install or replace the following supported GPU cards:

  • NVIDIA Tesla M10

  • NVIDIA Tesla P40

  • AMD FirePro S7150 X2


Caution

When using NVIDIA Tesla P40 GPU cards in this node, the maximum operating temperature (air inlet temperature) for the node is 32° C (89.6° F).


Table 1. HX240c M5 Operating Temperature Requirements For GPU Cards

GPU Card

Maximum node Operating Temperature (Air Inlet Temperature)

NVIDIA Tesla M10

35° C (95.0° F)

NVIDIA Tesla P40

32° C (89.6° F)

AMD FirePro S7150 X2

35° C (95.0° F)


Note

For NVIDIA GPUs: The NVIDIA GPU card might be shipped with two power cables: a straight cable and a Y-cable. The straight cable is used for connecting power to the GPU card in this server; do not use the Y-cable, which is used for connecting the GPU card in external devices only (such as the Magma chassis).

For AMD GPUs: The correct power cable is a Y-cable.


Procedure


Step 1

Put the node in Cisco HX Maintenance Mode as described in Shutting Down Using vSphere With HX Maintenance Mode.

Step 2

Shut down the node as described in Shutting Down and Removing Power From the Node.

Step 3

Decommission the node from UCS Manager as described in Decommissioning the Node Using Cisco UCS Manager.

Caution 

After a node is shut down to standby power, electric current is still present in the node. To completely remove power, you must disconnect all power cords from the power supplies in the node.

Step 4

Disconnect all power cables from all power supplies.

Step 5

Slide the node out the front of the rack far enough so that you can remove the top cover. You might have to detach cables from the rear panel to provide clearance.

Caution 
If you cannot safely view and access the component, remove the node from the rack.
Step 6

Remove the top cover from the node as described in Removing the Node Top Cover.

Step 7

Remove an existing GPU card:

  1. Use two hands to grasp the metal bracket of the PCIe riser and lift straight up to disengage its connector from the socket on the motherboard. Set the riser on an antistatic surface.

  2. On the bottom of the riser, press down on the clip that holds the securing plate.

  3. Swing open the hinged securing plate to provide access.

  4. Open the hinged plastic retainer that secures the rear-panel tab of the card.

  5. Disconnect the GPU card's power cable from the power connector on the PCIe riser.

  6. Pull evenly on both ends of the GPU card to remove it from the socket on the PCIe riser.

Step 8

Install a new GPU card:

Note 

Observe the configuration rules for this node, as described in GPU Card Configuration Rules.

  1. Align the GPU card with the socket on the riser, and then gently push the card’s edge connector into the socket. Press evenly on both corners of the card to avoid damaging the connector.

  2. Connect the GPU power cable. The straight power cable connectors are color-coded. Connect the cable's black connector into the black connector on the GPU card and the cable's white connector into the white GPU POWER connector on the PCIe riser.

    Caution 

    Do not reverse the straight power cable. Connect the black connector on the cable to the black connector on the GPU card. Connect the white connector on the cable to the white connector on the PCIe riser.

  3. Close the card-tab retainer over the end of the card.

  4. Swing the hinged securing plate closed on the bottom of the riser. Ensure that the clip on the plate clicks into the locked position.

  5. Position the PCIe riser over its socket on the motherboard and over the chassis alignment channels.

  6. Carefully push down on both ends of the PCIe riser to fully engage its connector with the sockets on the motherboard.

    At the same time, align the GPU front support bracket (on the front end of the GPU card) with the securing latch that is on the node's air baffle.

Step 9

Insert the GPU front support bracket into the latch that is on the air baffle:

  1. Pinch the latch release tab and hinge the latch toward the front of the node.

  2. Hinge the latch back down so that its lip closes over the edge of the GPU front support bracket.

  3. Ensure that the latch release tab clicks and locks the latch in place.

Figure 1. GPU Front Support Bracket Inserted to Securing latch on Air Baffle

1

Front end of GPU card

3

Lip on securing latch

2

GPU front support bracket

4

Securing latch release tab

Step 10

Replace the top cover to the node.

Step 11

Replace the node in the rack, replace cables, and then fully power on the node by pressing the Power button.

Step 12

Recommission the node in UCS Manager as described in Recommissioning the Node Using Cisco UCS Manager.

Step 13

Associate the node with its UCS Manager service profile as described in Associating a Service Profile With an HX Node.

Step 14

After ESXi reboot, exit HX Maintenance mode as described in Exiting HX Maintenance Mode.

Note 

If you installed an NVIDIA Tesla M-series or P-Series GPU, you must install GRID licenses to use the optional GRID features. See Using NVIDIA GRID License Server For M-Series and P-Series GPUs.


Using NVIDIA GRID License Server For M-Series and P-Series GPUs

This section applies to NVIDIA Tesla M-Series and P-Series GPUs.

Use the topics in this section in the following order when obtaining and using NVIDIA GRID licenses.

  1. Familiarize yourself with the NVIDIA GRID License Server.

    NVIDIA GRID License Server Overview

  2. Register your product activation keys with NVIDIA.

    Registering Your Product Activation Keys With NVIDIA

  3. Download the GRID software suite.

    Downloading the GRID Software Suite

  4. Install the GRID License Server software to a host.

    Installing NVIDIA GRID License Server Software

  5. Generate licenses on the NVIDIA Licensing Portal and download them.

    Installing Licenses From the Licensing Portal

  6. Manage your GRID licenses.

    Managing GRID Licenses

NVIDIA GRID License Server Overview

The NVIDIA M-Series GPUs combine Tesla and GRID functionality when the licensed GRID features such as GRID vGPU and GRID Virtual Workstation are enabled. These features are enabled during OS boot by borrowing a software license that is served over the network from the NVIDIA GRID License Server virtual appliance. The license is returned to the license server when the OS shuts down.

You obtain the licenses that are served by the GRID License Server from NVIDIA’s Licensing Portal as downloadable license files, which you install into the GRID License Server via its management interface.

Figure 2. NVIDIA GRID Licensing Architecture

There are three editions of GRID licenses, which enable three different classes of GRID features. The GRID software automatically selects the license edition based on the features that you are using.

GRID License Edition

GRID Feature

GRID Virtual GPU (vGPU)

Virtual GPUs for business desktop computing

GRID Virtual Workstation

Virtual GPUs for midrange workstation computing

GRID Virtual Workstation – Extended

Virtual GPUs for high-end workstation computing

Workstation graphics on GPU pass-through

Registering Your Product Activation Keys With NVIDIA

After your order is processed, NVIDIA sends you a Welcome email that contains your product activation keys (PAKs) and a list of the types and quantities of licenses that you purchased.

Procedure


Step 1

Select the Log In link, or the Register link if you do not already have an account.

The NVIDIA Software Licensing Center > License Key Registration dialog opens.

Step 2

Complete the License Key Registration form and then click Submit My Registration Information.

The NVIDIA Software Licensing Center > Product Information Software dialog opens.

Step 3

If you have additional PAKs, click Register Additional Keys. For each additional key, complete the form on the License Key Registration dialog and then click Submit My Registration Information.

Step 4

Agree to the terms and conditions and set a password when prompted.


Downloading the GRID Software Suite

Procedure


Step 1

Return to the NVIDIA Software Licensing Center > Product Information Software dialog.

Step 2

Click the Current Releases tab.

Step 3

Click the NVIDIA GRID link to access the Product Download dialog. This dialog includes download links for:

  • NVIDIA License Manager software

  • The gpumodeswitch utility

  • The host driver software

Step 4

Use the links to download the software.


Installing NVIDIA GRID License Server Software

For full installation instructions and troubleshooting, refer to the NVIDIA GRID License Server User Guide. Also refer to the NVIDIA GRID License Server Release Notes for the latest information about your release.

http://www.nvidia.com

Platform Requirements for NVIDIA GRID License Server

  • The hosting platform can be a physical or a virtual machine. NVIDIA recommends using a host that is dedicated only to running the License Server.

  • The hosting platform must run a supported Windows OS.

  • The hosting platform must have a constant IP address.

  • The hosting platform must have at least one constant Ethernet MAC address.

  • The hosting platform’s date and time must be set accurately.

Installing GRID License Server on Windows

The License Server requires a Java runtime environment and an Apache Tomcat installation. Apache Tomcat is installed when you use the NVIDIA installation wizard for Windows.

Procedure

Step 1

Download and install the latest Java 32-bit runtime environment from https://www.oracle.com/downloads/index.html.

Note 

Install the 32-bit Java Runtime Environment, regardless of whether your platform is Windows 32-bit or 64-bit.

Step 2

Create a server interface:

  1. On the NVIDIA Software Licensing Center dialog, click Grid Licensing > Create License Server.

  2. On the Create Server dialog, fill in your desired server details.

  3. Save the .bin file that is generated onto your license server for installation.

Step 3

Unzip the NVIDIA License Server installer Zip file that you downloaded previously and run setup.exe.

Step 4

Accept the EULA for the NVIDIA License Server software and the Apache Tomcat software. Tomcat is installed automatically during the License Server installation.

Step 5

Use the installer wizard to step through the installation.

Note 

On the Choose Firewall Options dialog, select the ports to be opened in the firewall. NVIDIA recommends that you use the default setting, which opens port 7070 but leaves port 8080 closed.

Step 6

Verify the installation. Open a web browser on the License Server host and connect to the URL http://localhost:8080/licserver. If the installation was successful, you see the NVIDIA License Client Manager interface.


Installing GRID License Server on Linux

The License Server requires a Java runtime environment and an Apache Tomcat installation. You must install both separately before installing the License Server on Linux.

Procedure

Step 1

Verify that Java was installed with your Linux installation. Use the following command:

java -version

If no Java version is displayed, use your Linux package manager to install with the following command:

sudo yum install java

Step 2

Use your Linux package manager to install the tomcat and tomcat-webapps packages:

  1. Use the following command to install Tomcat:

    sudo yum install tomcat

  2. Enable the Tomcat service for automatic startup on boot:

    sudo systemctl enable tomcat.service

  3. Start the Tomcat service:

    sudo systemctl start tomcat.service

  4. Verify that the Tomcat service is operational. Open a web browser on the License Server host and connect to the URL http://localhost:8080. If the installation was successful, you see the Tomcat webapp.

Step 3

Install the License Server:

  1. Unpack the License Server tar file using the following command:

    tar xfz NVIDIA-linux-2015.09-0001.tgz

  2. Run the unpacked setup binary as root:

    sudo ./setup.bin

  3. Accept the EULA and then continue with the installation wizard to finish the installation.

    Note 

    On the Choose Firewall Options dialog, select the ports to be opened in the firewall. NVIDIA recommends that you use the default setting, which opens port 7070 but leaves port 8080 closed.

Step 4

Verify the installation. Open a web browser on the License Server host and connect to the URL http://localhost:8080/licserver. If the installation was successful, you see the NVIDIA License Client Manager interface.


Installing GRID Licenses From the NVIDIA Licensing Portal to the License Server

Accessing the GRID License Server Management Interface

Open a web browser on the License Server host and access the URL http://localhost:8080/licserver.

If you configured the License Server host’s firewall to permit remote access to the License Server, the management interface is accessible from remote machines at the URL http://hostname:8080/licserver

Reading Your License Server’s MAC Address

Your License Server’s Ethernet MAC address is used as an identifier when registering the License Server with NVIDIA’s Licensing Portal.

Procedure

Step 1

Access the GRID License Server Management Interface in a browser.

Step 2

In the left-side License Server panel, select Configuration.

The License Server Configuration panel opens. Next to Server host ID, a pull-down menu lists the possible Ethernet MAC addresses.

Step 3

Select your License Server’s MAC address from the Server host ID pull-down.

Note 

It is important to use the same Ethernet ID consistently to identify the server when generating licenses on NVIDIA’s Licensing Portal. NVIDIA recommends that you select one entry for a primary, non-removable Ethernet interface on the platform.


Installing Licenses From the Licensing Portal

Procedure

Step 1

Access the GRID License Server Management Interface in a browser.

Step 2

In the left-side License Server panel, select Configuration.

The License Server Configuration panel opens.

Step 3

Use the License Server Configuration menu to install the .bin file that you generated earlier.

  1. Click Choose File.

  2. Browse to the license .bin file that you want to install and click Open.

  3. Click Upload.

    The license file is installed on your License Server. When installation is complete, you see the confirmation message, “Successfully applied license file to license server.”


Viewing Available GRID Licenses

Use the following procedure to view which licenses are installed and available, along with their properties.

Procedure

Step 1

Access the GRID License Server Management Interface in a browser.

Step 2

In the left-side License Server panel, select Licensed Feature Usage.

Step 3

Click on a feature in the Feature column to see detailed information about the current usage of that feature.


Viewing Current License Usage

Use the following procedure to view information about which licenses are currently in-use and borrowed from the server.

Procedure

Step 1

Access the GRID License Server Management Interface in a browser.

Step 2

In the left-side License Server panel, select Licensed Clients.

Step 3

To view detailed information about a single licensed client, click on its Client ID in the list.


Managing GRID Licenses

Features that require GRID licensing run at reduced capability until a GRID license is acquired.

Acquiring a GRID License on Windows

Procedure

Step 1

Open the NVIDIA Control Panel using one of the following methods:

  • Right-click on the Windows desktop and select NVIDIA Control Panel from the menu.

  • Open Windows Control Panel and double-click the NVIDIA Control Panel icon.

Step 2

In the NVIDIA Control Panel left-pane under Licensing, select Manage License.

The Manage License task pane opens and shows the current license edition being used. The GRID software automatically selects the license edition based on the features that you are using. The default is Tesla (unlicensed).

Step 3

If you want to acquire a license for GRID Virtual Workstation, under License Edition, select GRID Virtual Workstation.

Step 4

In the License Server field, enter the address of your local GRID License Server. The address can be a domain name or an IP address.

Step 5

In the Port Number field, enter your port number of leave it set to the default used by the server, which is 7070.

Step 6

Select Apply.

The system requests the appropriate license edition from your configured License Server. After a license is successfully acquired, the features of that license edition are enabled.

Note 

After you configure licensing settings in the NVIDIA Control Panel, the settings persist across reboots.


Acquiring a GRID License on Linux

Procedure

Step 1

Edit the configuration file /etc/nvidia/gridd.conf:

sudo vi /etc/nvidia/gridd.conf

Step 2

Edit the ServerUrl line with the address of your local GRID License Server.

The address can be a domain name or an IP address. See the example file below.

Step 3

Append the port number (default 7070) to the end of the address with a colon. See the example file below.

Step 4

Edit the FeatureType line with the integer for the license type. See the example file below.

  • GRID vGPU = 1

  • GRID Virtual Workstation = 2

Step 5

Restart the nvidia-gridd service.

sudo service nvidia-gridd restart

The service automatically acquires the license edition that you specified in the FeatureType line. You can confirm this in /var/log/messages.

Note 

After you configure licensing settings in the NVIDIA Control Panel, the settings persist across reboots.

Sample configuration file:

# /etc/nvidia/gridd.conf - Configuration file for NVIDIA Grid Daemon
# Description: Set License Server URL
# Data type: string
# Format: "<address>:<port>" 
ServerUrl=10.31.20.45:7070
# Description: Set Feature to be enabled
# Data type: integer
# Possible values:
# 1 => for GRID vGPU 
# 2 => for GRID Virtual Workstation
FeatureType=2
 

Using gpumodeswitch

The command line utility gpumodeswitch can be run in the following environments:

  • Windows 64-bit command prompt (requires administrator permissions)

  • Linux 32/64-bit shell (including Citrix XenServer dom0) (requires root permissions)


Note

Consult NVIDIA product release notes for the latest information on compatibility with compute and graphic modes.


The gpumodeswitch utility supports the following commands:

  • --listgpumodes

    Writes information to a log file named listgpumodes.txt in the current working directory.

  • --gpumode graphics

    Switches to graphics mode. Switches mode of all supported GPUs in the server unless you specify otherwise when prompted.

  • --gpumode compute

    Switches to compute mode. Switches mode of all supported GPUs in the server unless you specify otherwise when prompted.


Note

After you switch GPU mode, reboot the server to ensure that the modified resources of the GPU are correctly accounted for by any OS or hypervisor running on the server.


Installing Drivers to Support the NVIDIA GPU Cards

After you install the hardware, you must update to the correct level of server BIOS, activate the BIOS firmware, and then install NVIDIA drivers and other software in this order:

1. Updating the Node BIOS Firmware

Install the latest Cisco BIOS for your node by using Cisco UCS Manager.


Note

You must do this procedure before you update the NVIDIA drivers.


Caution

Do not remove the hardware that contains the endpoint or perform any maintenance on it until the update process completes. If the hardware is removed or otherwise unavailable due to maintenance, the firmware update fails. This failure might corrupt the backup partition. You cannot update the firmware on an endpoint with a corrupted backup partition.


Procedure


Step 1

In the Navigation pane, click Equipment.

Step 2

On the Equipment tab, expand Equipment > Chassis > Chassis Number > Servers.

Step 3

Click the Name of the node for which you want to update the BIOS firmware.

Step 4

On the Properties page in the Inventory tab, click Motherboard.

Step 5

In the Actions area, click Update BIOS Firmware.

Step 6

In the Update Firmware dialog box, do the following:

  1. From the Firmware Version drop-down list, select the firmware version to which you want to update the endpoint.

  2. Click OK.

Cisco UCS Manager copies the selected firmware package to the backup memory slot, where it remains until you activate it.

Step 7

(Optional) Monitor the status of the update in the Update Status field.

The update process can take several minutes. Do not activate the firmware until the firmware package you selected displays in the Backup Version field in the BIOS area of the Inventory tab.


What to do next

Activate the server BIOS firmware.

2. Activating the Node BIOS Firmware

Procedure


Step 1

In the Navigation pane, click Equipment.

Step 2

On the Equipment tab, expand Equipment > Chassis > Chassis Number > Servers.

Step 3

Click the Name of the server for which you want to activate the BIOS firmware.

Step 4

On the Properties page in the Inventory tab, click Motherboard.

Step 5

In the Actions area, click Activate BIOS Firmware.

Step 6

In the Activate Firmware dialog box, do the following:

  1. Select the appropriate server BIOS version from the Version To Be Activated drop-down list.

  2. If you want to set only the start-up version and not change the version running on the server, check Set Startup Version Only.

    If you configure Set Startup Version Only, the activated firmware moves into the pending-next-reboot state and the server is not immediately rebooted. The activated firmware does not become the running version of firmware until the server is rebooted.

  3. Click OK.


What to do next

Update the NVIDIA drivers.

3. Updating the GPU Card Drivers

After you update the server BIOS, you can install GPU drivers to your hypervisor virtual machine.

Procedure


Step 1

Install your hypervisor software on a computer. Refer to your hypervisor documentation for the installation instructions.

Step 2

Create a virtual machine in your hypervisor. Refer to your hypervisor documentation for instructions.

Step 3

Install the GPU drivers to the virtual machine. Download the drivers from either:

Step 4

Restart the server.

Step 5

Check that the virtual machine is able to recognize the GPU card. In Windows, use the Device Manager and look under Display Adapters.