Cisco Nexus Hyperfabric — Notifications
Notifications
Set up notifications to receive alerts about fabric-related events and their significance. Notifications can help monitor and maintain the health of the fabric.
Currently, the default policy notification enables the configuration of assertion notifications for one or more fabrics and the notification endpoints you specify. See Configure notifications.
Notification endpoints
Notification endpoints allow the system to send alerts or updates to a designated recipient or endpoint. A notification endpoint can be an application, service, or a user that receives these notifications.
Cisco Nexus Hyperfabric currently supports these notification endpoint types:
Assertion notification frequency
Notifications are sent only when there are changes in latched assertions. The delivery and duration between notifications vary based on the notification endpoint type.
|
Endpoint type |
Maximum duration |
|---|---|
|
|
5 minutes |
|
Amazon S3 |
30 seconds |
|
Splunk |
30 seconds |
Configure email endpoints
The system sends a verification code to the email address you configure. Ensure you have access to the email address or can retrieve the verification code by another means. Notification codes remain valid for 30 minutes. After this time, the email code will expire and you need to request a new one.
Follow these steps to configure email endpoints.
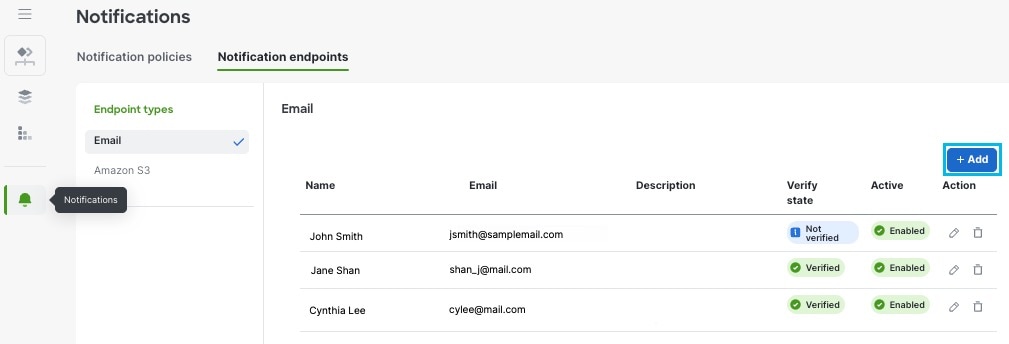
Step 1 | Choose . |
Step 2 | From the Endpoint types area, select Email. |
Step 3 | Select + Add. |
Step 4 | In the Add email endpoint window, enable or disable notifications for this email endpoint. Notifications are enabled by default. |
Step 5 | Enter a name, email address, and a description. |
Step 6 | Select Save. |
Step 7 | Complete email verification.
|
Step 8 | If you want to configure more email endpoints, repeat these steps. |
Step 9 | If you want to send notifications using this email endpoint, see Configure notifications. |
 Note
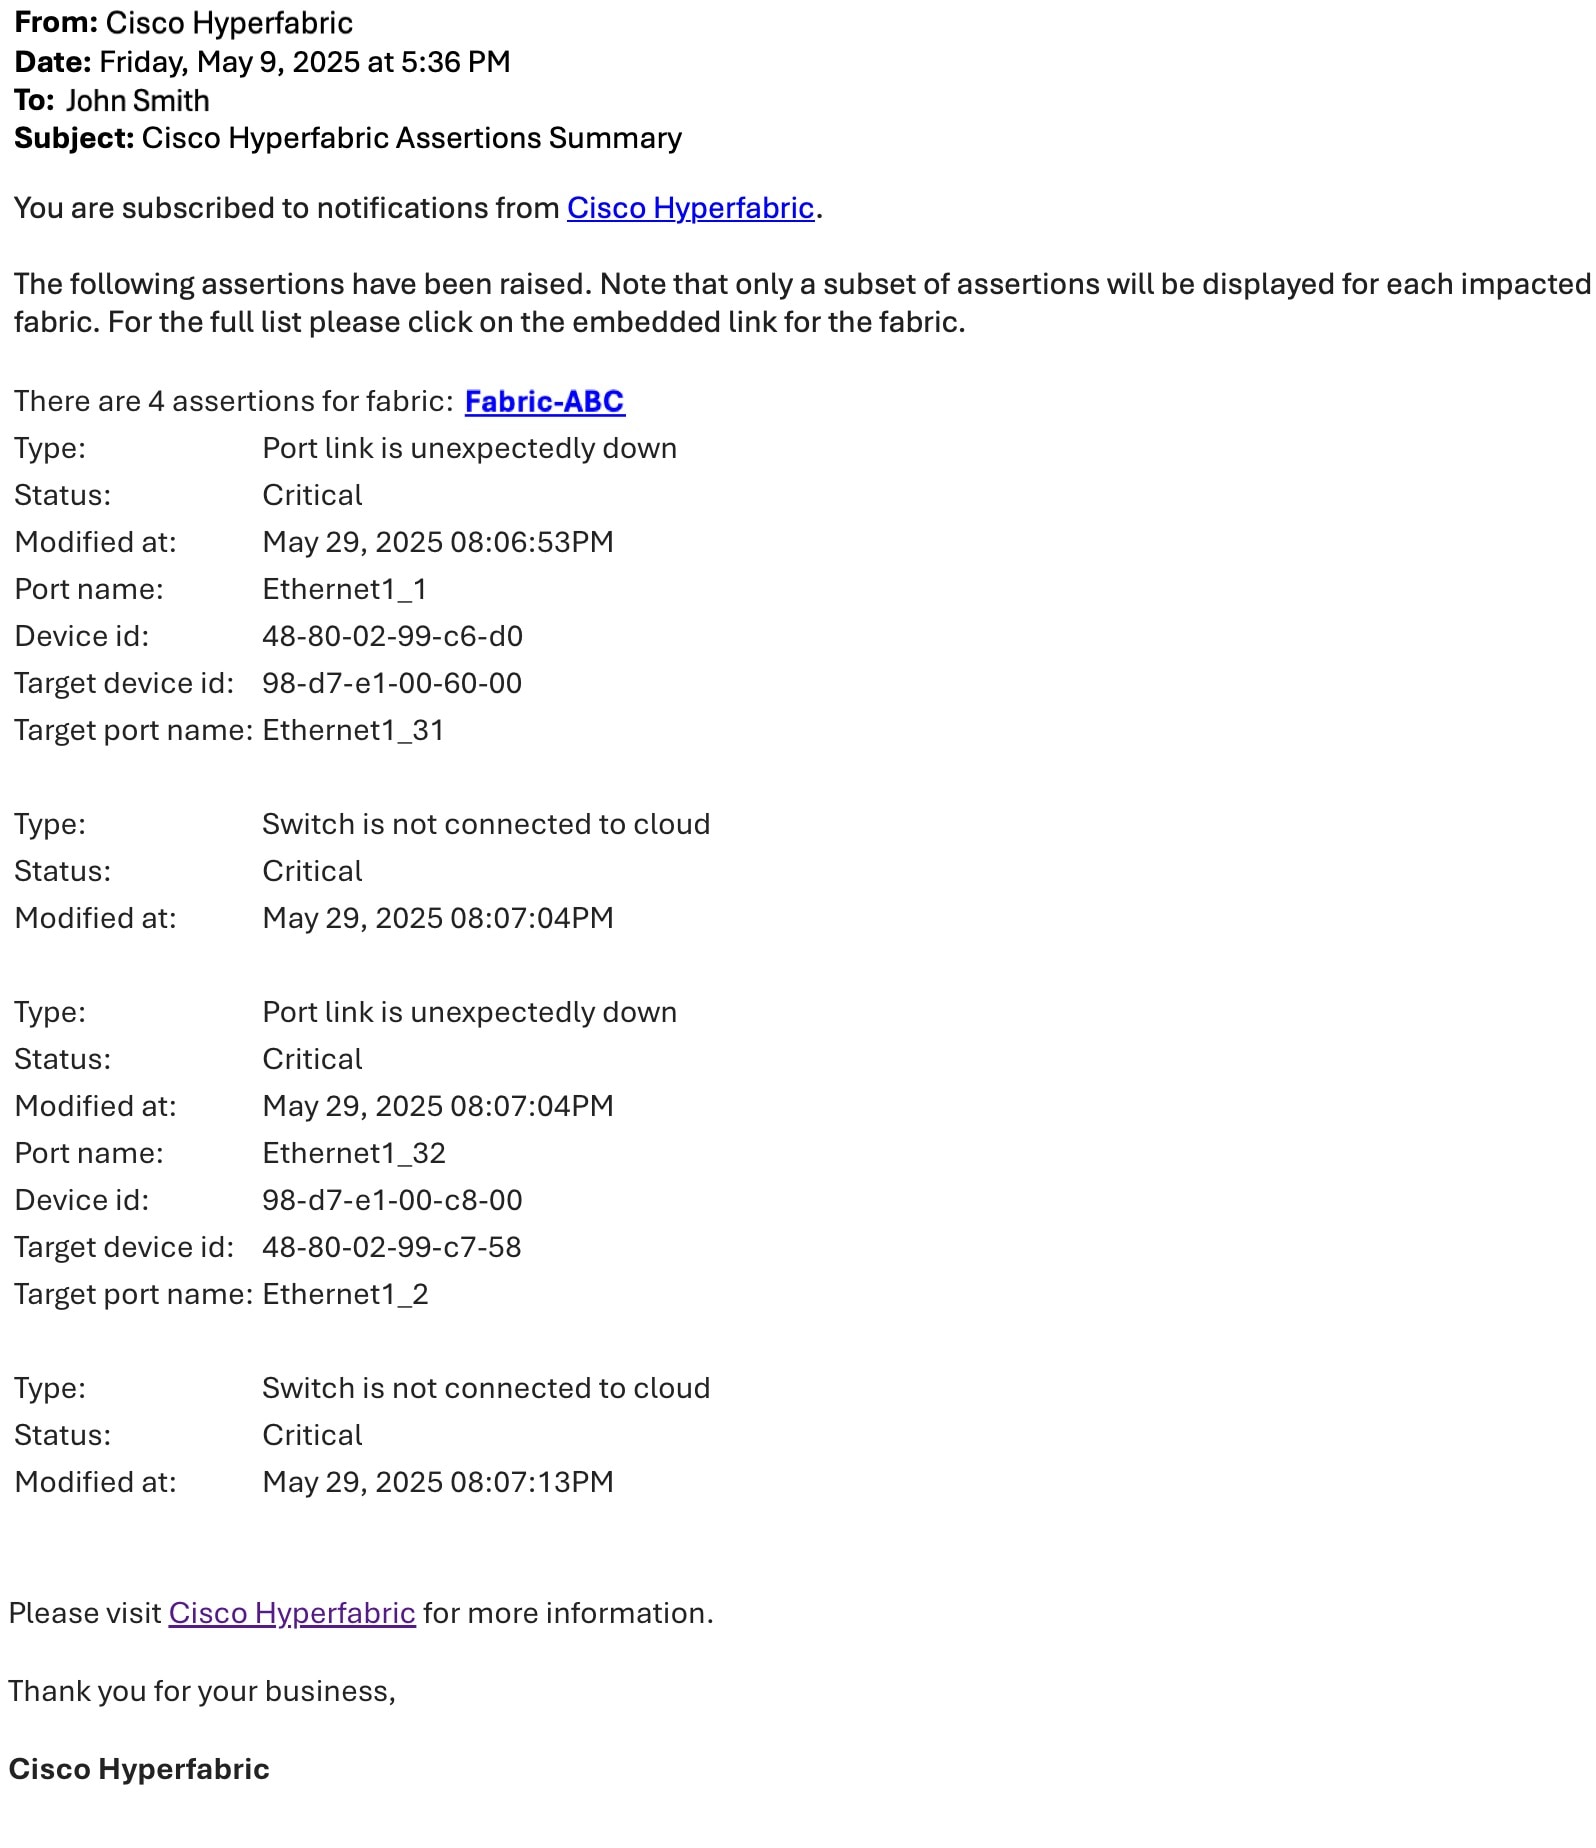
Note- The email displays the top five priority assertions per fabric. To see all fabric-related assertions select the fabric name.
Select the image to view it in full size.
Configure Amazon S3 endpoints
Ensure you have the required Amazon S3 information:
- AWS region
- bucket name
- bucket path, and
- Amazon Web Services (AWS) access key ID and corresponding secret access key
Follow these steps to configure notifications for Amazon S3 endpoints.
Step 1 | Choose . |
Step 2 | From the Endpoint types area, select Amazon S3. |
Step 3 | Select + Add. 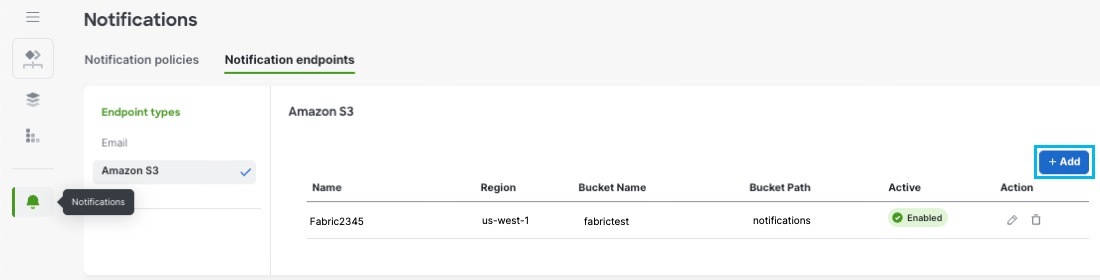 |
Step 4 | In the Add Amazon S3 endpoint window, enable or disable notifications for this endpoint. Notifications are enabled by default. |
Step 5 | Enter a name for the endpoint and the required AWS information. 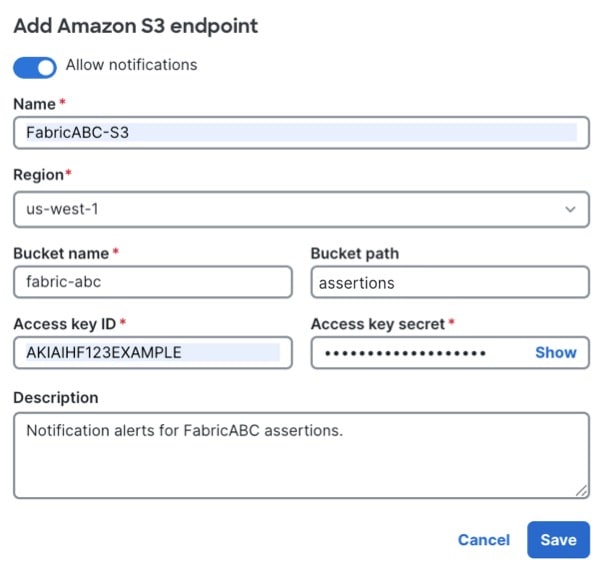 |
Step 6 | Select Save. |
Step 7 | If you want to configure more Amazon S3 endpoints, repeat these steps. |
Step 8 | If you want to send notifications using this Amazon S3 endpoint, see Configure notifications. |
The notification is sent as a JSON file with the filename format as notification_ <endpoint-name> - <timestamp>.json.

Configure Splunk webhook endpoints
You can integrate Splunk with Nexus Hyperfabric to export actionable alerts. This allows for rapid response to fabric-related events by sending assertion details directly to your Splunk environment.
Ensure you have completed these tasks in Splunk:
- Set up an HTTP Event collector (HEC) in Splunk Enterprise or Splunk Cloud.
- Copied the HEC token.
- Created a specific index in Splunk for Nexus Hyperfabric data.
- For Splunk Enterprise: If your HEC is behind a firewall, you must add the Nexus Hyperfabric source IP addresses to your allow list. This ensures the firewall does not block inbound traffic from Nexus Hyperfabric regional nodes.
For more information, see Splunk HEC documentation.
Step 1 | Choose . |
Step 2 | From the Endpoint types area, select Webhooks. |
Step 3 | Select + Add. |
Step 4 | In the Add webhook endpoint window, configure the webhook options: 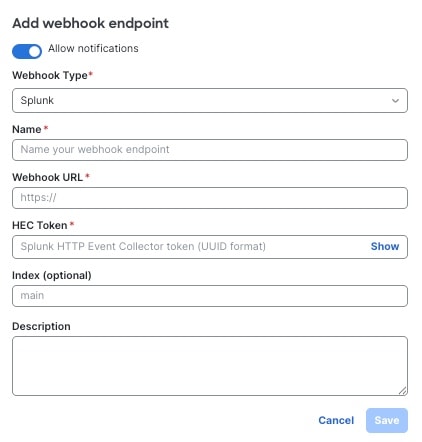
|
Step 5 | To send notifications using this Splunk webhook endpoint, see Configure notifications. |
The Splunk webhook alerts will mirror the assertion details shown within the fabric blueprint. Each notification includes:
- A timestamp and criticality level.
- A breadcrumb link back to the associated fabric blueprint in Nexus Hyperfabric.
- Summaries of configuration change commits.
Source IP addresses for Splunk Enterprise
If your HTTP Event Collector is behind a firewall, you must add the Nexus Hyperfabric source IP addresses to your allow list.
Nexus Hyperfabric uses these regional IP addresses to transmit webhook notifications. To ensure high availability, add all ten IP addresses to your allow list, as any one of these may be used for transmission at any given time.
- 34.231.206.148/32
- 34.197.66.81/32
- 3.230.185.87/32
- 107.21.150.190/32
- 18.208.31.175/32
- 44.246.11.147/32
- 34.208.128.222/32
- 16.146.213.238/32
- 44.224.15.30/32
- 34.223.190.67/32
Configure notifications
At this time, you can set up notifications only for specific fabrics to designated endpoints using the default policy. Additionally, different notification policies can be created for various fabrics and notification endpoints.
Ensure you have configured a notification endpoint before you configure notifications.
Follow these steps to configure notifications.
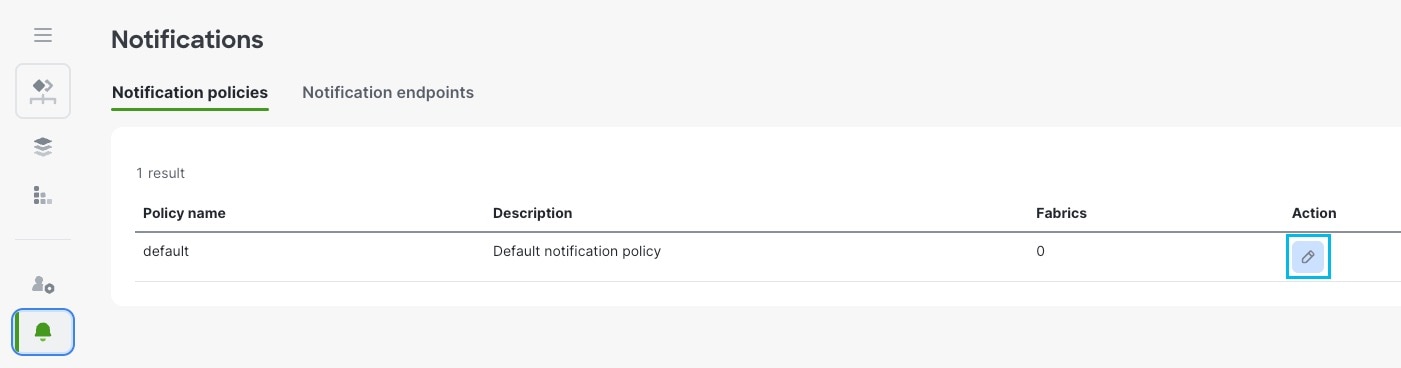
Step 1 | Choose . |
Step 2 | Under the Action column, select the pencil icon. |
Step 3 | Select +. |
Step 4 | From the Fabrics drop-down list, select one or more fabrics for which you want to receive assertion notifications for. |
Step 5 | From the Endpoints drop-down list, select one or more endpoints for which you want to send assertion notifications to. |
Step 6 | Select Save. |
Step 7 | If you want to configure more assertion notification policies with different fabric and endpoint combinations, select +. |