Upgrading Cisco DCNM

This chapter provides information about upgrading Cisco DCNM, and contains the following section:

Upgrading to Cisco DCNM Release 11.5(1)

Before Cisco DCNM Release 11.0(1), DCNM OVA, and ISO supported SAN functionality. From Cisco DCNM Release 11.3(1), you can install Cisco DCNM for SAN Deployment on both OVA and ISO virtual appliances.

The following table summarizes the type of upgrade that you must follow to upgrade to Release 11.5(1).

Table 1. Type of Upgrade for Cisco DCNM SAN deployments

Current Release Number

Upgrade type to upgrade to Release 11.5(1)

11.4(1)

To Windows—Inline Upgrade

To Linux—Inline Upgrade

To OVA\ISO—Inline Upgrade

11.3(1)

To Windows—Inline Upgrade

To Linux—Inline Upgrade

To OVA\ISO—Inline Upgrade

11.2(1)

To Windows—Inline Upgrade

To Linux—Inline Upgrade

To OVA\ISO—

  1. Fresh 11.3(1) SAN Only Installation.

  2. Migrate Performance Manager Collections to 11.3(1)

    Note


    The old Performance Manager data will replace any existing Performance Manager data on 11.3(1).

  3. Inline upgrade to 11.5(1)

11.1(1)

To Windows— 11.1(1) → 11.4(1) → 11.5(1)

To Linux— 11.1(1) → 11.4(1) → 11.5(1)

To OVA\ISO—

  1. Fresh 11.3(1) SAN Only Installation.

  2. Migrate Performance Manager Collections to 11.3(1).

    Note


    The old Performance Manager data will replace any existing Performance Manager data on 11.3(1).

  3. Inline upgrade to 11.5(1)

Retaining the CA Signed Certificate

Perform this procedure if you need to retain the CA signed SSL Certificate after upgrade.

When you configure a 3-node federation setup and apply external CA certificate, do the following:

  1. Stop DCNM servers in Federation.

    • For Windows – Navigate to C:\Program Files\Cisco Systems\dcm\dcnm\bin. Double-click on the StopLANSANServer.bat to stop the services.

    • For Linux – Logon to /root. Execute /root/Stop_DCNM_Servers command to stop services.

  2. Generate CA certificates for Primary Servers, and apply the same CA certificate in the three secondary servers.

  3. Start the Primary server first, then the secondary, third server thereafter, on Federation.

Note that if you change the keystore password or alias, you need to update it in the standalone-san.xml document located at:

<DCNM_install_root>\dcm\wildfly-14.0.1.Final\standalone\configuration\standalone-san.xml

Update the password in the keystore tag and alias:

<keystore key-password>="<<storepass-pwd>> key-alias="updated-key-alias" keystore-password="updated-password" path="<DCNM_install_root>\dcm\wildfly-14.0.1.Final\standalone\configuration\fmserver.jks">


Note


<<storepass-pwd>> is the password string generated while installing DCNM Server. This string is located in the <install dir>/dcm/fm/conf/serverstore.properties directory. Fetch the dcnm.fmserver.token value for the storepass-pwd.


Procedure


Step 1

Backup the signed certificate from the location:

  • For Windows: <DCNM_install_root>\dcm\wildfly-14.0.1.Final\standalone\configuration\fmserver.jks

  • For Linux: <DCNM_install_root>/dcm/wildfly-14.0.1.Final/standalone/configuration/fmserver.jks

Step 2

Upgrade to Cisco DCNM Release 11.5(1).

Step 3

After upgrade, copy the certificate to the same location on the upgraded version of the Cisco DCNM.

Note

 
You must load the certificates to the same location as mentioned in Step 1.

Step 4

Restart the DCNM Services.


Upgrading to Cisco SAN on Windows from Release 11.4(1) to 11.5(1)

The following sections provide instructions to upgrade Cisco DCNM SAN on Windows to the latest version:

Upgrading Cisco DCNM Windows using GUI

Before you begin

  • Ensure that Cisco DCNM 11.4(1) is up and running.

  • Ensure that the Elasticsearch service is operational.

  • Before you start to upgrade, close all instances of DCNM SAN client and Device Manager running on the server.

  • For DCNM SAN deployment on Windows, disable all Antivirus software for the entire duration of DCNM upgrade. The antivirus software might block the DCNM upgrade process.

Procedure


Step 1

Stop the DCNM services.

  • For Windows – Navigate to C:\Program Files\Cisco Systems\dcm\dcnm\bin. Double-click on the StopLANSANServer.bat to stop the services.

  • For Linux – Logon to /root. Execute /root/Stop_DCNM_Servers command to stop services.

Note


When DCNM services are stopped, Elasticsearch is also stopped. You must restart the Elasticsearch service.

  • For Windows – Launch the task manager on the Windows server. Choose Services tab. Select the Elasticsearch application. Right click on the application and choose Start.

  • For Linux – Execute service elasticsearch start command.

Step 2

Run the Cisco DCNM software for Release 11.5(1) executable file.

The following message appears:

Please close the DCNM Installation wizard gracefully using "Done" option
on last installation step and wait for the installation wizard to close automatically. 
Do not restart the system or forcefully terminate the Installation wizard while it is still in progress." 

Click OK to continue.

Step 3

Click OK to begin the upgrade.

Step 4

Click Done after the upgrade is complete.

The Cisco DCNM Release 11.5(1) services will start automatically.


Upgrading Cisco DCNM Windows Federation using GUI


Note


Ensure that both primary and secondary database properties are same.

Before you begin

  • Ensure that Cisco DCNM 11.4(1) is up and running.

  • Ensure that the Elasticsearch service is operational.

  • Before you start to upgrade, close all instances of DCNM SAN client and Device Manager running on the server.

  • For DCNM SAN deployment on Windows, disable all Antivirus software for the entire duration of DCNM upgrade. The antivirus software might block the DCNM upgrade process.

Procedure


Step 1

Stop both the primary and secondary DCNM services.

Note


Ensure that the Elasticsearch service is running.

Step 2

On the primary server, run the Cisco DCNM Release 11.5(1) executable file.

Upgrade notification window appears.

The following message appears:

Please close the DCNM Installation wizard gracefully using "Done" option
on last installation step and wait for the installation wizard to close automatically. 
Do not restart the system or forcefully terminate the Installation wizard while it is still in progress." 

Click OK to continue.

Step 3

Click OK to begin the upgrade.

Step 4

On the primary server, click Done after the upgrade is complete.

The Cisco DCNM Release 11.5(1) services will start automatically on the primary server.

Step 5

On the secondary server, run the Cisco DCNM Release 11.5(1) executable file.

Upgrade notification window appears.

The following message appears:

Please close the DCNM Installation wizard gracefully using "Done" option
on last installation step and wait for the installation wizard to close automatically. 
Do not restart the system or forcefully terminate the Installation wizard while it is still in progress." 

Click OK to continue.

Step 6

Click OK to begin the upgrade.

Step 7

On the secondary server, click Done after the upgrade is complete.

The Cisco DCNM Release 11.5(1) services will start automatically on the secondary server.


Upgrading Cisco DCNM Windows through Silent Installation


Note


Cisco DCNM supports Silent installation and upgrade only on Local Authorization mode and not on Remote Authorization mode.

Before you begin

  • Ensure that Cisco DCNM 11.4(1) is up and running.

  • Ensure that the Elasticsearch service is operational.

  • Before you start to upgrade, close all instances of DCNM SAN client and Device Manager running on the server.

  • For DCNM SAN deployment on Windows, disable all Antivirus software for the entire duration of DCNM upgrade. The antivirus software might block the DCNM upgrade process.

Procedure


Step 1

Stop the DCNM services.

Step 2

Open the installer.properties file and update the following properties:

INSTALLATION_TYPE=UPGRADE
USE_EXISTING_DB=TRUE

ORA_DB_PATH=C:\\oraclexe\\app\\oracle\\product\\10.2.0\\server
#---------------Use Existing Oracle--------------
DCNM_DB_URL=jdbc\:oracle\:thin\:@<ip_address_of_oracle_machine>\:1521\:XE
DCNM_DB_NAME=XE
SELECTED_DATABASE=oracle
DCNM_DB_USERNAME=oracledbadmin1
DCNM_DB_USER_PASSWORD=oracledbadmin1

Step 3

Go to the directory where you downloaded the Cisco DCNM software and run the appropriate installer by using the following command:

dcnm-release.exe -i silent -f <path_of_installer.properties>

The Cisco DCNM Release 11.5(1) services will start after the upgrade is complete.

You can check the status of the upgrade in the Task Manager process.


Upgrading Cisco DCNM Windows Federation through Silent Installation


Note


Cisco DCNM supports Silent installation and upgrade only on Local Authorization mode and not on Remote Authorization mode.

Note


Ensure that both primary and secondary database properties are same.

Before you begin

  • Ensure that Cisco DCNM 11.4(1) is up and running.

  • Ensure that the Elasticsearch service is operational.

  • Before you start to upgrade, close all instances of DCNM SAN client and Device Manager running on the server.

  • For DCNM SAN deployment on Windows, disable all Antivirus software for the entire duration of DCNM upgrade. The antivirus software might block the DCNM upgrade process.

Procedure


Step 1

Stop both the primary and secondary DCNM services.

Step 2

On the primary server, open the installer.properties file and update the following properties:


INSTALLATION_TYPE=UPGRADE
USE_EXISTING_DB=TRUE

Step 3

Go to the directory where you downloaded the Cisco DCNM software and run the appropriate installer by using the following command:

dcnm-release.exe -i silent -f <path_of_installer.properties>

You can check the status of the upgrade in the Task Manager process.

The Cisco DCNM Release 11.5(1) services will start automatically on the primary server.

Step 4

On the secondary server, open the installer.properties file and update the following properties:

INSTALLATION_TYPE=UPGRADE
USE_EXISTING_DB=TRUE

ORA_DB_PATH=C:\\oraclexe\\app\\oracle\\product\\10.2.0\\server
#---------------Use Existing Oracle--------------
DCNM_DB_URL=jdbc\:oracle\:thin\:@<ip_address_of_oracle_machine>\:1521\:XE
DCNM_DB_NAME=XE
SELECTED_DATABASE=oracle
DCNM_DB_USERNAME=oracledbadmin1
DCNM_DB_USER_PASSWORD=oracledbadmin1

Step 5

Go to the directory where you downloaded the Cisco DCNM software and run the appropriate installer by using the following command:

dcnm-release.exe -i silent -f <path_of_installer.properties>

You can check the status of the upgrade in the Task Manager process.

The Cisco DCNM Release 11.5(1) services will start automatically on the secondary server.


Upgrading Cisco DCNM Windows Federation when Elasticsearch Schema is modified

Before you begin

Ensure that the Elasticsearch must be running on 2 nodes in the Federation setup.

Procedure


Step 1

Stop the following DCNM services:

  • For Windows – Navigate to C:\Program Files\Cisco Systems\dcm\dcnm\bin. Double-click on the StopLANSANServer.bat to stop the services.

  • For Linux – Logon to /root. Execute /root/Stop_DCNM_Servers command to stop services.

Step 2

Upgrade Primary server first, and then the Secondary server in the Federation setup. For instructions, see Upgrading Cisco DCNM Windows Federation through Silent Installation.

Step 3

Start the DCNM Services.


Upgrading to Cisco SAN on Linux from Release 11.4(1) to 11.5(1)

The following sections provide instructions to upgrade Cisco DCNM SAN on Linux to the latest version:

Upgrading Cisco DCNM Linux using GUI

Before you begin

  • Ensure that Cisco DCNM 11.4(1) is up and running.

  • Ensure that the Elasticsearch service is operational.

  • Before you start to upgrade, close all instances of DCNM SAN client and Device Manager running on the server.

Procedure


Step 1

Stop the DCNM services.

Note


Ensure that the Elasticsearch service is running.

Step 2

Run the Cisco DCNM software for Release 11.5(1) executable file.

Upgrade Notification window appears

Step 3

Click OK to begin the upgrade.

The following message appears:

Please close the DCNM Installation wizard gracefully using "Done" option
on last installation step and wait for the installation wizard to close automatically. 
Do not restart the system or forcefully terminate the Installation wizard while it is still in progress." 

Click OK to continue.

Step 4

Click Done after the upgrade is complete.

The Cisco DCNM Release 11.5(1) services will start automatically.


What to do next

After you upgrade from Cisco DCNM Release 11.2(1) on Linux Standalone server, ensure that you clear the browser cache and Java console cache before you launch the Web UI and download the SAN Client. The Java console remembers the previous version of the SAN client data. If you do not clear Java console cache, you will not be able to use the latest downloaded SAN Client.

Upgrading Cisco DCNM Linux Federation using GUI


Note


Ensure that both primary and secondary database properties are same.

Before you begin

  • Ensure that Cisco DCNM 11.4(1) is up and running.

  • Ensure that the Elasticsearch service is operational.

  • Before you start to upgrade, close all instances of DCNM SAN client and Device Manager running on the server.

Procedure


Step 1

Stop both the primary and secondary DCNM services.

Note


Ensure that the Elasticsearch service is running.

Step 2

On the primary server, run the Cisco DCNM Release 11.5(1) executable file.

Upgrade notification window appears.

The following message appears:

Please close the DCNM Installation wizard gracefully using "Done" option
on last installation step and wait for the installation wizard to close automatically. 
Do not restart the system or forcefully terminate the Installation wizard while it is still in progress." 

Click OK to continue.

Step 3

Click OK to begin the upgrade.

Step 4

On the primary server, click Done after the upgrade is complete.

The Cisco DCNM Release 11.5(1) services will start automatically on the primary server.

Step 5

On the secondary server, run the Cisco DCNM Release 11.5(1) executable file.

Upgrade notification window appears.

The following message appears:

Please close the DCNM Installation wizard gracefully using "Done" option
on last installation step and wait for the installation wizard to close automatically. 
Do not restart the system or forcefully terminate the Installation wizard while it is still in progress." 

Click OK to continue.

Step 6

Click OK to begin the upgrade.

Step 7

On the secondary server, click Done after the upgrade is complete.

The Cisco DCNM Release 11.5(1) services will start automatically on the secondary server.


Upgrading Cisco DCNM Linux through Silent Installation


Note


Cisco DCNM supports Silent installation and upgrade only on Local Authorization mode and not on Remote Authorization mode.

Note


You must use the same database for Release 11.5(1) as in the existing DCNM set up.


Before you begin

  • Ensure that Cisco DCNM 11.4(1) is up and running.

  • Ensure that the Elasticsearch service is operational.

  • Before you start to upgrade, close all instances of DCNM SAN client and Device Manager running on the server.

Procedure


Step 1

Stop the DCNM services.

Step 2

Open the installer.properties file and update the following properties:

INSTALLATION_TYPE=UPGRADE
USE_EXISTING_DB=TRUE

Step 3

Go to the directory where you downloaded the Cisco DCNM software and run the appropriate installer by using the following command:

dcnm-release.bin -i silent -f <path_of_installer.properties>

The Cisco DCNM Release 11.5(1) services will start after the upgrade is complete.

You can check the status of the upgrade process by using the following command: ps -ef | grep ‘LAX’ . The prompt will return after the silent install is complete.


Upgrading Cisco DCNM Linux Federation through Silent Installation


Note


Cisco DCNM supports Silent installation and upgrade only on Local Authorization mode and not on Remote Authorization mode.

Note


Ensure that both primary and secondary database properties are same as in the previous Release set up.

Before you begin

  • Ensure that Cisco DCNM 11.4(1) is up and running.

  • Ensure that the Elasticsearch service is operational.

  • Before you start to upgrade, close all instances of DCNM SAN client and Device Manager running on the server.

Procedure


Step 1

Stop both the primary and secondary DCNM services.

Step 2

On the primary server, open the installer.properties file and update the following properties:


INSTALLATION_TYPE=UPGRADE
USE_EXISTING_DB=TRUE

Step 3

Go to the directory where you downloaded the Cisco DCNM software and run the appropriate installer by using the following command:

dcnm-release.bin -i silent -f <path_of_installer.properties>

You can check the status of the upgrade process by using the following command: ps -ef | grep ‘LAX’ . The prompt will return after the silent install is complete.

The Cisco DCNM Release 11.5(1) services will start automatically on the primary server.

Step 4

On the primary server, click Done after the upgrade is complete.

The Cisco DCNM Release 11.5(1) services will start automatically on the primary server.

Step 5

On the secondary server, open the installer.properties file and update the following properties:

INSTALLATION_TYPE=UPGRADE
USE_EXISTING_DB=TRUE

Step 6

Go to the directory where you downloaded the Cisco DCNM software and run the appropriate installer by using the following command:

dcnm-release.bin -i silent -f <path_of_installer.properties>

You can check the status of the upgrade process by using the following command: ps -ef | grep ‘LAX’ . The prompt will return after the silent install is complete.

The Cisco DCNM Release 11.5(1) services will start automatically on the secondary server.


Upgrading Cisco DCNM Linux Federation when Elasticsearch Schema is modified

Before you begin

Ensure that the Elasticsearch must be running on 2 nodes in the Federation setup.

Procedure


Step 1

Stop the following DCNM services:

  • For Windows – Navigate to C:\Program Files\Cisco Systems\dcm\dcnm\bin. Double-click on the StopLANSANServer.bat to stop the services.

  • For Linux – Logon to /root. Execute /root/Stop_DCNM_Servers command to stop services.

Step 2

Upgrade Primary server first, and then the Secondary server in the Federation setup. For instructions, see Upgrading Cisco DCNM Linux Federation through Silent Installation.

Step 3

Start the DCNM Services.


Upgrade Cisco DCNM SAN 11.2(1) or 11.3(1) to 11.5(1) on Windows and Linux Deployments

This sections includes the following topics:


Note


If the Elasticsearch is not compatible for upgrade, you must reindex the performance manager data before upgrading to Release 11.5(1). If you choose to conserve the Performance Manager data when you upgrade to Release 11.5(1), we recommend that you contact Cisco TAC for further assistance.


Upgrading Cisco DCNM Using GUI from Release 11.2(1) or 11.3(1) to 11.5(1)

As the Elasticsearch version supported in 11.2(1) and 11.3(1) is not compatible with the Elasticsearch supported with 11.5(1), you must reindex the Elasticsearch data before upgrading to Release 11.5(1).

The upgrade script will verify if the current version of Elasticsearch is compatible for upgrade. If it is not compatible, the upgrade process stops. When you run the upgrade script, the upgrade process terminates when it encounters the non-compatible performance data. You must reindex the data and continue with the upgrade.

If the existing Elasticsearch database is more than 250GB, Cisco DCNM Server requires more than 500GB HDD space to complete reindexing.

To upgrade Cisco DCNM Windows/Linux from 11.2(1) or 11.3(1) to Release 11.5(1), perform the following steps.

Before you begin

  • Ensure that Cisco DCNM 11.2(1) or 11.3(1) is up and running.

  • Ensure that the Elasticsearch service is operational.

    Elasticservice service must be operation on all nodes in a federation setup.

  • Before you start to upgrade, close all instances of DCNM SAN client and Device Manager running on the server.

  • For DCNM SAN deployment on Windows, disable all Antivirus software for the entire duration of DCNM upgrade. Antivirus software might block the DCNM upgrade process.

Additionally for Federation setup, perform upgrade in the following order:

  1. Upgrade the Primary node.

    Start the services. Reindex the primary node PM data.

  2. Upgrade the Secondary node.

    Start the services.

  3. Upgrade the Tertiary node.

    Start the services.

Procedure


Step 1

Stop the DCNM services.

Note


Ensure that the Elasticsearch service is running.

For Federation setup, ensure that the Elasticsearch is running on all nodes for upgrade to continue.

Step 2

Run the Cisco DCNM software for Release 11.5(1) executable file.

The following message appears:

Please close the DCNM Installation wizard gracefully using "Done" option
on last installation step and wait for the installation wizard to close automatically. 
Do not restart the system or forcefully terminate the Installation wizard while it is still in progress." 

Click OK to continue.

Step 3

Click OK to begin the upgrade.

The installer verifies if the Elasticsearch is upgradable.

  • If the Elasticsearch is not compatible for upgrade, the following error message is generated.

    Elasticsearch indices need manual reindexing
     Some Elastic Search indices are created with ES version 2.3.
     Please reindex these manually and proceed with upgrade.
     Reindexing package can be downloaded from CCO. DCNM Installer will now quit.

    Click OK to stop the upgrade process.

    You must reindex the PMDB data and begin to upgrade.

    Note


    If the Elasticsearch is not compatible for upgrade, you must reindex the performance manager data before upgrading to Release 11.5(1). If you choose to conserve the Performance Manager data when you upgrade to Release 11.5(1), we recommend that you contact Cisco TAC for further assistance.

  • If the Elasticsearch upgrade is compatible, or if you’ve completed the reindexing the Elasticsearch, the process continues.

The Elasticsearch is also upgraded as a part of DCNM upgrade to Release 11.5(1). After the upgrade is complete, a message regarding the reindexing of the old PMDB data is generated.

PM DB manual reindexing
PMDB Elastic Search index needs to be reindexed manually using the 
scripts under INSTALL_DIR/dcnm/dcnm/fm/reindexes/esmapping. 
The old PMDB data will be available after reindexing.

Step 4

Click Done after the upgrade is complete.

The following message is generated:

Elasticsearch(ES) indices for historical Performance Monitoring (PM) 
data need to be reindexed manually. 
Check DCNM installation and upgrade guide for more details.

Step 5

Click OK.

The Cisco DCNM Release 11.5(1) services will start automatically.

Note

 
Upgrade process will not reindex PMDB data. You must perform this task manually. If you need the PMDB data from the previous version on Release 11.5(1), you must reindex the data manually. For instructions to reindex PMDB data manually, see Reindexing PMDB post upgrade to DCNM SAN Release 11.5(1).

Upgrading Cisco DCNM through Silent Installation from Release 11.2(1) or 11.3(1) to 11.5(1)

As the Elasticsearch version supported in 11.2(1) and 11.3(1) is not compatible with the Elasticsearch supported with 11.5(1), you must reindex the Elasticsearch data before upgrading to Release 11.5(1).

The upgrade script will verify if the current version of Elasticsearch is compatible for upgrade. If it is not compatible, the upgrade process stops. When you run the upgrade script, the upgrade process terminates when it encounters the non-compatible performance data. You must reindex the data and continue with the upgrade.

If the existing Elasticsearch database is more than 250GB, Cisco DCNM Server requires more than 500GB HDD space to complete reindexing.

To upgrade Cisco DCNM Windows/Linux from 11.2(1) or 11.3(1) to Release 11.5(1), perform the following steps.

Before you begin

  • Ensure that Cisco DCNM 11.2(1) or 11.3(1) is up and running.

  • Ensure that the Elasticsearch service is operational.

  • Before you start to upgrade, close all instances of DCNM SAN client, both SAN Client and Device Manager running on the server.

  • For DCNM SAN deployment on Windows, disable all Antivirus software for the entire duration of DCNM upgrade. Antivirus software might block the DCNM upgrade process.

Additionally for Federation setup, perform upgrade in the following order:

  1. Upgrade the Primary node.

    Start the services. Reindex the primary node PM data.

  2. Upgrade the Secondary node.

    Start the services.

  3. Upgrade the Tertiary node.

    Start the services.

Procedure


Step 1

Stop the DCNM services.

Note


Ensure that the Elasticsearch service is running.

For Federation setup, ensure that the Elasticsearch is running on all nodes for upgrade to continue.

Step 2

Open the installer.properties file and update the following properties:

INSTALLATION_TYPE=UPGRADE
USE_EXISTING_DB=TRUE

Step 3

Go to the directory where you downloaded the Cisco DCNM software and run the appropriate installer by using the following command:

dcnm-release.exe -i silent -f <path_of_installer.properties>

If the Elasticsearch is not compatible for upgrade, the upgrade stops. An error message is generated in the error.properties file. You must reindex the PMDB data and begin to upgrade.

Note


If the Elasticsearch is not compatible for upgrade, you must reindex the performance manager data before upgrading to Release 11.5(1). If you choose to conserve the Performance Manager data when you upgrade to Release 11.5(1), we recommend that you contact Cisco TAC for further assistance.

If the Elasticsearch upgrade is compatible, or if you’ve completed the reindexing the Elasticsearch, the process continues.


What to do next

The Cisco DCNM Release 11.5(1) services will start after the upgrade is complete. You can check the status of the upgrade in the Task Manager process.

The message to reindex PMDB is generated in the dcnm_installer.log file.


Note


Upgrade process will not reindex PMDB data. You must perform this task manually. If you need the PMDB data from the previous version on Release 11.5(1), you must reindex the data manually. For instructions to reindex PMDB data manually, see Reindexing PMDB post upgrade to DCNM SAN Release 11.5(1).

The following message is included in the dcnm_installer.log file.

Elasticsearch(ES) indices for historical Performance Monitoring (PM) 
data need to be reindexed manually. 
Check DCNM installation and upgrade guide for more details.

Reindexing PMDB post upgrade to DCNM SAN Release 11.5(1)

If the Elasticsearch is not compatible for upgrade, you must reindex the performance manager data before upgrading to Release 11.5(1). To reindex the performance manager data, perform the following tasks:

If the existing Elasticsearch database is more than 250GB, Cisco DCNM Server requires more than 500GB HDD space to complete reindexing.

Before you begin

After you upgrade DCNM Release 11.2(1) or 11.3(1) to Release 11.5(1), you must delete the old PM database index.

If you choose to conserve the Performance Manager data when you upgrade to Release 11.5(1), we recommend that you contact Cisco TAC for further assistance.

Procedure


Step 1

Navigate to the esmapping directory, and locate the following scripts:

For DCNM on Windows:

  • ReindexPMDBCurl.bat

  • DeletePMDBIndexCurl.bat

Note


Windows installation may need curl utility. Please install curl utility. A zip file is provided as curl-win64.zip in the /esmapping directory.

For DCNM on Linux:

  • ReindexPMDBCurl.sh

  • DeletePMDBIndexCurl.sh

If you choose to conserve the Performance Manager data when you upgrade to Release 11.5(1), we recommend that you contact Cisco TAC for further assistance.

Step 2

Run ReindexPMDBCurl.bat script for DCNM on Windows, or ReindexPMDBCurl.sh script for DCNM on Linux.

Ensure that you don’t see any errors while running the script. Collect the output from the script to a file and verify is all the files are reindexed.

PmdbReindex.log file is generated for PMDB reindexing script.


Upgrading to Cisco SAN on OVA/ISO

From Release 11.3(1), you can install Cisco DCNM SAN on OVA\ISO. However, you cannot migrate the older release DCNM to Release 11.3(1). Instead, perform a fresh install of Cisco DCNM for SAN on OVA or ISO, and import the Performance Manager data from the older version.


Note


Before you start to upgrade, close all instances of DCNM SAN client, both SAN Client and Device Manager running on the server.


For instructions, see Inline Upgrade for DCNM Virtual Appliance in Standalone Mode section.

PM Data Migration

There is no upgrade path to DCNM SAN for OVA/ISO. However, fresh installation of Cisco DCNM 11.3(1) allows you to migrate the Performance Manager data from the following releases:

Use the following upgrade paths to upgrade to Cisco DCNM Release 11.5(1).

  • 11.4(1) to 11.5(1) using Inline Upgrade

  • 11.3(1) to 11.5(1) using Inline Upgrade

  • 11.3(1) to 11.4(1) using Inline Upgrade

  • 11.2(1) SAN to 11.3(1) SAN OVA/ISO

  • 11.1(1) SAN to 11.3(1) SAN OVA/ISO

  • 10.4(2) SAN OVA to 11.3(1) SAN OVA/ISO

If you choose to conserve the Performance Manager data when you upgrade to Release 11.5(1), we recommend that you contact Cisco TAC for further assistance.


Note


Ensure that you stop Performance Manager on Cisco DCNM 11.3(1) before migrating the performance manager data. You must start performance manager data collection after the upgrade completes.


Note


The newly collected data in the Cisco DCNM 11.3(1) will be replaced with migrated Performance Manager collections data.


For OVA/ISO deployments, you must update the certificates after upgrading to Cisco DCNM Release 11.5(1), before launching the SAN Client or Device Manager. Use the appmgr afw update-cert-dcnm-client command to update the certificates.

SAN Insights data from older releases

SAN Insights data from older releases is too large and it is refreshed every two weeks. We recommend that you do not migrate the SAN Insight data to the fresh DCNM 11.3(1) OVA/ISO installation.

If you are using Performance Monitoring on the fabric(s), migrate the Performance Manager data using the procedure in this section. However, this procedure copies everything in the Elasticsearch database. Therefore, before using this procedure, remove the SAN Insights data for each of the switch that is streaming data to DCNM, using the following command:

<DCNM Install Location>\dcm\fm\bin\FMGeneric.bat com.cisco.dcbu.analytics.CleanupSanInsightES <switchname_in_lowercase> <switch_ip_address>

C:\Program Files\CiscoDCNM\dcm\fm\bin\FMGeneric.bat com.cisco.dcbu.analytics.CleanupSanInsightES mds9396t-174145 XXX.XX.XXX.XXX

The following sections provide instructions to migrate PM data to the newly installed Cisco DCNM 11.3(1) appliance.

Inline Upgrade for DCNM Virtual Appliance in Standalone Mode

Inline upgrade allows you to upgrade DCNM by imposing the new DCNM version to the existing DCNM. After the inline upgrade, ensure that you clear your browser cache before launching the DCNM application.

Perform the following task to upgrade the DCNM virtual appliance in standalone mode.


Note


Ensure that you have closed all instances of DCNM SAN client and Device Manager running on the server.

Procedure


Step 1

Log on to the Cisco DCNM appliance console.

Caution


If the system requirements do not meet the minimum resource requirements, every time you log on to DCNM via the console or SSH, SYSTEM RESOURCE ERROR is displayed. Modify the system requirements logon to DCNM via Console/SSH.

  • For OVA Installation: On the OVF template deployed for the host, right click and select Settings > Launch Web Console.

  • For ISO Installation: Select the KVM console or UCS (Bare Metal) console.

Caution

 
Do not perform an Inline Upgrade from an SSH Session. The session may timeout and result in an incomplete upgrade.

OR

Run the following command to create a screen session.

dcnm# screen

This creates a session which allows you to execute the commands. The commands continue to run even when the window is not visible or if you get disconnected.

Step 2

Take a backup of the application data using the appmgr backup command.

Note


Do not perform this step is you have configured SAN Insights feature.

dcnm# appmgr backup

Copy the backup file to a safe location outside the DCNM server.

Step 3

Log on to the /root/ directory, by using the su command.

dcnm# su
Enter password: <<enter-password>>
[root@dcnm]#

Note


Ensure that you have access to the /root/ folder before you mount the ISO to the directory.

Step 4

Unzip the dcnm-va.11.5.1.iso.zip file and upload the DCNM 11.5(1) ISO file to the /root/ folder in the DCNM setup that you want to upgrade.

Step 5

Create folder that is named iso using the mkdir /mnt/iso command.

[root@dcnm]# mkdir /mnt/iso

Step 6

Mount the DCNM 11.5(1) ISO file on the standalone setup in the /mnt/iso folder.

mount -o loop <DCNM 11.5(1) image> /mnt/iso
[root@dcnm]# mount -o loop dcnm-va.11.5.1.iso /mnt/iso

Step 7

Navigate to /mnt/iso/packaged-files/scripts/ and run the ./inline-upgrade.sh script.

[root@dcnm]# cd /mnt/iso/packaged-files/scripts/
dcnm# ./inline-upgrade.sh
Do you want to continue and perform the inline upgrade to 11.5(1)? [y/n]: y

Note


The prompt to enter a new sysadmin password appears while you’re upgrading from Cisco DCNM Release 11.2(1) only.

Step 8

Provide the new sysadmin user password at the prompt:

Note


The prompt to enter a new sysadmin password appears while you’re upgrading from Cisco DCNM Release 11.2(1) only.

Enter the password for the new sysadmin user: <<sysadmin_password>>
Enter it again for verification: <<sysadmin_password>>

After the upgrade is complete, the appliance reboots. After reboot, the SSH \root access is disabled by default. Use sysadmin user.

As the Elasticsearch versions in earlier releases is not compatible with the Elasticsearch supported with 11.5(1), you must reindex the Elasticsearch data after upgrading to Release 11.5(1).

The following message is generated:

*********************************************************************
WARNING: Elasticsearch indices for historical Performance Monitoring (PM)
data need to be reindexed manually.
Check DCNM installation and upgrade guide for more details.
*********************************************************************

A confirmation message appears. Enter y to continue to upgrade.

The system reboots after upgrade.

Step 9

Ensure that the DCNM application is functional, by using the appmgr status all command.

[root@dcnm]# appmgr status all

Step 10

To verify that you have successfully installed the Cisco DCNM Release 11.5(1), use the appmgr show version command.

[root@dcnm]# appmgr show version 

Cisco Data Center Network Manager
Version: 11.5(1)
Install mode: SAN Only
Standalone node. HA not enabled.

Step 11

Terminate the screen session, by using the exit command.

[root@dcnm]# exit

Step 12

Unmount the dcnm-va-patch.11.5.1.iso file from the DCNM setup.

Note


You must terminate the screen session before unmounting the .iso file.

[root@dcnm]# umount /mnt/iso

What to do next

Log on to the DCNM Web UI with appropriate credentials.


Note


In Release 11.3(1), the sysadmin and the root user's password are not identical. When you upgrade to 11.5(1), the sysadmin and root user passwords are preserved.

However, when you perform backup and restore on Cisco DCNM after upgrade, the sysadmin user inherits the password from the root user, and therefore both the users will have the same password. You can change the password for both the users after restore is complete.


Click Settings icon and choose About DCNM. You can view and verify the Installation type that you have deployed.

The old PM data is retained in Elasticsearch. Elasticsearch shows as reindex required on Cisco DCNM Web UI > Dashboard > Health and Administration > DCNM Server > Server Status.

If you choose to conserve the Performance Manager data when you upgrade to Release 11.5(1), we recommend that you contact Cisco TAC for further assistance.

If you choose to conserve the Performance Manager data, we recommend that you contact Cisco TAC for further assistance.

After upgrading the Cisco DCNM Server 11.3(1) with the SAN Insights data, some data on the DCNM Server 11.4(1) is reprocessed. This causes a lag in the current data that is displayed on a few SAN Insights pages on the Cisco DCNM Web UI.

PM Data Migration from 10.4(x) SAN OVA/ISO/Windows to the New DCNM 11.3(1) OVA/ISO

In Release 10.4(1) OVA or 10.4(2) OVA the performance manager uses RRD as database to store all raw data. Cisco DCNM offers an inline migration process to migrate RRD files to Elastic database.

To migrate 10.4(1) or 10.4(2) OVA data to 11.3(1) OVA\ISO, perform the following steps:

Procedure


Step 1

Stop the DCNM 10.4(1) or 10.4(2) server.

  • For Windows – Navigate to C:\Program Files\Cisco Systems\dcm\dcnm\bin. Double-click on the StopLANSANServer.bat to stop the services.

  • For Linux – Logon to /root. Execute /root/Stop_DCNM_Servers command to stop services.

Step 2

Navigate to /usr/local/cisco/dcm/fm/pm/db where the RRD files are located.

Copy the RRD files to a safe location.

For Windows – Right-click on the RRD files folder and click Copy. Paste the contents to a safe directory.

For Linux – Execute the copy /usr/local/cisco/dcm/fm/pm/db/<<rrd_directory>> to copy all the RRD files to a safe directory.

Step 3

In the new installed DCNM 11.3(1) SAN OVA\ISO server, discover the same fabric.

Step 4

After fabric discovery, enable SAN Collections to begin Performance Manager collections.

Choose Cisco DCNM Web UI > Administration > DCNM Server > Server Status > Performance Collector. Verify the Status column.

Allow the DCNM server for 60 to 70 minutes to ensure that the Performance manager is collecting data from the Cisco DCNM Web UI.

Step 5

Provide root access to the DCNM Server by using appmgr root-access permit command.

Step 6

On the 11.3(1) DCNM Server, navigate to /usr/local/cisco/dcm/fm/pm/db/ directory.

Copy the RRD files from the older DCNM to this directory.

Step 7

Change the read and write permissions to all RRD files using the chmod ‐R 777 command.

Step 8

Choose Administration > DCNM Server > Server Status.

Identify the Performance Collector Service.

Step 9

Under the Actions column, click Stop Service icon to stop the performance collector service. Click Re(Start) Service icon to start the collections.

Based on the volume of RRD files, the migration can take longer duration. After data migration, all the migrated RRD files is copied to the db_backup location. You can view the historical data from the Web UI.


PM Data Migration from 11.1(1) and 11.2(1) Windows to fresh install of 11.3(1) OVA/ISO


Note


The data from Windows Federation can’t be migrated to Release 11.3(1) SAN OVA\ISO Deployment.

In the fresh install 11.3(1) OVA, discover the same fabric and enable performance manager. When you import the old data to 11.3(1), it replaces the data existing data on 11.3(1).

To migrate 11.1(1) or 11.2(1) DCNM Windows performance manager data to 11.3(1) SAN OVA\ISO deployment, perform the following steps:

Procedure


Step 1

Stop the elastic search service on the older DCNM version.

On the Web UI, choose Administration > DCNM Server > Server Status. Stop Performance Manager collections.

Step 2

Take a backup of the Performance Manager collections directory files located at \\DCNM_Install_Directory\dcm\elasticsearch\data\.

Zip all the files and save files to a safe location.

Note

 
The zip file must have the root folder and nodes and all the subfolder with data.
[root@dcnm173 ~]# unzip -l nodes.zip
Archive:  nodes.zip
  Length      Date    Time    Name
---------  ---------- -----   ----
        0  10-15-2019 04:34   nodes/
        0  10-15-2019 04:34   nodes/0/
        0  10-15-2019 04:34   nodes/0/indices/
        0  10-15-2019 04:34   nodes/0/indices/5AJ72Xv0SXKfXaD9IDMbdw/
        0  10-15-2019 04:34   nodes/0/indices/5AJ72Xv0SXKfXaD9IDMbdw/0/
        0  10-15-2019 04:34   nodes/0/indices/5AJ72Xv0SXKfXaD9IDMbdw/0/index/
      615  10-15-2019 04:33   nodes/0/indices/5AJ72Xv0SXKfXaD9IDMbdw/0/index/segments_11
        0  10-10-2019 00:28   nodes/0/indices/5AJ72Xv0SXKfXaD9IDMbdw/0/index/write.lock
       82  10-15-2019 03:58   nodes/0/indices/5AJ72Xv0SXKfXaD9IDMbdw/0/index/_1ay.dii
       .
       ..
       ...
     2037  10-10-2019 00:28   nodes/0/indices/CMzGQjhtS-W3xyPoT1ktnw/_state/state-13.st
        0  10-10-2019 00:12   nodes/0/node.lock
        0  10-15-2019 04:34   nodes/0/_state/
     4668  10-10-2019 00:24   nodes/0/_state/global-7.st
       71  10-10-2019 00:12   nodes/0/_state/node-0.st
---------                     -------
129921151                     487 files
[root@dcnm173 ~]# 

Step 3

On 11.3(1) DCNM server, provide root access to the DCNM Server, by using appmgr root-access permit command.

Step 4

Copy the zip file to the freshly installed DCNM 11.3(1) SAN OVA\ISO server.

Note

 
You can copy the zip file contents to any safe directory.

Step 5

Stop the Performance Manager on the DCNM 11.3(1) Windows SAN appliance.

Step 6

Migrate the Performance Manager data using the appmgr migrate-pm-es-data command.

Note

 
After the old version DCNM Performance Manager data is migrated, the original 11.3(1) Performance Manager data is erased.
dcnm11-3-1# appmgr migrate-pm-es-data nodes.zip
stop elasticsearch
Stopping AFW Applications...
Stopping AFW Server Processes
Stopping AFW Agent Processes
Stopped Application Framework...
Archive:  nodes.zip
   creating: /var/afw/vols/data/elasticsearch_Cisco_afw/usr/share/elasticsearch/data/nodes/
   creating: /var/afw/vols/data/elasticsearch_Cisco_afw/usr/share/elasticsearch/data/nodes/0/
   creating: /var/afw/vols/data/elasticsearch_Cisco_afw/usr/share/elasticsearch/data/nodes/0/indices/
   creating: /var/afw/vols/data/elasticsearch_Cisco_afw/usr/share/elasticsearch/data/nodes/0/indices/5AJ72Xv0SXKfXaD9IDMbdw/
   creating: /var/afw/vols/data/elasticsearch_Cisco_afw/usr/share/elasticsearch/data/nodes/0/indices/5AJ72Xv0SXKfXaD9IDMbdw/0/
   creating: /var/afw/vols/data/elasticsearch_Cisco_afw/usr/share/elasticsearch/data/nodes/0/indices/5AJ72Xv0SXKfXaD9IDMbdw/0/index/
  inflating: /var/afw/vols/data/elasticsearch_Cisco_afw/usr/share/elasticsearch/data/nodes/0/indices/5AJ72Xv0SXKfXaD9IDMbdw/0/index/segments_11
 extracting: /var/afw/vols/data/elasticsearch_Cisco_afw/usr/share/elasticsearch/data/nodes/0/indices/5AJ72Xv0SXKfXaD9IDMbdw/0/index/write.lock
 extracting: /var/afw/vols/data/elasticsearch_Cisco_afw/usr/share/elasticsearch/data/nodes/0/indices/5AJ72Xv0SXKfXaD9IDMbdw/0/index/_1ay.dii
  inflating: /var/afw/vols/data/elasticsearch_Cisco_afw/usr/share/elasticsearch/data/nodes/0/indices/5AJ72Xv0SXKfXaD9IDMbdw/0/index/_1ay.dim
           .
           ..
           ...
    ending: inflating: /var/afw/vols/data/elasticsearch_Cisco_afw/usr/share/elasticsearch/data/nodes/0/indices/CMzGQjhtS-W3xyPoT1ktnw/_state/state-13.st
extracting: /var/afw/vols/data/elasticsearch_Cisco_afw/usr/share/elasticsearch/data/nodes/0/node.lock
  creating: /var/afw/vols/data/elasticsearch_Cisco_afw/usr/share/elasticsearch/data/nodes/0/_state/
 inflating: /var/afw/vols/data/elasticsearch_Cisco_afw/usr/share/elasticsearch/data/nodes/0/_state/global-7.st
extracting: /var/afw/vols/data/elasticsearch_Cisco_afw/usr/share/elasticsearch/data/nodes/0/_state/node-0.st
Started AFW Server Processes
Started AFW Agent Processes
dcnm11-3-1# 

Wait for approximately 30 minutes for the data to be migrated.

Step 7

Verify the status of elastic search by using the docker ps command.

dcnm11-3-1# docker ps
CONTAINER ID        IMAGE                                     COMMAND                  CREATED             STATUS              PORTS                  NAMES
8dfa2935cb0d        127.0.0.1:5000/afwapiproxy:2.0            "/bin/entry.sh"          20 seconds ago      Up 17 seconds       0.0.0.0:443->443/tcp   AfwApiProxy
6839a3d88cb4        127.0.0.1:5001/saninsightpost:1.0         "java -Xms1G -Xmx7..."   20 seconds ago      Up 17 seconds                              saninsightpost_Cisco_afw.9hfm7g3g0l6y7as0f8e4e288m.qk3gw8a4wm1g7pg8k4rsx4qme
6bbdff07fc8a        127.0.0.1:5001/epltwo:2.0                 "/bin/sh -c /usr/l..."   22 seconds ago      Up 19 seconds                              epltwo_Cisco_afw.9hfm7g3g0l6y7as0f8e4e288m.0newc0fzp1frqt08i8xjjdx5h
896336c7689a        127.0.0.1:5001/saninsightcol:1.0          "/bin/pipeline.sh "      23 seconds ago      Up 20 seconds                              saninsightcol_Cisco_afw.9hfm7g3g0l6y7as0f8e4e288m.vzqkxe8owuf9y18icawns3abw
9bc609916781        127.0.0.1:5001/dcnmelastic:5.6.7_11.2.2   "/docker-entrypoin..."   25 seconds ago      Up 22 seconds       9200/tcp, 9300/tcp     elasticsearch_Cisco_afw.9hfm7g3g0l6y7as0f8e4e288m.owdosoye1rco3rr4790429zky
ee78966aef89        127.0.0.1:5000/registry:2                 "/sbin/entry.sh"         26 seconds ago      Up 23 seconds                              registry_cisco_afw.1.xwsd91ty6oajfp7ukfvw2iutd
cc635ab41796        registry:2                                "/sbin/entry.sh"         42 seconds ago      Up 40 seconds                              AfwAppRegistry

Step 8

Restart the DCNM Server by using the appmgr restart all command.

Wait for 10 minutes for DCNM to stabilize and connect to the new performance manager data.


PM Data Migration from 11.1(1) and 11.2(1) Linux to fresh install of 11.3(1) OVA/ISO


Note


The data from Linux Federation can’t be migrated to Release 11.3(1) SAN OVA\ISO Deployment.

In the fresh install 11.3(1) OVA, discover the same fabric and enable performance manager. When you import the old data to 11.3(1), it replaces the data existing data on 11.3(1).

To migrate 11.1(1) or 11.2(1) DCNM Linux performance manager data to 11.3(1) SAN OVA\ISO deployment, perform the following steps:

Procedure


Step 1

Stop the elastic search service on the older DCNM version.

On the Web UI, choose Administration > DCNM Server > Server Status. Stop Performance Manager collections.

Step 2

Take a backup of the Performance Manager collections directory files located at \\DCNM_Install_Directory\dcm\elasticsearch\data\.

Zip all the files and save files to a safe location.

Note

 
The zip file must have the root folder and nodes and all the subfolder with data.
[root@dcnm]# unzip -l nodes.zip
Archive:  nodes.zip
  Length      Date    Time    Name
---------  ---------- -----   ----
        0  10-15-2019 04:34   nodes/
        0  10-15-2019 04:34   nodes/0/
        0  10-15-2019 04:34   nodes/0/indices/
        0  10-15-2019 04:34   nodes/0/indices/5AJ72Xv0SXKfXaD9IDMbdw/
        0  10-15-2019 04:34   nodes/0/indices/5AJ72Xv0SXKfXaD9IDMbdw/0/
        0  10-15-2019 04:34   nodes/0/indices/5AJ72Xv0SXKfXaD9IDMbdw/0/index/
      615  10-15-2019 04:33   nodes/0/indices/5AJ72Xv0SXKfXaD9IDMbdw/0/index/segments_11
        0  10-10-2019 00:28   nodes/0/indices/5AJ72Xv0SXKfXaD9IDMbdw/0/index/write.lock
       82  10-15-2019 03:58   nodes/0/indices/5AJ72Xv0SXKfXaD9IDMbdw/0/index/_1ay.dii
       .
       ..
       ...
     2037  10-10-2019 00:28   nodes/0/indices/CMzGQjhtS-W3xyPoT1ktnw/_state/state-13.st
        0  10-10-2019 00:12   nodes/0/node.lock
        0  10-15-2019 04:34   nodes/0/_state/
     4668  10-10-2019 00:24   nodes/0/_state/global-7.st
       71  10-10-2019 00:12   nodes/0/_state/node-0.st
---------                     -------
129921151                     487 files
[root@dcnm]# 

Step 3

Zip all the files and save files to a safe location, using the zip -r myPMData.zip ./ command.

Note

 
The zip file must have the root folder and nodes and all the subfolder with data.
[root@dcnm]# zip -r nodes.zip nodes
  adding: nodes/ (stored 0%)
  adding: nodes/0/ (stored 0%)
  adding: nodes/0/indices/ (stored 0%)
  adding: nodes/0/indices/CMzGQjhtS-W3xyPoT1ktnw/ (stored 0%)
  adding: nodes/0/indices/CMzGQjhtS-W3xyPoT1ktnw/3/ (stored 0%)
  adding: nodes/0/indices/CMzGQjhtS-W3xyPoT1ktnw/3/index/ (stored 0%)
  adding: nodes/0/indices/CMzGQjhtS-W3xyPoT1ktnw/3/index/_114o.fdx (deflated 2%)
  adding: nodes/0/indices/CMzGQjhtS-W3xyPoT1ktnw/3/index/_1bsm.fnm (deflated 87%)
  adding: nodes/0/indices/CMzGQjhtS-W3xyPoT1ktnw/3/index/_1cs1.si (deflated 23%)
  adding: nodes/0/indices/CMzGQjhtS-W3xyPoT1ktnw/3/index/_1bsm.si (deflated 38%)
  .
  ..
  ...
  adding: nodes/0/indices/5AJ72Xv0SXKfXaD9IDMbdw/2/_state/ (stored 0%)
  adding: nodes/0/indices/5AJ72Xv0SXKfXaD9IDMbdw/2/_state/state-0.st (deflated 5%)
  adding: nodes/0/indices/5AJ72Xv0SXKfXaD9IDMbdw/_state/ (stored 0%)
  adding: nodes/0/indices/5AJ72Xv0SXKfXaD9IDMbdw/_state/state-3.st (deflated 9%)
  adding: nodes/0/node.lock (stored 0%)
  adding: nodes/0/_state/ (stored 0%)
  adding: nodes/0/_state/global-7.st (deflated 72%)
  adding: nodes/0/_state/node-0.st (deflated 7%)
[root@dcnm]# 

Step 4

On 11.3(1) DCNM server, provide root access to the DCNM Server, by using appmgr root-access permit command.

Step 5

Copy the zip file to the freshly installed DCNM 11.3(1) SAN OVA\ISO server.

Note

 
You can copy the zip file contents to any safe directory.

Step 6

Stop the Performance Manager on the DCNM 11.3(1) Linux SAN appliance.

Step 7

Migrate the Performance Manager data using the appmgr migrate-pm-es-data command.

Note

 
After the old version DCNM Performance Manager data is migrated, the original 11.3(1) Performance Manager data is erased.
dcnm11-3-1# appmgr migrate-pm-es-data nodes.zip
stop elasticsearch
Stopping AFW Applications...
Stopping AFW Server Processes
Stopping AFW Agent Processes
Stopped Application Framework...
Archive:  nodes.zip
   creating: /var/afw/vols/data/elasticsearch_Cisco_afw/usr/share/elasticsearch/data/nodes/
   creating: /var/afw/vols/data/elasticsearch_Cisco_afw/usr/share/elasticsearch/data/nodes/0/
   creating: /var/afw/vols/data/elasticsearch_Cisco_afw/usr/share/elasticsearch/data/nodes/0/indices/
   creating: /var/afw/vols/data/elasticsearch_Cisco_afw/usr/share/elasticsearch/data/nodes/0/indices/5AJ72Xv0SXKfXaD9IDMbdw/
   creating: /var/afw/vols/data/elasticsearch_Cisco_afw/usr/share/elasticsearch/data/nodes/0/indices/5AJ72Xv0SXKfXaD9IDMbdw/0/
   creating: /var/afw/vols/data/elasticsearch_Cisco_afw/usr/share/elasticsearch/data/nodes/0/indices/5AJ72Xv0SXKfXaD9IDMbdw/0/index/
  inflating: /var/afw/vols/data/elasticsearch_Cisco_afw/usr/share/elasticsearch/data/nodes/0/indices/5AJ72Xv0SXKfXaD9IDMbdw/0/index/segments_11
 extracting: /var/afw/vols/data/elasticsearch_Cisco_afw/usr/share/elasticsearch/data/nodes/0/indices/5AJ72Xv0SXKfXaD9IDMbdw/0/index/write.lock
 extracting: /var/afw/vols/data/elasticsearch_Cisco_afw/usr/share/elasticsearch/data/nodes/0/indices/5AJ72Xv0SXKfXaD9IDMbdw/0/index/_1ay.dii
  inflating: /var/afw/vols/data/elasticsearch_Cisco_afw/usr/share/elasticsearch/data/nodes/0/indices/5AJ72Xv0SXKfXaD9IDMbdw/0/index/_1ay.dim
           .
           ..
           ...
    ending: inflating: /var/afw/vols/data/elasticsearch_Cisco_afw/usr/share/elasticsearch/data/nodes/0/indices/CMzGQjhtS-W3xyPoT1ktnw/_state/state-13.st
extracting: /var/afw/vols/data/elasticsearch_Cisco_afw/usr/share/elasticsearch/data/nodes/0/node.lock
  creating: /var/afw/vols/data/elasticsearch_Cisco_afw/usr/share/elasticsearch/data/nodes/0/_state/
 inflating: /var/afw/vols/data/elasticsearch_Cisco_afw/usr/share/elasticsearch/data/nodes/0/_state/global-7.st
extracting: /var/afw/vols/data/elasticsearch_Cisco_afw/usr/share/elasticsearch/data/nodes/0/_state/node-0.st
Started AFW Server Processes
Started AFW Agent Processes
dcnm11-3-1# 

Wait for approximately 30 minutes for the data to be migrated.

Step 8

Verify the status of elastic search by using the docker ps command.

dcnm11-3-1# docker ps
CONTAINER ID        IMAGE                                     COMMAND                  CREATED             STATUS              PORTS                  NAMES
8dfa2935cb0d        127.0.0.1:5000/afwapiproxy:2.0            "/bin/entry.sh"          20 seconds ago      Up 17 seconds       0.0.0.0:443->443/tcp   AfwApiProxy
6839a3d88cb4        127.0.0.1:5001/saninsightpost:1.0         "java -Xms1G -Xmx7..."   20 seconds ago      Up 17 seconds                              saninsightpost_Cisco_afw.9hfm7g3g0l6y7as0f8e4e288m.qk3gw8a4wm1g7pg8k4rsx4qme
6bbdff07fc8a        127.0.0.1:5001/epltwo:2.0                 "/bin/sh -c /usr/l..."   22 seconds ago      Up 19 seconds                              epltwo_Cisco_afw.9hfm7g3g0l6y7as0f8e4e288m.0newc0fzp1frqt08i8xjjdx5h
896336c7689a        127.0.0.1:5001/saninsightcol:1.0          "/bin/pipeline.sh "      23 seconds ago      Up 20 seconds                              saninsightcol_Cisco_afw.9hfm7g3g0l6y7as0f8e4e288m.vzqkxe8owuf9y18icawns3abw
9bc609916781        127.0.0.1:5001/dcnmelastic:5.6.7_11.2.2   "/docker-entrypoin..."   25 seconds ago      Up 22 seconds       9200/tcp, 9300/tcp     elasticsearch_Cisco_afw.9hfm7g3g0l6y7as0f8e4e288m.owdosoye1rco3rr4790429zky
ee78966aef89        127.0.0.1:5000/registry:2                 "/sbin/entry.sh"         26 seconds ago      Up 23 seconds                              registry_cisco_afw.1.xwsd91ty6oajfp7ukfvw2iutd
cc635ab41796        registry:2                                "/sbin/entry.sh"         42 seconds ago      Up 40 seconds                              AfwAppRegistry

Step 9

Restart the DCNM Server by using the appmgr restart all command.

Wait for 10 minutes for DCNM to stabilize and connect to the new performance manager data.


Dropping Performance Manager Data


Note


If you choose to conserve the Performance Manager data when you upgrade to Release 11.5(1), we recommend that you contact Cisco TAC for further assistance.


To drop the Performance Manager (PM) data, perform the following steps:

Before you begin

  • Ensure that the DCNM appliance is operational. (for standalone upgrade)

  • If you have a Federation setup, ensure that all the nodes in the DCNM Federation setup are operational. (for Federation setup)

Procedure


Step 1

Launch the SSH session and run the following command to view the PMDB indices.

Identify the PMDB indices in the performance manager database.

For example:

dcnm-root-11-4# curl http://127.0.0.1:33500/_cat/indices?pretty | grep pmdb

  % Total    % Received % Xferd  Average Speed    Time    Time     Time  Current
                                 Dload   Upload   Total   Spent    Left  Speed
100  2448  100  2448    0     0   4523      0 --:--:-- --:--:-- --:--:--  4524
green open pmdb_cpumemdata                       rb-CJf-NR0my8M3mO-7QkA 5 1  7286   0   1.4mb 760.2kb
green open pmdb_ethintfratedata                  P18gMKdPTkCODv0TomYAdw 5 1  9283   0   2.4mb   1.2mb

You will see indices prefixed with "pmdb_"

Step 2

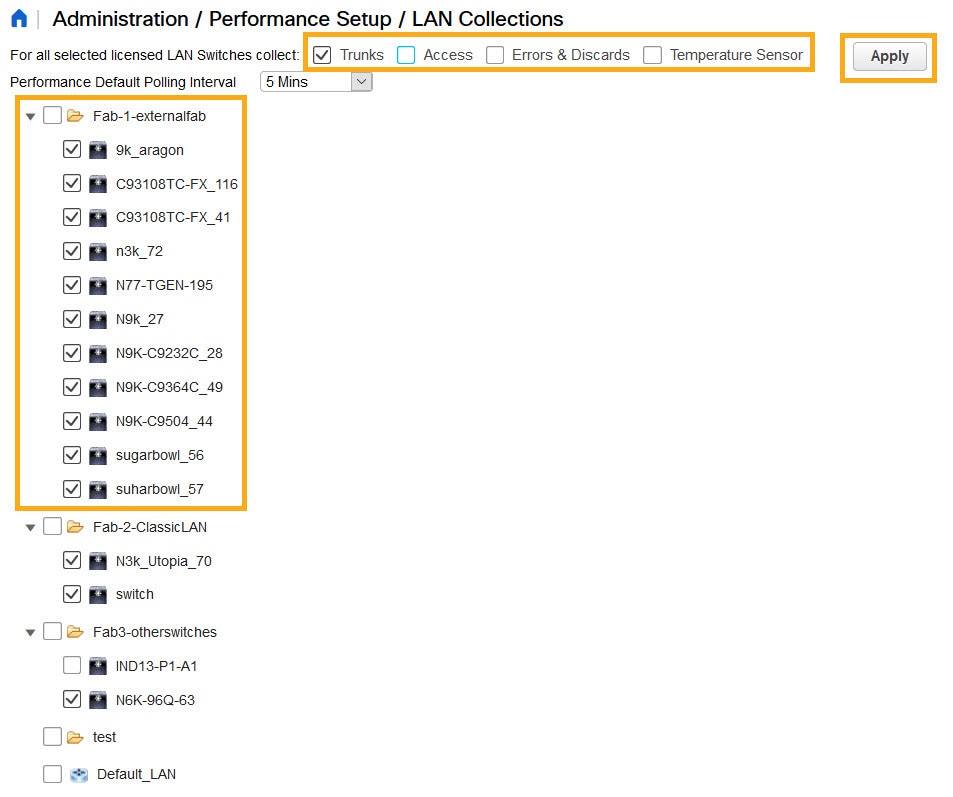
On the Cisco DCNM Web UI, choose Administration > Performance Setup > LAN Collections.

Uncheck all the check boxes and click Apply to disable all switches and collections.

Step 3

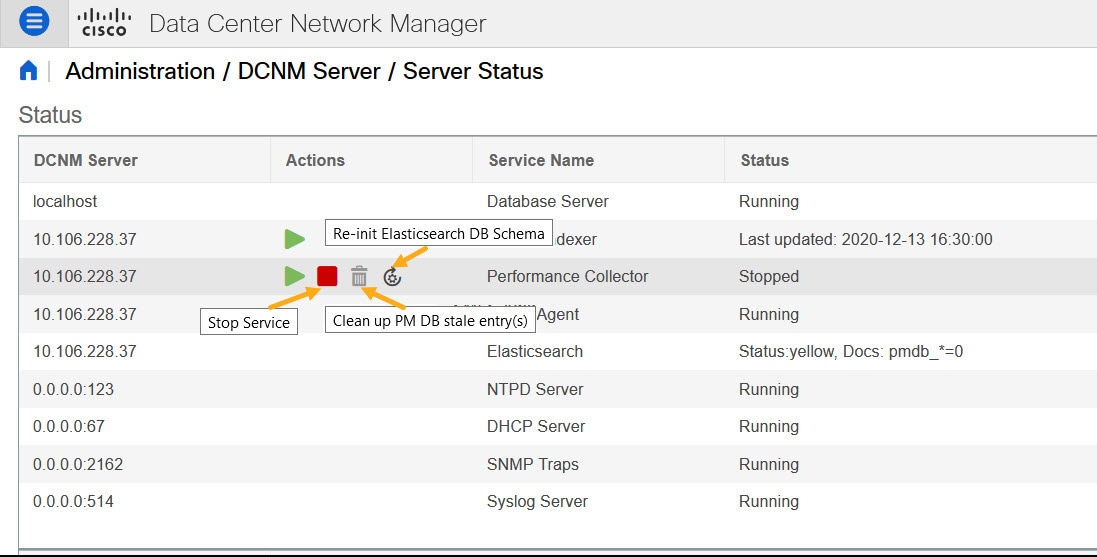
Choose Administration > DCNM Server > Server Status.

Step 4

Against the Performance Collector service, click the stop icon in the Actions column to stop the data collection.

Step 5

Click the delete icon to clean the Performance Manager database.

This action deletes the stale entries in the performance manager database.

Step 6

Click on the reinitialize icon to reindex the Elasticsearch database schema.

This operation cleans the performance manager data in the Elasticsearch database and restarts the performance manager. It may take a few minutes to complete.

Step 7

Click Continue.

The status of the Performance Collector service shows Stopped.

Step 8

Ensure that you’ve deleted all the PMDB entries using the following command:

  • For upgrading from Release 11.1(1)

    curl https://127.0.0.1:33500/_cat/indices?pretty | grep pmdb
  • For upgrading from Release 11.2(1)

    curl https://127.0.0.1:33500/_cat/indices?pretty | grep pmdb
  • For upgrading from Release 11.3(1)

    curl http://127.0.0.1:33500/_cat/indices?pretty | grep pmdb
  • For upgrading from Release 11.4(1)

    curl http://127.0.0.1:33500/_cat/indices?pretty | grep pmdb

For example:

dcnm-root-11-4# curl http://127.0.0.1:33500/_cat/indices?pretty | grep pmdb

  % Total    % Received % Xferd  Average  Speed   Time    Time     Time  Current
                                 Dload    Upload  Total   Spent    Left  Speed
100  2244  100  2244    0     0   3638      0 --:--:-- --:--:-- --:--:--  3636

Step 9

Proceed to upgrade the DCNM to Release 11.5(1).