Performing a System Upgrade, Downgrade or Recovery

Important Notes

Important Notes For Release 25.0(3)

Following are important notes for release 25.0(3) regarding the installation, upgrade or downgrade procedures for the Cisco Cloud Network Controller:

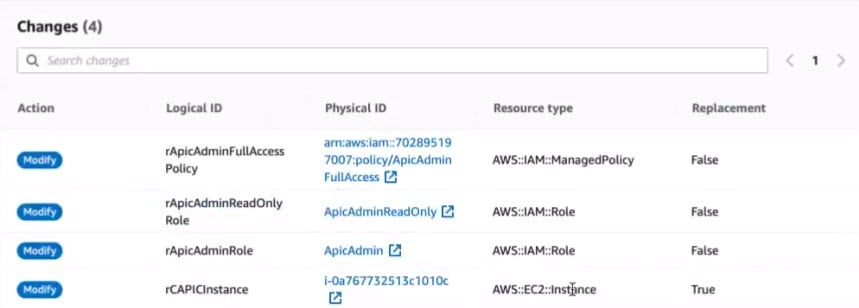
  • Because of the move from the Cisco Cloud Services Router 1000v to the Cisco Catalyst 8000V, you must add the necessary policy before upgrading from a release prior to 25.0(3) to release 25.0(3) or later:

    1. Go to the infra tenant in the AWS portal.

    2. Click IAM > Policies.

    3. In the Policies window, click the ApicAdminFullAccess policy.

      The Summary page for this policy is displayed.

    4. Click Edit Policy.

    5. Click the JSON tab.

    6. Copy the entry below and paste it into the policy:

      
      {
          "Effect": "Allow",
          "Action": "ssm:*",
          "Resource": "*"
      }
      
    7. Click Review Policy, then click Save Changes.

  • The Cisco Catalyst 8000V supports subscription-based licensing. Before upgrading from a release prior to 25.0(3) to release 25.0(3), you must first subscribe to one of the tier-based Cisco Catalyst 8000V licenses.

    Cisco Cloud Network Controller makes use of the “Cisco DNA Advantage” subscription. For features supported by the “Cisco DNA Advantage” subscription, see Cisco DNA SoftwareSD-WAN and Routing Matrices.

  • When you upgrade your Cisco Cloud Network Controller to release 25.0(3), you should then upgrade the CCRs as soon after the Cisco Cloud Network Controller upgrade as possible. For those instructions, see:

    Following are examples of how you would go through these upgrade processes:

    • Single-Site Upgrade: You normally would not need to have CCRs for a single-site AWS deployment. However, if you do have CCRs deployed in this situation, once the Cisco Cloud Network Controller has completed the upgrade to release 25.0(3) and reached the ready state, you must then start the upgrade of the older CCRs (the Cisco Cloud Services Router 1000v) to the newer CCRs (the Cisco Catalyst 8000V) before making any configuration changes.

    • Multi-Cloud/Hybrid-Cloud Upgrade: As an example of this upgrade process, assume that you have the following setup:

      • Site 1: AWS

      • Site 2: Azure

      • Site 3: On-premises site

      You would then upgrade these sites the following way:

      1. Upgrade Nexus Dashboard Orchestrator to the 3.7(1) release.

      2. Upgrade site 1 (AWS site) to the Cisco Cloud Network Controller release 25.0(3) using the procedures in Upgrading the Software.

        Wait until this upgrade has reached the steady state before proceeding to the next step.

      3. Upgrade the CCRs on site 1 (AWS site) from the older CCRs (the Cisco Cloud Services Router 1000v) to the newer CCRs (the Cisco Catalyst 8000V) using the procedures in Triggering an Upgrade of the CCRs.

        Wait until the CCRs are fully upgraded to the newer Cisco Catalyst 8000Vs before proceeding to the next step.

      4. Once the CCRs on site 1 (AWS site) are fully upgraded, repeat these steps for site 2 (Azure site), where you will first upgrade the Cisco Cloud Network Controller software to release 25.0(3). After that upgrade has reached the steady state, then you will upgrade the CCRs on site 2 to the newer Cisco Catalyst 8000Vs.

  • Prior to Cisco Cloud Network Controller release 25.0(3), the older Cisco Cloud Services Router 1000v routers were configured with number-based throughput, as described in Requirements for the AWS Public Cloud. Since the Cisco Catalyst 8000V routers will only support tier-based throughput options, during upgrades to release 25.0(3), the Cisco Cloud Network Controller will map the throughput values from the number-based throughput used by the older Cisco Cloud Services Router 1000v routers to the tier-based throughput used by the newer Cisco Catalyst 8000V routers.

    The following table shows the mapping of throughput from the older Cisco Cloud Services Router 1000v routers to the newer Cisco Catalyst 8000V routers during an upgrade:

    Throughput on Cisco Cloud Services Router 1000v

    Throughput on Cisco Catalyst 8000V

    10M

    T0 (up to 15M throughput)

    50M

    T1 (up to 100M throughput)

    100M

    T1 (up to 100M throughput)

    250M

    T2 (up to 1G throughput)

    500M

    T2 (up to 1G throughput)

    1G

    T2 (up to 1G throughput)

    2.5G

    T3 (up to 10G throughput)

    5G

    T3 (up to 10G throughput)

    7.5G

    T3 (up to 10G throughput)

    10G

    T3 (up to 10G throughput)

    For the Cisco Catalyst 8000V routers, end user should choose IOS XE Autonomous boot up mode. The exact license PID for the routers supported in Cisco Cloud APIC is IOSXE-AUTO-MODE-PF. The requirements for the license are:

    • License Tier : DNA Advantage

    • Duration : 3Y, 5Y or 7Y

    • Throughput : 25M, 200M, 1G, 10G

    • Deployment mode : Autonomous

    Below are examples for PID supported in Cisco Cloud APIC for the CCR routers. End users need to use a similar PID by choosing the tier and the number of years for the license.

    Throughput on Cisco Cloud Services Router 8000v

    PID License

    25M (T0)

    DNA-P-T0-A-3Y

    200M (T1)

    DNA-P-T1-A-3Y

    1G (T2)

    DNA-P-T2-A-3Y

    10G (T3)

    DNA-P-T3-A-3Y

    In the above table, P stands for On-prem, T is the tier, A stands for Advantage, and Y stands for year.

    When migrating from the older Cisco Cloud Services Router 1000v routers to the newer Cisco Catalyst 8000V routers during an upgrade, the Cisco Cloud Network Controller will migrate the comparable bandwidth as described above. When these Cisco Catalyst 8000V routers come up, they will try to register for that bandwidth to the smart licensing account. If the smart licensing server does not have these licenses, then the Cisco Catalyst 8000V will fall back to the default bandwidth and will fail to service the existing workload traffic. So you must procure and provision the required Cisco Catalyst 8000V licenses in your smart account before migrating from the older Cisco Cloud Services Router 1000v routers to the newer Cisco Catalyst 8000V routers during an upgrade.

  • Similarly, when downgrading from release 25.0(3) to an earlier release, the Cisco Cloud Network Controller will map the throughput values from the tier-based throughput used by the newer Cisco Catalyst 8000V routers to the number-based throughput used by the older Cisco Cloud Services Router 1000v routers.

    The following table shows the mapping of throughput from the newer Cisco Catalyst 8000V routers to the number-based throughput used by the older Cisco Cloud Services Router 1000v routers during a downgrade:

    Throughput on Cisco Catalyst 8000V

    Throughput on Cisco Cloud Services Router 1000v

    T0 (up to 15M throughput)

    10M

    T1 (up to 100M throughput)

    100M

    T2 (up to 1G throughput)

    1G

    T3 (up to 10G throughput)

    10G


    Note


    Do not make any configuration changes when the Cisco Cloud Network Controller and the CCRs are in incompatible mode. When upgrading to release 25.0(3), verify that both the Cisco Cloud Network Controller and the CCRs are upgraded to that latest release before making any configuration changes.


General Important Notes

Following are general important notes:

  • Cisco Cloud Network Controller supports policy-based upgrades for the following upgrade paths:

    • Release 5.2(1) to 25.0(5)

    • Release 25.0(1) to 25.0(5)

    • Release 25.0(2) to 25.0(5)

    • Release 25.0(3) to 25.0(5)

    • Release 25.0(4) to 25.0(5)

  • For Cisco Cloud Network Controller services compatibility information, see the Nexus Dashboard and Services Compatibilty Matrix.

  • When you downgrade from release 5.0(x) to a previous release, as the CCRs downgrade to a lower release, you could see some of the tunnels in a “down” state in the CCRs. This could occur due to stale VPN resources in the AWS accounts that did not get cleaned up.

    To correct this issue, manually clean up the stale VPN connections.

  • As noted in Requirements for the AWS Public Cloud, the supported instance type for the Cisco Cloud Network Controller deployment has changed for release 5.0(x) or later:

    • For releases prior to release 5.0(x), Cisco Cloud Network Controller is deployed using the m4.2xlarge instance.

    • For release 5.0(x) and later, Cisco Cloud Network Controller is deployed using the m5.2xlarge instance.

    When upgrading from a 4.2(x) release to release 5.0(x) or later, policy-based upgrades are not supported because you cannot change the instance type through a policy-based upgrade; instead, for these upgrades, you must upgrade using a migration procedure, as provided in Migration-Based Upgrade.

  • There is an issue with the upgrade process where an upgrade from release 5.2(1g) to any later release will fail.

    To work around this issue, enable the Ignore Compatibility Check option:

    1. Follow the normal upgrade instructions provided in Upgrading the Software Using the Policy-Based Upgrade Process until you get to the Ignore Compatibility Check step in the Schedule Upgrade window.

    2. Enter a check mark in the box next to the Ignore Compatibility Check field to enable the Ignore Compatibility Check option.

      Enabling the Ignore Compatibility Check option allows this specific upgrade to proceed normally.

    3. Complete the upgrade to the post-5.2(1g) release.

    4. Once you have completed the upgrade to the post-5.2(1g) release, return to the Schedule Upgrade window and remove the check mark in the box next to the Ignore Compatibility Check field.

      This disables the Ignore Compatibility Check option, which is the default setting for this field.

  • Due to the issue described in the previous bullet, if you are upgrading from a release prior to release 5.2(1) to a 5.2(1) release, we recommend that you upgrade directly to release 5.2(1h) and not release 5.2(1g).

Upgrading the Software

The following sections provide information on upgrading the Cisco Cloud Network Controller software using either a policy-based upgrade or a migration-based upgrade.


Note


If the policy-based upgrade does not work for some reason, you can upgrade using the migration-based process as described in Migration-Based Upgrade.


Upgrading the CCRs

Regardless of the method that you use to upgrade your Cisco Cloud Network Controller software, the CCRs must also be upgraded whenever the Cisco Cloud Network Controller software is upgraded.

  • Prior to release 5.2(1), the CCRs are upgraded automatically whenever you trigger an upgrade for the Cisco Cloud Network Controller.

  • Beginning with release 5.2(1), you can trigger upgrades to the CCRs and monitor those CCR upgrades, independent from the Cisco Cloud Network Controller upgrades. This is useful to reduce traffic loss by allowing you to split up the upgrades for the management plane (Cisco Cloud Network Controller ) and the data plane (CCRs).

See Triggering an Upgrade of the CCRs for more information.

Policy-Based Upgrade

Use the procedures in the following sections to perform a policy-based upgrade of your Cisco Cloud Network Controller software.

Backing Up Your Existing Configuration

We recommend that you back up your existing configuration before performing any policy-based upgrades.

If you decide to downgrade back to that previous release at some point afterward using the procedures provided in Downgrading the Software, you will need the backed-up configuration files in order to perform that downgrade successfully.

Procedure

Step 1

Enable Global AES encryption before performing the backup.

  1. In your Cisco Cloud Network Controller GUI, navigate to Infrastructure > System Configuration.

    You should see the General tab selected by default; if not, click the General tab.

  2. Click the pencil icon at the upper right part of the Global AES Encryption area.

    The Global AES Encryption Settings window appears.

  3. Click the box next to the Encryption: Enabled area, enter a passphrase in the Passphrase/Confirm Passphrase fields, then click Save at the bottom of the window.

    Make a note of the passphrase that you entered in this step, as you will need it if you need as part of the backup restoration process.

Step 2

Make a note of the infra VPC pool that you configured during the stack deployment.

For the infra VPC pool, you might have multiple infra subnet pools, so be sure to locate the information for the infra subnet that was used when you launched the original Cisco Cloud Network Controller.

  1. Log into your AWS account for the infra tenant:

    https://signin.aws.amazon.com/

  2. Click the Services link at the top of the screen, then click the CloudFormation link.

    The CloudFormation screen appears.

  3. On the AWS CloudFormation dashboard, click your existing Cisco Cloud Network Controller stack.

    The Stack details window appears for your Cisco Cloud Network Controller stack.

  4. Click the Parameters tab in the Stack details window.

  5. Locate the pInfraVPCPool line in the Paramaters table.

    Make a note of the entry in the pInfraVPCPool line. This is infra VPC pool that you configured during the stack deployment.

Step 3

Back up your existing configuration.

  1. Navigate to Operations > Backup & Restore.

  2. Click the Backup Policies tab.

  3. Click Actions > Create Backup Configuration.

  4. Back up your existing configuration.

    For more information on the options available in the Create Backup Configuration, see the "Creating a Backup Configuration Using the Cisco Cloud Network Controller GUI" procedure in the Cisco Cloud Network Controller for AWS User Guide.


Downloading an Image

Procedure

Step 1

Log in to your Cisco Cloud Network Controller, if you aren't logged in already.

Step 2

From the Navigation menu, choose Operations > Firmware Management.

The Firmware Management window appears.

Step 3

Click the Images tab in the Firmware Management window.

Step 4

Click Actions, then choose Add Firmware Image from the scroll-down menu.

The Add Firmware Image pop-up appears.

Step 5

Determine if you want to add the firmware image from a local or a remote location.

  • If you want to add the firmware image from a local location, click the Local radio button in the Image Location field. Click the Choose File button, then navigate to the folder on your local system with the firmware image that you want to import and select the file. Go to Step 6.

  • If you want to import the firmware image from a remote location, click the Remote radio button in the Image Location field, then perform the following actions:

  1. In the Protocol field, click either the HTTP or the SCP radio button.

  2. In the URL field, enter the URL from where the image will be downloaded.

    • If you selected the HTTP radio button in the previous step, enter the http source that you want to use to download the software image. An example URL is 10.67.82.87:/home/<username>/cloud-network-controller-dk9.25.0.5f.iso. Go to Step 6.

    • If you selected the SCP radio button in the previous step, enter the Secure Copy Protocol (SCP) source that you want to use to download the software image, using the format <SCP server>:/<path>. An example URL is 10.67.82.87:/home/<username>/cloud-network-controller-dk9.25.0.5f.iso.

  3. In the Username field, enter your username for secure copy.

  4. In the Authentication Type field, select the type of authentication for the download. The type can be:

    • Password

    • SSH Key

    The default is Password.

  5. If you selected Password, in the Password field, enter your password for secure copy. Go to Step 6.

  6. If you selected SSH Key, enter the following information:

    • SSH Key Content — The SSH Key Content is used to create the SSH Key File which is required when creating a Remote location for the download.

      Note


      The public key is generated at the time of the transfer. After the transfer the key files that were generated in the background are deleted. The temporary key files are stored in dataexport directory of the Cisco Cloud Network Controller.

    • SSH Key Passphrase — The SSH Key Passphrase is used to create the SSH Key File which is required when creating a Remote location for the download.

      Note


      The Passphrase field can remain empty.

Step 6

Click Select.

Wait for the Cisco Cloud Network Controller firmware images to download.

Upgrading the Software Using the Policy-Based Upgrade Process

Use the procedures in the following sections to perform a policy-based upgrade of your Cisco Cloud Network Controller software.

Before you begin

Verify that you have downloaded an image using the procedures provided in Downloading an Image.

Procedure

Step 1

Back up your existing configuration before performing the policy-based upgrade.

We recommend that you back up the configuration for your existing release using the information provided in Backing Up Your Existing Configuration before performing a policy-based upgrade.

After you have completed the policy-based upgrade, if you decide to downgrade back to the previous release at some point afterward using the procedures provided in Downgrading the Software, you will need the backed-up configuration files from the previous release in order to perform that downgrade successfully.

Step 2

In the Cisco Cloud Network Controller GUI, from the Navigation menu, choose the Operations > Firmware Management.

The Firmware Management window appears.

Step 3

Click Schedule Upgrade.

The Schedule Upgrade pop-up appears.

If you see a message that says that faults are present in your fabric, we recommend that you resolve these faults before performing a upgrade. See "Viewing Health Details Using the Cisco Cloud Network Controller GUI" in the Cisco Cisco Cloud Network Controller for AWS User Guide for more information.

Step 4

In the Target Firmware field, choose a firmware image from the scroll-down menu.

Step 5

In the Upgrade Start Time field, determine if you want to begin the upgrade now or later.

  • Click Now if you want to schedule the upgrade for now. Go to Step 6.

  • Click Later if you want to schedule the upgrade for a later date or time, then select the date and time from the pop-up calendar for the scheduled upgrade.

Step 6

In the Ignore Compatibility Check field, leave the setting in the default off (unchecked) setting, unless you are specifically told to disable the compatibility check feature.

In Cisco Cloud Network Controller, there is a compatibility check feature that verifies if an upgrade path from the currently-running version of the system to a specific newer version is supported or not. The Ignore Compatibility Check setting is set to off by default, so the system automatically checks the compatibility for possible upgrades by default.

Note


If you choose to disable the compatibility check feature by entering a check mark in the box next to the Ignore Compatibility Check field, you run the risk of making an unsupported upgrade to your system, which could result in your system going to an unavailable state.

Step 7

Click Schedule Upgrade.

You can monitor the progress of the upgrade in the main Firmware Management window, under the Upgrade Status area.


Migration-Based Upgrade

The following section provides migration-based upgrade procedures, which will allow you to upgrade without losing traffic flow.

Upgrading Your Cisco Cloud Network Controller Software Using Migration Procedures

This section provides the migration-based upgrade procedures for your Cisco Cloud Network Controller. There should be no effect on traffic with this migration.

Procedure

Step 1

Enable the encryption passphrase control, if it is not enabled already.

  1. In your Cisco Cloud Network Controller GUI, navigate to Infrastructure > System Configuration.

    You should be underneath the General tab by default; if not, click the General tab.

  2. Determine if the encrypted passphrase control is enabled already.

    • In the Global AES Encryption area, if you see Yes underneath the Encryption and Key Configured fields, then you have the encrypted passphrase control enabled already. Go to Step 2.

    • If you do not see Yes underneath the Encryption and Key Configured fields:

      1. Click the pencil icon at the upper right part of the Global AES Encryption area.

        The Global AES Encryption Settings window appears.

      2. Click the box next to the Encryption: Enabled area, enter a passphrase in the Passphrase/Confirm Passphrase fields, then click Save at the bottom of the window.

Step 2

Back up your existing Cisco Cloud Network Controller configuration.

There are a number of different ways that you can back up your Cisco Cloud Network Controller configuration. See the Cisco Cloud Network Controller for AWS Users Guide for more information. Note that if you want to use a remote backup, you will also need to add a remote location first.

Step 3

Terminate the Cisco Cloud Network Controller EC2 instance from the AWS infra account.

  1. Log into your Amazon Web Services account for the Cisco Cloud Network Controller infra tenant and go to the AWS Management Console, if you are not there already:

    https://signin.aws.amazon.com/

    https://console.aws.amazon.com/

  2. Go into Instances in the EC2 Dashboard in the AWS Management Console.

  3. Locate the Cisco Cloud Network Controller instance.

    • For releases prior to release 5.0(x), Cisco Cloud Network Controller is deployed using the m4.2xlarge instance.

    • For release 5.0(x) and later, Cisco Cloud Network Controller is deployed using the m5.2xlarge instance.

  4. Check the box next to the Cisco Cloud Network Controller instance to select it, then click Actions > Instance State > Terminate.

    In the Terminate Instances popup window, select Yes, Terminate to terminate this instance.

    The Instances window reappears and the status changes to shutting-down in the Instance State row for the Cisco Cloud Network Controller instance. Even though you are terminating the Cisco Cloud Network Controller instance here, there should be no traffic drop for your Cisco Cloud Network Controller.

Step 4

Go to the Cisco Cloud Network Controller page on the AWS Marketplace

Step 5

Click Continue to Subscribe.

Step 6

In the Subscribe to this software page, click the Continue to Configuration button.

The Configure this software page appears.

Step 7

Select the following parameters:

  • Delivery Method: Cisco Cloud Network Controller Cloud Formation Template (selected by default)

  • Software Version: Select the appropriate version of the Cisco Cloud Network Controller software.

  • Region: Region where Cisco Cloud Network Controller will be deployed

Step 8

Click the Continue to Launch button.

The Launch this software page appears, which shows a summary of your configuration and lets you launch the cloud formation template.

Step 9

In the Choose Action field, choose Launch CloudFormation, then click Launch to go directly to the CloudFormation service in the correct region, with the correct Amazon S3 template URL already populated. The Specify template page appears within the Create stack page.

Step 10

In the Specify template page, make the following selections:

  • Prerequisite- Prepare template field: Leave the default Template is ready option selected.

  • Specify template area:

    • In the Template source field, leave the default Amazon S3 URL option selected.

    • In the Amazon S3 URL field, leave the automatically-generated entry as-is.

    • Click View in designer.

Step 11

In the template1 area in the lower half of the screen:

  • Leave the Choose template language selection as JSON.

  • Place your cursor at the very beginning of the text string on line 1, press the Shift key and scroll down to the bottom of the window to select the entire text string in the window, then copy all of the text in this window (press Ctrl+C, or right-click and select Copy).

Step 12

On your local computer, navigate to an appropriate folder and create a text file, giving it a unique name, and paste the text string that you just copied into the text file.

This will be the Cisco Cloud Network Controller CFT, which has the m5.2xlarge instance type.

Step 13

Save and close the text file.

Step 14

Upload the Cisco Cloud Network Controller CFT to AWS.

  1. Log in to the AWS CloudFormation console:

    https://console.aws.amazon.com/cloudformation

  2. On the AWS CloudFormation dashboard, click your existing Cisco Cloud Network Controller stack, then click Update.

  3. In the Update Stack wizard, in the Prepare template screen, select Replace current template.

    The Specify template area appears.

  4. In the Update Stack wizard, on the Specify template area, select Upload a template file.

    The Upload a template file option appears.

  5. Click Choose file underneath the Upload a template file option and navigate to the area where you created the Cisco Cloud Network Controller CFT.

  6. Select the Cisco Cloud Network Controller CFT and then click Next.

  7. In the Specify stack details screen, verify that the instance type shown in the Other parameters area at the bottom of the screen is correctly set to m5.2xlarge, then click Next.

    Do not change the instance type to m4.2xlarge in this step.

  8. In the Configure stack options screen, click Next.

  9. In the Review screen, click Update stack.

The following actions take place at this point:

  • The AWS infra detects three IAM resources that will be updated (shown as False in the Replacement column).

  • The AWS infra detects one EC2 instance that will be replaced (shown as True in the Replacement column).

This will bring up the new Cisco Cloud Network Controller instance with the release image, with the same public IP address as you had previously. You can check the progress of the new Cisco Cloud Network Controller instance coming up by navigating back to Instances in the EC2 Dashboard in the AWS Management Console.

Step 15

When you see the Instance State change to running, you can then log into your Cisco Cloud Network Controller is you did previously.

The Cisco Cloud Network Controller will come up with no configurations at this point.

Note


If you see an error message when you try to log in, such as REST Endpoint user authentication datastore is not initialized- Check Fabric Membership Status of this fabric node, wait for several minutes, then try again after a few minutes. You might also have to refresh the page in order to log in.

Step 16

Enable the same encryption passphrase.

  1. In your Cisco Cloud Network Controller GUI, navigate to Infrastructure > System Configuration.

    You should be underneath the General tab by default; if not, click the General tab.

  2. In the Global AES Encryption area, click the pencil icon at the upper right part of the Global AES Encryption area.

    The Global AES Encryption Settings window appears.

  3. Click the box next to the Encryption: Enabled area, enter the same passphrase in the Passphrase/Confirm Passphrase fields that you used in Step 1, then click Save at the bottom of the window.

Step 17

Import the configuration that you backed up in Step 2.

If you configured a remote location when you backed up your configuration, you might have to create the remote location again to access the backup.

  1. In your Cisco Cloud Network Controller GUI, navigate to Operations > Backup & Restore.

  2. In the Backup & Restore window, click the Backups tab.

  3. Click the Actions scrolldown menu, then choose Restore Configuration.

    The Restore Configuration window appears.

  4. Enter the necessary information to restore the configuration that you backed up in Step 2.

    Use the following settings:

    • In the Restore Type field, choose Merge.

    • In the Restore Mode field, choose Best Effort.

    Click Restore Configuration when you have entered the necessary information in this window. Click the Job Status tab in the Backup & Restore window to get the status of the backup restore.

Step 18

Run the CapicTenantRole update to change the set for all trusted tenants.

  1. Locate the tenant role CFT.

    The tenant role CFT is located in the S3 bucket in the AWS account for the Cisco Cloud Network Controller infra tenant. The name of the S3 bucket is capic-common-[cloud-network-controller-AccountId]-data and the tenant role CFT object is tenant-cft.json in that bucket. The cloud-network-controller-AccountId is the AWS account number for the Cisco Cloud Network Controller infra tenant, which is the account in which Cisco Cloud Network Controller is deployed.

  2. Click the tenant role CFT link.

    The Overview page for this tenant role CFT appears.

  3. Click the box next to the tenant-cft.json entry on the Overview page.

    A slide-in pane appears for this JSON-formatted tenant role CFT.

  4. Click Download to download the tenant role CFT to a location on your computer.

    For security reasons, public access to this S3 bucket in AWS is not allowed, so you must download this file and use it in the tenant account.

  5. In AWS, go to the user account of the trusted tenants, then click CloudFormation.

  6. On the AWS CloudFormation dashboard, locate the trusted tenant stack and click on the stack name for that trusted tenant.

    The stack properties page appears for this particular stack.

  7. Click the Change sets tab.

  8. In the Change sets area, click Create change set.

  9. In the Create change set window for this stack, click Replace current template.

  10. In the Specify template area, click the circle next to Upload a template file, then click the Choose File button.

  11. Navigate to the location on your computer where you downloaded the tenant role CFT and select that template file.

  12. Click Next in the Create change set window for this stack.

    The Create Change Set pop-up appears.

  13. Click Create Change Set in the Create Change Set pop-up window.

    The Status will show as CREATE_PENDING for a period of time, then will change to CREATE_COMPLETE.

  14. Repeat these steps for each trusted tenant.

    On each trusted tenant, use this tenant-cft.json file to create a change set and run that change set.

Step 19

In your Cisco Cloud Network Controller GUI, verify that all the configurations that you previously had for your Cisco Cloud Network Controller prior to the migration are present now.

Note that for releases prior to 5.2(1), the CCRs will also get upgraded automatically, from the 16.x version to the 17.x version. You can verify this by navigating to Instances in the EC2 Dashboard in the AWS Management Console and locating the CCR instances to verify that they are also upgraded.

For release 5.2(1) and later, CCRs are no longer upgraded automatically when the Cisco Cloud Network Controller is upgraded, so you must trigger the CCR upgrades separately after the Cisco Cloud Network Controller has finished upgrading. See Triggering an Upgrade of the CCRs for more information.


Downgrading the Software

The following sections provide the necessary information that you will need to successfully downgrade your Cisco Cloud Network Controller software.

Downgrading the Software: Release 25.0(1) to 5.2(1)

These procedures describe how to downgrade the software from release 25.0(1) to release 5.2(1).

These procedures assume the following scenario:

  1. At some point previously, you were running release 5.2(1) and you decided to upgrade to release 25.0(1). Before you performed that upgrade, however, you backed up your release 5.2(1) configuration and saved that backed-up configuration file.

  2. You then performed a policy-based upgrade to release 25.0(1) and, at some pointer later on, decided to revert back to release 5.2(1).

These procedures describe how to revert back to release 5.2(1), but you will need that backed-up release 5.2(1) configuration file in order for these downgrade procedures to work.

Procedure


Step 1

Verify that you have the backed-up release 5.2(1) configuration file, as described in Backing Up Your Existing Configuration.

Do not use these procedures to downgrade from release 25.0(1) if you do not have that backed-up release 5.2(1) configuration file available. You will need that backup configuration file for these downgrade procedures.

Step 2

Verify that there are non-home region CCRs configured.

Step 3

Remove the CCRs from the home region.

There will be an intersite traffic loss for around 3-5 minutes while the home region CCRs are getting deleted and the traffic flow switches to the non-home region CCRs.

  1. In your Cisco Cloud Network Controller GUI, click the Intent icon (the icon with an arrow pointing into several circles) and choose Cisco Cloud Network Controller Setup.

  2. In the Region Management area, click Edit Configuration.

    The Regions to Manage window appears.

  3. Unselect (remove checks from boxes) in the Cloud Routers column for the home region (the region that has the text Cisco Cloud Network Controller Deployed).

  4. Click Next, then enter the necessary information in the following page and click Save and Continue.

    The process of removing the CCRs might take 5-10 minutes. You can monitor the process of the CCR removal by looking at the virtual machines in AWS portal.

    Note


    Do not proceed to the next step until the CCRs in the home region have been completely removed.

Step 4

From the infra account in the AWS portal, manually delete all infra VPC peering connections between the home region VPC and any remote region VPCs.

  1. In the navigation pane, choose Peering connections.

  2. Select the VPC peering connection, then choose Actions > Delete VPC peering connection.

  3. Inside the Delete VPC peering connection dialog box, review the connection details, check the Delete related route table entries checkbox to remove the necessary routes, then choose Yes, Delete to delete the selected VPC peering connection.

    Do not alter any VPC peering connections from a remote region VPC to other remote region VPCs.

Step 5

Wait 10-15 minutes for the remaining configurations to be deleted automatically.

The following configurations should be deleted automatically after 10-15 minutes:

  • The connect peers for the transit gateway connect attachment in the home region

  • The transit gateway connect attachment

  • The transit gateway attachment to the infra VPC

If they do not delete automatically, delete them manually as follows:

  1. For the transit gateway connect attachment in the home region, delete the connect peers.

    1. In the navigation pane, choose Transit Gateway Attachments.

    2. Select the Connect attachment.

    3. In the Connect peers tab, select the Transit Gateway Connect peer and choose Actions > Delete Connect peer.

    4. In the confirmation dialog box, choose Yes, Delete.

    5. Repeat these steps to delete additional connect peers for the transit gateway connect attachment in the home region.

  2. Delete the transit gateway connect attachment.

    1. In the navigation pane, choose Transit Gateway Attachments.

    2. Select the Connect attachment.

    3. Choose Actions > Delete.

    4. When prompted for confirmation, choose Delete.

  3. Delete the transit gateway attachment to the infra VPC.

    1. In the navigation pane, choose Transit Gateway Attachments.

    2. Select the infra VPC attachment only.

      There may be other user VPC attachments, so verify that you are selecting the infra VPC attachment for this procedure.

    3. Choose Actions > Delete.

    4. When prompted for confirmation, choose Delete.

Step 6

Delete the stack.

  1. In the AWS console, navigate to Services > CloudFormation > Stacks.

  2. Select the stack that you want to delete.

  3. Click Delete Stack.

This will delete the Cisco Cloud Network Controller VM and will attempt to delete the other resources.

Step 7

Wait 15-20 minutes for the stack to be deleted.

If the stack deletion is stuck in Delete in Progress, then delete the infra VPC manually in the home region:

  1. In the AWS console, navigate to Services > Virtual Private Cloud > Your VPCs.

  2. Select the infra VPC.

  3. Choose Actions > Delete VPC.

    The Delete VPC window appears.
  4. Type delete in the To confirm deletion, type delete in the field area, then click Delete.

Step 8

Recreate a fresh stack with the cloud formation template for the release image that you're downloading to.

Note


Alternatively, you can deploy a cloud formation template from the AWS Marketplace in place of steps a-c below.

  1. In the AWS console, navigate to Services > CloudFormation > Stacks.

  2. Click Create Stack > With new resources (standard).

    The Create stack window appears.
  3. In the Specify template area, click the circle next to Upload a template file, then click the Choose File button.

  4. Navigate to the location on your computer with the appropriate JSON-formatted tenant role CFT and select that template file, then click Next.

    The Specify Details page appears within the Create stack page.

  5. Enter the necessary information on the Specify Details page.

    • Stack name: Enter the name for this Cisco Cloud Network Controller configuration.

    • Fabric name: Leave the default value as-is or enter a fabric name. This entry will be the name for this Cisco Cloud Network Controller.

    • Infra VPC Pool: Use the same infra VPC pool information that you originally had when you first deployed your Cisco Cloud Network Controller.

      You should have noted this infra VPC pool information as part of the procedures in Backing Up Your Existing Configuration.

    • Availability Zone: Select an availability zone for the Cisco Cloud Network Controller subnets from the scroll-down menu.

    • Instance Type: Select the EC2 instance type.

    • Password/Confirm Password: Enter and confirm an admin password. This entry is the password that you will use to log into the Cisco Cloud Network Controller after you have enabled SSH access.

    • SSH Key Pair: Choose the name of the SSH key pair.

      You will use this SSH key pair to log into the Cisco Cloud Network Controller.

    • Access Control: Enter the IP addresses and subnets of the external networks that you will allow to connect to Cisco Cloud Network Controller (for example, 192.0.2.0/24). Only the IP addresses from this subnet are allowed to connect to Cisco Cloud Network Controller. Entering a value of 0.0.0.0/0 means that anyone is allowed to connect to Cisco Cloud Network Controller.

    • Assign Public IP address: Select whether to assign a public IP address to the Out-of-Band (OOB) management interface for the Cisco Cloud Network Controller or not.

      Prior to release 5.2(1), the management interface of the Cisco Cloud Network Controller was assigned a public IP address and a private IP address. Beginning with release 5.2(1), a private IP address is assigned to the management interface of the Cisco Cloud Network Controller and assigning a public IP address is optional. For more information, see the "Private IP Address Support for Cisco Cloud Network Controller and CCR" topic in the Cisco Cloud Network Controller for AWS User Guide, Release 5.2(1) or later.

      • true: Assigns a public IP address to the Out-of-Band (OOB) management interface for the Cisco Cloud Network Controller.

      • false: Disables the public IP address and assigns a private IP address to the Out-of-Band (OOB) management interface for the Cisco Cloud Network Controller.

  6. Click Next at the bottom of the screen.

    The Options page appears within the Create stack page.

  7. Accept all the default values in the Options screen, then click Next at the bottom of the Options screen.

    The Review page appears within the Create stack page.

  8. Verify that all the information on the Review page is correct.

    If you see any errors on the Review page, click the Previous button to go back to the page with the incorrect information.

  9. When you have verified that all the information on the Review page is correct, check the box next to the I acknowledge that AWS CloudFormation might create IAM resources with custom names area.

  10. Click the Create stack button at the bottom of the page.

    The CloudFormation page reappears, and the Cisco Cloud Network Controller template that you created is displayed with the text CREATE_IN_PROGRESS displayed in the Status column.

    The system now uses the information that you provided in the template to create the Cisco Cloud Network Controller instance. This process takes 5-10 minutes to complete. You can monitor the progress of the creation process by checking the box next to the name of your Cisco Cloud Network Controller template, then clicking on the Events tab. The text CREATE_IN_PROGRESS is displayed in the Status column under the Events tab.

  11. When the CREATE_COMPLETE message is shown, verify that the instance is ready before proceeding.

    1. Click the Services link at the top of the screen, then click the EC2 link.

      The EC2 Dashboard screen appears.

    2. In the EC2 Dashboard screen, you should see text displaying the number of running instances in the Resources area (for example, 1 Running Instances). Click this running instances link.

      The Instances screen appears.

    3. Wait until you see that instance is ready before proceeding.

      You will see the new instance going through the Initializing stage under Status check. Wait until you see the 2/2 Checks Passed message under Status check before proceeding.

Step 9

Enable Global AES encryption using the same passphrase that you noted when you backed up your configuration in Backing Up Your Existing Configuration.

  1. In your Cisco Cloud Network Controller GUI, navigate to Infrastructure > System Configuration.

    It should be underneath the General tab by default; if not, click the General tab.

  2. Click the pencil icon at the upper right part of the Global AES Encryption area.

    The Global AES Encryption Settings window appears.

  3. Click the box next to the Encryption: Enabled area, then enter the passphrase that you noted in Backing Up Your Existing Configuration in the Passphrase/Confirm Passphrase fields.

  4. Click Save at the bottom of the window.

Step 10

Import the release 5.2(1) configuration that you backed up before you upgraded to release 25.0(1) and verify that the previous configurations converge.

Use the following settings when importing the release 5.2(1) configuration that you backed up:

  • In the Restore Type field, choose Merge.

  • In the Restore Mode field, choose Best Effort.

The home region CCR creation will automatically begin after this step.

Step 11

If the site is managed by ACI Multi-Site Orchestrator/Nexus Dashboard Orchestrator, update the new Cisco Cloud Network Controller VM IP address.

  1. Log into ACI Multi-Site Orchestrator/Nexus Dashboard.

  2. Edit and reregister the site.

    1. In Nexus Dashboard, navigate to Sites and click on the correct site.

    2. Click the Details icon to bring up the Overview window.

    3. Click on the pencil icon to edit the information for this site.

    4. Click the box next to Re-register Site and enter the necessary information to update with the new Cisco Cloud Network Controller VM IP address.

    5. Click Save.

  3. Go into ACI Multi-Site Orchestrator/Nexus Dashboard Orchestrator and verify that the site is still managed.

    1. In Nexus Dashboard Orchestrator, navigate to Sites.

    2. Locate your site and verify that Managed is displayed in the State column.

  4. Perform a cloud site refresh.

    1. In Nexus Dashboard Orchestrator, navigate to Infrastructure > Infra Configuration, then click Configure Infra.

    2. Select the site in the left nav bar, then click Refresh.

      Click Yes in the confirmation window to continue with the cloud site refresh.

  5. Click DEPLOY > Deploy Only to deploy the infra configuration.


Downgrading the Software: Release 25.0(2) to 25.0(1) or 5.2(1)

These procedures describe how to downgrade the software from release 25.0(2) to 25.0(1) or 5.2(1).

These procedures assume the following scenario:

  1. At some point previously, you were running release 25.0(1) or 5.2(1) and you decided to upgrade to release 25.0(2). Before you performed that upgrade, however, you backed up your release 25.0(1) or 5.2(1) configuration and saved that backed-up configuration file, as described in Backing Up Your Existing Configuration.

  2. You then performed a policy-based upgrade to release 25.0(2) and, at some pointer later on, decided to revert back to release 25.0(1) or 5.2(1).

These procedures describe how to revert back to that previous release, but you will need that backed-up configuration file for that previous release in order for these downgrade procedures to work.

Procedure


Step 1

Verify that you have the backed-up configuration file from the previous release, as described in Backing Up Your Existing Configuration.

Do not use these procedures to downgrade from release 25.0(2) if you do not have that backed-up configuration file from the previous release available. You will need that backup configuration file for these downgrade procedures.

Step 2

Create a duplicate of the SSH key with the same contents (the same public or private key).

  1. Open the Amazon EC2 console at https://console.aws.amazon.com/ec2/.

  2. In the navigation pane, choose Key Pairs.

  3. Choose Import key pair.

  4. For Name, enter a descriptive name for the public key. The name can include up to 255 ASCII characters. It can’t include leading or trailing spaces.

    Note


    When you connect to your instance from the EC2 console, the console suggests this name for the name of your private key file.

  5. Either choose Browse to navigate to and select your public key, or paste the contents of your public key into the Public key contents field.

  6. Choose Import key pair.

  7. Verify that the public key that you imported appears in the list of key pairs.

Note


If the Import key pair process doesn't work for any reason, you can create a new key pair using the Create key pair option, and use that in Step 7 , if necessary.

Step 3

Navigate to the EC2 instance area and terminate the Cisco Cloud Network Controller VM instance.

  1. In the navigation pane, choose Instances.

  2. Check the box next to the Cisco Cloud Network Controller VM instance.

  3. Right-click on the line for the Cisco Cloud Network Controller VM instance and choose Instance State > Terminate.

    It will take a few minutes for the Cisco Cloud Network Controller VM instance to terminate.

    After you the Cisco Cloud Network Controller VM instance is terminated, the two interfaces associated with the VM will hang at this point. Once the new VM comes up as part of the upgrade, it will get reattached to the same interfaces.

    Once the termination process is completed for the Cisco Cloud Network Controller VM, you will note that the VPCs and other network resources, such as the CIDRs and subnets, are still intact.

Step 4

When the termination process is completed for the Cisco Cloud Network Controller VM, go back to the stack and verify that it is still in the running state.

Navigate to the CloudFormation area and verify that the Cisco Cloud Network Controller stack is still in the running state.

Step 5

Click the circle next to the Cisco Cloud Network Controller stack and click Update.

The Update stack window appears.

Step 6

Click Use current template, then click Next.

Because you are not changing anything in the template, you will choose the Use current template option in this window.

The Specify stack details window appears.

Step 7

In the Specify stack details window, leave all of the fields as-is, except for the SSH Key Pair field.

In the SSH Key Pair field, select the new SSH key file name that you configured in Step 2.

Step 8

Click Next at the bottom of the Specify stack details window, then navigate through the remaining windows in the Update stack windows, verifying that you see the new SSH key file name in the fields in those windows.

Step 9

Click on Update stack at the end of the process.

The update for the stack begins.

Step 10

Monitor the progress of the update for the stack.

The update for the stack will go through the following stages:

  • AWS will first create a new Cisco Cloud Network Controller VM.

  • As part of the stack update, it will try to delete the old Cisco Cloud Network Controller VM, which was already deleted manually.

  • The Cisco Cloud Network Controller will be posted in the stack.

Step 11

Wait until you see the UPDATE_COMPLETE message in the Stacks window, then navigate back to the Instances window.

  • The Cisco Cloud Network Controller instance will have the new instance ID and will be using the new SSH key.

  • The old interfaces will be reattached to the new instance, and the CIDRs and subnets will all remain the same.

  • The Cisco Cloud Network Controller management IP address will also be the same.

Step 12

After roughly 5-10 minutes, verify that the version is correct in the Cisco Cloud Network Controller.

Log into your Cisco Cloud Network Controller using the management IP address. You should see the version of release that was running previously, before you upgraded to release 25.0(2).

Step 13

Enable Global AES encryption using the same passphrase that you noted when you backed up your configuration in Backing Up Your Existing Configuration.

  1. In your Cisco Cloud Network Controller GUI, navigate to Infrastructure > System Configuration.

    It should be underneath the General tab by default; if not, click the General tab.

  2. Click the pencil icon at the upper right part of the Global AES Encryption area.

    The Global AES Encryption Settings window appears.

  3. Click the box next to the Encryption: Enabled area, then enter the passphrase that you noted in Backing Up Your Existing Configuration in the Passphrase/Confirm Passphrase fields.

  4. Click Save at the bottom of the window.

Step 14

Import the configuration for the previous release that you backed up before you upgraded to release 25.0(2) and verify that the previous configurations converge.

Use the following settings when importing the configuration for the previous release that you backed up:

  • In the Restore Type field, choose Merge.

  • In the Restore Mode field, choose Best Effort.

The home region CCR creation will automatically begin after this step.

Step 15

If the site is managed by ACI Multi-Site Orchestrator/Nexus Dashboard Orchestrator, update the new Cisco Cloud Network Controller VM IP address.

  1. Log into ACI Multi-Site Orchestrator/Nexus Dashboard.

  2. Edit and reregister the site.

    1. In Nexus Dashboard, navigate to Sites and click on the correct site.

    2. Click the Details icon to bring up the Overview window.

    3. Click on the pencil icon to edit the information for this site.

    4. Click the box next to Re-register Site and enter the necessary information to update with the new Cisco Cloud Network Controller VM IP address.

    5. Click Save.

  3. Go into ACI Multi-Site Orchestrator/Nexus Dashboard Orchestrator and verify that the site is still managed.

    1. In Nexus Dashboard Orchestrator, navigate to Sites.

    2. Locate your site and verify that Managed is displayed in the State column.

  4. Perform a cloud site refresh.

    1. In Nexus Dashboard Orchestrator, navigate to Infrastructure > Infra Configuration, then click Configure Infra.

    2. Select the site in the left nav bar, then click Refresh.

      Click Yes in the confirmation window to continue with the cloud site refresh.

  5. Click DEPLOY > Deploy Only to deploy the infra configuration.


Downgrading the Software: Release 25.0(3) to 25.0(2), 25.0(1), or 5.2(1)

These procedures describe how to downgrade the software from release 25.0(3) to 25.0(2), 25.0(1), or 5.2(1).

These procedures assume the following scenario:

  1. At some point previously, you were running release 25.0(2), 25.0(1), or 5.2(1) and you decided to upgrade to release 25.0(3). Before you performed that upgrade, however, you backed up your release 25.0(2), 25.0(1), or 5.2(1) configuration and saved that backed-up configuration file, as described in Backing Up Your Existing Configuration.

  2. You then performed a policy-based upgrade to release 25.0(3) and, at some pointer later on, decided to revert back to release 25.0(2), 25.0(1), or 5.2(1).

These procedures describe how to revert back to that previous release, but you will need that backed-up configuration file for that previous release in order for these downgrade procedures to work.

Procedure


Step 1

Verify that you have the backed-up configuration file from the previous release, as described in Backing Up Your Existing Configuration.

Do not use these procedures to downgrade from release 25.0(3) if you do not have that backed-up configuration file from the previous release available. You will need that backup configuration file for these downgrade procedures.

Step 2

Create a duplicate of the SSH key with the same contents (the same public or private key).

  1. Open the Amazon EC2 console at https://console.aws.amazon.com/ec2/.

  2. In the navigation pane, choose Key Pairs.

  3. Choose Import key pair.

  4. For Name, enter a descriptive name for the public key. The name can include up to 255 ASCII characters. It can’t include leading or trailing spaces.

    Note


    When you connect to your instance from the EC2 console, the console suggests this name for the name of your private key file.

  5. Either choose Browse to navigate to and select your public key, or paste the contents of your public key into the Public key contents field.

  6. Choose Import key pair.

  7. Verify that the public key that you imported appears in the list of key pairs.

Note


If the Import key pair process doesn't work for any reason, you can create a new key pair using the Create key pair option, and use that in #__, if necessary.

Step 3

Navigate to the EC2 instance area and terminate the Cisco Cloud Network Controller VM instance.

  1. In the navigation pane, choose Instances.

  2. Check the box next to the Cisco Cloud Network Controller VM instance.

  3. Right-click on the line for the Cisco Cloud Network Controller VM instance and choose Instance State > Terminate.

    It will take a few minutes for the Cisco Cloud Network Controller VM instance to terminate.

    After you the Cisco Cloud Network Controller VM instance is terminated, the two interfaces associated with the VM will hang at this point. Once the new VM comes up as part of the upgrade, it will get reattached to the same interfaces.

    Once the termination process is completed for the Cisco Cloud Network Controller VM, you will note that the VPCs and other network resources, such as the CIDRs and subnets, are still intact.

Step 4

When the termination process is completed for the Cisco Cloud Network Controller VM, go back to the stack and verify that it is still in the running state.

Navigate to the CloudFormation area and verify that the Cisco Cloud Network Controller stack is still in the running state.

Step 5

Click the circle next to the Cisco Cloud Network Controller stack and click Update.

The Update stack window appears.

Step 6

Click Use current template, then click Next.

Because you are not changing anything in the template, you will choose the Use current template option in this window.

The Specify stack details window appears.

Step 7

In the Specify stack details window, leave all of the fields as-is, except for the SSH Key Pair field.

In the SSH Key Pair field, select the new SSH key file name that you configured in #__.

Step 8

Click Next at the bottom of the Specify stack details window, then navigate through the remaining windows in the Update stack windows, verifying that you see the new SSH key file name in the fields in those windows.

Step 9

Click on Update stack at the end of the process.

The update for the stack begins.

Step 10

Monitor the progress of the update for the stack.

The update for the stack will go through the following stages:

  • AWS will first create a new Cisco Cloud Network Controller VM.

  • As part of the stack update, it will try to delete the old Cisco Cloud Network Controller VM, which was already deleted manually.

  • The Cisco Cloud Network Controller will be posted in the stack.

Step 11

Wait until you see the UPDATE_COMPLETE message in the Stacks window, then navigate back to the Instances window.

  • The Cisco Cloud Network Controller instance will have the new instance ID and will be using the new SSH key.

  • The old interfaces will be reattached to the new instance, and the CIDRs and subnets will all remain the same.

  • The Cisco Cloud Network Controller management IP address will also be the same.

Step 12

After roughly 5-10 minutes, verify that the version is correct in the Cisco Cloud Network Controller.

Log into your Cisco Cloud Network Controller using the management IP address. You should see the version of release that was running previously, before you upgraded to release 25.0(3).

Step 13

Trigger a CCR downgrade to the older Cisco Cloud Services Router 1000v.

As part of the upgrade to 25.0(3), you also moved from the older Cisco Cloud Services Router 1000v to the newer Cisco Catalyst 8000V. Downgrading from 25.0(3) to an earlier release therefore requires downgrading the CCR back to the older Cisco Cloud Services Router 1000v.

When the downgrade is completed, the system will recognize that the CCRs are now incompatible with the Cisco Cloud Network Controller. You will see a message saying that the CCRs and the Cisco Cloud Network Controller are incompatible and that any new policies configured for the Cisco Cloud Network Controller will not be applied to the CCRs until you've downgraded the CCRs.

You can begin the process of triggering the CCR downgrade using either of the following methods. Note that while the menu option is shown as Upgrade CCRs in both methods, you are actually downgrading the CCRs in this situation by selecting this option.

  • In the banner at the top of the screen when your first log into the Cisco Cloud Network Controller, click on the Upgrade CCRs link, or

  • Through the CCRs area in the Firmware Management page by navigating to:

    Operations > Firmware Management

    Click the CCRs tab, then choose Upgrade CCRs.

Step 14

Enable Global AES encryption using the same passphrase that you noted when you backed up your configuration in Backing Up Your Existing Configuration.

  1. In your Cisco Cloud Network Controller GUI, navigate to Infrastructure > System Configuration.

    It should be underneath the General tab by default; if not, click the General tab.

  2. Click the pencil icon at the upper right part of the Global AES Encryption area.

    The Global AES Encryption Settings window appears.

  3. Click the box next to the Encryption: Enabled area, then enter the passphrase that you noted in Backing Up Your Existing Configuration in the Passphrase/Confirm Passphrase fields.

  4. Click Save at the bottom of the window.

Step 15

Import the configuration for the previous release that you backed up before you upgraded to release 25.0(3) and verify that the previous configurations converge.

Use the following settings when importing the configuration for the previous release that you backed up:

  • In the Restore Type field, choose Merge.

  • In the Restore Mode field, choose Best Effort.

The home region CCR creation will automatically begin after this step.

Step 16

If the site is managed by ACI Multi-Site Orchestrator/Nexus Dashboard Orchestrator, update the new Cisco Cloud Network Controller VM IP address.

  1. Log into ACI Multi-Site Orchestrator/Nexus Dashboard.

  2. Edit and reregister the site.

    1. In Nexus Dashboard, navigate to Sites and click on the correct site.

    2. Click the Details icon to bring up the Overview window.

    3. Click on the pencil icon to edit the information for this site.

    4. Click the box next to Re-register Site and enter the necessary information to update with the new Cisco Cloud Network Controller VM IP address.

    5. Click Save.

  3. Go into ACI Multi-Site Orchestrator/Nexus Dashboard Orchestrator and verify that the site is still managed.

    1. In Nexus Dashboard Orchestrator, navigate to Sites.

    2. Locate your site and verify that Managed is displayed in the State column.

  4. Perform a cloud site refresh.

    1. In Nexus Dashboard Orchestrator, navigate to Infrastructure > Infra Configuration, then click Configure Infra.

    2. Select the site in the left nav bar, then click Refresh.

      Click Yes in the confirmation window to continue with the cloud site refresh.

  5. Click DEPLOY > Deploy Only to deploy the infra configuration.


Performing a System Recovery

The procedures for performing a system recovery is identical to the procedures for performing a migration-based upgrade. Refer to the section Migration-Based Upgrade for those procedures.

Triggering an Upgrade of the CCRs

The following topics provide information and procedures for triggering an upgrade of the CCRs.

Triggering an Upgrade of the CCRs

You can trigger upgrades to the CCRs and monitor those CCR upgrades, independent from the Cisco Cloud Network Controller upgrades. This is useful to reduce traffic loss by allowing you to split up the upgrades for the management plane (Cisco Cloud Network Controller) and the data plane (CCRs).

This feature is enabled by default, where the default assumption is that you will be triggering the upgrades to the CCRs after you trigger an upgrade to the Cisco Cloud Network Controller. You cannot disable this feature once it's enabled.

When this feature is enabled, the proper upgrade sequence for the Cisco Cloud Network Controller and the CCRs is as follows.


Note


Following are upper-level steps to describe the overall process for triggering upgrades to the CCRs. For specific step-by-step instructions, see Triggering an Upgrade of the CCRs Using the Cisco Cloud Network Controller GUI.


  1. Upgrade Cisco Cloud Network Controller using the instructions provided in this chapter.

  2. Wait for the Cisco Cloud Network Controller upgrade process to complete. When that upgrade is completed, the system will recognize that the CCRs are now incompatible with the Cisco Cloud Network Controller. You will then see a message saying that the CCRs and the Cisco Cloud Network Controller are incompatible and that any new policies configured for the Cisco Cloud Network Controller will not be applied to the CCRs until you've upgraded the CCRs.

  3. View and accept the terms and conditions for the CCRs on the AWS portal.

  4. Trigger the CCR upgrade so that it is now at a compatible version as the Cisco Cloud Network Controller.

    You can begin the process of triggering the CCR upgrade using either of these two methods:

    • In the banner at the top of the screen, click on the Upgrade CCRs link, or

    • Through the CCRs area in the Firmware Management page. Navigate to:

      Operations > Firmware Management

      Click the CCRs tab, then choose Upgrade CCRs.

You can also trigger the CCR upgrade through the REST API. See Triggering an Upgrade of the CCRs Using the REST API for those instructions.

Guidelines and Limitations

  • After you have upgraded the Cisco Cloud Network Controller, if you do not see the message saying that the CCRs and the Cisco Cloud Network Controller are incompatible, you might have to refresh the browser for that message to appear.

  • Trigger an upgrade to the CCRs after you have upgraded the Cisco Cloud Network Controller. Do not trigger an upgrade to the CCRs before you have upgraded the Cisco Cloud Network Controller.

  • Once you have triggered an upgrade to the CCRs, it cannot be stopped.

  • If you see any errors after you trigger an upgrade to the CCRs, check and resolve those errors. The CCR upgrade will continue automatically once those CCR upgrade errors have been resolved.

Triggering an Upgrade of the CCRs Using the Cisco Cloud Network Controller GUI

This section describes how to trigger an upgrade to the CCRs using the Cisco Cloud Network Controller GUI. For more information, see Triggering an Upgrade of the CCRs.

Procedure


Step 1

Begin the process of triggering the CCR upgrade to a compatible CCR version.

You can begin the process of triggering the CCR upgrade using either of these two methods:

  • In the banner at the top of the screen, click on the Upgrade CCRs link, or

  • Through the CCRs area in the Firmware Management page. Navigate to:

    Operations > Firmware Management

    Click the CCRs tab, then choose Upgrade CCRs.

A warning appears after clicking Upgrade CCRs, stating that upgrading the CCRs will cause the CCRs to reboot, which may cause temporary disruption in traffic.

Step 2

If this is a good time to upgrade the CCRs and have a temporary disruption in traffic, click Confirm Upgrade in the warning message.

The CCR software upgrade begins. A banner appears at the top of the screen, saying that the CCR upgrade is in process. Click View CCR upgrade status in the message to view the status of the CCR upgrade.

Step 3

Fix any faults that might occur during the upgrade of the CCRs.

If a fault occurs during the upgrade, you can get more information on the fault by navigating to:

Operations > Event Analytics > Faults


Triggering an Upgrade of the CCRs Using the REST API

This section describes how to trigger an upgrade to the CCRs using the REST API. For more information, see Triggering an Upgrade of the CCRs.

Procedure


Set the value for the routerUpgrade field to "true" in the cloud template to trigger an upgrade to the CCRs through the REST API (routerUpgrade="true").


<polUni>
<fvTenant name="infra">
    <cloudtemplateInfraNetwork name="default" vrfName="overlay-1">
        <cloudtemplateProfile name="defaultxyz" routerUsername="SomeFirstName" routerPassword="SomePass" routerUpgrade="true">
        </cloudtemplateProfile>
        <cloudtemplateExtSubnetPool subnetpool="10.20.0.0/16"/>
        <cloudtemplateIntNetwork name="default">
            <cloudRegionName provider="aws" region="us-west-1"/>
            <cloudRegionName provider="aws" region="us-west-2"/>
        </cloudtemplateIntNetwork>
        <cloudtemplateExtNetwork name="default">
            <cloudRegionName provider="aws" region="us-west-2"/>
            <cloudtemplateVpnNetwork name="default">
                <cloudtemplateIpSecTunnel peeraddr="23.2.1.1/32" />
                <cloudtemplateIpSecTunnel peeraddr="23.0.1.1/32" />
                <cloudtemplateIpSecTunnel peeraddr="23.1.1.1/32" />
                <cloudtemplateOspf area="0.0.0.1"/>
            </cloudtemplateVpnNetwork>
            <cloudtemplateBgpEvpn peeraddr="34.1.1.1/32" asn="63000" siteId="123" password="abcd1234" />
        </cloudtemplateExtNetwork>
    </cloudtemplateInfraNetwork>
</fvTenant>
</polUni>