Deploying the Cloud APIC in Azure

Subscribing to the CCR

The procedures for subscribing to the CCR vary depending on the release of the Cisco Cloud APIC software:

Subscribing to the Cisco Cloud Services Router 1000V

You must subscribe to the Cisco Cloud Services Router (CSR) 1000V - Bring Your Own License (BYOL) for Maximum Performance. To subscribe through the Microsoft Azure Marketplace:

Procedure


Step 1

In the Azure Marketplace search text field, type Cisco Cloud Services Router (CSR) 1000V and select the option that appears.

The Cisco Cloud Services Router (CSR) 1000V option appears as a search suggestion.
Step 2

Click the Cisco Cloud Services Router (CSR) 1000V option.

You should be redirected to the Cisco Cloud Services Router (CSR) 1000V page in the Microsoft Azure Marketplace.

Step 3

Locate the Select a software plan drop-down menu.

If you do not see the Select a software plan drop-down menu in the main page, you might have to click the Plans + Pricing tab, if that option is available, to access the Select a software plan drop-down menu.

Step 4

In the Select a software plan drop-down menu, locate the area that lists the Cisco CSR 1000V Bring Your Own License options.
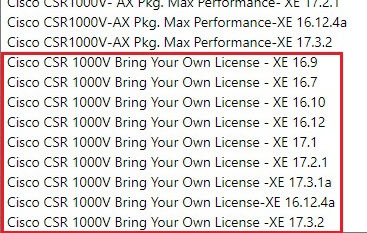
Step 5

Select the appropriate option, depending on the Cisco Cloud APIC software release:

For Cloud APIC Release

Select this specific option

Release 4.2x

Cisco CSR 1000V Bring Your Own License - XE 16.12

Release 5.0(1)

Cisco CSR 1000V Bring Your Own License - XE 16.12

Release 5.0(2)

Cisco CSR 1000V Bring Your Own License - XE 17.1

  • Release 5.1(2)

  • Release 5.2(1)

  • Release 25.0(1)

  • Release 25.0(2)

Cisco CSR 1000V Bring Your Own License - XE 17.3.1(a)

Step 6

Locate the Want to deploy programmability? field and click Get Started.

Step 7

In the Configure Programmability Deployment page, scroll down to your subscription and, in the Status column, change the status from Disable to Enable for your subscription.

Step 8

Click Save.


What to do next

Go to Registering the Necessary Resource Providers.

Subscribing to the Cisco Cloud Router 8000V

You must subscribe to the Cisco Cloud Router (CCR) 8000V - Bring Your Own License (BYOL) for Maximum Performance. To subscribe through the Microsoft Azure Marketplace:

Procedure


Step 1

In the Azure Marketplace search text field, type Cisco Catalyst 8000V Edge Software and select the option that appears.

The Cisco Catalyst 8000V Edge Software option appears as a search suggestion.
Step 2

Click the Cisco Catalyst 8000V Edge Software option.

You should be redirected to the Cisco Catalyst 8000V Edge Software page in the Microsoft Azure Marketplace.

Step 3

Locate the Select a software plan drop-down menu.

If you do not see the Select a software plan drop-down menu in the main page, you might have to click the Plans + Pricing tab, if that option is available, to access the Select a software plan drop-down menu.

Step 4

In the Select a software plan drop-down menu, select the appropriate option, depending on the Cisco Cloud APIC software release:

For Cloud APIC Release

Select this specific option

  • 25.0(3)

  • 25.0(4)

Cisco Catalyst 8000V Edge Software-BYOL-17.07.01a

Step 5

Locate the Want to deploy programmability? field and click Get Started.

Step 6

In the Configure Programmability Deployment page, scroll down to your subscription and, in the Status column, change the status from Disable to Enable for your subscription.

Step 7

Click Save.


What to do next

Go to Registering the Necessary Resource Providers.

Registering the Necessary Resource Providers

For every subscription that you use with the Cloud APIC, including for tenants that have subscriptions that you might add later, you must register the following resource providers:

  • microsoft.insights

  • Microsoft.EventHub

  • Microsoft.Logic

  • Microsoft.ServiceBus

These procedures describe how to register these necessary resource providers for a subscription.

Procedure


Step 1

Access the area in Azure where you can view the resource providers:

  1. From the main Azure management portal page, click the All services link in the left nav bar, then click the Subscriptions link.

  2. In the Subscriptions page in the Azure management portal, click the subscription account for your Microsoft account.

    The overview information for that subscription is displayed.

  3. From the overview page for that subscription, locate the Resource providers link in the left nav bar and click that link.

    The Resource Providers page for that subscription is displayed.

Step 2

Locate the following four resource providers in the list of providers, as shown in the preceding screenshot:

  • microsoft.insights

  • Microsoft.EventHub

  • Microsoft.Logic

  • Microsoft.ServiceBus

Step 3

Determine if all four of the resource providers are in the Registered or NotRegistered state.

  • If all four of the resource providers are shown as Registered in the Status column, then you do not have to do anything further to register these resource providers for this subscription.

  • For every resource provider that is shown as NotRegistered in the Status column:

    1. Click on that specific resource provider that is shown as NotRegistered.

    2. Click on Register at the top of the screen to register that resource provider.

      The Status will change from NotRegistered to Registering, then to Registered when the registration process is completed.

    3. Repeat these steps for every resource provider that is shown as NotRegistered until all four resource providers are shown as Registered.


Creating an Application in Azure

Follow these instructions to create an application in Azure, if necessary. You will need these procedures if you are creating a new subscription for the tenant and you are selecting Unmanaged Identity to manage the cloud resources through a specific application.


Note

An application in Azure is also referred to as a Service Principal.


Procedure


Step 1

Log into your Azure account for the Cloud APIC infra tenant and go to the Azure management portal, if you are not there already:

https://portal.azure.com/#home

Step 2

From the main Azure management portal page, click the Azure Active Directory link in the left nav bar, then click the App registrations link.

Step 3

In the App registrations page, click + New registration.

Step 4

Enter the necessary information in the Register an application page:

  • Name

  • Supported Account Types: Select the first option (Accounts in this organizational directory only)

  • (Optional) Redirect URI

Then click Register.

The overview page for this application appears.

Step 5

Click Certificates & secrets in the left nav bar, then enter the necessary information in the Add a client secret area and click Add.

This generates the necessary information that you will need for the Application Secret field later on in these procedures.

Step 6

Open a text file and copy-and-paste the necessary information into the text file:

  • Client Secret: Copy the text in the Value field in the Client Secrets area in the Clients & Secrets page.

  • Application ID: Navigate to Home > App registrations > <application-name>, then, in the Overview page, copy the text from Application (client) ID field.

  • Azure Active Directory ID: Navigate to Home > App registrations > <application-name>, then, in the Overview page, copy the text from Directory (tenant) ID field.

Step 7

Save the text file and note its location.

You will refer to this information when you are going through the procedures in Configuring a Tenant later on in this document.


Generating an SSH Key Pair for Azure

As part of the Cloud APIC setup process, you will be asked to provide the Admin Public Key (the SSH public key) in the Azure Resource Manager (ARM) template for your Cloud APIC. The following sections provide instructions for generating the SSH public and private key pair in Windows or Linux systems.

Generating an SSH Key Pair in Windows

These procedures describe how to generate an SSH public and private key pair in Windows. For instructions on generate an SSH public and private key pair in Linux, see Generating an SSH Key Pair in Linux or MacOS.

Procedure


Step 1

Download and install the PuTTY Key Generator (puttygen):

https://www.puttygen.com/download-putty

Step 2

Run the PuTTY Key Generator by navigating to Windows > Start Menu > All Programs > PuTTY > PuTTYgen.

You will see a window for the PuTTY Key Generator on your screen.

Step 3

Click Generate.

A screen appears, asking you to move the mouse over the blank area to generate a public key.

Step 4

Move your cursor around the blank area to generate random characters for a public key.

Step 5

Save the public key.

  1. Navigate to a folder on your laptop where you want to save the public key file and create a text file for this public key.

  2. Copy the information in the PuTTY Key Generator.

    Copy the public key information in the window, with these inclusions and exclusions:

    • Including the ssh-rsa text at the beginning of the public key.

    • Excluding the following text string at the end:

      == rsa-key-<date-stamp>

      Truncate the key so that it does not include the == rsa-key-<date-stamp> text string at the end.

      Note 

      In the next set of procedures, you will paste the public key information into the Azure ARM template. If the form does not accept the key in this format, add == back to the end of the key, as this format is required in some regions.

    If the key is not in the correct format, the Cloud APIC will not complete its installation.

  3. Paste the information in the public key text file that you created in 5.a and save the file, giving it a unique file name.

    This public key text file will now contain a key that is on a single line of text. You will need the information in this public key text file in the next set of procedures.

    Note 

    Do not save the public key using the Save public key option in the PuTTY Key Generator. Doing so saves the key in a format that has multiple lines of text, which is not compatible with the Cloud APIC deployment process.

Step 6

Save the private key.

  1. Click Save private key.

    A screen appears, asking if you want to save the file without a passphrase. Click Yes on this screen.

  2. Navigate to a folder on your laptop and save the private key file, giving it a unique file name.

    Note 

    The private key file is not used in the installation process. However, you might need it for other reasons, such as logging into your Cloud APIC through SSH, as described in Logging Into Cloud APIC Through SSH.


What to do next

Follow the instructions in Deploying the Cloud APIC in Azure to continue the Azure configuration process, which includes pasting the public key information into the Azure ARM template.

Generating an SSH Key Pair in Linux or MacOS

These procedures describe how to generate an SSH public and private key pair in Linux or MacOS. For instructions on generate an SSH public and private key pair in Windows, see Generating an SSH Key Pair in Windows.

Procedure


Step 1

On your Linux virtual machine or Mac, create a public and private key pair using ssh-keygen, directing the output to a file.

# ssh-keygen -f filename

For example:

# ssh-keygen -f azure_key

Output similar to the following appears. Press the Enter key without entering any text when you are asked to enter a passphrase (leave the field empty so that there is no passphrase).

Generating public/private rsa key pair.
Enter passphrase (empty for no passphrase):
Enter same passphrase again:
Your identification has been saved in azure_key.
Your public key has been saved in azure_key.pub.
The key fingerprint is:
SHA256:gTsQIIAadjgNsgcguifIloh4XGpVWMdcXVV6U0dyBNs
...
Step 2

Locate the public and private key files that you saved.

# ls

Two files should be displayed, where:

  • The file with the .pub suffix contains the public key information

  • The file with the same name, but with no suffix, contains the private key information

For example, if you directed the output to a file named azure_key, you should see the following output:

# ls
azure_key
azure_key.pub

In this case:

  • The azure_key.pub file contains the public key information

  • The azure_key file contains the private key information

Step 3

Open the public key file and copy the public key information from that file, without the username@hostname information at the end.

Note 

The private key file is not used in the installation process. However, you might need it for other reasons, such as logging into your Cloud APIC through SSH, as described in Logging Into Cloud APIC Through SSH.


What to do next

Follow the instructions in Deploying the Cloud APIC in Azure to continue the Azure configuration process, which includes pasting the public key information from the public key file into the Azure ARM template.

Deploying the Cloud APIC in Azure

Before you begin

Procedure


Step 1

Log into your Azure account for the Cloud APIC infra tenant and go to the Azure management portal, if you are not there already:

https://portal.azure.com/#home

Step 2

From the main Azure management portal page, in the search text field, type Cisco Cloud APIC.

Step 3

In the Cisco Cloud APIC page, in the Select a plan field, select the appropriate release and click Create.

The Basics page for the Cisco Cloud APIC screen appears.

Step 4

Complete the necessary fields in the Basics page:

  • Subscription: Select the Cloud APIC infra subscription account from the drop-down list.

  • Resource group: Choose an existing resource group from the drop-down list or click Create new to enter a name for a new resource group.

    A resource group is a container that holds related resources for an Azure solution.

    You can define custom naming rules for most cloud resources created by the Cloud APIC, with the exception of the resource group for the Cloud APIC itself. Ensure that the resource group name you select here is correct.

  • Region: Select the location from the drop-down list where you want to deploy the virtual machine for the Cloud APIC.

  • Virtual Machine name: Enter a virtual machine name. This entry will be the name for the virtual machine for this Cloud APIC. The virtual machine name must be only alphanumeric characters, but can be separated by dashes (for example, CloudAPIC).

  • Password: Enter an admin password. This entry is the password that you will use to log into the Cloud APIC after you have enabled SSH access.

    The password must have the following characteristics:

    • Must be between 12 and 72 characters in length

    • Must have three of the following:

      • 1 lower case letter

      • 1 upper case letter

      • 1 number

      • 1 of the following acceptable special characters:

        @$!%*#?&

  • Confirm Password: Enter the admin password again.

  • SSH Public Key: Paste the public key information that you copied at the end of one of these procedures:

    You will use this SSH key pair to log into the Cloud APIC. Note that the ssh-rsa string should remain at the beginning of the public key string that you paste into this field.

    Note 

    If you generated an SSH key pair in Windows, the key in the PuTTY Key Generator ends with == rsa-key-<date-stamp>. Truncate the key so that it does not include == rsa-key-<date-stamp>. If the form does not accept the key in this format, add == back to the end of the key, as this format is required in some regions.

    If the key is not in the correct format, the Cloud APIC will not complete its installation.

Step 5

When you have finished completing the fields in this page, click Next: ACI Settings.

The ACI Settings page for the Cisco Cloud APIC screen appears.

Step 6

Complete the necessary fields in the ACI Settings page:

  • ACI Fabric Name: Leave the default value as-is or enter a fabric name. This entry will be the name for this Cloud APIC. The fabric name must be only alphanumeric characters, but can be separated by dashes (for example, ACI-Cloud-Fabric).

  • Virtual machine size: The virtual machine size is automatically set to the default deployment size of Standard_D8s_v3. You cannot change the default virtual machine size setting.

  • Image Version: Choose the appropriate release in this field.

  • Infra Subnet: The infra pool for your Cloud APIC. This field is automatically populated with a default value of 10.10.0.0/24. Change the value in this field if the default value overlaps with your infra pool from your on-premises fabric. This entry must be a /24 subnet.

    Note 

    We recommend that you do not use any subnet from 172.17.0.0/16 (for example, 172.17.10.0/24) as the infra subnet, as this might cause a conflict with the Docker bridge IP subnet, as described in Resolving Subnet Conflict Issue With Infra Subnet.

  • Public IP Address: Set the public IP address to static.

    1. In the Public IP Address field, click Create New.

      Note 

      To assign a private IP address for Cloud APIC, select none from the drop-down list.

      The Create public IP address field appears on the right side of the page.

    2. In the SKU area, choose either the Basic or the Standard SKU.

      For more information on the differences between the Basic and the Standard SKU, see the Public IP Addresses in Azure document in the Microsoft documentation site.

    3. In the Assignment area, choose Static.

      Do not leave the setting as Dynamic in the Assignment area.

    4. Click OK in the Create public IP address area.

  • DNS Prefix for the public IP Address: The Cloud APIC DNS name prefix. When the Cloud APIC is deployed, you can access the Cloud APIC using the DNS name.

    Note 

    Due to an Azure restriction, you cannot use periods ( . ) in the Cloud APIC DNS name prefix that you enter in this field.

  • External Subnets: Enter the IP addresses and subnets of the external networks that you will allow to connect to Cloud APIC (for example, 192.0.2.0/24). Only the IP addresses from this subnet are allowed to connect to Cloud APIC. Entering a value of 0.0.0.0/0 means that anyone is allowed to connect to Cloud APIC.

  • Virtual Network Name: Leave the default entry for the virtual network name as-is or change the entry in this field, if desired.

  • Management NSG Name: Leave the default entry for the management network security group name as-is or change the entry in this field, if desired.

  • Management ASG Name: Leave the default entry for the management application security group name as-is or change the entry in this field, if desired.

  • Subnet Prefix: Leave the default entry for the subnet prefix as-is or change the entry in this field, if desired.

Step 7

When you have finished completing the fields in this page, click Next: Review + create.

The Review + create page for the Cisco Cloud APIC screen appears.

Step 8

Review the information in the Review + create page, then click Create.

The system now uses the information that you provided in the template to create the Cloud APIC VM instance. This process takes 5-10 minutes to complete. Click the Notifications icon (the bell-shaped icon) to check the status of the deployment of your Cloud APIC.

Step 9

When the deployment is complete, add a User Access Administrator role assignment.

  1. From the main Azure management portal page, click the All services link in the left nav bar, then click the Subscriptions link.

  2. In the Subscriptions page in the Azure management portal, click the subscription account to which Cloud APIC was deployed.

    The overview information for that subscription is displayed.

  3. From the overview page for that subscription, locate the Access control (IAM) link in the left nav bar and click that link.

    The Access Control page for that subscription is displayed.

  4. Click + Add, then select Add role assignment from the drop-down menu.

  5. In the Add role assignment page, make the following selections:

    • In the Role field, select User Access Administrator from the drop-down menu.

    • In the Assign access to field, select Virtual Machine.

    • In the Subscription field, select the subscription where the Cloud APIC is deployed.

    • Select the Cloud APIC virtual machine.

  6. Click Save at the bottom of the screen.


What to do next

Go to Adding a Role Assignment to determine if you need to add a role assignment for a managed identity or unmanaged identity for the access type.

Resolving Subnet Conflict Issue With Infra Subnet

In some situations, you might encounter an issue with a subnet conflict with your Cloud APIC. This issue might occur when the following conditions are met:

  • Your Cloud APIC is running on release 25.0(2)

  • The infra subnet for your Cloud APIC is configured within the 172.17.0.0/16 CIDR (for example, if you entered 172.17.10.0/24 in the Infra Subnet field as part of the procedures in Deploying the Cloud APIC in Azure)

  • There is something else configured that overlaps with the 172.17.0.0/16 CIDR that you are using for the infra subnet for your Cloud APIC (for example, if the Docker bridge IP subnet is configured with 172.17.0.0/16, which is the default subnet in Cloud APIC).

In this situation, your Cloud APIC might not be able to reach the CCR private IP address due to this subnet conflict and the Cloud APIC will raise an SSH connectivity fault for the affected CCR.

You could determine if there might be a possible conflict by logging in as root into the Cloud APIC and entering the route -n command:


[root@ACI-Cloud-Fabric-1 ~]# route -n

Assume that you see output similar to the following:


Kernel IP routing table
Destination     Gateway         Genmask         Flags Metric Ref    Use Iface
0.0.0.0         172.17.0.17     0.0.0.0         UG    16     0        0 oobmgmt
169.254.169.0   0.0.0.0         255.255.255.0   U     0      0        0 bond0
169.254.254.0   0.0.0.0         255.255.255.0   U     0      0        0 lxcbr0
172.17.0.0      0.0.0.0         255.255.0.0     U     0      0        0 docker0
172.17.0.12     0.0.0.0         255.255.255.252 U     0      0        0 bond0
172.17.0.16     0.0.0.0         255.255.255.240 U     0      0        0 oobmgmt

In this example output, the highlighted text shows that a Docker bridge is configured with 172.17.0.0/16.

Because this overlaps with the 172.17.0.0/16 CIDR that you used for the infra subnet for your Cloud APIC, you might see an issue where you lose connectivity to the CCR, where you are not able to SSH into the CCR, and you see a Host Unreachable message when you try to ping the CCR (such as in the following example, where 172.17.0.84 is the private IP address of the CCR):


[root@ACI-Cloud-Fabric-1 ~]# ping 172.17.0.84
PING 172.17.0.84 (172.17.0.84) 56(84) bytes of data.
From 172.17.0.1 icmp_seq=1 Destination Host Unreachable
From 172.17.0.1 icmp_seq=2 Destination Host Unreachable
From 172.17.0.1 icmp_seq=3 Destination Host Unreachable
From 172.17.0.1 icmp_seq=5 Destination Host Unreachable
From 172.17.0.1 icmp_seq=6 Destination Host Unreachable
^C
--- 172.17.0.84 ping statistics ---
9 packets transmitted, 0 received, +5 errors, 100% packet loss, time 8225ms
pipe 4
[root@ACI-Cloud-Fabric-1 ~]# 

To resolve the conflict in this situation, enter a REST API post similar to the following to change the IP address for the other area that is causing the conflict:


https://{{apic}}/api/plgnhandler/mo/.xml
<apPluginPolContr>
    <apContainerPol containerBip="<new-IP-address>" />
</apPluginPolContr>

For example, to move the Docker bridge IP address out from under the 172.17.0.0/16 CIDR, which was shown in the example scenario above, you might enter a REST API post such as the following:


https://{{apic}}/api/plgnhandler/mo/.xml
<apPluginPolContr>
    <apContainerPol containerBip="172.19.0.1/16" />
</apPluginPolContr>

where 172.19.0.1/16 is the new subnet for the Docker bridge. This moves the Docker bridge IP address under the 172.19.0.0/16 CIDR, where there is no longer a conflict with the infra subnet for your Cloud APIC that is configured within the 172.17.0.0/16 CIDR.

You can use the same commands as before to verify that there is no longer a conflict:


[root@ACI-Cloud-Fabric-1 ~]# route -n
Kernel IP routing table
Destination     Gateway         Genmask         Flags Metric Ref    Use Iface
0.0.0.0         172.17.0.17     0.0.0.0         UG    16     0        0 oobmgmt
169.254.169.0   0.0.0.0         255.255.255.0   U     0      0        0 bond0
169.254.254.0   0.0.0.0         255.255.255.0   U     0      0        0 lxcbr0
172.17.0.12     0.0.0.0         255.255.255.252 U     0      0        0 bond0
172.17.0.16     0.0.0.0         255.255.255.240 U     0      0        0 oobmgmt
172.19.0.0      0.0.0.0         255.255.0.0     U     0      0        0 docker0

In this example output, the highlighted text shows that a Docker bridge is configured with the IP address 172.19.0.0. Because there is no overlap with the 172.17.0.0/16 CIDR that you are using for the infra subnet for your Cloud APIC, there is no issue with connectivity with the CCR:


[root@ACI-Cloud-Fabric-1 ~]# ping 172.17.0.84
PING 172.17.0.84 (172.17.0.84) 56(84) bytes of data.
64 bytes from 172.17.0.84: icmp_seq=1 ttl=255 time=1.15 ms
64 bytes from 172.17.0.84: icmp_seq=2 ttl=255 time=1.01 ms
64 bytes from 172.17.0.84: icmp_seq=3 ttl=255 time=1.03 ms
64 bytes from 172.17.0.84: icmp_seq=4 ttl=255 time=1.03 ms
64 bytes from 172.17.0.84: icmp_seq=5 ttl=255 time=1.09 ms
64 bytes from 172.17.0.84: icmp_seq=6 ttl=255 time=1.06 ms
64 bytes from 172.17.0.84: icmp_seq=7 ttl=255 time=1.03 ms
64 bytes from 172.17.0.84: icmp_seq=8 ttl=255 time=1.05 ms
^C
--- 172.17.0.84 ping statistics ---
8 packets transmitted, 8 received, 0% packet loss, time 7005ms
rtt min/avg/max/mdev = 1.014/1.061/1.153/0.046 ms
[root@ACI-Cloud-Fabric-1 ~]#
 

Adding a Role Assignment

The type of role assignment that you add depends on whether you have a managed identity or unmanaged identity for the access type:

  • If you have a managed identity for the access type, then you must add a role assignment for the user tenant. Go to Adding a Role Assignment for a Virtual Machine.

    Note that this access type would apply if you make either of the following selections when you are entering information in the Associate Account page in the Configuring a Tenant procedures later in this manual:

    • You choose Mode: Create Own and you selected Managed Identity in the Associate Account page, or

    • You choose Mode: Select Shared and you are sharing with the infra tenant

  • If you have an unmanaged identity (service principal) for the access type, then the cloud resources will be managed through a specific application. Go to Adding a Role Assignment for an App.

    Note that this access type would apply if you select Unmanaged Identity (service principal) in the Associate Account page in the Configuring a Tenant procedures later in this manual.

Adding a Role Assignment for a Virtual Machine

Follow the procedures in this section if you have a managed identity for the access type, where you must add a role assignment for the user tenant. See Understanding Tenants, Identities, and Subscriptions for more information about the relationship between Azure subscription types and Cloud APIC tenants.


Note

If you have an unmanaged identity for the access type, where the cloud resources will be managed through a specific application, follow the procedures in Adding a Role Assignment for an App instead.


Procedure


Step 1

From the main Azure management portal page, click the All services link in the left nav bar, then click the Subscriptions link.

Step 2

In the Subscriptions page in the Azure management portal, click the subscription account to which Cloud APIC was deployed.

The overview information for that subscription is displayed.

Step 3

From the overview page for that subscription, locate the Access control (IAM) link in the left nav bar and click that link.

The Access Control page for that subscription is displayed.

Step 4

Click + Add, then select Add role assignment from the drop-down menu.

Step 5

Add a Contributor role assignment.

  1. In the Add role assignment page, make the following selections:

    • In the Role field, select Contributor from the drop-down menu.

    • In the Assign access to field, select Virtual Machine.

    • In the Subscription field, select the subscription where the Cloud APIC is deployed.

    • Select the Cloud APIC virtual machine.

  2. Click Save at the bottom of the screen.

Step 6

Add a User Access Administrator role assignment.

  1. In the Add role assignment page, make the following selections:

    • In the Role field, select User Access Administrator from the drop-down menu.

    • In the Assign access to field, select Virtual Machine.

    • In the Subscription field, select the subscription where the Cloud APIC is deployed.

    • Select the Cloud APIC virtual machine.

  2. Click Save at the bottom of the screen.

Note 

If you are sharing a subscription for the user tenant, it could take up to 30 minutes for a new IAM role assignment to take effect in Azure. Wait for at least 30 minutes before proceeding to the next section.


What to do next

Go to Configuring Cisco Cloud APIC Using the Setup Wizard to continue setting up the Cloud APIC.

Adding a Role Assignment for an App

Follow the procedures in this section if you have an unmanaged identity for the access type, where the cloud resources will be managed through a specific application. See Understanding Tenants, Identities, and Subscriptions for more information about the relationship between Azure subscription types and Cloud APIC tenants.


Note

If you have a managed identity for the access type, where you must add a role assignment for the user tenant, follow the procedures in Adding a Role Assignment for a Virtual Machine instead.


Procedure


Step 1

From the main Azure management portal page, click the All services link in the left nav bar, then click the Subscriptions link.

Step 2

In the Subscriptions page in the Azure management portal, click the subscription account to which Cloud APIC was deployed.

The overview information for that subscription is displayed.

Step 3

From the overview page for that subscription, locate the Access control (IAM) link in the left nav bar and click that link.

The Access Control page for that subscription is displayed.

Step 4

Click + Add, then select Add role assignment from the drop-down menu.

Step 5

Add a Contributor role assignment.

  1. In the Add role assignment page, make the following selections:

    • In the Role field, select Contributor from the drop-down menu.

    • In the Assign access to field, select Azure AD user, group, or service principal.

    • In the Select field, select the credentials that are associated with the Azure application.

  2. Click Save at the bottom of the screen.

Step 6

Add a User Access Administrator role assignment.

  1. In the Add role assignment page, make the following selections:

    • In the Role field, select User Access Administrator from the drop-down menu.

    • In the Assign access to field, select Azure AD user, group, or service principal.

    • In the Select field, select the credentials that are associated with the Azure application.

  2. Click Save at the bottom of the screen.

Note 

It could take up to 30 minutes for a new IAM role assignment to take effect in Azure. Wait for at least 30 minutes before proceeding to the next chapter. If you attempt to configure the Cloud APIC using the setup wizard before the IAM role assignment takes effect in Azure, then the CCR deployment will fail.


What to do next

Go to Configuring Cisco Cloud APIC Using the Setup Wizard to continue setting up the Cloud APIC.