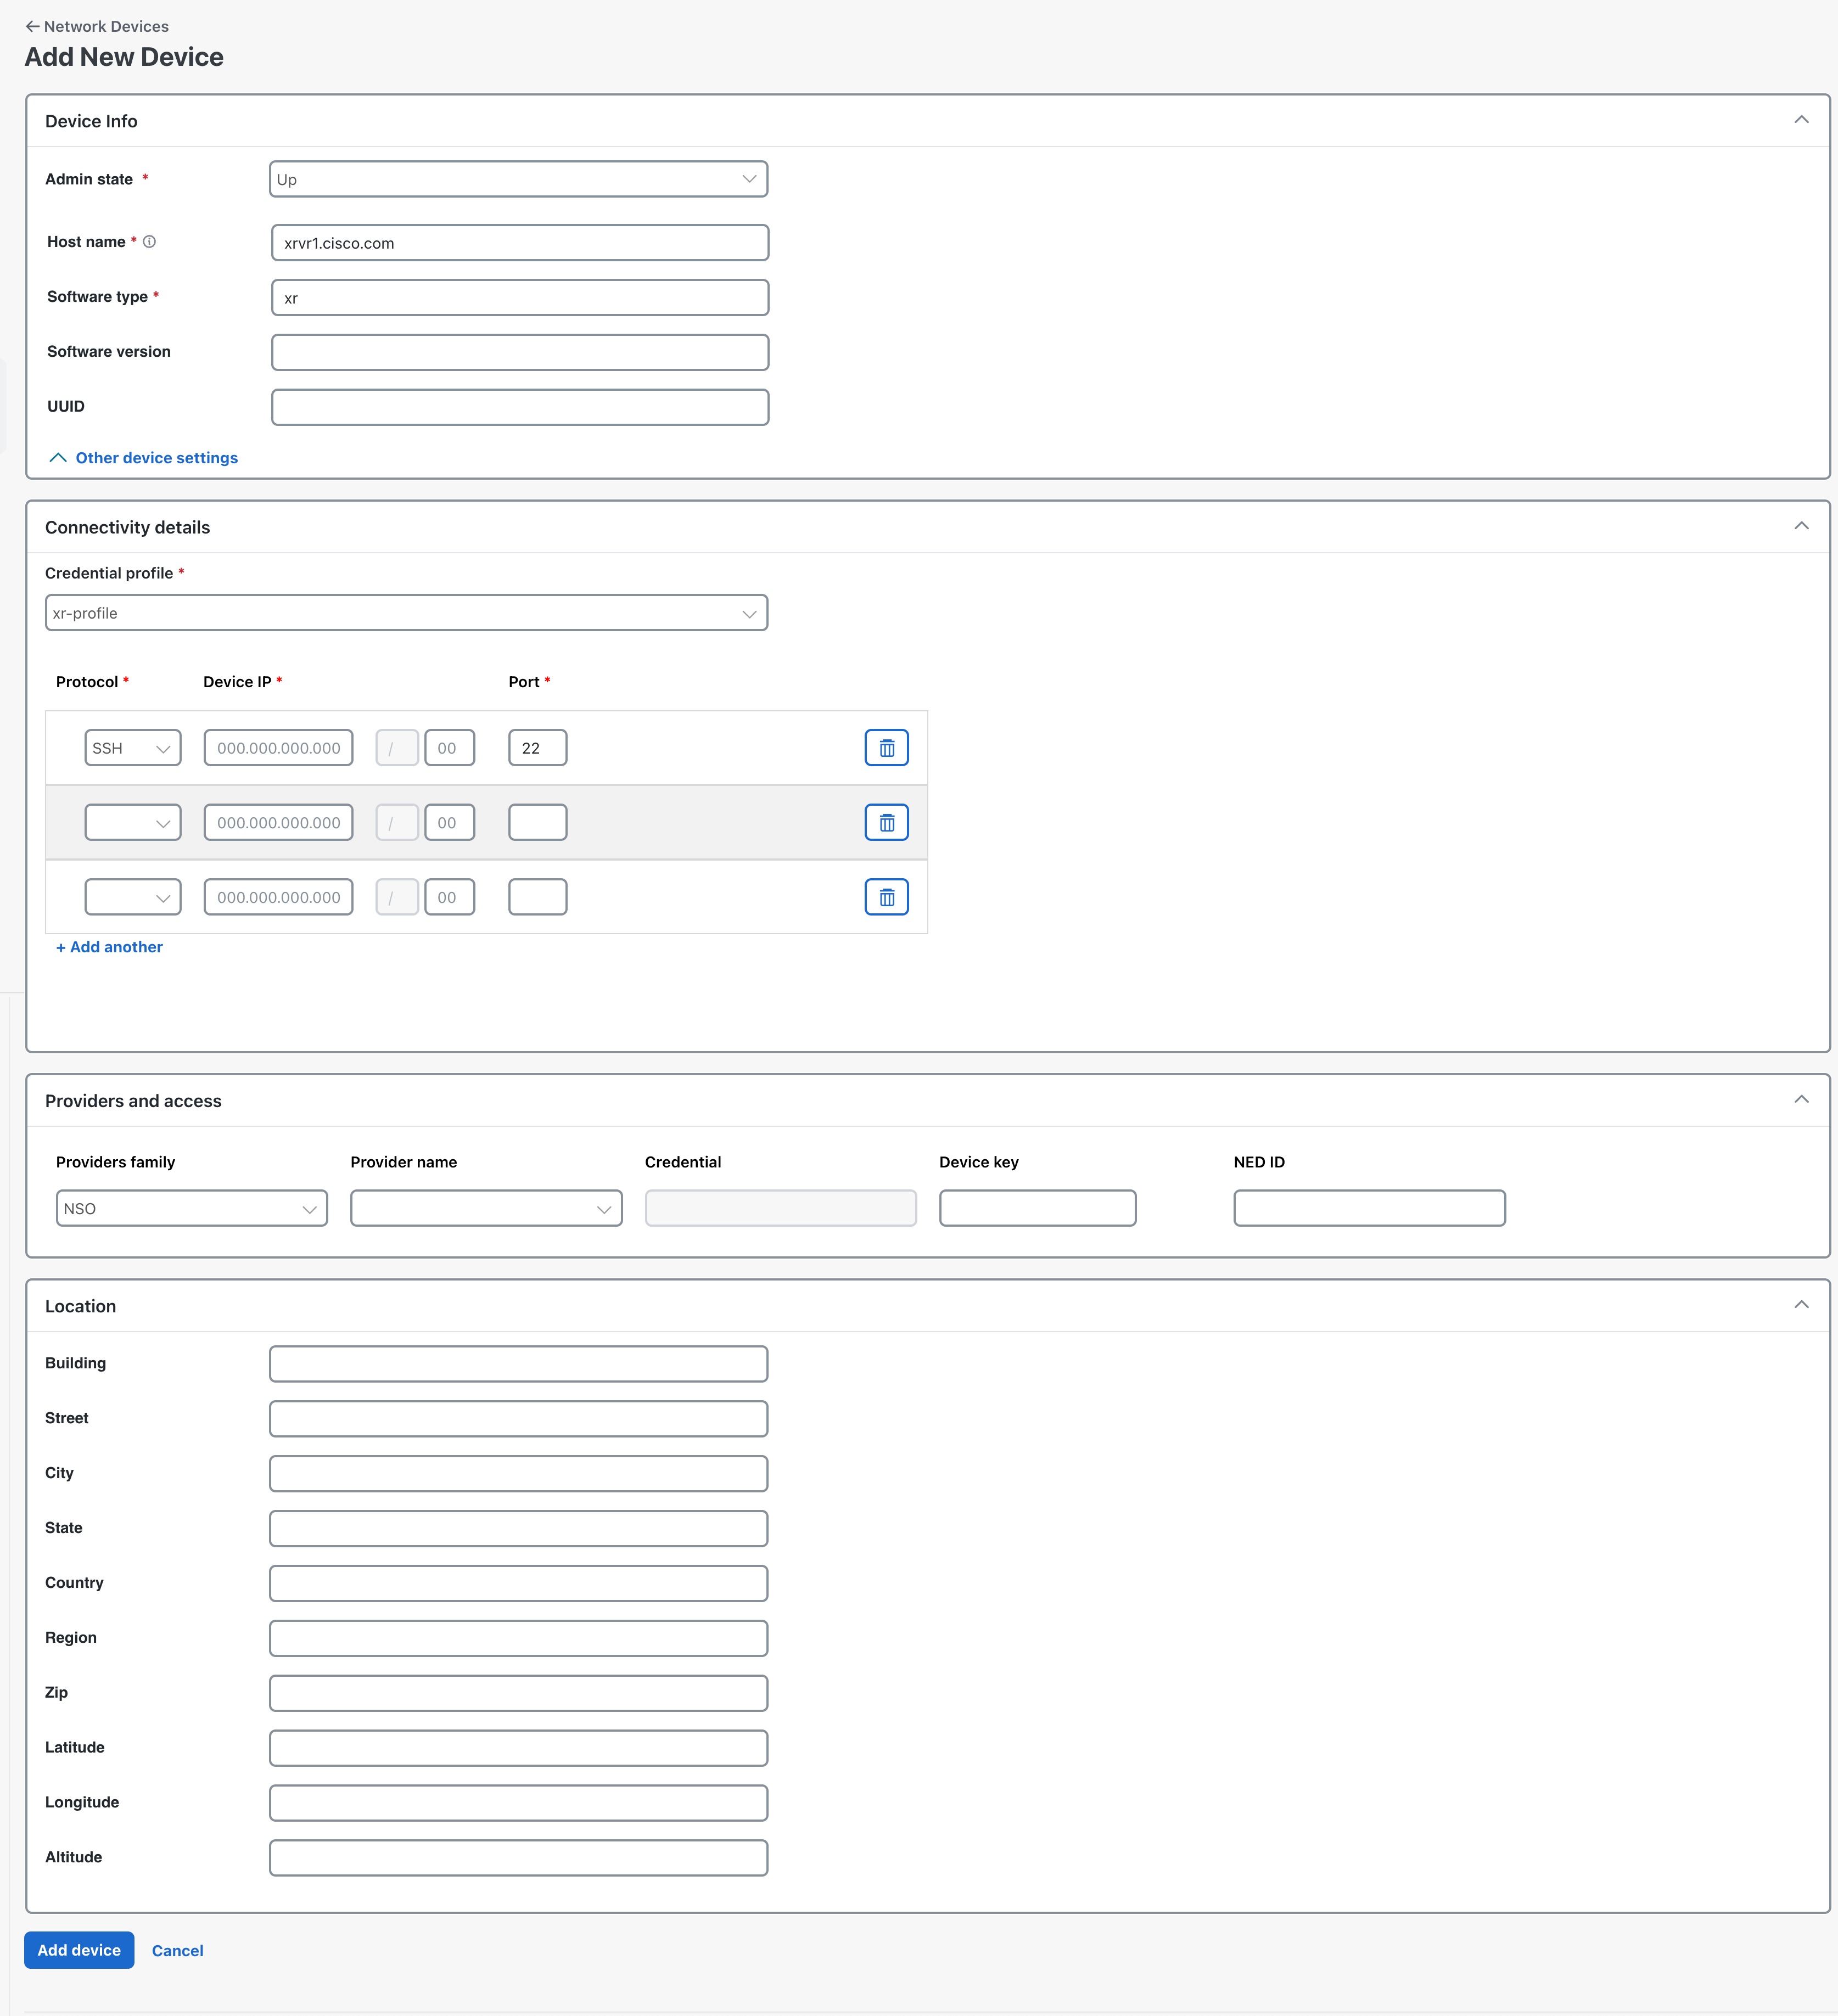
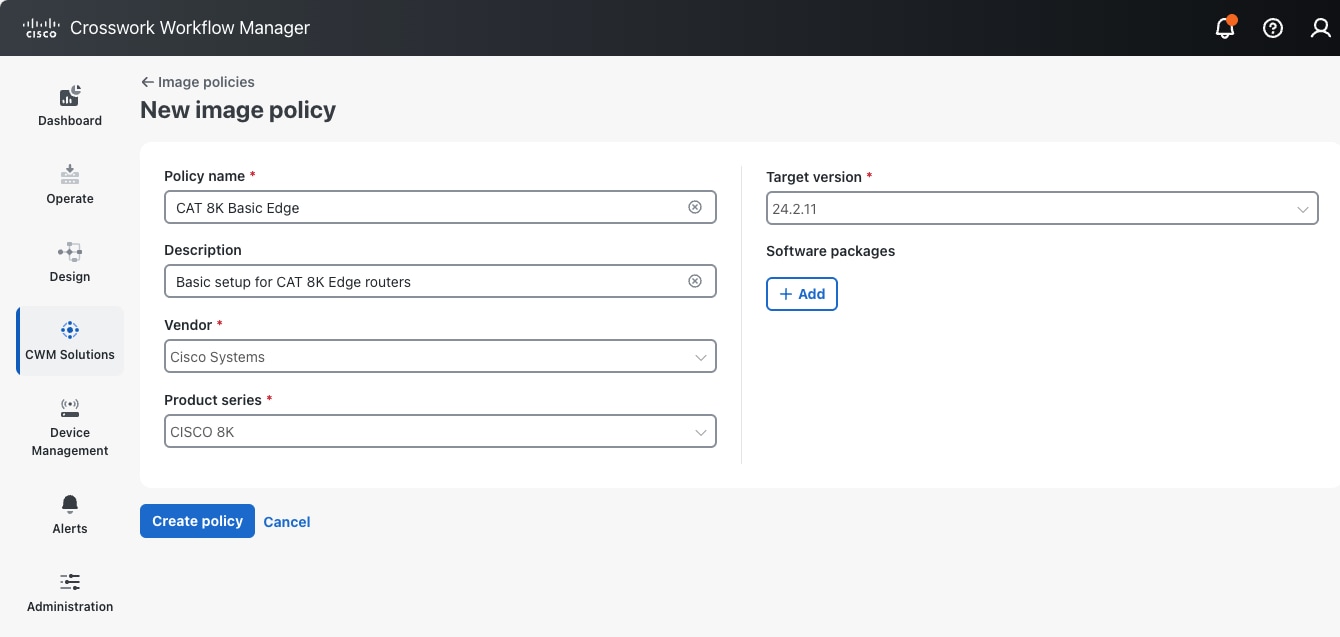
Get Started With Fleet Upgrade

This document covers the following topics:

Onboard Devices

Before you can test devices for compliance with software image standards, or upgrade them, the devices must be part of your device inventory. Follow the steps below to add devices one by one to your inventory, using the CWM user interface.

You can also add devices using the method in Import Devices in Bulk. You may also want to consider making a backup of your device information by following the steps in Export Devices.

Procedure


Step 1

Log in to Crosswork Workflow Manager and, from the main menu, choose Device Management > Network Devices.

Step 2

Click the add icon icon to display the Add New Device window.

Step 3

Enter the required values for the new device, as listed in the table below. The Add device device button is disabled until all required fields are completed.

Table 1. Add New Device (*=Required)
Field Description

Device info

Provide basic device information.

Admin state *

The management state of the device. Options are:

  • DOWN—The device is not being managed and is down.

  • UP—The device is being managed and is up.

Host name *

The hostname of the device.

Software type *

Enter the software type of the device (such as IOS-XE).

Software version

Software version of the operating system.

UUID

Universally unique identifier (UUID) for the device.

Connectivity details

Provide basic connectivity information.

Credential profile *

The name of the credential profile to be used to access the device for data collection and configuration changes. For example: nso-51.

Protocol *

The connectivity protocols used by the device. Choices are: SSH, NETCONF, and HTTP.

To add more connectivity protocols for this device, click + Add another at the end of the last row in the Connectivity Details panel. To delete a protocol you have entered, click add icon shown next to that row in the panel.

You can enter as many sets of connectivity details as you want, but only one set for each protocol. You must enter details for at least SSH and HTTP.

Device IP *

Enter the device's IP address (IPv4 or IPv6) and subnet mask.

Please ensure that the subnets chosen for the IP networks (including devices and destinations) do not have overlapping address space (subnets/supernets) as it may result in unpredictable connectivity issues.

* Port

The port used for this connectivity protocol. Each protocol is mapped to a port, so be sure to enter the port number that corresponds to the protocol you chose. The standard port assignments for each protocol are:

  • SSH: 22

  • NETCONF: 830

  • HTTP: 80

Timeout (sec)

The elapsed time (in seconds) before communication attempts using this protocol will time out. The default value is 30 seconds.

For XE devices using NETCONF, the recommended minimum timeout value is 90 seconds. For all other devices and protocols, the recommended minimum timeout value is 60 seconds.

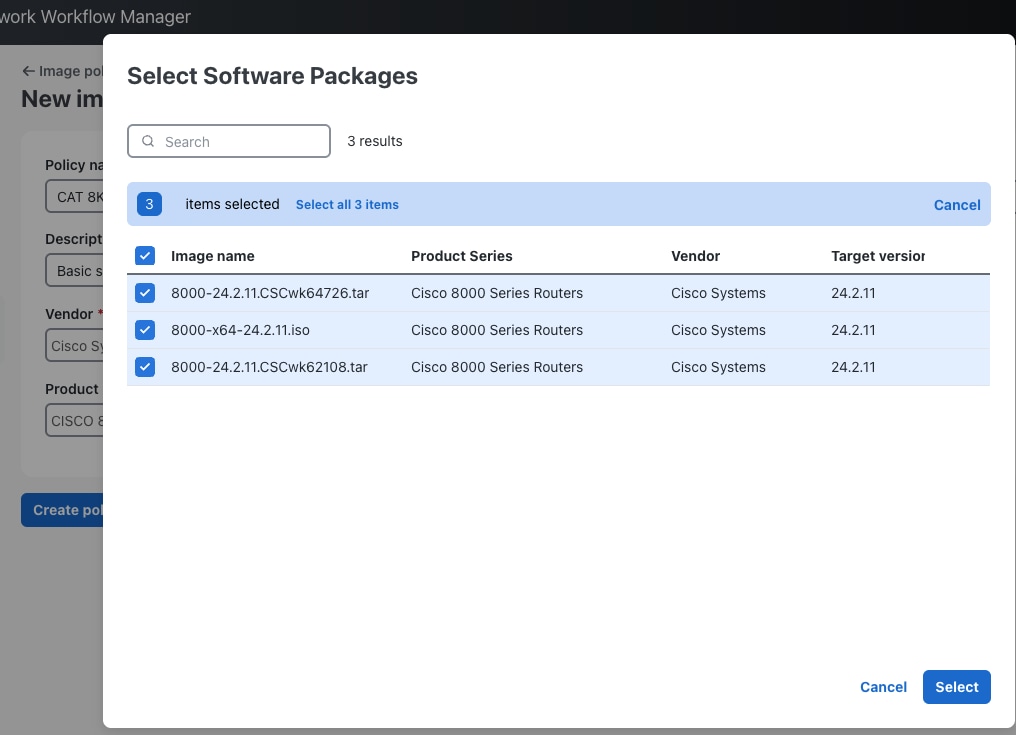
Providers and access

Give information about the access provider.

Providers family

Provider type used for topology computation. Choose a provider from the list (the default is NSO and should be the only option).

Provider name

Provider name used for topology computation. Choose a provider from the list.

Credential

The credential profile used for the provider. This field is read-only and is autopopulated based on the provider you select.

Device key

The host name used for the provider.

NED ID

The ID of the Cisco NSO Network Element Driver (NED) used to manage the device. For example: cisco-iosxr-cli-7.61.

Location

Provide location information for the device.

Building

The name or number of the building where the device is located

Street

The street address where the device is located.

City

The name of the city where the device is located.

State

The name of the state, district or province where the device is located.

Country

The name of the nation or country where the device is located.

Region

Where applicable, the name of the geographical region where the device is located.

Zip

The zip or postal code of the device location.

Latitude

The geographical latitude of the device location, entered in Decimal Degrees (DD) format.

Longitude

The geographical longitude of the device location, entered in Decimal Degrees (DD) format.

Altitude

The altitude at which the device is located, in feet or meters. For example, 123m.

Step 4

When you are finished, click Add device.

Step 5

(Optional) Repeat steps 3 and 4 to add another device.


What to do next

Follow the steps in Populate the Image Repository.

Populate the Image Repository

Before you use Fleet Upgrade to standardize, test conformance, and upgrade the images installed on your network devices, you must first populate the local software image repository with the images you need. Follow these steps to populate the repository.

Before you begin

CWM Solutions provides a local software image repository that you can use to set up policies that establish your software-image standards. You can then use the same repository to test whether your devices are in conformance with those standards, and deploy software images and upgrades to your managed devices. You can browse, choose and automatically download SMUs to the local repository directly from Cisco.com, using your Cisco customer login. You can also upload software images to the repository.

Fleet Upgrade image repository downloading is not yet available for Cisco ISO network operating system files, or the network OS files offered by supported third parties. For this reason, Cisco recommends that you download network OS files in advance, so that they are ready for upload to the Fleet Upgrade repository when you follow the steps in this topic.


Note


To reduce your internet visibility, you can configure Fleet Upgrade to download SMUs from Cisco.com using a proxy server. For details, see Download Software Upgrades Using a Proxy Server.


Procedure


Step 1

From the main menu, choose CWM Solutions > Image Repository. The Fleet Upgrade window's Image repository tab displays the list of ISOs and SMUs loaded to the local image repository.

Step 2

There are two ways to load images into the local repository:

  • If you want to load Cisco SMUs, go to Step 3.

  • If you want to load Cisco or third-party network OS software images you have previously downloaded, go to Step 4.

Step 3

To load Cisco SMUs:

  1. Click the Cisco.com tab. The window's Image repository section now displays the catalog of all SMUs available from the Cisco.com software image download site.

    Tip


    Cisco releases many new SMUs each quarter. Use the Filters button to limit the display to the SMUs of interest to you. If you don't see the ones you want, or the timestamps shown under Synced are more than three months old, click Sync catalogs to update the list.

  2. Choose one or more of the SMUs you want to download by clicking the checkboxes shown next to each SMU image's name in the far left column.

    A blue check mark shown next to the SMU image's name under the In local column (circled in the image below) indicates that the image is already in the local repository . You need not select it and try to download it again.

  3. To begin the download, click the More icon () in the far right column in the same row as any of the SMUs you chose.

  4. Choose Download to local. You will be shown a list of the SMUs you chose and a device activation code. Click Authenticate to download, and log in with the activation code. Record the activation code and follow the instructions on your device for the next steps.

Step 4

To load Cisco or third-party network OS software images you have previously downloaded:

  1. Click Upload image.

  2. Complete the fields on the Upload Image window as shown in the following table (the Vendor and Image File Name are required):

    In this field...

    Enter or choose:

    Vendor *

    Cisco or Juniper.

    Software Type *

    If Vendor is Cisco, IOS XR or IOS XE. If Vendor is Juniper, MX 960.

    Product Series *

    A supported Product Series for the chosen Vendor and Software Type (for example, "CAT2000" for Cisco IOS XE).

    Functional area (optional)

    A description of the OS functional area affected by the upgrade (such as: "ACL" or "Infrastructure").

    Impact (optional)

    A description of the operational impact of the upgrade installation (such as: "Requires reboot" or "Hitless")

    Choose image file *

    The path and filename of (or click Browse to choose) the software image file to be uploaded

  3. When you are finished, click Upload image.


What to do next

Follow the steps in Create Image Policies.

Create Image Policies

Software image policies are a critical part of the Fleet Upgrade workflow. Whenever you create a software image policy, you choose one or more software image versions stored in your local repository, making them part of that image policy. Choosing them establishes those images as the standards that are supposed to be installed on your devices. As different types of devices run different types of software images, you'll need to establish image policies for each type of device. Whenever you run a Fleet Upgrade conformance report against a particular type of device, you will also need to pick the appropriate image policy for that device type. The Fleet Upgrade workflow will then check the software actually installed on those devices against the standard image established in the policy. If the installed and standard image versions don't match, then the device is non-conformant.

Note that Fleet Upgrade will rate as conformant only those devices that have all the chosen target images and image versions in the image policy installed at the time you run the conformance report. If you run a conformance report against a device that does not have one or more of the policy's images or versions installed, the report will rate that device as non-conformant.

Before you begin

Ensure you have downloaded one or more SMUs and network OS software images to your local CWM Solutions image repository, as explained in Populate the Image Repository.

Procedure


Step 1

From the main menu, choose CWM Solutions > Software conformance > Image policies

Step 2

Click + Add image policy to display the New image policy window.

Step 3

Complete the first five fields in the New image policy window as shown in the following table:

In this field...

Enter or choose...

Policy name

A unique name for the image policy, such as ASR1KSMU.

Description

An optional description of the policy's purpose, such as Standard minimum SMU level for all Cisco ASR 1000 routers.

Vendor

The name of the software vendor, such Cisco Systems.

Product series

The network device product series, such as the Cisco ASR1000.

Target version

The target version of the product series, such as 17.09.04a for the Cisco ASR1000 (supported target versions are pre-selected for you based on the target version).

Step 4

In the Software packages field, click the + Add button. The Select Software Packages window lists all the software images downloaded to your local repository that can be installed on the network device product series you specified.

Step 5

Click the check box next to the Image name of each software image you want to make part of this image policy.

Step 6

When you are finished selecting software images, click Select. You can continue revising your entries as needed, or click + Add again to change your software image selections. When you are finished, click Create policy to save the new policy.


What to do next

Follow the steps in Run a Policy Conformance Report

Run a Policy Conformance Report

Use the policy conformance report to determine when you need to perform a Fleet Upgrade on one or more of your network devices.

You can create Fleet Upgrade conformance reports to check software image conformance for any device type and any combination of software images and versions. The core of the report is the software image policy you choose. The software image policy specifies the standard software images your devices should have installed on them. In addition, you can choose to run Fleet Upgrade conformance reports against devices on demand, at a future date or time you choose, or at regular recurring intervals. Each time the report runs, it will compare the software image installed on the devices with the software images specified in the image policy. The report will identify as "conformant" every device with all the policy's images installed. The report will flag as "non-conformant" any devices missing one or more of the policy images.


Tip


You may find that the image policy that forms the basis of the conformance report you ran is out of date or otherwise incorrect. If that's the case, you can easily edit the policy and then run the report again. To edit an existing image policy, select CWM Solutions > Fleet Upgrade > Software Conformance > Image policies to display the list of image policies. Scroll or use Search to find the policy you want, then click the More (…) menu at the far right in the same row and select Edit.


Before you begin

Ensure you have created one or more software image policies, as explained in Create Image Policies.

Procedure


Step 1

From the main menu, select CWM Solutions > Fleet Upgrade > Software conformance > Conformance reports. The Conformance reports tab displays the status of all completed software conformance reports, as shown in the figure below.

Step 2

Click + New report.

Step 3

Complete the first five fields in the New image policy window as shown in the following table:

In this field...

Enter or select...

Report name

A unique name for the conformance report, such as ASR1KStandard.

Select image policy

An optional description of the policy's purpose, such as Cisco ASR 1000 edge router SMU status.

Current version

The device software version number, such as 24.2.2.

Run schedule

One of the following:

  • Run now.

  • Schedule for specific data and time. If you select this option, you must also specify a Time and Date.

  • Run recurring report. If you select this option, you must also specify an Interval between runs, or the Days of the week or Days of the month you want the recurring report to run on.

Step 4

When you are finished, click Create Report to save the new report. If you selected Run now, you will also run the new report.

Clicking Create Report will return you to the Conformance reports tab, where you can review the status of any report you have already run.


What to do next

If you're still viewing the results of a report and you see non-conforming devices, consider running a Fleet Upgrade using the steps in Run a Fleet Upgrade.

If your conformance report failed, investigate by following the steps in Monitor Conformance Report Jobs.

Monitor Conformance Report Jobs

Use the Conformance reports tab to monitor the results of a conformance report, including any failures that occur. The status details for failures will help you diagnose the cause and correct it.

Procedure


Step 1

Choose CWM Solutions > Software Conformance > Conformance reports

Step 2

Click the Latest status column header to sort the column alphabetically. Reports with "Conformant" and "Failed" results will be sorted like those shown in the following figure.

Step 3

For any report that failed: Click the Report name. CWM displays a detail screen like the one shown below, giving the reason for the report failure. In this example, no existing devices were specified, so there was nothing against which to compare the software image policy. You can easily correct this by ensuring that the next run includes devices.

Tip


For any software conformance report whose details you're viewing:

  • Click on the dropdown date field to see details for other runs of the same report.

  • Click Edit report to change the report settings and re-run or re-schedule it.

  • Click Export to CSV to save the report as a CSV file in your default downloads directory.

  • Click Run instantly to re-run the report immediately with the same settings as before.

Step 4

For any report showing non-conformant devices: Click the Report name. CWM displays a detail screen like the one shown below, listing the non-conformant devices. If needed, click the Device name to see details for each non-conforming device. In this example, the first of the three devices was missing both of the required software packages.

Any non-conforming device will also be identified as non-conformant on the Fleet Upgrade > Devices page.


Run a Fleet Upgrade

Fleet Upgrade uses Methods Of Procedure (MOPs) to perform automated device upgrades. The definition of "MOP" varies from one industry to another, but "MOP" as used here refers to a set of pre-programmed CWM workflow Actions that are performed in sequenced phases. Each Action in the MOP is selected and (where needed) customized to deliver a complete, successful upgrade for the combination of software image and device for which it is intended. Fleet Upgrade provides default MOPs for the devices and software it supports, as well as facilities for creating custom versions of the default MOPs, and entirely new MOPs with mixtures of default and new Actions. At runtime, you have the opportunity to select which MOP your Fleet Upgrade job will use, as well as customizing other variables (such as the job name and the execution schedule). For more on these topics, see Use the Default MOPs and Create Custom MOPs.

Before you begin

The easiest way to run a Fleet Upgrade is, first, to run a conformance report, as explained in Run a Policy Conformance Report, and then select the non-conforming device and click Start Fleet Upgrade. Running the conformance report first not only ensures that the Fleet Upgrade is really needed, it also lets you launch the upgrade automatically.

The steps below assume that you will want to launch a Fleet Upgrade from the Software conformance > Conformance report window. But you can also launch an upgrade by clicking the Start Fleet Upgrade button on any of the other Fleet Upgrade windows where it appears: Devices, Image repository > Local repository, Image repository > Cisco.comSoftware conformance > Image policies, MOPs, and Jobs,

Procedure


Step 1

Choose CWM Solutions > Software conformance to display the Conformance reports list. The list should show a Report with one or more devices with a Latest status that is Not Conformant.

Step 2

Click the selection checkbox shown next to the name of the Report. Click Start Fleet Upgrade. The New Software Update window displays a list of all the devices that were checked for conformance. The non-conformant devices are already selected for you.

Step 3

For each additional device you want Fleet Upgrade to update, click the check box shown next to the device Host name. Or click the check box shown next to the Host name column title to select all of them.

You can select a maximum of 50 devices to be upgraded in the same Fleet Upgrade job.

Step 4

Click Next to display the Select software image window. If the software image policy you used to create the conformance report specified a target version and software packages, the list of software packages to be installed on the devices will be pre-selected for you.

Step 5

If the image policy did not specify packages, or you want to install more packages, click +Add, then click the check box shown next to each package's Image name. Then click Select to display the list of all packages to be installed.

Step 6

Click Next to display the Select MOP window.

Step 7

Click the Select MOP drop down list to select the MOP you want to use to install the chosen software packages on the selected devices.

The drop down list will always display one or more MOPs pre-selected for the type of device series you are trying to upgrade. Unless you have a special purpose in mind, use the pre-defined MOPs supplied with Fleet Upgrade, such as the Default XR Upgrade MOP shown in the following figure.

Step 8

Click Next to display the Execution settings window.

Step 9

Complete the fields in the Execution settings window as shown in the following table:

In this field...

Enter or select...

Job name

A unique name for the job, such as ASR1KStandard.

Job tags

An optional, comma-separated list of search tags to help you find the job in the job listing, ASR1000, ASRUpdates.

Parallel upgrades

Specify the number of device upgrades to be executed at the same time, in parallel. Defaults to 1. For help with setting this and the Acceptable failures value, see Use Parallel Upgrades with Acceptable Failures.

Acceptable failures

Specify the number of installation failures to be allowed before further upgrades are canceled. Defaults to 1.

Execution time

Specify one of the following:

  • Run now. CMW Solutions will begin executing the upgrade as soon as you click Submit.

  • Schedule for specific data and time. If you select this option, you must also specify a Time and Date.

Step 10

Click Next to display the Summary window.

Step 11

When you are finished, make sure the confirmation checkbox is selected. Then click Submit to save the new update job and either schedule or (if you selected Run now) run it.


What to do next

Follow the steps in Monitor Fleet Upgrade Jobs.

Monitor Fleet Upgrade Jobs

Use the Fleet Upgrade Jobs page to monitor the results of a Fleet Upgrade, including any failures that occur. The status details for failures will help you diagnose the cause and correct it.

Procedure


Step 1

Choose CWM Solutions > Fleet Upgrade > Jobs

Step 2

Click the Status column header to sort the column alphabetically. Upgrade jobs will be sorted like those shown in the following figure.

Step 3

Click the Job name for a job that failed. CWM displays a Job Summary page like the one shown below. Under Device results, the page lists the Host name of the device where the update failed and the Last finished stage where the failure occurred.

Step 4

Click the Host name to display a pop up screen with tabs representing the stages of the upgrade. As we can see in the example below, all the pre-checks passed.

Step 5

Click the tab for the stage where the upgrade failed (in this example, Activate), and expand the tab as needed to display further detail. In this example, it appears the upgrade could not be activated due to a problem with two of the Field Programmable Devices (FPDs) in this release.