The Cisco Crosswork Network Controller 7.0.1 release includes new functionality and important bug fixes. This document describes what’s new, the resolved bugs, and how to install the patch.
If you have additional questions not addressed in this document, contact Cisco Customer Experience.
What's new in this release
This table lists the primary new features and functionality introduced in Cisco Crosswork Network Controller 7.0.1:
|
Category |
What's New |
|||||||
|---|---|---|---|---|---|---|---|---|
|
Single VM deployment |
In the 7.0.1 release, the Crosswork Network Controller Essentials package supports a single VM deployment with Large VM profiles.
|
|||||||
|
Profile |
vCPU |
Memory (RAM) |
Storage |
Latency |
Use case |
|||
|
Large |
12 |
96 GB |
1 TB |
< 10 ms |
Use the Large VM profile if you only plan to use the Crosswork Network Controller Essentials package. |
|||
|
OS support |
Crosswork Network Controller 7.0.1 supports these OS versions.
This is in addition to the software versions listed in the Crosswork Network Controller 7.0 Release Notes. |
|||||||
|
Device support |
|
|||||||
|
Certificate management |
In version 7.0.1, Crosswork Network Controller introduces an additional method for updating web certificates using a Certificate Signing Request (CSR). For more information, see Update web certificate using certificate signing request. |
|||||||
|
Topology UI |
The use of links on non-physical interfaces is now available. |
|||||||
Update web certificate using certificate signing request
Crosswork Network Controller enables the updating of web certificates by importing an intermediate Certificate Authority (CA) certificate. Starting with version 7.0.1, it also supports updating web certificates through a Certificate Signing Request (CSR).
This approach allows you to obtain a certificate signed by an Enterprise or Commercial CA without exposing the private key outside of the Crosswork Network Controller.
Before you begin
-
Updating the certificate can disrupt the existing trust chain of certificates used for client authentication if enabled, so proceed with caution.
-
This process requires the Crosswork server to be restarted, which will take several minutes to complete.
-
Set the AAA mode to Local to enable client authentication.
Procedure
|
Step 1 |
From the main menu, choose |
|
Step 2 |
Click The Certificate Update Method window is displayed. |
|
Step 3 |
Create a CSR to submit to the Certificate Authority.
|
|
Step 4 |
After generating the CSR, click Download to download it and use the CSR to get a signed certificate from your CA. 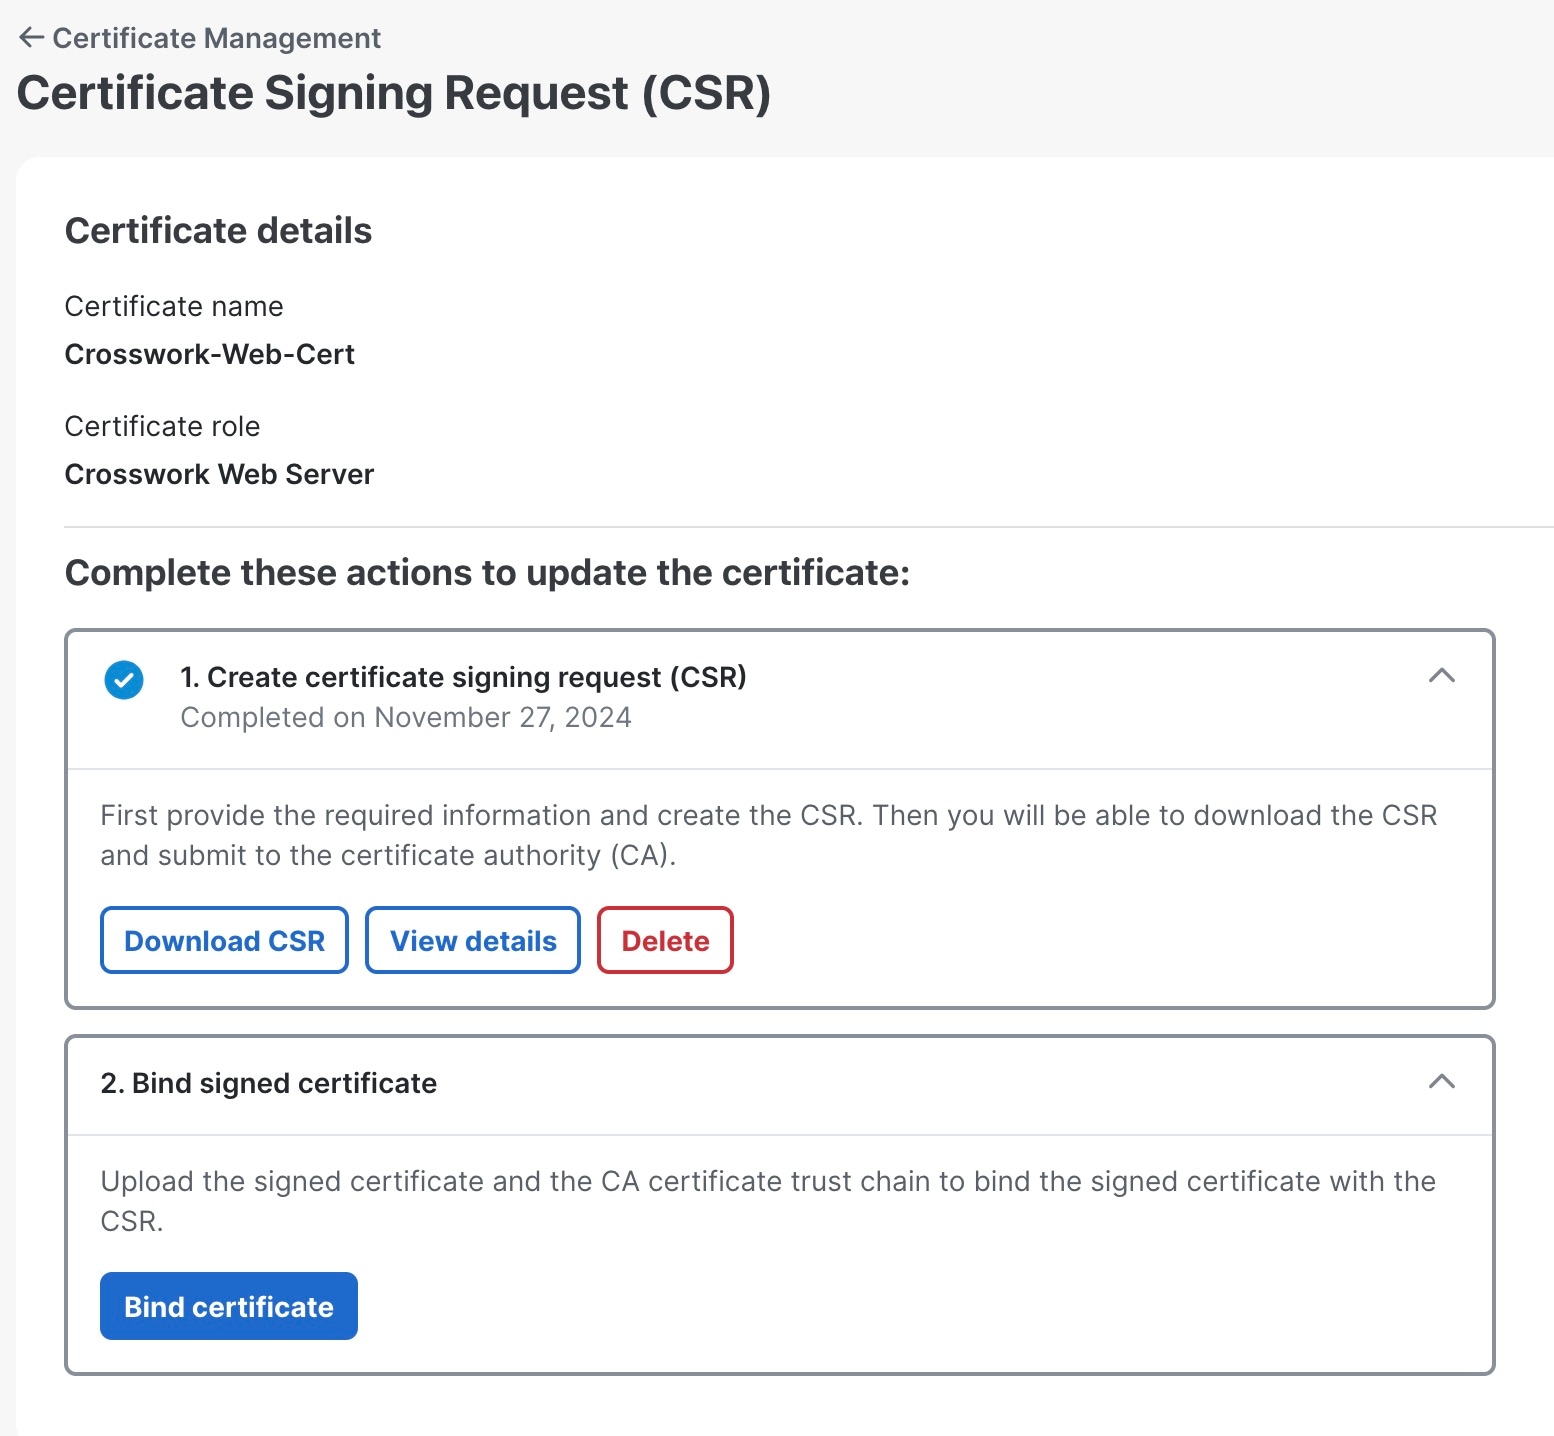
|
|
Step 5 |
Upload the CA-signed certificate and CA certificate trustchain to bind the certificate.
|

Resolved bugs
The Cisco Crosswork Network Controller 7.0.1 patch resolves these Cisco Crosswork Network Controller bugs:
See the Find additional bug details section on how to use the Cisco Bug Search Tool to get more information on these bugs.
|
Bug ID |
Bug description |
|---|---|
|
CSCwk70850 |
Crosswork Network Controller BlastRADIUS vulnerability evaluation |
|
CSCwm05397 |
After switchover, the topology links are missing and the xtc log shows 401 unauthorized |
|
CSCwm08363 |
The Network Services Orchestrator (NSO) function pack deployer needs to refresh the data from Device Lifecycle Management (DLM) after a cluster switchover is performed |
|
CSCwm11621 |
Using long type is not enough for representing large unsigned 64 counters in Java for interface stats |
|
CSCwm13394 |
ICON GNMI collection is failing for IOS-XR devices due to missing origin |
|
CSCwm45238 |
User directly allows shell access without prompting for challenge to decode |
|
Bug ID |
Bug description |
|---|---|
|
CSCwm13708 |
The add dashlet option for Zero Touch Provisioning is not allowing the title to be custom configured by the user |
|
CSCwm37329 |
Alarm manager fails to create events |
|
CSCwm54072 |
The download system MIB package does not contain the correct files |
|
CSCwm59689 |
Cisco 8804 router is in CWW state due to feature-port-mode failure |
|
Bug ID |
Bug description |
|---|---|
|
CSCwk40013 |
Service visualization is not working for the multi-key (more than 2 keys) custom model due to service key parsing |
|
CSCwm05152 |
Crosswork Network Controller RESTCONF GET API to retrieve Crosswork Network Controller Optimization Engine plan file could intermittently produce an empty plan file |
|
CSCwm42621 |
Crosswork Network Controller Optimization Engine is not responding to GET requests for API (ietf-network-state:networks) |
|
Bug ID |
Bug description |
|---|---|
|
CSCwk82235 |
The vertical scroll option is missing on the service creation page |
|
CSCwk40013 |
Service visualization is not working for the multi key (more than 2 keys) custom model due to a service key parsing issue. |
|
CSCwm32607 |
Service visualization is failing due to "/" in interface ports |
|
Bug ID |
Bug description |
|---|---|
|
CSCwk46487 |
Crosswork Network Controller Optimization Engine's optical performance monitoring (OPM) play to get Link State Packet (LSP) path verification |
|
CSCwm40652 |
Vulnerabilities found in vim 9.0.2142 CVE-2024-41957, 2024-41965, 2024-437 in 700 |
|
CSCwm40657 |
Vulnerabilities found in zlib 1.2.13 CVE-2023-45853 in 7.0, 5.0.4 |
|
Bug ID |
Bug description |
|---|---|
|
CSCwm34195 |
Vulnerabilities found in golang 1.21.4 |
|
Bug ID |
Bug description |
|---|---|
|
CSCwj78310 |
The Crosswork Network Controller bridge domain state sub-service continues to remain stuck in the init state |
|
Bug ID |
Bug description |
|---|---|
|
CSCwk56644 |
IPsec server certificate PSB non-compliance due to validity set for 10 years |
|
CSCwm27054 |
Device routes are missing on the Crosswork Network Controller VM, leading to SWIM failure |
|
CSCwm33935 |
The first sync after Geo switchover puts the postgress in standby and cluster database into error state |
Find additional bug details
You can use the Cisco Bug Search Tool to see additional details for selected bug IDs listed in the Cisco Crosswork Network Controller 7.0.1 component tables.
-
Go to the Cisco Bug Search Tool.
-
Enter your registered Cisco.com username and password, and click Log In.
The Bug Search page opens.

Note
-
From the Product list, select Cloud and Systems Management > Routing and Switching Management > Cisco Crosswork Network Automation.
-
Enter 7.0.1 in the Release field.
-
(Optional) You can enter additional criteria (such as bug ID, problem description, a feature, or a product name) in the Search For field.
-
Click Search. When the search results are displayed, use the filter tools to narrow the results. You can filter the bugs by status, severity, and so on.
Note |
To export the results to a spreadsheet, click Export Results to Excel. |
Patch installation workflow
This section provides the high-level workflow for installing the Crosswork Network Controller 7.0.1 patch.
|
Step |
Action |
||
|---|---|---|---|
|
1. Ensure that your environment meets all the installation prerequisites. |
Refer to the guidelines in Patch installation prerequisites. |
||
|
2. Compare the versions of your current Crosswork applications with the new patch versions to determine which applications need an upgrade. Download only the upgrades for the versions you need. |
See Download Cisco Crosswork Network Controller 7.0.1 component patch files for more information. |
||
|
3. Extract and validate the Crosswork Network Controller 7.0.1 patch files. |
Refer to the guidelines in Extract and validate 7.0.1 patch files. |
||
|
4. Copy and execute the Crosswork Infrastructure MOP script. |
Refer to the guidelines in Copy and execute the Crosswork Infrastructure MOP. |
||
|
5. Take a backup of both your data and the NSO data. |
See Take a backup to your data for more information. |
||
|
6. Add and install the 7.0.1 patch files in the Crosswork Network Controller UI. |
Refer to the guidelines in Add and install 7.0.1 patch files. |
||
|
(Optional) 7. Add and install the Geo Redundancy patch.
|
Refer to the guidelines in Install Geo Redundancy 7.0.1 patch. |
 Caution |
The upgrade process is disruptive and should be performed during a maintenance window. The time required for the applications to restart is typically less than 30 minutes per application. If you encounter any error while installing the patch, contact the Cisco Customer Experience team before attempting to move forward with the next step. |
Patch installation prerequisites
This section describes the installation prerequisites needed to install the Crosswork Network Controller 7.0.1 patch.
-
Ensure that the target system has Crosswork Network Controller version 7.0.0 installed, as well as the 7.0.0 version of any relevant components, before applying the patch upgrade. For more information, see the instructions in Cisco Crosswork Network Controller 7.0 Installation Guide.
-
Ensure that you have installed Crosswork Data Gateway using the signed-cw-na-dg-7.0.0-26-release-20240918.uefi.ova file. If you are using a different version of Crosswork Data Gateway, upgrade to the latest version using the files available on Cisco Software Download. For detailed instructions on how to upgrade, see Upgrade Crosswork Data Gateway.
-
-
Ensure that you have your Cisco Crosswork Administrator user credentials.
-
Ensure that you have the Management IP address used for your Crosswork VM deployment.
-
Ensure that your local machine, where the patch files are downloaded, is accessible via
scpby the Crosswork Network Controller. -
In a geo redundant setup, ensure that all relevant files, such as the Crosswork cluster, application CAPPs, and data gateways, are installed on both the active and standby clusters. Perform an on-demand synchronization operation before starting the patch installation process. Wait to perform any further syncs until the MOP and infrastructure upgrades are completed, and the services are working well.
Download Cisco Crosswork Network Controller 7.0.1 component patch files
This section provides the overview and installation sequence of all the component patch files available in the Crosswork Network Controller 7.0.1 release.
Review the lists and download all the required patch files from the Cisco Software Download page to a local machine.
Multi-VM cluster deployment files
If you have deployed Crosswork Network Controller version 7.0.0 on a multi-VM cluster, and intend to install the 7.0.1 patch, you must install the files in this sequence:
Note |
You can skip the patch files for the Crosswork applications that you do not need. |
-
(Mandatory) Crosswork Infrastructure MOP file: signed-cw-na-infra-7.0.1-MOP-241118.tar.gz
-
(Mandatory) Crosswork Infrastructure patch: signed-cw-na-infra-patch-7.0.1-27-release-241118.tar.gz
-
Element Management Functions: signed-cw-na-element-management-functions-patch-7.0.1-262-releaseems701-241119.tar.gz
-
Crosswork Optimization Engine: signed-cw-na-coe-patch-7.0.1-9-release-241118.tar.gz
-
Crosswork Active Topology: signed-cw-na-cat-patch-7.0.1-7-release-241017.tar.gz
-
Crosswork Service Health: signed-cw-na-aa-patch-7.0.1-7-release-241108.tar.gz
-
Crosswork Change Automation: signed-cw-na-ca-patch-7.0.1-5-release-241025.tar.gz
-
Crosswork Health Insights: signed-cw-na-hi-patch-7.0.1-11-release-241023.tar.gz
-
Geo Redundancy patch: signed-cw-na-geo-patch-7.0.1-5-release-241107.tar.gz
Single VM deployment files
If you have deployed Crosswork Network Controller version 7.0.0 on a single VM and intend to install the 7.0.1 patch, you must install these files in this sequence:
-
Crosswork Infrastructure MOP file: signed-cw-na-infra-7.0.1-MOP-241118.tar.gz
-
Crosswork Infrastructure patch: signed-cw-na-infra-patch-7.0.1-27-release-241118.tar.gz
-
Embedded Collectors: signed-cw-na-dgcollectors-patch-7.0.1-19-release-241118.tar.gz
-
Element Management Functions: signed-cw-na-element-management-functions-patch-7.0.1-262-releaseems701-241119.tar.gz
Extract and validate 7.0.1 patch files
This section explains how to extract and validate the downloaded 7.0.1 patch files. Repeat these steps for each patch file you plan to install.
Attention |
It is crucial that you extract the .tar.gz file from the signed file. You must add and install this specific file through the Crosswork Network Controller UI. |
Procedure
|
Step 1 |
After downloading the patch file, navigate to the folder where the tar file was downloaded. As an example, consider the Crosswork Infrastructure signed patch image (signed-cw-na-infra-patch-7.0.1-27-release-241118.tar.gz) for this procedure. cd <folder where the tar file was downloaded> |
||
|
Step 2 |
Extract the file using this command. tar -xzvf <signed image file>The file unpacks into the patch and the necessary tools to validate its contents. Example:
|
||
|
Step 3 |
Validate the extracted patch file using this command.
Example:
|
Copy and execute the Crosswork Infrastructure MOP
This section explains how to copy and execute the Crosswork Infrastructure 7.0.1 MOP file.
Before you begin
Ensure you have extracted and validated the Crosswork Infrastructure MOP, cw-na-infra-7.0.1-MOP-241118.tar.gz, using the instructions in Extract and validate 7.0.1 patch files.
Procedure
|
Step 1 |
Copy the extracted MOP file using the VIP address to the /home/cw-admin/ folder on one of the Crosswork hybrid nodes.
Example:
|
||
|
Step 2 |
SSH into the Crosswork hybrid node where you copied the files, and change to root using |
||
|
Step 3 |
Extract the MOP file: tar -xzvf <MOP file> Example: Output: |
||
|
Step 4 |
Update the permissions. chmod 755 update_orch.sh |
||
|
Step 5 |
Run the script file. ./update_orch.sh When you run the script you will be asked for the password for the cw-admin user account.
Wait 10 to 15 minutes for the update to complete and verify that system is healthy. |
Back up your data
Take a backup of both your data and the NSO data (for more information, see Manage Crosswork Network Controller Backup and Restore).
Additionally, ensure that the server being patched has sufficient space to unarchive and copy the MOP scripts. Make sure to clean up at least 5GB of space in the /home/cw-admin/ directory and 1GB of space in the /tmp/ directory to prevent any space constraints during script execution.
Add and install 7.0.1 patch files
This section explains how to add and install the 7.0.1 patch files in the Crosswork Network Controller UI.
Important |
A patch upgrade is only supported if the component's 7.0.0 version is already installed on the target system. |
Before you begin
Ensure you have extracted and validated the required 7.0.1 patch files using the instructions in Extract and validate 7.0.1 patch files.
Procedure
|
Step 1 |
Click on , and select the Application Management tab. The Crosswork Platform Infrastructure and any applications that are added are displayed here as tiles. |
||
|
Step 2 |
Click on the Add File (.tar.gz) option to add the patch file that you extracted. As an example, consider the Crosswork Infrastructure patch file, cw-na-infra-patch-7.0.1-27-release-241118.tar.gz for this procedure.
The Add File (tar.gz) via Secure Copy popup window is displayed. |
||
|
Step 3 |
Enter the relevant information and click Add. |
||
|
Step 4 |
Once the patch file is added, you can observe the existing application tile displaying an upgrade prompt. Click the upgrade prompt to install the patch file. In the Upgrade pop-up screen, select the new version that you want to upgrade to, and click Upgrade. Click on Job History to see the progress of the upgrade operation. |
||
|
Step 5 |
After the installation is complete, go to and confirm all of the applications are reporting a Healthy status.
|
||
|
Step 6 |
Repeat steps 1 to 5 to add and install the remaining Crosswork application patch files that you need. |
Install Geo Redundancy 7.0.1 patch
This section explains how to add and install the Geo Redundancy 7.0.1 patch files in the Crosswork Network Controller UI. The Geo Redundancy patch must be installed on both the active and standby clusters.
Important |
The installation of this patch is only required if geo redundancy is in use. If you are not using geo redundancy, there is no need to install this patch. |
Before you begin
Ensure you have extracted and validated the Geo Redundancy 7.0.1 patch, signed-cw-na-geo-patch-7.0.1-5-release-241107.tar.gz, using the instructions in Extract and validate 7.0.1 patch files.
Procedure
|
Step 1 |
On the active cluster, click on , and select the Application Management tab. |
||
|
Step 2 |
Click on the Add File (.tar.gz) option to add the patch file. The Add File (tar.gz) via Secure Copy popup window is displayed.
|
||
|
Step 3 |
Enter the relevant information and click Add. |
||
|
Step 4 |
Once the patch file is added, you can observe the existing application tile displaying an upgrade prompt. Click the upgrade prompt to install the patch file. In the Upgrade pop-up screen, select the new version that you want to upgrade to, and click Upgrade. Click on Job History to see the progress of the upgrade operation. |
||
|
Step 5 |
After the installation is complete, go to and confirm all of the applications are reporting a Healthy status. |
||
|
Step 6 |
Log in to the standby cluster and repeat steps 1 to 5. |
 Feedback