Upgrade Cisco Crosswork Change Automation and Health Insights
This section explains the migration procedure from Cisco Crosswork Network Automation VM version 3.0 to version 3.1. The Cisco Crosswork Network Automation VM is referring to the common product suite name and VM where you will be installing Cisco Crosswork Change Automation and Health Insights. One of the primary changes in the version 3.1 is the collection mechanism. The collection architecture used in version 3.0 has been changed to independent and scalable Crosswork Data Gateway VMs in version 3.1.
The upgrade process retains the following:
-
User uploaded inventory (devices, providers, credential profiles, and tags).
-
Platform details (database credentials).
-
User configurations (Playbooks, Topology).
-
Cisco Crosswork Network Automation VM version 3.0 settings for any rollback scenario.
 Note |
Consider the following inventory changes in Cisco Crosswork Network Automation VM version 3.1:
|
Limitations:
-
The data from Cisco Crosswork Change Automation and Health Insights version 3.0 applications (Change Automation, Health Insights, Topology) cannot be migrated, as the schema has been updated in the version 3.1.
-
AAA remote authentication server settings, custom local users and custom roles are not retained in the migration from Cisco Crosswork Change Automation and Health Insights version 3.0 to version 3.1.
Note |
The upgrade process for Cisco Crosswork Network Automation VM requires two instances (old and new) to exist at the same time. As a result you should plan to have resources (storage, disk and memory) within your data center (even if only temporarily) to support two VMs. |
Before you begin, ensure that:
-
You meet the system requirements to install Cisco Crosswork Change Automation and Health Insights and Cisco Crosswork Data Gateway. For more information, see Install Cisco Crosswork Change Automation and Health Insights Via vCenter and Install Cisco Crosswork Data Gateway.
-
You have details of the Cisco Crosswork Network Automation VM version 3.0 including the Management IPv4 address, username and password.
-
You have a public IP address (IPv4 or IPv6) to assign to the Cisco Crosswork Network Automation VM version 3.1 management network virtual interface. This can be a temporary address if you wish to retain the Management IPv4 address from Cisco Crosswork Network Automation VM version 3.0.
Note
It is preferred that the DNS and NTP servers are reachable via the Management Network Interface. However, it is not mandatory. The only requirement is that they are reachable on one of the network interfaces connected to the server.
-
You have a public or private IP address (IPv4 or IPv6) to assign to the Cisco Crosswork Network Automation VM's data network virtual interface. This IP address must be able to reach your managed devices, and be reachable by Cisco Network Services Orchestrator.
-
The Cisco Network Services Orchestrator (NSO) is migrated to the supported version (version 5.2).
Note |
Before upgrading, it is recommended to move the Cisco Crosswork Network Automation VM version 3.0 to maintenance mode. |
Note |
VMware vCenter supports vSphere Web Client (flash mode) and vSphere Client (HTML5 mode), however vSphere Web Client (flash mode) is recommended for the Cisco Crosswork Network Automation VM deployment and is explained in this procedure. The vSphere Client (HTML5 mode) is supported only on VMware vCenter Server 6.7 Update 3b. |
Procedure
| Step 1 |
Download the latest available Cisco Crosswork Change Automation and Health Insights image file (*.ova) to your system.
|
||
| Step 2 |
With VMware ESXi running, log in to the VMware vSphere Web Client. On the left side, choose the ESXi host on which you want to deploy the VM, then select , as shown in the following figure. 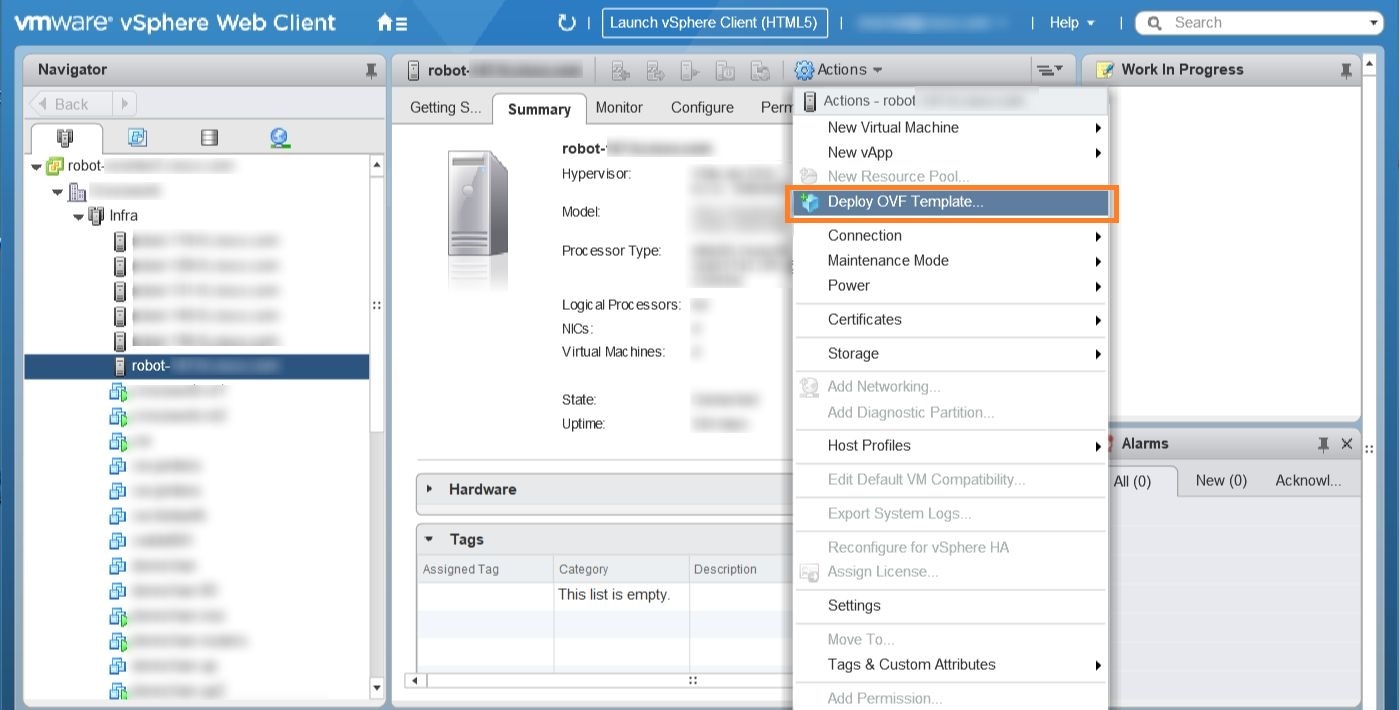 |
||
| Step 3 |
The VMware Deploy OVF Template wizard appears and highlights the first step, 1 - Select template, as shown in the following figure. Click Browse to navigate to the location where you downloaded the OVA image file and select it. Once selected, the file name is displayed in the window. 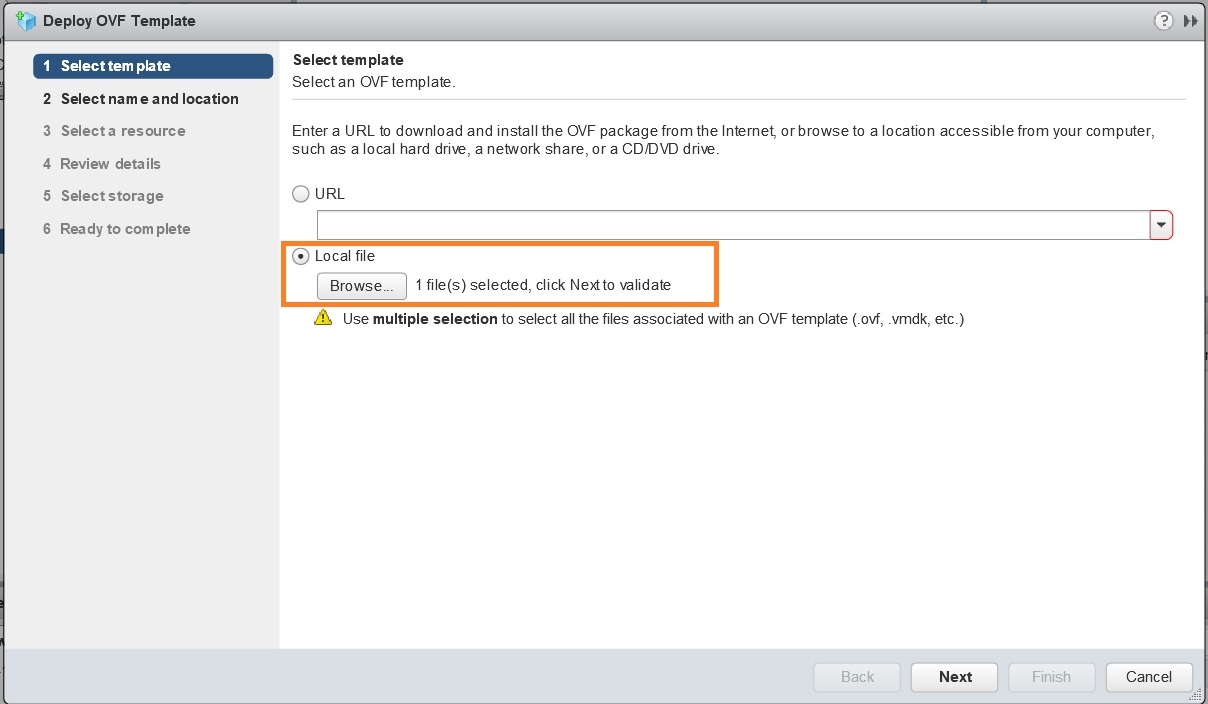 |
||
| Step 4 |
Click Next to go to 2 - Select name and location, as shown in the following figure. Enter a name for the Cisco Crosswork Network Automation VM you are creating. Cisco recommends that you include the Cisco Crosswork Change Automation and Health Insights version and build number in the name (for example: Crosswork CA/HI 3.1 Build 283). 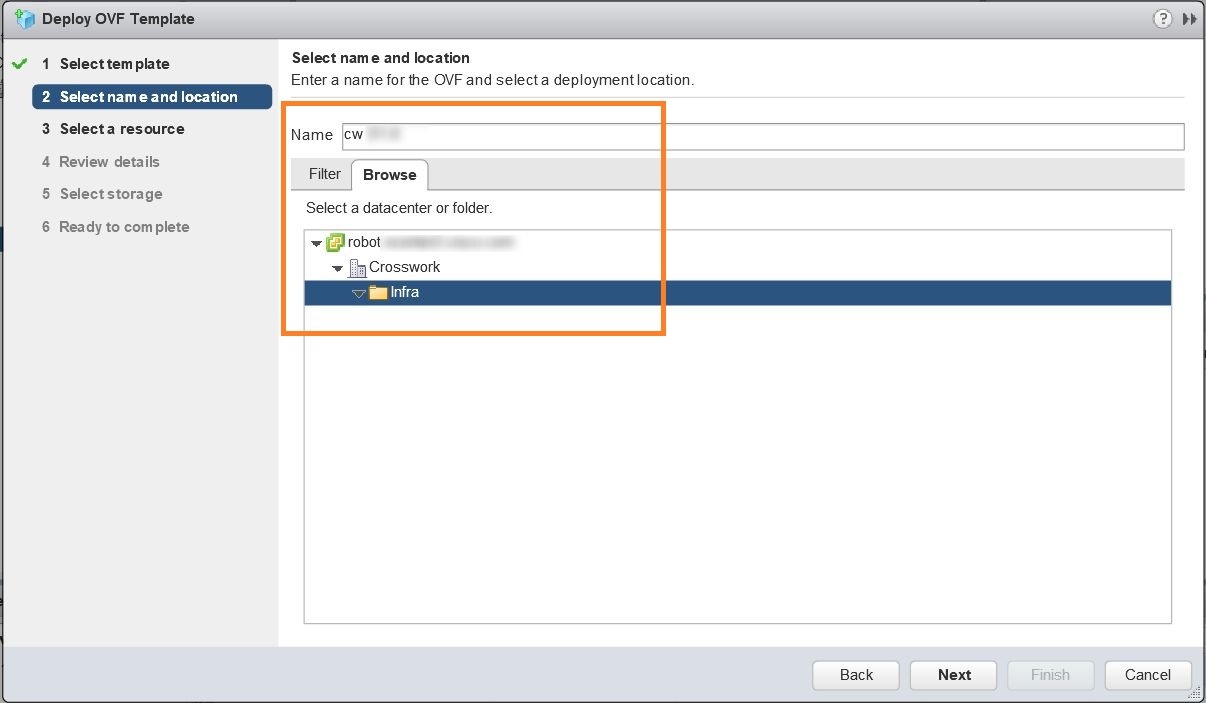 |
||
| Step 5 |
Click Next to go to 3 - Select a resource, as shown in the following figure. Choose the Cisco Crosswork Network Automation VM’s host. 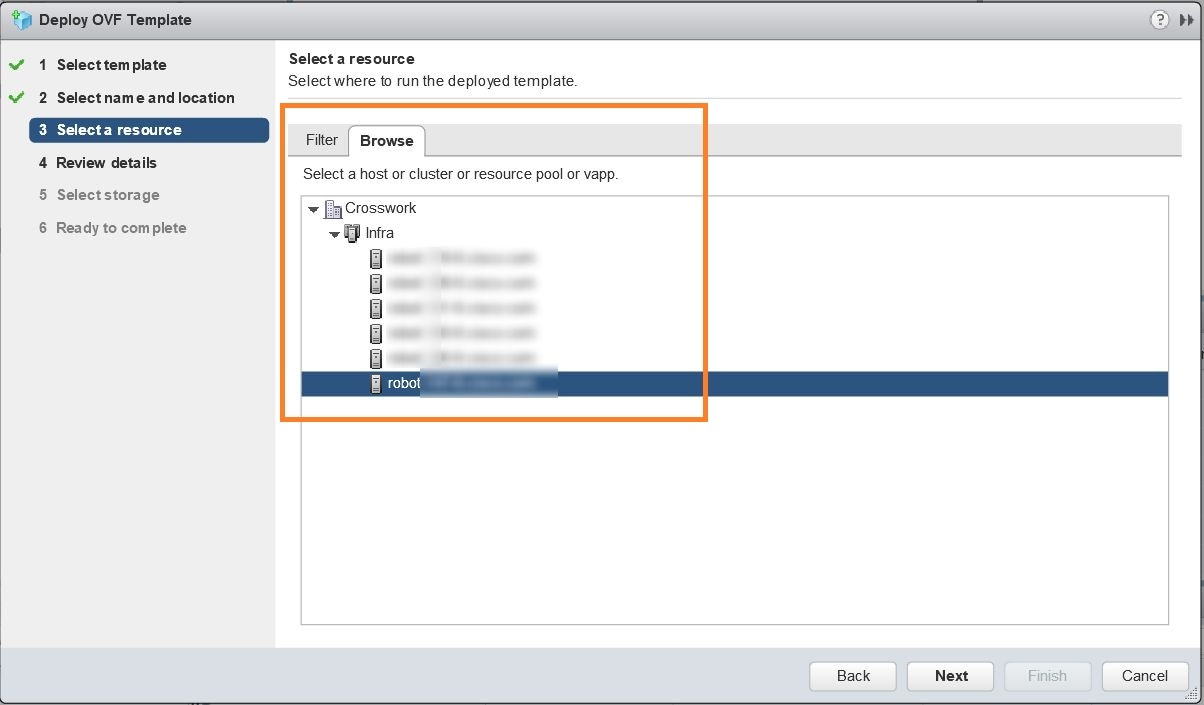 |
||
| Step 6 |
Click Next. The VMware vCenter Server validates the OVA. Network speed will determine how long validation takes. When validation is complete, the wizard moves to 4 - Review details, as shown in the following figure. Take a moment to review the OVF template you are deploying. Note that this information is gathered from the OVF and cannot be modified. 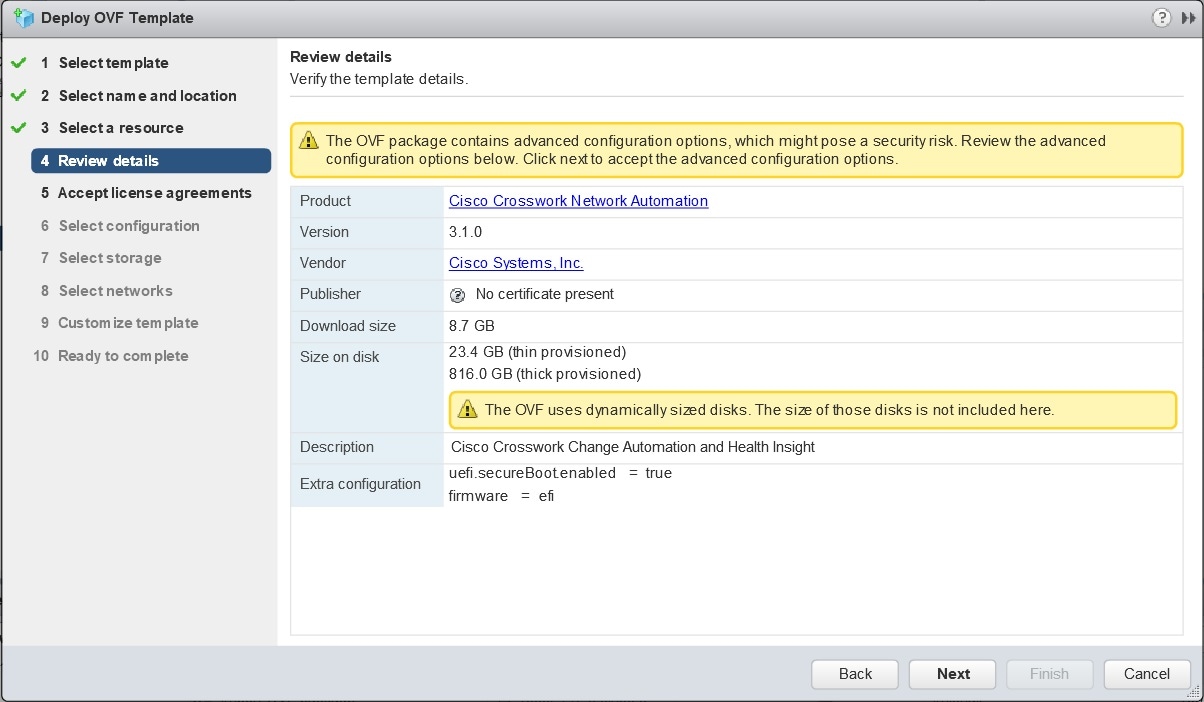 |
||
| Step 7 |
Click Next to go to 5 - Accept license agreements. Review the End User License Agreement and click on Accept before you continue. |
||
| Step 8 |
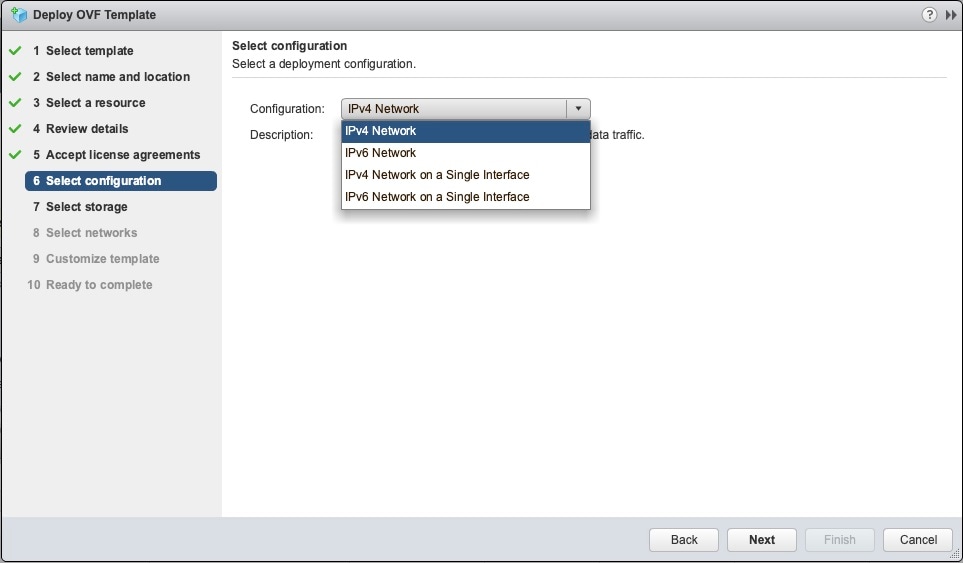
Click Next to go to 6 - Select configuration, as shown in the following figure. Select the desired deployment configuration (IPv4, IPv6 or IPv4 Network on a Single Interface).
 |
||
| Step 9 |
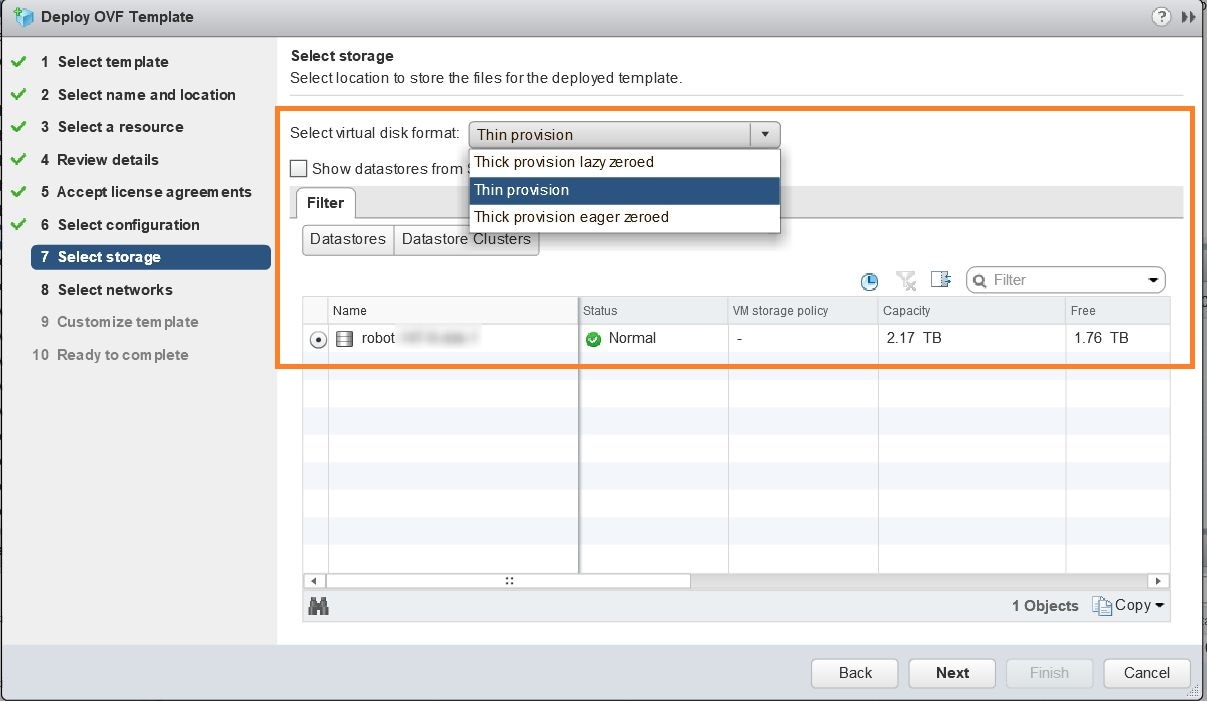
Click Next to go to 7 - Select Storage, as shown in the following figure. Select the relevant option from the Select virtual disk format drop-down list. From the table, choose the datastore you want to use and review its properties to ensure there is enough available storage.
 |
||
| Step 10 |
Click Next to go to 8 - Select networks, as shown in the following figure. In the dropdown table at the top of the page, choose the appropriate destination network for the source Data Network and Management Network, respectively. 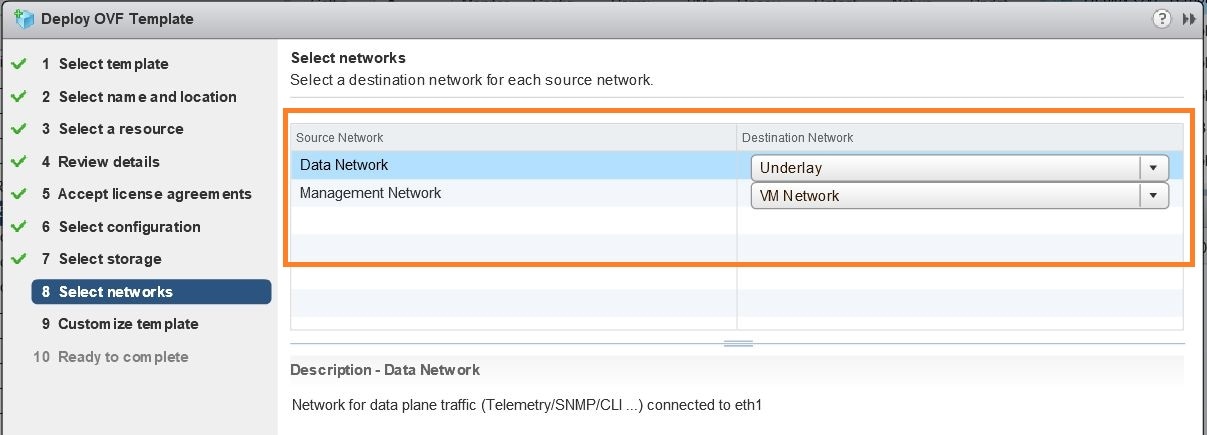 |
||
| Step 11 |
Click Next to go to 9 - Customize template, with the Crosswork Configuration settings already expanded, as shown in the following figure. Make entry in the Disclaimer field. 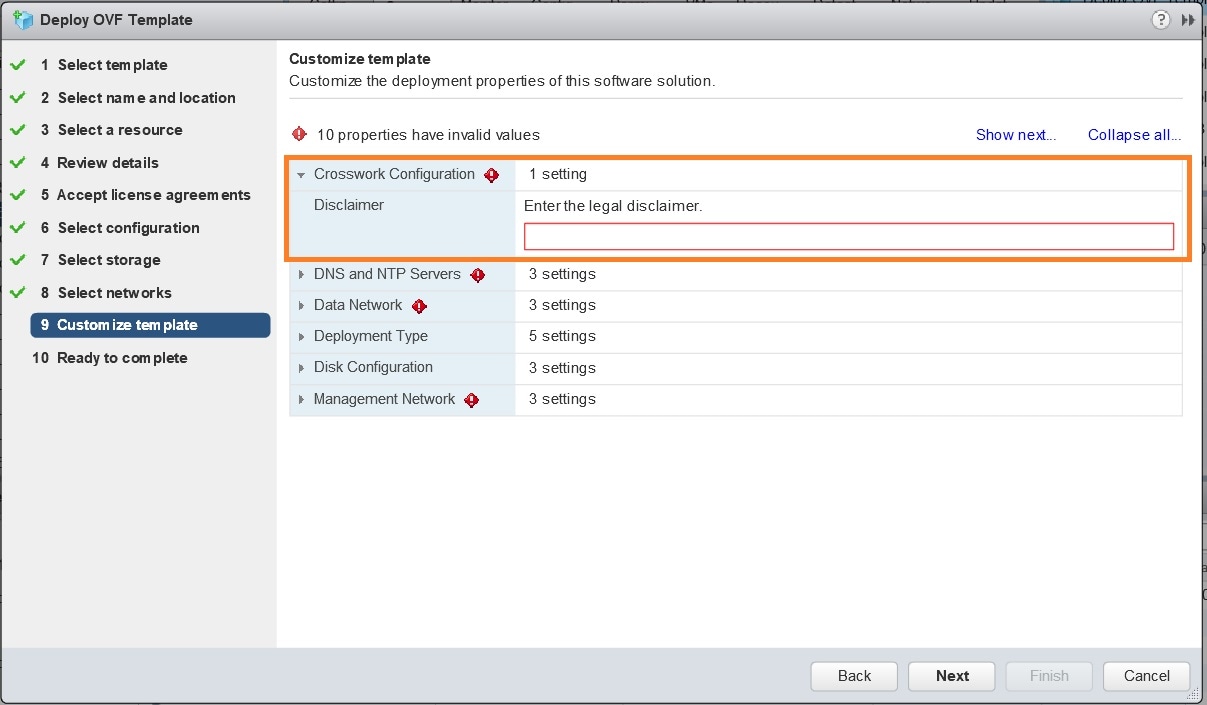 |
||
| Step 12 |
Expand the Management Network settings. According to your deployment configuration, the fields displayed are different. Enter the temporary IP address you want to be associated with the VM during the upgrade. If as part of the upgrade you want to keep this address associated with the VM you can select this option later in the upgrade process. See how to customize the template (step 11). 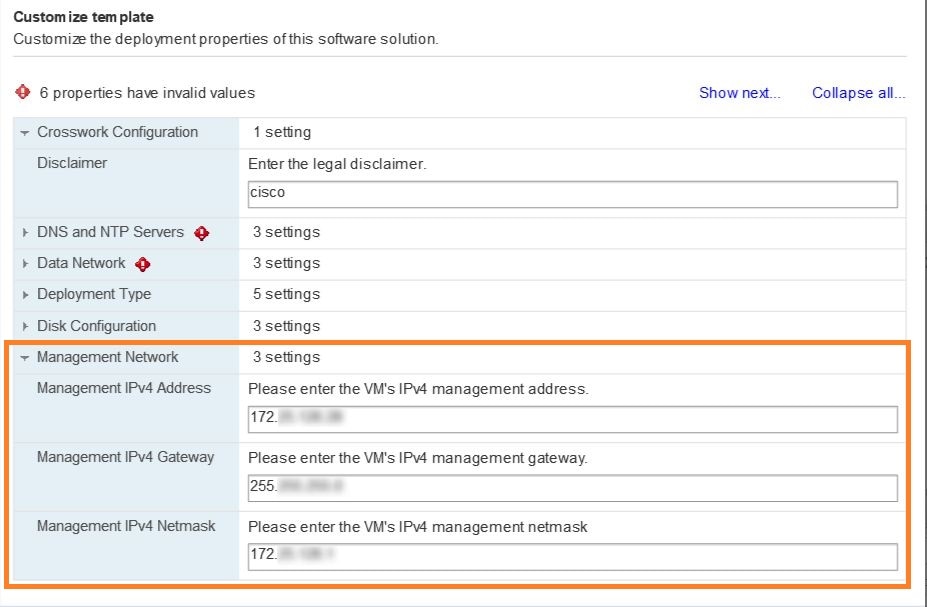 |
||
| Step 13 |
Expand the Data Network settings. According to your deployment configuration, the fields displayed are different. Enter a temporary IP address and other information for the data network. If you want to change the IP to this value you can choose to do that in the customizing template section (step 11). 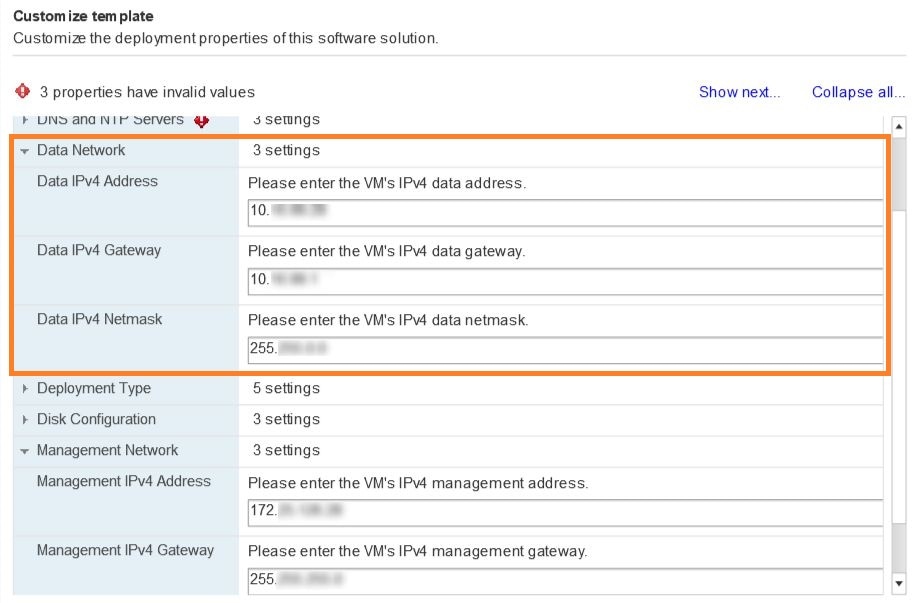 |
||
| Step 14 |
Expand the DNS and NTP Servers settings, as shown in the following figure. According to your deployment configuration, the fields displayed are different. Make entries in three fields:
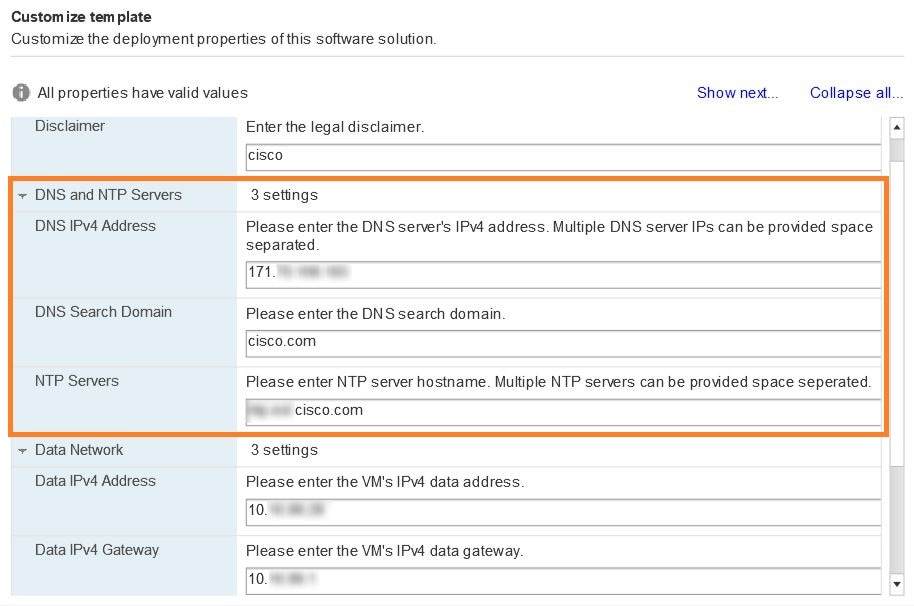 |
||
| Step 15 |
Disk Configuration settings allows you to adjust the amount of storage space available to Cisco Crosswork Change Automation and Health Insights. The default settings should work for most environments. For assistance in adding additional storage, contact the Cisco Customer Experience team. 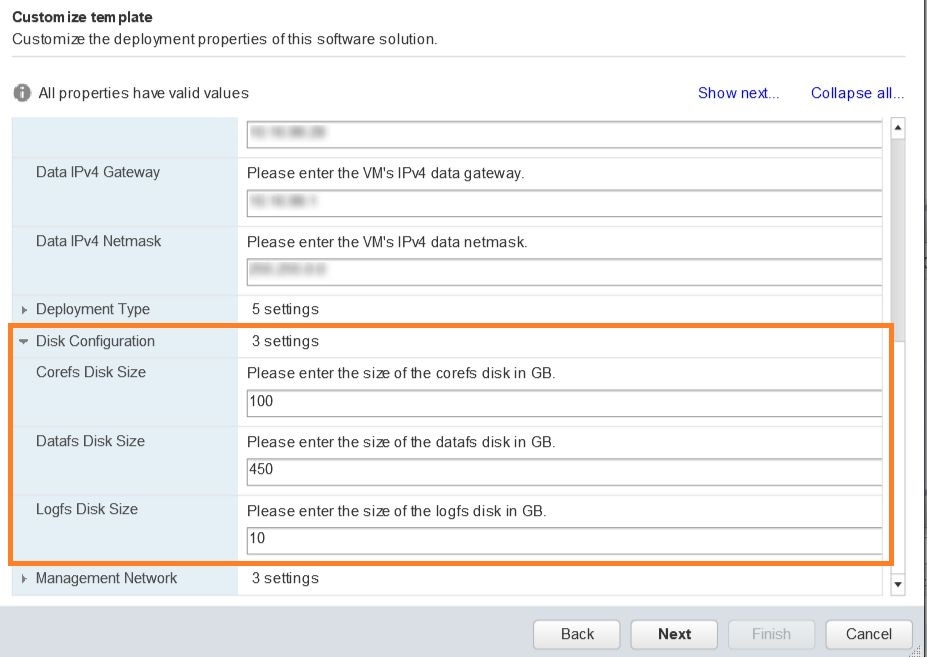 |
||
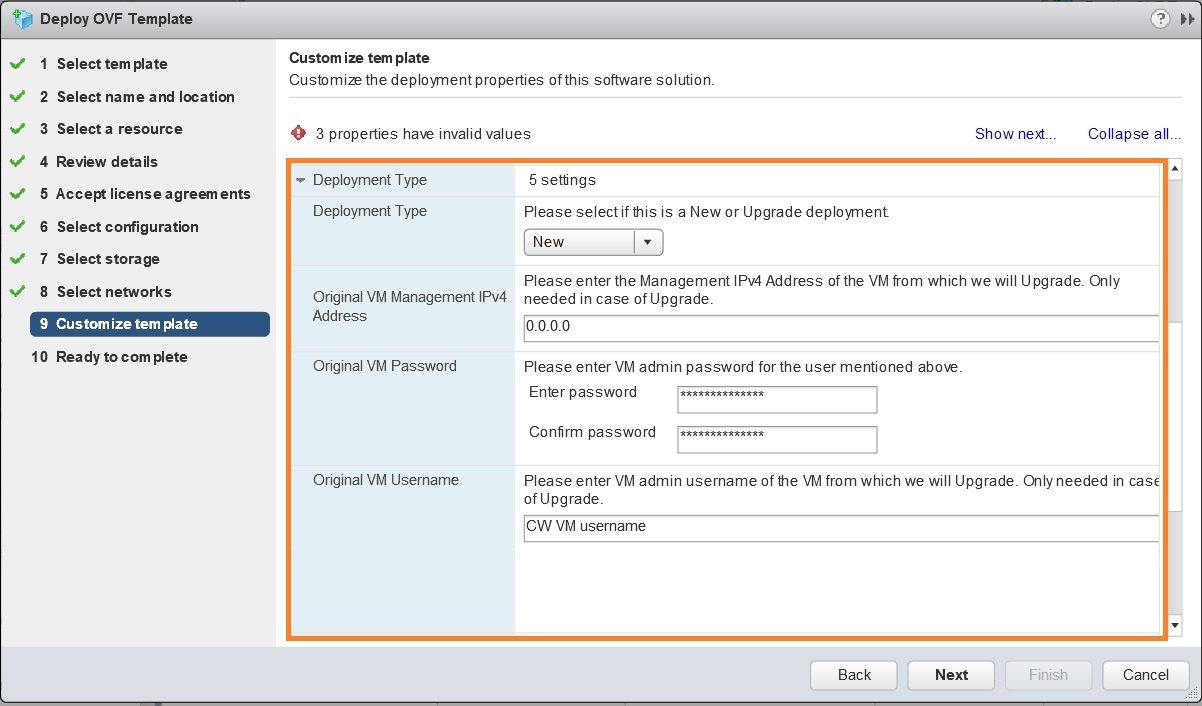
| Step 16 |
Expand the Deployment Type settings, as shown in the following figure. In the Deployment Type dropdown, select Upgrade, and make relevant entries for the following fields:
 |
||
| Step 17 |
Click Next to go to 10 - Ready to Complete, as shown in the following figure. Review your settings and then click Finish if you are ready to begin deployment. 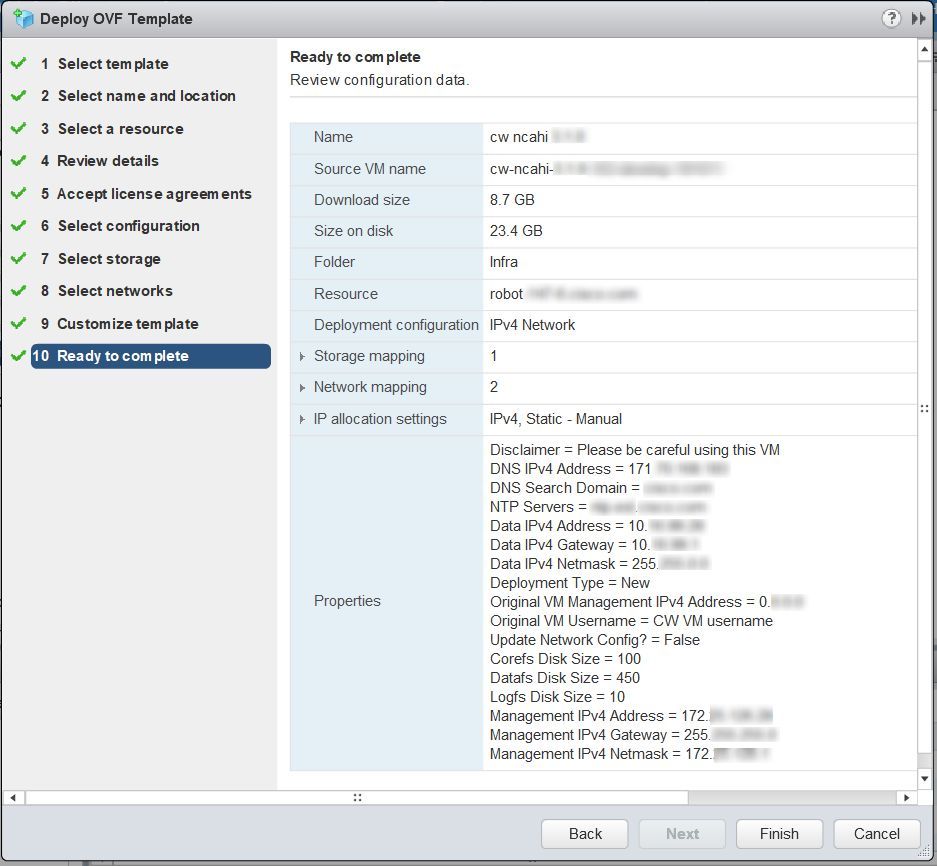 |
||
| Step 18 |
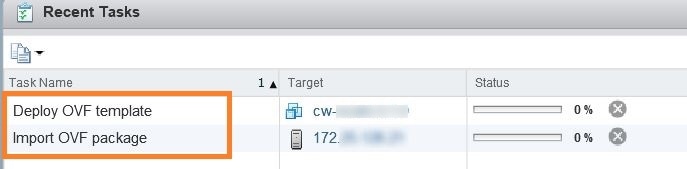
Wait for the deployment to finish before continuing. To check on the deployment status:
|
||
| Step 19 |
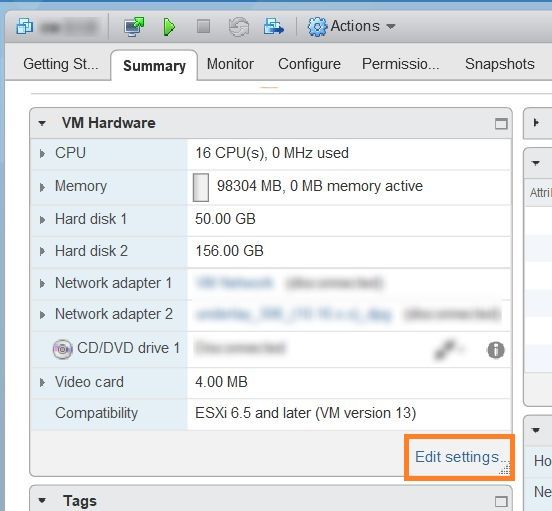
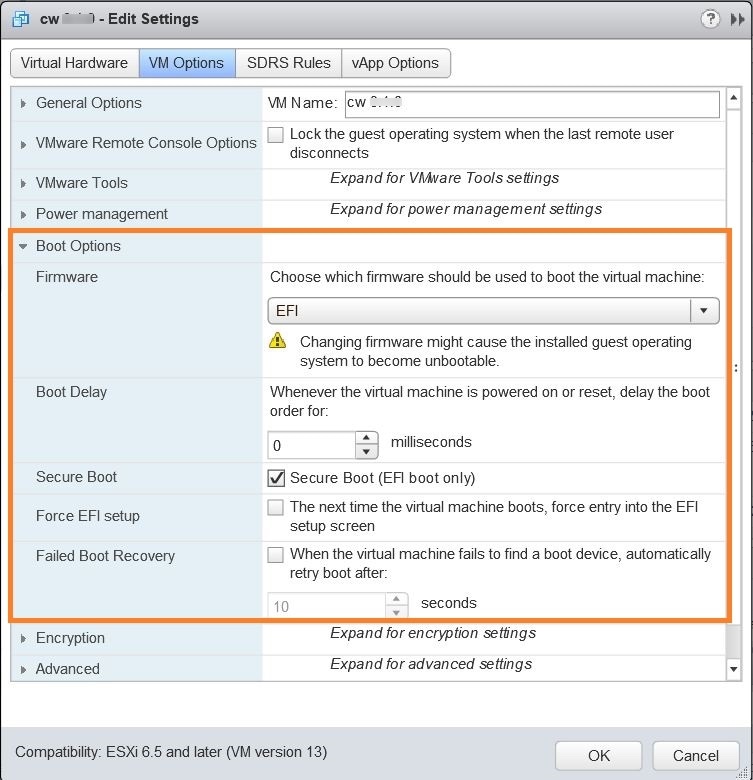
After the deployment tasks are complete, check the host's VM settings to permit boot from EFI Firmware:
|
||
| Step 20 |
You can now power on the Cisco Crosswork Network Automation VM to complete the deployment process. Expand the host’s entry so you can click the Cisco Crosswork Network Automation VM and then choose , as shown in the following figure. 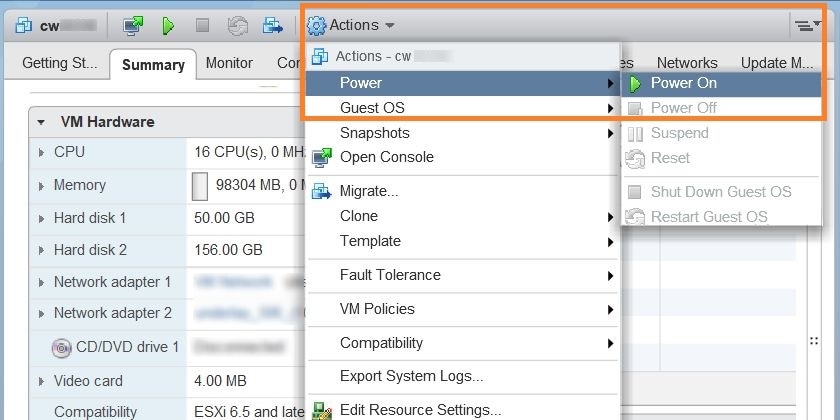 From this point, the upgrade is automatically triggered. The Data and IP configurations are transferred from Cisco Crosswork Network Automation VM version 3.0 to version 3.1. Once the transfer is completed, Cisco Crosswork Network Automation VM version 3.0 will shut down. It will take 30 minutes or more for the Cisco Crosswork Network Automation VM version 3.1 to become operational. Please wait for the process to finish before continuing. To get the current status of the upgrade, login as the super user and use the cli
|
||
| Step 21 |
Install Cisco Crosswork Data Gateway and complete the post-installation tasks using the instructions in Install Cisco Crosswork Data Gateway and Post-installation Tasks respectively. |
||
| Step 22 |
Enroll the Cisco Crosswork Data Gateway with Cisco Crosswork Change Automation and Health Insights as instructed in Enroll Cisco Crosswork Data Gateway. For information on adding devices to the Cisco Crosswork Data Gateway, see the Manage Crosswork Data Gateway Instances section in the Cisco Crosswork Change Automation and Health Insights User Guide |
||
| Step 23 |
What to do next
-
Verify that you are able to login to Cisco Crosswork Network Automation VM version 3.1 using the 3.0 credentials (cw-admin as username and password).
-
Verify if the inventory data and application configurations from Cisco Crosswork Network Automation VM version 3.0 have been retained in version 3.1.
-
Verify if the device details are visible in the Topology page.
-
Check the health status of Cisco Crosswork Change Automation and Health Insights version 3.1 and Cisco Crosswork Data Gateway using the Crosswork Manager and Data Gateway Managementwindows in the UI respectively.
For more information, see the Perform Administrative Tasks chapter in the Cisco Crosswork Change Automation and Health Insights User Guide.
-
Check if you are able to configure and use the applications in Cisco Crosswork Change Automation and Health Insights version 3.1. For more information on the UI workflow, see the Cisco Crosswork Change Automation and Health Insights User Guide.
 Feedback