Zero Touch Provisioning

This section contains the following topics:

Zero Touch Provisioning Concepts

The Cisco Crosswork Zero Touch Provisioning (ZTP) application allows you to ship factory-fresh devices to a branch office or remote location and provision them once physically installed. Local operators can cable these devices to the network without installing an image or configuring them. To use ZTP, you first establish an entry for each device in the DHCP server and in the ZTP application. You can then activate ZTP processing by connecting the device to the network and powering it on or reloading it. The device will download and apply a software image and configurations to the device automatically (you can also apply configurations only). Once configured, ZTP onboards the new device to the Cisco Crosswork device inventory. You can then use other Cisco Crosswork applications to monitor and manage the device.

Cisco Crosswork ZTP uses the following basic terms and concepts:

  • Classic ZTP: A process to download and apply software and configuration files to devices. It uses iPXE firmware and HTTP to boot the device and perform downloads. It's not suitable for use over public networks.

  • Secure ZTP: A secure process to download and apply software images and configuration files to devices. It uses secure transport protocols and certificates to verify devices and perform downloads.

  • PnP ZTP: A secure process to download and apply software images and configuration files to Cisco devices. It uses Cisco Plug and Play (Cisco PnP) to verify devices and perform downloads over a secure, encrypted channel.

  • Evaluation License Countdown: You can use ZTP to onboard devices without licenses for 90 days. After this evaluation period expires, you cannot use ZTP to onboard new devices until you purchase and install a license bundle with enough capacity to cover all prior devices onboarded using ZTP, as well as your projected future needs.

  • Image file: A binary software image file, used to install the network operating system on a device. For Cisco devices, these files are the supported versions of Cisco IOS images. Software image installation is an optional part of ZTP processing. When configured to do so, the ZTP process downloads the image from Cisco Crosswork to the device, and the device installs it. If you must also install SMUs, ZTP can install them as part of configuration processing in Classic and Secure ZTP (SMUs are not supported in PnP ZTP).

  • Cisco Plug and Play (Cisco PnP): Cisco's proprietary zero-touch provisioning solution, bundled in most IOS software images. Cisco PnP uses a software PnP agent and a PnP server to distribute images and configurations to devices. To ensure communications are secure, the server and agent communicate using HTTPS.

  • Configuration file: A file used to set the operating parameters of the newly imaged or re-imaged device. Depending on the ZTP mode you plan to use, the file may be a Python script, Linux shell script, or a sequence of Cisco IOS CLI commands stored as ASCII text (not all of these are supported in all ZTP modes). The ZTP process downloads the configuration file to the newly imaged device, which then executes it. ZTP processing requires configuration files. Secure ZTP also supports up to three different configuration files, which are applied during onboarding in the following order: pre-configuration, day-zero, and post-configuration.

  • Configuration handling method: A Secure ZTP user option. It allows you to specify whether you want to merge a new configuration into the existing device configuration or to overwrite it. It is only available when implementing Secure ZTP.

  • Credential profile: Collections of passwords and community strings that are used to access devices via SNMP, SSH, HTTP, and other network protocols. Cisco Crosswork uses credential profiles to access your devices, automating device access. All credential profiles store passwords and community strings in encrypted format.

  • Bootfile name: The explicit path to and name of a software image that is stored in the ZTP repository. For each device you plan to onboard using ZTP, specify the bootfile name as part of the device configuration in DHCP.

  • HTTPS/TLS: Hypertext Transport Protocol Secure (HTTPS) is a secure form of the HTTP protocol. It wraps an encrypted layer around HTTP. This layer is the Transport Layer Security (TLS) (formerly Secure Sockets Layer, or SSL).

  • iPXE: The open-source boot firmware iPXE is the popular implementation of the Preboot eXecution Environment (PXE) client firmware and boot loader. iPXE allows devices without built-in PXE support to boot from the network. The iPXE boot process is a normal part of Classic ZTP processing only.

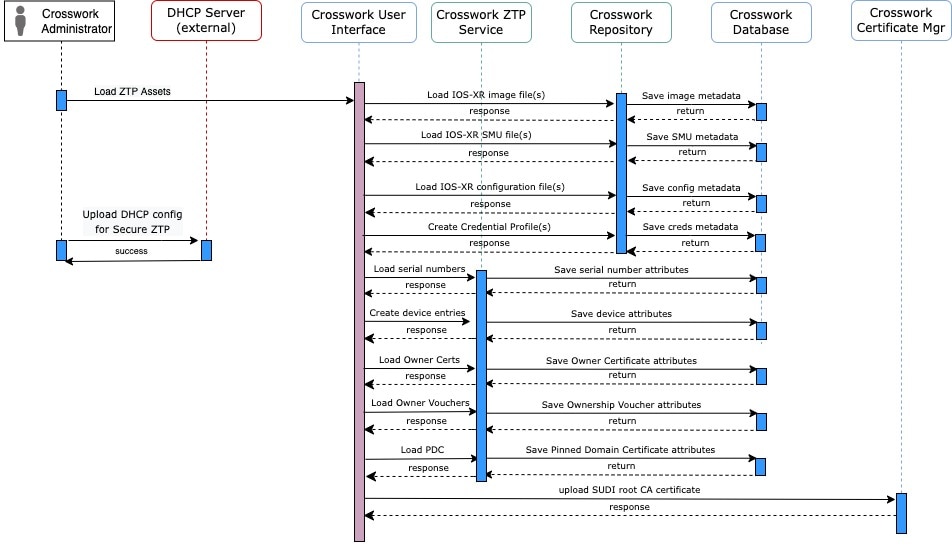
  • Owner certificate: The CA-signed end-entity certificate for your organization, which binds a public key to your organization. You install owner certificates on your devices as part of Secure ZTP processing.

  • Ownership Voucher: Nonceless audit vouchers that verify that devices onboarded with ZTP are bootstrapping into a domain your organization owns. Cisco supplies OVs in response to requests from your organization.

  • Cisco PnP agent: A software agent embedded in Cisco IOS-XE devices. Whenever a device that supports PnP agent powers up for the first time without a startup configuration file, the agent tries to find a Cisco PnP server. The agent can use various means to discover the server's IP address, including DHCP and DNS.

  • Cisco PnP server: A central server for managing and distributing software images and configurations to Cisco PnP-enabled devices. Cisco Crosswork ZTP has an embedded PnP server, which is configured to communicate with PnP agents using HTTPS.

  • SUDI: The Secure Unique Device Identifier (SUDI) is a certificate with an associated key pair. The SUDI contains the device's product identifier and serial number. Cisco inserts the SUDI and key pair in the device hardware Trust Anchor module (TAm) during manufacturing, giving the device an immutable identity. During Secure ZTP processing, the back-end system challenges the device to validate its identity. The router responds using its SUDI-based identity. This exchange, and the TAm encryption services, permit the back-end system to provide encrypted image and configuration files. Only the validated router can open these encrypted files, ensuring confidentiality in transit over public networks.

  • SUDI Root CA Certificates: A root authority certificate for SUDIs, issued and signed by a Certificate Authority (CA), used to authenticate subordinate SUDI certificates.

  • UUID: The Universal Unique Identifier (UUID) uniquely identifies an image file that you have uploaded to Cisco Crosswork. You use the UUID of the software image file in the DHCP bootfile URL with Classic and Secure ZTP.

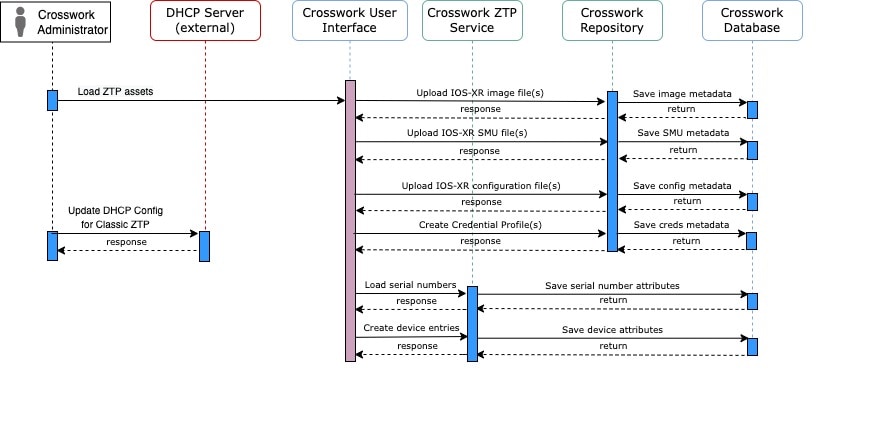
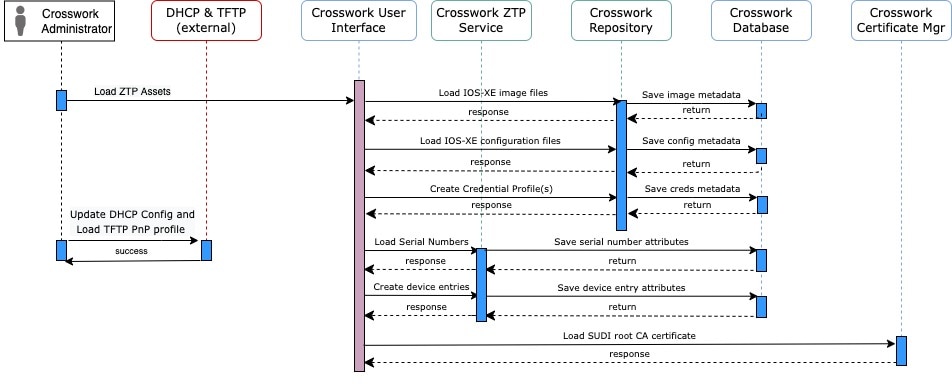
  • ZTP asset: ZTP requires access to several types of files and information in order to onboard new devices. We refer to these files and information collectively as "ZTP assets." You load these assets as part of ZTP setup, before initiating ZTP processing.

  • ZTP profile: A Cisco Crosswork storage construct that combines (normally) one image and one configuration into a single unit. Cisco Crosswork uses ZTP profiles to automate imaging and configuration processes. Using ZTP profiles is optional, but we recommended them. They are an easy way to organize ZTP images and configurations around device families, classes, and roles, and help maintain consistent ZTP use.

  • ZTP repository: The location where Cisco Crosswork stores image and configuration files.

Platform Support for ZTP

This topic details Cisco Crosswork Zero Touch Provisioning support for Cisco and third-party software and devices.

Platform Support for Classic ZTP

The following platforms support Classic ZTP:

  • Software: Cisco IOS-XR versions 6.6.3, 7.0.1, 7.0.2, 7.0.12, and 7.3.1 or later.

  • Hardware:

    • Cisco Network Convergence Systems (NCS) 540 Series Routers

    • Cisco NCS 1000-1004 Series Routers

    • Cisco NCS 5500 Series Routers

    • Cisco NCS 8000 and 8800 Series Routers (Spitfire fixed mode)

Classic ZTP doesn't support third-party devices or software.

Platform Support for Secure ZTP

The following platforms support Secure ZTP:

  • Software: Cisco IOS-XR version 7.3.1 or later, with the exception of releases 7.3.2 and 7.4.1, which are not supported in this release.

    You can upgrade from IOS-XR 6.6.3 to 7.3.1 as a single image installation.

  • Hardware:

    • Cisco Network Convergence Systems (NCS) 540 Series

    • Cisco NCS 1000-1004 Series

    • Cisco NCS 5500 Series

    • Cisco NCS 8000 and 8800 Series (Spitfire fixed mode)

Secure ZTP supports provisioning for third-party devices only if the third-party devices:

Platform Support for PnP ZTP

The following platforms support PnP ZTP:

  • Software: Cisco IOS-XE version 16.12 and 17.4.1.

    Version 16.12.5 is the recommended version for customers.

  • Hardware:

    • Cisco Network Convergence Systems (NCS) 520 Series Routers

    • Cisco Aggregation Services Router (ASR) 903

    • Cisco ASR 907

    • Cisco ASR 920

PnP ZTP doesn't support third-party devices or software.

If you plan on using PnP ZTP, check that the minimum license boot-level on each IOS-XE device is set to metroipaccess or advancedmetroipaccess before you trigger ZTP processing. If the boot level has been set properly, the output of the IOS-XE #sh run | sec license CLI command on the device should contain statements showing either of these two license levels: license boot level advancedmetroipaccess or license boot level metroipaccess. If the command output shows any other license level, especially one lower than these two, the Cisco PnP cryptographic functionality will not be enabled. This will cause certificate installation to fail, which will then cause PnP ZTP device provisioning to fail.

Secure ZTP: Guidelines for Third-Party Device Certificates and Ownership Vouchers

Secure ZTP processing for any device starts with a successful HTTPS/TLS handshake between the device and Cisco Crosswork. After the handshake, Secure ZTP must extract a serial number from the device certificate. Secure ZTP then validates the extracted serial number against its internal "allowed" list of serial numbers. You create the allowed list by uploading device serial numbers to Cisco Crosswork. A similar serial-number validation step occurs later, when validating downloads using ownership vouchers.

Unlike Cisco IOS-XR devices, the format of the serial number in third-party vendors' device certificates is not standardized across vendors. Typically, a third-party vendor's device certificate has a Subject field or section. The Subject contains multiple key-value pairs that the vendor decides upon. One of the key-values pairs is usually a serialNumber key. This key's value contains the actual device serial number as a string, which is preceded by the string SN:. For example: Let's suppose that the third-party device certificate's Subject section contains the following key and value: serialNumber = PID:NCS-5501 SN:FOC2331R0CW. Secure ZTP will take the value after the SN: string and match that to one of the serial numbers in the allowed list.

If the third-party vendor's device certificate has a different format, validation failures can occur. The degree of failure depends on the degree of difference. The vendor certificate may not match this format at all. The certificate's Subject field may not contain a serialNumber key with a value that contains the SN: string. In this case, Secure ZTP processing falls back to using the whole string value of the serialNumber key (if present) as the device serial number. It will then try to match that value to one in the allowed list of serial numbers. These two methods – string matching and the fallback – are the only means Secure ZTP has for determining the third-party device's serial number. If the vendor certificate differs from this expectation sufficiently, Secure ZTP may be unable to validate the device at all.

Secure ZTP has similar format expectations for ownership vouchers. Cisco tools generate ownership vouchers with filenames in the format SerialNumber.vcj, where SerialNumber is the device's serial number. Secure ZTP extracts the serial number from the filename and then attempts to match it to one in the allowed list. For multivendor support, we assume that third-party vendor tools generate OV files with file names in the same format. If this expectation isn't met, validation failures are likely.

ZTP Implementation Decisions

As a best practice, always choose the most secure implementation for the devices you have. That said, ZTP offers a range of implementation choices and cost vs. benefit tradeoffs worth considering in advance:

  • When to Use Classic ZTP: Classic ZTP is easier to implement than Secure ZTP. It needs no PDC, owner certificates, or ownership vouchers. It’s less subject to processing errors, as device and server verification is less stringent and setup is less complex. It’s your only choice if your Cisco devices run IOS-XR versions earlier than 7.3.1, as Secure and PnP ZTP don't support them. Although Classic ZTP now includes a device serial-number check, it remains insecure at the transport layer. It's not recommended if routes to your remote devices cross a metro or otherwise unsecured network.

  • When to Use Secure ZTP: Use Secure ZTP when you must traverse public networks and you have devices that support Secure ZTP. The additional security that it provides requires a more complex setup than Classic ZTP. This complexity can make processing error-prone if you’re new to the setup tasks. Secure ZTP setup also requires a certificates and ownership vouchers from the device manufacturer. Use it if your devices are from third-party manufacturers, as Classic ZTP doesn't support third-party hardware. Third-party devices and their software must be 100-percent compliant with RFCs 8572 and 8366. Device certificates for third-party devices must contain the device serial number. Third-party ownership vouchers must be in a format that uses the device serial number as the filename. Cisco can’t guarantee Secure ZTP compatibility with all third-party devices. For more details on third-party device support, see Platform Support for ZTP.

  • When to Use PnP ZTP: Use PnP ZTP when you want a secure provisioning setup for Cisco IOS-XE devices that support the Cisco PnP protocol. Less complicated to set up than Secure ZTP, but only slightly more complicated than Classic ZTP, it's your best choice when your network devices happen to meet these base requirements.

  • Use ZTP With Imaged Devices: There’s no need to specify a software image when you use any of the ZTP modes. This feature allows you the option of shipping to your remote location one or more devices on which you have already installed a software image. You can then connect to these devices and trigger ZTP processing remotely. Depending on how you set up things, you can apply:

    • A configuration only

    • One or more images or SMUs, with more configurations.

    Secure ZTP offers more flexibility with pre-imaged devices because it offers pre-configuration, day-zero, and post-configuration script execution capability. While both Classic and Secure ZTP modes can chain configuration files, Classic ZTP's ability to execute additional scripts will be limited to the support for script execution allowed on specific devices. PnP ZTP can only execute CLI commands, which doesn't allow for script execution.

    In all cases, the result is to onboard the device. Once onboarded to Cisco Crosswork, you will want to avoid using ZTP to configure the device again (see Reconfigure Onboarded ZTP Devicesfor details).

  • Organize Configurations: Keep your configurations as consistent as possible across devices. Consistency makes solving problems easier. It minimizes the amount of extra configuration you must perform to bring new devices online. It also reduces the number of "special" things to keep in mind when it comes time to reconfigure or upgrade your devices. Start by ensuring that all devices from the same device family and with similar roles have the same or similar basic configurations.

    How you define the role that a device plays depends on your organization, its operational practices, and the complexity of your network environment. For example: Suppose that your organization is a financial services enterprise. It has three types of branches: Sidewalk ATMs, retail branches open during standard business hours, and private trading offices. You could define three sets of basic profiles covering all the devices at each type of branch. You can map your configuration files to each of these profiles.

    Another method of enforcing consistency is to develop basic script configurations for similar types of devices, then use the script logic to call, or chain, other scripts for devices with special roles. If you’re using Classic ZTP, the script is in the specified configuration file. To extend our example, that script would apply a common configuration, then download and apply other scripts depending on the branch type. If using Secure ZTP, you have even more flexibility, as you can specify pre-configuration and post-configuration scripts in addition to the day-zero configuration script.

ZTP Processing Logic

Cisco Crosswork ZTP processing differs depending on whether you choose to implement Classic ZTP, Secure ZTP, or PnP ZTP.

The following illustrations and text provide details on each step of ZTP processing for each ZTP mode.

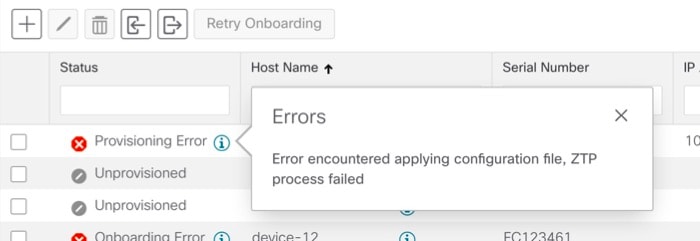
Once initiated by a device reset or reload, the ZTP process proceeds automatically. Crosswork also updates the Zero Touch Devices window with status messages showing the state each device reaches as it is processed. The three figures indicate each of these state transitions with blocks in shades of green on the left side of each diagram (the Onboarded is not shown, as reaching the Onboarding state only happens at the end of ZTP processing).

As indicated in the figures, the configuration scripts you use with ZTP must report device state changes to Cisco Crosswork using Cisco Crosswork API calls. If your configurations fail to do this, Crosswork can't register state changes when they occur, resulting in failed ZTP provisioning and onboarding. To see examples of these calls, select Device Management > ZTP Configuration Files, then click Download Sample Script.

Classic ZTP Processing

The following illustration shows the process logic that Classic ZTP uses to provision and onboard devices.

Figure 1. Classic ZTP Processing
Classic ZTP Processing

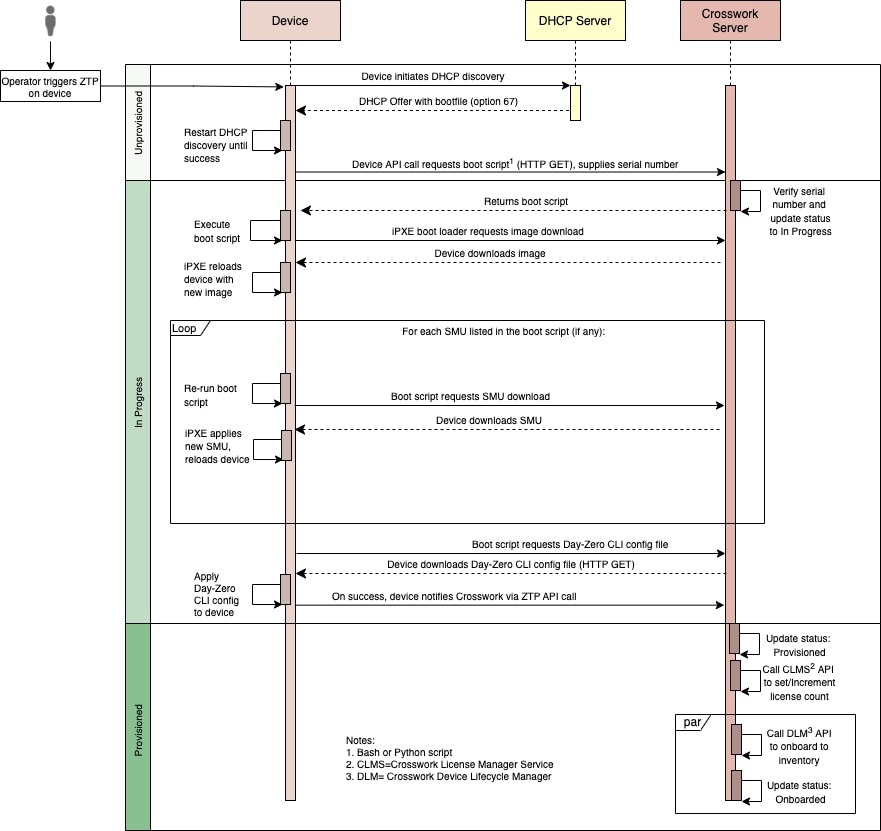
The DHCP server verifies the device identity based on the device serial number, then offers downloads of the boot file and image. Once ZTP images the device, the device downloads the configuration file and executes it.

Secure ZTP Processing

The following illustration shows the process logic that Secure ZTP uses to provision and onboard devices.

Figure 2. Secure ZTP Processing
Secure ZTP Processing

The device and the ZTP bootstrap server authenticate each other using the Secure Unique Device Identifier (SUDI) on the device and server certificates over TLS/HTTPS. Over a secure HTTPS channel, the bootstrap server lets the device download signed image and configuration artifacts. These artifacts must adhere to the RFC 8572 YANG schema. Once the device installs the new image (if any) and reloads, the device downloads configuration scripts and executes them.

PnP ZTP Processing

The following illustration shows the process logic that PnP ZTP uses to provision and onboard devices.

Figure 3. PnP ZTP Processing
PnP ZTP Processing

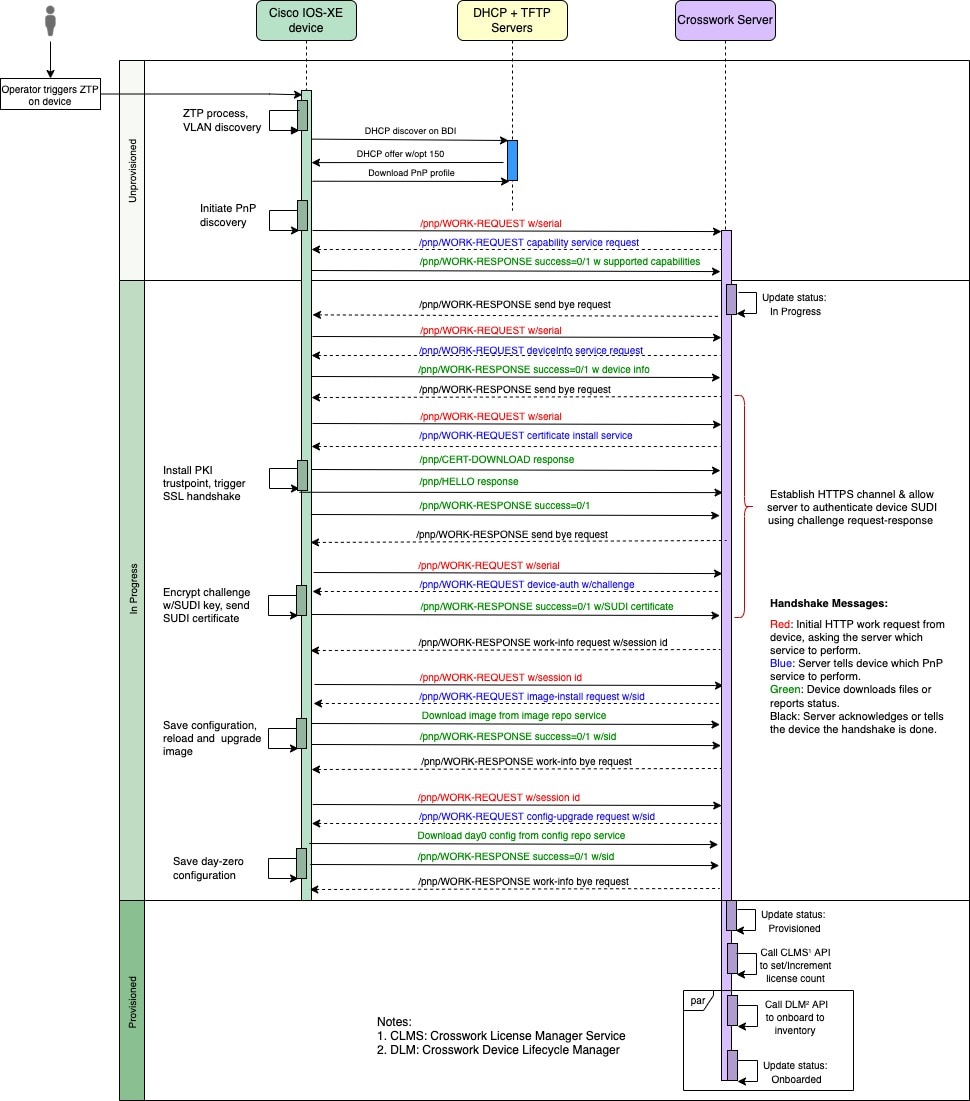
Once an operator triggers PnP ZTP processing, the device performs VLAN discovery and creates a BDI interface, on which DHCP discovery is initiated. As part of the DHCP discovery, the device also fetches the external TFTP server IP address using the DHCP Option 150 configuration. The device downloads the PnP Profile from the TFTP server without authentication and copies it to the device's running configuration. The PnP Profile is a CLI text file. The profile activates the device's PnP agent and sends work requests to the embedded Crosswork PnP server over HTTP on port 30620. The PnP server then validates the device's serial number against Crosswork's "allowed" list of serial numbers (previously uploaded to Crosswork) and then initiates a PnP capability service request. A successful PnP work response from the device changes the device provisioning status from Unprovisioned to In Progress. Thereafter, the PnP server initiates a series of service requests, including requests for device information, certificate installation, image installation, configuration upgrade, and so on. Each of these service requests involves a four-way handshake between the PnP server and PnP agent. As part of certificate-install request, Crosswork PnP server shares its certificate with the device. Successful installation of this trustpoint on the device changes the PnP profile configuration to start using HTTPS and port 30603 on Crosswork. Subsequent image and config download requests use HTTPS to secure transactions. There is currently no SUDI certificate authentication support on the device. Once the device downloads and installs a new image (if any) and reloads, the PnP process will continue to download CLI configuration files and apply them to device running configuration. The device status is then set to Provisioned and the;license count is updated in Crosswork. The device status is then set to Onboarded, and the device stops communicating with the PnP server.

ZTP and Evaluation Licenses

All Cisco Crosswork applications can be used for 90 days without a license. Any time users log into the system, Crosswork displays a banner showing the number of days left in the trial period. When the trial expires, the banner will indicate it. At that point, no more devices will be able to complete the ZTP onboarding process. ZTP licensing follows a consumption-based model with licenses sold in blocks. In order to regain the ability to onboard devices using ZTP, you must install a license block that covers both the number of devices you onboarded during the trial period as well as the new devices you expect to onboard with ZTP in the future. For example: If you onboard 10 devices during the trial and then install a license bundle for 10 devices on day 91, you have no licenses left to use, and must install at least one more license block before onboarding another device. You can add more license blocks as needed. Operators should monitor license consumption to avoid running out of licenses unexpectedly. To see how many licenses you have used and are still available, check the Cisco Smart Licensing Site.

Your onboarded ZTP devices are always associated with either:

  • A serial number, or

  • The values of the Option 82 location ID attributes (remote ID and circuit ID).

Serial numbers and location IDs form an "allowed" list. ZTP uses this list when deciding to onboard a device and assign it a license. If you delete an onboarded ZTP device from inventory, and then onboard it again later, use the same serial number or location ID. If you use a different serial number or location ID, you may consume an extra license. The current release provides no workaround for this scenario. In any case, you can't have two different ZTP devices with the same serial number or location ID active at the same time.

ZTP Setup Workflow

Zero touch provisioning requires you to complete the following setup tasks first, before you can trigger ZTP boot and configuration:

  1. Make sure that your environment meets ZTP prerequisites for security, provider configuration, and device connectivity.

  2. Assemble the assets ZTP needs for processing. These assets include:

    • The software image to install (optional).

    • The configurations to apply.

    • Credentials to access the device.

    • Device serial numbers.

    If you’re using Secure ZTP, these assets also include device owner certificates, the pinned domain certificate, and ownership vouchers, and the SUDI device certificate.

  3. Prepare configurations for the devices you plan to onboard.

  4. Load into Cisco Crosswork the ZTP assets you have assembled.

  5. Create credential profiles using the credential assets that you assembled.

  6. Prepare ZTP device entry files. These files create the Cisco Crosswork device entries that ZTP uses to onboard the devices to the Cisco Crosswork device inventory. If you have many devices to onboard, create the entries in bulk by importing a CSV file. If you have only a few devices to onboard, it's more convenient to prepare these entries one by one, using the Cisco Crosswork UI. You can also use Crosswork APIs to onboard devices.

Irrespective of the ZTP mode you have chosen, ZTP setup has a simple two-part structure: Load device-related assets into Crosswork, and configure one or more external servers to establish communications between Crosswork and the device being onboarded. The actual assets and server configurations vary with each ZTP mode, and you can finish each part in any order. But all the tasks in both parts must be completed before triggering ZTP processing.

To help illustrate this, the following three figures diagram details of the workflow involved in setting up properly for each of the ZTP modes. The remaining topics in this section then explain how to perform each task. You may find these figures a helpful reference while completing the setup tasks.

Figure 4. Classic ZTP Setup Workflow
Classic ZTP Setup Workflow
Figure 5. Secure ZTP Setup Workflow
Secure ZTP Setup Workflow
Figure 6. PnP ZTP Setup Workflow
PnP ZTP Setup Workflow

Meet ZTP Prerequisites

For compatibility with ZTP, your Cisco Crosswork installation must meet the following prerequisites:

  • If you want ZTP to onboard your devices to Cisco NSO, configure NSO as a Cisco Crosswork provider. Be sure to set the NSO provider property key to forward and the property value to true.

  • The Cisco Crosswork cluster nodes must be reachable from the devices, and the nodes from the devices, over either an out-of-band management network or an in-band data network. For a general indication of the scope of these requirements, see the network diagrams in the "Network Requirements" section of the Cisco Crosswork Infrastructure and Applications Installation Guide. Enabling this kind of access may require you to change firewall configurations.

  • If your Crosswork cluster nodes and the devices you want to onboard using Crosswork ZTP are in completely different subnets, you will need to set up one or more static routes from your Crosswork nodes to the device subnet. To do this from the main menu, select Administration > Settings > Static Routes. Click the Add icon, enter the destination subnet IP address and mask (in slash notation), then click Add.

Assemble ZTP Assets

The term "ZTP Assets" refers to the files, credentials and other assets listed in the following table. Depending on the ZTP mode you plan to use, some of them are required.

Table 1. ZTP Asset Types

ZTP Asset Type

Classic ZTP

Secure ZTP

PnP ZTP

Description

Software image

Optional

Optional

Optional

Download from the Cisco Support & Downloads page for the devices supported for the ZTP mode you want to use.

Software image loading is optional. You can load configurations without a software image.

Configurations

Required

Required. Supports multiple configurations.

Required

Your organization's library of configuration files.

Software Maintenance Updates (SMUs)

Optional

Optional

Not Supported

Download from the Cisco Support & Downloads page for the device and NOS you want to onboard.

Device Credentials

Required

Required

Required

Your organization's device credentials library.

Serial Numbers

Required

Required

Required

Your Cisco account team can supply these on request.

Owner Certificates (with owner key)

Not Used

Required

Not used

Your Cisco account team can supply these on request. Your request must include the serial numbers of the devices you want to onboard.

Pinned Domain Certificate (PDC)

Not Used

Required

Not used

Your Cisco account team can supply these on request. Your request must include the serial numbers of the devices you want to onboard.

Ownership Voucher

Not Used

Required

Not used

Your Cisco account team can supply these on request. Your request must include the serial numbers of the devices you want to onboard.

SUDI Root Certificate

Not used

Required

Not used in this release

Download from https://www.cisco.com/security/pki/policies/index.html

Cisco Crosswork ZTP uses the following ZTP assets:

  • Software images: The installable network operating system software (such as Cisco IOS-XR or, for PnP ZTP, Cisco IOS-XE) that enables the network device to function. Software images are required only if the device is un-imaged, or you want to upgrade the network OS. Cisco distributes IOS-XR images as TAR, ISO, BIN, or RPM files. Cisco always distributes IOS-XE images as BIN files. Each image file represents a single release of the given network OS for a given device platform or family. Upload image files to Cisco Crosswork one at a time, and enter the MD5 checksum for each software image file when preparing the upload. Cisco Crosswork uses the MD5 checksum to validate the integrity of the file. Be sure to record the checksum when you download device images from Cisco or any third-party manufacturer. You can also generate your own MD5 checksum for an image you want to upload. Note that ZTP does not require you to apply a software image to a device that is already imaged.

  • Software Maintenance Updates (SMUs). SMUs are Cisco software packages that provide point fixes for one or more critical issues in a given software release. Cisco distributes SMUs in nonbootable format with a readme.txt file explaining the associated issues. Cisco rolls SMU contents into the next maintenance release of a software image. For Classic and Secure ZTP, be sure to apply SMUs using configuration files, not during software image download, and upload them to Cisco Crosswork one at a time. For PnP ZTP, SMU files are not supported for Cisco IOS-XE.

  • Configurations: Classic and Secure ZTP use configuration files to configure the features of the installed software image on a given device, including upgrading the software using SMUs. Configuration files used with these two ZTP modes can be Linux shell scripts (SH), Python scripts (PY), or device operating system CLI commands stored in an ASCII text file (TXT). Cisco PnP ZTP supports only day-zero configuration TXT files on Cisco ASR 900 and Cisco NCS 520 devices. Your PnP ZTP configuration files must use IOS-XE CLI commands. PnP ZTP does not support Linux shell (SH) or Python (PY) script files. Your organization or consultants create these configurations. Upload configuration files to Cisco Crosswork one at a time.

  • Device credentials: All Cisco Crosswork ZTP modes require user names and passwords to access devices and update or configure them. You load these as Cisco Crosswork credential profiles. Cisco Crosswork stores credentials in encrypted form. You can create credential profiles one at a time using the GUI, or load them in bulk by downloading and modifying a credential profile CSV file.

  • Serial numbers: The serial numbers of the devices you plan to onboard using ZTP. Enter serial numbers for each device you’re planning to onboard using any of the ZTP modes. Load serial numbers in bulk, by importing a CSV file, before creating device entries. If you’re planning to use Secure ZTP, submit the serial numbers to Cisco when requesting ownership vouchers.

  • Owner certificates: Load both the owner certificates and the owner key to Cisco Crosswork, so it can generate leaf certificates for each of your devices.

  • Pinned Domain Certificate (PDC): Load the PDC to Cisco Crosswork along with your owner certificates. You also submit the PDC to Cisco when requesting ownership vouchers.

  • Ownership vouchers (OVs): Load your OVs with the other certificates. Submit your PDC and device serial numbers when you request OVs from Cisco or third party manufacturers. Cisco returns the OVs to you when they are ready, as one or more VCJ files in a Tarball. This exchange takes place using a secure method agreed upon by you and your Cisco account team. If you’re using vouchers for third-party devices, the VCJ files the manufacturer supplies must follow the naming convention serial.vcj, where serial is the serial number of the corresponding device. Cisco Crosswork requires this file naming convention in order to map the ownership voucher to the device.

  • SUDI Root CA certificates. You load SUDI Root CA certificates at the same time as other certificates and (in the case of Secure ZTP) OVs. Cisco SUDI root certificates are available for customer download at the Cisco PKI: Policies, Certificates, and Documents page (https://www.cisco.com/security/pki/policies/index.html).

Some organizations maintain libraries of approved versions of many of these assets. If your organization has a library like this, ensure that these assets are easily accessible from your client desktop. Doing so makes it easier for you to complete ZTP setup.

Prepare Configuration Files

The following sections provide guidelines for preparing custom configuration files for use in configuring your devices using any of the ZTP onboarding modes:

Note that Secure ZTP allows you to apply up to three configuration files during onboarding: one for pre-configuration preparation, a second that is the day-zero or main configuration, and a third post-configuration file to be applied after the day-zero configuration is complete. Only the day-zero configuration is required. The order of application is fixed.

Download the Sample Configuration File

The contents of your configuration code will vary greatly, depending on the devices you use and how your organization uses them. A complete description of all the options available to you is therefore beyond the scope of this document.

The main guidelines to remember are:

  1. Your custom configuration code can use both default and custom replaceable (or "placeholder") parameters. This allows you to insert values at runtime using the Configuration Attributes field when importing device entries in bulk or creating them one at a time.

  2. You can create new, custom replaceable parameters as needed. You can name them anything you like, as long as they do not use the same names as the default parameters and follow the variable naming convention. If you do use the default replaceable parameters, their runtime values will be inserted from the sources described in Use Default Replaceable Parameters in Configuration Files instead of the values you set in the device entry's Configuration Attributes field.

  3. Replaceable parameter names are case-sensitive, and must include the braces and dollar sign. They must not include spaces (use underscores instead).

  4. Be sure all of your custom replaceable parameters have a runtime value specified in the Configuration Attributes field. If you fail to specify a runtime value for even one of your custom replaceable parameters, the device configuration process will fail.

  5. If you’re using Secure ZTP, you can use custom replaceable parameters for the day-zero configuration only. Custom replaceable parameters are not supported for pre-configuration and post-configuration files.

  6. Your configurations must use Cisco Crosswork API calls to complete some tasks. In particular, the code must use API calls to notify the Cisco Crosswork server when the device transitions from one ZTP state to another.

  7. While any configuration file can call another configuration file and run it (if it can be successfully downloaded to the device), only Secure ZTP lets you specify separate pre-configuration, post-configuration, and day-zero configuration files as part of the initial, secure download.

  8. Configuration file names cannot contain more than one period, and must use underscores in place of spaces. Additional file restrictions are noted in the sample configuration file discussed below.

For examples of how to use the configuration parameters and API calls, see the sample ZTP configuration file for Cisco IOS-XR devices supplied with the Cisco Crosswork ZTP application. To download the sample ZTP configuration file from Cisco Crosswork, select Device Management > ZTP Configuration Files, then click Download Sample Script (XR). The sample configuration script is commented and provides examples of the more commonly used APIs and parameters.

For more details on replaceable parameters, see the following sections, Use Default Replaceable Parameters in Configuration Files and Use Custom Replaceable Parameters in Configuration Files.

For more details on the API calls, see the section on ZTP device and configuration APIs in the "Crosswork API References" menu, available on the Cisco Developer Network (DevNet) site for Cisco Crosswork. The sample configuration scripts in this topic also display examples of how to use the relevant Crosswork APIs.

Preview Configuration Files

To preview the contents of any configuration file previously uploaded to Cisco Crosswork, select Device Management > ZTP Configuration Files, then click the configuration file name. The pop-up preview includes code syntax styling for important code features, as shown in the following table.

Table 2. Code Syntax Colors in ZTP Config File Preview

These code features...

… are shown in this color

Punctuation, Operator, Entity, URL, Variable, Class Name, Constant

Black

Comment

Gray

Property, Tag, Boolean, Function Name, Symbol

Orange

Selector, Attribute Name, Char, Builtin, Inserted

Dark Green

Function

Purple

Keyword, Attribute Value

Blue

Regex, Important

Brown

String

Green

Number, Ethernet Address, MAC Address

Magenta

Use Default Replaceable Parameters in Configuration Files

The following table lists the default replaceable parameters you can use in your custom configuration files. At runtime, for each of these placeholders, Cisco Crosswork substitutes the appropriate values for each device. For an example of the use of these placeholders, download the sample configuration script from Cisco Crosswork: Device Management > ZTP Configuration Files > Download Sample Script (XR). For examples showing how to use these default replaceable parameters, see Sample ZTP Configuration Scripts

Table 3. Default Parameters in ZTP Configuration Files

Cisco Crosswork substitutes this placeholder...

...Using the value from the...

{$HOSTNAME}

Host name of the device as specified in the ZTP device entry.

{$IP_ADDRESS}

IP address of the device as specified in the ZTP device entry.

{$SSH_USERNAME}

The value of the User Name field in the credential profile (when the Connectivity Type is SSH).

{$SSH_PASSWORD}

The value of the Password field in the credential profile (when the Connectivity Type is SSH).

{$SSH_ENPASSWORD}

The value of the Enable Password field in the credential profile (when the Connectivity Type is SSH)

{$SNMP_READ_COM}

The value of the Read Community field in the credential profile (when the Connectivity Type is SNMPv2).

{$SNMP_WRITE_COM}

The value of the Write Community field in the credential profile (when the Connectivity Type is SNMPv2).

{$SNMP_SEC_LEVEL}

The value of the Security Level field in the credential profile (when the Connectivity Type is SNMPv3).

{$SNMP_USERNAME}

The value of the User Name field in the credential profile (when the Connectivity Type is either SNMPv2 or SNMPv3).

{$SNMP_AUTH_TYPE}

The value of the User Name field in the credential profile (when the Connectivity Type is SNMPv3 and Security Level is AUTH_NO_PRIV) or AUTH_PRIV).

{$SNMP_AUTH_PASS}

The value of the User Name field in the credential profile (when the Connectivity Type is SNMPv3 and Security Level is AUTH_NO_PRIV or AUTH_PRIV).

{$SNMP_PRIV_TYPE}

The value of the User Name field in the credential profile (when the Connectivity Type is SNMPv3 and Security Level is AUTH_PRIV).

{$SNMP_PRIV_PASS}

The value of the Priv Password field in the credential profile (when the Connectivity Type is SNMPv3 and Security Level is AUTH_PRIV).

Use Custom Replaceable Parameters in Configuration Files

You can create your own custom replaceable parameters in configuration files, as shown in the following sample. You can use custom and default replaceable parameters in the same configuration file, as shown in the sample.

You can assign any name you want to a custom replaceable parameter, so long as you:

  • Follow the given variable definition format (for example, {$MyParm})

  • Substitute an underline character in place of spaces in the parameter name.

  • Don't re-use the same names and capitalization as any of the default replaceable parameters.

  • Supply values for each of your custom parameters in the Configuration Attributes field in the device entry file. To use the following sample CLI configuration file and its custom parameters with a ZTP device entry file, you would need to specify a value for the {$LOOPBACK0_IP} custom parameter in each device's Configuration Attributes field in the ZTP device entry file. If you forget to specify values for any custom parameter, the configuration will fail.

If you’re using Secure ZTP, custom replaceable parameters are supported for the day-zero configuration file only.

The first line in this sample script is required in CLI scripts for IOS-XR devices. It allows ZTP to verify whether the file is a CLI script or bash/Python script. Be sure to update the version number as appropriate. No such line is required for IOS-XE devices.

Figure 7. Sample IOS-XR CLI Configuration Script With Mixed Replaceable Parameters
!! IOS XR Configuration 7.3.1
!
hostname {$HOSTNAME}
username {$SSH_USERNAME}
 group root-lr
 group cisco-support
 password 0 {$SSH_PASSWORD}
!
cdp
!
line console
exec-timeout 0 0
!
line default
exec-timeout 0 0
session-timeout 120
!

call-home
 service active
 contact smart-licensing
 profile CiscoTAC-1
  active
  destination transport-method http
 !
!
interface Loopback0
 ipv4 address {$LOOPBACK0_IP} 255.255.255.255
!
interface MgmtEth0/RP0/CPU0/0
 description OOB Management ZTP
 ipv4 address {$IP_ADDRESS}
!     
end

Sample ZTP Configuration Scripts

The following samples contain examples of tested, commented configuration files.

Figure 8. Classic ZTP Day-Zero Configuration Script for IOS XR Devices
#!/bin/bash

#################################################################################
#
# ztpSampleScriptFile.sh
#
# Purpose: This sample script is required to notify Crosswork of the status of
# ZTP processing on an IOS XR device, and to update the device's IP address and
# hostname in Crosswork. It is also used to download a day0 config file from
# Crosswork config repository and apply this initial configuration to the device.
#
# To use: Modify the sample script as needed, following the comment guidance.
# Then upload the modified script to the Crosswork config repository.
# Next, copy the URL of this file from the repository and set that
# value in the DHCP server boot filename for ZTP config download. When ZTP is
# triggered on the device, it will download and run the script, then notify
# Crosswork.
#
# Replace the following variables with valid values & upload to Crosswork config
# repository. Sample values are provided for reference.
# - XRZTP_INTERFACE_NAME: e.g., MgmtEth0/RP0/CPU0/0 interface where ZTP triggered
# - CW_HOST_IP: Crosswork VM management or data network IP address,
# - CW_PORT: 30604 for HTTP & 30603 only for HTTPS download of config file
# - CW_CONFIG_UUID: Replace with UUID of day0 config file from Crosswork repo,
#   assuming user has already uploaded device day-0 config file.
#
# This script has been tested and is known to work on Cisco NCS5501, NCS540l,
# ASR9901, and 8800 routers.
#
#################################################################################


export LOGFILE=/disk0:/ztp/customer/user-script.log

XRZTP_INTERFACE_NAME="MgmtEth0/RP0/CPU0/0"
# ZTP helper library is assumed to be installed in IOS-XR linux shell
source /pkg/bin/ztp_helper.sh
interfacedata=$(xrcmd "show interface ${XRZTP_INTERFACE_NAME}")

CW_HOST_IP="192.168.100.248"
CW_PORT="30604"
CW_CONFIG_UUID="e04661f8-0169-4ad3-82b8-a7c26c4f2565"

# Send logging information to log file on device disk0:/ztp/user-script.log
function ztp_log() {

    echo "$(date +"%b %d %H:%M:%S") "$1 >> $LOGFILE
}

#
# Get chassis serial number of the device, required by ZTP process.
# This works on Cisco NCS5501, NCS540l, 8800 series routers.
#
function get_serialkey(){

    local sn=$(dmidecode | grep -m 1 "Serial Number:" | awk '{print $NF}');
    if [ "$sn" != "Not found" ]; then
           ztp_log "Serial $sn found.";
           # The value of $sn from dmidecode should be same as serial number
           # of XR device chassis.
           DEVNAME=$sn;
           return 0
    else
        ztp_log "Serial $sn not found.";
        return 1
    fi
}

#
# Get chassis serial number of the device, required by ZTP process.
# This is tested and works on Cisco ASR 9901, but not other devices.
#
function get_serialkey_asr9901(){

     udi=$(xrcmd "show license udi")
     sn="$(cut -d':' -f4 <<<"$udi")"
     pid="$(cut -d':' -f3 <<<"$udi")"
     pid="$(cut -d',' -f1 <<<"$pid")"
     echo "Serial Number $sn"
     echo "product id $pid"
}

#
# Get IP address and subnet mask from device. IP address is assigned from DHCP
# server on interface where ZTP was triggered.
#
function get_ipaddress(){

    local ipvar=($(echo $interfacedata | awk -F "Internet address is " '{sub(/ .*/,"",$2);print $2}'));
    local ipv4addr=$(xrcmd "sh run interface ${XRZTP_INTERFACE_NAME} | i ipv4 address" | awk '{print $3}')
    local ipv6addr=$(xrcmd "sh run interface ${XRZTP_INTERFACE_NAME} | i ipv6 address" | awk '{print $3}')
    local ipaddress=($(echo $ipvar | awk -F "/" '{sub(/ .*/,"",$1);print $1}'));
    local mask=($(echo $ipvar | awk -F "/" '{sub(/ .*/,"",$2);print $2}'));
    local maskv6=($(echo $ipv6addr | awk -F "/" '{sub(/ .*/,"",$2);print $2}'));

    ztp_log "### Value of interfacedata => $interfacedata ###"
    ztp_log "### Value of ipvar => $ipvar ###"
    ztp_log "#####IPv4 address $ipaddress and mask $mask found. #####";

    IPADDR=$ipaddress
    MASK=$mask
    MASKV6=$maskv6

    return 0
}

#
# Fetch hostname from device configuration.
#
function get_hostname(){

    hostnamedata=$(xrcmd "show running-config hostname")
    local hostname=($(echo $hostnamedata | awk -F "hostname " '{sub(/ .*/,"",$2);print $2}'));

    ztp_log "#####hostname $hostname found.";
    HOSTNAME=$hostname;
    return 0;
}

#
# Download day-0 config file from Crosswork config repository using values
# set for CW_HOST_IP, CW_PORT and CW_CONFIG_UUID.
# The MESSAGE variable is optional, can be used to display a suitable message
# based on the ZTP success/failure log.
#
function download_config(){

    ztp_log "### Downloading system configuration ::: ${DEVNAME} ###";
    ztp_log "### ip address passed value ::: ${IPADDR} ###";
    ip netns exec global-vrf /usr/bin/curl -k --connect-timeout 60 -L -v --max-filesize 104857600 http://${CW_HOST_IP}:${CW_PORT}/crosswork/configsvc/v1/configs/device/files/${CW_CONFIG_UUID} -H X-cisco-serial*:${DEVNAME} -H X-cisco-arch*:x86_64 -H X-cisco-uuid*: -H X-cisco-oper*:exr-config -o /disk0:/ztp/customer/downloaded-config 2>&1

    if [[ "$?" != 0 ]]; then
        STATUS="ProvisioningError"
        ztp_log "### status::: ${STATUS} ###"
        ztp_log "### Error downloading system configuration, please review the log ###"
        MESSAGE="Error downloading system configuration"
    else
        STATUS="Provisioned"
        ztp_log "### status::: ${STATUS} ###"
        ztp_log "### Downloading system configuration complete ###"
        MESSAGE="Downloading system configuration complete"
    fi
}

#
# Apply downloaded configuration to the device and derive ZTP status based on
# success/failure of ZTP process. The MESSAGE variable is optional, can be used
# to display a suitable message based on the ZTP success/failure log.
#
function apply_config(){
    ztp_log "### Applying initial system configuration ###";
    xrapply_with_reason "Initial ZTP configuration" /disk0:/ztp/customer/downloaded-config 2>&1 >> $LOGFILE;
    ztp_log "### Checking for errors ###";
    local config_status=$(xrcmd "show configuration failed");
    if [[ $config_status ]]; then
        echo $config_status  >> $LOGFILE
        STATUS="ProvisioningError"
        ztp_log "### status::: ${STATUS} ###"
        ztp_log "!!! Error encountered applying configuration file, please review the log !!!!";
        MESSAGE="Error encountered applying configuration file, ZTP process failed"
    else
       STATUS="Provisioned"
       ztp_log "### status::: ${STATUS} ###"
       ztp_log "### Applying system configuration complete ###";
       MESSAGE="Applying system configuration complete, ZTP process completed"
   fi
}

#
# Call Crosswork ZTP API to update device ZTP status, IP address, hostname.
# Without this function, device status will remain in "In Progress" and not
# be updated in Crosswork.
#
# Using this API, device SSH/SNMP connectivity details can also be updated.
# Values for connectivity details values can be added as part of
# "connectivityDetails" array in below curl command. Sample snippet provided:
#
#   "connectivityDetails": [{
#     "protocol": "SSH",
#     "inetAddr": [{
#       "inetAddressFamily": "IPV4/IPV6",
#       "ipaddrs": "<ssh/snmp ipaddress>",
#       "mask": <ipaddress mask(Integer).>,
#       "type": "CONNECTIVITYINFO"
#     }],
#     "port": <ssh/snmp port(Integer)>,
#     "timeout": <ssh/snmp timeout(Integer). default to 60sec>
#   }]
#
function update_device_status() {

     echo "'"$IPADDR"'"
     echo "'"$MASK"'"
     echo "'"$DEVNAME"'"
     echo "'"$STATUS"'"
     echo "'"$HOSTNAME"'"
     echo "'"$MESSAGE"'"


    curl -d '{
       "ipAddress":{
            "inetAddressFamily": "IPV4",
            "ipaddrs": "'"$IPADDR"'",
            "mask":  '$MASK'
        },
       "serialNumber":"'"$DEVNAME"'",
       "status":"'"$STATUS"'",
       "hostName":"'"$HOSTNAME"'",
       "message":"'"$MESSAGE"'"
   }' -H "Content-Type: application/json" -X PATCH http://${CW_HOST_IP}:${CW_PORT}/crosswork/ztp/v1/deviceinfo/status
}


# ==== Script entry point ====
STATUS="InProgress"
get_serialkey;
#get_serialkey_asr9901; // For Cisco ASR9901, replace get_serialkey with get_serialkey_asr9901.
ztp_log "Hello from ${DEVNAME} !!!";
get_ipaddress;
ztp_log "Starting autoprovision process...";
download_config;
apply_config;
get_hostname;
update_device_status;

ztp_log "Autoprovision complete...";
exit 0
Figure 9. Sample Secure ZTP Post-Configuration Script
#!/bin/bash

#################################################################################
#
# Secure ZTP post-configuration script. It updates the hostname and
# ipaddress for the device input, serial key and Crosswork host and port
#
#################################################################################


export LOGFILE=/disk0:/ztp/customer/user-script.log

XRZTP_INTERFACE_NAME="MgmtEth0/RP0/CPU0/0"
# ZTP helper library is assumed to be installed in IOS-XR linux shell
source /pkg/bin/ztp_helper.sh
interfacedata=$(xrcmd "show interface ${XRZTP_INTERFACE_NAME}")

CW_HOST_IP="192.168.100.248"   #update from the post script prepare code
CW_PORT="30603"           #update from the post script prepare code


# Send logging information to log file on device disk0:/ztp/user-script.log
function ztp_log() {

    echo "$(date +"%b %d %H:%M:%S") "$1 >> $LOGFILE
}


#
# Get IP address and subnet mask from device. IP address is assigned from DHCP
# server on interface where ZTP was triggered.
#
function get_ipaddress(){

    local ipvar=($(echo $interfacedata | awk -F "Internet address is " '{sub(/ .*/,"",$2);print $2}'));
    local ipv4addr=$(xrcmd "sh run interface ${XRZTP_INTERFACE_NAME} | i ipv4 address" | awk '{print $3}')
    local ipv6addr=$(xrcmd "sh run interface ${XRZTP_INTERFACE_NAME} | i ipv6 address" | awk '{print $3}')
    local ipaddress=($(echo $ipvar | awk -F "/" '{sub(/ .*/,"",$1);print $1}'));
    local mask=($(echo $ipvar | awk -F "/" '{sub(/ .*/,"",$2);print $2}'));
    local maskv6=($(echo $ipv6addr | awk -F "/" '{sub(/ .*/,"",$2);print $2}'));

    ztp_log "### Value of interfacedata => $interfacedata ###"
    ztp_log "### Value of ipvar => $ipvar ###"
    ztp_log "#####IPv4 address $ipaddress and mask $mask found. #####";

    IPADDR=$ipaddress
    MASK=$mask
    MASKV6=$maskv6

    return 0
}

#
# Fetch hostname from device configuration.
#
function get_hostname(){

    hostnamedata=$(xrcmd "show running-config hostname")
    local hostname=($(echo $hostnamedata | awk -F "hostname " '{sub(/ .*/,"",$2);print $2}'));

    ztp_log "#####hostname $hostname found.";
    HOSTNAME=$hostname;
    return 0;
}


#
# Call Crosswork ZTP API to update device ZTP status, IP address, hostname.
# Without this function, device status will remain in "In Progress" and not
# be updated in Crosswork.
#
# Using this API, device SSH/SNMP connectivity details can also be updated.
# Values for connectivity details values can be added as part of
# "connectivityDetails" array in below curl command. Sample snippet provided:
#
#   "connectivityDetails": [{
#     "protocol": "SSH",
#     "inetAddr": [{
#       "inetAddressFamily": "IPV4/IPV6",
#       "ipaddrs": "<ssh/snmp ipaddress>",
#       "mask": <ipaddress mask(Integer).>,
#       "type": "CONNECTIVITYINFO"
#     }],
#     "port": <ssh/snmp port(Integer)>,
#     "timeout": <ssh/snmp timeout(Integer). default to 60sec>
#   }]
#
function update_device_status() {

     echo "'"$IPADDR"'"
     echo "'"$MASK"'"
     echo "'"$SERIAL_KEY"'"
     echo "'"$HOSTNAME"'"


    curl -d '{
       "ipAddress":{
            "inetAddressFamily": "IPV4",
            "ipaddrs": "'"$IPADDR"'",
            "mask":  '$MASK'
        },
       "serialNumber":"'"$SERIAL_KEY"'",
       "hostName":"'"$HOSTNAME"'",
       "message":"Post config script updated succssfully"
   }' -H "Content-Type: application/json" -X PATCH http://${CW_HOST_IP}:${CW_PORT}/crosswork/ztp/v1/deviceinfo/status
}

function get_sudi_serial() {
   local rp_card_num=`ip netns exec xrnns /pkg/bin/show_platform_sysdb | grep Active  | cut -d ' ' -f 1`
   echo $rp_card_num
   xrcmd "show platform security tam all location $rp_card_num" > tamfile.txt
   local sudi_serial=$(sed -n -e '/Device Serial Number/ s/.*\- *//p' tamfile.txt)
   echo $sudi_serial
   SERIAL_KEY=$sudi_serial
   return 0
}

function ztp_disable()
{
	xrcmd "ztp disable noprompt"
}

function ztp_enable()
{
	xrcmd "ztp enable noprompt"
}

# ==== Script entry point ====
get_sudi_serial;
ztp_log "Hello from ${SERIAL_KEY} !!!";
get_ipaddress;
get_hostname;
update_device_status;

ztp_log "Autoprovision complete...";
ztp_log "Disabling secure mod"
ztp_disable;
exit 0

Load ZTP Assets

Upload the ZTP assets you assembled, per the requirements of the ZTP mode you want to use.

Classic ZTP requires you to load:

  • Configuration files (TXT, SH, or PY files)

  • Device serial numbers

Secure ZTP requires you to load:

  • Configuration files (TXT, SH, or PY)

  • Device serial numbers

  • Pinned domain certificate

  • Ownership certificates

  • Ownership Vouchers

  • SUDI Root Certificates

PnP ZTP requires you to load:

  • Configuration files (TXT only)

  • Device serial numbers

If you plan to image, re-image, or update the device operating system software as part of ZTP onboarding, you must also load software images and SMUs, as follows:
  • Classic ZTP: TAR, ISO, BIN, or RPM image files, and SMUs

  • Secure ZTP: TAR, ISO, BIN, or RPM image files, and SMUs

  • PnP ZTP: BIN only. SMUs are not supported.

You may use a mapped network drive to upload software images, SMUs, and configuration files.

Cisco Crosswork checks uploaded serial numbers for duplicates and merges them into single entries automatically. Cisco Crosswork also associates all uploaded ownership vouchers with existing serial numbers automatically.

You can upload images, SMUs, configuration files, and serial numbers in any order. Load certificates and ownership vouchers only after loading serial numbers.

Procedure


Step 1

(Optional) Upload software images and SMUs:

  1. From the main menu, select Device Management > Software Images and then click the Add icon.

  2. Enter the required image or SMU file information and then click Add.

    You must enter the MD5 checksum for the file.

    You can also click Browse to select the software image file.

  3. Click Add icon and repeat step 1b until you have loaded all the image and SMU files.

Step 2

Upload configuration files:

  1. From the main menu, select Device Management > ZTP Configuration Files and then click the Add icon.

  2. Enter the required configuration information and then click Add.

    Click Browse to select a configuration file.

    If you’re implementing Secure ZTP, use the Type dropdown to specify whether the configuration file you are adding is a Pre-config, Day0-config, or Post-config. For Classic and PnP ZTP, always select Day0-config.

  3. Click Add icon and repeat step 2b until you have loaded all the configuration files.

Step 3

Upload device serial numbers:

  1. From the main menu, select Device Management > Serial Number and Voucher, then click Add Serial Number.

  2. Click Upload CSV, then click the serialnumber.csv link to download the sampleSerialnumber.csv template file.

  3. Using your choice of CSV file editor, enter into the template the serial numbers for all the devices you plan to onboard using ZTP. Save the updated CSV file template under a new name.

  4. Select Add Serial Number again. Click Browse to select the updated CSV file, then click Add Serial Number to import the serial numbers.

Step 4

Continue with the following steps only if you plan to implement Secure ZTP.

Step 5

Update the default ownership certificate, Pinned Domain Certificate, Owner Key, Owner Certificate, and Owner Passphrase:

  1. From the main menu, select Administration > Certificate Management.

  2. Under Certificates, click the More icon next to Crosswork-ZTP-Owner, then click Update Certificate.

  3. Click Browse to select the Pinned Domain Certificate (PEM or CRT file). With the file selected, click Save.

  4. Click Browse to select the Owner Key (PEM, KEY, CRT file). With the file selected, click Save.

  5. Click Browse to select the Owner Certificate (PEM or CRT file). With the file selected, click Save.

  6. In Owner Passphrase enter the owner passphrase.

  7. Click Save.

Step 6

Update the default ownership voucher certificate:

  1. From the main menu, select Administration > Certificate Management

  2. Under Certificates, click the More icon next to Crosswork-ZTP-Owner.

  3. Click Update Certificate.

  4. Click Browse to select the TAR or VCJ file you want to use to update the default ownership voucher.

  5. Click Save.

Step 7

Update the default SUDI device certificate:

  1. From the main menu, select Administration > Certificate Management.

  2. Under Certificates, click the More icon next to Crosswork-ZTP-Device-SUDI.

  3. Click Update Certificate.

  4. Click Browse to select the SUDI device certificate file you want to use to update the default SUDI certificate.

  5. Click Save.

Step 8

Upload additional ownership vouchers, as needed:

  1. From the main menu, select Device Management > Serial Number & Voucher.

  2. Click Add Voucher.

  3. Click Browse to select the TAR or VCJ voucher file you want to upload.

    If you are uploading vouchers for third party devices, ensure that the uploaded VCJ file or files in the Tarball follow the name convention serial.vcj, where serial is the serial number of the corresponding device. Cisco Crosswork requires this type of naming in order to map the ownership voucher to the device.

  4. Click Upload.


Create Credential Profiles for ZTP

Cisco Crosswork ZTP requires credential profiles in order to access and configure your devices. The following steps show how to add them in bulk using a CSV file.

You can also add credential profiles one at a time. To do so, select Device Management > Credential Profiles, then click the Add icon.

Credential profiles allow you to specify different credentials for each protocol the device supports. When creating device credential profiles that contain SNMP credentials, we recommend that the profile contain credentials for the version of SNMP actually enabled on the device, and that version only. For example: If SNMPv3 is not enabled in the device configuration, do not include SNMPv3 credentials in the device credential profile.

Procedure


Step 1

From the main menu, choose Device Management > Credential Profiles.

Step 2

Click the Import icon.

Step 3

Click the Download sample 'Credential template (*.csv)' file link and save the CSV file template locally.

Step 4

Open the CSV template using your preferred editor. Begin adding rows to the file, one row for each credential profile you want to create.

As you do, observe these guidelines:

  • If the Password column for any credential profile is blank, you can’t import the CSV file. If you wish, you can enter the actual passwords in these fields. Cisco Crosswork stores them in encrypted form. If you choose this method, be sure to destroy the CSV file immediately after upload. We recommend using asterisks to fill the Password column in the CSV file and then importing it. After successful import, you can use the Cisco Crosswork GUI to edit each profile and enter the actual passwords, as explained in the following steps.

  • Use a semicolon to separate multiple entries in the same field.

  • When you separate multiple entries with semicolons, remember that the order in which you enter values in each field is important. The first entry in one column will map to the first entry in the next column, and so on. For example: Suppose you enter in Password Type this list of password types: ROBOT_USERPASS_SSH;ROBOT_USERPASS_TELNET;ROBOT_USERPASS_NETCONF. You then enter in the User Name column Tom;Dick;Harry; and in the Password column root;MyPass;Turtledove;. The order of entry in these columns sets the following mapping between the three password types and the three user names and three passwords you entered:

    • ROBOT_USERPASS_SSH; Tom ; root

    • ROBOT_USERPASS_NETCONF; Dick ; MyPass

    • ROBOT_USERPASS_TELNET; Harry; Turtledove

  • Be sure to delete sample data rows before saving the file. You can ignore the column header row.

Step 5

When you’re finished, save the CSV file to a new name.

Step 6

If necessary, choose Device Management > Credential Profiles again, then click the Import icon.

Step 7

Click Browse to navigate to the CSV file and select it.

Step 8

With the CSV file selected, click Import.

Step 9

When the import is complete:

  1. From the left-hand side of the Credential Profiles window, select the profile you want to update, then click the Edit icon.

  2. Enter the passwords and community strings for the credential profile and then click Save.

  3. Repeat these steps as needed until you have entered all passwords and community strings.


Create ZTP Profiles

Cisco Crosswork uses ZTP profiles to automate imaging and configuration processes. While ZTP profiles are optional, we strongly recommend creating them, as they can help simplify the ZTP imaging and configuration process. Use ZTP profiles to help organize defined sets of image and configuration files you can apply to devices in a particular class or device family.

If you’re implementing Classic ZTP, each ZTP profile can have only one image file and one configuration file associated with it. Secure ZTP allows you to specify pre-configuration, post-configuration, and day-zero configuration files.

ZTP profiles don’t require that you specify an image file.

You can create as many ZTP profiles as you like. We recommend that you create only one ZTP profile for each device family, use case, or network role.

Procedure


Step 1

From the main menu, choose Device Management > Zero Touch Profiles.

Step 2

Click + New Profile.

Step 3

Enter the required values for the new ZTP profile. You don't need to specify a software image for the profile.

Step 4

If you’re implementing Secure ZTP: Move the Secure ZTP slider to Enabled. Then enter the names of the pre- and post-configuration files.

Secure ZTP is not available if you select IOS-XE as the OS Version.

Step 5

Click Save to create the new ZTP profile.


Prepare ZTP Device Entry Files

Cisco Crosswork uses ZTP device entries to let you specify in advance the IP addresses, protocols, and other information for the devices you want to provision. Cisco Crosswork populates these imported entries with more information once ZTP processing completes successfully.

You can create ZTP device entries in bulk by importing a device-entry CSV file.

The following topics explain how to download a template for a device entry CSV file and create properly formatted ZTP device entries.

We recommend that you experiment with the device entry CSV file format until you get used to it. Add only one or two device entries in a copy of the template, then import it. You can then see how to get the results you want.

You can also create ZTP device entries one by one, using the Cisco Crosswork UI, as explained in Prepare Single ZTP Device Entries.

Download and Edit the ZTP Device Entry Template

  1. From the main menu, choose Device Management > Devices.

  2. Click the Zero Touch Devices tab.

  3. Click the Import icon.

  4. Click the Download 'devices import' template (.csv) link and then Save it to a local storage resource. Click Cancel to clear the dialog box.

  5. Open the CSV template with the application of your choice and save it to a new name. In each row, create an entry for each of the devices you plan to onboard using ZTP. Refer to the next topic section for help on the values to enter in each column.

ZTP Device Entry CSV Template Reference

The following table explains how to use the columns in the template. We mark columns that require entries with an asterisk (*) next to the column name.

The four "Connectivity" columns allow multiple entries, so you can specify multiple connectivity protocols for a single device. If you use this option, use semicolons between entries, and enter the values in the next three columns in the same order. For example: Suppose you enter SSH;NETCONF; in the Connectivity Protocol column. If you enter 23;830; in the Connectivity Port column, the entries in the two columns map like this:

  • SSH: 22

  • NETCONF: 830

Table 4. ZTP Device Entry Template Column Reference

Template Column

Usage

Serial Number *

Enter the device serial number. You can enter up to three serial numbers for the same device. These must be the same serial number for each device that you loaded into Cisco Crosswork previously.

ZTP requires a serial number entry for all normal deployments. If you’re using DHCP option 82 to implement a relay agent, you can leave this field blank, but you must specify a Remote Id and Circuit ID to identify the device.

Location Enabled

Enter TRUE if you plan to identify the device using a location ID. Enter FALSE if you plan to identify it by serial number. If you enter TRUE, enter a Remote ID and a Circuit ID in the corresponding columns. If you enter FALSE, enter a Serial Number in the corresponding column.

Remote ID *

If implementing Secure ZTP and using option 82: Identify the name of the remote host acting as the bootstrap server.

If you’re using DHCP option 82 to implement a relay agent, this entry is required. You must enter a combination of the device RemoteID and CircuitID.

If you’re not using option 82, you can leave this field blank but you must specify the device serial number.

Circuit ID *

If implementing Secure ZTP and using option 82: Identify the interface or VLAN on which the bootstrap server receives requests.

If you’re using DHCP option 82 to implement a relay agent, this entry is required. You must enter a combination of the device RemoteID and CircuitID.

If you’re not using option 82, you can leave this field blank but you must specify the device serial number.

Host Name *

Enter the host name you want to assign to the device.

Credential Profile *

Enter the name of the credential profile you want Cisco Crosswork to use to access and configure the device. The name you enter must match the the name of the credential profile as specified in Cisco Crosswork.

OS Platform *

Enter the OS platform for the device. For example: IOS XR. Note that you must enter Cisco IOS platform names with a space, not a hyphen.

Version *

Enter the OS platform version for the device software image. The platform version should be the same version as the ones specified for the image and configuration files you use to provision it.

Required only if you don’t specify a ZTP profile in the Profile Name column.

Device Family *

Enter the device family for the device. The device family must match the device family in the image and configuration files ZTP uses to provision it.

Required only if you don’t specify a ZTP profile in the Profile Name column.

Config ID *

Enter the Cisco Crosswork-assigned ID for the configuration file you want to use when configuring the device. Cisco Crosswork assigns a unique ID for every configuration file during upload.

Required only if you don’t specify a ZTP profile in the Profile Name column.

Profile Name *

Enter the name of the ZTP profile you want to use to provision this device.

Required only if you want to use a ZTP profile to specify things like the configuration ID, image ID, OS platform, and so on.

Product ID *

Enter the Cisco-assigned PID (product identifier) coded into the device hardware. You can retrieve the PID from the UDI (Unique Device Identifier) information printed on the label affixed to every Cisco networking device when it leaves the factory.

Please note that, in this release, no verification is performed on the PID. We recommend that you supply a correct PID anyway, in case of future requirements.

UUID

You can choose to generate and specify a Universally Unique Identifier (UUID) to be assigned to the device when it is onboarded. If you choose this option, enter the 128-bit UUID in this column. Otherwise, leave the field blank and Cisco Crosswork will assign a random UUID when it onboards the device.

MAC Address

Enter the device's MAC address.

IP Address

Enter the device's IP address (IPv4 or IPv6), along with its subnet mask in slash notation.

Configuration Attributes

Enter the values you want Cisco Crosswork to use for the custom replaceable parameters in the configuration file for the device. If you are using only the default replaceable paramters, leave this field blank. If you’re using Secure ZTP, you can use custom replaceable paramters only for day-zero configuration file parameters.

Connectivity Protocol

The connectivity protocols needed to monitor the device or to support Cisco Crosswork applications and features. Choices are: SSH, SNMPv2, NETCONF, TELNET, HTTP, HTTPS, GRPC, and SNMPv3.

Connectivity IP Address

Enter the IP address (IPv4 or IPv6) and subnet mask for the connectivity protocol. Required only if you chose to set up a connectivity protocol.

Connectivity Port

Enter the port used for this connectivity protocol. Each protocol maps to a port. Be sure to enter the port number that maps to the protocol you chose.

Specify at least one port and protocol for every device, except if you want to:

  • Set the status of the onboarded device as unmanaged or down.

  • Disable Cisco Crosswork reachability checks for the onboarded device.

You may need to specify more than one protocol and port per device. The number of protocols and ports you specify depends on how you have configured Cisco Crosswork and the Crosswork applications you’re using. See the table in the following section, Crosswork Connectivity Protocol Requirements.

Connectivity Timeout

Enter the elapsed time (in seconds) before an attempt to communicate using this protocol times out. The default value is 30 seconds; the recommended timeout value is 60 seconds.

Provider Name

Enter the name of the provider to which you want to onboard the new ZTP devices. The name you enter must match exactly the name of the provider managing the device, as specified in Cisco Crosswork.

Inventory ID

Enter the inventory ID you want to assign to the device.

Secure ZTP Enabled

Enter TRUE if you want to provision the device using Secure ZTP, or FALSE if not.

Secure ZTP Encrypted

Currently unsupported. Enter FALSE.

Image ID

Cisco Crosswork assigns a unique ID for every software image file during upload.

Enter the Cisco Crosswork-assigned ID for the software image file you want to install on the device.

Required only if you want to include installation of a software image during onboarding, and you did not specify a ZTP profile with this software image in the Profile Name column.

PreConfig ID

Cisco Crosswork assigns a unique ID for every configuration file during upload.

Enter the Cisco Crosswork ID of the configuration script you want to run before running the configuration file specified in the Config ID column.

Required only if you want to run a pre-configuration file during onboarding.

PostConfig ID

Cisco Crosswork assigns a unique ID for every configuration file during upload.

Enter the Cisco Crosswork ID of the configuration script you want to run immediately after running the configuration file specified in the Config ID column.

Required only if you want to run a post-configuration file during onboarding.

SZTP Config Mode

Enter merge if you want Secure ZTP to merge the configuration files you specify in the Config ID, PreConfig ID, and PostConfig ID columns with a pre-existing configuration on the device. Leave this column blank if you want to overwrite any existing configuration with the content of the specified configuration files (overwrite is the default specified by leaving the column blank).

Version ID

The version ID of the configuration.

Required only if you specified a pre-configuration and a post-configuration file to run during onboarding.

routingInfo.globalospfrouterid

If implementing OSPF on the device: Enter the OSPF Router ID for the device. Otherwise, leave this field blank.

routingInfo.globalisissystemid

If implementing IS-IS on the device: Enter the IS-IS System ID for the device. Otherwise, leave this field blank.

routingInfo.teRouterid

If implementing Traffic Engineering on the device: Enter the TE router ID for the device. Otherwise, leave this field blank.

Crosswork Connectivity Protocol Requirements

Cisco Crosswork applications require you to enable a range of connectivity protocols for each device. The following table identifies these requirements for each supported connectivity protocol. If you use the applications listed in this table, be sure to enable these protocols on your devices. You must enable at least one of these protocols on each device in order to onboard it; you cannot onboard a device without at least one of these protocols.

Table 5. Connectivity Protocol Requirements for Applications and Features

Protocol

Port

Crosswork Application

Application Feature

GRPC

9090

  • Cisco Crosswork Network Controller

  • Cisco Crosswork Change Automation and Health Insights

  • Cisco Crosswork Optimization Engine

Cisco Crosswork API communication

HTTP

80

  • Cisco Crosswork Network Controller

  • Cisco Crosswork Change Automation and Health Insights

  • Cisco Crosswork Optimization Engine

Onboarding of the device to Cisco Network Services Orchestrator

HTTPS

443

  • Cisco Crosswork Network Controller

Onboarding of the device to Cisco Network Services Orchestrator

NETCONF

830

  • Cisco Crosswork Network Controller

  • Cisco Crosswork Change Automation and Health Insights

  • Cisco Crosswork Optimization Engine

Onboarding of the device to Cisco Network Services Orchestrator

SNMPv2

161

  • Cisco Crosswork Network Controller

  • Cisco Crosswork Change Automation and Health Insights

  • Cisco Crosswork Optimization Engine

SNMPv2 data collection

SNMPv3

161

  • Cisco Crosswork Network Controller

  • Cisco Crosswork Change Automation and Health Insights

  • Cisco Crosswork Optimization Engine

SNMPv3 data collection

SSH

22

  • Cisco Crosswork Network Controller

  • Cisco Crosswork Change Automation and Health Insights

  • Cisco Crosswork Optimization Engine

  • CLI data collection

  • SSH access to devices

Prepare Single ZTP Device Entries

If you have only a few devices to onboard using ZTP, you may find it easier to create the device entries one by one. Use the ZTP user interface and the following instructions to create single ZTP device entries.

Procedure


Step 1

From the main menu, choose Device Management > Devices.

Step 2

Click the Zero Touch Devices tab.

Step 3

Click the Add icon.

Step 4

Enter values for the new ZTP device entry.

For reference on the information called for each device entry, see the template reference in Prepare ZTP Device Entry Files.

After ZTP onboards your devices, Cisco Crosswork will display fields calling for more information about the device, such as its geographical location. You will need to supply this additional information by editing the device's inventory record, as explained in Complete Onboarded ZTP Device Information.

Step 5

Click Save.


ZTP Provisioning Workflow

Once you complete ZTP setup, you can provision your devices and maintain them, as follows:

  1. Set up DHCP so that Cisco Crosswork can download image and configuration software securely after you trigger ZTP processing.

  2. Upload to Cisco Crosswork the ZTP device entry CSV file you created. Importing the file creates the device entries that ZTP populates during onboarding. If you’re onboarding only a few ZTP devices, create device entries using the ZTP user interface instead.

  3. Trigger ZTP processing by power-cycling or performing a CLI reboot for each device.

  4. Complete the information for the onboarded devices. Edit them and supply (for example) geographical location information that ZTP couldn’t discover during provisioning.

After completing this core workflow, you can perform ongoing maintenance of your ZTP devices using the advice and methods in the following topics:

  • Update ZTP devices with additional information.

  • Reconfigure your ZTP devices after onboarding, using other applications or by deleting and re-onboarding the devices.

  • Retire or replace ZTP devices without consuming more device licenses.

  • Perform housekeeping on the ZTP assets you used to onboard your devices.

  • Troubleshoot issues with ZTP processing and devices.

The remaining topics in this section discuss how to perform each of these tasks.

Upload ZTP Device Entries

The following steps explain how to create multiple ZTP device entries by importing your previously prepared ZTP device-entry CSV file.

Imported ZTP device entries always appear in the Zero Touch Devices tab with their Status set to Unprovisioned. They remain Unprovisioned until you trigger ZTP processing.

Procedure


Step 1

From the main menu, choose Device Management > Network Devices.

Step 2

Click the Zero Touch Devices tab.

Step 3

Click the Import icon.

Step 4

Click Browse to navigate to the ZTP device entry CSV file you created and then select it.

Step 5

With the CSV file selected, click Import.


Set Up DHCP for Crosswork ZTP

Before triggering ZTP processing, you must update your DHCP (and, for PnP ZTP, TFTP) server configuration with information that permits Cisco Crosswork to communicate with your devices and respond to their requests for downloads.

The following topics provide examples showing how to update your server configurations to meet this requirement. The instructions and examples you follow depend on the ZTP mode you want to use:

Set Up DHCP for Classic ZTP

Before triggering ZTP processing, update your DHCP configuration file with information that identifies your ZTP devices and the software applied to them. This information permits Cisco Crosswork and DHCP to identify the ZTP devices and respond to requests for network connection and file downloads.

The following topics provide examples showing how to update DHCP server configurations to meet this requirement. The examples in these topics assume the DHCP context settings shown in the following figure. The figure shows example settings for the Internet Systems Consortium DHCP server.

Figure 10. Classic ZTP DHCP Context
#
authoritative;

default-lease-time 7200;
max-lease-time 7200;

subnet 192.168.100.0 netmask 255.255.255.0 {
  option routers 192.168.100.1;
  option domain-name "cisco.com";
  option domain-name-servers 171.70.168.183;
  option subnet-mask 255.255.255.0;
  range 192.168.100.105 192.168.100.195;
}
Examples: DHCP Setup for Classic ZTP

We strongly recommend that you use Classic ZTP to provision devices over secure network domains only.

Cisco devices supported by Classic ZTP allow iPXE software image downloads via HTTP only. These same devices support download of configuration files via either HTTP or HTTPS. These options require entry of DHCP bootfile URLs in the DHCP server configuration for your organization.

If you want to use HTTP for both image and configuration file downloads, these URLs must specify the HTTP protocol and port 30604. For help, see the examples in figures 1 and 2.

If you want to use HTTPS for configuration file downloads only, the URL must specify the HTTPS protocol and port 30603. Specify the -k option before the HTTPS protocol in the URL. For help, see the examples in figures 3 and 4.

ZTP permits use of DHCP option 82 for configuration downloads. Option 82, also known as the DHCP Relay Agent Information Option, helps protect your devices from attacks using IP and MAC spoofing or DHCP address starvation. Option 82 allows you to specify an intermediary, or relay, router located between the device you're onboarding and the DHCP server resolving device requests. To use this option, specify a location ID. The location ID consists of a circuit ID (interface or VLAN ID) and remote ID (host name). Specify these values as parameters of the configuration download URL, as shown in the examples in figures 2 and 4. For more information about option 82, see RFC 3046 (http://tools.ietf.org/html/rfc3046).

When following these examples:

Figure 11. Classic ZTP DHCP Setup, Using HTTP
host cztp1 {
 hardware ethernet 00:a7:42:86:54:f1;
  if exists user-class and option user-class = "iPXE" {
     filename = "http://<CW_HOST_IP>:30604/crosswork/imagesvc/v1/device/files/<IMAGE_UUID>";
  } else if exists user-class and option user-class ="exr-config" {
     filename = "http://<CW_HOST_IP>:30604/crosswork/configsvc/v1/file";
  }
}
Figure 12. Classic ZTP DHCP Setup, Using HTTP and Option 82
host cztp2 {
 hardware ethernet 00:a7:42:86:54:f2;
  if exists user-class and option user-class = "iPXE" {
     filename = "http://<CW_HOST_IP>:30604/crosswork/imagesvc/v1/device/files/<IMAGE_UUID>";
  } else if exists user-class and option user-class ="exr-config" {
     filename = "http://<CW_HOST_IP>:30604/crosswork/configsvc/v1/file?circuitid=Gig001&remoteid=MAR1";
  }
}
Figure 13. Classic ZTP DHCP Setup, Using HTTPS
host cztp3 {
 hardware ethernet 00:a7:42:86:54:f3;
  if exists user-class and option user-class = "iPXE" {
     filename = "http://<CW_HOST_IP>:30604/crosswork/imagesvc/v1/device/files/<IMAGE_UUID>";
  } else if exists user-class and option user-class ="exr-config" {
     filename = "-k https://<CW_HOST_IP>:30603/crosswork/configsvc/v1/file";
  }
}
Figure 14. Classic ZTP DHCP Setup, Using HTTPS and Option 82
host cztp4 {
 hardware ethernet 00:a7:42:86:54:f4;
  if exists user-class and option user-class = "iPXE" {
     filename = "http://<CW_HOST_IP>:30604/crosswork/imagesvc/v1/device/files/<IMAGE_UUID>";
  } else if exists user-class and option user-class ="exr-config" {
     filename = "-k https://<CW_HOST_IP>:30603/crosswork/configsvc/v1/file?circuitid=Gig001&remoteid=MAR1";
  }
}
Examples: Generic Internet Systems Consortium (ISC) DHCP Setup for Classic ZTP

The following figures show examples of the type of host entries you would make for Classic ZTP in the /etc/dhcp/dhcp.conf configuration file of an Internet Systems Consortium (ISC) DHCP server.

Other third-party DHCP servers differ in overall implementation, but many use options and formats similar to these ISC examples.

Be sure to reload or restart the ISC DHCP server once you have finished creating these new entries.

Figure 15. Classic ZTP ISC IPv4 DHCP Configuration Example

host NCS5k-l
{
    option dhcp-client-identifier "FOC2302R09H";
    hardware ethernet 00:cc:fc:bb:be:6a;
    fixed-address 105.1.1.16;
    if exists user-class and option user-class = "iPXE" {
        filename = "http://<CW_HOST_IP>:30604/crosswork/imagesvc/vl/device/files/
           <IMAGE_UUID>
    } else if exists user-class and option user-class = "exr-config" {
        filename = "http://<CW_HOST_IP>:30604/crosswork/configsvc/vl/file";
    }
}
Figure 16. Classic ZTP ISC IPv6 DHCP Configuration Example

host 5501
{
    host-identifier option dhcp6.client-id 00:02:00:00:00:09:46:4f:43:32:33:30:38:52:30:53:33:00;
    fixed-address6 fc00:15:2::36;
    if exists dhcp6.user-class and substring(option dhcp6.user-class, 2, 4) = "iPXE" {
      option dhcp6.bootfile-url "http://<CW_HOST_IP>:30604/crosswork/imagesvc/v1/device/files/
        <IMAGE_UUID>";
    } else {if exists dhcp6.user-class and substring(option dhcp6.user-class, 0, 10) = "exr-config" {
      option dhcp6.bootfile-url "http://<CW_HOST_IP>:30604/crosswork/crosswork/configsvc/vl/file";
    } 
}

The following table describes each line in the IPv4 ISC DHCP device entry examples given, and the source of the values used. Descriptions for the entries in the IPv6 example are identical, but adapted for the IPv6 addressing scheme.

Table 6. ISC IPv4 DHCP Configuration Host Entries and Values (Classic ZTP)

IPv4 Entry

Description

host NCS5k-l

The device entry host name. The host name can be the same as the actual assigned host name, but need not be.

option dhcp-client-identifier

The unique ID of the device entry. The value "FOC2302R09H" shown in the IPv4 example is the serial number of the device. You can find the serial number on the device chassis. If you don’t have physical access to the device, the IOS-XR show inventory command provides the serial number.

hardware ethernet 00:cc:fc:bb:be:6a

The MAC address of the Ethernet NIC port on the device. This address is the address on which you trigger the ZTP process. The address can be a management or data port, as long as it’s reachable from Cisco Crosswork.

fixed-address 105.1.1.16

The IP address to be assigned to the device during configuration. The example is for a static IP, but you can also use standard DHCP IP pool assignment commands.

option user-class = "iPXE" and filename =

This line checks that the incoming ZTP request contains the "iPXE" option. Classic ZTP uses this option to image the device. If the request includes this option, then the device downloads the image file matching the UUID and path specified in the filename = parameter.

option user-class = "exr-config" and ffl filename =

This line checks that the incoming ZTP request contains the "exr-config" option. ZTP uses this option to configure the device. If the request includes this option, then the device downloads the configuration file matching the path specified in the filename = parameter.

Copy Bootfile Names and UUIDs for DHCP Setup

When modifying your DHCP server configuration file, specify the bootfile name and UUID for each software image. You can quickly copy both to your clipboard directly from the list of software images that you have already uploaded to Cisco Crosswork. No UUID is required for configuration files.

To copy software image bootfile names and UUIDs:

  1. From the main menu, choose Device Management > Software Images.

  2. If you want to copy:

    • The bootfile name and UUID of the software image: Click  the Copy Icon in the Image/SMU Name column.

    • Only the UUID of the software image: Click the Copy Icon in the Image UUID column.

    Cisco Crosswork copies the bootfile name and/or UUID to your clipboard. You can now paste it into your DHCP host entry.

    When using the copied file path to create DHCP host entries, replace the IP variable with the IP address and port of your Cisco Crosswork server.

Set Up DHCP for Secure ZTP

Before triggering ZTP processing, update your DHCP configuration file with information that identifies your ZTP devices and the software applied to them. This information permits Cisco Crosswork and DHCP to identify the ZTP devices and respond to requests for network connection and file downloads.

The following topics provide examples showing how to update DHCP server configurations to meet this requirement. The examples in these topics assume the DHCP context settings shown in the following figure. The following figure shows example settings for the Internet Systems Consortium DHCP server. The line enabling the sztp-redirect option is required for Secure ZTP.

Figure 17. Secure ZTP DHCP Context
#
authoritative;

default-lease-time 7200;
max-lease-time 7200;
# Next line is required for Secure ZTP;
option sztp-redirect code 143 = text; 

subnet 192.168.100.0 netmask 255.255.255.0 {
  option routers 192.168.100.1;
  option domain-name "cisco.com";
  option domain-name-servers 171.70.168.183;
  option subnet-mask 255.255.255.0;
  range 192.168.100.105 192.168.100.195;
}
Examples: DHCP Setup for Secure ZTP

Secure ZTP allows you to provision devices over both secure and insecure network domains. Use HTTPS for the configuration file download, and specify option sztp-redirect for configuration artifacts. Add a remote ID and circuit ID if you want to use option 82. The remote ID identifies the remote host acting as the bootstrap server, and the circuit ID identifies the interface or VLAN on the remote host. For help with using bootfile names and UUIDs, see the related topic, #Cisco_Concept.dita_e12e1cb3-1cef-447c-8067-97d1000c6708__CopyBootfileNamesAndUUIDsForDHCPSetup.

Figure 18. Secure ZTP DHCP Setup, Using HTTPS
host sztp1 {
 hardware ethernet 00:a7:42:86:54:f4;
  if exists user-class and option user-class = "iPXE" {
     filename = "http://<CW_HOST_IP>:30604/crosswork/imagesvc/v1/device/files/<IMAGE_UUID>";
  } else {
     option sztp-redirect "https://<CW_HOST_IP>:30617/restconf/operations/ietf-sztp-bootstrap-server:get-bootstrap-data"; 
  }
}
Figure 19. Secure ZTP DHCP Setup, Using HTTPS and Option 82
host sztp2 {
 hardware ethernet 00:a7:42:86:54:f5;
  if exists user-class and option user-class = "iPXE" {
     filename = "http://<CW_HOST_IP>:30604/crosswork/imagesvc/v1/device/files/<IMAGE_UUID>";
  } else if exists user-class and option user-class ="exr-config" {
     option sztp-redirect "https://<CW_HOST_IP>:30617/restconf/operations/ietf-sztp-bootstrap-server:get-bootstrap-data?circuitid=Gig001&remoteid=MAR1";
  }
}
Examples: Generic Internet Systems Consortium (ISC) DHCP Setup for Secure ZTP

The following figures show examples of the type of host entries you would make for Secure ZTP in the /etc/dhcp/dhcp.conf configuration file of an Internet Systems Consortium (ISC) DHCP server.

Other third-party DHCP servers differ in overall implementation, but many use options and formats similar to these ISC examples.

Be sure to reload or restart the ISC DHCP server once you have finished creating these new entries.

Figure 20. Secure ZTP ISC IPv4 DHCP Configuration Example
authoritative;
option sztp-redirect code 143 = text;

default-lease-time 7200;
max-lease-time 7200;

subnet 105.1.1.0 netmask 255.255.255.0 {
  option routers 105.1.1.254;
  option domain-name "cisco.com";
  option domain-name-servers 171.70.168.183;
  option subnet-mask 255.255.255.0;
  range 105.1.1.40 105.1.1.140;
  if exists user-class and option user-class = "iPXE" {
         filename = "http://105.1.2.100:30604/crosswork/imagesvc/v1/device/files/cw-image-uuid-db2fb355-de5b-4c13-8290-346c4daaa577";
      } else {
option sztp-redirect "https://105.1.2.100:30617/restconf/operations/ietf-sztp-bootstrap-server:get-bootstrap-data";
  }

}
Figure 21. Secure ZTP ISC IPv6 DHCP Configuration Example
default-lease-time 2592000;
preferred-lifetime 604800;
option dhcp-renewal-time 3600;
option dhcp6.user-class code 15 = string;
option dhcp6.bootfile-url code 59 = string;
option dhcp-rebinding-time 7200;
allow leasequery;
option dhcp6.name-servers 3ffe:501:ffff:100:200:ff:fe00:3f3e;
option dhcp6.domain-search "cisco.com";
option sztp-redirect code 136 = text;

option dhcp6.info-refresh-time 21600;
subnet6 fc00::/64 {
	range6 fc00::10:10:101 fc00::10:10:105;
}
	host CW14-NCS {

      host-identifier option dhcp6.client-id 00:02:00:00:00:09:46:4f:43:32:32:32:31:52:31:39:4e:00;
      fixed-address6 fc00::10:10:100;
      if exists dhcp6.user-class and substring(option dhcp6.user-class, 2, 4) = "iPXE" {
		option dhcp6.bootfile-url "http://[fc00::10:11:97]:30604/crosswork/imagesvc/v1/device/files/cw-image-uuid-db2fb355-de5b-4c13-8290-346c4daaa577";
      } else {
option sztp-redirect "https://[fc00::10:11:20]:30617/restconf/operations/ietf-sztp-bootstrap-server:get-bootstrap-data";
	} 

	}

The following table describes each line in the IPv4 ISC DHCP device entry examples given, and the source of the values used. Descriptions for the entries in the IPv6 example are identical to the ones for IPv4, but adapted for the IPv6 addressing scheme.

Table 7. ISC IPv4 DHCP Configuration Host Entries and Values (Secure ZTP)

IPv4 Entry

Description

host NCS5k-l

The device entry host name. The host name can be the same as the actual assigned host name, but need not be.

option dhcp-client-identifier

The unique ID of the device entry. The value "FOC2302R09H" shown in the Classic ZTP and IPv4 example is the serial number of the device. You can find the serial number on the device chassis. If you don’t have physical access to the device, the IOS-XR show inventory command provides the serial number.

hardware ethernet 00:cc:fc:bb:be:6a

The MAC address of the Ethernet NIC port on the device. This address is the address on which you trigger the ZTP process. The address can be a management or data port, as long as it’s reachable from Cisco Crosswork.

fixed-address 105.1.1.16

The IP address to be assigned to the device during configuration. The example is for a static IP, but you can also use standard DHCP IP pool assignment commands.

option user-class = "iPXE" and filename =

This line checks that the incoming ZTP request contains the "iPXE" option. Classic ZTP uses this option to image the device. If the request includes this option, then the device downloads the image file matching the UUID and path specified in the filename = parameter.

option sztp-redirect code 143=text

This line checks that the incoming ZTP request contains the "exr-config" option. Secure ZTP uses this option to configure the device. If the request includes this option, then the device downloads the configuration file matching the path specified in the filename = parameter.

Set Up DHCP and TFTP for PnP ZTP

Before triggering PnP ZTP processing, you must:

  1. Set up an external TFTP server that is reachable by your ASR 900 and NCS 520 devices.

  2. Upload PnP profle to the external TFTP server.

  3. Update your DHCP configuration file with information pointing to the location of the Cisco Crosswork PnP Server.

This information permits Cisco Crosswork and.

The following topics provide examples showing how to perform each of these tasks.

Set Up the External TFTP server

An external TFTP server is required for all of the supported Cisco ASR 900-series and NCS 520-series routers. The server must be active on port 69 UDP.

Upload the PnP Profile to TFTP

The PnP profile is a simple generic configuration file. Uploading the PnP profile to the configuration service on the TFTP repository is a one-time activity.

The profile's contents must specify use of the Crosswork cluster's virtual data port. In this example, the IP address 192.168.100.211 is the data VIP for the embedded Cisco Crosswork PnP server and 30620 is the PnP server external port.

Figure 22. Example: Generic PnP Profile
pnp profile cwpnp-data
transport http ipv4 192.168.100.211 port 30620
Configure the DHCP Server

The DCHCP entry redirects traffic from the PnP agent on the device to the IP address of the external TFTP server.

Figure 23. Sample PnP ZTP DHCP Setup
option tftp code 150 = text;
host cztp1 {
 hardware ethernet 00:a7:42:86:54:f1;
  option tftp150 "192.168.100.205":
   }

Classic ZTP DHCP Setup Scripts for Cisco Prime Network Registrar (CPNR)

Following are two sets of scripts that allow you to add Classic ZTP device, image and configuration file entries to the CPNR DHCP server configuration file. There’s one set of three scripts for IPv4, and a separate set of five scripts for IPv6.


Note

The following scripts are for use with Classic ZTP only. You can't use them with Secure ZTP or PnP ZTP.


To use these scripts:

  1. Copy and paste the contents of the scripts into local text files with the names given here.

  2. Modify the device, image, and configuration entries in the ztp-v4-setup-vi-nrcmd.txt script, or the ztp-v6-setup-vi-nrcmd.txt script, to fit your needs, as explained in the script comments.

  3. Copy the script files you want to use to the root folder of your local CPNR server.

  4. Execute the scripts on the CPNR server using the following command:

    [root@cpnr-local ~]#/opt/nwreg2/local/usrbin/nrcmd -N username -P password <ztp-IPVersion-setup-via-nrcmd.txt

    Where:

    • username is the name of a user ID with administrator privileges on the CPNR server.

    • password is the password for the corresponding CPNR admin user ID.

    • IPVersion is either v4 for the IPv4 version of the scripts, or v6 for the IPv6 version of the scripts.

Figure 24. IPv4 Script 1 of 3: ztp-v4-setup-vi-nrcmd.txt
#
# Create the scope
#
scope ztp-ncs-5501-mgmt create 192.0.20.0/24
 
# Add the dynamic range
scope ztp-ncs-5501-mgmt addrange 200 225
 
# Default the routers option. Note: No need to do subnet-mask. It is automatically provided.
scope-policy ztp-ncs-5501-mgmt setoption routers 10.10.10.1
 
# Set the lease time for clients on this scope
scope-policy ztp-ncs-5501-mgmt setoption dhcp-lease-time 216000
#
# Load the option 43 definitions
import option-set ztp-v4-option-set.txt
#
# Set the client classing expression and enable use of client-class
dhcp set client-class-lookup-id=@ztp-v4-client-class-expr.txt
dhcp enable client-class
#
# Load the client classes - these are used to lookup the correct client details 
# depending on whether an iso or script is requested by the client.
client-class ztp-iso create
client-class ztp-iso set client-lookup-id="(or (try (concat (as-string 
    (request get option 61)) \"-iso\")) (request macaddress-string))"
#
client-class ztp-script create
client-class ztp-script set client-lookup-id="(or (try (concat (as-string 
    (request get option 61)) \"-script\")) (request macaddress-string))"
#
# Clients that are not ztp will fall into the ztp-none class
# and should not be offered service so they are excluded.
#
client-class ztp-none create
client-class ztp-none set action=exclude
#
# Create a default client that will prevent service to unknown clients.
client default create
client default set action=exclude
#
# Create some ZTP clients
#
# For each ZTP client we create two clients based on their serial number.
# (See above for the client-lookup-id expressions.)
# One has "-iso" added to the end that will be used when the client's
# request includes "iPXE" in option 77.
# The other has "-script" added to the end that will be used when the
# client's request includes "exr-config" in option 77.
#
 
### Device-1 Settings ####
client <device-1-serial-num>-iso create
client-policy <device-1-serial-num>-iso set packet-file-name=
   "http://<cw-ipv4-address>:30604/crosswork/imagesvc/v1/device/files/cw-image-uuid-d3930e13-b081-4905-b2e5-051249d9b0cb"
 
client <device-1-serial-num>-script create
client-policy <device-1-serial-num>-script set packet-file-name=
   "http://<cw-ipv4-address>:30604/crosswork/configsvc/v1/configs/device/files/d1d7b441-3a27-47d1-aef0-39c3087d34c1"
client-policy <device-1-serial-num>-script setvendoroption 43 Cisco-ZTP "(1 exr-config)(2 0)"
 
### Device-2 Settings ####
client <device-2-serial-num>--iso create
client-policy <device-2-serial-num>-iso set packet-file-name=
   "http://<cw-ipv4-address>:30604/crosswork/imagesvc/v1/device/files/cw-image-uuid-d3930e13-b081-4905-b2e5-051249d9b0cb"
 
client <device-2-serial-num>-script create
client-policy <device-2-serial-num>-script set packet-file-name=
   "http://<cw-ipv4-address>:30604/crosswork/configsvc/v1/configs/device/files/d1640deb-8252-47b6-aab1-a843c0c7757b"
client-policy <device-2-serial-num>-script setvendoroption 43 Cisco-ZTP "(1 exr-config)(2 0)"
 
#
# Create more as needed using the above as models.
# Note: For those that need option 67 (boot file), you can use:
#   client-policy <name> setoption boot-file "<file-url>"
#
# The next line is optional. Uncomment it if you want to log what the script is doing.
# dhcp set log-settings=+incoming-packet-detail,outgoing-packet-detail,client-detail

# Assure that the server is up-to-date with this configuration
dhcp reload
Figure 25. IPv4 Script 2 of 3: ztp-v4-setup-vi-nrcmd.txt
#
# Create the scope
#
scope ztp-ncs-5501-mgmt create 192.0.20.0/24
 
# Add the dynamic range
scope ztp-ncs-5501-mgmt addrange 200 225
 
# Default the routers option. Note: No need to do subnet-mask. It is automatically provided.
scope-policy ztp-ncs-5501-mgmt setoption routers 10.10.10.1
 
# Set the lease time for clients on this scope
scope-policy ztp-ncs-5501-mgmt setoption dhcp-lease-time 216000
#
# Load the option 43 definitions
import option-set ztp-v4-option-set.txt
#
# Set the client classing expression and enable use of client-class
dhcp set client-class-lookup-id=@ztp-v4-client-class-expr.txt
dhcp enable client-class
#
# Load the client classes - these are used to lookup the correct client details 
# depending on whether an iso or script is requested by the client.
client-class ztp-iso create
client-class ztp-iso set client-lookup-id="(or (try (concat (as-string 
    (request get option 61)) \"-iso\")) (request macaddress-string))"
#
client-class ztp-script create
client-class ztp-script set client-lookup-id="(or (try (concat (as-string 
    (request get option 61)) \"-script\")) (request macaddress-string))"
#
# Clients that are not ztp will fall into the ztp-none class
# and should not be offered service so they are excluded.
#
client-class ztp-none create
client-class ztp-none set action=exclude
#
# Create a default client that will prevent service to unknown clients.
client default create
client default set action=exclude
#
# Create some ZTP clients
#
# For each ZTP client we create two clients based on their serial number.
# (See above for the client-lookup-id expressions.)
# One has "-iso" added to the end that will be used when the client's
# request includes "iPXE" in option 77.
# The other has "-script" added to the end that will be used when the
# client's request includes "exr-config" in option 77.
#
 
### Device-1 Settings ####
client <device-1-serial-num>-iso create
client-policy <device-1-serial-num>-iso set packet-file-name=
   "http://<cw-ipv4-address>:30604/crosswork/imagesvc/v1/device/files/cw-image-uuid-d3930e13-b081-4905-b2e5-051249d9b0cb"
 
client <device-1-serial-num>-script create
client-policy <device-1-serial-num>-script set packet-file-name=
   "http://<cw-ipv4-address>:30604/crosswork/configsvc/v1/configs/device/files/d1d7b441-3a27-47d1-aef0-39c3087d34c1"
client-policy <device-1-serial-num>-script setvendoroption 43 Cisco-ZTP "(1 exr-config)(2 0)"
 
### Device-2 Settings ####
client <device-2-serial-num>--iso create
client-policy <device-2-serial-num>-iso set packet-file-name=
   "http://<cw-ipv4-address>:30604/crosswork/imagesvc/v1/device/files/cw-image-uuid-d3930e13-b081-4905-b2e5-051249d9b0cb"
 
client <device-2-serial-num>-script create
client-policy <device-2-serial-num>-script set packet-file-name=
   "http://<cw-ipv4-address>:30604/crosswork/configsvc/v1/configs/device/files/d1640deb-8252-47b6-aab1-a843c0c7757b"
client-policy <device-2-serial-num>-script setvendoroption 43 Cisco-ZTP "(1 exr-config)(2 0)"
 
#
# Create more as needed using the above as models.
# Note: For those that need option 67 (boot file), you can use:
#   client-policy <name> setoption boot-file "<file-url>"
#
# The next line is optional. Uncomment it if you want to log what the script is doing.
# dhcp set log-settings=+incoming-packet-detail,outgoing-packet-detail,client-detail

# Assure that the server is up-to-date with this configuration
dhcp reload
Figure 26. IPv4 Script 3 of 3: ztp-v4-client-class-expr.txt

(or
   (if (equal (as-string (request get-blob option 77)) "iPXE") "ztp-iso")
   (if (equal (as-string (request get-blob option 77)) "exr-config") "ztp-script")
   "ztp-none"
)
Figure 27. IPv6 Script 1 of 5: ztp-v6-setup-vi-nrcmd.txt

#
# create prefix for mgmt
prefix prefix-for-mgmt create 2001:DB8:10e:201a::/64
#
# Set the client classing expression and enable use
# of client-class
#
dhcp set v6-client-class-lookup-id=@ztp-v6-client-class-expr.txt
dhcp enable client-class
#
# Load the client classes - these are used to lookup the correct
# client details depending on whether an iso or script is requested
# by the client.
#
client-class ztp-iso create
client-class ztp-iso set v6-client-lookup-id=@ztp-v6-iso-lookup-expr.txt
#
client-class ztp-script create
client-class ztp-script set v6-client-lookup-id=@ztp-v6-script-lookup-expr.txt
client-class-policy ztp-script set v6-reply-options=17
#
# Delete option set (may not exist and ok if fails)
#
option-set dhcp6-cisco-custom delete
#
import option-set ztp-v6-options.txt
#
# Clients that are not ztp will fall into the ztp-none class
# and should not be offered service so they are excluded.
#
client-class ztp-none create action=exclude
#
# Create a default client that will prevent service to
# unknown clients.
#
client default create
client default set action=exclude
#
# Create some ZTP clients
#
# For each ZTP client we create two clients based on their mac-address.
# One has "-iso" added to the end that will be used when the client's
# request does not include the "exr-config" in option 77.
# The other has "-script" added to the end that will be used when the
# client's request does include "exr-config" in option 77.
#
client <device-serial-no>-iso create
# Set the vendor options using blob format as option definitions are for different data
client-policy <device-serial-no>-iso setV6VendorOption 17 dhcp6-cisco-custom "(1 exr-config)(2 0)"
# Escape the [ and ] as nrcmd (which uses tcl interpreter) will otherwise fail command
client-policy <device-serial-no>-iso setv6option bootfile-url 
   "http://\[cw-ipv6-address\]:30604/crosswork/imagesvc/v1/device/files/cw-image-uuid-aec596
      a1-7847-4254-966a-2456aa5"
#
client <device-serial-no>-script create
# Set the vendor options using blob format as option definitions are for different data
client-policy <device-serial-no>-script setV6VendorOption 17 dhcp6-cisco-custom "(1 exr-config)(2 0)"
# Escape the [ and ] as nrcmd (which uses tcl interpreter) will otherwise fail command
client-policy <device-serial-no>-script setv6option bootfile-url 
   "http://\[cw-ipv6-address\]:30604/crosswork/configsvc/v1/configs/device/files/8eb6b7e1
      -bd54-40bb-84e0-89f11a60128b"
#
 
# Assure the server is up-to-date with this configuration
dhcp reload
 
Figure 28. IPv6 Script 2 of 5: ztp-v6-client-class-expr.txt

(or (try (if (equal (as-string (request get option 15)) "exr-config") "ztp-script"))
    (try (if (equal (as-string (request get option 15)) "iPXE") "ztp-iso"))
   "ztp-none"
)
Figure 29. IPv6 Script 3 of 5: ztp-v6-iso-lookup-expr.txt

(let (id)
  (setq id (request get option 1))
  (or
# First try extracting the serial number from DUID
      (try (if (equali (substring id 0 6) 00:02:00:00:00:09)
               (concat (as-string (substring id 6 128)) "-script")
           )
      )
# If that fails, use normal client-id (DUID) lookup
     (concat (to-string id) "-iso")

  )
)
Figure 30. IPv6 Script 4 of 5: ztp-v6-script-lookup-expr.txt

(let (id)
  (setq id (request get option 1))
  (or
# First try extracting the serial number from DUID
      (try (if (equali (substring id 0 6) 00:02:00:00:00:09)
               (concat (as-string (substring id 6 128)) "-script")
           )
      )
# If that fails, use normal client-id (DUID) lookup
     (concat (to-string id) "-script")
  )
)
Figure 31. IPv6 Script 5 of 5: ztp-v6-options.txt

# Option Definition Set Export/Import Utility
# Version: 1
#
{
  ( name = dhcp6-cisco-custom )
  ( desc = Cisco Systems, Inc. )
  ( vendor-option-enterprise-id = 9 )
  ( id-range = 2 )
  ( option-list = [
    {
      ( name = cisco-17 )
      ( id = 17 )
      ( base-type = AT_VENDOR_OPTS )
      ( flags = AF_IMMUTABLE )
      ( sepstr = , )
      ( option-list = [
        {
          ( name = clientID )
          ( id = 1 )
          ( base-type = AT_NSTRING )
          ( sepstr = , )
          ( desc = ZTP - clientID )
        }
        {
          ( name = authCode )
          ( id = 2 )
          ( base-type = AT_INT8 )
          ( sepstr = , )
          ( desc = ZTP - authCode )
        }
        {
          ( id = 3 )
          ( name = md5sum )
          ( base-type = AT_NSTRING )
          ( desc = ZTP - md5sum )
        }
        {
          ( name = cnr-leasequery )
          ( id = 13 )
          ( base-type = AT_BLOB )
          ( flags = AF_IMMUTABLE )
          ( sepstr = , )
          ( option-list = [
            {
              ( name = oro )
              ( id = 1 )
              ( base-type = AT_SHORT )
              ( flags = AF_IMMUTABLE )
              ( repeat = ZERO_OR_MORE )
              ( sepstr = , )
            }
            {
              ( name = dhcp-state )
              ( id = 2 )
              ( base-type = AT_INT8 )
              ( flags = AF_IMMUTABLE )
              ( sepstr = , )
            }
            {
              ( name = data-source )
              ( id = 3 )
              ( base-type = AT_INT8 )
              ( flags = AF_IMMUTABLE )
              ( sepstr = , )
            }
            {
              ( name = start-time-of-state )
              ( id = 4 )
              ( base-type = AT_TIME )
              ( flags = AF_IMMUTABLE )
              ( sepstr = , )
            }
            {
              ( name = base-time )
              ( id = 5 )
              ( base-type = AT_DATE )
              ( flags = AF_IMMUTABLE )
              ( sepstr = , )
            }
            {
              ( name = query-start-time )
              ( id = 6 )
              ( base-type = AT_DATE )
              ( flags = AF_IMMUTABLE )
              ( sepstr = , )
            }
            {
              ( name = query-end-time )
              ( id = 7 )
              ( base-type = AT_DATE )
              ( flags = AF_IMMUTABLE )
              ( sepstr = , )
            }
            {
              ( name = client-class-name )
              ( id = 8 )
              ( base-type = AT_NSTRING )
              ( flags = AF_IMMUTABLE )
              ( sepstr = , )
            }
            {
              ( name = partner-last-transaction-time )
              ( id = 9 )
              ( base-type = AT_TIME )
              ( flags = AF_IMMUTABLE )
              ( sepstr = , )
            }
            {
              ( name = client-creation-time )
              ( id = 10 )
              ( base-type = AT_TIME )
              ( flags = AF_IMMUTABLE )
              ( sepstr = , )
            }
            {
              ( name = limitation-id )
              ( id = 11 )
              ( base-type = AT_BLOB )
              ( flags = AF_IMMUTABLE )
              ( sepstr = , )
            }
            {
              ( name = binding-start-time )
              ( id = 12 )
              ( base-type = AT_TIME )
              ( flags = AF_IMMUTABLE )
              ( sepstr = , )
            }
            {
              ( name = binding-end-time )
              ( id = 13 )
              ( base-type = AT_STIME )
              ( flags = AF_IMMUTABLE )
              ( sepstr = , )
            }
            {
              ( name = fwd-dns-config-name )
              ( id = 14 )
              ( base-type = AT_NSTRING )
              ( flags = AF_IMMUTABLE )
              ( sepstr = , )
            }
            {
              ( name = rev-dns-config-name )
              ( id = 15 )
              ( base-type = AT_NSTRING )
              ( flags = AF_IMMUTABLE )
              ( sepstr = , )
            }
            {
              ( name = lookup-key )
              ( id = 16 )
              ( base-type = AT_BLOB )
              ( flags = AF_IMMUTABLE )
              ( sepstr = , )
            }
            {
              ( name = user-defined-data )
              ( id = 17 )
              ( base-type = AT_NSTRING )
              ( flags = AF_IMMUTABLE )
              ( sepstr = , )
            }
            {
              ( name = prefix-name )
              ( id = 18 )
              ( base-type = AT_NSTRING )
              ( flags = AF_IMMUTABLE )
              ( sepstr = , )
            }
            {
              ( name = failover-state-serial-number )
              ( id = 19 )
              ( base-type = AT_INT )
              ( flags = AF_IMMUTABLE )
              ( sepstr = , )
            }
            {
              ( name = reservation-key )
              ( id = 20 )
              ( base-type = AT_BLOB )
              ( flags = AF_IMMUTABLE )
              ( sepstr = , )
            }
            {
              ( name = failover-partner-lifetime )
              ( id = 21 )
              ( base-type = AT_STIME )
              ( flags = AF_IMMUTABLE )
              ( sepstr = , )
            }
            {
              ( name = failover-next-partner-lifetime )
              ( id = 22 )
              ( base-type = AT_STIME )
              ( flags = AF_IMMUTABLE )
              ( sepstr = , )
            }
            {
              ( name = failover-expiration-time )
              ( id = 23 )
              ( base-type = AT_STIME )
              ( flags = AF_IMMUTABLE )
              ( sepstr = , )
            }
            {
              ( name = client-oro )
              ( id = 24 )
              ( base-type = AT_SHORT )
              ( flags = AF_IMMUTABLE )
              ( repeat = ZERO_OR_MORE )
              ( sepstr = , )
            }
          ] )
        }
        {
          ( name = failover )
          ( id = 21 )
          ( base-type = AT_BLOB )
          ( flags = AF_NO_CONFIG_OPTION,AF_SUPPORTS_ENCAP_OPTION,AF_IMMUTABLE )
          ( sepstr = , )
          ( option-list = [
            {
              ( name = server-state )
              ( id = 1 )
              ( base-type = AT_INT8 )
              ( flags = AF_IMMUTABLE )
              ( sepstr = , )
            }
            {
              ( name = server-flags )
              ( id = 2 )
              ( base-type = AT_INT8 )
              ( flags = AF_IMMUTABLE )
              ( sepstr = , )
            }
            {
              ( name = binding-status )
              ( id = 3 )
              ( base-type = AT_INT8 )
              ( flags = AF_IMMUTABLE )
              ( sepstr = , )
            }
            {
              ( name = binding-flags )
              ( id = 4 )
              ( base-type = AT_INT8 )
              ( flags = AF_IMMUTABLE )
              ( sepstr = , )
            }
            {
              ( name = start-time-of-state )
              ( id = 5 )
              ( base-type = AT_DATE )
              ( flags = AF_IMMUTABLE )
              ( sepstr = , )
            }
            {
              ( name = state-expiration-time )
              ( id = 6 )
              ( base-type = AT_DATE )
              ( flags = AF_IMMUTABLE )
              ( sepstr = , )
            }
            {
              ( name = failover-expiration-time )
              ( id = 7 )
              ( base-type = AT_DATE )
              ( flags = AF_IMMUTABLE )
              ( sepstr = , )
            }
            {
              ( name = bndupd-serial )
              ( id = 8 )
              ( base-type = AT_INT )
              ( flags = AF_IMMUTABLE )
              ( sepstr = , )
            }
            {
              ( name = bndack-serial )
              ( id = 9 )
              ( base-type = AT_INT )
              ( flags = AF_IMMUTABLE )
              ( sepstr = , )
            }
            {
              ( name = client-flags )
              ( id = 10 )
              ( base-type = AT_INT )
              ( flags = AF_IMMUTABLE )
              ( sepstr = , )
            }
            {
              ( name = vpn-id )
              ( id = 11 )
              ( base-type = AT_INT )
              ( flags = AF_IMMUTABLE )
              ( sepstr = , )
            }
            {
              ( name = lookup-key )
              ( id = 12 )
              ( base-type = AT_BLOB )
              ( flags = AF_IMMUTABLE )
              ( sepstr = , )
              ( option-list = [
                {
                  ( name = type )
                  ( id = 0 )
                  ( base-type = AT_INT8 )
                  ( flags = AF_IMMUTABLE )
                  ( sepstr = , )
                }
                {
                  ( name = data )
                  ( id = 0 )
                  ( base-type = AT_BLOB )
                  ( flags = AF_IMMUTABLE )
                  ( sepstr = , )
                }
              ] )
            }
            {
              ( name = user-defined-data )
              ( id = 13 )
              ( base-type = AT_BLOB )
              ( flags = AF_IMMUTABLE )
              ( sepstr = , )
            }
            {
              ( name = reconfigure-data )
              ( id = 14 )
              ( base-type = AT_BLOB )
              ( flags = AF_IMMUTABLE )
              ( sepstr = , )
              ( option-list = [
                {
                  ( name = time )
                  ( id = 0 )
                  ( base-type = AT_DATE )
                  ( flags = AF_IMMUTABLE )
                  ( sepstr = , )
                }
                {
                  ( name = key )
                  ( id = 0 )
                  ( base-type = AT_BLOB )
                  ( flags = AF_IMMUTABLE )
                  ( sepstr = , )
                }
              ] )
            }
            {
              ( name = requested-fqdn )
              ( id = 15 )
              ( base-type = AT_BLOB )
              ( flags = AF_IMMUTABLE )
              ( sepstr = , )
              ( option-list = [
                {
                  ( name = flags )
                  ( id = 0 )
                  ( base-type = AT_INT8 )
                  ( flags = AF_IMMUTABLE )
                  ( sepstr = , )
                }
                {
                  ( name = domain-name )
                  ( id = 0 )
                  ( base-type = AT_DNSNAME )
                  ( flags = AF_IMMUTABLE )
                  ( sepstr = , )
                }
              ] )
            }
            {
              ( name = forward-dnsupdate )
              ( id = 16 )
              ( base-type = AT_NSTRING )
              ( flags = AF_IMMUTABLE )
              ( sepstr = , )
            }
            {
              ( name = reverse-dnsupdate )
              ( id = 17 )
              ( base-type = AT_NSTRING )
              ( flags = AF_IMMUTABLE )
              ( sepstr = , )
            }
            {
              ( name = partner-raw-cltt )
              ( id = 18 )
              ( base-type = AT_DATE )
              ( flags = AF_IMMUTABLE )
              ( sepstr = , )
            }
            {
              ( name = client-class )
              ( id = 19 )
              ( base-type = AT_NSTRING )
              ( flags = AF_IMMUTABLE )
              ( sepstr = , )
            }
            {
              ( name = status-code )
              ( id = 20 )
              ( base-type = AT_BLOB )
              ( flags = AF_IMMUTABLE )
              ( sepstr = , )
              ( option-list = [
                {
                  ( name = status-code )
                  ( id = 0 )
                  ( base-type = AT_SHORT )
                  ( flags = AF_IMMUTABLE )
                  ( sepstr = , )
                }
                {
                  ( name = status-message )
                  ( id = 0 )
                  ( base-type = AT_NSTRING )
                  ( flags = AF_IMMUTABLE )
                  ( sepstr = , )
                }
              ] )
            }
            {
              ( name = dns-info )
              ( id = 21 )
              ( base-type = AT_BLOB )
              ( flags = AF_IMMUTABLE )
              ( sepstr = , )
              ( option-list = [
                {
                  ( name = flags )
                  ( id = 0 )
                  ( base-type = AT_SHORT )
                  ( flags = AF_IMMUTABLE )
                  ( sepstr = , )
                }
                {
                  ( name = host-label-count )
                  ( id = 0 )
                  ( base-type = AT_INT8 )
                  ( flags = AF_IMMUTABLE )
                  ( sepstr = , )
                }
                {
                  ( name = name-number )
                  ( id = 0 )
                  ( base-type = AT_INT8 )
                  ( flags = AF_IMMUTABLE )
                  ( sepstr = , )
                }
              ] )
            }
            {
              ( name = base-time )
              ( id = 22 )
              ( base-type = AT_DATE )
              ( flags = AF_IMMUTABLE )
              ( sepstr = , )
            }
            {
              ( name = relationship-name )
              ( id = 23 )
              ( base-type = AT_NSTRING )
              ( flags = AF_IMMUTABLE )
              ( sepstr = , )
            }
            {
              ( name = protocol-version )
              ( id = 24 )
              ( base-type = AT_INT )
              ( flags = AF_IMMUTABLE )
              ( sepstr = , )
            }
            {
              ( name = mclt )
              ( id = 25 )
              ( base-type = AT_INT )
              ( flags = AF_IMMUTABLE )
              ( sepstr = , )
            }
            {
              ( name = dns-removal-info )
              ( id = 26 )
              ( base-type = AT_BLOB )
              ( flags = AF_IMMUTABLE )
              ( sepstr = , )
              ( option-list = [
                {
                  ( name = host-name )
                  ( id = 1 )
                  ( base-type = AT_RDNSNAME )
                  ( flags = AF_IMMUTABLE )
                  ( sepstr = , )
                }
                {
                  ( name = zone-name )
                  ( id = 2 )
                  ( base-type = AT_DNSNAME )
                  ( flags = AF_IMMUTABLE )
                  ( sepstr = , )
                }
                {
                  ( name = flags )
                  ( id = 3 )
                  ( base-type = AT_SHORT )
                  ( flags = AF_IMMUTABLE )
                  ( sepstr = , )
                }
                {
                  ( name = forward-dnsupdate )
                  ( id = 4 )
                  ( base-type = AT_NSTRING )
                  ( flags = AF_IMMUTABLE )
                  ( sepstr = , )
                }
                {
                  ( name = reverse-dnsupdate )
                  ( id = 5 )
                  ( base-type = AT_NSTRING )
                  ( flags = AF_IMMUTABLE )
                  ( sepstr = , )
                }
              ] )
            }
            {
              ( name = max-unacked-bndupd )
              ( id = 27 )
              ( base-type = AT_INT )
              ( flags = AF_IMMUTABLE )
              ( sepstr = , )
            }
            {
              ( name = receive-timer )
              ( id = 28 )
              ( base-type = AT_INT )
              ( flags = AF_IMMUTABLE )
              ( sepstr = , )
            }
            {
              ( name = hash-bucket-assignment )
              ( id = 29 )
              ( base-type = AT_BLOB )
              ( flags = AF_IMMUTABLE )
              ( sepstr = , )
            }
            {
              ( name = partner-down-time )
              ( id = 30 )
              ( base-type = AT_DATE )
              ( flags = AF_IMMUTABLE )
              ( sepstr = , )
            }
            {
              ( name = next-partner-lifetime )
              ( id = 31 )
              ( base-type = AT_DATE )
              ( flags = AF_IMMUTABLE )
              ( sepstr = , )
            }
            {
              ( name = next-partner-lifetime-sent )
              ( id = 32 )
              ( base-type = AT_DATE )
              ( flags = AF_IMMUTABLE )
              ( sepstr = , )
            }
            {
              ( name = client-oro )
              ( id = 33 )
              ( base-type = AT_SHORT )
              ( flags = AF_IMMUTABLE )
              ( repeat = ZERO_OR_MORE )
              ( sepstr = , )
            }
            {
              ( name = requested-prefix-length )
              ( id = 34 )
              ( base-type = AT_INT8 )
              ( flags = AF_IMMUTABLE )
              ( sepstr = , )
            }
          ] )
        }
      ] )
    }
  ] )
}


Trigger ZTP Device Bootstrap

With device entries imported to Cisco Crosswork and DHCP configured, you can initiate ZTP processing by restarting each of the devices.

Before you begin

Before triggering ZTP bootstrap on any of your devices, ensure that you have finished:

  • All of the preliminary setup tasks explained in ZTP Setup Workflow.

  • Creating ZTP device entries for the devices you want to bootstrap, as explained in

  • DHCP setup, as appropriate for your choice of ZTP mode and servers, as explained in


Note

If you are using PnP ZTP, be sure to set the minimum license boot-level on each IOS-XE device to metroipaccess or advancedmetroipaccess before you trigger ZTP processing. If the boot level has been set properly, the output of the IOS-XE #sh run | sec license CLI command on the device should contain statements showing either of these two license levels: license boot level advancedmetroipaccess or license boot level metroipaccess. If the command output shows any other license level lower than these two, the Cisco PnP cryptographic functionality will not be enabled. This will cause certificate installation to fail, which will then cause PnP ZTP device provisioning to fail.


Procedure


Step 1

Initiate ZTP processing as appropriate for the ZTP mode you are using:

  • For Classic and Secure ZTP, use one of these options:

    • Power-cycle the device to restart it.

    • Using a pin, press the chassis reset button at the back of the device. Press for 15 seconds, or until the power light on the device starts flashing.

    • For a previously imaged device: Connect to it via Telnet, then issue a ztp initiate command.

  • For PnP ZTP, use the option appropriate for your devices:

    • On Cisco ASR 903, ASR 907, and NCS 520 devices: Connect to it via Telnet, then issue a write erase command, followed by a reload command.

    • On Cisco ASR 920 devices: Press the ZTP button on the chassis for 8 seconds.

Repeat this step as needed for each of the devices you plan to provision during this session. You can restart all or as few devices as needed during a single session.

Step 2

Monitor the progress of ZTP processing using the Zero Touch Provisioning status tile shown in the following figure. To view the tile, click the Home icon on the main menu.

ZTP Provisioning Error Popup (Sample)

The tile provides a summary view of your current ZTP processing status. It gives a count of all the ZTP profiles, images, and configuration files currently in use. The tile also shows the number of devices in each of the possible ZTP processing states.


Complete Onboarded ZTP Device Information

ZTP devices, once onboarded, are automatically part of the shared Cisco Crosswork device inventory. You can edit them like any other device. The following steps explain two ways to add information to devices onboarded using ZTP.

Before editing any device, it’s always good practice to export a CSV backup of the devices you want to change. You can do this using the export function described in Step 2.

Before you begin

Some information needed for a complete device inventory record is either not necessary or not available via automation. For example: Geographical data, indicating that a device is located in a building at a given address, or at a set of GPS coordinates. Location data like this is a requirement for most organizations with active networks, and can only be added by a human operator.

Still other kinds of inventory information are useful when you use other applications to manage your network. For example: Cisco Crosswork tags make it easier to apply Cisco Crosswork Health Insights KPIs to particular devices. Similarly, associating an SRE policy with devices makes it easier to use Cisco Crosswork Network Controller or Cisco Crosswork Optimization Engine. Some Cisco Crosswork providers, such as Cisco NSO, base convenient functions on this kind of extended device information. All of it needs update from humans.

You can add this kind of information using functions in the other Cisco Crosswork applications and providers. For more information on this topic, see the user documentation for the application. You can also add much of it using Cisco Crosswork ZTP.

Procedure


Step 1

To update the inventory record for a ZTP device:

  1. From the main menu, choose Device Management > Network Devices.

  2. Click the ZTP Devices tab.

  3. Select the device you want to change, then click the Edit icon.

  4. Change the value of the Status field to Unprovisioned.

  5. Edit the other values configured for the device, as needed.

  6. Click Save.

Step 2

To update the inventory records for devices in bulk, including devices onboarded using ZTP:

  1. From the main menu, choose Device Management > Devices.

  2. Click the Export icon. Save the CSV file.

  3. Open the CSV template with the application of your choice and edit the device information you want to add or update. It’s a good idea to delete rows for devices you don’t want to update.

  4. When you’re finished, save the edited CSV file.

  5. If needed: Choose Device Management > Devices, then click the Zero Touch Devices tab.

  6. Click the Import icon.

  7. Click Browse to navigate to the CSV file you created and then select it.

  8. With the CSV file selected, click Import.


Reconfigure Onboarded ZTP Devices

The purpose of Cisco Crosswork ZTP is to onboard new devices quickly and easily, without requiring you to locate experts on site with the new devices. ZTP performs imaging and configuration as part of that task, and can run scripts as part of device configuration. But it’s not designed as an all-purpose device configuration utility, and shouldn’t be used in that way.

If you need to reconfigure a device onboarded using ZTP, use:

  • A Cisco Crosswork Change Automation Playbook, which allows you to roll out configuration changes to devices on demand.

  • The configuration change functions of Cisco Network Services Orchestrator (Cisco NSO), or any of the other Cisco Crosswork providers you’re using.

  • A direct connection to the device and the device OS command line interface.

If you can't use any of these methods, the best approach is to delete the device. You can onboard the device again, this time with the correct configuration.

To delete a ZTP device, select Device Management > Devices > Zero Touch Devices, select the device in the table, then click the Delete icon.

Retire or Replace Devices Onboarded With ZTP

Sometimes you must retire a Cisco device that was onboarded using ZTP. Device licenses are associated with the device serial number that you entered at the time of onboarding. ZTP permits association of a single device with up to three different serial numbers. You can use this fact to remove a failed or obsolete device from your network and from Cisco Crosswork inventory. You can replace it later without consuming an extra license.

This rule applies not only to devices with a chassis, but also to line cards and other pluggable device modules. Each of these modules has its own serial number. If you need to RMA a module, associate the old license with the serial number of the new module. But first remove the old line card and its serial number from inventory, as explained in the following steps.

  1. Select Device Management > Devices > Zero Touch Devices.

  2. Find the old device in the table and make a record of its serial number.

  3. Select the device and then click the Delete icon to delete it.

    After you delete the device, Cisco Crosswork will still count the license associated with this serial number as consumed. Track this license as part of any new or RMA replacement device purchase, so you can return the license for the old device to active use.

    Cisco Crosswork won’t allow two active devices with the same license. You must delete the old device before you can onboard a new or replacement device.

  4. When it’s time to onboard the new device:

    1. When you create a ZTP device entry for the new device, enter both the new and old serial numbers.

    2. If you’re using Secure ZTP: Submit both the old and new device serial numbers with the Ownership Voucher request for the new device. Cisco associates the old and new serial numbers with the in-use license in the regenerated Ownership Voucher.

    3. Onboard the new device as you would any other ZTP device. Only the old device license is consumed.

ZTP Asset Housekeeping

Once you have completed onboarding your devices with ZTP, you can delete offline copies of some of the ZTP assets you assembled. Retain others, depending on the policies and best practices of your organization. We recommend:

  • ZTP profiles: Usually, it’s safe to delete ZTP profiles after onboarding is complete. To delete a ZTP profile, select Device Management > Zero Touch Profiles . On the tile representing the ZTP profile you want to delete, click the More icon and then select Delete from the dropdown menu.

  • ZTP device entry CSV file: You may want to retain an offline copy of this file for use as a template. This file can be handy if, say, you have many branch offices sharing the same network architecture and device types. Otherwise, you can simply delete it from the file system. You can download the CSV file template at any time. You may find it more useful to export a backup CSV file containing all the data for your ZTP devices, including data you entered after onboarding. To export a CSV device backup, select Device Management > Devices > Zero Touch Devices . Then click the Export icon and save the CSV file.

  • Software images and SMUs: Save the production versions of these files offline, and delete older ones per the policies of your organization. Don’t delete the uploaded image files from Cisco Crosswork if you plan to use them to image more devices of the same family. To delete obsolete images, select Device Management > Software Images, select the file in the table, then click the Export icon.

  • Configuration files: You need not retain configurations you already uploaded to Cisco Crosswork, but the policy of your organization may differ. Don’t delete uploaded configuration files if you plan to configure more devices of the same family using ZTP. When configurations change, you can easily update the stored version. Prepare the new configuration file or script, select Device Management > Configuration Files, select the file in the table, and then click the Edit icon. You can then browse to the new script file you created, and copy/paste the new configuration. If a configuration becomes obsolete, delete it: Select Device Management > Configuration Files, select the file in the table, then click the Delete icon.

  • Credential profiles: You can delete an imported credential profile CSV file immediately. Don’t delete the uploaded credential profiles. When user names and passwords change, update the credential profiles: Select Device Management > Credentials, select the credential profile in the table, then click the Edit icon.

Troubleshoot ZTP Issues

Normally, Cisco Crosswork ZTP provisioning and onboarding happen quickly and automatically. Issues do occur at times, so the following topics explain how to diagnose and remedy issues, including both common issues and issues specific to each of the ZTP modes.

Third-party devices that conform 100 percent to the Secure ZTP RFC are the only third-party devices you can onboard using Cisco Crosswork ZTP.

Diagnose ZTP Issues Using the Status Column

The Status column in the Zero Touch Devices window displays the Details icon next to every device entry whose ZTP processing finished with a Provisioning Error, Onboarding Error or (for Secure ZTP only) ZTP Error. Click on the Details icon to display a popup window with information about the error, as in the following example. When you’re finished viewing the popup window, click the Close icon to close it.

Figure 32. Provisioning Error Popup Window
Provisioning Error Popup Window

You can also diagnose problems using the ZTP error logs, as explained in the next two sections.

Diagnose ZTP Issues Using Error Logs

You can access ZTP error log files directly, by SSH login to one or more of the virtual machines running Crosswork, and to one of the instances of the Crosswork ZTP service Kubernetes pod running on that VM. Follow these steps:

1. Log in to the VM using an Secure Shell command like the following:

ssh admin@VMIP

Where:

  • admin is the Crosswork administrator ID. For example: cw-admin.

  • VMIP is the IP address of the virtual machine running Crosswork. For example: 192.168.100.102.

2. Access the cw-ztp-service Kubernetes pod using a command like the following:

# kubectl exec -it PodID# bash

Where PodID# is the ID of the cw-ztp-service Kubernetes pod. Change the pod ID number as needed to match the number of the pod you want to access (pod 0 is always the first). For example: cw-ztp-service-0, cw-ztp-service-1, cw-ztp-service-2, and so on.

Change to the log folder with a command like the following: cd /var/log/robot/. You can then open any of the following ZTP-specific files in the folder:

  • cw-image-service_stdout.log

  • cw-image-service_stderr.log

  • cw-config-service_stdout.log

  • cw-config-service_stderr.log

Request ZTP Error Logs

You can request copies of ZTP error log files using the Crosswork user interface. Follow these steps:

1. Using an ID with administrator privileges, log into the Crosswork user interface.

2. Select Administration > Crosswork Manager

3. With the Crosswork Summary page displayed, click on the Zero Touch Provisioning tile. Crosswork displays details for the ZTP application.

4. With the application details displayed, select Showtech Options > Request Logs. Then select Showtech Requests. You can retrieve your log files from the dashboard when the request is completed.


Note

If you are having issues with the onboarding phase of processing, you may want to request logs for the Crosswork inventory manager application (dlminvmgr) in addition to the logs for ZTP. You can do that by selecting Platform Infrastructure instead of Zero Touch Provisioning during step 3, above.

Troubleshoot Common ZTP Issues

The following identifies remedies for common issues that can occur with any of the ZTP modes.

Table 8. Common ZTP Issues and Fixes

Phase

Issue

Symptoms

Remedy

Setup

Image, configuration, or SMU file upload fails

Error messages displayed in the user interface during upload

Make sure that the MD5 checksum for the file is correct. If the file information is correct, image uploads can still fail due to slow network connections. If you’re running into this problem, retry the upload.

Uploaded files aren’t in the drop-down menu when creating ZTP device entries or ZTP profiles

Files missing from the dropdown list

The drop-down menu selects files based on the device family and IOS release number you specify in your device entry or ZTP profile. Make sure that the file information matches the information for the device entry or profile you're creating.

Errors during device entry CSV file import

Errors are displayed indicating issues with fields in the CSV file. This can be downloaded as an errors CSV file and used to fix the devices import CSV file

If devices in inventory have the same serial numbers as the devices you’re importing, check that the devices are in the Unprovisioned state before import. All the devices imported using CSV files have their status set to Unprovisioned on import.

Before import, make sure the configurations, images, and ZTP profiles mentioned in the CSV file exist. You can edit device image and configuration files by exporting a device CSV file and reimporting it with changes. If you use this edit method, make sure the CSV file has the correct UUIDs before import.

Unprovisioned

DHCP is unresponsive or offer execution fails

No message

Test that DHCP server is running and properly configured, and reachable from the Crosswork cluster. As the DHCP server is external to Crosswork, users must be responsible for ensuring that the DHCP server is properly configured.

In Progress

Image or SMU file download fails

Status column and log file errors

Check that there’s network connectivity between Cisco Crosswork and the device. Make sure that the device is getting its IP address from the DHCP server. Ensure that the UUID of the software image given in the configuration file of the DHCP server is correct.

If you must correct the image UUID specified in the configuration file, make sure you restart the DHCP server before initiating ZTP processing again.

Cannot apply image or SMU to device

In Progress message doesn't clear; log file errors

Check that the image or SMU are compatible with the device and pass file checksums. Upload to Crosswork repository again.

Configuration file download fails

Log file errors

Check that there’s network connectivity between Cisco Crosswork and the device. Make sure that the device is getting its IP address from the DHCP server. Ensure that the UUID of the software image given in the DHCP server configuration file is correct. If you must correct the image UUID specified in the DHCP configuration file, make sure you restart the DHCP server before re-initiating ZTP processing. Make sure that the device serial number matches the serial number on the chassis of the device.

Ensure that the status of the device is either Unprovisioned or In Progress before initiating ZTP processing. Configuration downloads continue to fail as long as the device is in any other state.

Configuration file execution fails

Log file errors

Edit configuration files as needed.

Onboarded

Device state is showing Onboarded and not Provisioned

Status column did not show Provisioned

Provisioned is an intermediate state in ZTP processing. When the device state changes to Provisioned, Cisco Crosswork attempts to onboard the device immediately. The status changes to Onboarded or Onboarding Error after.

Onboarding Error

Status column shows Onboarding Error

The default Cisco Crosswork device life-cycle management (DLM) policy for identifying devices uniquely is the IP address. If you import a new device with an IP address that matches an existing device, the device status changes to Provisioned, then to Onboarding Error. If the IP address of the new device is blank, you get the same result. These same issues apply if your installation uses an OSPF ID, ISIS ID, or other DLM policy for determining device IDs. Onboarding can only succeed when you fill all the DLM policy fields with unique, non-blank values. If onboarding fails, inspect the popup error message, update the corresponding fields and retry onboarding.