Install Cisco Crosswork Data Gateway

This chapter contains the following topics:

Install Cisco Crosswork Data Gateway

This procedure can be used for installing the first Cisco Crosswork Data Gateway or for adding additional Cisco Crosswork Data Gateway VMs.


Note

If you are re-deploying Cisco Crosswork Data Gateway with Cisco Crosswork, delete the previous Cisco Crosswork entry for auto-enrollment to work.


Cisco Crosswork Data Gateway Deployment and Set Up Workflow

To deploy and set up Crosswork Data Gateway VM for use with Cisco Crosswork, follows these steps:

  1. Choose the deployment type for Cisco Crosswork Data Gateway i.e., Standard or Extended. See Cisco Crosswork Data Gateway Requirements.

  2. Install Cisco Crosswork Data Gateway on your preferred platform:

    VMware

    Install Cisco Crosswork Data Gateway Using vCenter vSphere Client

    Install Cisco Crosswork Data Gateway Via OVF Tool

    Cisco CSP

    Install Cisco Crosswork Data Gateway on Cisco CSP

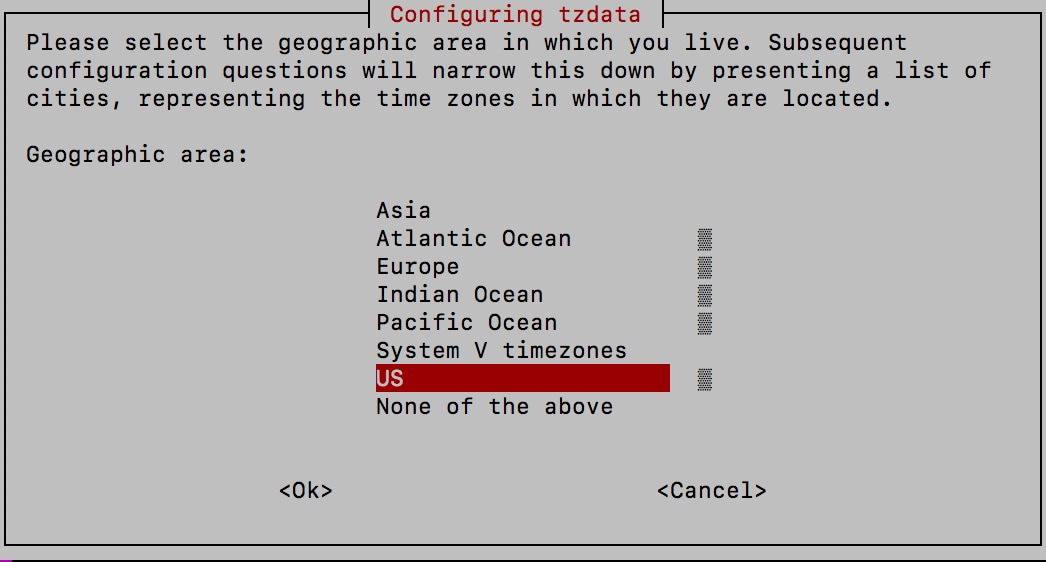
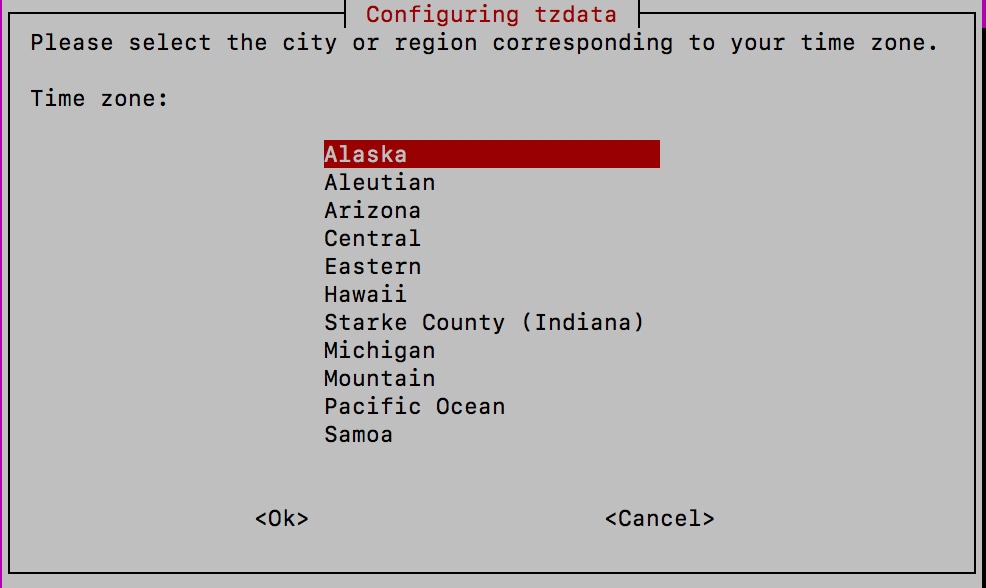
  3. Set timezone on Cisco Crosswork Data Gateway VM. See Configure Timezone of the Crosswork Data Gateway VM.

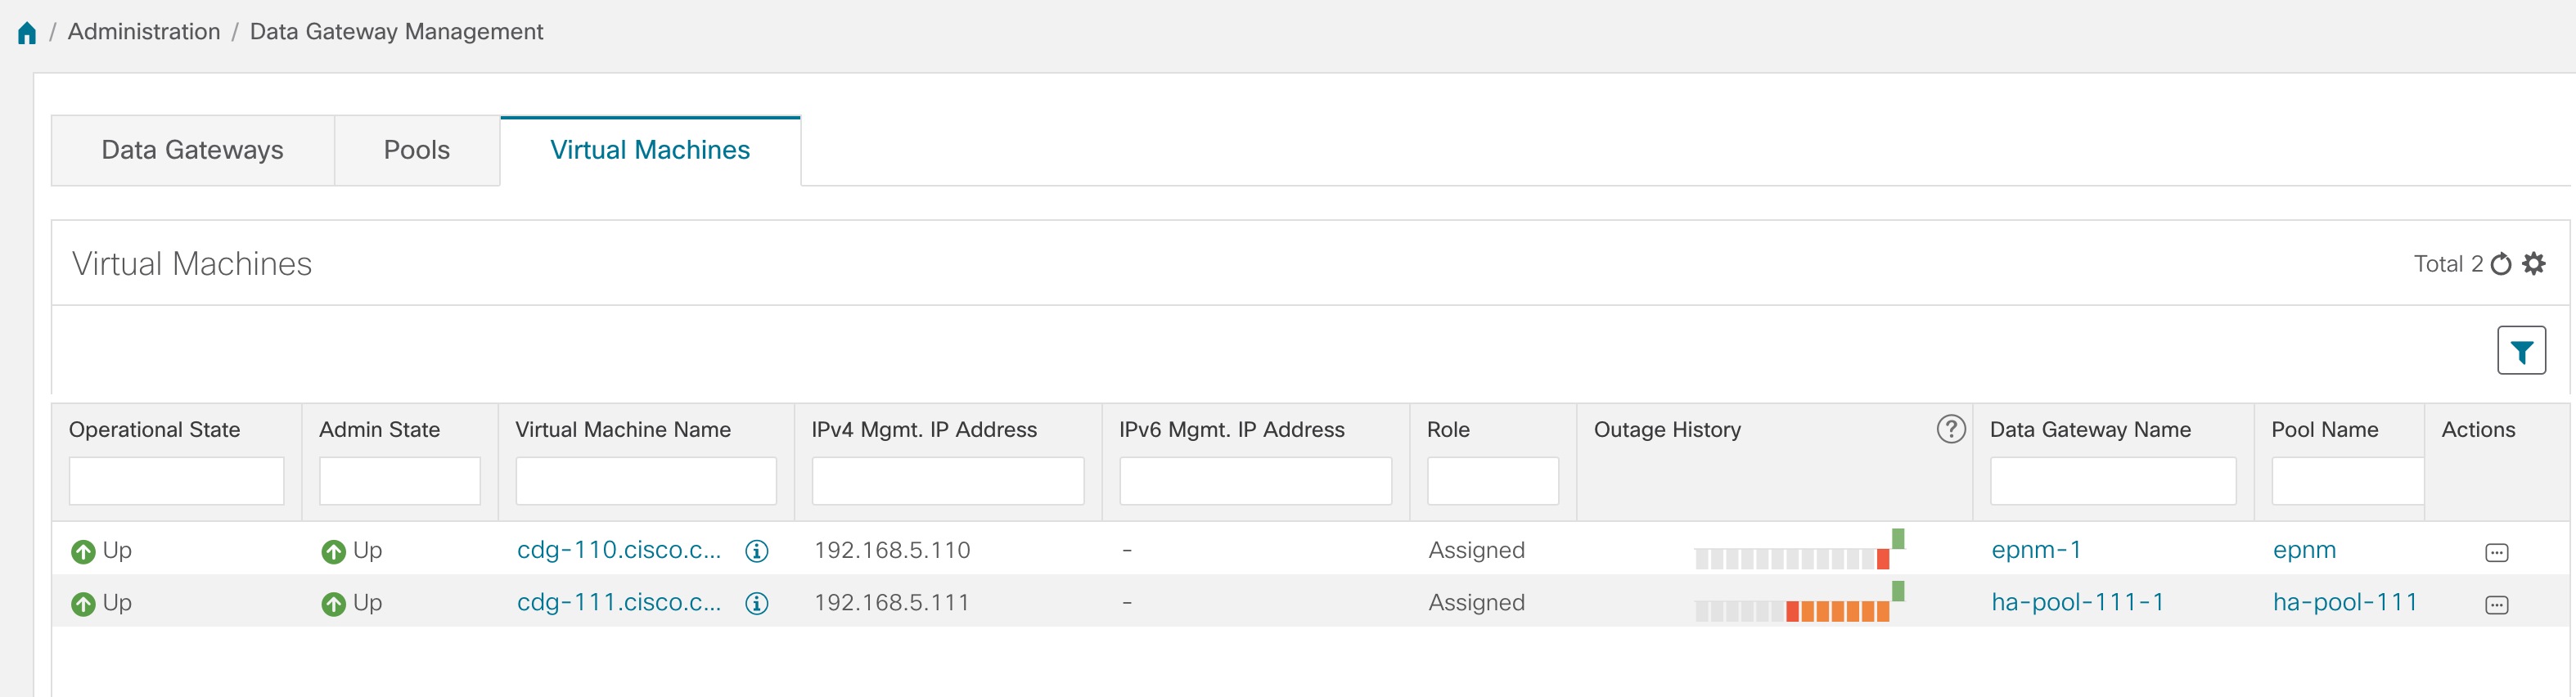
  4. Verify Cisco Crosswork Data Gateway enrollment with Cisco Crosswork. See Cisco Crosswork Data Gateway Authentication and Enrollment.

After verifying that the Cisco Crosswork Data Gateway has successfully enrolled with Cisco Crosswork, create a Cisco Crosswork Data Gateway pool and add the Cisco Crosswork Data Gateway VMs to the pool.


Note

If you are going to have multiple Cisco Crosswork Data Gateways due to load or scale and/or you wish to leverage Cisco Data Gateway High Availability, it is recommended that you install all the Cisco Crosswork Data Gateway VMs and then add them to a Data Gateway pool.


Cisco Crosswork Data Gateway Parameters and Deployment Scenarios

Before you begin installing the Crosswork Data Gateway, go through this section to read about the deployment parameters and possible deployment scenarios.

Crosswork Data Gateway supports either IPv4 or IPv6 for all interfaces. Cisco Crosswork does not support dual stack configurations. Therefore, plan ALL addresses for the environment as either IPv4 or IPv6.

During installation, Cisco Crosswork Data Gateway creates two default user accounts:

  • Cisco Crosswork Data Gateway administrator, with the username, dg-admin and the password set during installation. The administrator uses this ID to log in and troubleshoot Cisco Crosswork Data Gateway.

  • Cisco Crosswork Data Gateway operator, with the username, dg-oper and the password set during installation. The dg-oper user has permissions to perform all ‘read’ operations and limited ‘action’ commands.

  • To know what operations an admin and operator can perform, see Section Supported User Roles in the Cisco Crosswork Infrastructure 4.1 and Applications Administration Guide.

The dg-admin and dg-oper user accounts are reserved usernames and cannot be changed. You can change the password from the console for both the accounts. See Section Change Passphrase Cisco Crosswork Infrastructure 4.1 and Applications Administration Guide. In case of lost or forgotten passwords, you have to create a new VM, destroy the current VM, and re-enroll the new VM with Cisco Crosswork.

In the following table:

* Denotes the mandatory parameters. Other parameters are optional. You can choose them based on deployment scenario you require. We have explained deployment scenarios wherever applicable in the Additional Information column.

** Denotes parameters that you can enter during install or address later using additional procedures.

Table 1. Cisco Crosswork Data Gateway Deployment Parameters and Scenarios

Name

Parameter

Description

Additional Information

Host Information

Hostname*

Hostname

Name of the Cisco Crosswork Data Gateway VM specified as a fully qualified domain name (FQDN).

Note 

In larger systems, you are likely to have more than one Cisco Crosswork Data Gateway VM. The hostname must, therefore, be unique and created in a way that makes identifying a specific VM easy.

Description*

Description

A detailed description of the Cisco Crosswork Data Gateway.

Label

Label

Label used by Cisco Crosswork to categorize and group multiple Cisco Crosswork Data Gateways.

Deployment

Deployment

Parameter that conveys the controller type. For On-premise installation , choose either onpremise-standard or onpremise-extended. Default value is onpremise-standard.

This parameter is pre-defined for CSP installation. You will need to specify this value for OVF tool installation.

Active vNICs*

ActiveVnics

Number of vNICs to use for sending traffic.

You can choose to use either 1, 2, or 3 vNICs as per the following combinations:

Note 

If you use one vNIC on your Crosswork cluster, use only one interface on the Crosswork Data Gateway. If you use two vNICs on your Crosswork Cluster, then you can use two or three vNICs on the Crosswork Data Gateway.

  • 1 - sends all traffic through vNIC0.

  • 2 - sends management traffic through vNIC0 and all data traffic through vNIC1.

  • 3 - sends management traffic through vNIC0, Northbound data through vNIC1, and Southbound data on vNIC2.

AllowRFC8190

*
AllowRFC8190

Automatically allow addresses in an RFC 8190 range. Options are yes, no or ask, where the initial configuration scripts prompts for confirmation. The default value is yes.

Private Key URI

DGCertKey

SCP URI to private key file for session key signing. You can retrieve this using SCP (user@host:path/to/file).

Cisco Crosswork uses self-signed certificates for handshake with Cisco Crosswork Data Gateway. These certificates are generated at installation.

However, if you want to use third-party or your own certificate files, then enter these three parameters.

Certificate chains override any preset or generated certificates in the Cisco Crosswork Data Gateway VM and are given as an SCP URI (user:host:/path/to/file).

Note 

The host with the URI files must be reachable on the network (from the vNIC0 interface via SCP) and files must be present at the time of install.

Certificate File URI

DGCertChain

SCP URI to PEM formatted signing certificate chain for this VM. You can retrieve this using SCP (user@host:path/to/file).

Certificate File and Key Passphrase

DGCertChainPwd

SCP user passphrase to retrieve the Cisco Crosswork Data Gateway PEM formatted certificate file and private key.

Data Disk Size

DGAppdataDisk

Size in GB of a second data disk. Default size is 5GB for Standard and 500GB for Extended.

Passphrase

dg-admin Passphrase*

dg-adminPassword

The password you have chosen for the dg-admin user.

Password must be 8-64 characters.

dg-oper Passphrase*

dg-operPassword

The password you have chosen for the dg-oper user.

Password must be 8-64 characters.

Interfaces

Note 

You must select either an IPv4 or IPv6 address. Selecting None in both vNICx IPv4 Method field and vNICx IPv6 Method field results in a non-functional deployment.

vNICx IPv4 Address (VNIC0, VNIC1, and VNIC2 based on the number of interfaces you choose to use)

vNICx IPv4 Method*

For example, the parameter name for vNIC0 is vNIC0 IPv4 Method.

VnicxIPv4Method

For example, the parameter name for vNIC0 is Vnic0IPv4Method.

Method by which the vNICx interface gets its IPv4 address.

The default value for Method is None.

If you choose to use IPv4 address, select Method as Static and enter information in Address, Netmask, Skip Gateway, and Gateway fields.

vNICx IPv4 Address

VnicxIPv4Address

IPv4 address of the vNICx interface.

vNICx IPv4 Netmask

VnicxIPv4Netmask

IPv4 netmask of the vNICx interface in dotted quad format.

vNICx IPv4 Skip Gateway

VnicxIPv4SkipGateway

Options are yes or no.

Selecting yes skips configuring a gateway.

vNICx IPv4 Gateway

VnicxIPv4Gateway

IPv4 address of the vNICx gateway.

vNICx IPv6 Address (VNIC0, VNIC1, and VNIC2 based on the number of interfaces you choose to use)

vNICx IPv6 Method*

For example, the parameter for vNIC0 is vNIC0 IPv6 Method.

VnicxIPv6Method

For example, the parameter for vNIC0 is Vnic0IPv6Method.

Method by which the vNICx interface gets its IPv6 address.

The default value for Method is None.

If you choose to use IPv6 address, select Method as Static and enter information in Address, Netmask, Skip Gateway, and Gateway fields.

vNICx IPv6 Address

VnicxIPv6Address

IPv6 address of the vNICx interface.

vNICx IPv6 Netmask

VnicxIPv6Netmask

IPv6 prefix of the vNICx interface.

vNICx IPv6 Skip Gateway

VnicxIPv6SkipGateway

Options are yes or no.

Selecting yes skips configuring a gateway.

vNICx IPv6 Gateway

VnicxIPv6Gateway

IPv6 address of the vNICx gateway.

DNS Servers

DNS Address*

DNS

Space-delimited list of IPv4/IPv6 addresses of the DNS server accessible from the management interface.

DNS Search Domain*

Domain

DNS search domain

DNS Security Extensions

*
DNSSEC

Options are False, True, Allow-Downgrade. The default value is False. Select True to use DNS security extensions.

DNS over TLS*

DNSTLS

Options are False, True, and Opportunistic. The default value is False. Select True to use DNS over TLS.

Multicast DNS*

mDNS

Options are False, True and Resolve. The default value is False. Select True to use multicast DNS.

If you choose Resolve, only resolution support is enabled. Responding is disabled.

Link-Local Multicast Name Resolution*

LLMNR

Options are False, True, Opportunistic and Resolve. By default, this is set to False. Select True to use link-local multicast name resolution.

If you choose Resolve, only resolution support is enabled. Responding is disabled.

NTPv4 Servers

NTPv4 Servers*

NTP

NTPv4 server list. Enter space-delimited list of IPv4/IPv6 addresses or hostnames of the NTPv4 servers accessible from the management interface.

You must enter a value here, such as pool.ntp.org. NTP server is critical for time synchronization between Crosswork Data Gateway VM, Crosswork, and devices. Using a non-functional or dummy address may cause issues when Cisco Crosswork and Crosswork Data Gateway try to communicate with each other. If you are not using an NTP server, ensure that time gap between Crosswork Data Gateway and Crosswork is not more than 10 minutes. Else, Crosswork Data Gateway fails to connect.

Use NTPv4 Authentication

NTPAuth

Select Yes to use NTPv4 authentication.

NTPv4 Keys

NTPKey

Key IDs to map to the server list. Enter space-delimited list of Key IDs.

NTPv4 Key File URI

NTPKeyFile

SCP URI to the chrony key file.

NTPv4 Key File Passphrase

NTPKeyFilePwd

Password of SCP URI to the chrony key file.

Remote Syslog Server

Use Remote Syslog Server* UseRemoteSyslog Select Yes to send syslog messages to a remote host.

Configuring an external syslog server sends service events (CLI/MDT/SNMP/gNMI) to the external syslog server. Otherwise, they are logged only to the Cisco Crosswork Data Gateway VM.

If you want to use an external syslog server, specify these seven settings.

Note 

The host with the URI files must be reachable on the network (from vNIC0 interface via SCP) and files must be present at the time of install.

Syslog Server Address

SyslogAddress

IPv4 or IPv6 address of a syslog server accessible from the management interface.

Note 

If you are using an IPv6 address, surround the address with square brackets ([1::1]).

Syslog Server Port

SyslogPort

Port number of the syslog server.

Syslog Server Protocol

SyslogProtocol

Use UDP or TCP when sending syslog. Default value is UDP.

Use Syslog over TLS?

SyslogTLS

Select Yes to use TLS to encrypt syslog traffic.

Syslog TLS Peer Name

SyslogPeerName

Syslog server hostname exactly as entered in the server certificate SubjectAltName or subject common name.

Syslog Root Certificate File URI

SyslogCertChain

PEM formatted root cert of syslog server retrieved using SCP.

Syslog Certificate File Passphrase

SyslogCertChainPwd

Password of SCP user to retrieve Syslog certificate chain.

Remote Auditd Server

Use Remote Auditd Server*

UseRemoteAuditd

Select Yes to send Auditd message to a remote host

If desired, you can configure an external remote auditd server to send Cisco Crosswork Data Gateway VM change audit notifications.

Specify these three settings to use an external Auditd server.

Auditd Server Address

AuditdAddress

Hostname, IPv4, or IPv6 address of an optional Auditd server

Auditd Server Port

AuditdPort

Port number of an optional Auditd server.

Controller and Proxy Settings

Crosswork Controller IP*

ControllerIP

The Virtual IP address or the hostname of Cisco Crosswork Cluster.

Note 

If you are using an IPv6 address, it must be surrounded by square brackets ([1::1]).

This is required if you are providing a controller signing certificate file URI.

Crosswork Controller Port*

ControllerPort

Port of the Cisco Crosswork controller.

The default port is 30607

Controller Signing Certificate File URI*

ControllerSignCertChain

PEM formatted root cert of Cisco Crosswork to validate signing certs retrived using SCP. Cisco Crosswork generates the PEM file and is available at the following location:

cw-admin@<Crosswork_VM_ Management_IP_Address> :/home/cw-admin/controller.pem

Crosswork Data Gateway requires the Controller Signing Certificate File to become functional.

If you specify these parameters during the installation, the certificate file is imported once Crosswork Data Gateway boots up for the first time.

If you do not specify these parameters during installation, then import the certificate file manually by following the procedure Import Controller Signing Certificate File.

Controller SSL/TLS Certificate File URI

ControllerTlsCertChain

Cisco Crosswork Controller PEM formatted SSL/TLS certificate file retrieved using SCP.

Controller Certificate File Passphrase*

ControllerCertChainPwd

Password of SCP user (cw-admin) to retrieve Cisco Crosswork certificate chain.

Proxy Server URL

ProxyURL

URL of management network proxy server.

Crosswork Data Gateway must connect to the Internet via TLS, and a proxy server may be required if it is not present in your environment.

If you want to use a proxy server, specify these parameters.

Proxy Server Bypass List

ProxyBypass

Space-delimited list of subnets and domains that should not be sent to the proxy server.

Authenticated Proxy Username

ProxyUsername

Username for authenticated proxy servers.

Authenticated Proxy Passphrase

ProxyPassphrase

Passphrase for authenticated proxy servers.

HTTPS Proxy SSL/TLS Certificate File URI

ProxyCertChain

HTTPS proxy PEM formatted SSL/TLS certificate file retrieved using SCP.

HTTPS Proxy SSL/TLS Certificate File Passphrase

ProxyCertChainPwd

Password of SCP user to retrieve proxy certificate chain.

Collector Listening Ports

The default port values can be changed either during install or changed later from the Interactive Menu ( Change Current System Settings > c Configure Collector Server Port) of the Crosswork Data Gateway VM.

SNMP trap port**

PortSNMPTrap

SNMP trap port. The default port is 1062.

Syslog UDP port**

PortSyslogUDP

Syslog UDP port. The default port is 9514.

Syslog TCP port**

PortSyslogTCP

Syslog TCP port. The default port is 9898.

Syslog TLS port**

PortSyslogTLS

Syslog TLS port. The default port is 6514.


Note

If you are not using the default SCP port 22, you can specify the port as a part of the SCP command. For example,

-P55 user@host:path/to/file

Where 55 is a custom port.


Install Cisco Crosswork Data Gateway Using vCenter vSphere Client

Follow the steps to install Cisco Crosswork Data Gateway using vCenter vSphere Client:

Note

The example images shown are only of Cisco Crosswork Data Gateway On-Premise Standard deployment.


Procedure


Step 1

Download the Cisco Crosswork Data Gateway 2.0 image file from cisco.com (*.ova).

Warning 

The default VMware vCenter deployment timeout is 15 minutes. If the time taken to fill the OVF template exceeds 15 minutes, vCenter times out and you will have to start over again. To prevent this, it is recommended that you plan for the installation by having the necessary parameters and requirements ready. Refer to the Table #id_125629__.

Step 2

Connect to vCenter vSphere Client. Then select Actions > Deploy OVF Template

Step 3

The VMware Deploy OVF Template wizard appears and highlights the first step, 1 Select template.
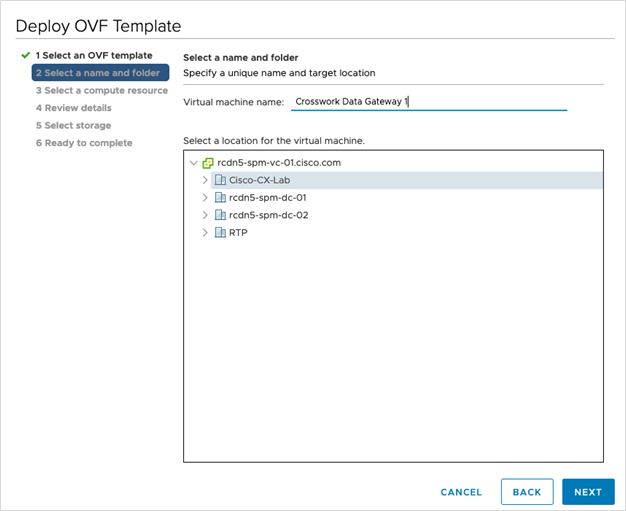
  1. Click Browse to navigate to the location where you downloaded the OVA image file and select it.

    Once selected, the filename is displayed in the window.

Step 4

Click Next to go to 2 Select name and location, as shown in the following figure.

  1. Enter a name for the VM you are creating.

  2. In the Select a location for the virtual machine list, choose the datacenter under which the VM will reside.

Step 5

Click Next to go to 3 Select a resource. Choose the VM’s host.

Step 6

Click Next. The VMware vCenter Server validates the OVA. Network speed will determine how long validation takes. When the validation is complete, the wizard moves to 4 Review details. Review the OVA’s information and then click Next.

Take a moment to review the OVF template you are deploying.

Note 

This information is gathered from the OVF and cannot be modified.

Step 7

Click Next to go to 5 accept license agreements. Review the End User License Agreement and click Accept.

Step 8

Click Next to go to 6 Select configuration, as shown in the following figure. Select the type of configuration you want i.e., either Crosswork On-Premise Standard or Crosswork On-Premise Extended.
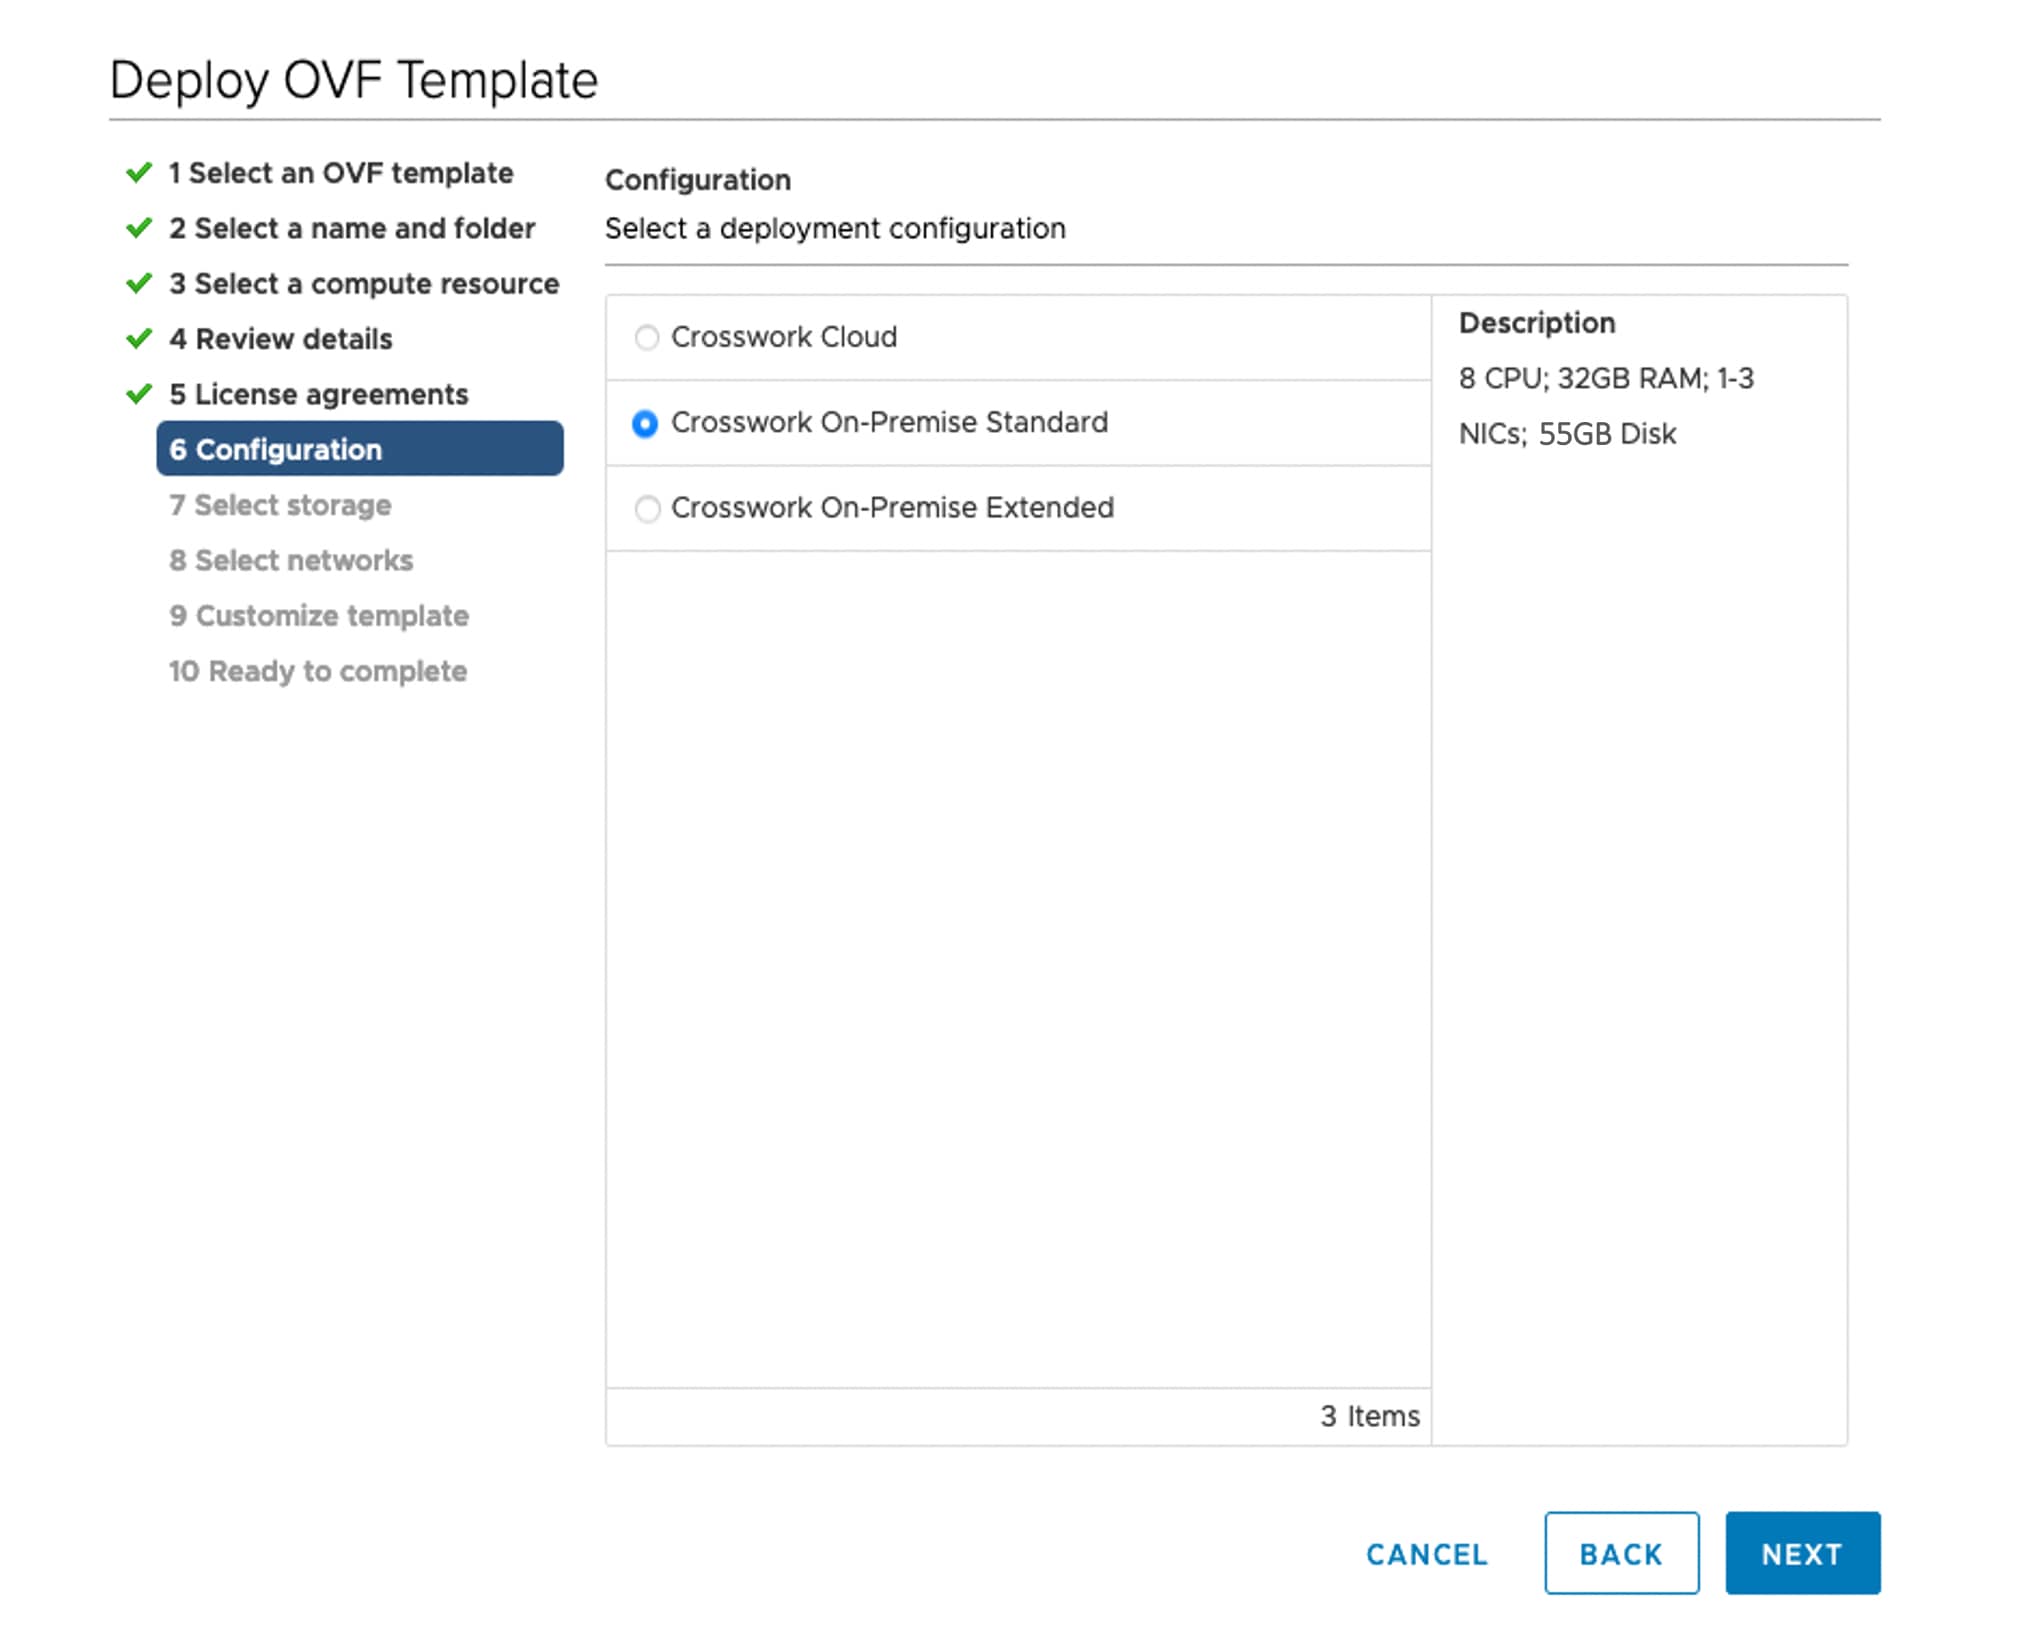
Note 
You must choose Crosswork On-Premise Extended if you plan to use Crossowork Data Gateway with Crosswork Health Insights.
Step 9

Click Next to go to 7 Select storage, as shown in the following figure.
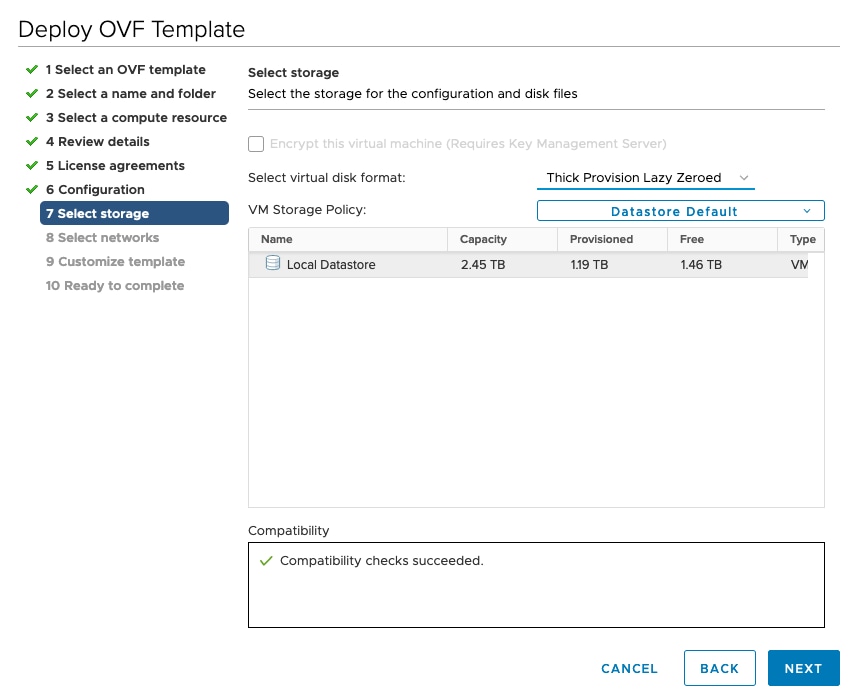
  1. Cisco recommends that you select Thick provision lazy zeroed from the Select virtual disk format drop-down list.

  2. From the Datastores table, choose the datastore you want to use and review its properties to ensure there is enough available storage.

Step 10

Click Next to go to 8 Select networks, as shown in the following figure. In the dropdown table at the top of the page, choose the appropriate destination network for each source network, vNIC2, vNIC1, and vNIC0 respectively.
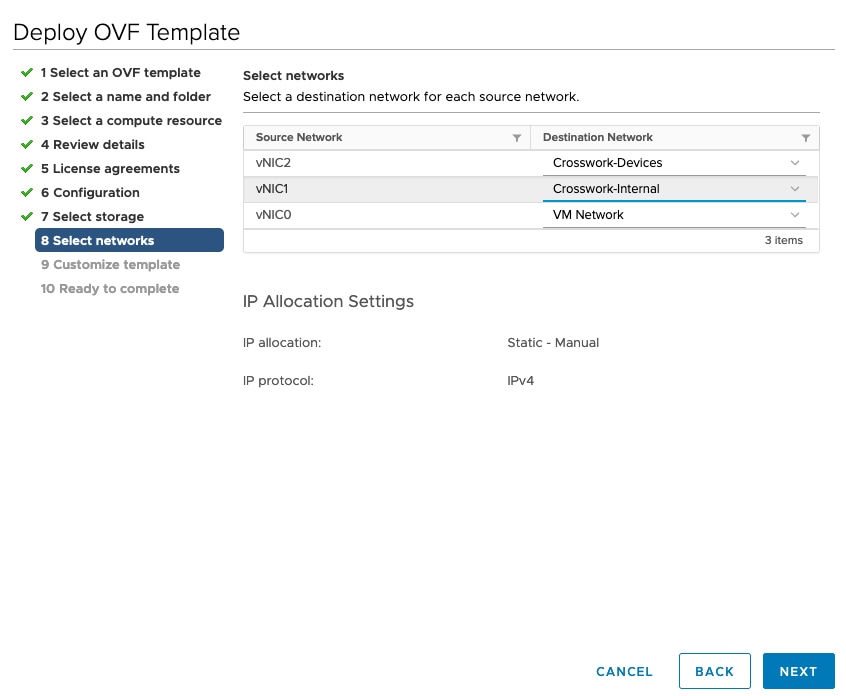
Note 

Starting with vNIC0, select a destination network for vNICs that will be used and leave unused vNICs set to the default value.

Step 11

Click Next to go to 9 Customize template, with the Host Information Settings already expanded. Enter the information for the parameters as explained in Table #id_125629__.
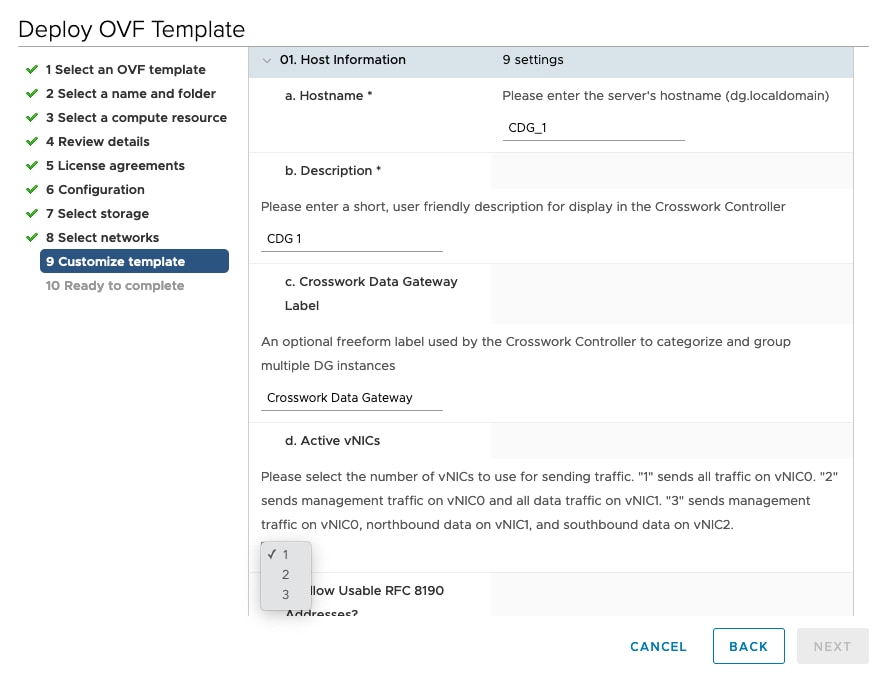
Step 12

Click Next to go to 10 Ready to complete. Review your settings and then click Finish if you are ready to begin deployment.

Step 13

Wait for the deployment to finish before continuing. To check the deployment status:

  1. Open the vCenter vSphere client.

  2. In the Recent Tasks tab for the host VM, view the status for the Deploy OVF template and Import OVF package jobs.

Wait for the deployment status to become 100%. You can now proceed to power on the VM.

Step 14

Once the deployment status is 100%, power on the VM to complete the deployment process. Expand the host’s entry so you can click the VM and then choose Actions > Power > Power On, as shown in the following figure:


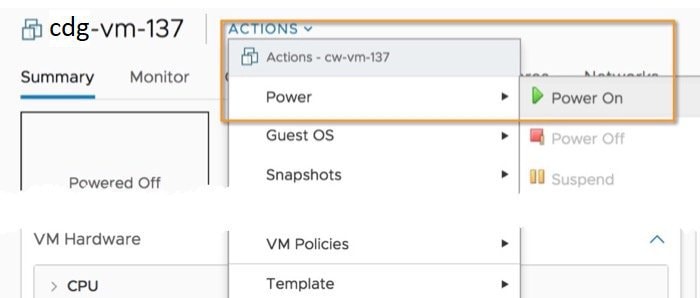
Wait for at least 5 minutes for the VM to come up and then login via vCenter or SSH as explained below.

Warning 

Changing the VM's network settings in vCenter may have significant unintended consequences, including but not limited to the loss of static routes and connectivity. The settings have been validated to provide the best network performance and any changes are done at your own risk.


What to do next

Login to Cisco Crosswork Data Gateway VM Via vCenter:

  1. Locate the VM in vCenter and then right click and select Open Console.

  2. Enter username (dg-admin or dg-oper as per the role assigned to you) and the corresponding password (the one that you created during installation process) and press Enter.

After you login, the Crossway Data Gateway should present you with the welcome screen and options menu indicating that the installation completed successfully. Log out and proceed with the post-installation tasks explained in the next section.

Install Cisco Crosswork Data Gateway Via OVF Tool

You can modify mandatory/optional parameters in the command/script as per your requirement and run the OVF Tool. Refer Table #id_125629__.

Below is a sample if you plan to run the OVF tool with a script:

#!/usr/bin/env bash

# robot.ova path
ROBOT_OVA_PATH="https://engci-maven.cisco.com/artifactory/cdg-group/build/2.0.0_dg200_7_2021-03-31_18-00-00/image/cw-na-dg-2.0.0-7-TESTONLY-20210331.ova"

VM_NAME="dg-32"
DM="thin"
Deployment="onpremise-standard"

ActiveVnics="3"

Hostname="dg-32.cisco.com"
Vnic0IPv4Address="172.23.213.32"
Vnic0IPv4Gateway="172.23.213.1"
Vnic0IPv4Netmask="255.255.255.0"
Vnic0IPv4Method="Static"
Vnic1IPv4Address="32.32.32.32"
Vnic1IPv4Gateway="32.32.32.1"
Vnic1IPv4Netmask="255.255.255.0"
Vnic1IPv4Method="Static"

DNS="171.70.168.183"
NTP="ntp.esl.cisco.com"
Domain="cisco.com"

ControllerIP="172.23.213.10"
ControllerPort="30607"
ControllerSignCertChain="cw-admin@172.23.213.10:/home/cw-admin/controller.pem"
ControllerCertChainPwd="Cwork123!"

Description="Description for Cisco Crosswork Data Gateway for 32"
Label="Label for Cisco Crosswork Data Gateway dg-32"

dg_adminPassword="cisco123"
dg_operPassword="cisco123"


ProxyUsername="cisco"
ProxyPassphrase="cisco123"


SyslogAddress="127.0.0.1"
SyslogPort=514
SyslogProtocol="UDP"
SyslogTLS=False
SyslogPeerName="combo-46.cisco.com"
SyslogCertChain="root@172.23.213.46:/root/stproxy/proxycert/CA.pem"
SyslogCertChainPwd="cisco123"

# Please replace this information according to your vcenter setup
VCENTER_LOGIN="administrator%40vsphere.local:Vtsisco%40123%21@172.23.213.21"
VCENTER_PATH="DC1/host/172.23.213.8"
DS="datastore1 (5)"

ovftool --acceptAllEulas --X:injectOvfEnv --skipManifestCheck --overwrite --noSSLVerify --powerOffTarget --powerOn \
--allowExtraConfig --extraConfig:firmware=efi --extraConfig:uefi.secureBoot.enabled=true \
--datastore="$DS" --diskMode="$DM" \
--name=$VM_NAME \
--net:"vNIC0=VM Network" \
--net:"vNIC1=DPortGroupVC-2" \
--net:"vNIC2=DPortGroupVC-1" \
--deploymentOption=$Deployment \
--prop:"ControllerIP=$ControllerIP" \
--prop:"ControllerPort=$ControllerPort" \
--prop:"ControllerSignCertChain=$ControllerSignCertChain" \
--prop:"ControllerCertChainPwd=$ControllerCertChainPwd" \
--prop:"Hostname=$Hostname" \
--prop:"Description=$Description" \
--prop:"Label=$Label" \
--prop:"ActiveVnics=$ActiveVnics" \
--prop:"Vnic0IPv4Address=$Vnic0IPv4Address" \
--prop:"Vnic0IPv4Gateway=$Vnic0IPv4Gateway" \
--prop:"Vnic0IPv4Netmask=$Vnic0IPv4Netmask" \
--prop:"Vnic0IPv4Method=$Vnic0IPv4Method" \
--prop:"Vnic1IPv4Address=$Vnic1IPv4Address" \
--prop:"Vnic1IPv4Gateway=$Vnic1IPv4Gateway" \
--prop:"Vnic1IPv4Netmask=$Vnic1IPv4Netmask" \
--prop:"Vnic1IPv4Method=$Vnic1IPv4Method" \
--prop:"DNS=$DNS" \
--prop:"NTP=$NTP" \
--prop:"dg-adminPassword=$dg_adminPassword" \
--prop:"dg-operPassword=$dg_operPassword" \
--prop:"Domain=$Domain" $ROBOT_OVA_PATH "vi://$VCENTER_LOGIN/$VCENTER_PATH"

Procedure


Step 1

Open a command prompt.

Step 2

Navigate to the location where you installed the OVF Tool.

Step 3

Run the OVF Tool in one of the following ways:

  1. Using the command

    The command contains the location of the source OVF file and location of the vmx file that will be created as a result of executing the command:

    ovftool <location_of_source_ovf_file> <location_of_vmx_file>

    For example,

    ovftool --acceptAllEulas --skipManifestCheck --X:injectOvfEnv -ds="datastore130-2"
     --deploymentOption="onpremise-standard" --diskMode="thin" --prop:"ControllerIP=<controller-ip>"
     --prop:"ControllerPort=30607" --prop:"ControllerSignCertChain=<location of controller.pem file>" 
    --prop:"ControllerCertChainPwd=<password>" --overwrite --powerOffTarget --powerOn 
    --noSSLVerify --allowExtraConfig --extraConfig:firmware=efi 
    --extraConfig:uefi.secureBoot.enabled=true --name="cdg147.cisco.com" 
    --prop:"Hostname=cdg147.cisco.com" --prop:"Description=CDG Base VM for Automation" 
    --net:"vNIC0=VM Network" --prop:"Vnic0IPv4Method=Static" 
    --prop:"Vnic0IPv4Address=<vNIC 0 IPv4 address>" --prop:"Vnic0IPv4Netmask=<vNIC0 IPv4 netmask>" 
    --prop:"Vnic0IPv4Gateway=<vNIC 0 IPv4 gateway>" --net:"vNIC1=DPG991" 
    --prop:"Vnic1IPv4Method=Static" --prop:"Vnic1IPv4Address=<vNIC1 IPv4 address>" 
    --prop:"Vnic1IPv4Netmask=<vNIC1 IPv4 netmask>" --prop:"Vnic1IPv4Gateway=<vNIC1 IPv4 gateway>" 
    --net:"vNIC2=DPG999" --prop:"dg-adminPassword=<password>" 
    --prop:"dg-operPassword=<password>" --prop:"DNS=<DNS address>" 
    --prop:"NTP=<NTP>" 
    --prop:"Domain=cisco.com" <image download url> vi://<username>:<password>'@<IP address>/DC/host/<IP address>
  2. Using the script

    If you want to execute the script thast you have created containing the command and arguments, run the following command:

    root@cxcloudctrl:/opt# ./cdgovfdeployVM197

Once the VM powers up, log into the VM. See Login into Crosswork Data Gateway VM. After you login, the Crossway Data Gateway should present you with the welcome screen and options menu indicating that the installation completed successfully. Log out and proceed with the post-installation tasks explained in the next section.

Install Cisco Crosswork Data Gateway on Cisco CSP

Follow the steps to install Cisco Crosswork Data Gateway on Cisco CSP:

Procedure


Step 1

Download the Cisco Crosswork Data Gateway qcow2 package:

  1. Download Cisco Crosswork Data Gateway qcow2 package from cisco.com to your local machine or a location on your local network that is accessible to your Cisco CSP. For the purpose of these instructions, we will use the package name "cw-na-dg-2.0.0-18-release-qcow2-pkg.tar.gz".

  2. Unzip the qcow2 package with the following command:

    tar -xvf cw-na-dg-2.0.0-18-release-qcow2-pkg.tar.gz

    The content of the qcow2 package is unzipped to a new directory (e.g. cw-na-dg-2.0.0-18-release-qcow2).

    This new directory will contain the Cisco Crosswork Data Gateway qcow2 build (e.g. cw-na-dg-2.0.0-18-release-20210409.tar.gz) and other files necessary to validate the build.

Step 2

(optional) Verify the Cisco Crosswork Data Gateway qcow2 package:

  1. Navigate to the directory created in the previous step.

  2. Use the following command to verify the signature of the build:

    Note 

    The machine where the script is being run needs HTTP access to cisco.com. Please contact Cisco Customer Experience team if access to cisco.com is not possible due to security restrictions, or if you did not get a successful verification message after running the script.

    python cisco_x509_verify_release.py -e <.cer file> -i <.tar.gz file> -s <.tar.gz.signature file> -v dgst -sha512
    Note 

    The cisco_x509_verify_release.py script is only compatible with python 2. Instead of using the provided script, you can also calculate and verify the md5 or SHA512 checksum of the file originally downloaded from Cisco against the checksum posted on Cisco.com.

Step 3

Prepare Cisco Crosswork Data Gateway Service Image for upload to Cisco CSP:
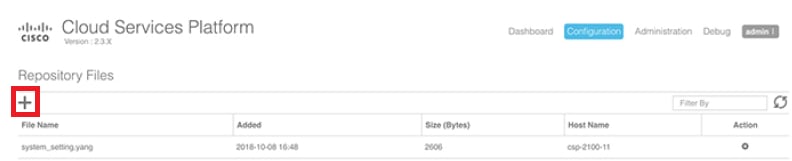
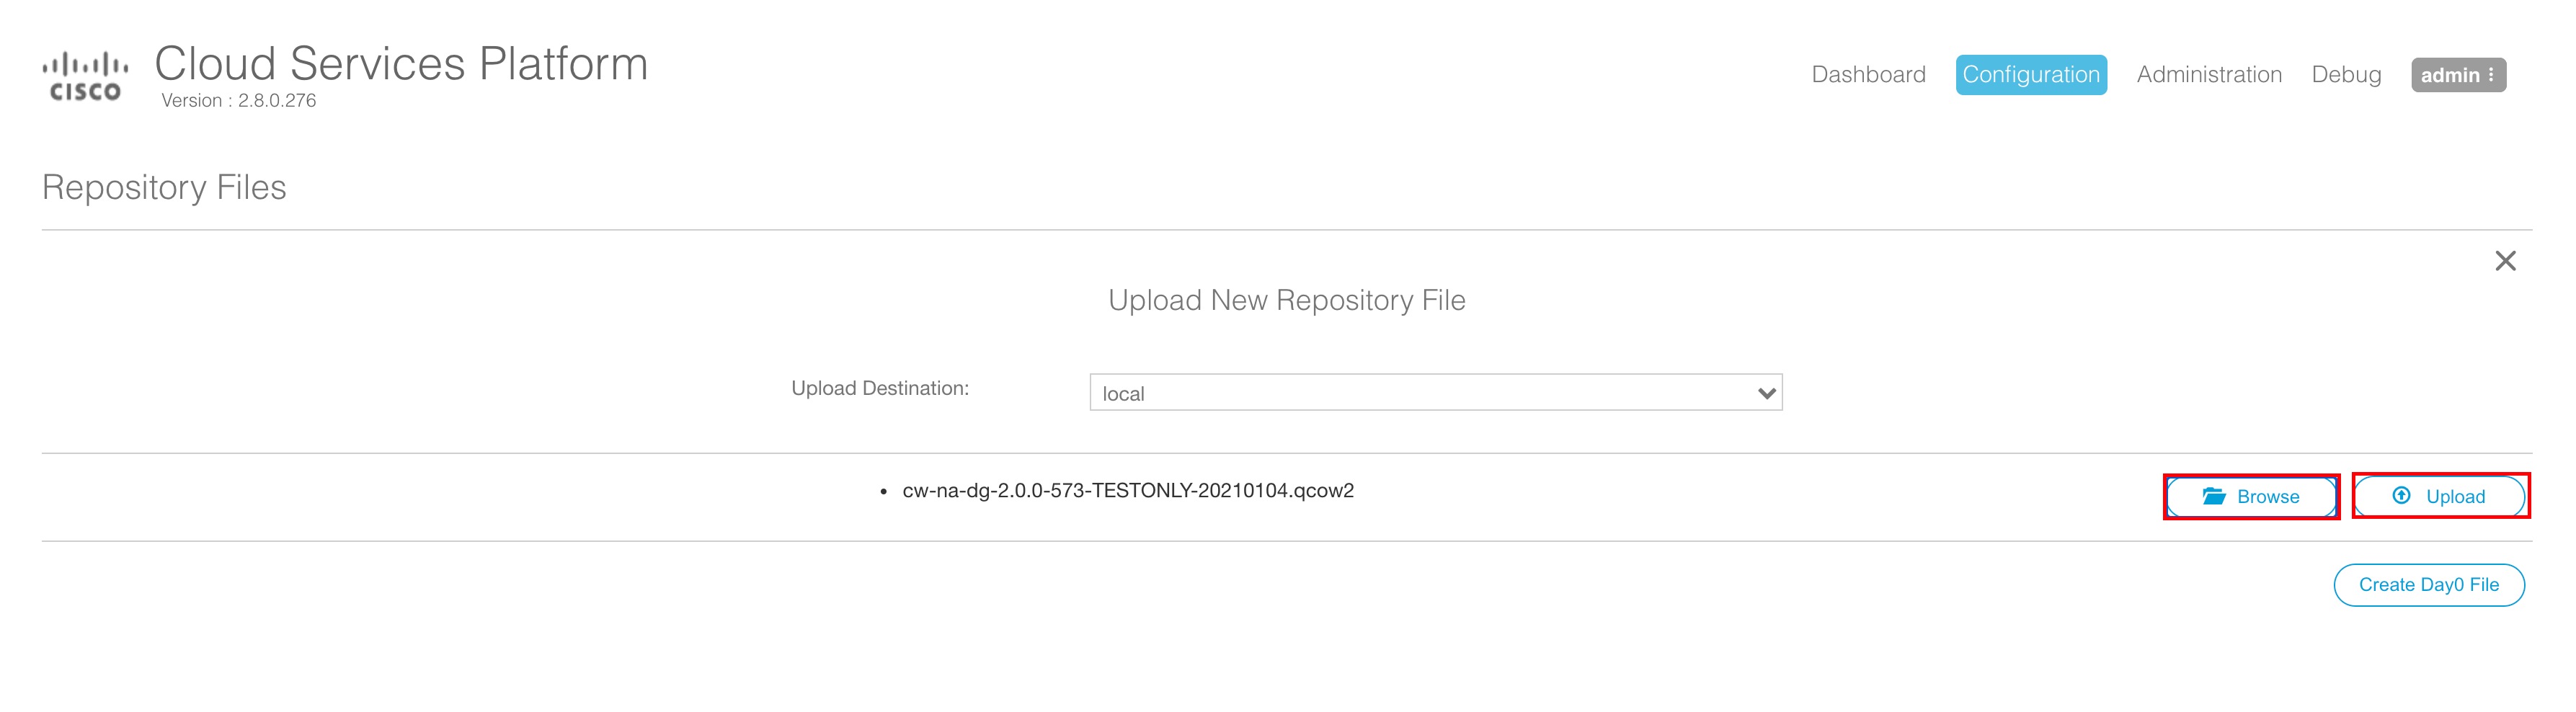
  1. The Cisco Crosswork Data Gateway qcow2 build is a tarball of the qcow2 and config.txt files. Unzip the .tar.gz ( e.g. cw-na-dg-2.0.0-18-release-20210409.tar.gz) with the following command:

    tar -xvf ccw-na-dg-2.0.0-18-release-20210409.tar.gz
  2. Open the config.txt file and modify the parameters as per your installation requirements. See Section Cisco Crosswork Data Gateway Parameters and Deployment Scenarios.

    Following parameters have pre-defined values:
    • Deployment

      • Use "Crosswork On-Premise" for Crosswork On-Premise.

    • Profile

      • Use "Standard" for standard deployment.

      • Use "Extended" for extended deployment.

    Below is an example of how the config.txt file looks like:

    ActiveVnics=3
    AllowRFC8190=Yes
    AuditdAddress=
    AuditdPort=60
    ControllerCertChainPwd=
    ControllerIP=changeme
    ControllerPort=30607
    ControllerSignCertChain=
    ControllerTlsCertChain=
    Deployment=Crosswork On-Premise
    Description=changeme
    DGAppdataDisk=5
    DGCertChain=
    DGCertChainPwd=
    DGCertKey=
    DNS=changeme
    DNSSEC=False
    DNSTLS=False
    Domain=changeme
    EnrollmentPassphrase=
    EnrollmentURI=
    Hostname=changeme
    Label=
    LLMNR=False
    mDNS-False
    NTP=changeme
    NTPAuth=False
    NTPKey=
    NTPKeyFile=
    NTPKeyFilePwd=
    PortSNMPTrap=1062
    PortSyslogTCP=9898
    PortSyslogTLS=6514
    PortSyslogUDP=9514
    Profile=Standard
    ProxyBypass=
    ProxyCertChain=
    ProxyCertChainPwd=
    ProxyPassphrase=
    ProxyURL=
    ProxyUsername=
    SyslogAddress=
    SyslogCertChain=
    SyslogCertChainPwd=
    SyslogPeerName=
    SyslogPort=514
    SyslogProtocol=UDP
    SyslogTLS=False
    UseRemoteAuditd=False
    UseRemoteSyslog=False
    Vnic0IPv4Address=0.0.0.0
    Vnic0IPv4Gateway=0.0.0.1
    Vnic0IPv4Method=None
    Vnic0IPv4Netmask=0.0.0.0
    Vnic0IPv4SkipGateway=False
    Vnic0IPv6Address=::0
    Vnic0IPv6Gateway=::1
    Vnic0IPv6Method=None
    Vnic0IPv6Netmask=64
    Vnic0IPv6SkipGateway=False
    Vnic1IPv4Address=0.0.0.0
    Vnic1IPv4Gateway=0.0.0.1
    Vnic1IPv4Method=None
    Vnic1IPv4Netmask=0.0.0.0
    Vnic1IPv4SkipGateway=False
    Vnic1IPv6Address=::0
    Vnic1IPv6Gateway=::1
    Vnic1IPv6Method=None
    Vnic1IPv6Netmask=64
    Vnic1IPv6SkipGateway=False
    Vnic2IPv4Address=0.0.0.0
    Vnic2IPv4Gateway=0.0.0.1
    Vnic2IPv4Method=None
    Vnic2IPv4Netmask=0.0.0.0
    Vnic2IPv4SkipGateway=False
    Vnic2IPv6Address=::0
    Vnic2IPv6Gateway=::1
    Vnic2IPv6Method=None
    Vnic2IPv6Netmask=64
    Vnic2IPv6SkipGateway=False
    dg-adminPassword=changeme
    dg-operPassword=changeme
    
Step 4

Upload Cisco Crosswork Data Gateway Service Image to Cisco CSP:

  1. Log into the Cisco CSP.

  2. Go to Configuration > Repository.

  3. On the Repository Files page, Click Add icon button.


  4. Select an Upload Destination.

  5. Click Browse, navigate to the qcow2 file, click Open and then Upload.

    Repeat this step to upload config.txt file.


    After the file is uploaded, the file name and other relevant information are displayed in the Repository Files table.

Step 5

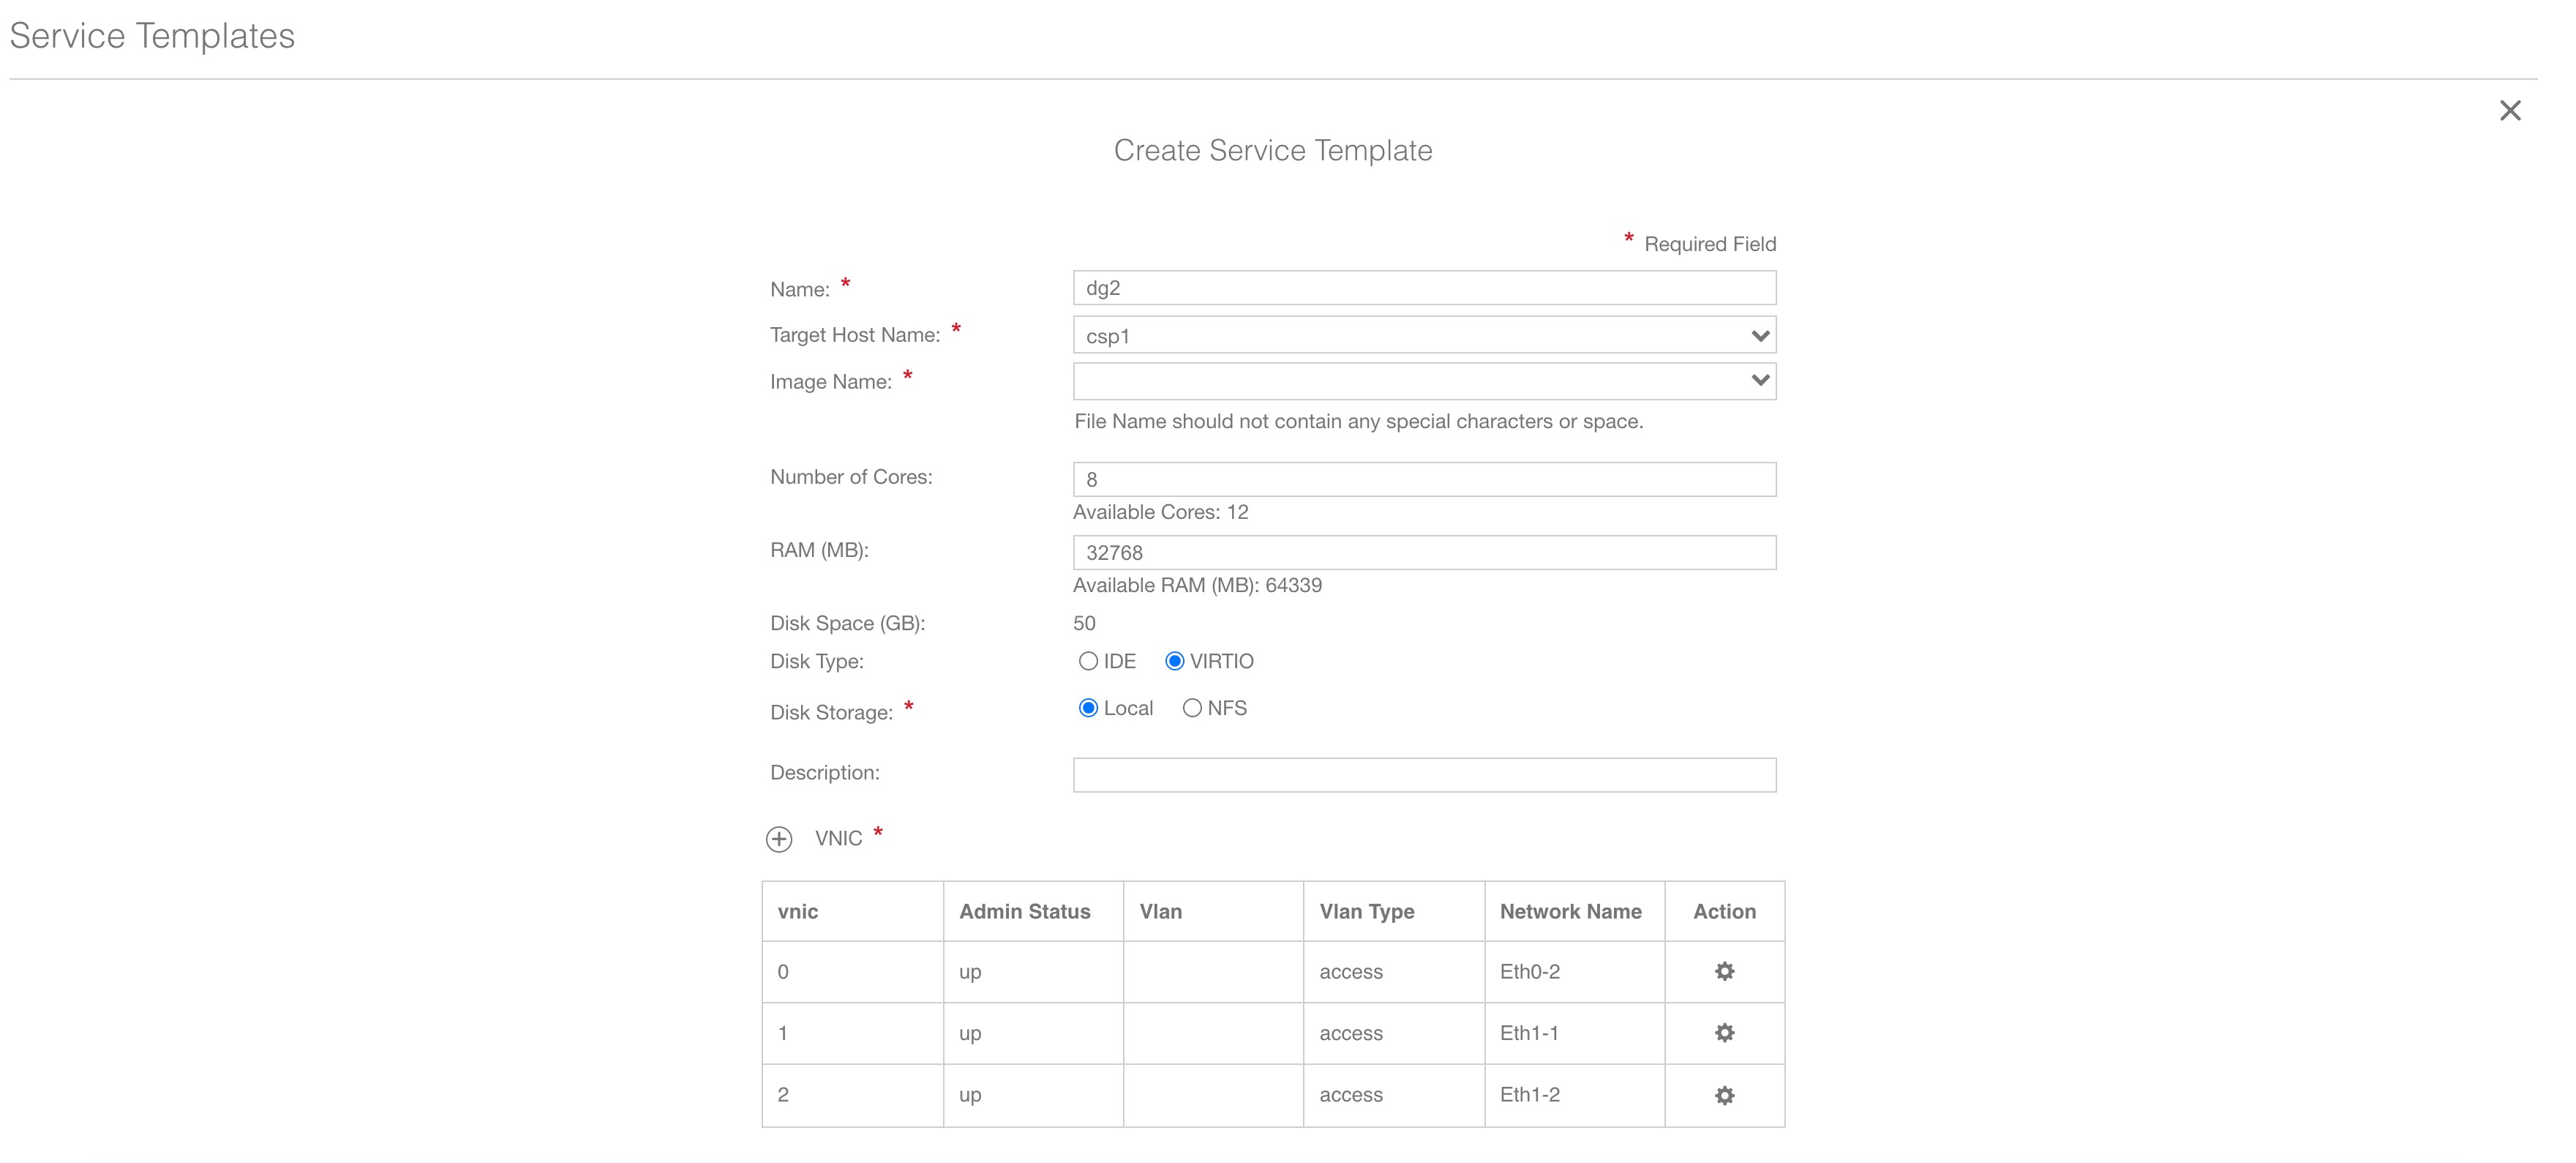
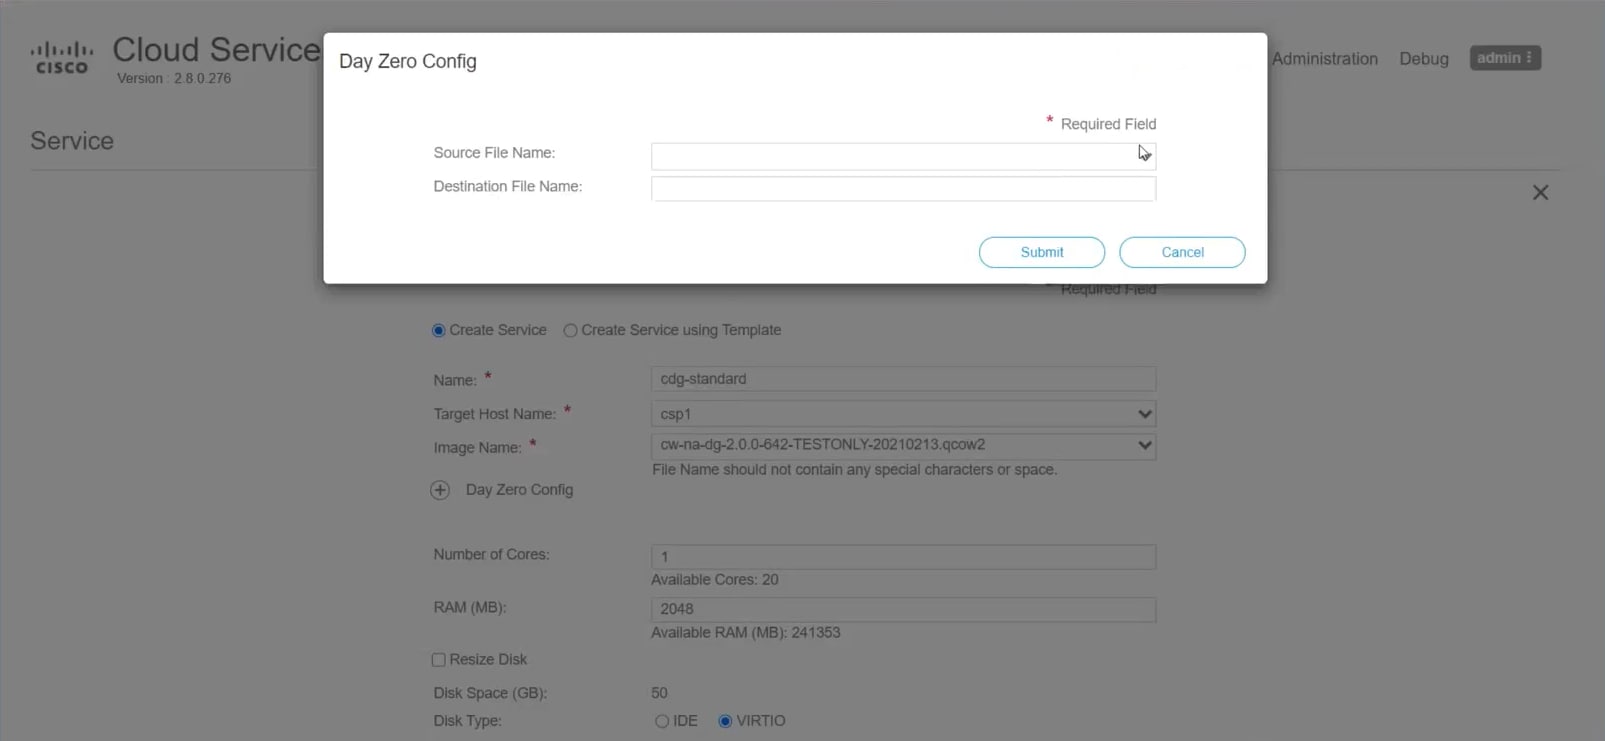
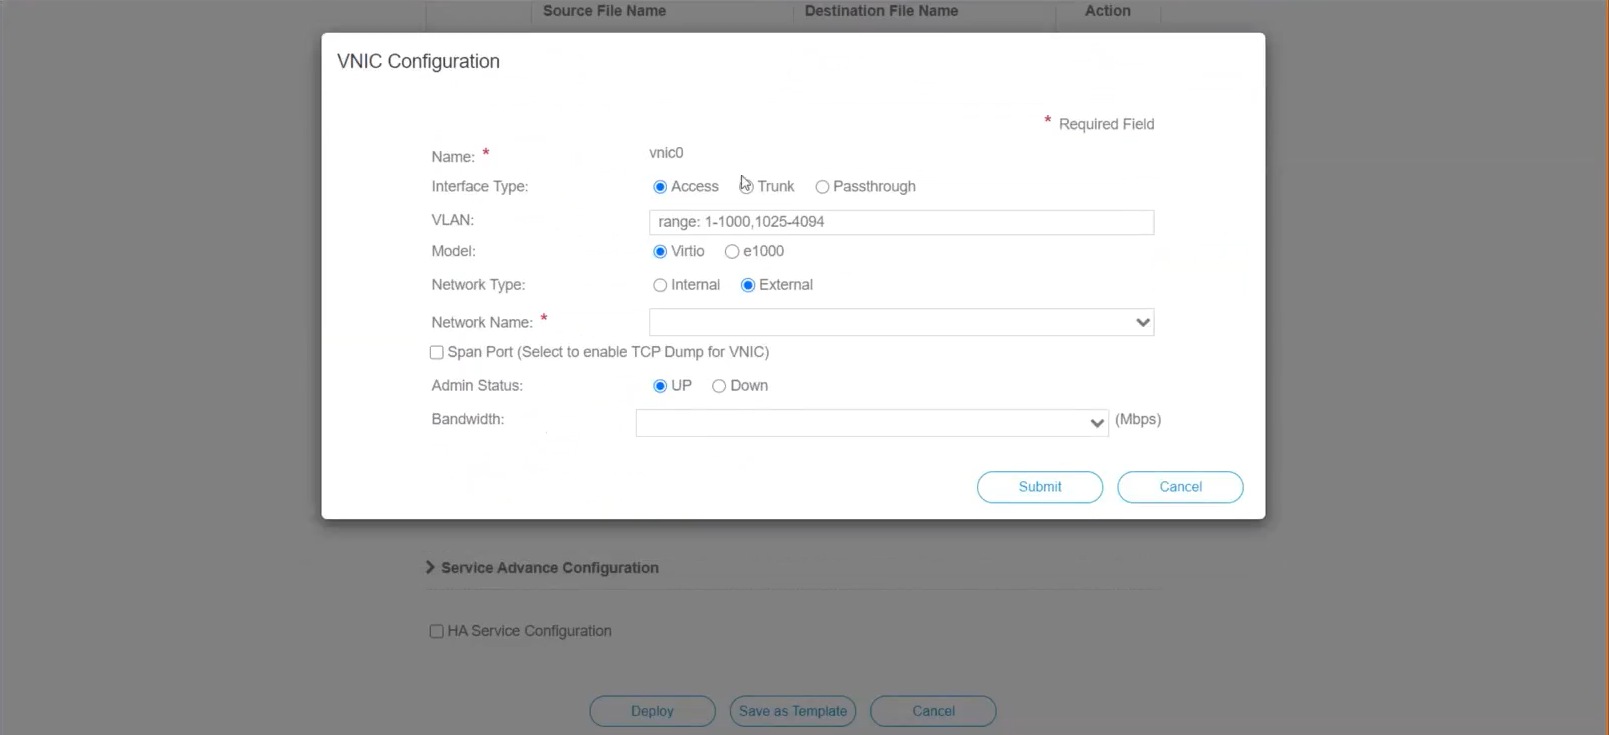
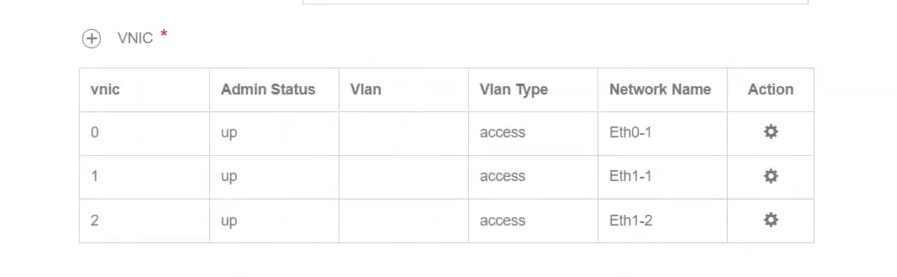
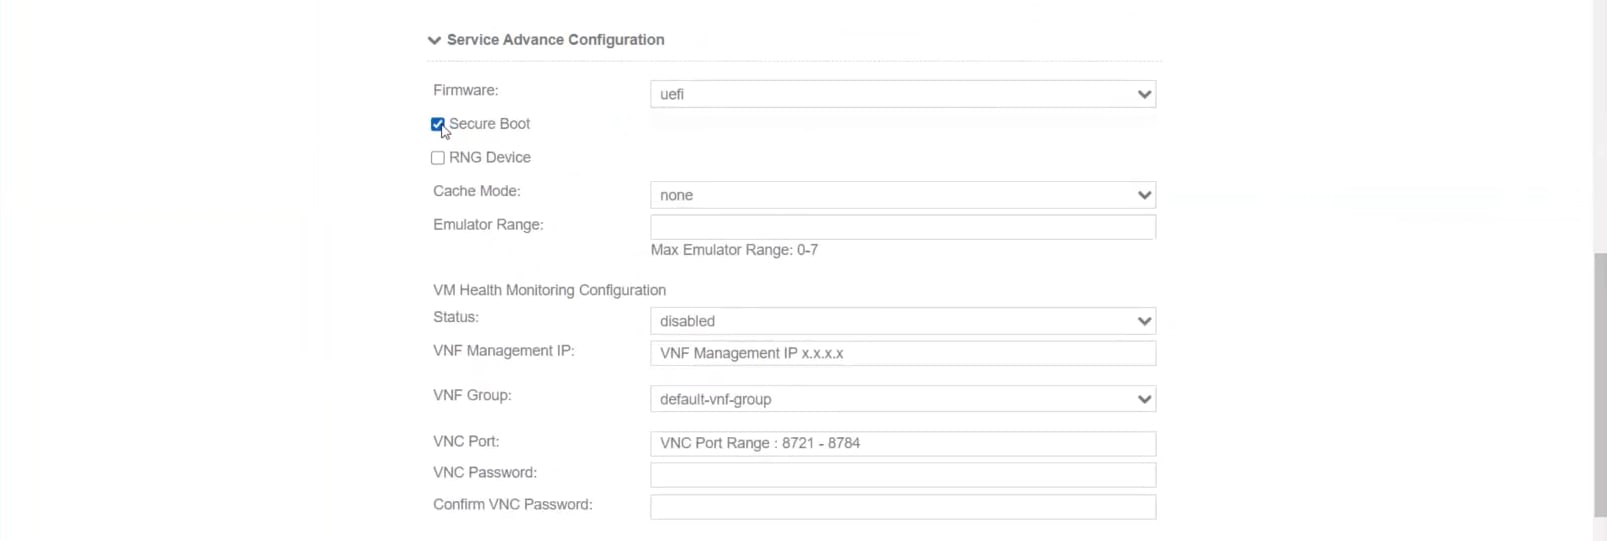
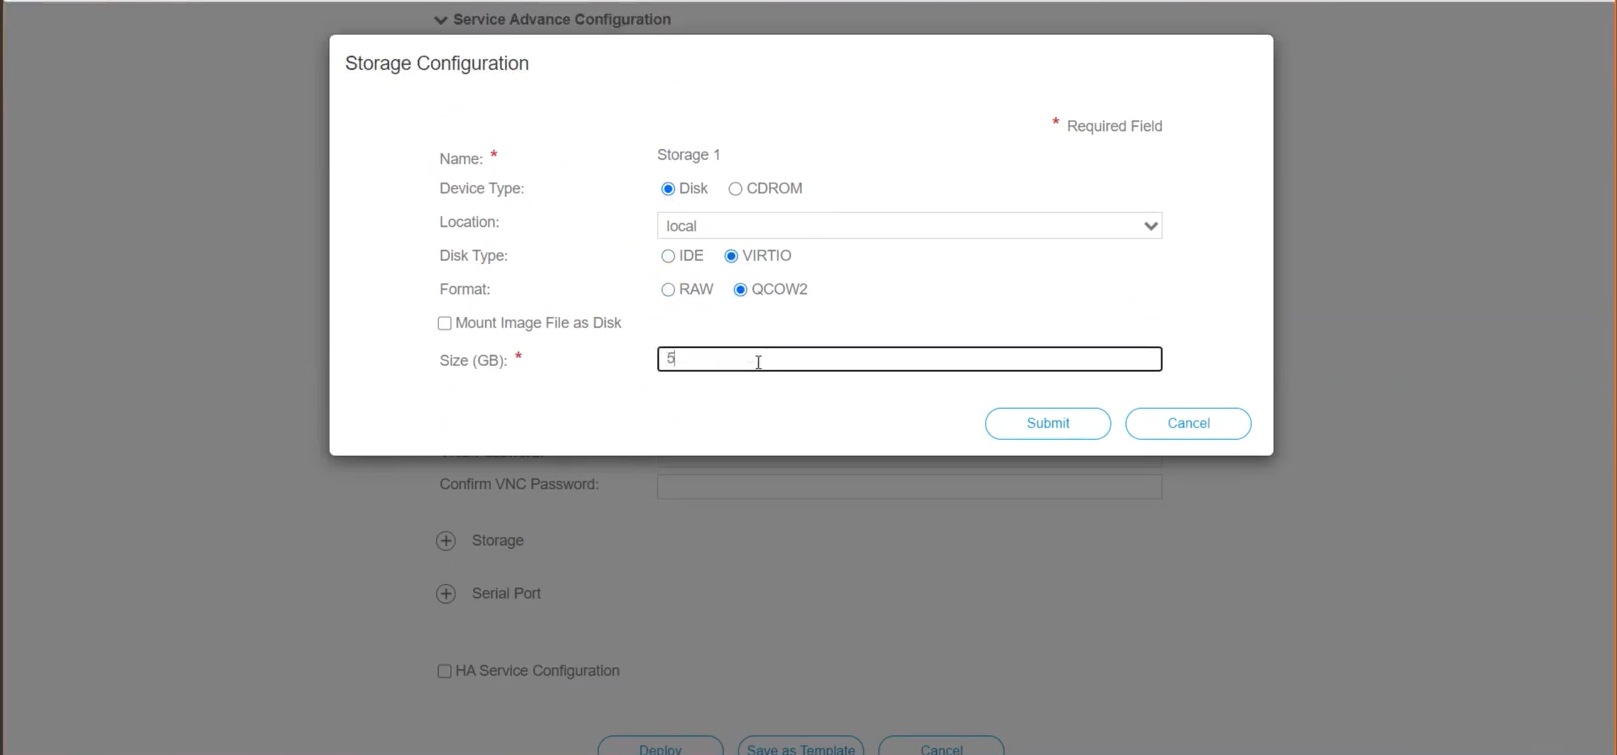
Create Crosswork Data Gateway VM:

  1. Go to Configuration > Services.

  2. On the Service page, click Add icon button.

  3. Check Create Service option.

    The Create Service Template page is displayed.


  4. Enter the values for the following fields:

    Field

    Description

    Name

    Name of the VM.

    Target Host Name

    Choose the target host on which you want to deploy the VM.

    Image Name

    Select the qcow2 image.

  5. Click Day Zero Config.


    In the Day Zero Config dialog box, do the following:

    1. From the Source File Name drop-down list, select a day0 configuration file i.e., the config.txt file that you modifed and uploaded earlier.

    2. In the Destination File Name field, specify the name of the day0 destination text file. This must always be "config.txt".

    3. Click Submit.

  6. Enter the values for the following fields:

    Field

    Description

    Number of Cores

    Standard: 8

    Extended: 16

    RAM (MB)

    Standard: 32768

    Extended: 98304

  7. Click VNIC.


    In the VNIC Configuration dialog box, do the following:

    Note 

    The VNIC Name is set by default.

    1. Select the Interface Type as Access.

    2. Select the Model as Virtio.

    3. Select the Network Type as External.

    4. Select Network Name:

      For VNIC...

      Select...

      vnic0

      Eth0-1

      vnic1

      Eth1-1

      vnic2

      Eth1-2

    5. Select Admin Status as UP.

    6. Click Submit.

    7. Repeat Steps i to vi for vNIC1 and vNIC2.

    After you have added all three vNICs, the VNIC table will look like this:


  8. Expand the Service Advance Configuration and for Firmware, select uefi from the drop-down.

    Check the Secure Boot checkbox.


  9. Click Storage.

    In the Storage Configuration dialog box, do the following:


    Field

    Description

    Name

    Name of the storage. This is specified by default.

    Device Type

    Select Disk.

    Location

    Select local.

    Disk Type

    Select VIRTIO.

    Format

    Select QCOW2.

    Mount image file as disk?

    Leave this unchecked.

    Size (GB)

    Enter the disk size (5 for Standard and 500 for Extended.)

    When you are done with the storage configuration, click Submit.

  10. Click Deploy.


    You will see a similar message once the service has successfully deployed. Click Close.


Step 6

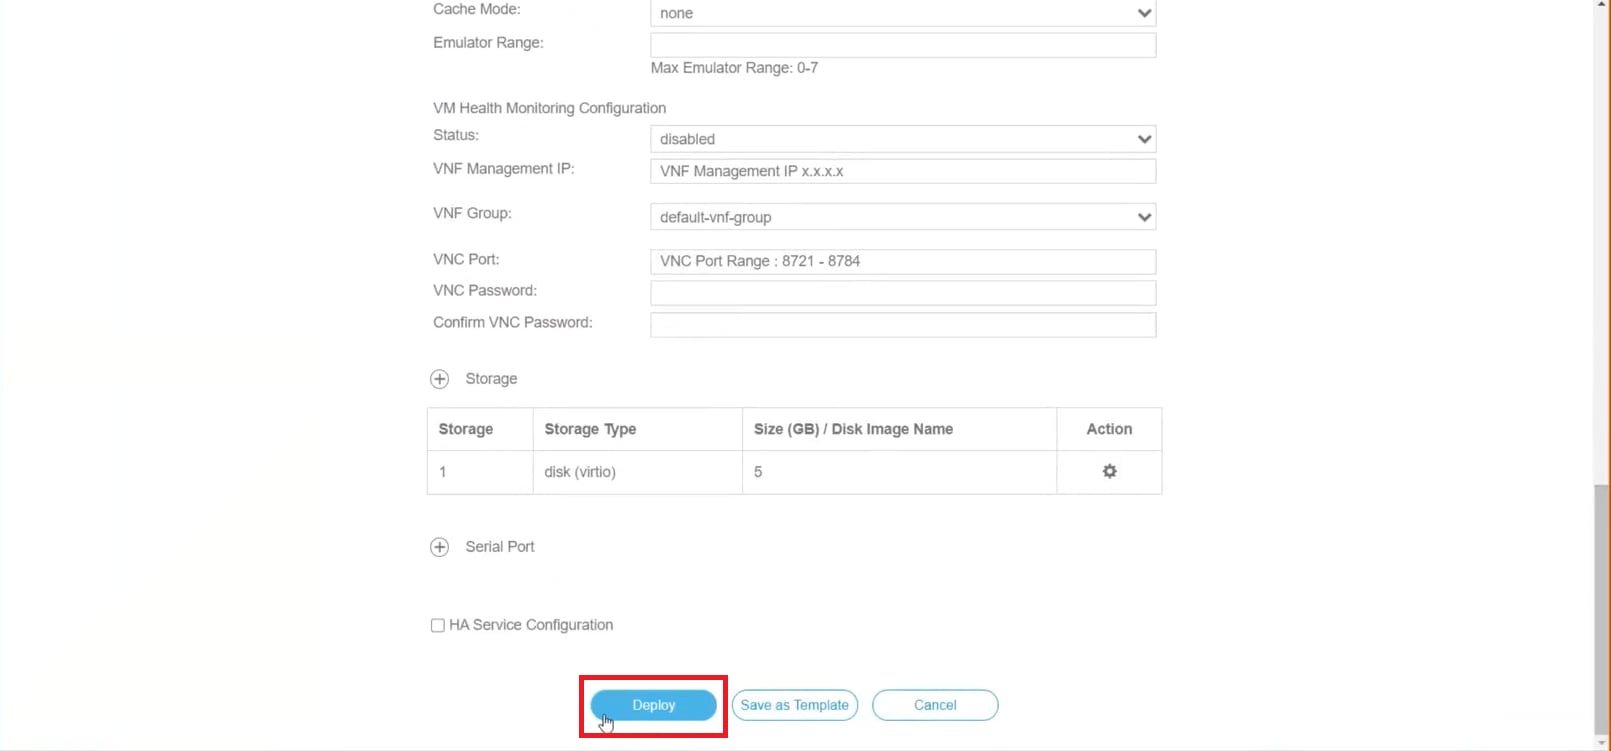
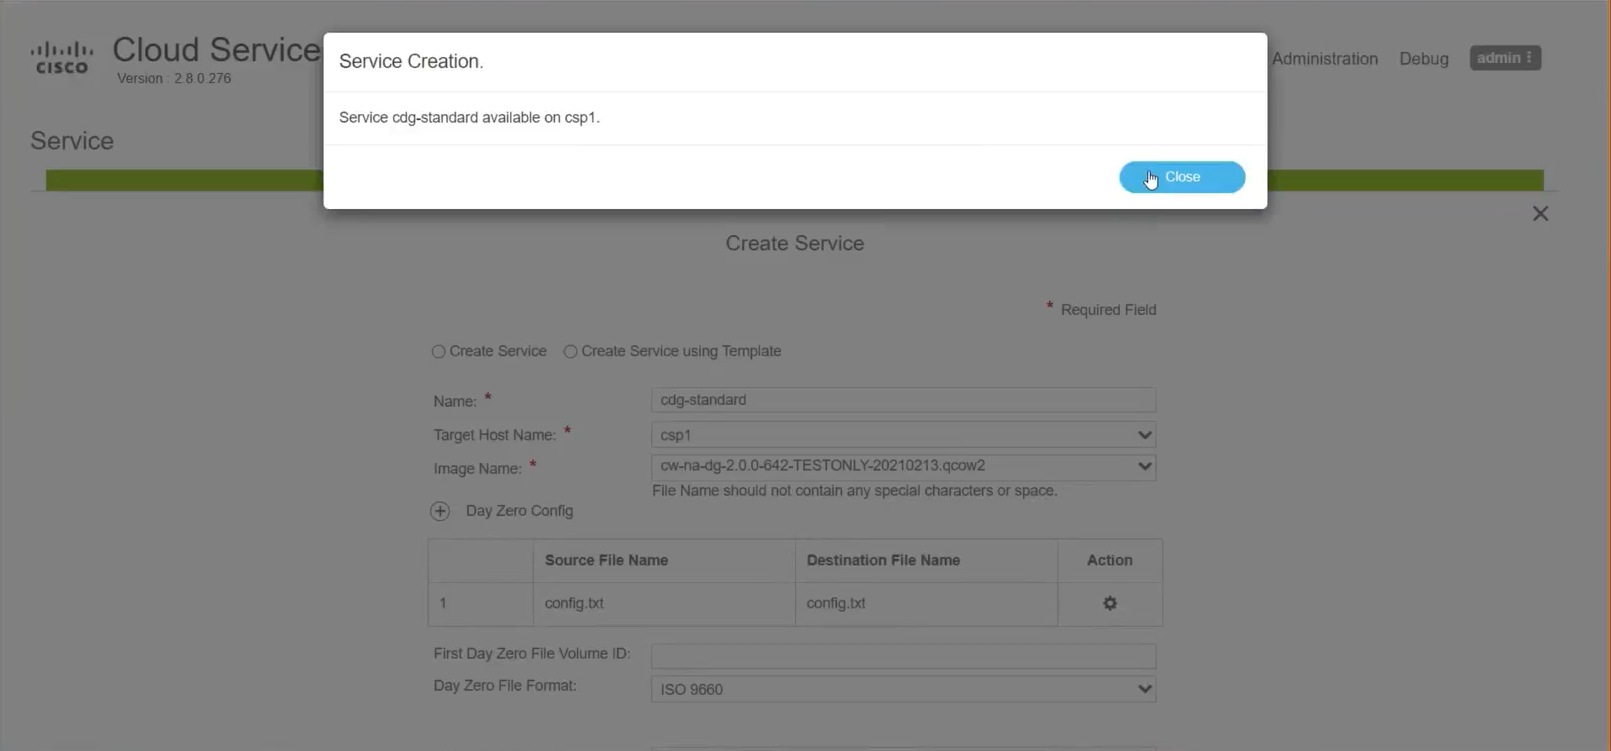
Deploy Cisco Crosswork Data Gateway service:

  1. Go to Configuration > Services.

  2. In the Services table, click the console icon under Console column for the Cisco Crosswork Data Gateway service you created above.


  3. The noVNC window opens. Click Connect option in the top right corner.


  4. Once the Cisco Crosswork Data Gateway service connects, enter username and password.


    The Cisco Crosswork Data Gateway console is available.


After you login, the Crossway Data Gateway should present you with the welcome screen and options menu indicating that the installation completed successfully.

Crosswork Data Gateway Post-installation Tasks

After installing Cisco Crosswork Data Gateway, configure the timezone and log out of the Croosswork Data Gateway VM.

Configure Timezone of the Crosswork Data Gateway VM

The Crosswork Data Gateway VM first launches with default timezone as UTC. Update the timezone with your geographical area so that all Crosswork Data Gateway processes (including the showtech logs) reflect the timestamp corresponding to the location you have chosen.

Procedure


Step 1

In Crosswork Data Gateway VM interactive menu, select Change Current System Settings.

Step 2

Select 9 Timezone.

Step 3

Select the geographic area in which you live.

Step 4

Select the city or region corresponding to your timezone.

Step 5

Select OK to save the settings.

Step 6

Reboot the Crosswork Data Gateway VM so that all processes pick up the new timezone.

Step 7

Log out of the Crosswork Data Gateway VM.


Log in and Log out of Crosswork Data Gateway VM

You can log into the Crosswork Data Gateway VM in one of the following ways:

To log out of the Crosswork Data Gateway VM:

Access Crosswork Data Gateway VM from SSH

The SSH process is protected from brute force attacks by blocking the client IP after a number of login failures. Failures such as incorrect username or password, connection disconnect, or algorithm mismatch are counted against the IP. Up to 4 failures within a 20 minute window will cause the client IP to be blocked for at least 7 minutes. Continuing to accumulate failures will cause the blocked time to be increased. Each client IP is tracked separately.

Follow these steps to login to the Cisco Crosswork Data Gateway VM from SSH.

Procedure


Step 1

From your work station with network access to the Cisco Crosswork Data Gateway management IP, run the following command:

ssh <username>@<ManagementNetworkIP>

where ManagementNetworkIP is the management network IP address.

For example,

To login as adminstrator user: ssh dg-admin@<ManagementNetworkIP>

To login as operator user: ssh dg-oper@<ManagementNetworkIP>

The Crosswork Data Gateway flash screen opens prompting for password.

Step 2

Input the corresponding password (the one that you created during installation process) and press Enter.


If you are unable to access the Cisco Crosswork Data Gateway VM, there is an issue with your network configuration settings. From the console check the network settings. If they are incorrect, it is best to delete the Cisco Crosswork Data Gateway VM and re-install with the correct network settings.

Access Crosswork Data Gateway Through vCenter

Follow these steps to log in via vCenter:

Procedure


Step 1

Locate the VM in vCenter and then right click and select Open Console.

The Crosswork Data Gateway console comes up.

Step 2

Enter username (dg-admin or dg-oper as per the role assigned to you) and the corresponding password (the one that you created during installation process) and press Enter.


Access Crosswork Data Gateway Through Cisco CSP

Follow the steps to launch Crosswork Data Gateway on Cisco CSP:

Procedure


Step 1

Log into your Cisco CSP.

Step 2

Go to Configuration > Services. The Service table shows the current status of services.

Step 3

Find your Crosswork Data Gateway service in the Service Name column.

Click on the Console icon under Console column to launch the service.

Step 4

In the Crosswork Data Gateway login prompt, enter your username and password and press Enter. Crosswork Data Gateway interactive menu is displayed.


Log Out of Crosswork Data Gateway VM

To log out, select option l Logout from the Main Menu and press Enter or click OK.

Cisco Crosswork Data Gateway Authentication and Enrollment

Once the Crosswork Data Gateway is installed, it identifies itself and enrolls with Cisco Crosswork automatically. Cisco Crosswork then instantiates a new Crosswork Data Gateway instance in its database and waits for a "first-sign-of-life" from the Crosswork Data Gateway VM.

After the connectivity is established, the Crosswork Data Gateway instance confirms the identity of the controller application (Cisco Crosswork) and offers its own proof of identity via signed certificates. Cisco Crosswork Data Gateway then downloads the configuration files and functional images (collection profiles) from Cisco Crosswork.

To verify if the Crosswork Data Gateway VM has enrolled successfully with Cisco Crosswork:

  1. Log into the Cisco Crosswork UI. See Log into the Cisco Crosswork UI.

  2. Navigate to Administration > Data Gateway Management.

  3. Click on Virtual Machines tab.

    All the Cisco Crosswork Data Gateway VMs that have successfully enrolled with Cisco Crosswork are displayed here.

Newly installed Crosswork Data Gateway VMs have the Operational State as "Degraded". After enrolling successfully with Cisco Crosswork, the Operational State changes to Not Ready. While it depends on the bandwidth between the Crosswork Data Gateway VMs and Cisco Crosswork, this operation typically takes less than 5 minutes.


Note

Cisco Crosswork Data Gateway VMs that were previously onboarded and still have the Operational State as Degraded need to be investigated. Contact Cisco Customer Experience team for assistance.


Click the Refresh icon in the Virtual Machines pane to refresh the pane and reflect the latest Operational State of the Crosswork Data Gateway VMs.


Note

Crosswork Data Gateway VMs that have the Role as Unassigned must be assigned to a pool before they can used. A Cisco Crosswork Data Gateway VM is your physical Crosswork Data Gateway. You cannot attach or detach devices to it. Devices can be attached only to a Cisco Crosswork Data Gateway pool.


Troubleshoot Crosswork Data Gateway Installation and Enrollment

If Crosswork Data Gateway fails to auto-enroll with Cisco Crosswork, you can collect Crosswork Data Gateway showtech (Main menu > 5 Troubleshooting > Run show-tech) and check for the reason in controller-gateway logs. If there are session establishment/certificate related issues, ensure that the controller.pem certificate is uploaded using the interactive menu.

The following table lists common problems that might be experienced while installing or enrolling Crosswork Data Gateway, and provides approaches to identifying the source of the problem and solving it.

Table 2. Troubleshooting the Installation/Enrollment

Issue

Action

1. Cannot enroll Crosswork Data Gateway with Cisco Crosswork

Crosswork Data Gateway cannot be enrolled with Cisco Crosswork due to an NTP issue, i.e., there is a clock-drift between the two.

The clock-drift might be with either Crosswork Data Gateway or Cisco Crosswork.

Also, on the NTP servers for Cisco Crosswork and Crosswork Data Gateway, the initial time is set to the ESXi server. For this reason, the ESXi server must also have NTP configured.

Sync the clock time on the host and retry.

1. Log into the Crosswork Data Gateway VM.

2. From the main menu, go to 5 Troubleshooting > Run show-tech.

Enter the destination to save the tarball containing logs and vitals and click OK.

In the show-tech logs (in file session.log at location /cdg/logs/components/controller-gateway/session.log), if you see the error UNAUTHENTICATED:invalid certificate. reason: x509: certificate has expired or is not yet valid, then there is a clock-drift between Crosswork Data Gateway and Cisco Crosswork.

3. From the main menu, go to 3 Change Current System Settings > 1 Configure NTP.

Configure NTP to sync with the clock time on the Cisco Crosswork server and try re-enrolling Crosswork Data Gateway.

2. Crosswork Data Gateway remains in degraded state for more than 10 minutes with reason stated as "Could not collect vitals"

Crosswork Data Gateway remains in degraded state for more than 10 minutes with reason stated as "Could not collect vitals" due to certificate errors.

1. Log into the Crosswork Data Gateway VM.

2. From the main menu, select 5 Troubleshooting > Run show-tech.

Enter the destination to save the tarball containing logs and vitals and click OK.

In the show-tech logs (in file gateway.log at location /cdg/logs/components/controller-gateway/gateway.log), if you see certificate errors, then re-upload the Controller Signing Certificate, as explained in the steps below:

1. From the main menu, select 3 Change Current System Settings > 7 Import Certification.

2. From the Import Certificates menu, select 1 Controller Signing Certificate File and click OK.

3. Enter the SCP URI for the certificate file and click OK.

3. Crosswork Data Gateway remains in degraded state for more than 10 minutes with reason stated as "gRPC connection cannot be established"

Crosswork Data Gateway remains in degraded state for more than 10 minutes with reason stated as "gRPC connection cannot be established" due to certificate errors.

1. Re-upload the certificate file as explained in the troubleshooting scenario 2. above.

2. Reboot the Crosswork Data Gateway VM following the steps below:

a. From the main menu, select 5 Troubleshooting and click OK.

b. From the Troubleshooting menu, select 7 Reboot VM and click OK.

c. Once the reboot is complete, check if the Crosswork Data Gateway's operational status is Up.

Crosswork Data Gateway goes into Error state

Check the vNIC values in the OVF template in case of vCenter and config.txt in case of Cisco CSP.

Crosswork Data Gateway enrollment with 1 NIC Cisco Crosswork fails

Check the vNIC values in the OVF template in case of vCenter and config.txt in case of Cisco CSP. If ActiveVnics property is missing for 1 NIC and 2 NIC, Crosswork Data Gateway tries to deploy 3 NICs by default.

Due to this, Crosswork Data Gateway enrollment with 1 NIC Cisco Crosswork fails post deployment with error in gateway.log that Crosswork Data Gateway expected 1 NIC, but it is not 1 NIC.

Crosswork Data Gateway deploys standard profile instead of extended

Check the deploymentoption property in the OVF template in case of vCenter and config.txt in case of Cisco CSP. If "deploymentoption" property mismatches or does not exist for extended profile template, then Crosswork Data Gateway deploys standard profile.

Import Controller Signing Certificate File

The Controller Certificate file is automatically imported after the VM boots. You will need to perform this step manually for the following reasons:

  • You have not specified Controller Signing Certificate File URI under the Controller Settings during installation.

  • Cisco Crosswork was upgraded and you need to authenticate and enroll Crosswork Data Gateway with Cisco Crosswork.

Follow these steps to import controller signing certificate file.

Procedure


Step 1

From the Cisco Crosswork Data Gateway VM's Interactive Menu, select 3 Change Current System Settings.

The Change System Settings menu opens.

Step 2

Select 7 Import Certificate.

Step 3

From Import Certificates menu, select 1 Controller Signing Certificate File.

Step 4

Enter the SCP URI for the certificate file.

An example URI is given below:

cw-admin@{server ip}:/home/cw-admin/controller.pem

Step 5

Enter the SCP passphrase (the SCP user pasword).

The certificate file is imported.

Step 6

Verify that the certificate was installed successfully. SeeView the Controller Signing Certificate File.


View the Controller Signing Certificate File

Follow the steps to view the signing certificate.

Procedure


Step 1

From the Crosswork Data Gateway VM's interactive menu, select 2 Show System Settings.

Step 2

From the Show Current System Settings menu, select 7 Certificates.

Step 3

Select 2 Controller Signing Certificate File.

Crosswork Data Gateway displays the default certificate if no new certificate has been imported. Otherwise, it displays the new certificate if it was successfully imported.