Manage Cisco Crosswork Data Gateways

This section contains the following topics:

Overview of Cisco Crosswork Data Gateway

When Cisco Crosswork Data Gateway and Cisco Crosswork Platform (also referred to as Cisco Crosswork in this guide) are deployed together, Cisco Crosswork acts as the controller application for the Cisco Crosswork Data Gateway instance. You can use the Cisco Crosswork UI to manage Cisco Crosswork Data Gateway no matter if they are forwarding data to Cisco Crosswork or other compatible data destination (external gRPC or Kafka servers). The number of Cisco Crosswork Data Gateways you need depends on the number of devices being supported, the amount of data being processed and your network architecture.

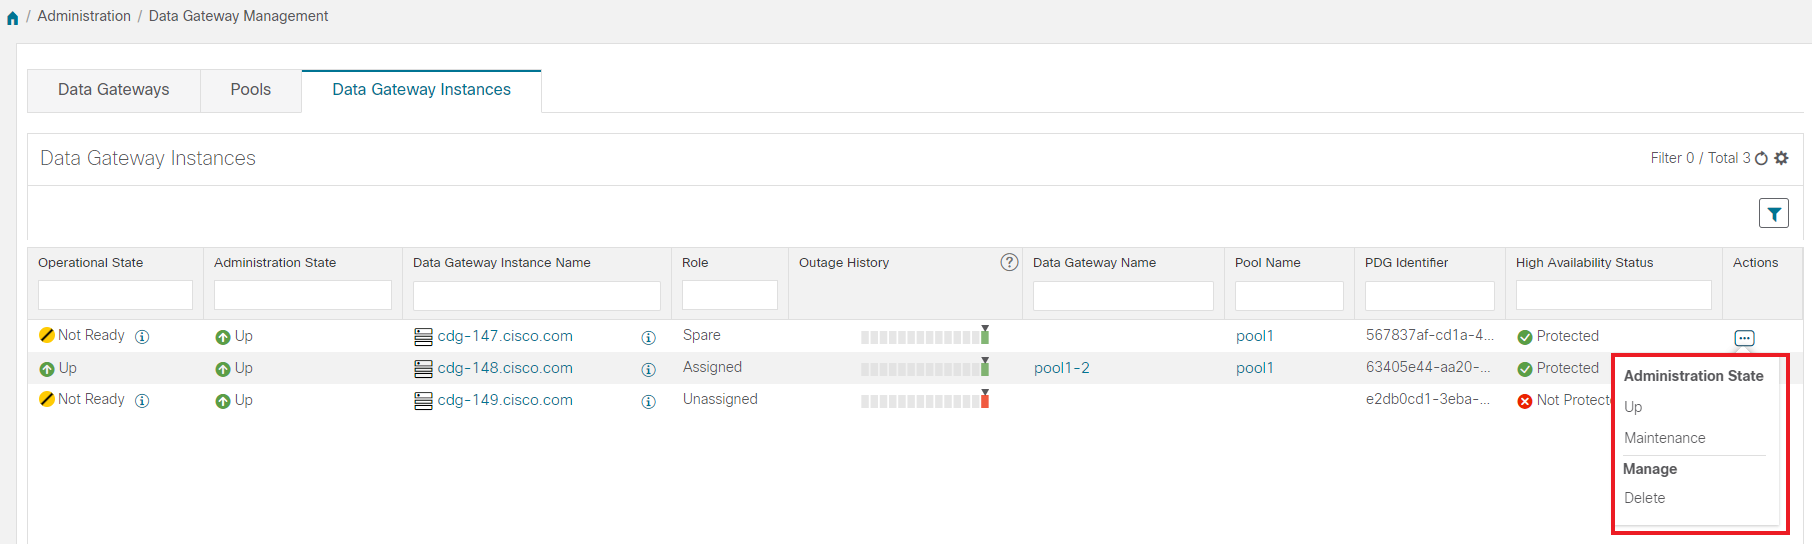
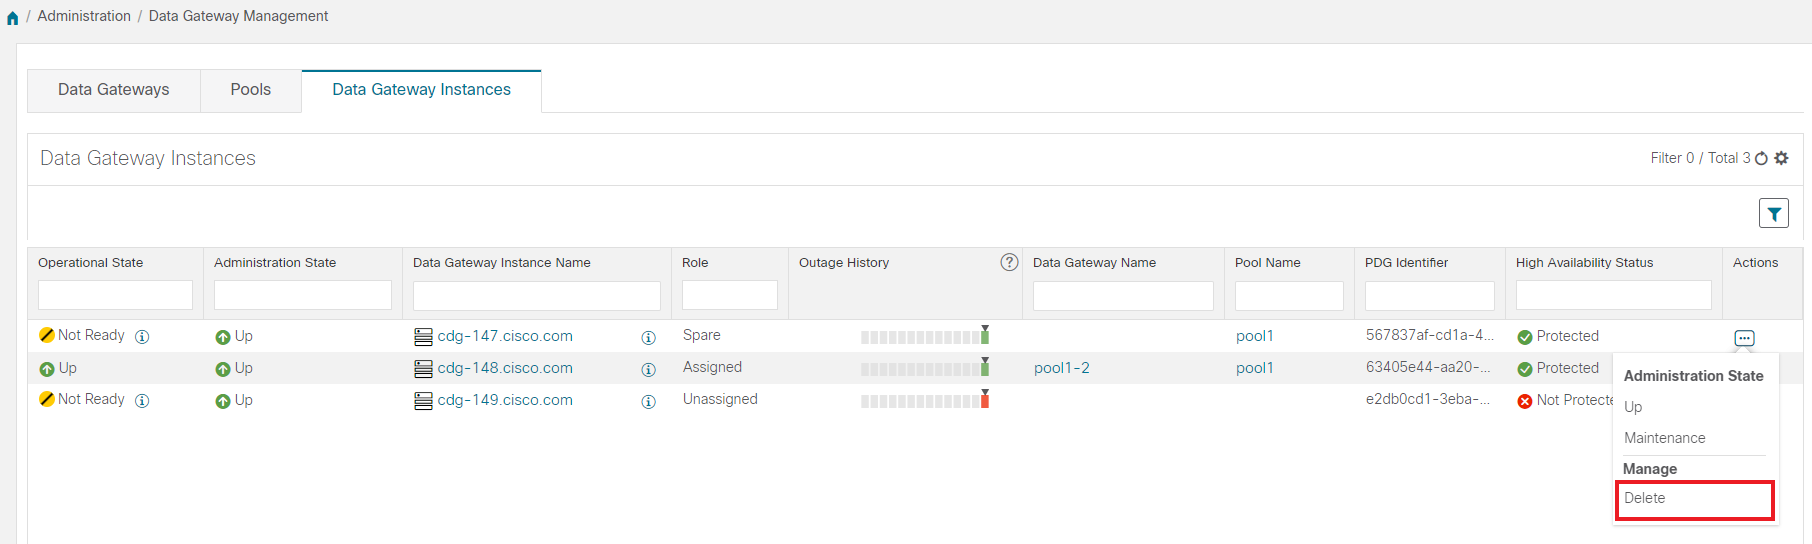
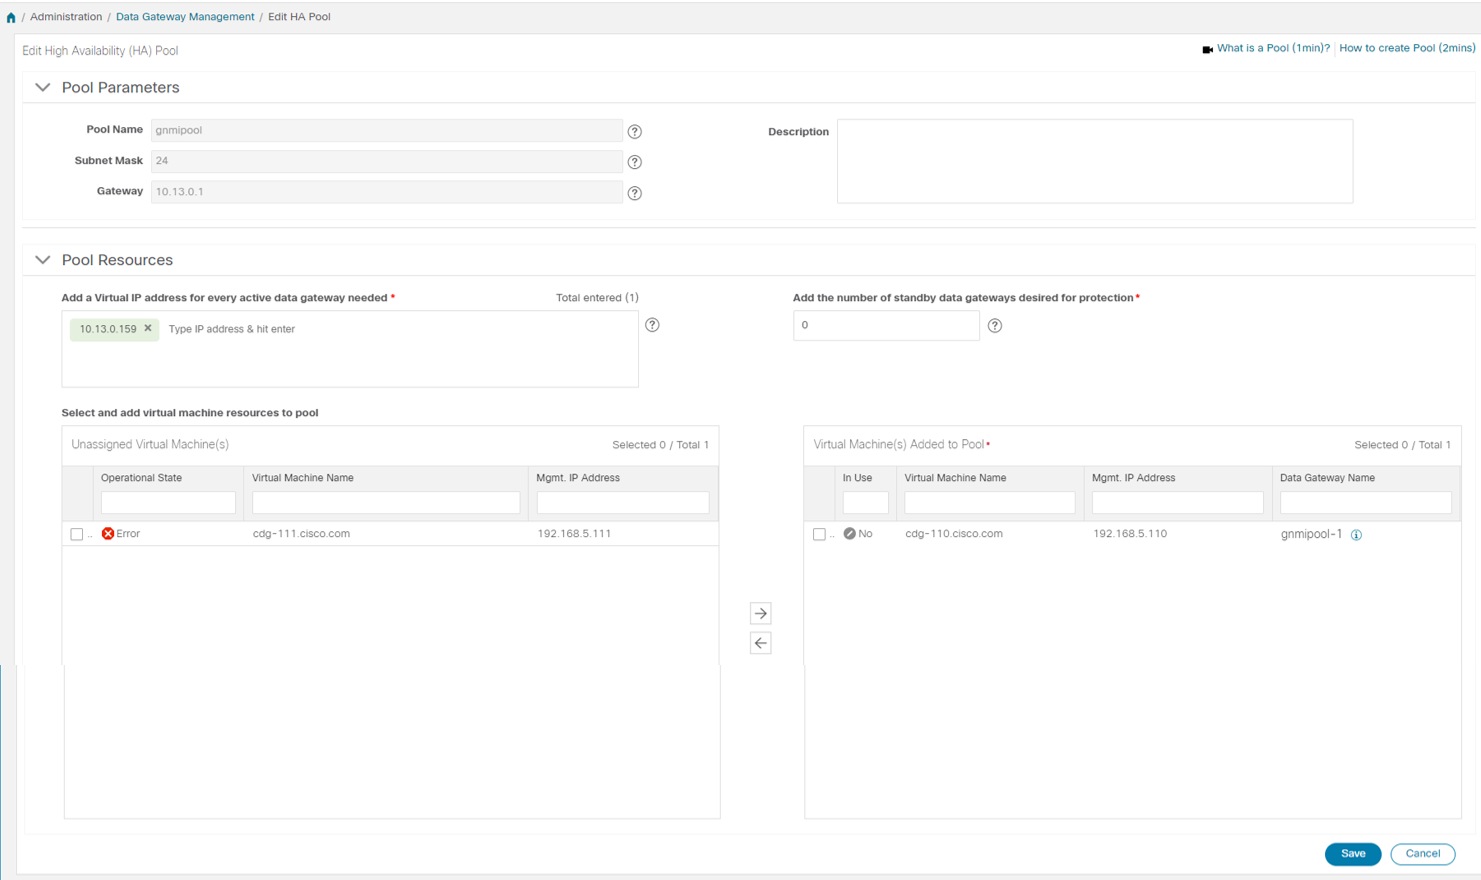
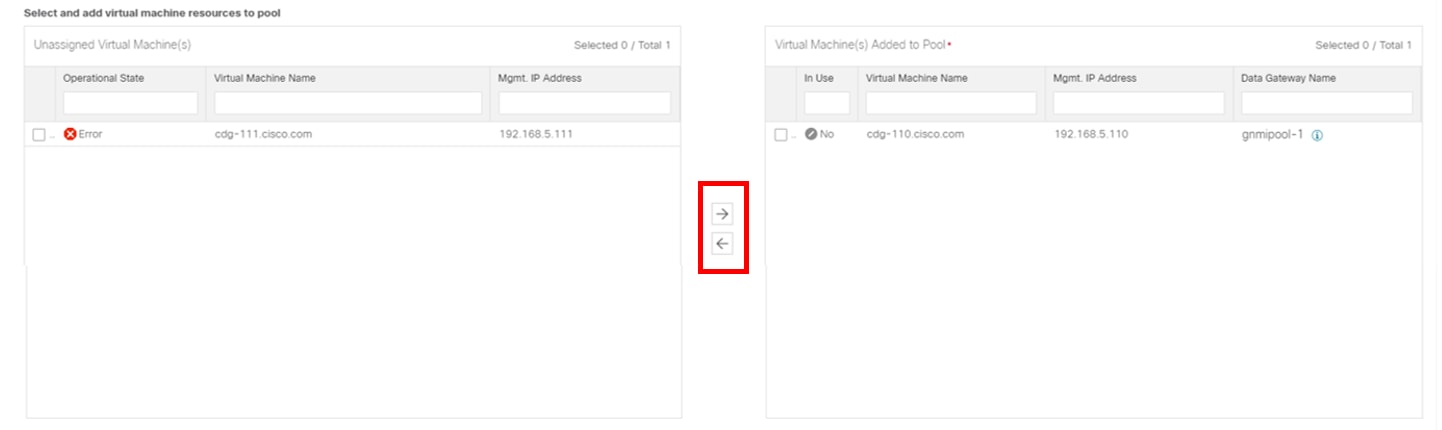
Once you install a Cisco Crosswork Data Gateway VM, it identifies itself to Cisco Crosswork and enrolls itself automatically. Newly enrolled Cisco Crosswork Data Gateway VMs will have the Operational Status as "Degraded" until enrollment is completed. Cisco Crosswork Data Gateway VMs that have the Role as "Unassigned" need to be assigned to a Crosswork Data Gateway pool before they can used. A pool can consist of one or more Cisco Crosswork Data Gateway VMs with an option to enable HA configuration.

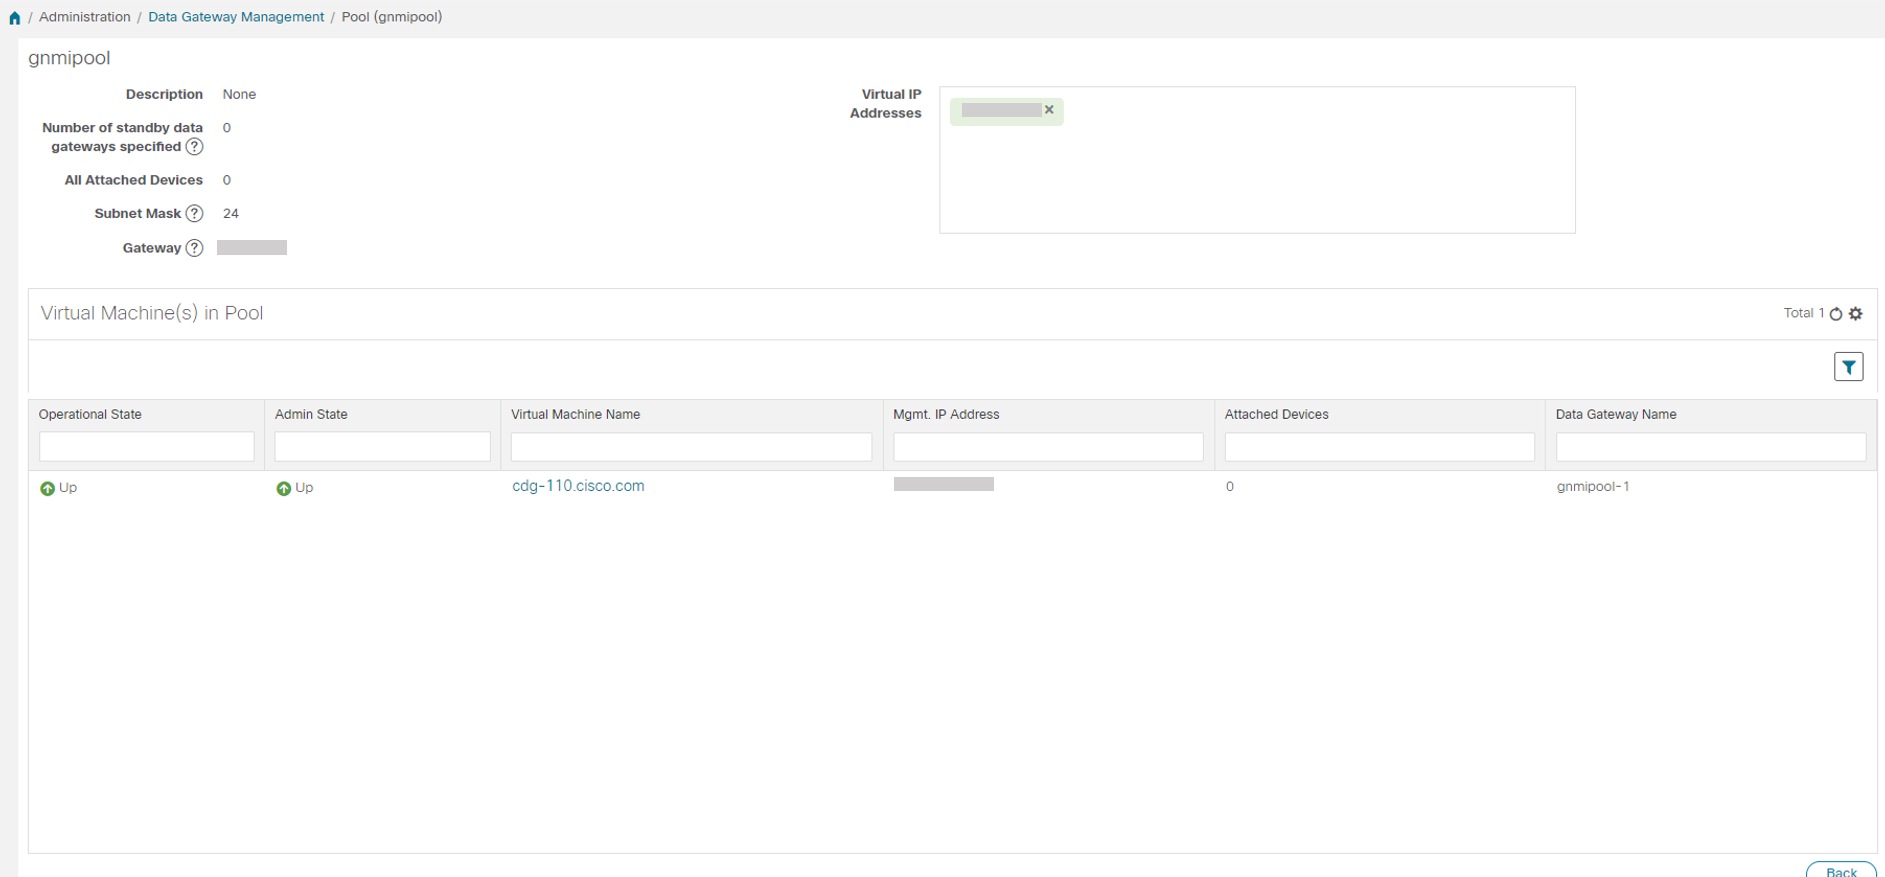
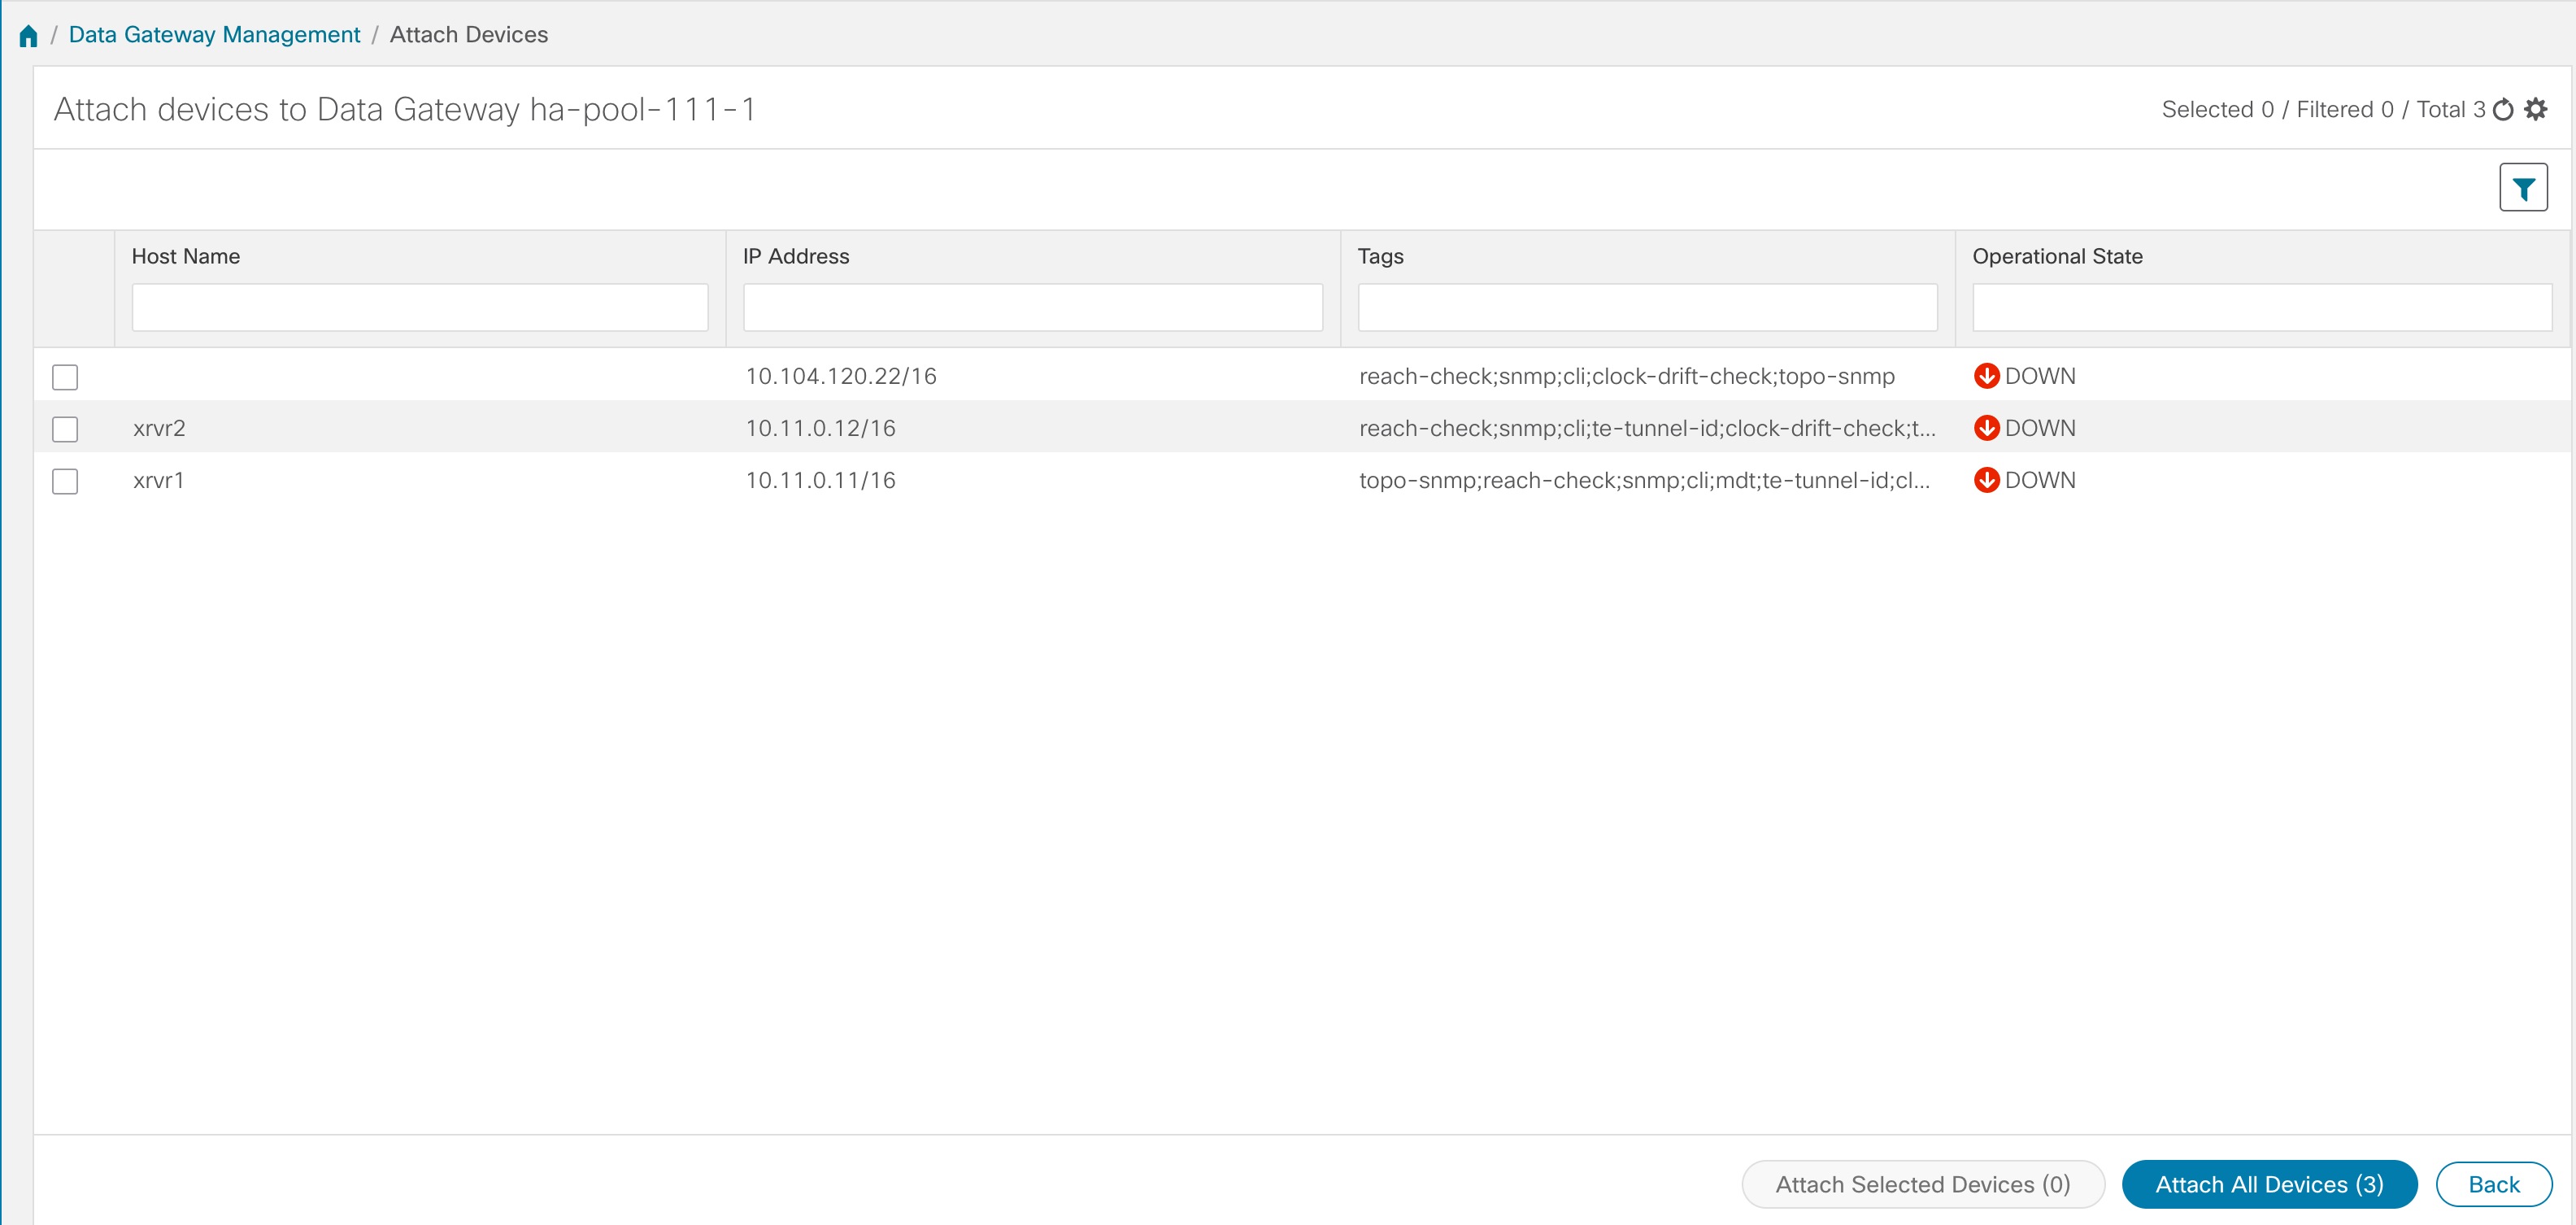
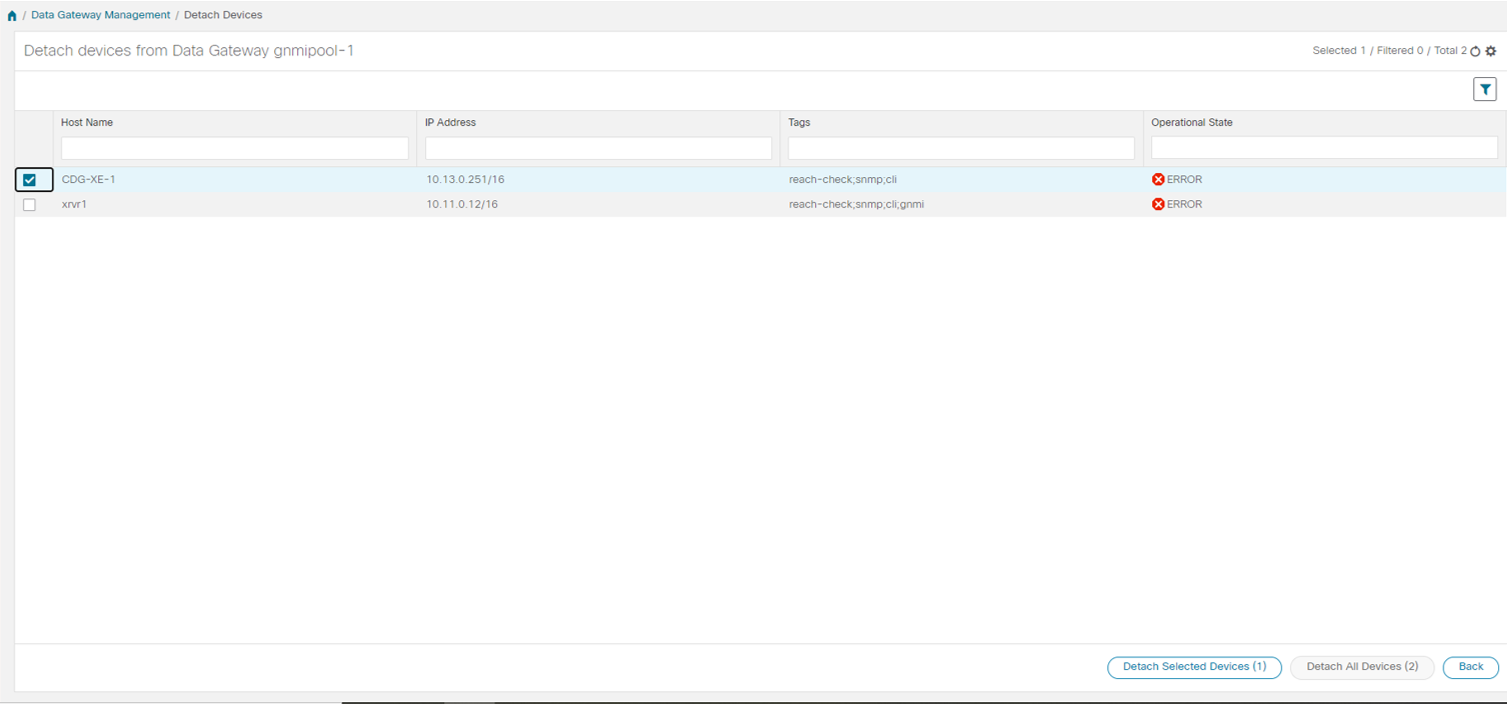
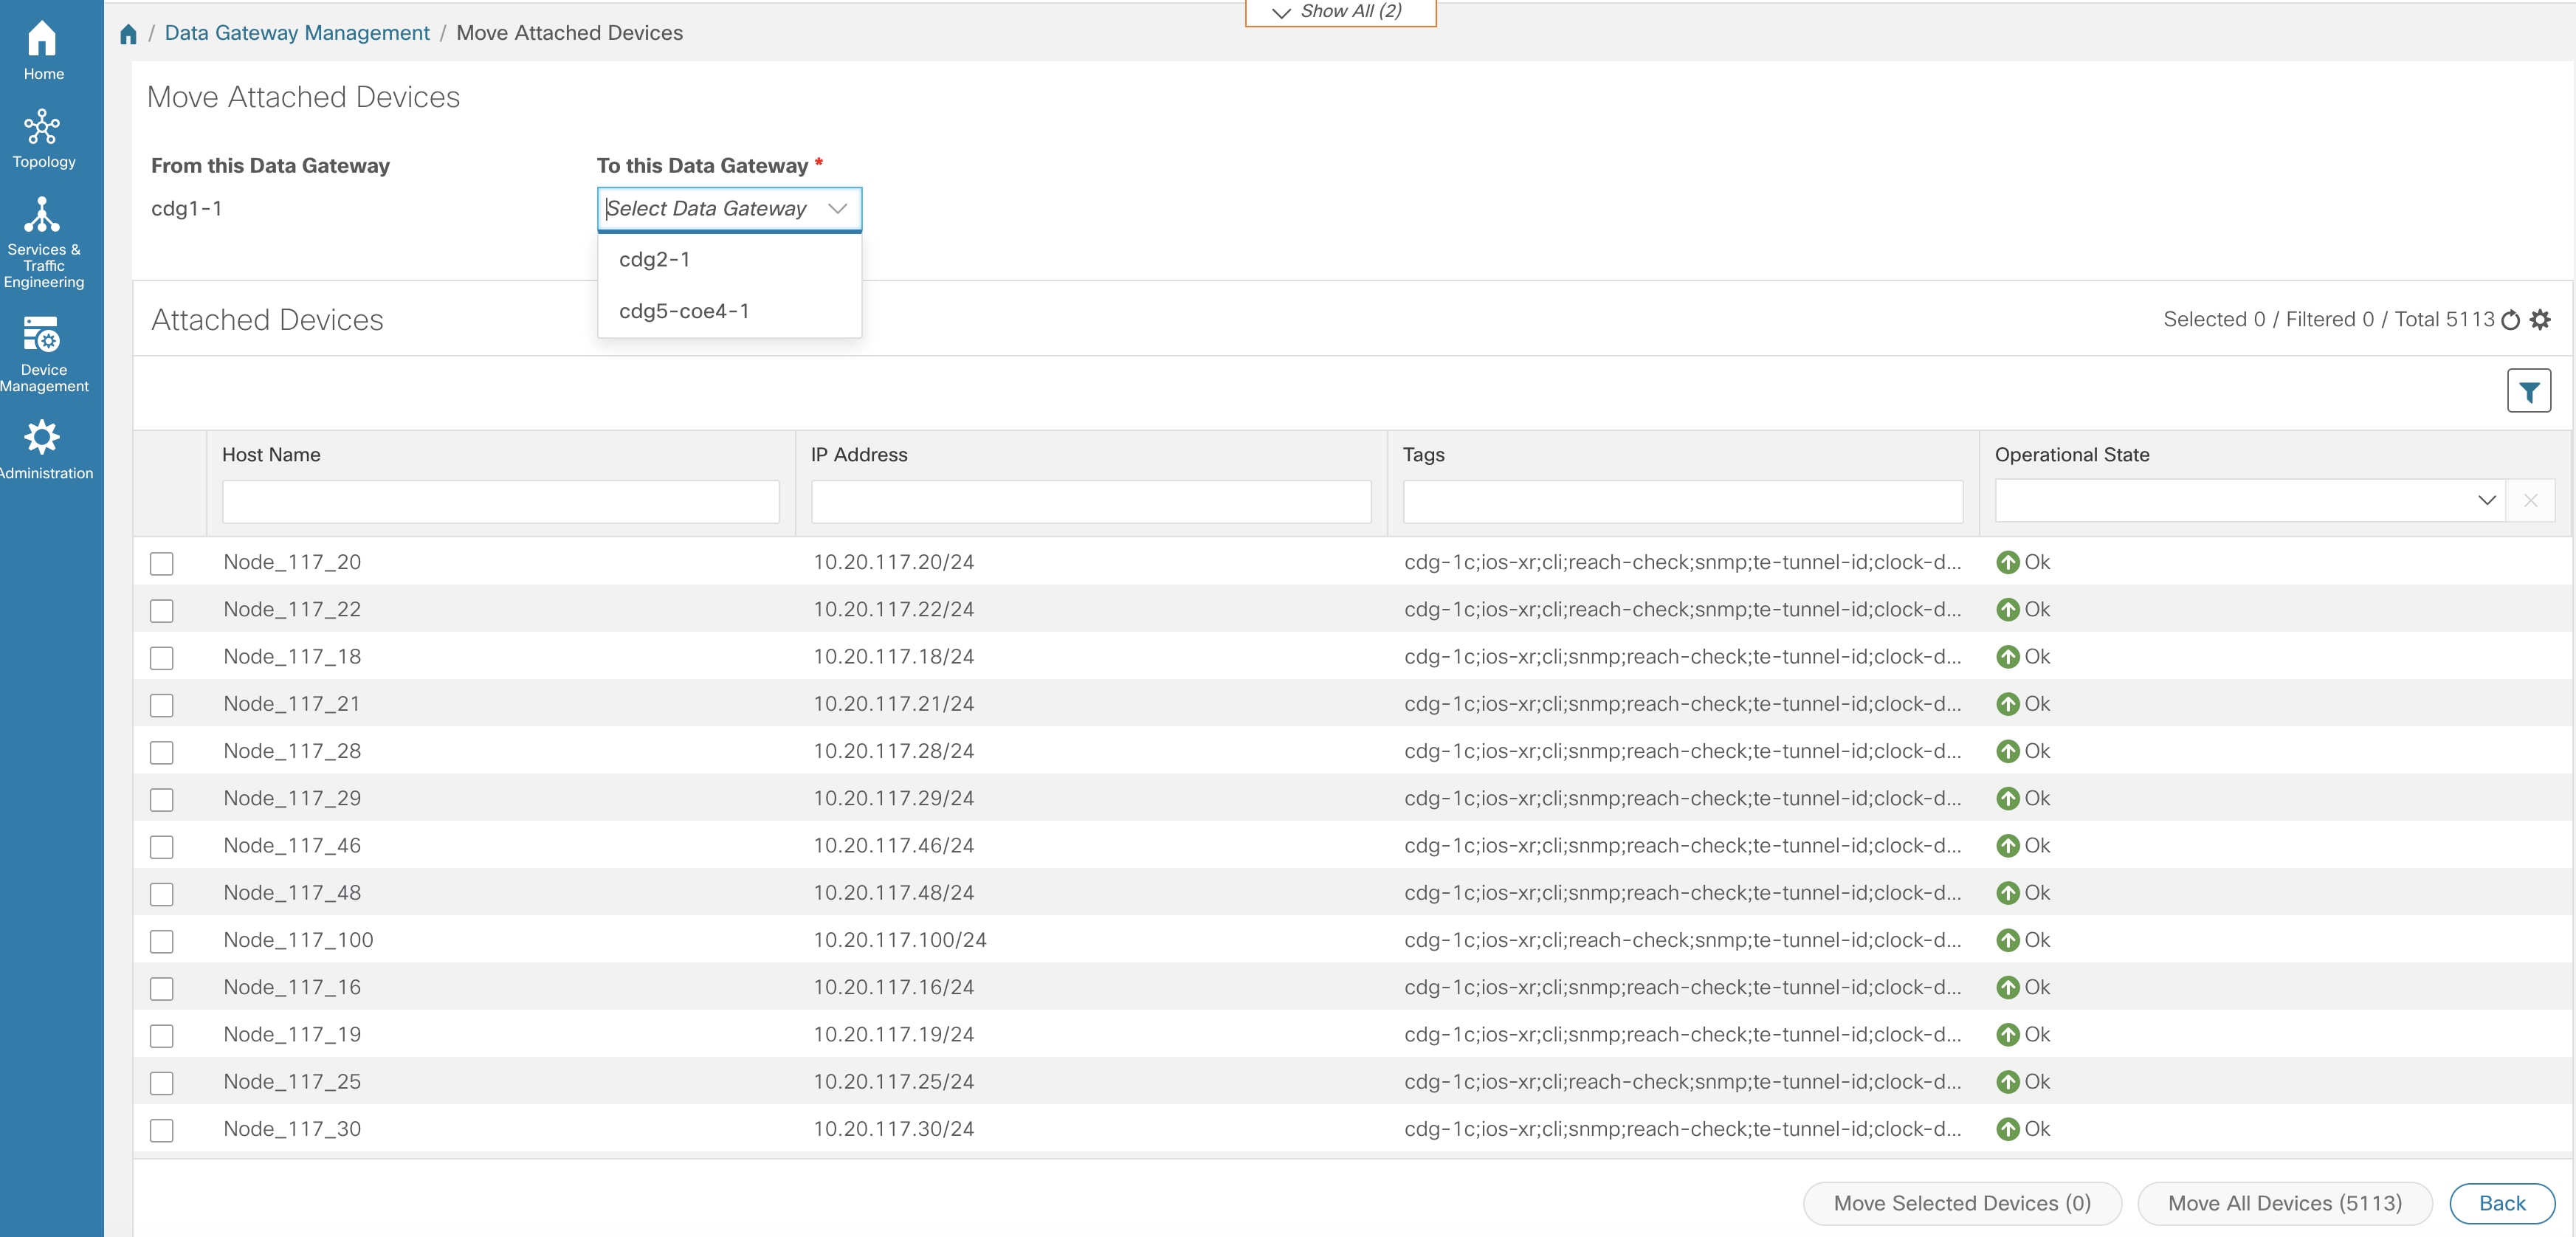
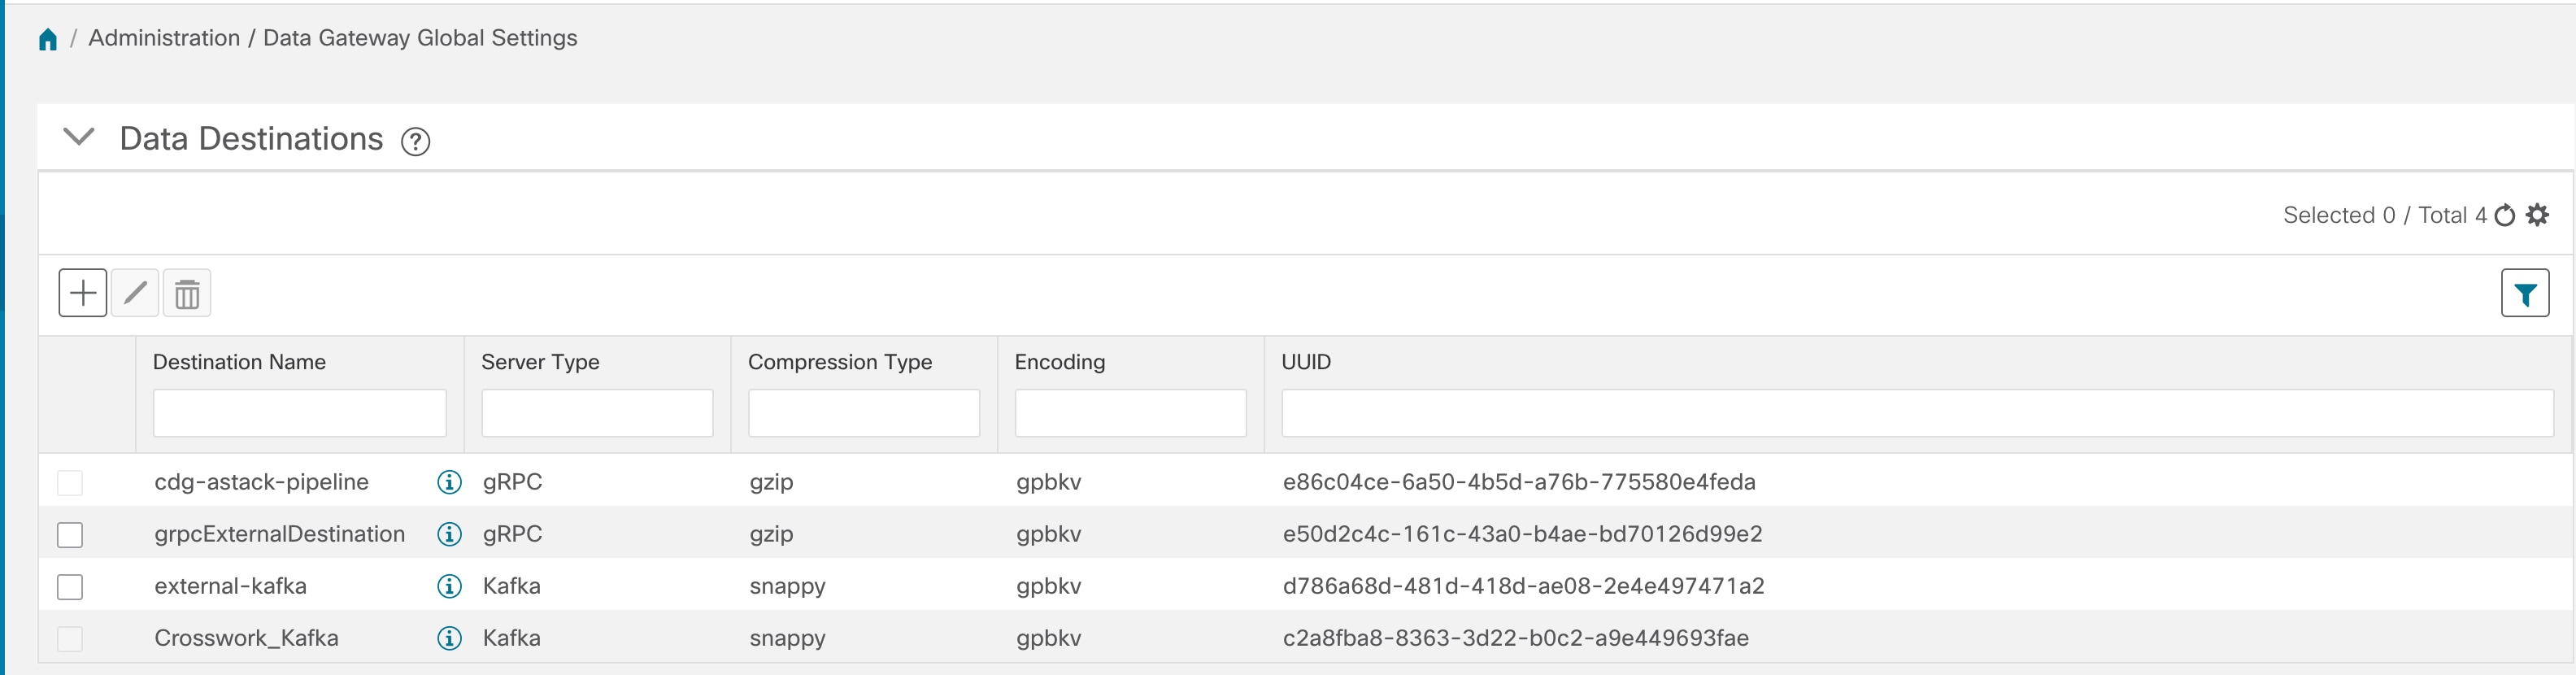
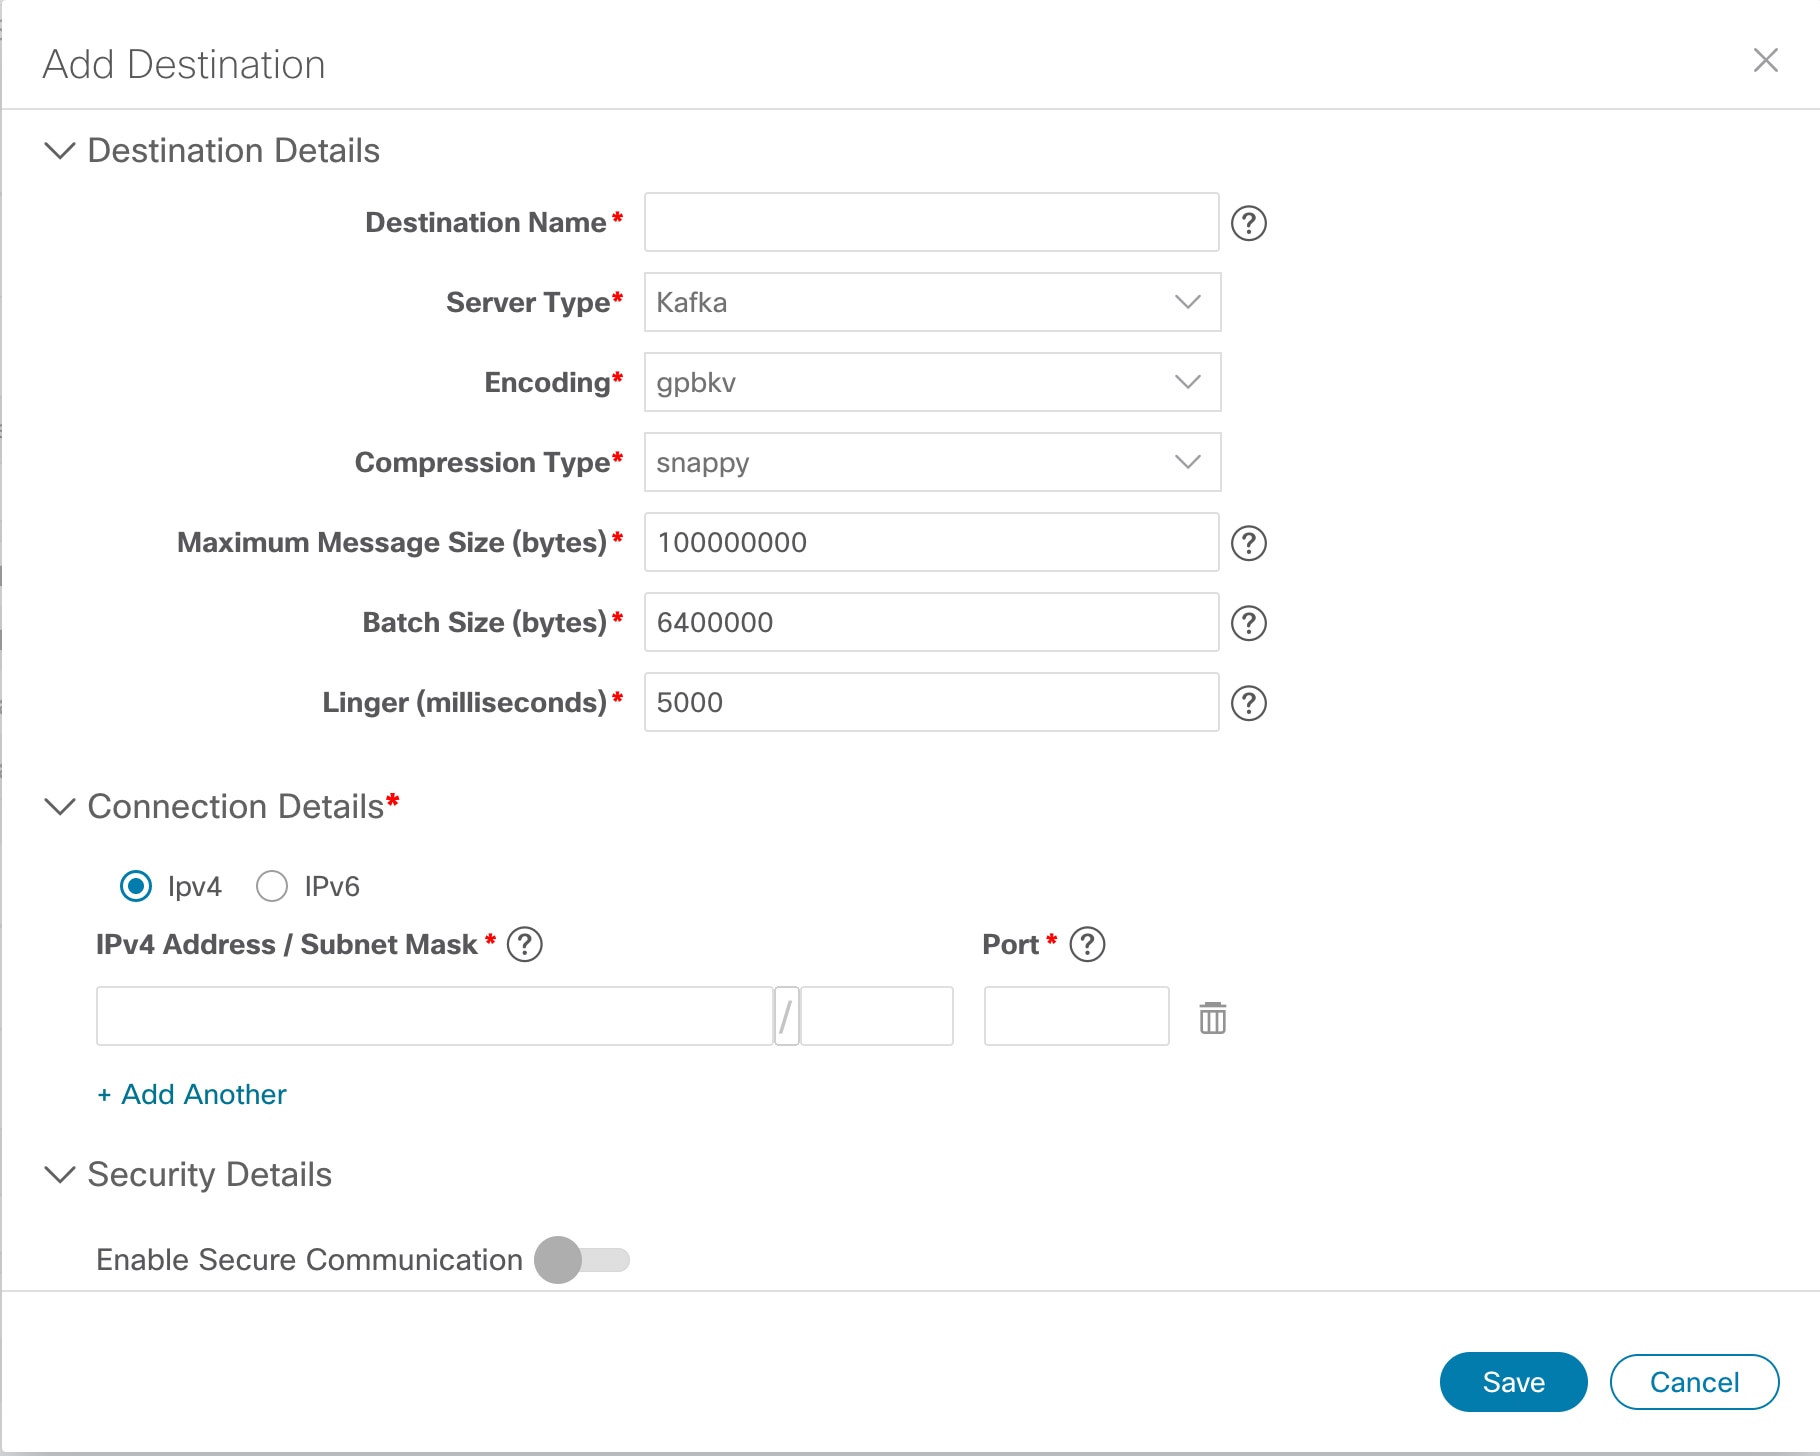
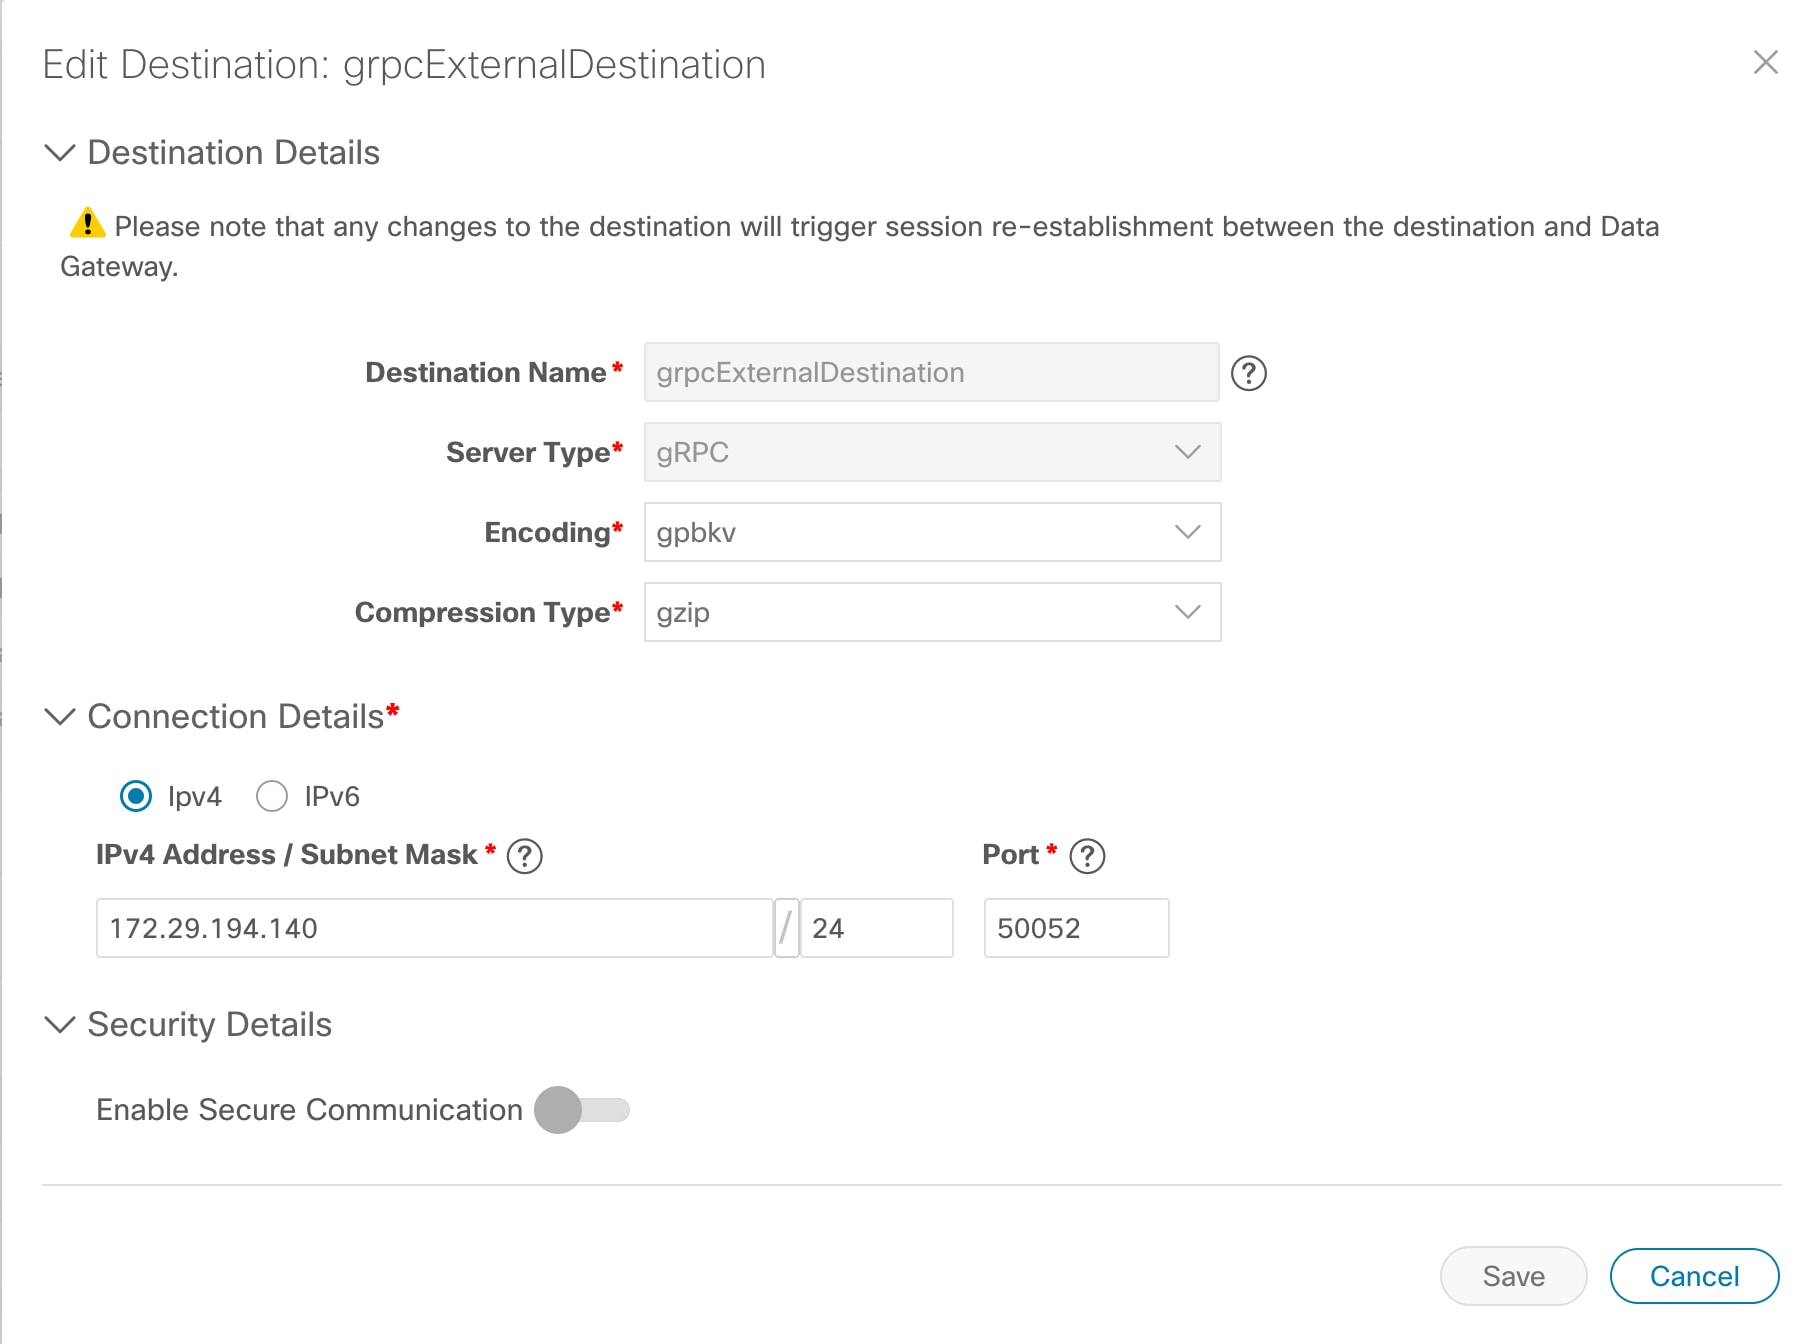
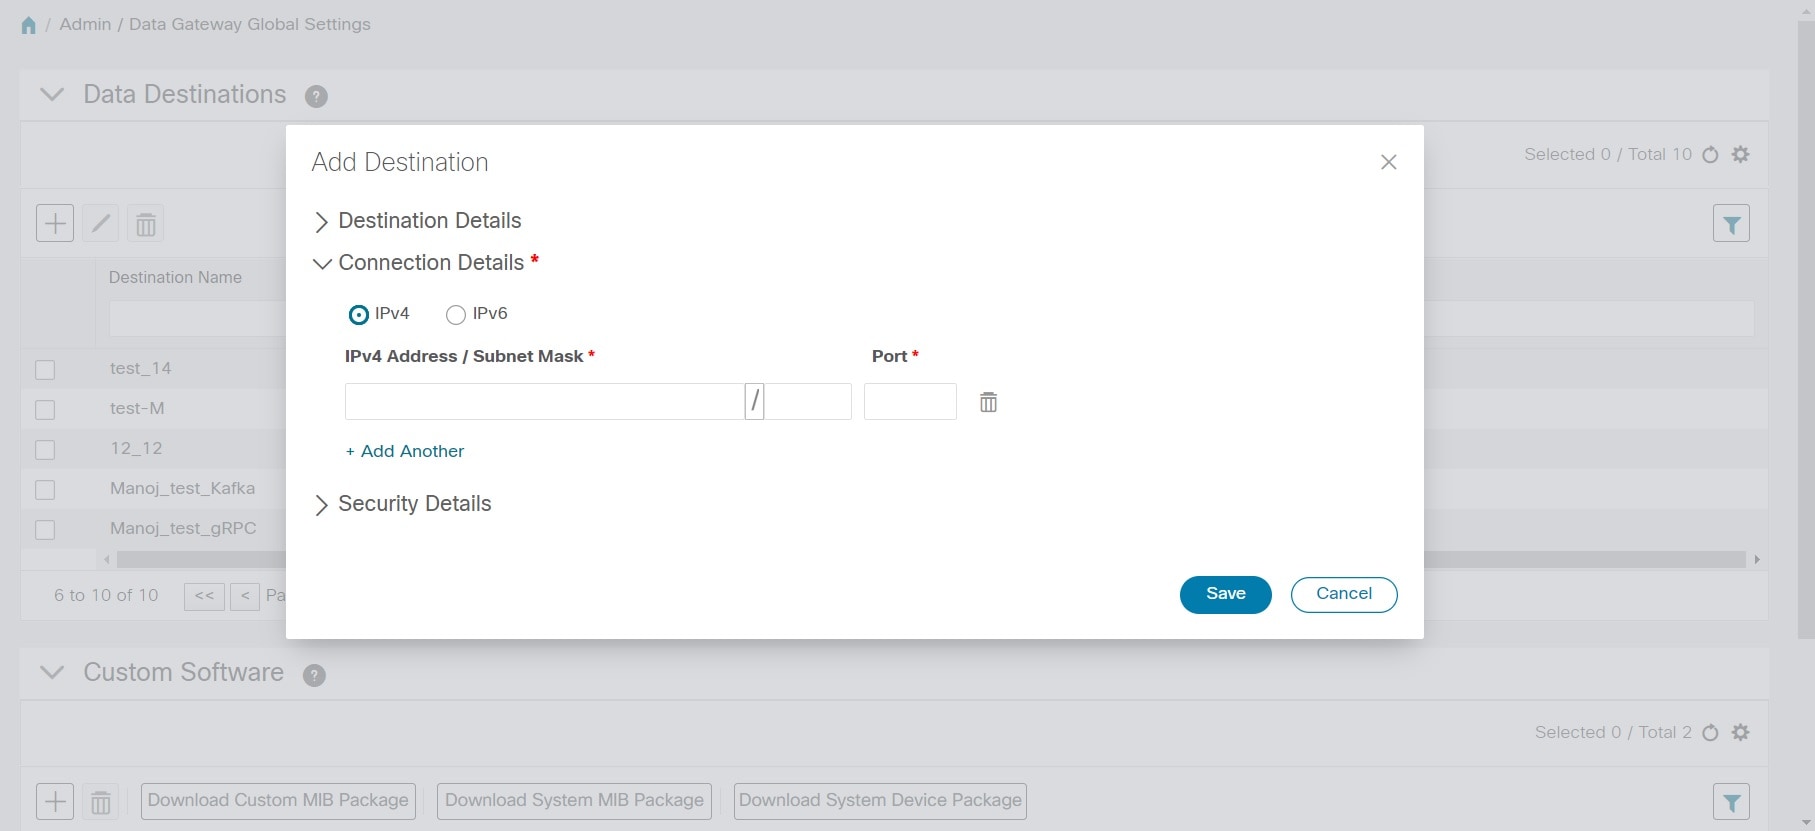
Once you assign a Cisco Crosswork Data Gateway VM to a pool, a virtual Cisco Crosswork Data Gateway gets created automatically and is visible under Data Gateways tab. You can then attach or detach devices to the pool, create external data destinations and run collection jobs to forward data to the preferred data destination.

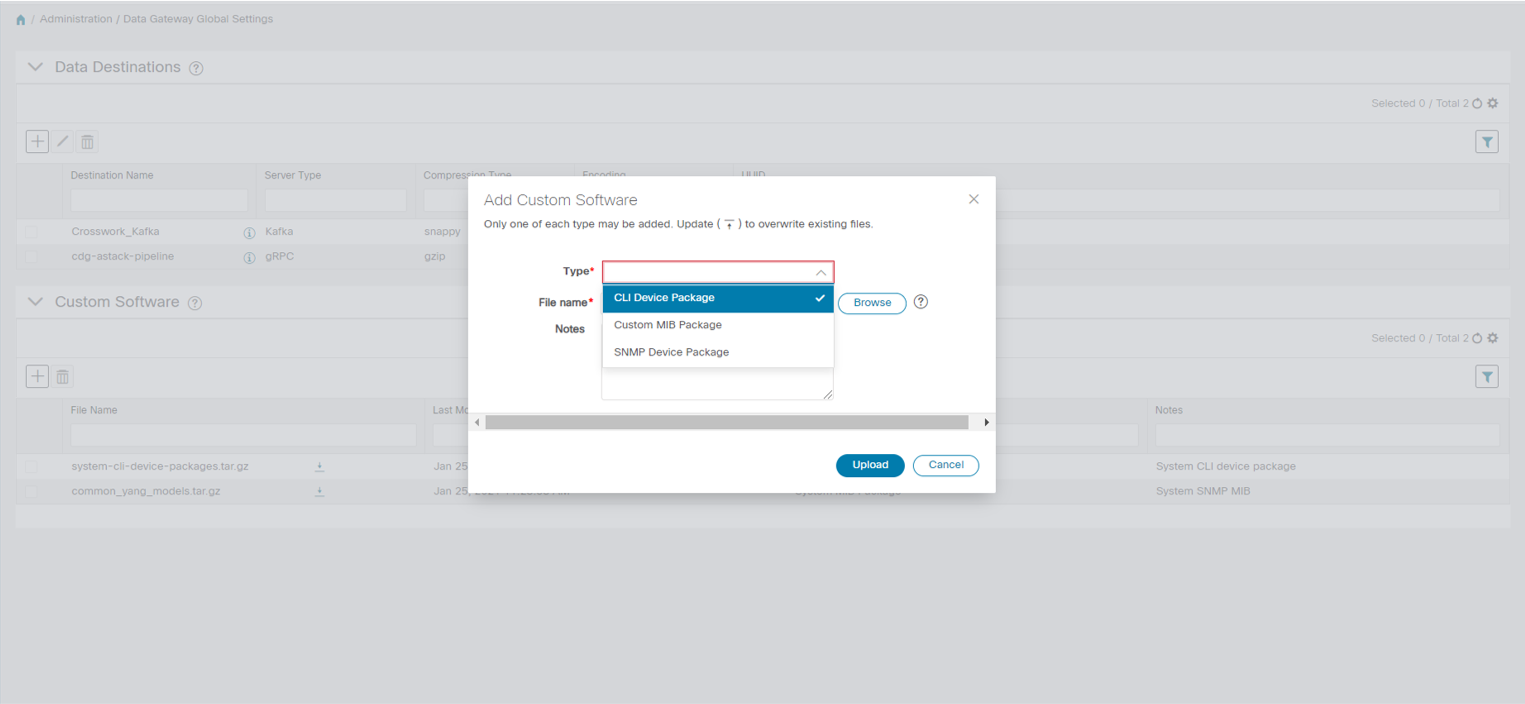
Cisco Crosswork includes MIB files and device model definitions for many Cisco products and provides the ability to load custom software packages in order to add data collection capability for currently unsupported devices.

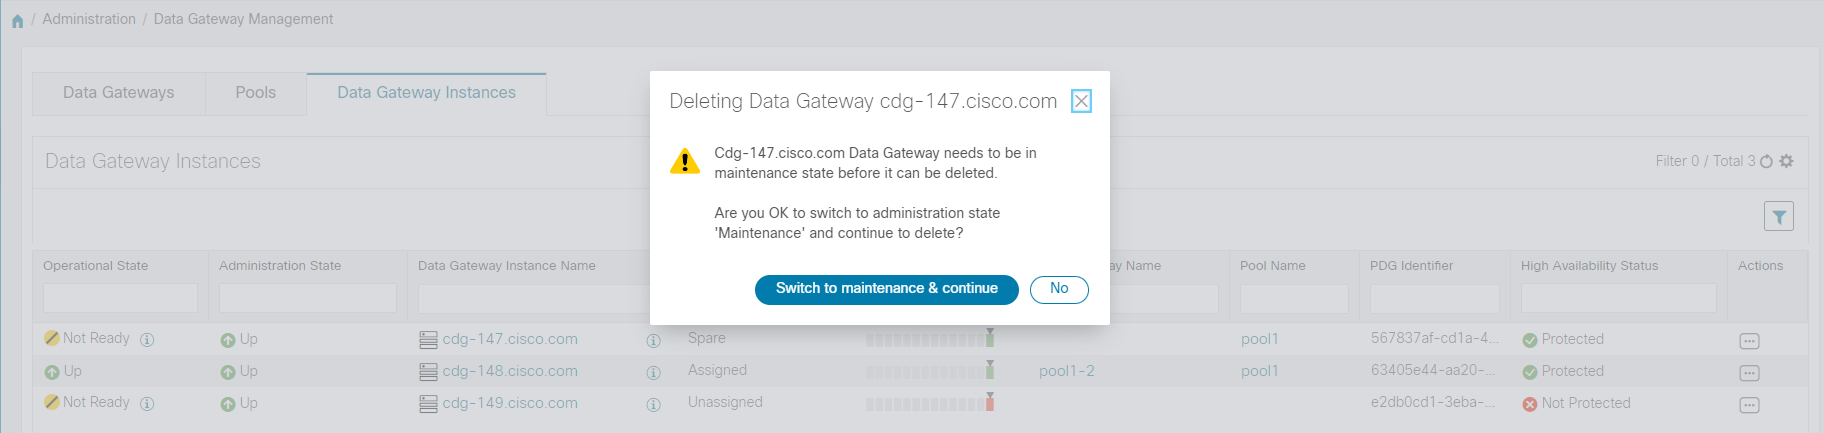
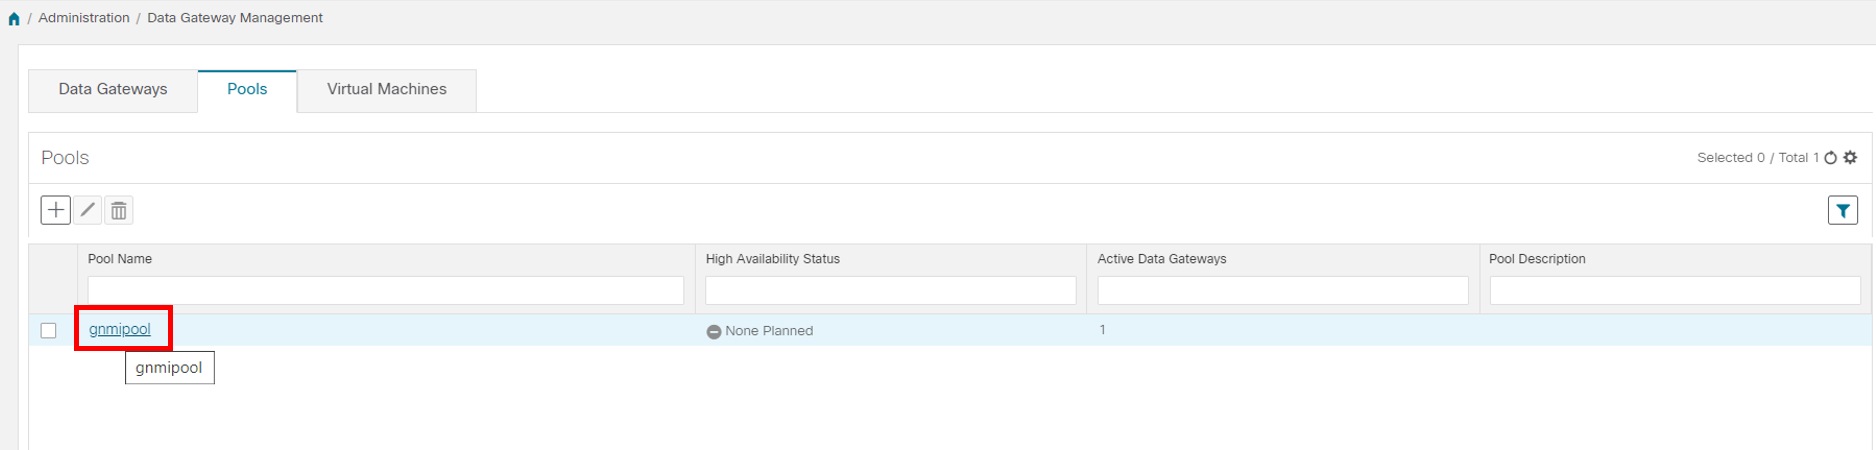
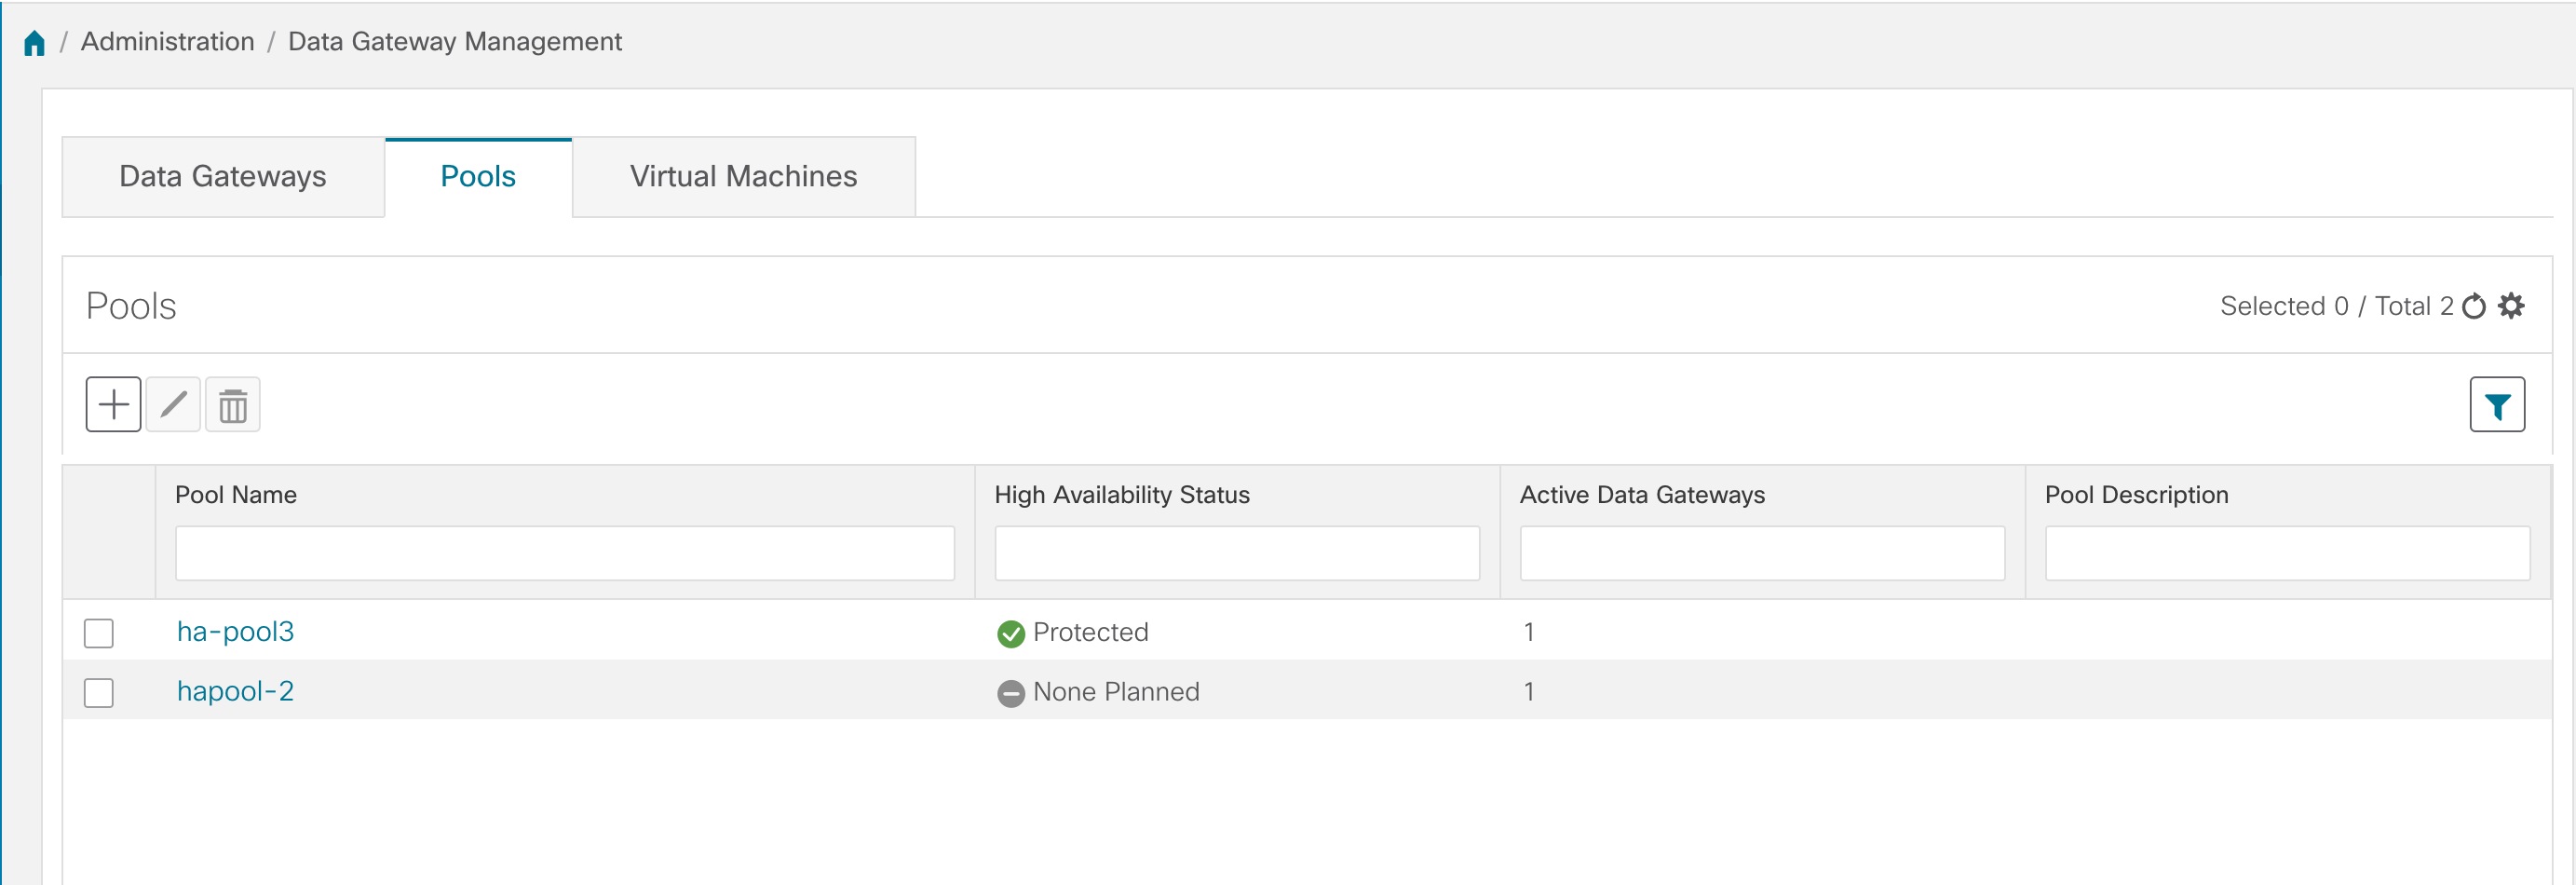
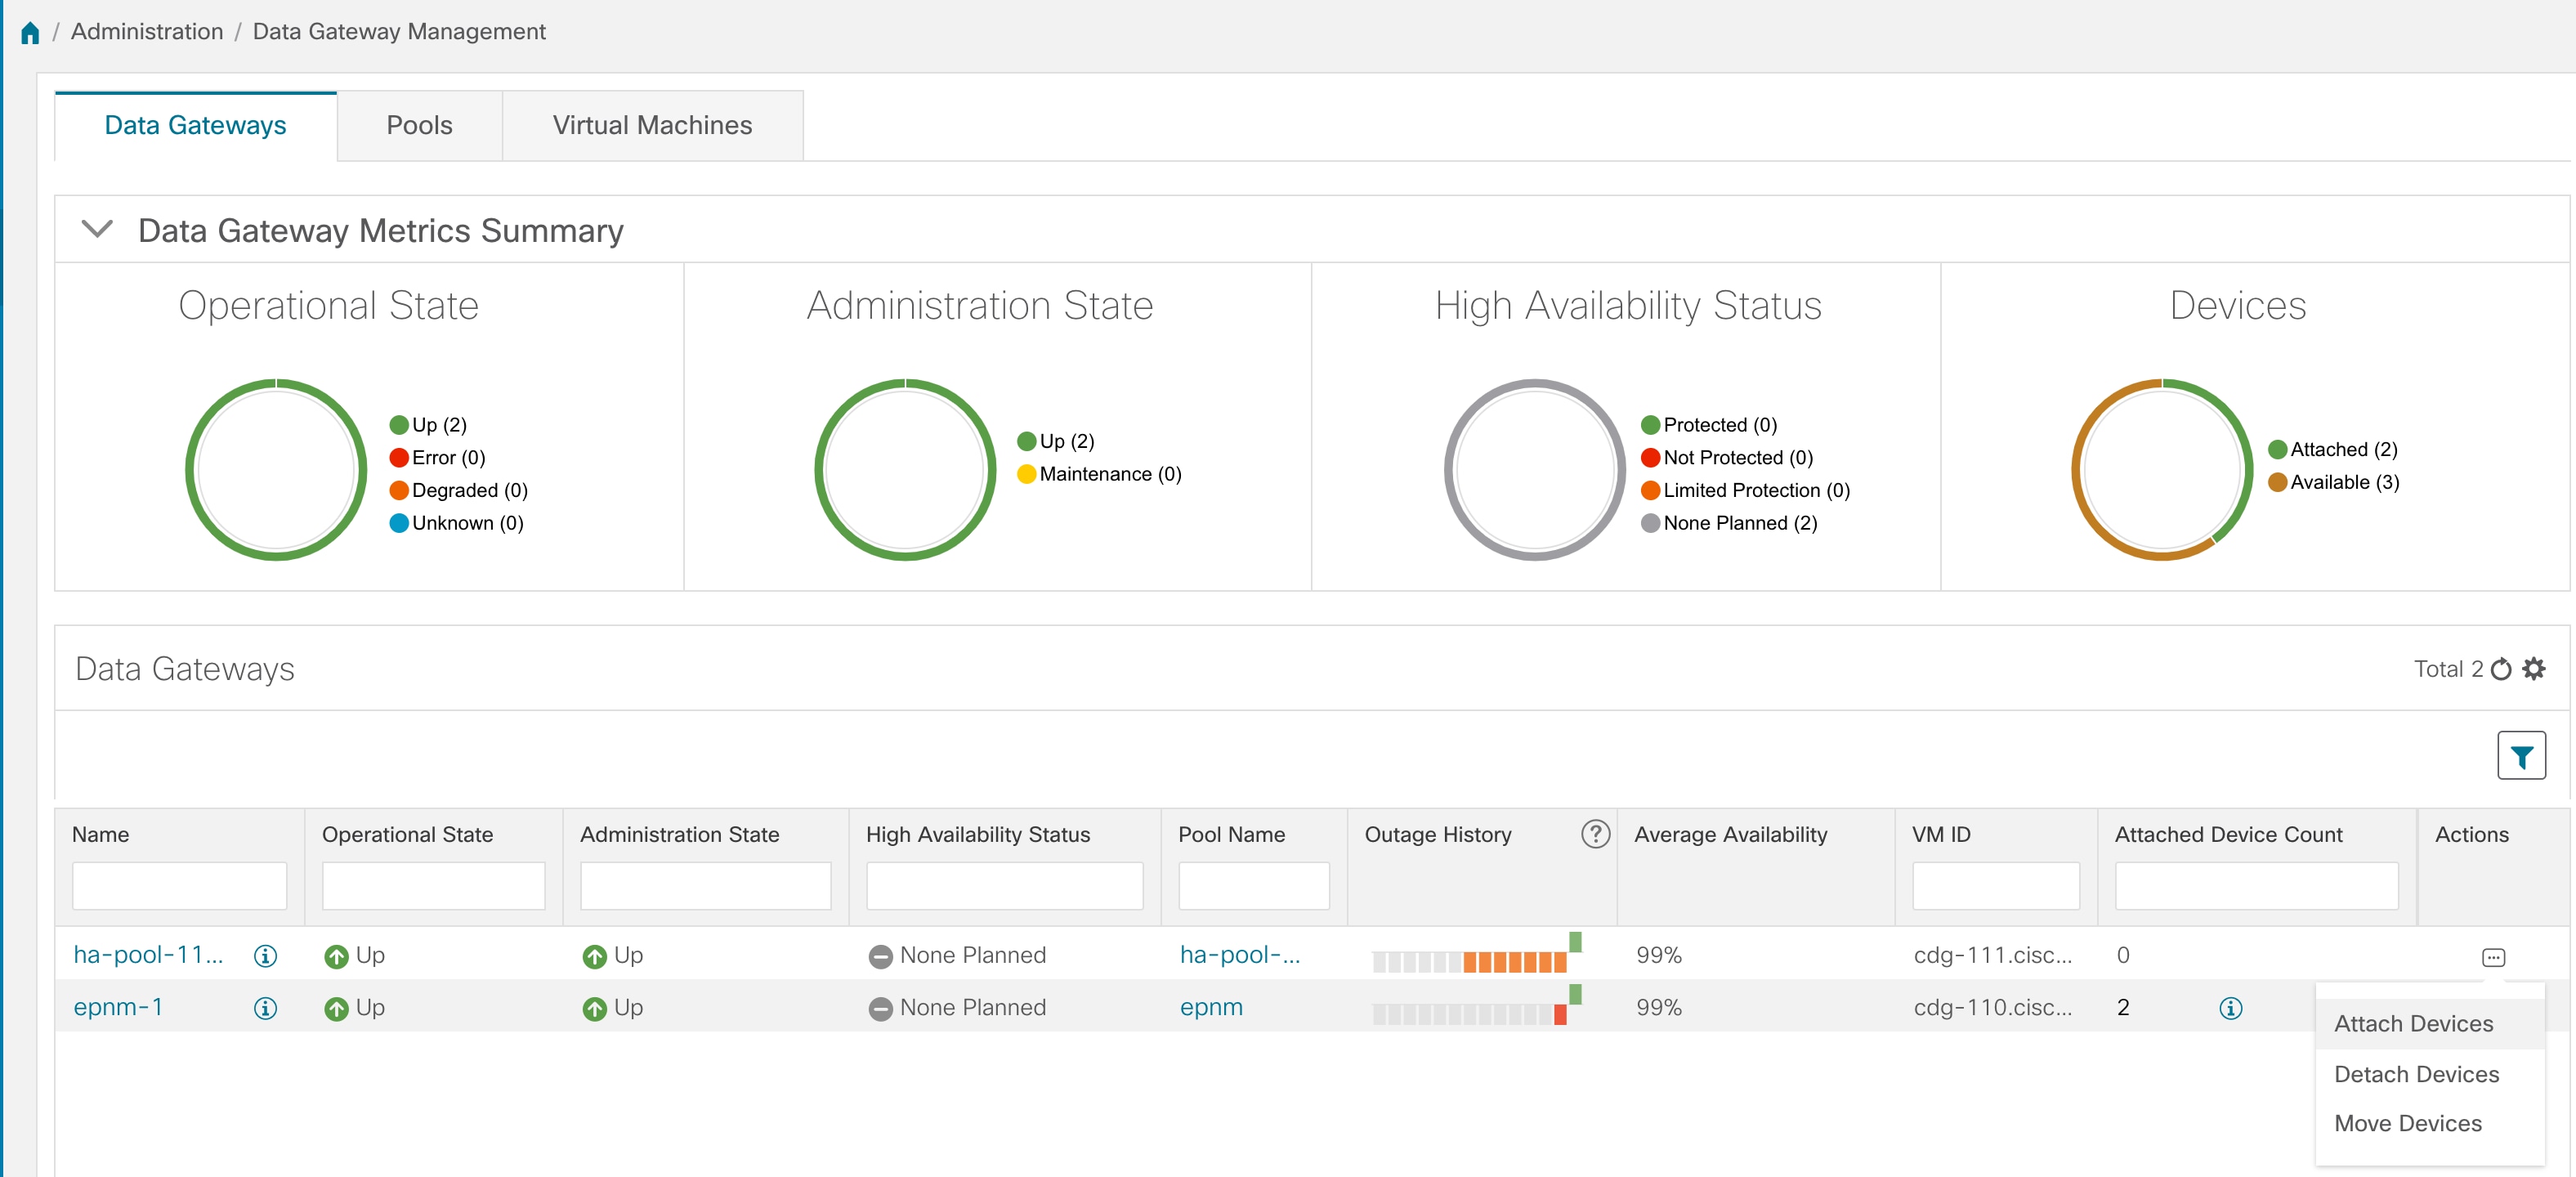
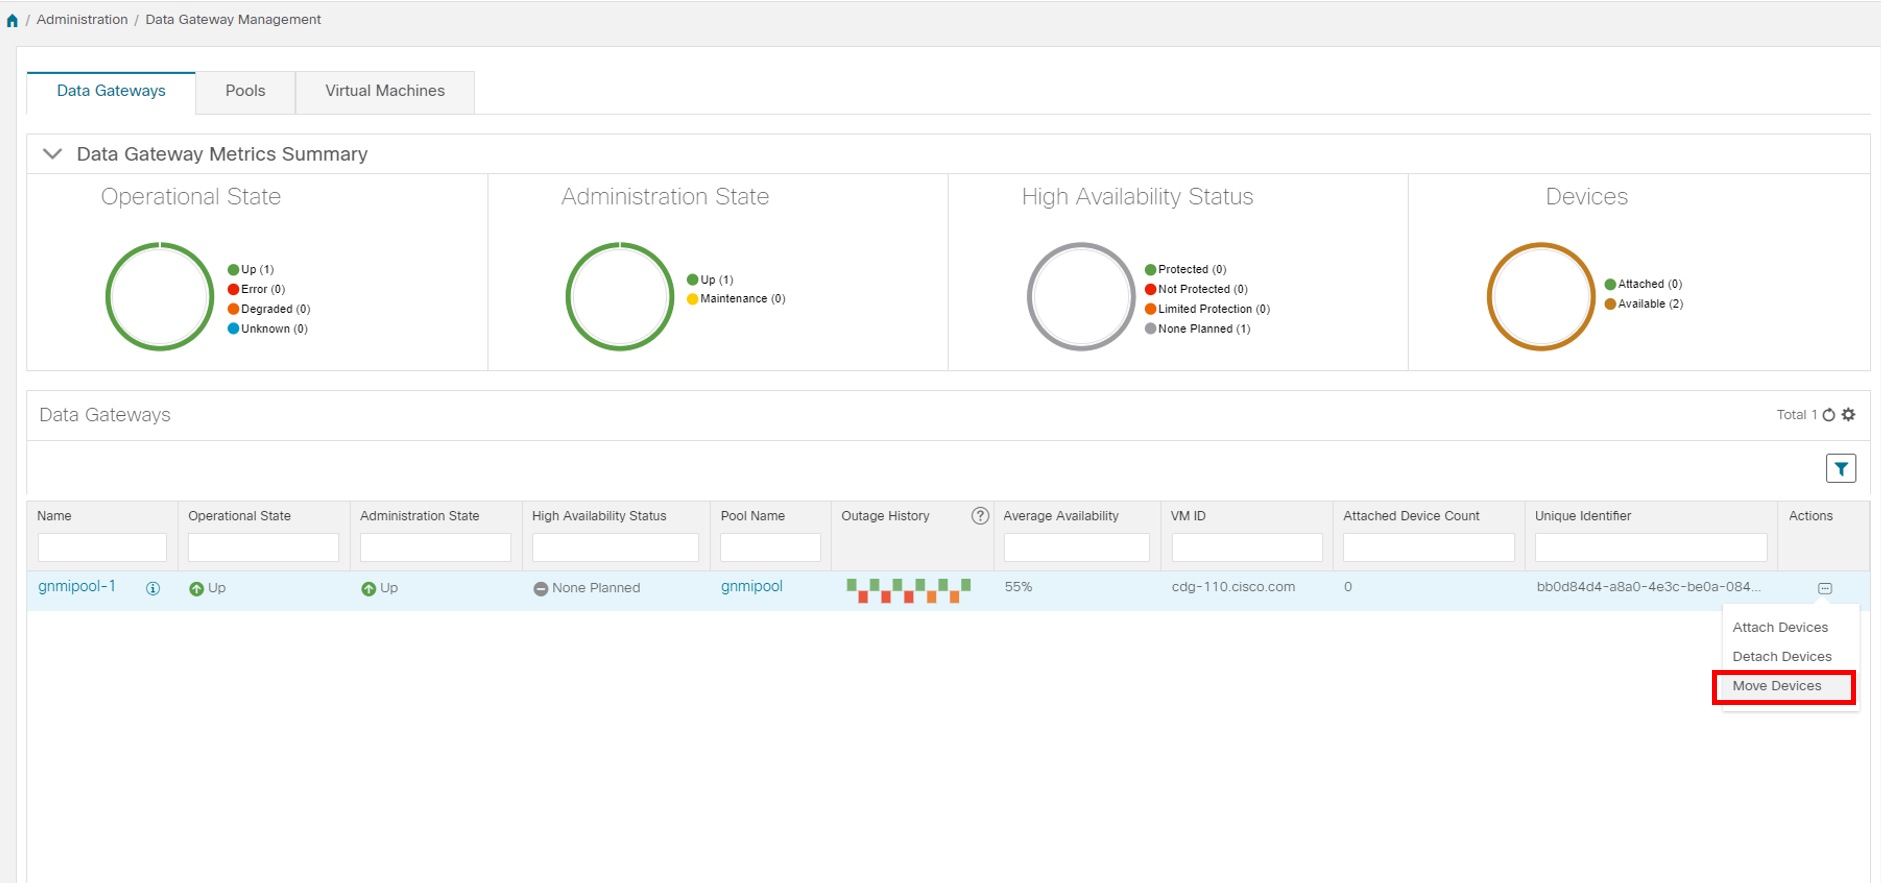
Cisco Crosswork Data Gateway features can be accessed the Cisco Crosswork main menu. To open Cisco Crosswork Data Gateway management view, choose Administration > Data Gateway Management from the left navigation bar.

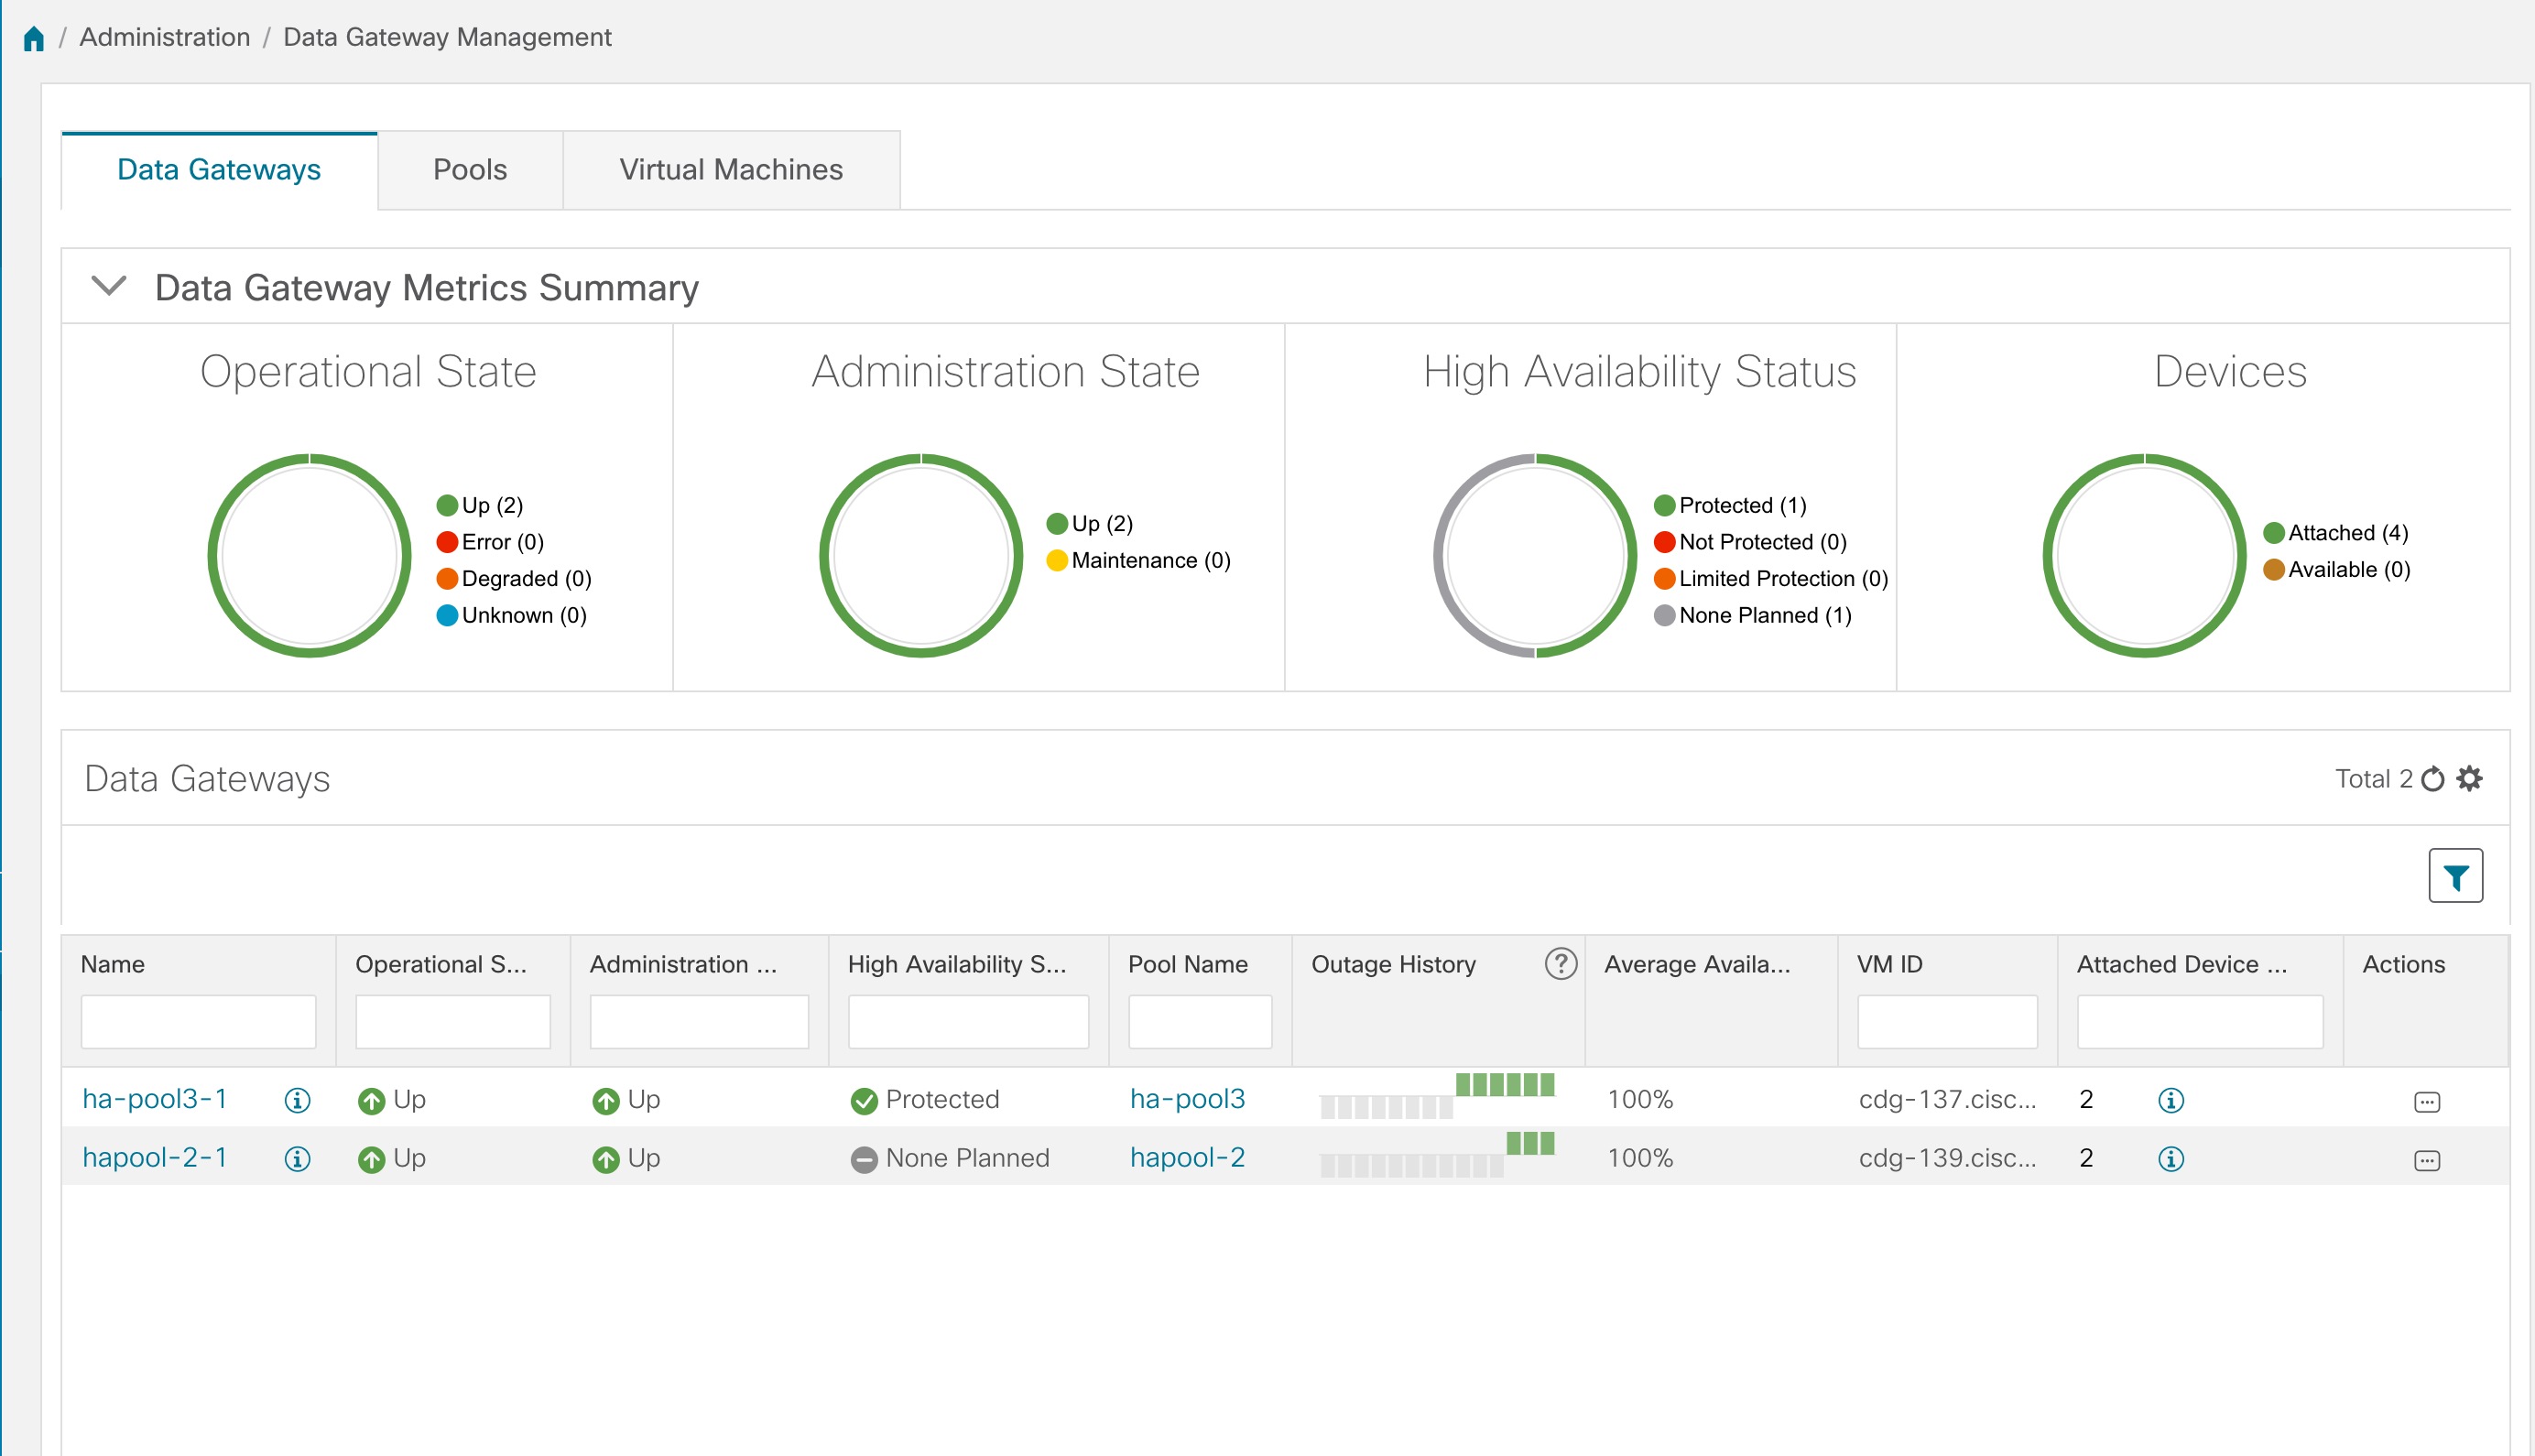
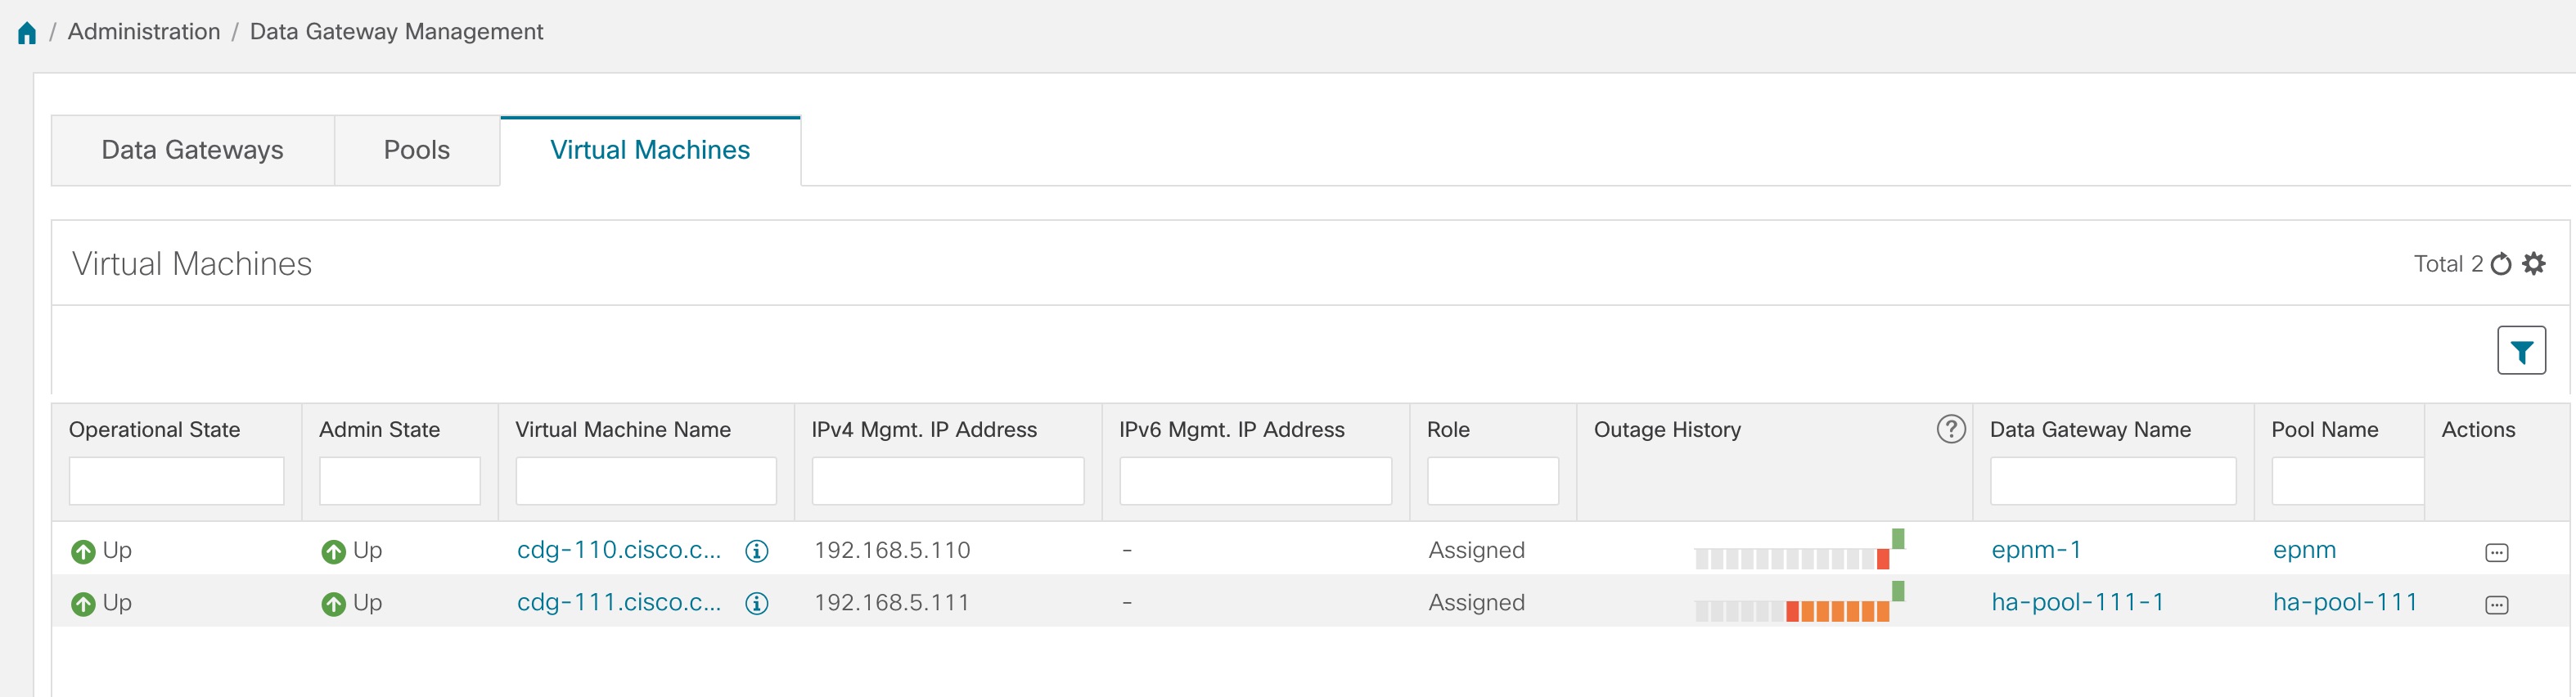
Data Gateway Management page has three tabs:

  • Data Gateways: Displays details of the virtual Cisco Crosswork Data Gateway instances.

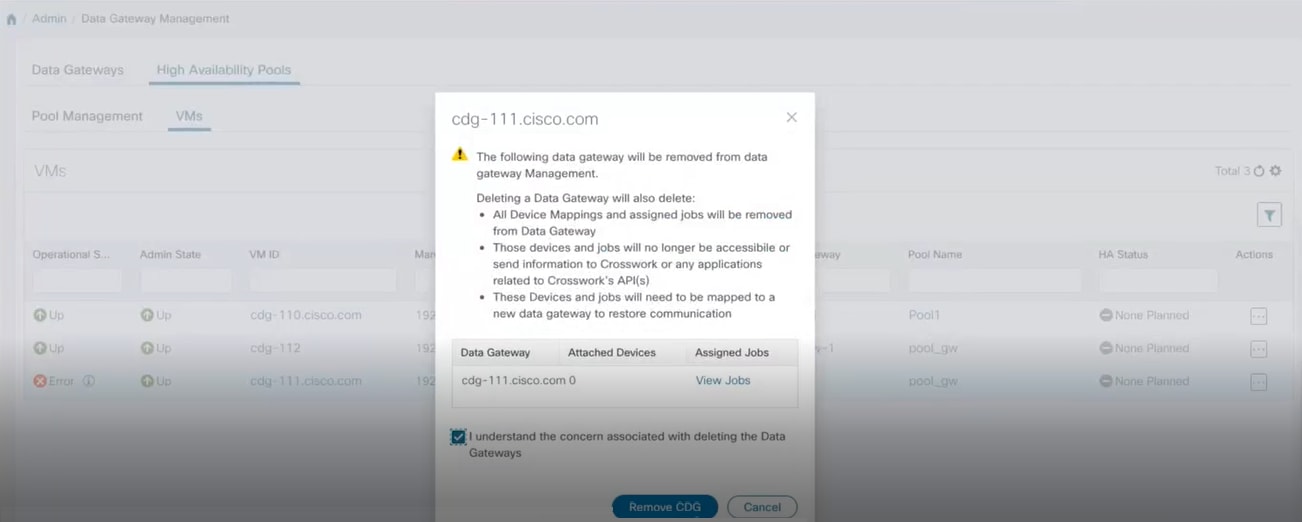
  • Pools: Manage Cisco Crosswork Data Gateway pools.

  • Virtual Machines: Manage physical Cisco Crosswork Data Gateway VMs.

Manage Cisco Crosswork Data Gateway VMs

When a Cisco Crosswork Data Gateway auto-enrolls with Cisco Crosswork, it shows up on the Virtual Machines page.


Note

It can take up to 5 mins for the Operational state to become UP after the initial deployment.

The Virtual Machines page provides the following details about Cisco Crosswork Data Gateway VMs:

Field

Description

Operational State

Operational state of the Cisco Crosswork Data Gateway VM. The Cisco Crosswork Data Gateway has following operational states:

  • Unknown: The initial state when the Cisco Crosswork Data Gateway is enrolled.

  • Up: When Cisco Crosswork Data Gateway is enrolled with Cisco Crosswork and is running.

  • Error: When Cisco Crosswork Data Gateway is not reachable from Cisco Crosswork.

  • Degraded: When there is a disconnect between Cisco Crosswork collectors and Cisco Crosswork.

Admin State

Administrative state of the Cisco Crosswork Data Gateway VM.

Virtual Machine Name

Name of the Cisco Crosswork Data Gateway VM.

Clicking the info icon next to the name displays the enrollment details of each VM. This includes details such as, the

  • Pool name

  • VM name

  • Management IP (eth0) with related MAC address

  • eth1 IP (north bound/vNIC1) with related MAC address

  • eth2 (south bound/vNIC2) with only the MAC address

    Note 

    The eth2 IP (south bound) is assigned to the Crosswork Data Gateway VM during pool creation. Hence, it will not be displayed as part of enrollment details for each VM.

IPv4 Mgmt.IP Address

Management IPv4 address of the Cisco Crosswork Data Gateway VM.

IPv6 Mgmt.IP Address

Management IPv6 address of the Cisco Crosswork Data Gateway VM.

Role

Shows the role of the Cisco Crosswork Data Gateway VM. It could be either:

  • Assigned: when Cisco Crosswork Data Gateway VM is assigned to a pool.

  • Unassigned: when Cisco Crosswork Data Gateway VM is not assigned to any pool.

  • Spare: when Cisco Crosswork Data Gateway VM is part of a pool but is in standby mode

Outage History

Outage history of the Cisco Crosswork Data Gateway VM over the period of 14 days.

Each tile represents the consolidated status of the corresponding Cisco Crosswork Data Gateway for a day. If the Cisco Crosswork Data Gateway was in error state at any time during that day, the tile will be the color representing Error. If the Data Gateway was not in Error but was in Degraded State anytime of the day, the tile will be the color for Degraded state. Finally, if the DG was neither Error nor Degraded but only UP, then the tile will be the color representing OK.

Data Gateway Name

Name of the virtual Cisco Crosswork Data Gateway associated with the Cisco Crosswork Data Gateway VM (if any).

Pool Name

Name of the pool to which the Cisco Crosswork Data Gateway has been assigned (if any).

High Availability Status

High availability status of the Cisco Crosswork Data Gateway VM. It could be either:

  • Protected

  • Limited protection

  • None Planned

  • Not Protected

Actions

Provides the following options:

  • Change administration state

  • Delete Cisco Crosswork Data Gateway VM

Change the Administration State of Cisco Crosswork Data Gateway VM

To perform upgrades or other maintenance within the data center is may become necessary to suspend operations between Cisco Crosswork platform and the Cisco Crosswork Data Gateway. This can be done by placing the Cisco Crosswork Data Gateway into Maintenance mode. During downtime, admin can do modifications to Cisco Crosswork Data Gateway, such as updating the certificates, etc.


Note

If the maintenance activities are affecting the communication between Crosswork and Crosswork Data Gateway, the collection is interrupted and resumes when the communication is restored. Similarly if the maintenance activities are affecting the communication between Crosswork Data Gateway and external destinations (Kafka/gRPC), the collection is interuppted and resumes when the communication is restored.


Once changes are done, admin can change the administration state to Up. Once the Crosswork Data Gateway VM is up, Cisco Crosswork resumes sending jobs to it.

Follow the steps below to change the administration state of a Crosswork Data Gateway VM:

Procedure


Step 1

From the main menu, choose Administration > Data Gateway Management > Virtual Machines.

Step 2

For the Cisco Crosswork Data Gateway whose adminstrative state you want to change, click on Edit icon under Actions column.


Step 3

Select the adminstration state to which you want to switch to.


Delete Cisco Crosswork Data Gateway VM from Cisco Crosswork

Follow the steps below to delete a Cisco Crosswork Data Gateway VM from Cisco Crosswork:

Before you begin

It is recommended that you move the attached devices to another data gateway to not lose any jobs corresponding to these devices. If you detach the devices from Cisco Crosswork Data Gateway VM, then the corresponding jobs are deleted.

Procedure


Step 1

From the main menu, choose Administration > Data Gateway Management > Virtual Machines.

Step 2

For the Crosswork Data Gateway that you want to delete, click Edit icon under Actions column and click Delete.


Step 3

The Cisco Crosswork Data Gateway VM must be in maintenance mode to be deleted. Click Switch & Continue when prompted to switch to Maintenance mode..


Step 4

Check the check box for "I understand the concern associated with deleting the Data Gateways." and click Remove CDG.


Re-deploy/Re-enroll a Crosswork Data Gateway VM

Re-install a Crosswork Data Gateway VM

If a Crosswork Data Gateway VM has gone down and can no longer be used, then delete the old VM and install a new one. For details on how to install a new Crosswork Data Gateway VM, refer to Section: Install Cisco Crosswork Data Gateway in the Cisco Crosswork Infrastructure 4.0 and Applications Installation Guide.


Note

If the Crosswork Data Gateway VM was already enrolled with Cisco Crosswork and you have installed the VM again with the same name, change the Administration State of the Crosswork Data Gateway VM to Maintenance for auto-enrollment to go through.


Re-enroll a Crosswork Data Gateway

If a Crosswork Data Gateway VM was already enrolled with Cisco Crosswork and Cisco Crosswork was re-installed, re-enroll the existing Crosswork Data Gateway VM with these steps:

  1. Delete the existing Crosswork Data Gateway enrollment from Cisco Crosswork.

  2. Login to the Crosswork Data Gateway VM. From the Main Menu in the Interactive Console, select Troubleshooting > 0 Re-enroll Data Gateway.

Troubleshoot Cisco Crosswork Data Gateway from Crosswork UI

Crosswork UI provides the following options to troubleshoot Cisco Crosswork Data Gateway:

Download showtech Logs

Follow the steps to download showtech logs from Cisco Crosswork UI:


Note

Showtech logs cannot be collected from the UI if the Cisco Crosswork Data Gateway is in a ERROR state. In the DEGRADED state of the Crosswork Data Gateway, if the OAM-Manager service is running and not degraded, you will be able to collect logs.


Procedure

Step 1

Go to Administration > Data Gateway Management > Data Gateways.

Step 2

Click the Crosswork Data Gateway name for which you want to download showtech.

Step 3

In the Crosswork Data Gateway details page, on the top right corner, click Actions and click Download Showtech.


Step 4

Enter a passphrase. .

Note 

Ensure that you make a note of this passphrase. You will need to enter this passphrase later to decrypt the showtech file.


Step 5

Click Download Showtech. The showtech file downloads in encrypted format.

Note 

Depending on how long the system was in use, it may take several minutes to download the showtech file.

Step 6

After the download is complete, run the following command to decrypt it:

Note 

In order to decrpyt the file, you must use OpenSSL version 1.1.1i. Use the command openssl version to check the openssl version on your system.

To decrypt the file on a MAC, you must install OpenSSL 1.1.1+. This is because LibreSSL's openssl command does not support all the switches that are supported by OpenSSL's openssl command.

openssl enc -d -AES-256-CBC -pbkdf2 -md sha512 -iter 100000 -in <showtech file> -out <decrypted filename> -pass pass:<encrypt string>


Reboot Cisco Crosswork Data Gateway VM

Follow the steps to reboot a Crosswork Data Gateway from Cisco Crosswork UI:


Note

Rebooting the Cisco Crosswork Data Gateway pauses its functionality until it's up again.


Procedure

Step 1

Go to Administration > Data Gateway Management > Data Gateways.

Step 2

Click the Cisco Crosswork Data Gateway name that you want to reboot.

Step 3

In the Crosswork Data Gateway details page, on the top right corner, click Actions, and click Reboot.


Step 4

Click on Reboot Gateway.


Once the reboot is complete, check the operational status of the Cisco Crosswork Data Gateway in the Administration > Data Gateway Management > Virtual Machines page.

Manage Cisco Crosswork Data Gateway Pools

A Cisco Crosswork Data Gateway pool ensures that your devices are managed and collections occur with minimal to no disruption.

You can use the Cisco Crosswork UI to create and configure pool(s) of Cisco Crosswork Data Gateway VMs. For information on how to create a pool, see Section: Create a Cisco Crosswork Data Gateway Pool in the Cisco Crosswork Infrastructure 4.0 and Applications Installation Guide.

Once you install a Cisco Crosswork Data Gateway VM and assign it to a to a pool, a virtual Cisco Crosswork Data Gateway gets created automatically and is visible under Data Gateways tab. You can then attach or detach devices to it and run collection jobs.


Note

You cannot attach or detach devices to your physical Cisco Crosswork Data Gateway VM. They can only be attached or detached to a virtual Crosswork Data Gateway.


If a Cisco Crosswork Data Gateway VM goes down, Cisco Crosswork automatically replaces that VM with a spare VM from the pool. Devices and any existing collection jobs are auto-assigned from the failed VM to the spare VM. Once the VM that went down is repaired, it becomes a spare VM in the pool.

A pool has following states:

  • Protected: All VMs are UP and there is at least one spare VM in the pool.

  • Not Protected: All the spare VMs are DOWN and there are none available to replace a VM that is in use.

  • Limited Protection: Some spare VMs are DOWN, but there is still at least one standby that is UP.

  • None Planned: No spare VMs were added to the pool during pool creation.

The pools can be managed from the Pools Tab. It can be accessed via Administration > Data Gateway Management > Pools.

View Pool Details

Follow the steps to view pool details:

Procedure


Step 1

From the main menu, choose Administration > Data Gateway Management and click Pools tab.

Step 2

Click the pool name whose details you want to view.


The pool details page opens where you can view the details of the pool.


Note 

If more than one Crosswork Data Gateways in a pool have same Southbound IP address, for example, CDG2 (Active) as well as CDG1 (Standby) have exact same Southbound IP address. Then, reboot the standby Crosswork Data Gateway (CDG1 in this example), so that it will loose its southbound IP address once it comes up.

This happens in case of a failover scenario: CDG1 was active and CDG2 was standby. CDG1 had southbound IP address IP1. CDG1 went down, so Cisco Crosswork made CDG2 as new active and programmed same IP1 as southbound IP on CDG2.

CDG1 later restores connectivity as a standby, but it kept the same IP1 as southbound IP address. Therefore, resulting in both CDG1 and CDG2 having same IP1 as southbound IPs.


Edit a Cisco Crosswork Data Gateway Pool

Follow the steps to edit a Cisco Crosswork Data Gateway pool:

Procedure


Step 1

From the main menu, choose Administration > Data Gateway Management and click Pools tab.

Step 2

From the list displayed in this page, select the pool which you wish to edit.

Step 3

Click Edit icon button to open Edit High Availability (HA) Pool page.

Step 4

In the Pool Resources pane, modify the values for the following parameters:

Note 
You cannot edit the parameters in the Pool Parameters pane. If you need to make changes to these parameters, you must create a new pool with the desired values and then move the Cisco Crosswork Data Gateway VMs to that pool.


  • Add a Virtual IP address for every active data gateway needed: A virtual IP address for every active Cisco Crosswork Data Gateway VM.

    Note 

    Enter either IPv4 or IPv6 addresses. Combination is not allowed.

  • Add the number of standby data gateways desired for protection: Entering a value greater than 0 in this field enables high availability for the pool. When an active data gateway goes down, a 'standby' in the pool replaces it to ensure protection.

Step 5

Add or remove Cisco Crosswork Data Gateway VMs from the pool.

Note 
The number of Crosswork Data Gateway VMs you add to the pool should be equal to the total number of virtual IPs and standby Crosswork Data Gateway VMs. For example, if you have entered 3 virtual IPs and wish to have 2 standy VMs, you should add 5 Cisco Crosswork Data Gateway VMs to the pool.
  • To add a VM to the pool, select VMs from the Unassigned Virtual Machine(s) on the left and click right arrow to move these to the Virtual Machine(s) Added to Pool.

  • To remove a VM from the pool, select VMs from the Virtual Machine(s) Added to Pool on the right and click left arrow to move these to the Unassigned Virtual Machine(s).


    Note 

    A virtual Cisco Crosswork Data Gateway can be taken out of the pool only if all devices have been unmapped from it. Once virtual Cisco Crosswork Data Gateway is removed, the Crosswork Data Gateway VM that was backing the virtual Crosswork Data Gateway becomes a spare automatically.

Step 6

Click Save.


Delete a Crosswork Data Gateway Pool

Follow the steps to delete a pool:

Procedure


Step 1

From the main menu, choose Administration > Data Gateway Management and click Pools tab.

Step 2

Select the pool you want to delete and click Delete icon button.

Step 3

Click Delete in the Delete High Availability (HA) Pool dialog box.


Manage Cisco Crosswork Data Gateway

The Data Gateways tab provides the following information:

Data Gateway Metrics Summary Pane

Summarizes the overall metrics of all Cisco Crosswork Data Gateway pools currently enrolled with Cisco Crosswork.

Item

Description

Operational State Tile

Shows the number of Cisco Crosswork Data Gateway in each operational state i.e., Up, Error, Degraded, and Unknown.

Administration State Tile

Shows the number of Cisco Crosswork Data Gateways in each adminstration state i.e., Up and Maintenance.

High Availability Status Tile

Shows the high availability status of the Cisco Crosswork Data Gateways.

Devices Tile

Shows the number of devices that are currently attached to a Cisco Crosswork Data Gateway and number of available devices.

Data Gateways Pane

Displays the following details for all Cisco Crosswork Data Gateway pools listed here.

Item

Description

Name

Name of the Cisco Crosswork Data Gateway pool

Operational State

Operational state of the Cisco Crosswork Data Gateway VM that is currently associated with the Cisco Crosswork Data Gateway pool.

  • Up icon Up: The Cisco Crosswork Data Gateway VM is operational and all individual components are "OK".

  • Error icon Error:

    The Cisco Crosswork Data Gateway VM is either unreachable or all of its components are in Error state.

  • Degraded icon Degraded:

    The Cisco Crosswork Data Gateway VM is reachable but one or more of its components are in a state other than OK.

  • Reachability Unknown icon Unknown:

    The Cisco Crosswork Data Gateway's operational state is unknown as it has enrolled itself with Cisco Crosswork, but hasn't established a session yet.

Administration State

Adminstration state of the Cisco Crosswork Data Gateway VM.

  • Up icon Up: The VM is administratively up.

  • Maintenance Mode icon Maintenance: The Crosswork Data Gateway VM has been set to "Maintenance" mode by the user. There is no impact new or running jobs.

High Availability Status

A Cisco Crosswork Data Gateway can be in one of these states:

  • Protected: All VMs are UP and there is at least one spare in the pool.

  • Not Protected: All the spare VMs are DOWN and there are none available to replace a VM that is in use

  • Limited Protection: Some spare VMs are DOWN, but there is still at least one standby that is UP

  • None Planned: No spare VMs were added to the pool during pool creation

Pool Name

Name of the pool with which the Cisco Crosswork Data Gateway VM is associated.

Outage History

Shows past status changes of Cisco Crosswork Data Gateway VMs over a period of 14 days.

Each tile represents the consolidated status of the corresponding Cisco Crosswork Data Gateway for a day. If the Cisco Crosswork Data Gateway was in error state at any time during that day, the tile will be the color representing Error. If the Data Gateway was not in Error but was in Degraded State anytime of the day, the tile will be the color for Degraded state. Finally, if the DG was neither Error nor Degraded but only UP, then the tile will be the color representing OK.

Average Availability

Value indicating the health of the Cisco Crosswork Data Gateway VM. This percentage is calculated as the time for which the Cisco Crosswork Data Gateway VM was available over the past 14 days or the time from when it was enrolled if less than 14 days.

A higher average is an indication of good health.

VM ID

VM ID of the associated Cisco Crosswork Data Gateway VM.

Attached Device Count

Number of devices attached to the Cisco Crosswork Data Gateway pool.

Unique Identifier

Unique identifier of the Cisco Crosswork Data Gateway VM.

Actions

Allows you to manage devices associated with the Cisco Crosswork Data Gateway pool.

View Cisco Crosswork Data Gateway Details

To view details of a Cisco Crosswork Data Gateway, in the Data Gateways pane, click the Cisco Crosswork Data Gateway name. For example,

The Cisco Crosswork Data Gateway details page opens that shows the following details:

1. General Cisco Crosswork Data Gateway Details


  • Name

  • Admin state

  • Operational state

  • High availability state

  • Current virtual machine name

  • Attached devices (Click View Devices to see all attached devices.)

  • Assigned jobs (Click View Jobs to see all associated jobs.)

  • Actions (Provides troubleshooting options. See Troubleshoot Cisco Crosswork Data Gateway from Crosswork UI.)

2. History


Shows the outage history of the Cisco Crosswork Data Gateway over 14 days. Cisco Crosswork maintains a list of all Cisco Crosswork Data Gateway transition state changes over the last 14 days. It includes information such as the timestamp, outage time and clear time.


Note

In outage history, the operation state change data of a Cisco Crosswork Data Gateway for past 14 days and the current or latest state change event will have the current time as “end time” and “duration” in Events table as Cisco Crosswork cannot anticipate it. But, the end time is required for plotting the graph. Hence, the change can be seen in Events table only. See Events.


It also provides the following options that are available in the top right corner of the History pane.

  • Zoom in

  • Zoom out

  • Selection zoom

  • Panning

  • Reset Zoom

  • Download SVG and PNG of the history chart

3. Events

The Events table shows the following details for Cisco Crosswork Data Gateway events:

  • Event Type

  • Message indicating the reason for the status change

  • Start Time

  • End Time

  • Duration

4. Health


Shows the health information of the Cisco Crosswork Data Gateway. The timestamp in the top right corner is the timestamp when the last health data was collected. If the Cisco Crosswork Data Gateway is in a Error state or if the data is stale for any reason, the the timestamp label highlights that the data is old.

  • Disk Space Used: Amount of the disk space used and available for different partitions.

  • Disk In/Out: Number of read/write or input/output operations involving a disk for the partitions.

    This is a cumulative counter, not a delta time series.

  • CPU Utilization: Amount of actively used CPU and total number of vCPUs.

  • Memory: Amount of used, available, and total memory.

  • Network In/Out: The amount of data sent/received in MB for NIC interfaces - eth1, eth2, and eth0.

    This is a cumulative counter, not a delta time series.

5. Service Status


Cisco Crosswork Data Gateway comprises of various containerized services running on an Ubuntu VM. Its overall health depends on health of each containerized service. Cisco Crosswork also displays the health information of these individual container services running on the Cisco Crosswork Data Gateway and their resource consumption:


Note

The resource consumption data displayed here is from docker statistics. This is higher than the actual resource consumed by the containerized service.
  • Service: Name of the service

  • Service Status: Status of the service i.e., Running, Degraded, or Error.

  • CPU Utilization: Percentage of actively utilized CPU by the service.

    CPU utilization is reported against maximum of 800% (8vCPUs) for Standard Profiles and 1600% (16vCPUs) for Extended Profiles.

  • Version: Version of the service deployed.

  • Memory Used: Amount of memory being used by the service in MB.

  • Network In/Out: The amount of data sent/received in MB by the service over its interface.

    This is a cumulative counter, not a delta time series.

  • Disk In/Out: Number of read/write or input/output operations that the service has done involving a disk.

    This is a cumulative counter, not a delta time series.

Attach a Device to Cisco Crosswork Data Gateway Pool

For optimal performance, it is recommended that attaching devices to a Cisco Crosswork Data Gateway pool should be done in batches of 300 devices or fewer.


Note

A device can be attached to only one Cisco Crosswork Data Gateway pool.


Follow the steps below to attach device(s) to a Cisco Crosswork Data Gateway pool:

Before you begin

Ensure that both the Admin state and Operational state of the Cisco Crosswork Data Gateway to which you want to attach devices is UP. Only then proceed with attaching devices.

Procedure


Step 1

From the main menu, choose Administration > Data Gateway Management > Data Gateways.

Step 2

For the Cisco Crosswork Data Gateway pool to which you want to attach devices, under Actions column, click Edit icon and select Attach Devices.

The Attach Devices window opens showing all the devices available for attaching.

Step 3

To attach all the devices, click Attach All Devices. Otherwise, select the devices you want to attach and click Attach Selected Devices.

Step 4

In Confirm - Attach Devices dialog box, click Attach.


To verify if the devices were attached to the VM, check the Attached Device Count under the Data Gateways pane. Click on the i icon next to the attached device count to see the list of all devices attached to the selected Cisco Crosswork Data Gateway pool.

Detach a Device from Cisco Crosswork Data Gateway Pool

Follow the steps below to detach a device from a Crosswork Data Gateway:

Before you begin

If you do not want to lose the jobs submitted for the device you wish to delete, it is reccomended that you move the device to another Cisco Data Gateway. Detaching the device from Cisco Crosswork Data Gateway will delete the jobs corresponding to the device.

Procedure


Step 1

From the main menu, choose Administration > Data Gateway Management > Data Gateways.

Step 2

For the Crosswork Data Gateway from which you want to detach devices, under Actions column, click Edit icon and select Detach Devices.


The Detach Devices window opens showing all attached devices.


Step 3

To detach all the devices click Detach All Devices. Otherwise, select the devices you want to detach and click Detach Selected Devices.

Step 4

In Confirm - Detach Devices dialog box, click Detach.


Move Devices between Cisco Crosswork Data Gateway Pools

It is highly recommended that you move devices between Data Gateways belonging to the same pool although you can move devices from a Data Gateway to any Data Gateway.

Follow the steps to move devices from one Crosswork Data Gateway to another:

Procedure


Step 1

From the main menu, choose Administration > Data Gateway Management > Data Gateways.

Step 2

For the Crosswork Data Gateway from which you want to move devices, under Actions column, click Edit icon and select Move Devices .


The Move Attached Devices window opens showing all the devices available for moving.


Step 3

From the To this Data Gateway dropdown, select the data gateway to which you want to move the devices.

Step 4

To move all the devices, click Move All Devices. Otherwise, select the devices you want to move and click Move Selected Devices.

Step 5

In Confirm - Move Devices dialog box, click Move.


Manage Data Destinations

Cisco Crosswork allows you to create external data destinations that can be used by collection jobs to deposit data.

In Cisco Crosswork UI, from the Data Destinations pane, you can add a new data destination, update the settings configured for an existing data destination, and delete a data destination.

It can be accessed by going to Administration > Data Gateway Global Settings. This table shows approved data destinations that can be used by the collection jobs to deposit their data. Kafka or gRPC servers can be added as new data destinations for REST API created collection jobs.


Note

The Crosswork_Kafka and cd-astack-pipeline are internal data destinations and cannot be updated or deleted.


Data Destination pane displays the following details of the data destinations:

Field

Description

Destination Name

Name of the data destination.

Server Type

Server type of the data destination i.e., external Kafka or gRPC server.

Compression Type

Compression type being used for the data destination.

Encoding

Encoding type being used for the data destination.

UUID

Unique identifier for the data destination. This ID is automatically generated by Cisco Crosswork when an external data destination is created and is a required parameter for collection job creation.

It also allows you to do the following:

Add/Edit a Data Destination

Follow the steps below to add a new data destination. You can then use this data destination for data collection. You can also add multiple data destinations.


Note

  • If you reinstall an already existing external Kafka data destination with the same IP address, then the collectors need to be restarted for changes to take place .

  • You can secure the communication channel between Cisco Crosswork and the specified data destination i.e., either Crosswork Kafka or external Kafka. Step 6 of the below procedure explain how to do that.

    However, enabling security can impact performance.

    • If your external data destination requires a TLS connection, keep the public certificate ready or if it requires client authentication, keep the client certificate and key files ready. The client key might be password-encrypted which will need to be configured as part of the data destination provisioning. Currently, Crosswork Data Gateway supports IP-based certificates only.

    • Ensure that the certificates are PEM encoded and the key file is in PKCS#8 format when generating them with your Certificate Authority.

  • Create the Kafka topics prior to submitting the job to Cisco Crosswork. Depending on external Kafka and how topics are managed in that external Kafka, Cisco Crosswork logs may show the exception listed when and if the topic does not exist at the time of dispatching the collected data to that specific external Kafka / topic. This could be either due to the topic is not yet created or topic got deleted prior to the completion of the requested collection job and dispatching the collected data.

    destinationContext: topicmdt4
    org.apache.kafka.common.errors.UnknownTopicOrPartitionException: This server does not host this topic-partition.

Before you begin

If you are using an external Kafka server for data collection, ensure the following:

  • You have configured the following properties on the external Kafka server:


    Note

    Refer your Kafka documentation for description and usage of these properties as this explanation is out of scope of this document.


    • num.io.threads = 8

    • num.network.threads = 3

    • message.max.bytes= 30000000

  • You have created Kafka topics that you want to be used for data collection.

Procedure


Step 1

From the main menu, choose Administration > Data Gateway Global Settings.

Step 2

From Data Destinations pane, click Add icon button. The Add Destination page opens.

If you want to edit an existing destination, click Edit icon button to open Edit Destination page and edit parameters.

Note 

Updating a data destination causes the Cisco Crosswork Data Gateway using it to re-establish a session with that data destination. Data collection will be paused and resumes once the session is re-established.

Step 3

Enter or modify the values for the following parameters:

Field Value

Destination Name

Enter a descriptive data destination name. The name can contain a maximum of 128 alphanumeric characters, plus underscores ("_") or hyphens ("-"). No other special characters are allowed.

If you have many data destinations, make the name as informative as possible to be able to distinguish later.

Server Type

From the drop down, select the server type of your data destination (Kafka/gRPC).

Encoding

From the drop down, select the encoding (json/gpbkv).

Compression Type

From the drop down, select the compression type:

Compression types supported for Kafka are snappy, gzip, lz4, zstd, and none)

Note 

zstd compression type is supported only for Kafka 2.0 or higher.

Compression types supported for gRPC are snappy, gzip, and deflate.

Maximum Message Size (bytes) (Kafka-only)

Enter the maximum message size in bytes.

  • Default Value: 100000000 bytes/ 30 MB

  • Min: 1000000 bytes/1 MB

  • Max: 100000000 bytes/ 30 MB

Batch Size (bytes) (Kafka-only)

Enter the required batch size in bytes.

  • Default Value: 6400000 bytes/6.4 MB

  • Min: 16384 bytes/ 16.38 KB

  • Max: 6400000 bytes/6.4 MB

Linger (milliseconds) (Kafka-only)

Enter the required linger time in milliseconds.

  • Default Value: 5000 ms

  • Min: 0 ms

  • Max: 5000 ms

For telemetry based collection, it is recommended to use the destination settings of Batch size as 16384 bytes and linger as 500 ms, for optimal results.

Step 4

Select a protocol from the Connection Details options. IPv4 and IPv6 are supported.


Step 5

Complete the Connection Details fields as described in the following table. The fields displayed will vary with the connectivity type you chose. The values you enter must match the values configured on the device.

Connectivity Type Fields

IPv4

Enter the required IPv4 Address/ Subnet Mask, and Port. You can add multiple IPv4 addresses by clicking + Add Another

IPv4 subnet mask ranges from 1 to 32 and port range from 1024 to 65535.

IPv6

Enter the required IPv6 Address/ Subnet Mask, and Port. You can add multiple IPv6 addresses by clicking + Add Another.

IPv6 subnet mask ranges from 1 to 128 and port range from 1024 to 65535.

Step 6

(Optional) To connect securely to the data destination, enable the Enable Secure Communication option under Security Details.

Step 7

Click Save.


What to do next

If you have enabled the Enable Secure Communication option, navigate to the Certificate Management page in the Cisco Crosswork UI (Administration > Certificate Management) and add the relevant certificate for the newly added data destination. This step is mandatory to establish a secure communication to the device. See Manage Certificates for more information.

Note

If you do not add the certificate for the data destination after enabling the Enable Secure Communication option, Cisco Crosswork still connects to the destination in non-secure mode for any collection jobs.


View Data Destination Details

To view details of a data destination, in the Data Destinations pane, click icon next to the data destination name whose details you want to see. Cisco Crosswork displays the details as shown in the following figure.

Delete a Data Destination

Follow the steps to delete a data destination:

Before you begin

A data destination can only be deleted if it is not associated with any collection job. We recommend to check in the Collection Jobs view to see if any collection jobs are using the data destination.

Procedure


Step 1

From the main menu, choose Administration > Data Gateway Global Settings.

Step 2

Select the Data destination(s) you want to delete and click Delete icon button.

Step 3

In Delete Data Destination(s) pop up, click Delete to confirm.


Manage Custom Software Packages

Cisco Crosswork allows you to add MIB files, device model definitions by means of custom software packages.

Device packages enable Crosswork to retrieve CLI and SNMP data and convert it into XML for third-party devices.

You can add three types of custom software packages:

  1. CLI Device Package: You may want to use CLI-based KPIs to monitor device health indicator for third-party devices. All custom CLI device packages along with their corresponding YANG models should be included in file custom-cli-device-packages.tar.xz. Multiple files are not supported.


    Note

    Before migrating to Cisco Crosswork 4.0, ensure that you back up CLI Device Package. See Migrate CLI Device Packages.


  2. Custom MIB Packages: Custom MIBs and device packages can be specific to third-party devices or be used to filter the collected data or format it differently for Cisco devices. These are editable by the user. All custom SNMP MIB packages along with YANG models should be included in file custom-mib-packages.tar.xz. Multiple files are not supported.


    Note

    Cisco Crosswork Data Gateway enables SNMP polling on third party devices for standard MIBs already included in the system. Proprietary MIBs are required only if the collection request references MIB TABLE names or SCALAR names from a proprietary MIB. However, if the requests are OID-based, then MIBs are not required.


  3. SNMP Device Package: Cisco Crosswork Data Gateway allows you to extend the SNMP coverage by uploading custom SNMP device packages with any additional MIB and YANG descriptions you require.

System Device and MIB Packages are bundled in the Crosswork software and are automatically downloaded to the system instances. These are not modifiable by the user. Custom Device Packages can be uploaded by the user, for example, when required for interfacing with third-party devices.

The Customer software pane can be accessed via Adminstration > Data Gateway Global Settings.

Custom Software pane displays the following details for the available custom software packages:

Field

Description

File Name

Name of the custom software package.

Last Modified Time

Time when the file was last (re)uploaded.

Type

Type of the custom software package.

Notes

Notes related to the custom software package entered by the user while importing the package.

It also allows you to perform the following operations:

Download Custom Software Packages

To download a custom software package, click on the Download icon 
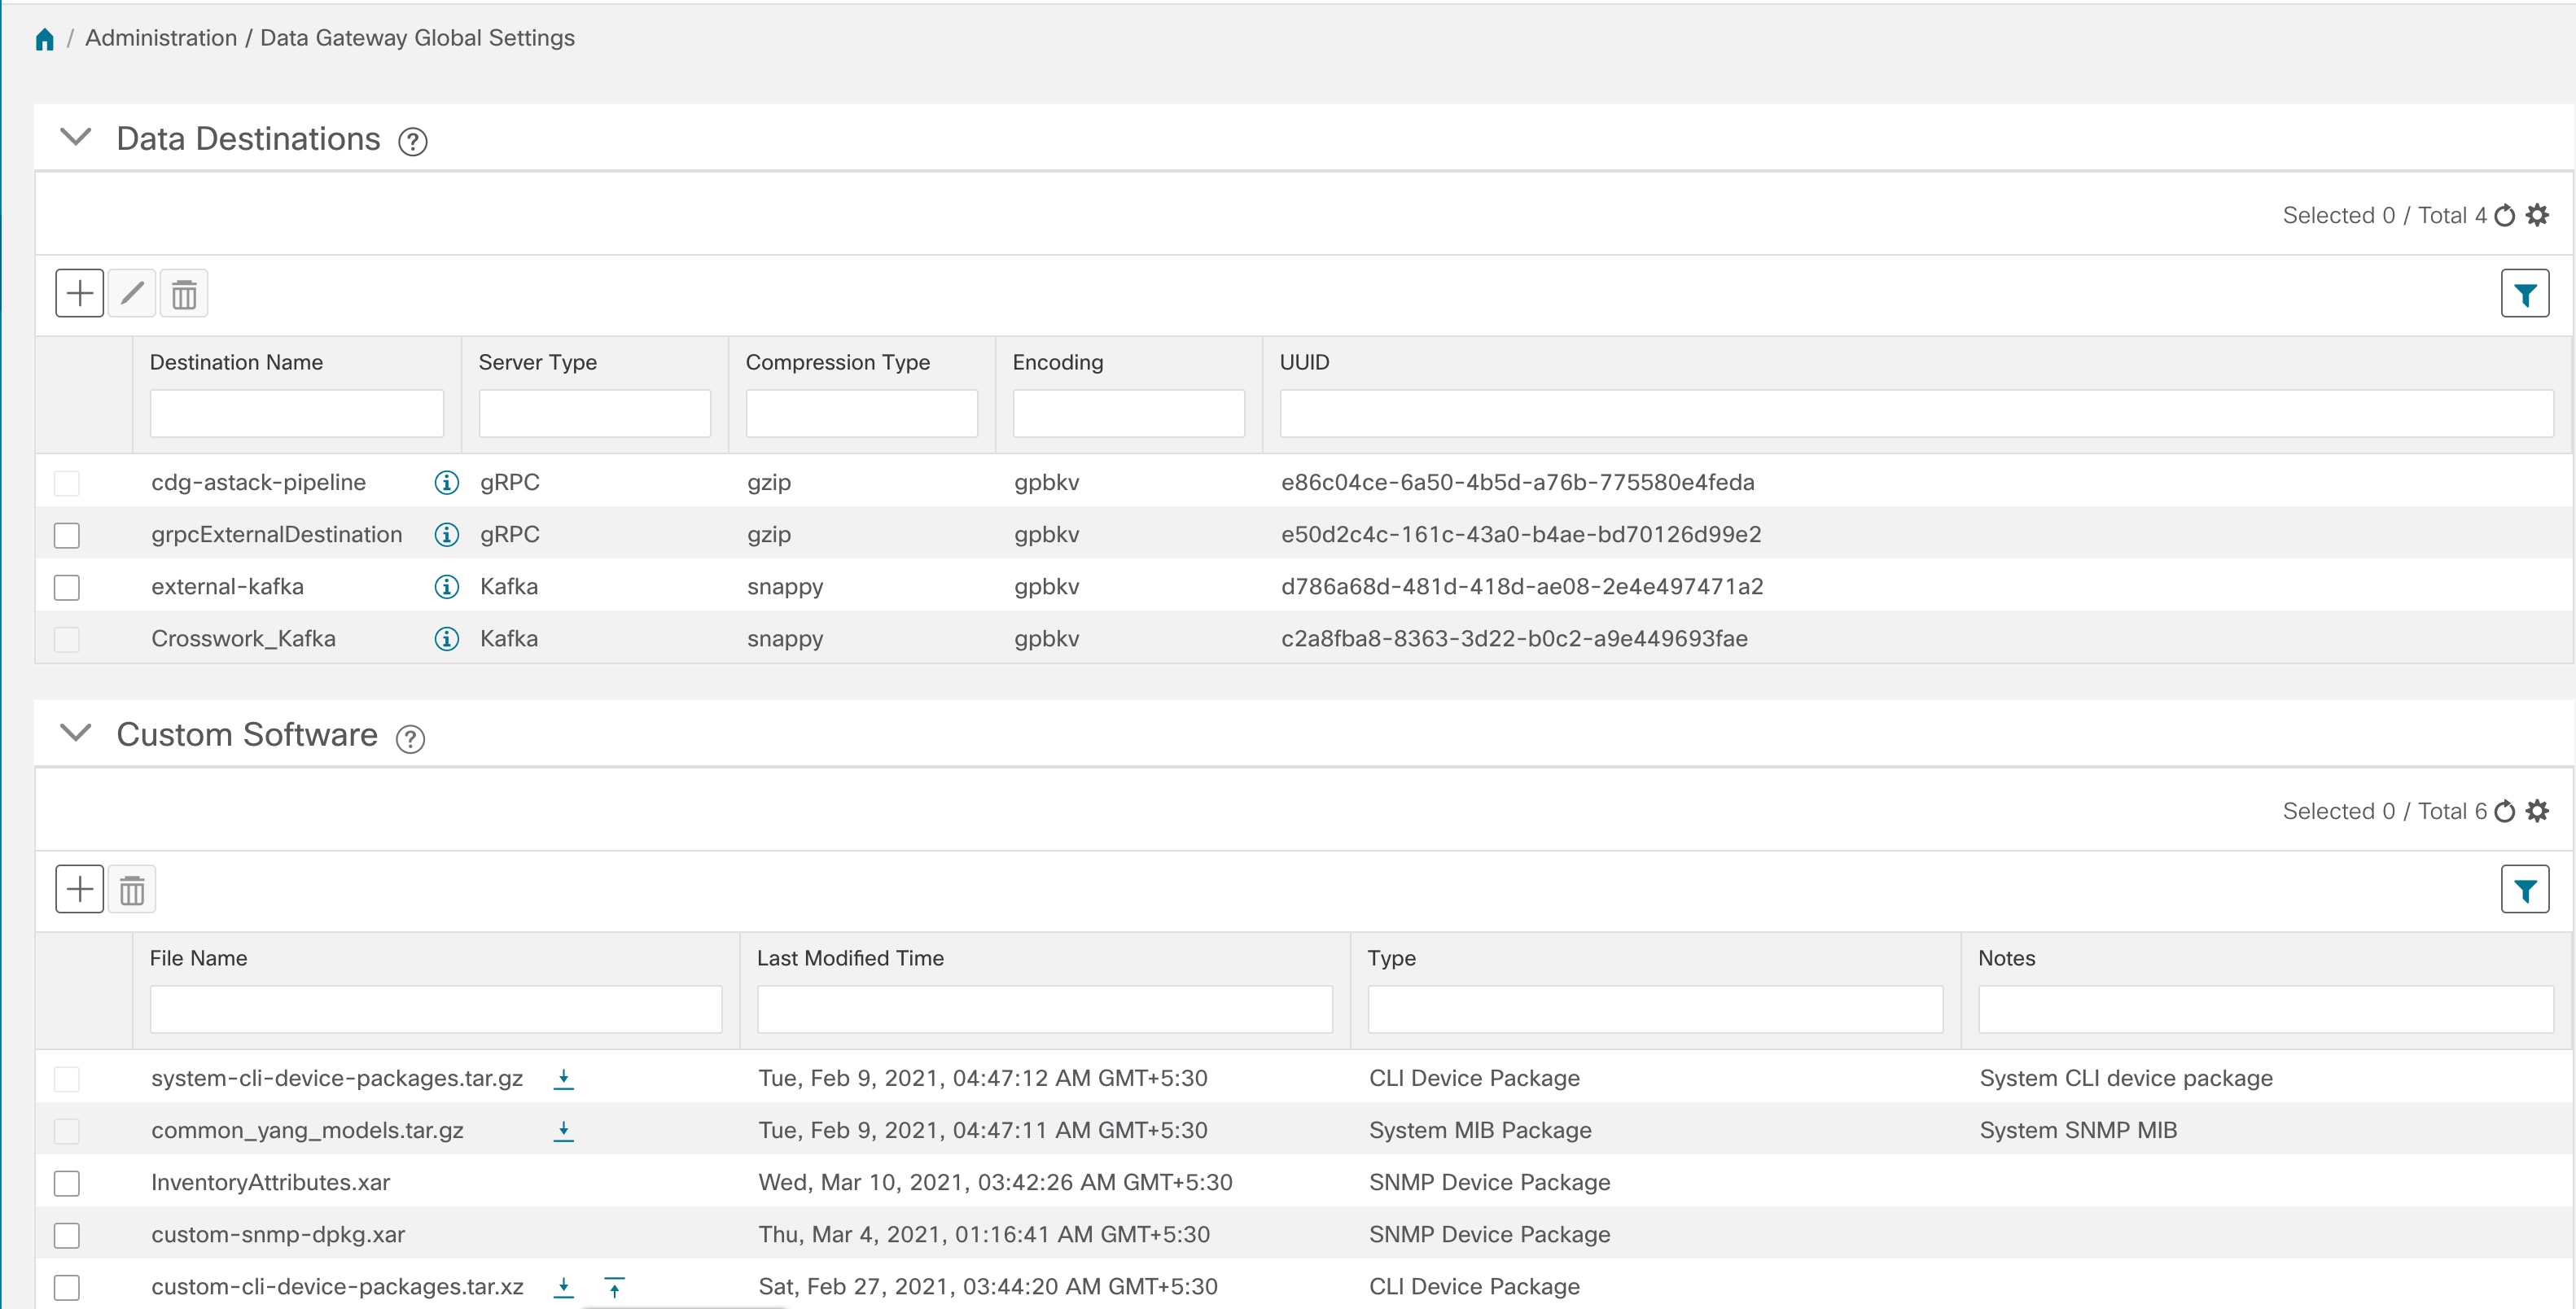
button next to its name in the File Name column.

Add a Custom Software Package

The scope of the usage of this feature is limited to Crosswork Change Automation and Health Insights only.

  1. You can upload one or more xar file in a single device package tar.gz file.

  2. When uploading new MIBs as a part of Custom MIB Package, it’s required that those new MIBs files are loadable within collectors along with existing System MIB files i.e., all dependencies in the files get resolved properly. An offline tool and procedure are available for you to ensure that new MIBs can be uploaded properly.

    For information on how to validate custom MIBs and Yangs i.e., to check if they can be uploaded to Cisco Crosswork, see Use Custom MIBs and Yangs on Cisco DevNet.

  3. Cisco Crosswork doesn't allow Custom MIB package files to overwrite the System MIB Package files. It results in a failed upload attempt.

  4. Ensure that the custom software package TAR file has just the device package folders and none of the parent folder or hierarchy of folders as part of the TAR file. If not imported properly, Cisco Crosswork throws exceptions when executing the job with custom device package.

  5. Cisco Crosswork does not validate the files being uploaded other than checking the file extension.

  6. To update the existing Custom CLI Device Package, click the upload icon next to the File name in the table

Follow these steps to upload a custom software package:

Procedure


Step 1

From the main menu, choose Administration > Data Gateway Global Settings.

Step 2

In Custom Software pane, click Add icon button.

To update the existing Custom CLI Device Package, click the upload icon next to the File name in the table.

Step 3

In the Add Custom Software pop up, select the type of custom software package you want to import from the Type dropdown.


Step 4

Click in the blank field of File Name to open the file browser window and select the custom software package to import and click Open.

Step 5

Add a description of the custom software package in the Notes field. This is recommended if you have many packages, to be able to distinguish among them.

Step 6

Click Upload.


What to do next

Restart all impacted services to get the latest custom MIB package updates.

Delete a Custom Software Package

Deleting a custom software package causes deletion of all YANG and XAR files from Cisco Crosswork. This will also impact the collection jobs using the custom software package.

Follow the steps to delete a custom software package:

Procedure


Step 1

From the main menu, choose Administration > Data Gateway Global Settings.

Step 2

From the Custom Software pane, select the custom package you want to delete and click Delete icon button.

Step 3

In the Delete Custom Software pop up, click Delete to confirm.


Migrate CLI Device Packages

Back up CLI Device Packages

To take a back up of the existing CLI device packages:

  1. Download the CLI device package (.xar files) to your local machine.

  2. Delete the CLI Device Package from Cisco Crosswork.

Restore CLI Device Package

After migrating to Cisco Crosswork 4.0, follow these steps to restore the CLI Device Packages before starting any collection jobs. To do this:

  1. Create the custom-cli-device-packages.tar.xz file from the .xar files you had backed up before migration in the following format:

    
    custom-cli-device-package
    ├── xar
    │   ├── function1.xar
    │   └── function2.xar
    └── yang
    ├── supported_yang-1.yang
    ├── supported_yang-2.yang
    └── supported_yang-3.yang
    
  2. Add the custom-cli-device-packages.tar.xz file in Administration > Data Gateway Global Settings > Custom Packages pane. Refer to the Section: Add a Custom Software Package.