- Preface
- Introduction to Cisco vWAAS
- Configuring Cisco vWAAS and Viewing vWAAS Components
- Cisco vWAAS on Cisco ISR-WAAS
- Cisco vWAAS on VMware ESXi
- Cisco vWAAS on Microsoft Hyper-V
- Cisco vWAAS on RHEL KVM and KVM CentOS
- Cisco vWAAS on Cisco ENCS 5400-W Series
- Cisco vWAAS with Cisco Enterprise NFVIS
- Cisco vWAAS with Akamai Connect
- Cisco vWAAS in Cloud Computing Systems
- Troubleshooting Cisco vWAAS
- Cisco vWAAS in Cloud Computing Systems
- Cisco vWAAS in Microsoft Azure
Cisco vWAAS in Cloud Computing Systems
Cisco vWAAS in Cloud Computing Systems
Cisco vWAAS is a cloud-ready WAN optimization solution that is fully interoperable with WAAS appliances, and can be managed by a common central manager or virtual central manager. The vWAAS cloud computing solution includes these features:
Cisco vWAAS in Microsoft Azure
This section contains the following topics:
- About Cisco vWAAS in Microsoft Azure
- Operating Considerations for Cisco vWAAS in Microsoft Azure
- Upgrade/Downgrade Considerations for Cisco vWAAS in Microsoft Azure
- Deploying Cisco vWAAS in Miscrosoft Azure
About Cisco vWAAS in Microsoft Azure
Azure is a Microsoft Cloud that provisions virtual machines (VMs) on the Microsoft Hyper-V hypervisor. vWAAS in Azure is part of WAAS support for Office 365, and is an end-to-end solution with enterprise branch offices.
- vWAAS in Azure is available for vWAAS Version 6.2.1x and later, and is supported for vWAAS-200, vWAAS-750, vWAAS-1300, vWAAS-2500, vWAAS-6000, and vWAAS-12000v.
- vWAAS in Azure is not supported for vWAAS-50000.
Table 10-1 shows the platforms supported for Cisco vWAAS in Microsoft Azure.
Table 10-1 Microsoft Azure VM Sizes for Cisco WAAS vWAAS Models
|
|
|
|
|
|---|---|---|---|
Operating Considerations for Cisco vWAAS in Microsoft Azure
vWAAS in Microsoft Azure and WAAS Interoperability
Note the following operating considerations for Cisco vWAAS in Microsoft Azure:
- vWAAS in Azure is available for all vWAAS models, for WAAS Version 6.2.1 and later.
- You can display and identify an Azure vWAAS device on the WAAS Central Manager or the CLI:
–![]() On the WAAS Central Manager, navigate to the Manage Devices screen. The vWAAS in Azure device type is displayed as OE-VWAAS-AZURE.
On the WAAS Central Manager, navigate to the Manage Devices screen. The vWAAS in Azure device type is displayed as OE-VWAAS-AZURE.
–![]() On the CLI, use either the show version EXEC command or the show hardware EXEC command. Output for both commands will include device ID, shown as OE-VWAAS-AZURE.
On the CLI, use either the show version EXEC command or the show hardware EXEC command. Output for both commands will include device ID, shown as OE-VWAAS-AZURE.
- vWAAS in Azure communicates with the WAAS Central Manager in the same ways as physical appliances communicate with the Central Manager.
A vWAAS in Azure device is displayed on the WAAS Central Manager as AZURE-VWAAS. To display vWAAS in Azure devices, navigate to Home > Devices > All Devices. The Device Type column shows all WAAS and vWAAS devices.

Note![]() For vWAAS in Azure, the supported traffic interception method is PBR (Police-Based Routing); vWAAS in Azure does not support WCCP or AppNav interception methods.
For vWAAS in Azure, the supported traffic interception method is PBR (Police-Based Routing); vWAAS in Azure does not support WCCP or AppNav interception methods.
–![]() If you register the vWAAS with the WAAS Central Manager using a private IP address, following the usual vWAAS registration process described in Configuring vWAAS Settings of Chapter 2, “Configuring and Cisco vWAAS and Viewing vWAAS Components.
If you register the vWAAS with the WAAS Central Manager using a private IP address, following the usual vWAAS registration process described in Configuring vWAAS Settings of Chapter 2, “Configuring and Cisco vWAAS and Viewing vWAAS Components.
–![]() If you register the vWAAS with the WAAS Central Manager using a public IP address, you must specify the public address of the vWAAS in the WAAS Central Manager Device Activation screen (navigate to Devices > device-name > Activation).
If you register the vWAAS with the WAAS Central Manager using a public IP address, you must specify the public address of the vWAAS in the WAAS Central Manager Device Activation screen (navigate to Devices > device-name > Activation).
Note![]() After you have registered the vWAAS in Azure device to the WAAS Central Manager, you must configure the public IP address of the Central Manager. The vWAAS in Azure device can contact the Central Manager only by using the public IP address of the registration. To set the public IP address of the WAAS Central Manager:
After you have registered the vWAAS in Azure device to the WAAS Central Manager, you must configure the public IP address of the Central Manager. The vWAAS in Azure device can contact the Central Manager only by using the public IP address of the registration. To set the public IP address of the WAAS Central Manager:
1. In the WAAS Central Manager, navigate to Home > Devices > Primary-CM-Device > Configure > Network > NatSettings.
2. In the NAT IP field, enter the public IP address of the Central Manager.
Operating Limitations for vWAAS in Microsoft Azure
Note the following operating limitations for Cisco vWAAS in Microsoft Azure:
- vWAAS auto-registration is not supported, because Microsoft Azure uses DHCP to configure VMs with IP address and Azure fabric server IP address. There will be operational issues if you deploy a separate DHCP server for auto-registration.
Functionality similar to auto-registration is available by providing the WAAS CM IP address during VM provisioning. The vWAAS VM will try to register with this WAAS CM during provisioning.
- Microsoft Azure does not support GRE, IPv6, or Jumbo Frames, therefore vWAAS in Azure does not support these features.
Note![]() For vWAAS in Azure, the supported traffic interception method is PBR (Police-Based Routing); vWAAS in Azure does not support WCCP or AppNav interception methods.
For vWAAS in Azure, the supported traffic interception method is PBR (Police-Based Routing); vWAAS in Azure does not support WCCP or AppNav interception methods.
Upgrade/Downgrade Considerations for Cisco vWAAS in Microsoft Azure
Consider the following upgrade/downgrade guidelines for Cisco vWAAS in Microsoft Azure:
Deploying Cisco vWAAS in Miscrosoft Azure
Deployment Options for Cisco vWAAS in Microsoft Azure
There are two major deployment options for Cisco vWAAS in Microsoft Azure:
In this type of deployment, both the application server and Cisco vWAAS can be put in the Azure cloud just as in a private cloud. The vWAAS is very close to the server, and tied to the server movement. In this case, the traffic flow is very similar to that in a normal enterprise data center deployment.
In this type of deployment, you do not have control over the application in the cloud; you control only the vWAAS. In this case, traffic from the CSR in the branch is tunneled to the CSR in Azure, which is then redirected to the vWAAS. A Destination Network Address Translation (DNAT) is performed to get the traffic back to the CSR in the Azure cloud from the SaaS application. For more information on Office 365 and WAAS, see Accelerate Microsoft Office 365 Shared Deployments with Cisco WAAS WAN Optimization.
Provisioning the vWAAS VM in Microsoft Azure
Note![]() To deploy vWAAS in Azure, you need a Microsoft Azure Pay-As-You-Go subscription. Subscription procedure and billing information are available on the Microsoft Azure website.
To deploy vWAAS in Azure, you need a Microsoft Azure Pay-As-You-Go subscription. Subscription procedure and billing information are available on the Microsoft Azure website.
To provision the vWAAS VM in Microsoft Azure, follow these steps:
Step 1![]() Login to the Microsoft Azure portal.
Login to the Microsoft Azure portal.
Step 2![]() Navigate to New > Compute > Virtual Machine > From Gallery.
Navigate to New > Compute > Virtual Machine > From Gallery.
The Create a Virtual Machine/Choose an Image screen is displayed.
Step 3![]() At the Create a Virtual Machine/Choose an Image > My Images screen, select the vWAAS Azure image for your system.
At the Create a Virtual Machine/Choose an Image > My Images screen, select the vWAAS Azure image for your system.
The Create a Virtual Machine/Virtual Machine Configuration screen is displayed.
Step 4![]() In the Virtual Machine Name field, enter the name of the VM you want to create. Use only letters and numbers, up to a maximum of 15 characters.
In the Virtual Machine Name field, enter the name of the VM you want to create. Use only letters and numbers, up to a maximum of 15 characters.
Step 5![]() In the Tier field, select Standard.
In the Tier field, select Standard.
Step 6![]() At the Size dropdown list, select the Azure VM size for your system. Table 10-2 shows the minimum Azure VM size for each vWAAS model available for provisioning in the Tier field.
At the Size dropdown list, select the Azure VM size for your system. Table 10-2 shows the minimum Azure VM size for each vWAAS model available for provisioning in the Tier field.
Table 10-2 Microsoft Azure VM Sizes for Cisco WAAS vWAAS Models
|
|
|
|
|
|---|---|---|---|
Note![]() Use the Microsoft Azure Tier field to select an Azure VM for the vWAAS models shown in Table 10-2. For vWAAS-6000 and vWAAS-12000, you must use the template to specify the Azure VM. For more information, see Deploying Cisco vWAAS in Miscrosoft Azure. For Azure VM sizes for vWAAS-6000 and vWAAS-12000, see Table 10-1.
Use the Microsoft Azure Tier field to select an Azure VM for the vWAAS models shown in Table 10-2. For vWAAS-6000 and vWAAS-12000, you must use the template to specify the Azure VM. For more information, see Deploying Cisco vWAAS in Miscrosoft Azure. For Azure VM sizes for vWAAS-6000 and vWAAS-12000, see Table 10-1.
Step 7![]() In the New User Name field, enter your user name.
In the New User Name field, enter your user name.
Step 8![]() In the New Password field, enter your password.
In the New Password field, enter your password.
Step 9![]() In the Confirm field, re-enter your password.
In the Confirm field, re-enter your password.
Step 10![]() (Optional) If your system uses SSH key-based authentication:
(Optional) If your system uses SSH key-based authentication:
a.![]() Check the Upload compatible SSH key for authentication checkbox.
Check the Upload compatible SSH key for authentication checkbox.
b.![]() At the Certificate field, browse for the certificate file for your system.
At the Certificate field, browse for the certificate file for your system.
Step 11![]() (Optional) If your system requires a password, check the Provide a password checkbox.
(Optional) If your system requires a password, check the Provide a password checkbox.
Step 12![]() Click the right arrow at the lower right of the screen to proceed to the next screen.
Click the right arrow at the lower right of the screen to proceed to the next screen.
The next Create a Virtual Machine/Virtual Machine Configuration screen is displayed.
Step 13![]() At the Cloud Service dropdown list, select Create a Cloud Service.
At the Cloud Service dropdown list, select Create a Cloud Service.
Step 14![]() In the Cloud Service DNS Name field, enter the name of the VM that you created in Step 4.
In the Cloud Service DNS Name field, enter the name of the VM that you created in Step 4.
In the naming style of Azure VMs, the DNS name has cloudapp.net automatically appended to it.
Step 15![]() At the Region/Affinity Group/Virtual Network dropdown list, choose a location that is in close proximity to the resources you want to optimize, such as East US or North Europe.
At the Region/Affinity Group/Virtual Network dropdown list, choose a location that is in close proximity to the resources you want to optimize, such as East US or North Europe.
The Region/Affinity Group/Virtual Network setting determines the location of the VM within the Azure cloud data centers.
Step 16![]() At the Storage Account dropdown list, select Use an automatically generated storage account.
At the Storage Account dropdown list, select Use an automatically generated storage account.
Step 17![]() At the Availability Set dropdown list, choose (None).
At the Availability Set dropdown list, choose (None).
Step 18![]() Click the right arrow at the lower right corner of the screen to proceed to the next screen.
Click the right arrow at the lower right corner of the screen to proceed to the next screen.
The Virtual Machines/Virtual Machine Instances screen is displayed
Step 19![]() By default, the Install the VM Agent check box is checked.
By default, the Install the VM Agent check box is checked.
Step 20![]() In the Endpoints section:
In the Endpoints section:
a.![]() Add an endpoint for SSH (port 22)
Add an endpoint for SSH (port 22)
b.![]() Add an endpoint for HTTPS (port 443)
Add an endpoint for HTTPS (port 443)
Step 21![]() Click the checkmark at the lower right corner of the screen to proceed for provisioning vWAAS.
Click the checkmark at the lower right corner of the screen to proceed for provisioning vWAAS.
The Virtual Machines/Virtual Machine Instances screen is displayed, showing the newly-created VM with an initial status of Starting (Provisioning).
Step 22![]() The process takes a few minutes before the VM status is displayed as running.
The process takes a few minutes before the VM status is displayed as running.
Step 24![]() Attach the data disks. See Table 10-2 for data disk sizes for Azure VMs.
Attach the data disks. See Table 10-2 for data disk sizes for Azure VMs.
Step 25![]() Stop and then start the VM, so that it picks up the attached disks.
Stop and then start the VM, so that it picks up the attached disks.
Your VM is ready to be deployed, with end-to-end setup.
Deploying vWAAS in Microsoft Azure
Deploying vWAAS VM and Data Disk with the VHD Template
To deploy the vWAAS VM and data disk with the VHD template, follow these steps:
Step 1![]() Copy vwaas.vhd to the storage account using AzCopy.
Copy vwaas.vhd to the storage account using AzCopy.
The AzCopy command parameters are:
Step 2![]() Use the template to deploy the vWAAS VM.
Use the template to deploy the vWAAS VM.
The vWAAS VM is deployed with the data disk.
Step 3![]() Log in with your username and password.
Log in with your username and password.
Step 4![]() (Optional) To verify deployment details such as CMS registration and WAAS Central Manager address, see Verifying the vWAAS in Azure Deployment.
(Optional) To verify deployment details such as CMS registration and WAAS Central Manager address, see Verifying the vWAAS in Azure Deployment.
Deploying vWAAS VM with Template and Custom VHD from the Microsoft ARM Portal
To deploy the vWAAS VM with a template and custom VHD from the Microsoft Azure Resource Manager (ARM) portal, follow these steps:
Step 1![]() Prerequisite: Verify that the vWAAS VM is provisioned in Azure, including the creation of a storage account and a VM location in Azure specified. For more information, see Provisioning the vWAAS VM in Microsoft Azure.
Prerequisite: Verify that the vWAAS VM is provisioned in Azure, including the creation of a storage account and a VM location in Azure specified. For more information, see Provisioning the vWAAS VM in Microsoft Azure.
Step 2![]() Copy vwaas.vhd to the storage account using Azcopy.
Copy vwaas.vhd to the storage account using Azcopy.
Step 3![]() Use the template to deploy the vWAAS VM.
Use the template to deploy the vWAAS VM.
Step 4![]() At the Microsoft ARM portal, navigate to New > Template Deployment > Edit Template.
At the Microsoft ARM portal, navigate to New > Template Deployment > Edit Template.
Step 5![]() Copy the template <<? from which location, or ? from flash>>
Copy the template <<? from which location, or ? from flash>>
Step 6![]() Paste the template here.
Paste the template here.
Step 7![]() For the parameters, enter the values for your system, such as resource group and resource group location, and whether or not to deploy the vWAAS VM in a new or existing virtual network.
For the parameters, enter the values for your system, such as resource group and resource group location, and whether or not to deploy the vWAAS VM in a new or existing virtual network.
Step 8![]() Accept the Terms and Conditions.
Accept the Terms and Conditions.
Step 10![]() The vWAAS VM is deployed.
The vWAAS VM is deployed.
Step 11![]() Log in with your username and password.
Log in with your username and password.
Step 12![]() (Optional) To verify deployment details such as CMS registration and WAAS Central Manager address, see Verifying the vWAAS in Azure Deployment.
(Optional) To verify deployment details such as CMS registration and WAAS Central Manager address, see Verifying the vWAAS in Azure Deployment.
Deploying vWAAS VM Using Windows Powershell
To deploy the vWAAS VM using Windows Powershell, follow these steps:
Step 1![]() Prerequisite: Verify that the vWAAS VM is provisioned in Azure, including the creation of a storage account and a VM location in Azure specified. For more information, see Provisioning the vWAAS VM in Microsoft Azure.
Prerequisite: Verify that the vWAAS VM is provisioned in Azure, including the creation of a storage account and a VM location in Azure specified. For more information, see Provisioning the vWAAS VM in Microsoft Azure.
Step 2![]() Deploy vWAAS on Microsoft Hyper-V. For information on this deployment procedure, see Chapter 5, “Cisco vWAAS on Microsoft Hyper-V”.
Deploy vWAAS on Microsoft Hyper-V. For information on this deployment procedure, see Chapter 5, “Cisco vWAAS on Microsoft Hyper-V”.
Step 3![]() Run the azure_predeploy.sh script in Hyper-V, to set the necessary Azure parameters.
Run the azure_predeploy.sh script in Hyper-V, to set the necessary Azure parameters.
Step 4![]() Export the flash VHD from the Hyper-V disk location to the storage account in Azure, using AzCopy.
Export the flash VHD from the Hyper-V disk location to the storage account in Azure, using AzCopy.
Step 5![]() Use Windows Powershell commands to specify the following parameters:
Use Windows Powershell commands to specify the following parameters:
Step 6![]() Use the New-AzureRmResourceGroup -Name $RGName -Location $locName Powershell command to create the resource group.
Use the New-AzureRmResourceGroup -Name $RGName -Location $locName Powershell command to create the resource group.
Step 7![]() Use the New-AzureRmResourceGroupDeployment Powershell cmdlet to deploy vWAAS in Azure. To complete the deployment, specify values for the following parameters:
Use the New-AzureRmResourceGroupDeployment Powershell cmdlet to deploy vWAAS in Azure. To complete the deployment, specify values for the following parameters:
Step 8![]() After you enter these parameters, vWAAS in Azure is deployed. The system displays provisioning information, including deployment name, provisioning state, date/time, and mode.
After you enter these parameters, vWAAS in Azure is deployed. The system displays provisioning information, including deployment name, provisioning state, date/time, and mode.
Step 9![]() Log in with your username and password.
Log in with your username and password.
Step 10![]() (Optional) To verify deployment details such as CMS registration and WAAS Central Manager address, see Verifying the vWAAS in Azure Deployment.
(Optional) To verify deployment details such as CMS registration and WAAS Central Manager address, see Verifying the vWAAS in Azure Deployment.
Verifying the vWAAS in Azure Deployment
Table 10-3 provides a checklist for verifying the vWAAS VM deployment in Microsoft Azure.
Table 10-3 Checklist for Verifying the vWAAS in Azure Deployment
Note![]() Whenever ARP cache(s) are cleared or the vWAAS is rebooted, packets may not be forwarded to the next hop in Azure cloud. To ensure that packets are successfully forwarded, use the ping EXEC command to update the ARP cache table.
Whenever ARP cache(s) are cleared or the vWAAS is rebooted, packets may not be forwarded to the next hop in Azure cloud. To ensure that packets are successfully forwarded, use the ping EXEC command to update the ARP cache table.
Cisco vWAAS in OpenStack
This section contains the following topics:
- Operating Considerations for vWAAS in OpenStack
- Upgrade/Downgrade Guidelines for Cisco vWAAS in OpenStack
- Deploying Cisco vWAAS in OpenStack
Operating Considerations for vWAAS in OpenStack
Consider the following operating guidelines for vWAAS in OpenStack:
- vWAAS in OpenStack is supported for vWAAS for WAAS Version 6.4.1b and later.
- vWAAS in OpenStack is supported for all vWAAS and vCM models that are supported on KVM on CentOS.
- On the Central Manager, vWAAS devices in OpenStack are displayed as OE-VWAAS-OPENSTACK.
- All vWAAS models for vWAAS in OpenStack are deployed with a single, unified OVA. Here are examples of the unified OVA and NPE OVA package filenames for vWAAS in OpenStack:
Upgrade/Downgrade Guidelines for Cisco vWAAS in OpenStack
Consider the following upgrade/downgrade guidelines for Cisco vWAAS in OpenStack:
Deploying Cisco vWAAS in OpenStack
Guidelines for Deploying vWAAS in OpenStack
Consider the following guidelines to deploy Cisco vWAAS in OpenStack:
- vWAAS in OpenStack is deployed for vWAAS on KVM. For more information on vWAAS on KVM, see the chapter “Cisco vWAAS on RHEL KVM and KVM CentOS”.
For vWAAS on KVM for WAAS Version 6.4.x and later, Cisco provides a single, unified OVA or NPE OVA package for each hypervisor type, which can be used with all vWAAS models for that hypervisor. Here are examples of the unified OVA and NPE OVA package filenames for vWAAS on KVM:
–![]() OVA—Cisco-KVM-vWAAS-Unified-6.4.1-b-33.tar.gz
OVA—Cisco-KVM-vWAAS-Unified-6.4.1-b-33.tar.gz
–![]() NPE OVA—Cisco-KVM-vWAAS-Unified-6.4.1-b-33-npe.tar.gz
NPE OVA—Cisco-KVM-vWAAS-Unified-6.4.1-b-33-npe.tar.gz
For more information about this unified OVA package, see Unified OVA Package for vWAAS on KVM for WAAS Version 6.4.1 and Later.
- After vWAAS in OpenStack is operational on a device, you can use the WAAS CM or the WAAS CLI to display the OpenStack device.
–![]() The WAAS CM displays the following information for the device:
The WAAS CM displays the following information for the device:
The OpenStack device is displayed in the Devices > All Devices listing under Device Type as OE-VWAAS-OPENSTACK.
The OpenStack device is displayed in the Devices > device-name > Dashboard as OE-VWAAS-OPENSTACK.
–![]() Use the show hardware command to display the device, as well as other system hardware status information such as startup date and time, the run time since startup, microprocessor type and speed, and a list of disk drives.
Use the show hardware command to display the device, as well as other system hardware status information such as startup date and time, the run time since startup, microprocessor type and speed, and a list of disk drives.
Procedure for Deploying vWAAS in OpenStack
To deploy vWAAS in OpenStack, follow these steps:
Step 1![]() Copy the unified OVA to a directory on the host machine.
Copy the unified OVA to a directory on the host machine.
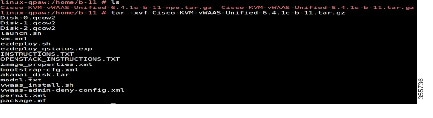
Step 2![]() Untar the OVA using the following command, shown below and in Figure 10-1.
Untar the OVA using the following command, shown below and in Figure 10-1.
Figure 10-1 Tar Command for vWAAS OpenStack OVA
From the OpenStack Admin tab, open the Compute > Images page (Figure 10-2).
Figure 10-2 OpenStack Compute > Images Page
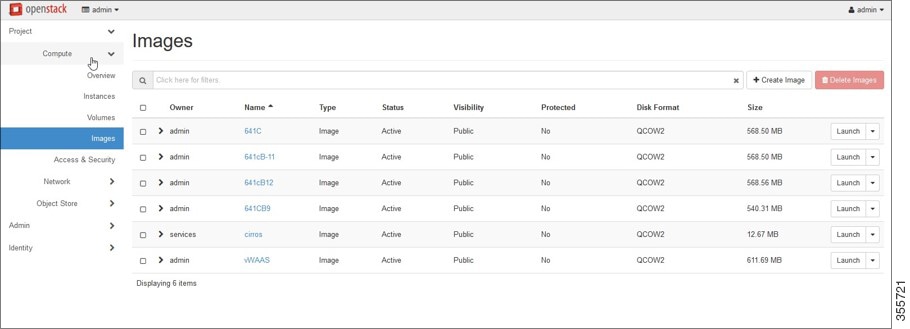
a.![]() From the Images table listing, select the image for your system.
From the Images table listing, select the image for your system.
b.![]() To create the image, click Create Image.
To create the image, click Create Image.
Step 4![]() Create the bootable volume.
Create the bootable volume.
From the OpenStack Admin tab, open the Compute > Create Volume page (Figure 10-3).
Figure 10-3 OpenStack Create Volume Dialog Box: Creating Bootable Volume
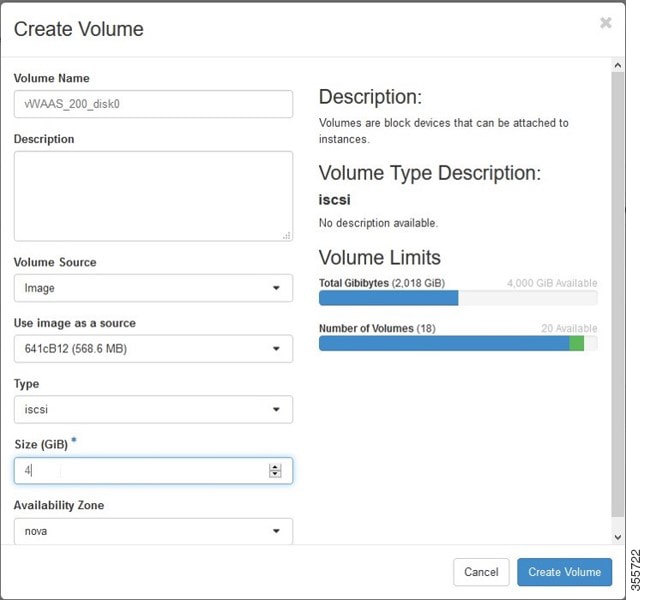
a.![]() In the Volume Name field, enter the name of the vWAAS model and disk, for example, vWAAS_200_disk0.
In the Volume Name field, enter the name of the vWAAS model and disk, for example, vWAAS_200_disk0.
b.![]() From the Volume Source drop-down list, choose Image.
From the Volume Source drop-down list, choose Image.
c.![]() From the Use image as a source drop-down list, choose the build number for your system, for example, 641bB12 (568.6 MB).
From the Use image as a source drop-down list, choose the build number for your system, for example, 641bB12 (568.6 MB).
d.![]() From the Type drop-down list, choose iscsi.
From the Type drop-down list, choose iscsi.
e.![]() From the Size (GiB) drop-down list, choose the size for this volume, for example, 4.
From the Size (GiB) drop-down list, choose the size for this volume, for example, 4.
f.![]() From the Availability drop-down list, choose nova.
From the Availability drop-down list, choose nova.
Step 5![]() Create nonbootable volumes.
Create nonbootable volumes.
From the OpenStack Admin tab, open the Compute > Create Volume page (Figure 10-4).
Figure 10-4 OpenStack Create Volume Dialog Box: Creating Nonbootable Volumes

a.![]() In the Volume Name field, enter the name of the vWAAS model and disk, for example, vWAAS_200_disk1.
In the Volume Name field, enter the name of the vWAAS model and disk, for example, vWAAS_200_disk1.
b.![]() From the Volume Source drop-down list, choose No source, empty volume.
From the Volume Source drop-down list, choose No source, empty volume.
c.![]() From the Type drop-down list, choose iscsi.
From the Type drop-down list, choose iscsi.
d.![]() From the Size (GiB) drop-down list, choose the size for this volume, for example, 10.
From the Size (GiB) drop-down list, choose the size for this volume, for example, 10.
e.![]() From the Availability drop-down list, choose nova.
From the Availability drop-down list, choose nova.
Step 6![]() On the OpenStack Compute > Volumes page, create all volumes related to your deployed model (Figure 10-5).
On the OpenStack Compute > Volumes page, create all volumes related to your deployed model (Figure 10-5).
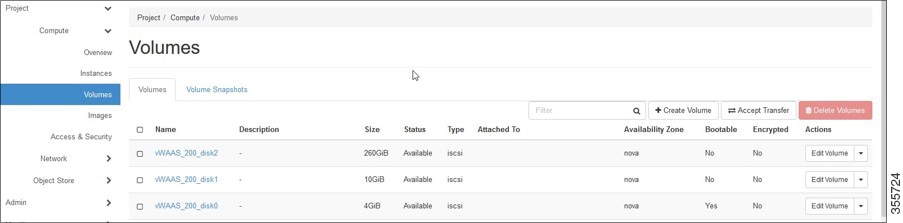
Figure 10-5 Openstack Compute > Volumes Page: Create all volumes for deployed model
On the OpenStack Compute > Volumes page, create an instance with a bootable volume (Figure 10-6).
Figure 10-6 OpenStack Compute > Volumes Page: Create Bootable Volume
From the OpenStack Admin tab, open the Compute > Instances > Launch Instance page (Figure 10-7).
Figure 10-7 OpenStack Launch Instance > Details Page
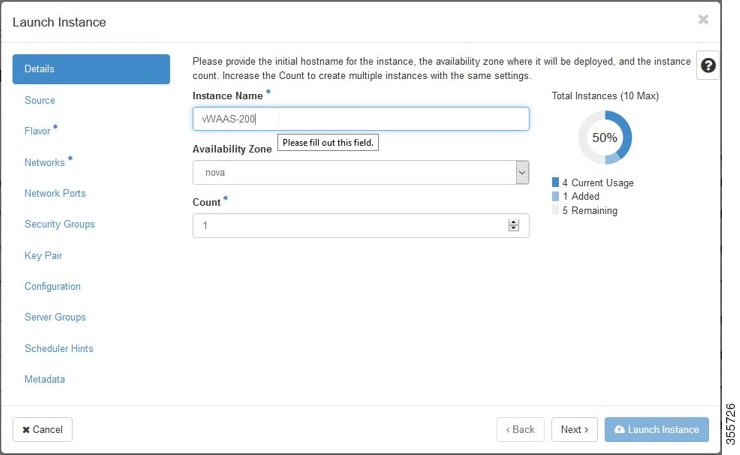
a.![]() In the Instance Name field, enter the name of the vWAAS model, for example, vWAAS-200.
In the Instance Name field, enter the name of the vWAAS model, for example, vWAAS-200.
b.![]() From the Availability drop-down list, choose nova.
From the Availability drop-down list, choose nova.
c.![]() From the Count drop-down list, choose 1.
From the Count drop-down list, choose 1.
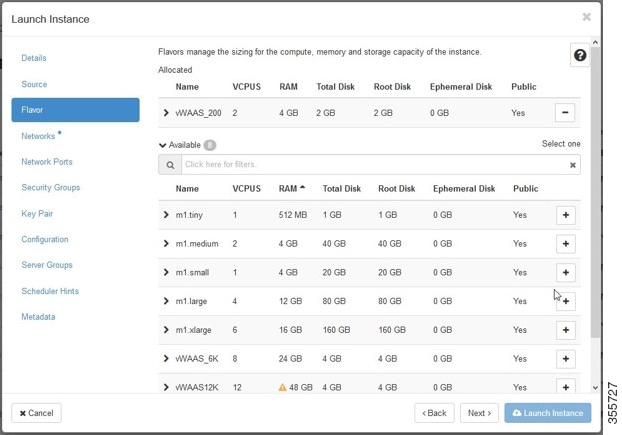
Step 8![]() Specify the flavor suitable for the selected vWAAS model. As noted on the OpenStack page (Figure 10-8), flavors manage the sizing for the compute, memory, and storage capacity of the instance.
Specify the flavor suitable for the selected vWAAS model. As noted on the OpenStack page (Figure 10-8), flavors manage the sizing for the compute, memory, and storage capacity of the instance.
From the OpenStack Admin tab, open the Compute > Instances > Launch Instance > Flavor page (Figure 10-8).
Figure 10-8 OpenStack Launch Instance > Flavor Page
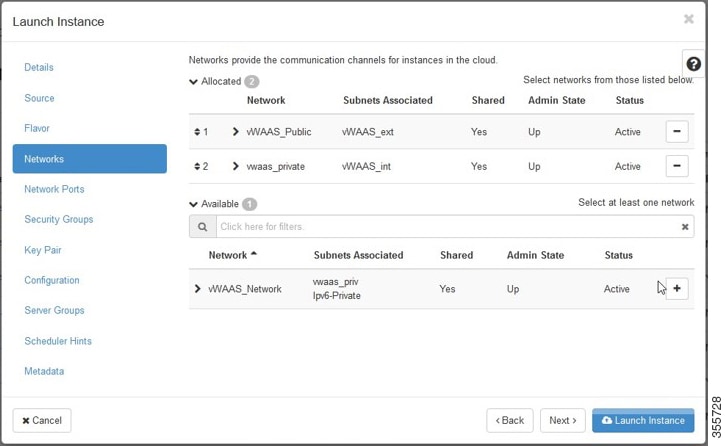
Step 9![]() Select the networks for the vWAAS.
Select the networks for the vWAAS.
From the OpenStack Admin tab, open the Compute > Instances > Launch Instance > Networks page (Figure 10-9).
Figure 10-9 OpenStack Launch Instance > Networks Page
Step 10![]() Select the configuration drive to send model parameters.
Select the configuration drive to send model parameters.
From the OpenStack Admin tab, open the Compute > Instances > Launch Instance > Configuration page (Figure 10-10).
Figure 10-10 OpenStack Launch Instance > Configuration Page
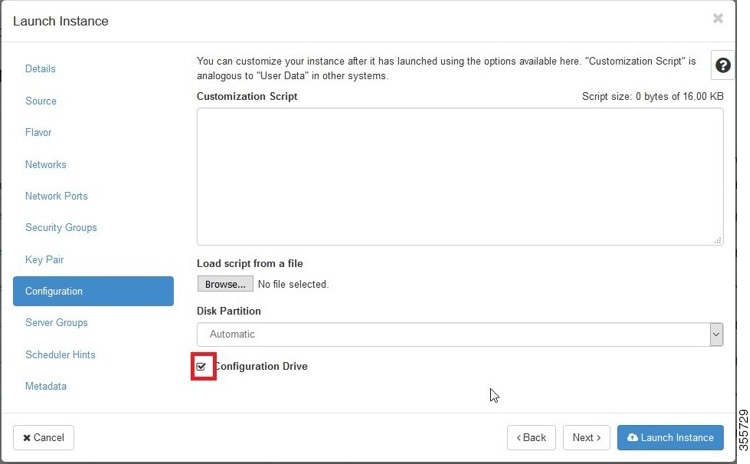
a.![]() From the Disk Partition drop-down list, choose Automatic.
From the Disk Partition drop-down list, choose Automatic.
b.![]() Check the Configuration Drive check box.
Check the Configuration Drive check box.
Step 11![]() Provide model and connection information to deploy vWAAS in OpenStack metadata.
Provide model and connection information to deploy vWAAS in OpenStack metadata.
From the OpenStack Admin tab, open the Compute > Instances > Launch Instance > Metadata page (Figure 10-11).
Figure 10-11 OpenStack Launch Instance > Metadata Page
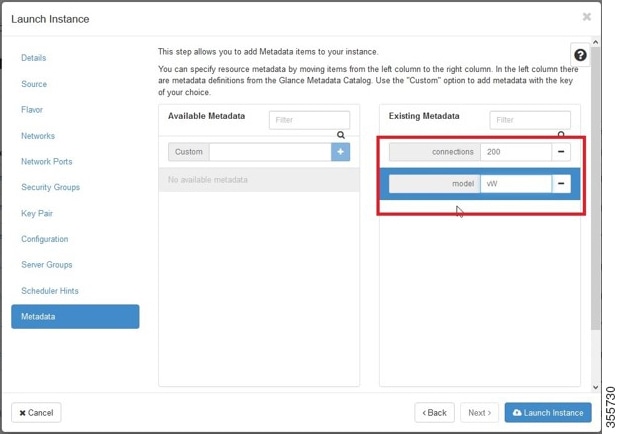
a.![]() Specify resource metadata by selecting and moving items from the Available Metadata column into the Existing Metadata column.
Specify resource metadata by selecting and moving items from the Available Metadata column into the Existing Metadata column.
Step 12![]() Attach disks to the deployed instance.
Attach disks to the deployed instance.
From the OpenStack Admin tab, open the Compute > Volumes page (Figure 10-12).
Figure 10-12 OpenStack Compute > Volumes Page: Attach disks to deployed instance
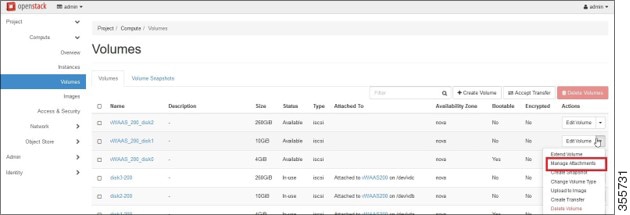
a.![]() From the Edit Volume drop-down list, choose Manage Attachments. The Manage Volume Attachments dialog box appears (Figure 10-13).
From the Edit Volume drop-down list, choose Manage Attachments. The Manage Volume Attachments dialog box appears (Figure 10-13).
Figure 10-13 OpenStack Manage Volume Attachments Dialog Box
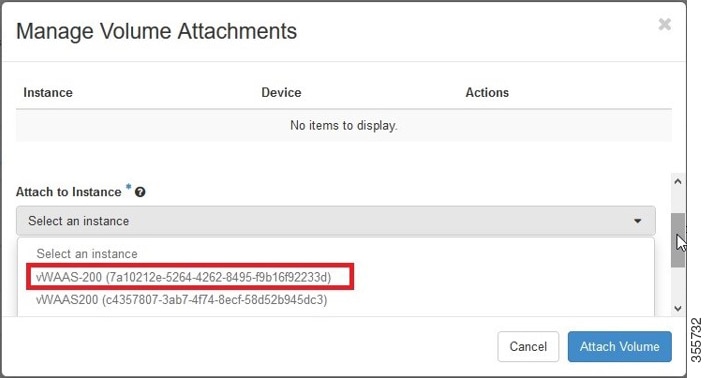
b.![]() From the Select an instance drop-down list, choose the instance to attach to the disk.
From the Select an instance drop-down list, choose the instance to attach to the disk.
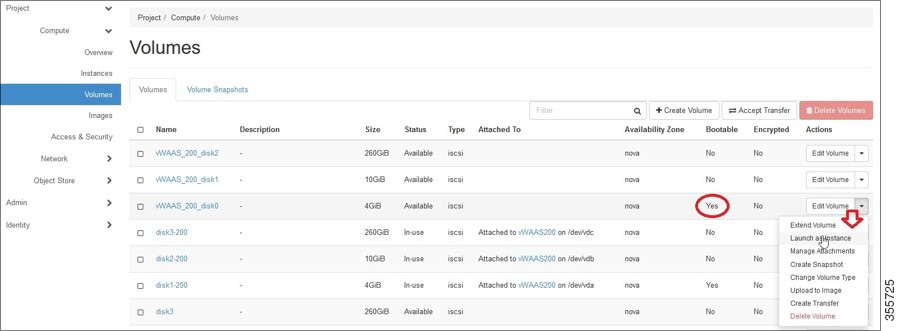
Step 13![]() After attaching the disks, the Compute > Volumes page displays the attached disks (Figure 10-14).
After attaching the disks, the Compute > Volumes page displays the attached disks (Figure 10-14).
Figure 10-14 OpenStack Compute > Volumes Page: List of attached disks

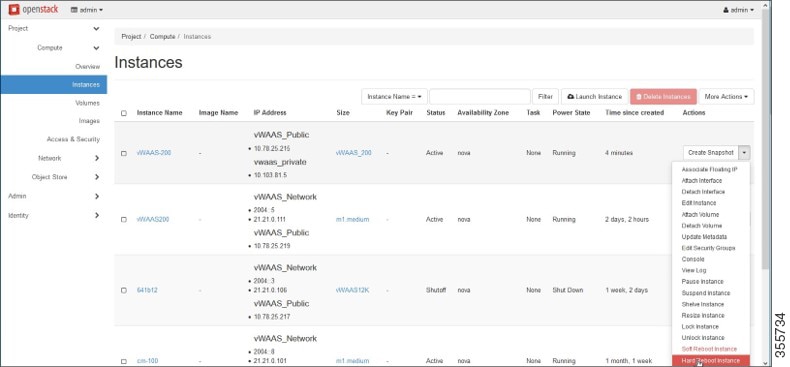
Step 14![]() Reboot the system (hard reboot).
Reboot the system (hard reboot).
a.![]() After the system is rebooted, navigate to the Compute > Instances page.
After the system is rebooted, navigate to the Compute > Instances page.
b.![]() From the Create Snapshot drop-down list, choose Hard Reboot Instance.
From the Create Snapshot drop-down list, choose Hard Reboot Instance.
c.![]() The Compute > Instances page displays the attached disks (Figure 10-15).
The Compute > Instances page displays the attached disks (Figure 10-15).
Figure 10-15 OpenStack Compute > Instances Page: Attached disks listing
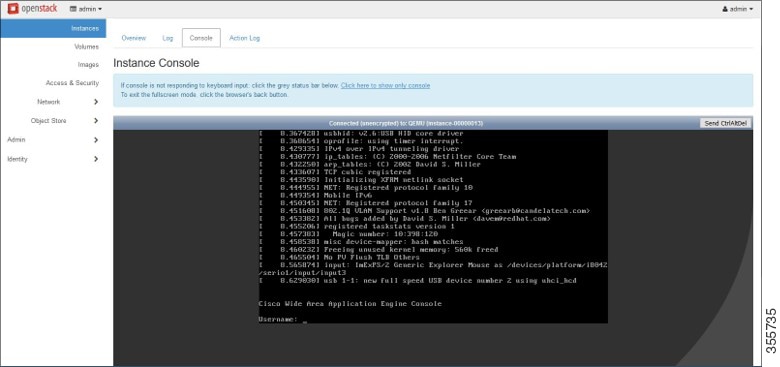
Step 15![]() From the Instances > Instance Console page, connect to the console to work on vWAAS (Figure 10-16).
From the Instances > Instance Console page, connect to the console to work on vWAAS (Figure 10-16).
Figure 10-16 OpenStack Instances > Instance Console Page
 Feedback