Cisco Vision Director Bulk Administration Tool
Available Languages
Table of Contents
Cisco Vision Director Bulk Administration Tool
Prerequisites for the Bulk Administration Tool
Restrictions for the Bulk Administration Tool
Information About the Bulk Administration Tool
Locations and DMPs TSV File Format
Locations to DMP Mapping TSV File Format
How to Use the Bulk Administration Tool
Exporting and Downloading a TSV File for Locations and DMPs
Creating a DMP or Location Entry in a TSV File
Creating an IP Phone or Third-Party Device Entry
Exporting and Downloading a TSV File for DMP Mapping
Exporting Luxury Suite Names and PIN Information
Configuration Examples for the Bulk Administration Tool
Example: Linking and Unlinking Existing DMPs to Locations Using a TSV File
Troubleshooting the Bulk Administration Tool
Feature Information for the Cisco Vision Director Bulk Administration Tool
Cisco Vision Director Bulk Administration Tool
First Published: November 4, 2011
The Bulk Administration Tool is functionality within the Cisco Vision Director software that provides an alternative to manually defining DMPs, IP Phones, locations, and third-party touch panels in the Devices area of the Control Panel. It allows you to add, delete, or modify device definitions in bulk to the Cisco Vision Director database as a batch export and import of data.
In addition to defining the DMPs, you can use the Bulk Administration Tool to associate the DMP with a particular location. This is referred to as linking or creating a DMP-to-location mapping.
Beginning in Cisco StadiumVision Director Release 2.4, you also can use the Bulk Administration Tool to export a list of configured suite names and PIN information.
Note : This document contains information about BAT through Cisco Vision Director Release 6.0. For a list of changes in Cisco Vision Director Release 6.0, see the Release Notes for Cisco Vision Director Release 6.0.
Contents
■![]() Prerequisites for the Bulk Administration Tool
Prerequisites for the Bulk Administration Tool
■![]() Restrictions for the Bulk Administration Tool
Restrictions for the Bulk Administration Tool
■![]() Information About the Bulk Administration Tool
Information About the Bulk Administration Tool
■![]() How to Use the Bulk Administration Tool
How to Use the Bulk Administration Tool
■![]() Configuration Examples for the Bulk Administration Tool
Configuration Examples for the Bulk Administration Tool
■![]() Troubleshooting the Bulk Administration Tool
Troubleshooting the Bulk Administration Tool
■![]() Feature Information for the Cisco Vision Director Bulk Administration Tool
Feature Information for the Cisco Vision Director Bulk Administration Tool
Prerequisites for the Bulk Administration Tool
Before you use the Bulk Administration Tool, be sure that the following requirements are met:
■![]() You have a Cisco Vision Director user account that is configured for an administrator role.
You have a Cisco Vision Director user account that is configured for an administrator role.
■![]() Determine the TV locations and a naming convention for devices that you want to add. A good naming convention will aid in problem isolation and troubleshooting, enabling you to more easily identify a TV or DMP that is experiencing difficulty.
Determine the TV locations and a naming convention for devices that you want to add. A good naming convention will aid in problem isolation and troubleshooting, enabling you to more easily identify a TV or DMP that is experiencing difficulty.
Restrictions for the Bulk Administration Tool
When using the Bulk Administration Tool, consider the following restrictions:
■![]() The Bulk Administration Tool has been tested with Microsoft Excel 2010. Other versions have not been tested, but might also work.
The Bulk Administration Tool has been tested with Microsoft Excel 2010. Other versions have not been tested, but might also work.
■![]() The Bulk Administration Tool supports tab-delimited text format beginning in Cisco StadiumVision Director Release 2.4. This is the preferred format for Unicode text to support internationalization and localization.
The Bulk Administration Tool supports tab-delimited text format beginning in Cisco StadiumVision Director Release 2.4. This is the preferred format for Unicode text to support internationalization and localization.
Note : When updating files, be sure to save text files as ‘Unicode text (*.txt) and not ‘Text (Tab Delimited) (*.txt)’ format for import into Cisco Vision Director.
■![]() To avoid errors due to truncation, limit the contents of the Cisco Vision fields to 200 characters in length.
To avoid errors due to truncation, limit the contents of the Cisco Vision fields to 200 characters in length.
■![]() When you import a file, the following limitations exist:
When you import a file, the following limitations exist:
–![]() No message is displayed when the import is completely successful.
No message is displayed when the import is completely successful.
–![]() No error message displays if the imported file is not saved as a unicode text file format “Unicode text (*.txt)” using tab-separated values. The file is simply ignored. Confirm that your imported data uploaded.
No error message displays if the imported file is not saved as a unicode text file format “Unicode text (*.txt)” using tab-separated values. The file is simply ignored. Confirm that your imported data uploaded.
Information About the Bulk Administration Tool
The Bulk Administration Tool for Cisco Vision Director provides an alternative to manually adding, updating or deleting device information in the Cisco Vision Director database. Device information can include DMPs, IP Phones, and third-party touch screens used for local TV control.
The Bulk Administration Tool uses a tab-separated values (TSV) text file to import and export data. This file can be edited using a standard spreadsheet application, such as Microsoft Excel.
Before the data is imported, the Bulk Administration Tool gets the current configuration from Cisco Vision Director (which might be empty, if this is the first time you are using the tool), merges the two sets of information, and checks for errors. If no errors are found, the Bulk Administration Tool synchronizes the database. If errors are found, the Bulk Administration Tool returns an error message, as described in the “Possible Error Messages” section.
The Bulk Administration Tool in Cisco Vision Director Release 6.0 supports the following functions:
■![]() DMPs, luxury suites, locations, and local control devices (IP Phone, AMX or Crestron touch panels) can be loaded into the Cisco Vision Director database in a bulk manner.
DMPs, luxury suites, locations, and local control devices (IP Phone, AMX or Crestron touch panels) can be loaded into the Cisco Vision Director database in a bulk manner.
■![]() Bulk association of DMP to Location is enabled using the “Entry Type” field to support the location association.
Bulk association of DMP to Location is enabled using the “Entry Type” field to support the location association.
■![]() Can be used in connection with an off-the-shelf bar code scanner for capturing DMP MAC addresses and TV Location IDs.
Can be used in connection with an off-the-shelf bar code scanner for capturing DMP MAC addresses and TV Location IDs.
■![]() Incremental updates are supported, allowing the tool and the Cisco Vision Director user interface to be used interchangeably.
Incremental updates are supported, allowing the tool and the Cisco Vision Director user interface to be used interchangeably.
■![]() The Bulk Administration Tool supports internationalization (i18n) for import/export of data, and for localization (L10n) of messages and headers.
The Bulk Administration Tool supports internationalization (i18n) for import/export of data, and for localization (L10n) of messages and headers.
■![]() Data files for the Bulk Administration Tool should be saved and imported as.txt data files in Unicode or UTF-16 format. Exported data is in UTF-16LE with Byte Order Mark (BOM)—this format is supported in Microsoft Windows and Apple MAC environments for all Unicode, including double-byte characters found in Chinese.
Data files for the Bulk Administration Tool should be saved and imported as.txt data files in Unicode or UTF-16 format. Exported data is in UTF-16LE with Byte Order Mark (BOM)—this format is supported in Microsoft Windows and Apple MAC environments for all Unicode, including double-byte characters found in Chinese.
Note : Microsoft Excel does not support UTF-16LE format, but you can use Unicode UTF-8.
■![]() TSV data is validated upon upload and any errors detected are logged in a separate file.
TSV data is validated upon upload and any errors detected are logged in a separate file.
■![]() Existing database records can be deleted or modified in bulk using the “Operation Type” field.
Existing database records can be deleted or modified in bulk using the “Operation Type” field.
TSV File Formats
The format of the TSV file differs depending on whether you are using export/import from the Locations & DMPs tab or from the Locations-DMP Mapping tab in the Devices window of Control Panel Setup.
Locations and DMPs TSV File Format
Locations & DMPs TSV Field Information describes the TSV file format and field descriptions for the text file used for import and export of information from the Locations & DMPs tab on the Devices screen of the Control Panel Setup window.
Locations to DMP Mapping TSV File Format
Locations to DMP Mapping TSV Field Information describes the TSV file format and field descriptions for the text file used for import and export of information from the Event Management > Control Panel > Setup > Devices > Locations-DMP Mapping tab.
How to Use the Bulk Administration Tool
This section includes the following tasks:
■![]() Exporting and Downloading a TSV File for Locations and DMPs
Exporting and Downloading a TSV File for Locations and DMPs
■![]() Exporting and Downloading a TSV File for DMP Mapping
Exporting and Downloading a TSV File for DMP Mapping
■![]() Exporting Luxury Suite Names and PIN Information
Exporting Luxury Suite Names and PIN Information
Exporting and Downloading a TSV File for Locations and DMPs
TIP : If you do not yet have any information for Locations and DMPs in the Cisco Vision Director Server, you can export an empty file that will have the appropriate formatting for headings only so that you can add new Locations and DMPs from a spreadsheet application.
To export and download a TSV file for Location and DMP information from the Cisco Vision Director server:
1.![]() Log into Cisco Vision Director as an administrator.
Log into Cisco Vision Director as an administrator.
2.![]() From the Cisco Vision Director Main Menu, click Event Management > Control Panel.
From the Cisco Vision Director Main Menu, click Event Management > Control Panel.
The Control Panel window displays in a new window.
3.![]() From the Control Panel window, click Setup > Devices > Locations & DMPs tab.
From the Control Panel window, click Setup > Devices > Locations & DMPs tab.
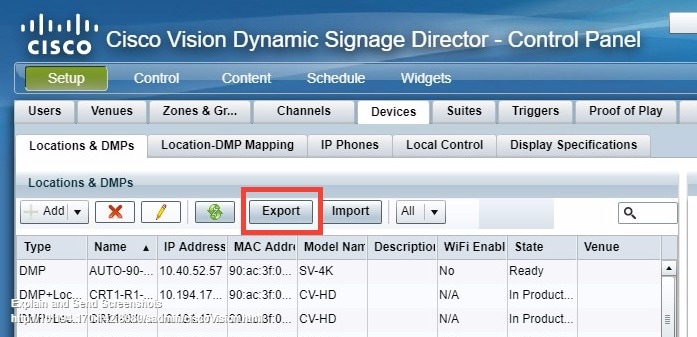
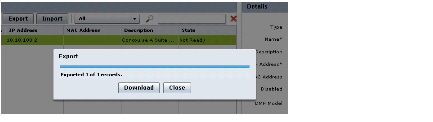
5.![]() When the Export box displays, click Download.
When the Export box displays, click Download.
6.![]() When the “Select location for download” window appears, type the name of the.txt file that you want to save, or accept the default name and click Save.
When the “Select location for download” window appears, type the name of the.txt file that you want to save, or accept the default name and click Save.
Editing a TSV File
This section describes some of the related tasks to modify a TSV file with data to be imported into Cisco Vision Director. This section includes the following tasks:
■![]() Creating a DMP or Location Entry in a TSV File
Creating a DMP or Location Entry in a TSV File
■![]() Creating an IP Phone or Third-Party Device Entry
Creating an IP Phone or Third-Party Device Entry
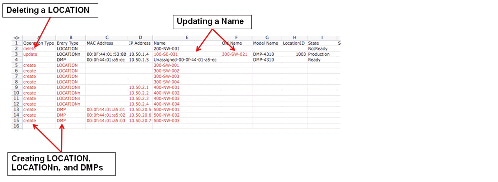
Figure 1 shows a sample TSV file with data showing delete, update, and create operation types as a reference for the tasks described in this section.
Figure 1 Sample Edit of a TSV File
Creating a DMP or Location Entry in a TSV File
To create a DMP or Location entry in a TSV file:
1.![]() Open the file that you exported from the Cisco Vision Director Server in a standard spreadsheet application (such as Microsoft Excel), as a tab-delimited text (.txt) file.
Open the file that you exported from the Cisco Vision Director Server in a standard spreadsheet application (such as Microsoft Excel), as a tab-delimited text (.txt) file.
2.![]() In the first available cell of the Operation Type column, type create (see Figure 1).
In the first available cell of the Operation Type column, type create (see Figure 1).
3.![]() In the corresponding Entry Type cell, type one of the following values with the appropriate case:
In the corresponding Entry Type cell, type one of the following values with the appropriate case:
■![]() DMP —Specifies that the entry is for a new DMP.
DMP —Specifies that the entry is for a new DMP.
■![]() LOCATION —Specifies that the entry is for a physical location of the TV to which the DMP is attached.
LOCATION —Specifies that the entry is for a physical location of the TV to which the DMP is attached.
■![]() LOCATIONn —Specifies that the entry is for both the DMP and the location.
LOCATIONn —Specifies that the entry is for both the DMP and the location.
4.![]() Complete the remaining cells according to the Entry Type that you specified, and refer to Locations & DMPs TSV Field Information for a description of optional and required fields:
Complete the remaining cells according to the Entry Type that you specified, and refer to Locations & DMPs TSV Field Information for a description of optional and required fields:
■![]() For a new DMP entry—Data supplied should include the IP address, Name, Model Name, and TV Type. Only the IP address, Name, and Model Name are required.
For a new DMP entry—Data supplied should include the IP address, Name, Model Name, and TV Type. Only the IP address, Name, and Model Name are required.
TIP : The MAC address is populated automatically when Cisco Vision Director polls the DMP using its IP address.
■![]() For a new LOCATION entry— Data supplied should include the Location Name and the Location ID (optional).
For a new LOCATION entry— Data supplied should include the Location Name and the Location ID (optional).
Creating an IP Phone or Third-Party Device Entry
To create an IP phone or third party device entry in a TSV file:
1.![]() Open the file that you exported from the Cisco Vision Director Server in a standard spreadsheet application (such as Microsoft Excel), as a tab-delimited text (.txt) file.
Open the file that you exported from the Cisco Vision Director Server in a standard spreadsheet application (such as Microsoft Excel), as a tab-delimited text (.txt) file.
2.![]() In the first available cell of the Operation Type column, type create (see Figure 1).
In the first available cell of the Operation Type column, type create (see Figure 1).
3.![]() In the corresponding Suite Control Type cell, type one of the following values with the appropriate case:
In the corresponding Suite Control Type cell, type one of the following values with the appropriate case:
Note : An IP phone can only be created as part of a LOCATION or LOCATIONn entry type. So, you can either add the IP Phone as part of a LOCATION “create” entry, or a LOCATION “update” entry. For more information about updating an existing entry, see Updating an Existing Entry.
4.![]() Complete the remaining cells according to the Suite Control Type that you specified, and refer to Table 1 for a description of optional and required fields.
Complete the remaining cells according to the Suite Control Type that you specified, and refer to Table 1 for a description of optional and required fields.
Deleting an Existing Entry
To delete an existing entry in a TSV file:
1.![]() Open the file that you exported from the Cisco Vision Director Server in a standard spreadsheet application (such as Microsoft Excel), as a tab-delimited text (.txt) file.
Open the file that you exported from the Cisco Vision Director Server in a standard spreadsheet application (such as Microsoft Excel), as a tab-delimited text (.txt) file.
2.![]() In the Operation Type cell that corresponds to the entry that you want to remove, type delete (see Sample Edit of a TSV File).
In the Operation Type cell that corresponds to the entry that you want to remove, type delete (see Sample Edit of a TSV File).
Updating an Existing Entry
For most fields that you want to update, simply overwrite the existing value and Cisco Vision Director will replace that value based on the matching MAC or IP address for the entry when you import the data.
For name-related fields, the updates are made in two separate cells—one that states the original “old” name, and one that specifies the modified name. For example, Figure 1 shows how to change the name of LOCATIONn at 10.50.1.4. The original name of “300-SW-021” is typed in the cell labeled “Old Name,” and the modified name of “100-SE-031” is typed in the cell labeled “Name.”
Note : If any required information is not given, you get an error message. To update existing information, you must have old information already filled in for that field.
To update an existing entry in a TSV file:
1.![]() Open the file that you exported from the Cisco Vision Director Server in a standard spreadsheet application (such as Microsoft Excel), as a tab-delimited text (.txt) file.
Open the file that you exported from the Cisco Vision Director Server in a standard spreadsheet application (such as Microsoft Excel), as a tab-delimited text (.txt) file.
2.![]() In the Operation Type cell that corresponds to the entry that you want to modify, type update (see Sample Edit of a TSV File).
In the Operation Type cell that corresponds to the entry that you want to modify, type update (see Sample Edit of a TSV File).
3.![]() Complete the appropriate cells for the corresponding field values that you want to modify (according to the type of entry that you are changing), and refer to Table 1 for a description of optional and required fields.
Complete the appropriate cells for the corresponding field values that you want to modify (according to the type of entry that you are changing), and refer to Table 1 for a description of optional and required fields.
TIP : Any field that you do not want to change can be left blank.
4.![]() To change the value of a name-related field, do one of the following:
To change the value of a name-related field, do one of the following:
–![]() Copy the value from the “Name” field, to the “Old Name” field.
Copy the value from the “Name” field, to the “Old Name” field.
–![]() Type the new name in the “Name” field.
Type the new name in the “Name” field.
–![]() Copy the value from the “Suite Name” field, to the “Old Suite Name” field.
Copy the value from the “Suite Name” field, to the “Old Suite Name” field.
–![]() Type the new name in the “Suite Name” field.
Type the new name in the “Suite Name” field.
■![]() To rename a suite controller:
To rename a suite controller:
–![]() Copy the value from the “Suite Controller Name” field, to the “Old Suite Controller Name” field.
Copy the value from the “Suite Controller Name” field, to the “Old Suite Controller Name” field.
–![]() Type the new name in the “Suite Controller Name” field.
Type the new name in the “Suite Controller Name” field.
Exporting and Downloading a TSV File for DMP Mapping
You can export two forms of TSV files from the Location-DMP Mapping tab, with the following information:
■![]() MAC address information only (exported from the Available Devices box)— TSV file that contains all of the MAC addresses from existing DMPs that you can use to copy into the TSV file with location information to link existing MAC addresses to locations.
MAC address information only (exported from the Available Devices box)— TSV file that contains all of the MAC addresses from existing DMPs that you can use to copy into the TSV file with location information to link existing MAC addresses to locations.
■![]() MAC address and location information (exported from the Locations box)—TSV file that contains MAC addresses, location names, and location IDs. This file is used to link or unlink DMPs from locations.
MAC address and location information (exported from the Locations box)—TSV file that contains MAC addresses, location names, and location IDs. This file is used to link or unlink DMPs from locations.
To export and download a TSV file for DMP mapping information from the Cisco Vision Director server:
1.![]() Log into Cisco Vision Director as an administrator.
Log into Cisco Vision Director as an administrator.
2.![]() From the Cisco Vision Director Main Menu, click Event Management > Control Panel. The Control Panel window displays.
From the Cisco Vision Director Main Menu, click Event Management > Control Panel. The Control Panel window displays.
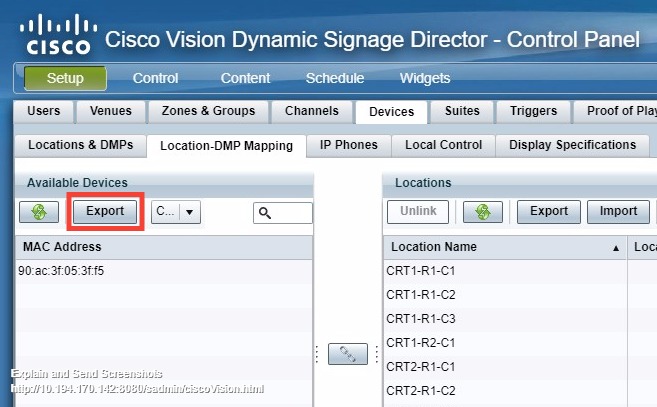
3.![]() From the Control Panel window, click Setup > Devices > Location-DMP Mapping tab.
From the Control Panel window, click Setup > Devices > Location-DMP Mapping tab.
(Optional) To export a list of available MAC addresses only for existing DMPs:
1.![]() In the Available Devices box, click Export.
In the Available Devices box, click Export.
a.![]() When the Export box displays, click Download.
When the Export box displays, click Download.
b.![]() When the “Select location for download” window appears, type the name of the.txt file and specify the file location, or accept the default name and click Save.
When the “Select location for download” window appears, type the name of the.txt file and specify the file location, or accept the default name and click Save.
A TSV file that contains only MAC addresses is created.
To export the current mapping of DMPs to Locations:
1.![]() In the Locations box, click Export.
In the Locations box, click Export.
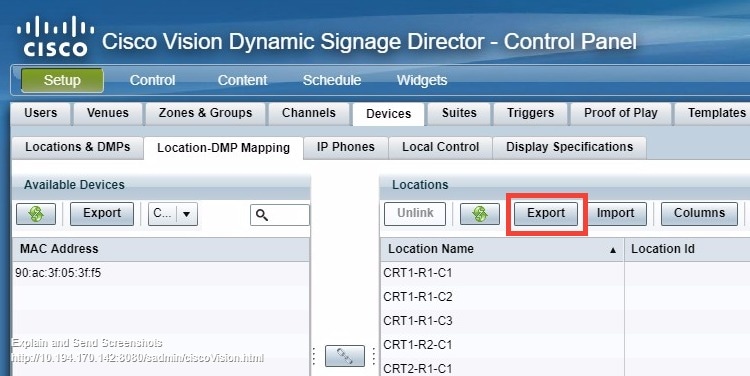
a.![]() When the Export box displays, click Download.
When the Export box displays, click Download.
b.![]() When the “Select location for download” window appears, type the name of the.txt file and specify the file location, or accept the default name and click Save.
When the “Select location for download” window appears, type the name of the.txt file and specify the file location, or accept the default name and click Save.
A TSV file that contains MAC addresses, Location names, and Location IDs is created.
Importing a TSV File
To import a TSV file to Cisco Vision Director server:
1.![]() Log into Cisco Vision Director as an administrator.
Log into Cisco Vision Director as an administrator.
2.![]() From the Cisco Vision Director Main Menu, click Event Management> Control Panel. The Control Panel window displays.
From the Cisco Vision Director Main Menu, click Event Management> Control Panel. The Control Panel window displays.
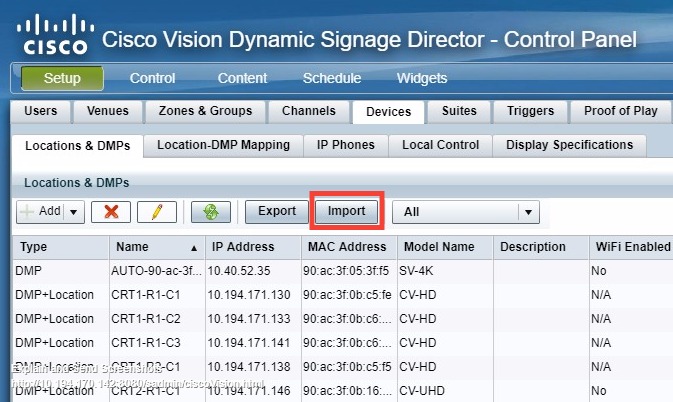
■![]() To import a TSV file for DMP mapping, from the Control Panel window, click Setup > Devices > Locations & DMPs tab. Click Import.
To import a TSV file for DMP mapping, from the Control Panel window, click Setup > Devices > Locations & DMPs tab. Click Import.
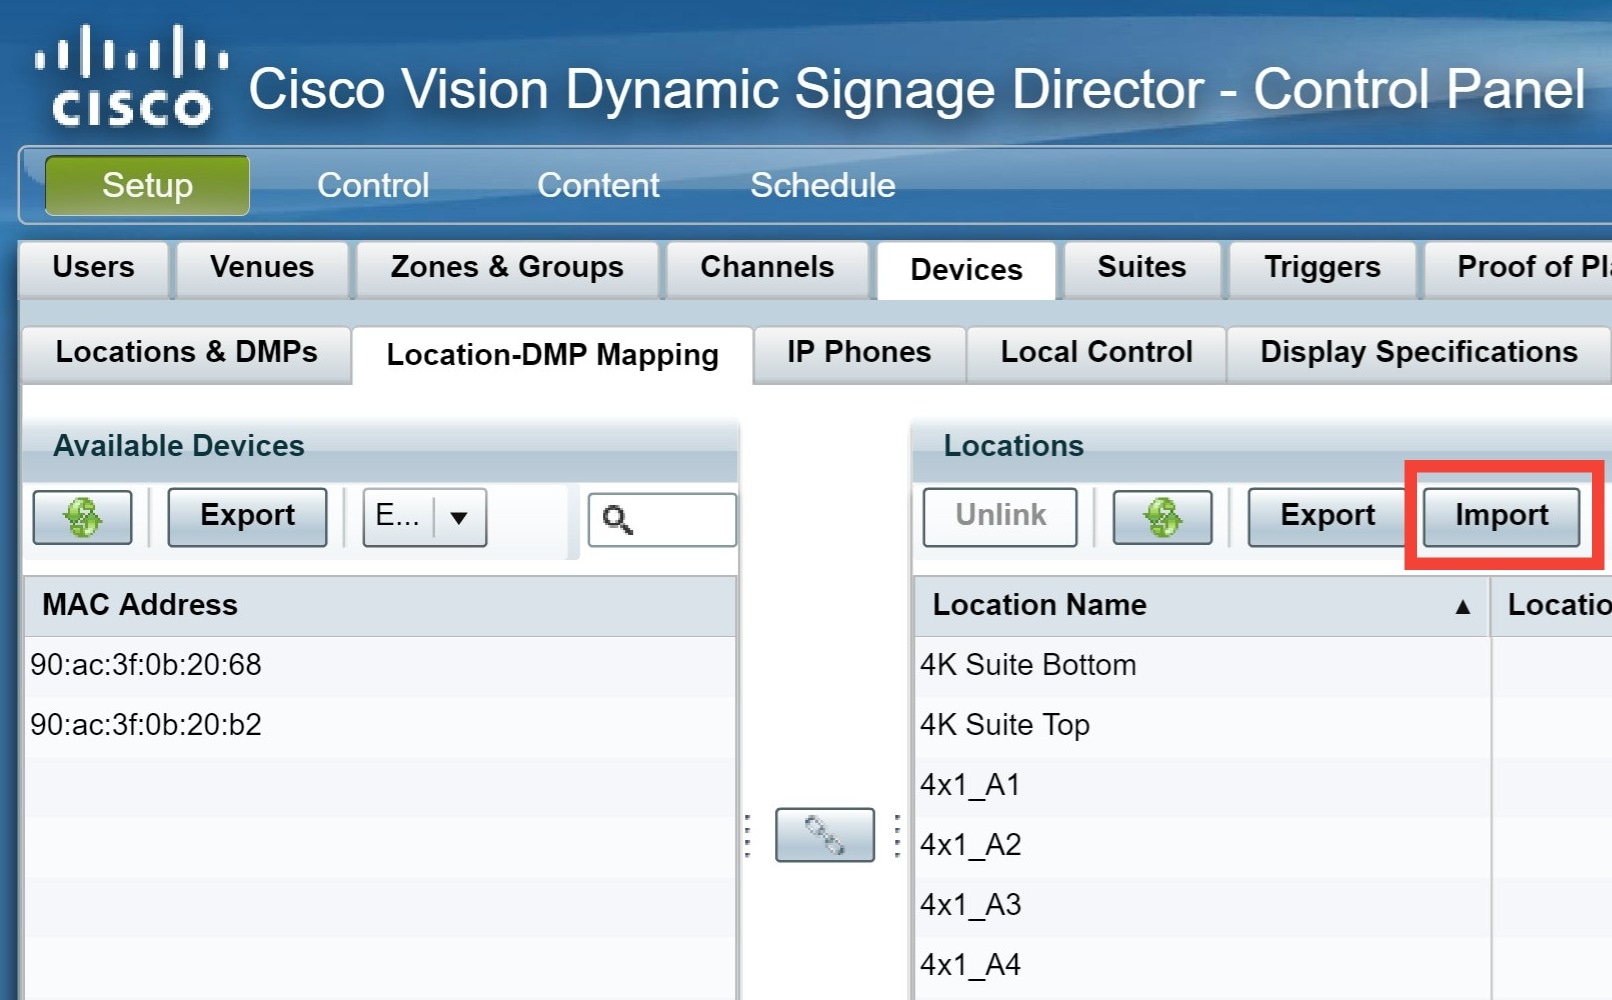
■![]() To import a TSV file for DMP mapping, from the Control Panel window, click Setup > Devices > Location-DMP Mapping tab. Click Import.
To import a TSV file for DMP mapping, from the Control Panel window, click Setup > Devices > Location-DMP Mapping tab. Click Import.
4.![]() When the “Select file for upload” window appears, select the location and name of the.txt file that you want to import, and click Open.
When the “Select file for upload” window appears, select the location and name of the.txt file that you want to import, and click Open.
When the import is complete, a message displays that shows the total number of records that were processed, the number that were successfully processed, and the number that failed.
No confirmation is provided if the import is completely successful. See Restrictions for the Bulk Administration Tool.
If any records failed, a message box displays that allows you to save a text file that includes only the rows that contain errors and an indicator of the error. For more information, see Troubleshooting the Bulk Administration Tool.
Exporting Luxury Suite Names and PIN Information
Beginning in Cisco StadiumVision Director Release 2.4, you can generate PINs for luxury suites, and you can manage these assignments by exporting the configured PINs for all luxury suites in a tab-delimited text file using the Bulk Administration Tool.
Note : You cannot import PIN information to Cisco Vision Director.
To export luxury suite names and PIN information from the Cisco Vision Director server:
1.![]() Log into Cisco Vision Director as an administrator.
Log into Cisco Vision Director as an administrator.
2.![]() From the Cisco Vision Director Main Menu, click Event Management > Control Panel.
From the Cisco Vision Director Main Menu, click Event Management > Control Panel.
The Control Panel window displays.
3.![]() From the Control Panel window, click Setup > Luxury Suite > Local Control PINs tab.
From the Control Panel window, click Setup > Luxury Suite > Local Control PINs tab.
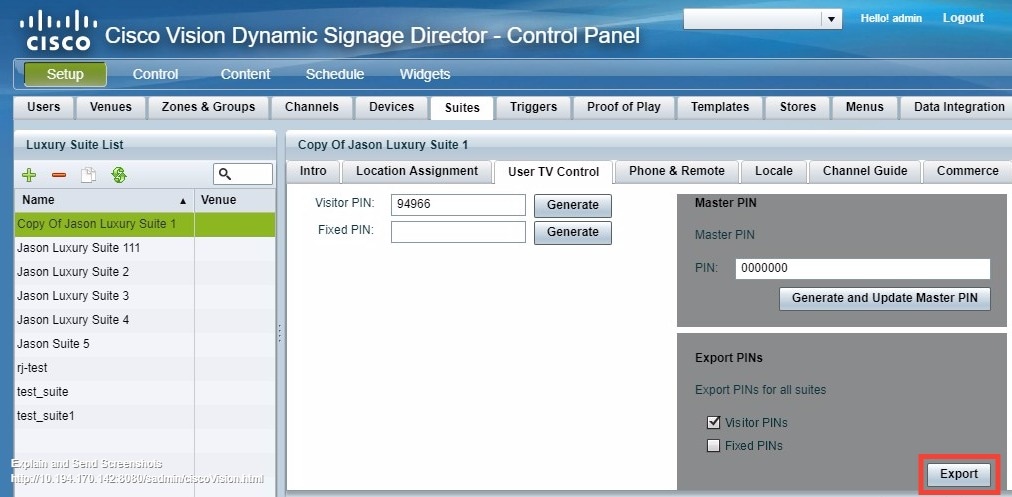
5.![]() When the Export box displays, click Download.
When the Export box displays, click Download.
6.![]() When the “Select location for download” window appears, type the name of the.txt file that you want to save, or accept the default name and click Save.
When the “Select location for download” window appears, type the name of the.txt file that you want to save, or accept the default name and click Save.
A TSV file that contains suite names, PIN names, PIN types, and modify dates is created. You can import this file into a standard spreadsheet application as a tab-delimited text file as with other downloaded text files from the Bulk Administration Tool.
Configuration Examples for the Bulk Administration Tool
This section provides examples of how to modify TSV files to implement specific types of changes.
Example: Linking and Unlinking Existing DMPs to Locations Using a TSV File
To link the DMP to a location:
1.![]() Open the TSV file for DMP mapping that you exported from the Locations box of the Cisco Vision Director Server in a standard spreadsheet application (such as Microsoft Excel), as a tab-delimited text (.txt) file.
Open the TSV file for DMP mapping that you exported from the Locations box of the Cisco Vision Director Server in a standard spreadsheet application (such as Microsoft Excel), as a tab-delimited text (.txt) file.
For more information, see Exporting and Downloading a TSV File for DMP Mapping.
To link an existing DMP to a location:
1.![]() In the MAC field, enter the MAC address of an existing DMP.
In the MAC field, enter the MAC address of an existing DMP.
Note : If you exported a list of existing DMP MAC addresses, you can copy the MAC addresses from that text file.
a.![]() In the LocationName field, type a name for the location that you want to link to the corresponding DMP.
In the LocationName field, type a name for the location that you want to link to the corresponding DMP.
b.![]() (Optional) In the LocationID field, type an ID for the location.
(Optional) In the LocationID field, type an ID for the location.
To unlink an existing DMP from a location:
1.![]() In the MAC field for an existing DMP, delete the MAC address.
In the MAC field for an existing DMP, delete the MAC address.
2.![]() Save the file as a Unicode text file.
Save the file as a Unicode text file.
Note : Do not save as ‘Text (Tab Delimited) (*.txt).
3.![]() Import the TSV file to Cisco Vision Director. See Importing a TSV File.
Import the TSV file to Cisco Vision Director. See Importing a TSV File.
Troubleshooting the Bulk Administration Tool
If any records failed while importing a TSV file to Cisco Vision Director, a message box displays that allows you to click Download to create a text file that includes only the rows that contain errors along with an error message.

After you download this file and save it as a text file, you can open it in a spreadsheet application as you would any of the downloaded text files from Cisco Vision Director to view the specific errors.
Troubleshooting Tips
■![]() You must open the error file with Microsoft Excel or another spreadsheet application.
You must open the error file with Microsoft Excel or another spreadsheet application.
If you double-click the file to open it, the content is opened in Notepad (by default on a Windows computer), but the error information is unreadable.
■![]() Confirm that your imported data uploaded to the Cisco Vision Director server because when you import a file, the following limitations exist:
Confirm that your imported data uploaded to the Cisco Vision Director server because when you import a file, the following limitations exist:
–![]() No confirmation message displays when the import is fully successful.
No confirmation message displays when the import is fully successful.
–![]() No error message displays if the imported file is not saved as a unicode text file format “Unicode text (*.txt)” using tab-separated values. The file is simply ignored.
No error message displays if the imported file is not saved as a unicode text file format “Unicode text (*.txt)” using tab-separated values. The file is simply ignored.
■![]() If you cannot get your import to work as expected, try to simplify the content in the import file until it works. Then, add additional information for import.
If you cannot get your import to work as expected, try to simplify the content in the import file until it works. Then, add additional information for import.
Error Messages
CAUTION : No error message displays if the imported file is not saved as a unicode text file format “Unicode text (*.txt)” using tab-separated values. The file is simply ignored. Confirm that your imported data uploaded.
Table 3 provides a list of possible error messages, their meanings, and recommended resolutions.
Feature Information for the Cisco Vision Director Bulk Administration Tool
Feature Information for the Cisco Vision Director Bulk Administration Tool lists the release history for this feature.
Cisco and the Cisco logo are trademarks or registered trademarks of Cisco and/or its affiliates in the U.S. and other countries. To view a list of Cisco trademarks, go to this URL: www.cisco.com/go/trademarks. Third-party trademarks mentioned are the property of their respective owners. The use of the word partner does not imply a partnership relationship between Cisco and any other company. (1721R)
Any Internet Protocol (IP) addresses and phone numbers used in this document are not intended to be actual addresses and phone numbers. Any examples, command display output, network topology diagrams, and other figures included in the document are shown for illustrative purposes only. Any use of actual IP addresses or phone numbers in illustrative content is unintentional and coincidental.
© 2017 Cisco Systems, Inc. All rights reserved.
 Feedback
Contact Cisco
- Open a Support Case

- (Requires a Cisco Service Contract)