Configure Posture on Catalyst 9800 WLC and ISE
Available Languages
Contents
Introduction
This document describes how to configure a posture WLAN on a Catalyst 9800 WLC and ISE through the Graphic User Interface (GUI).
Prerequisites
Requirements
Cisco recommends that you have knowledge of these topics:
- 9800 WLC general configuration
- ISE policies and profiles configuration
Components Used
The information in this document is based on these software and hardware versions:
- 9800 WLC Cisco IOS® XE Cupertino v17.9.5
- Identity Service Engine (ISE) v3.2
- Laptop Windows 10 Enterprise
The information in this document was created from the devices in a specific lab environment. All of the devices used in this document started with a cleared (default) configuration. If your network is live, ensure that you understand the potential impact of any command.
Background Information
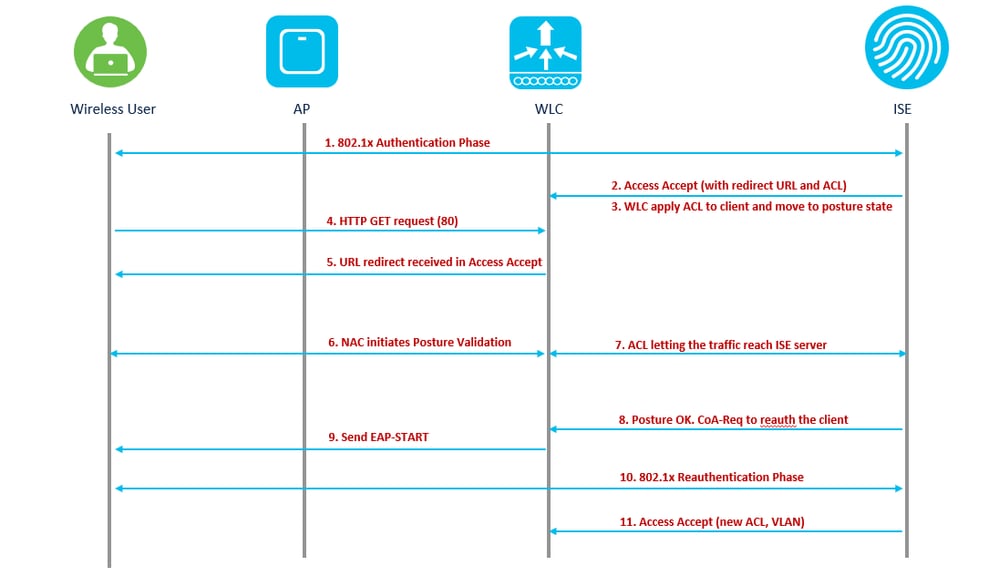
Wireless LAN Controller RADIUS NAC and CoA Feature Flow
1. Client authenticates using dot1x authentication.
2. RADIUS Access Accept carries redirected URL for port 80 and pre-auth ACLs that includes allowing IP addresses and ports, or quarantine VLAN.
3. Client is re-directed to the URL provided in access accept, and put into a new state until posture validation is done. The client in this state talks to the ISE server and validate itself against the policies configured on the ISE NAC server.
4. NAC agent on client initiates posture validation (traffic to port 80): Agent sends HTTP discovery request to port 80 which controller redirects to URL provided in access accept. The ISE knows that client trying to reach and responds directly to client. This way the client learns about the ISE server IP and from now on, the client talks directly with the ISE server.
5. WLC allows this traffic because the ACL is configured to allow this traffic. In case of VLAN override, the traffic is bridged so that it reaches the ISE server.
6. Once ISE-client completes assessment, a RADIUS CoA-Req with reauth service is sent to the WLC. This initiates re-authentication of the client (by sending EAP-START). Once re-authentication succeeds, the ISE sends access accept with a new ACL (if any) and no URL redirect, or access VLAN.
7. WLC has support for CoA-Req and Disconnect-Req as per RFC 3576. The WLC needs to support CoA-Req for re-auth service, as per RFC 5176.
8. Instead of downloadable ACLs, pre-configured ACLs are used on the WLC. The ISE server just sends the ACL name, which is already configured in controller.
9. This design works for both VLAN and ACL cases. In case of VLAN override, we just redirect the port 80 is redirected and allows (bridge) rest of the traffic on the quarantine VLAN. For the ACL, the pre-auth ACL received in access accept is applied.
This image provides a visual representation of this feature flow:
 feature workflow
For this use case, an SSID which is only used for corporate users are enabled for posture. No other use cases, such as BYOD, Guest, or any others exist on this SSID.
When a wireless client connects to the Posture SSID for the first time, it must download and install the Posture Module on the redirected portal of the ISE, and finally applied with relevant ACLs based on the posture check result (Compliant/Non-Compliant).
Configure
Network Diagram
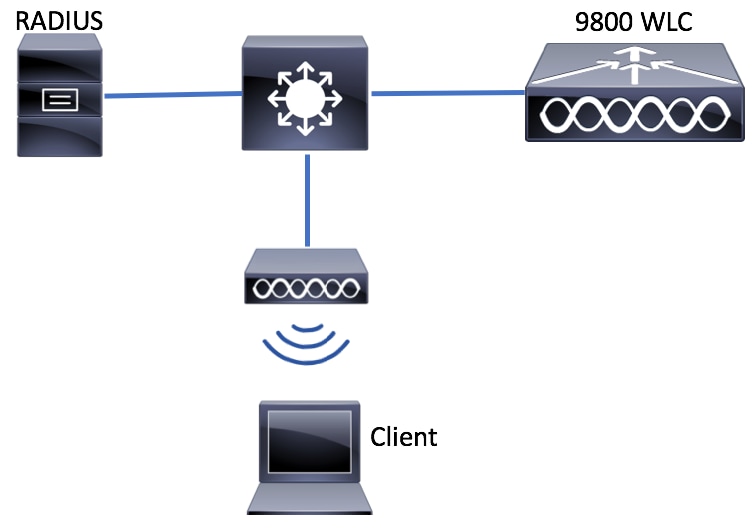 Network Diagram
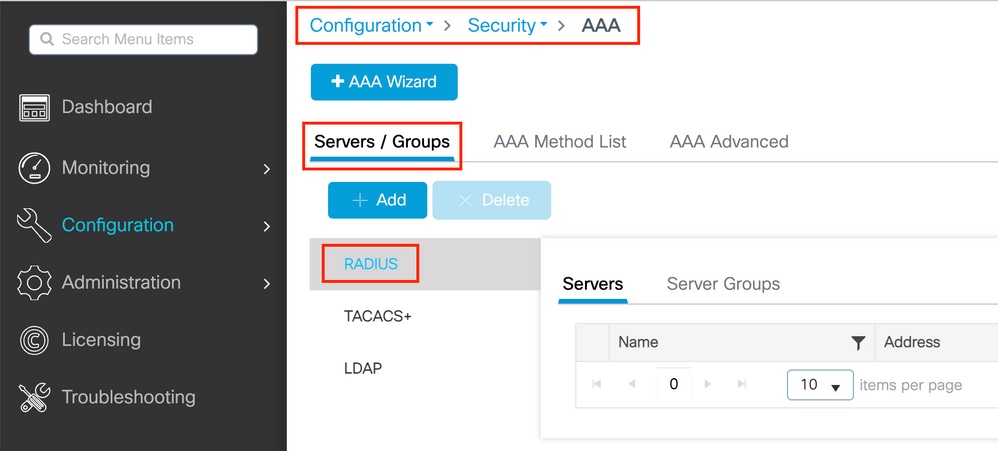
AAA Configuration on 9800 WLC
Step 1. Add the ISE server to the 9800 WLC configuration. Navigate to Configuration > Security > AAA > Servers/Groups > RADIUS > Servers > + Add and enter the RADIUS server information as shown in the images. Ensure Support for CoA is enabled for posture NAC.
 9800 create radius server
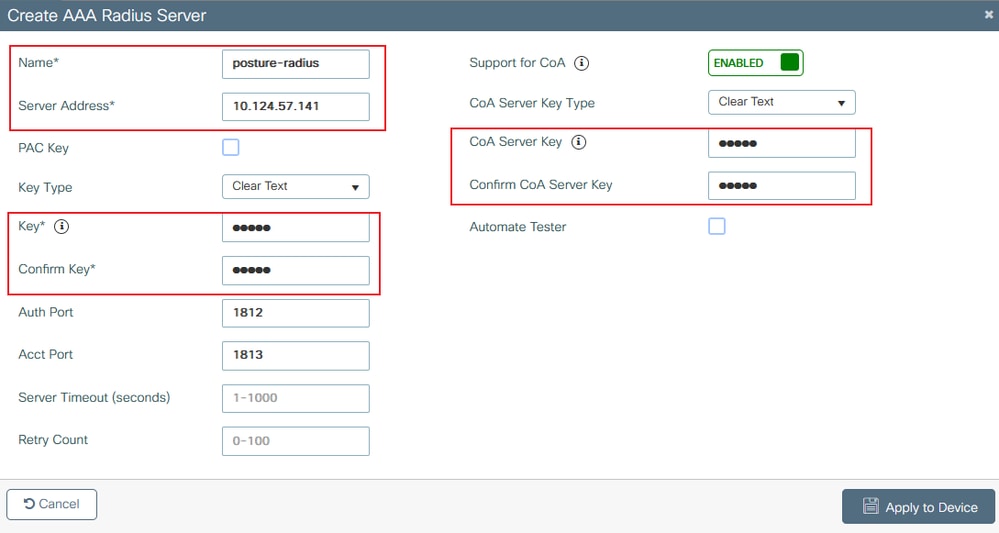 9800 create radius details
Step 2. Create an authentication method list. Navigate to Configuration > Security > AAA > AAA Method List > Authentication > + Add as shown in the image:
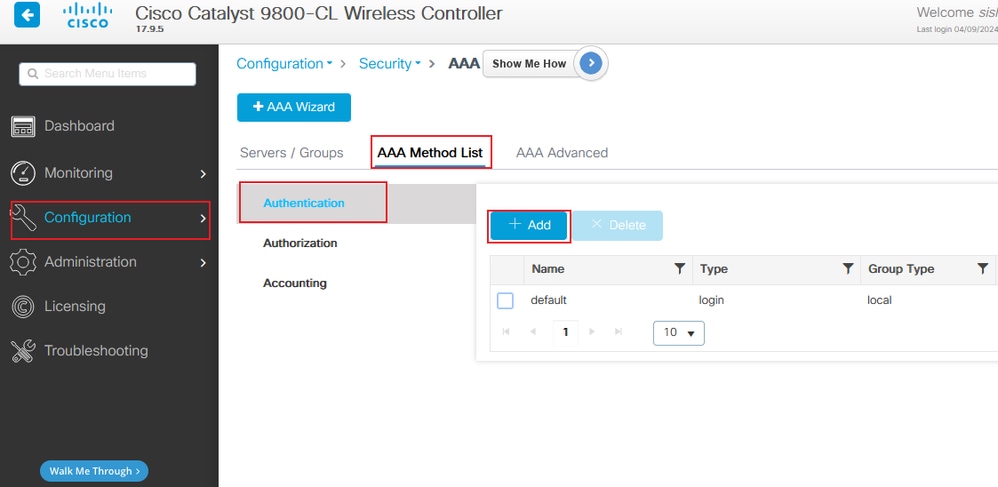 9800 add auth list
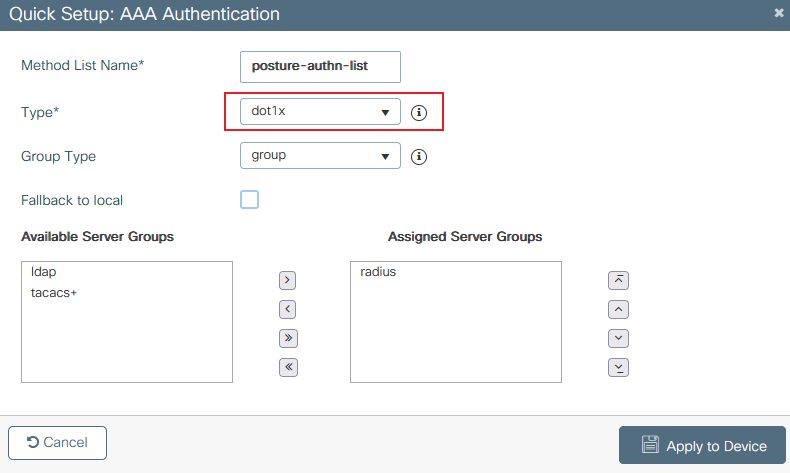 9800 create auth list details
Step 3. (Optional) Create an accounting method list as shown in the image:
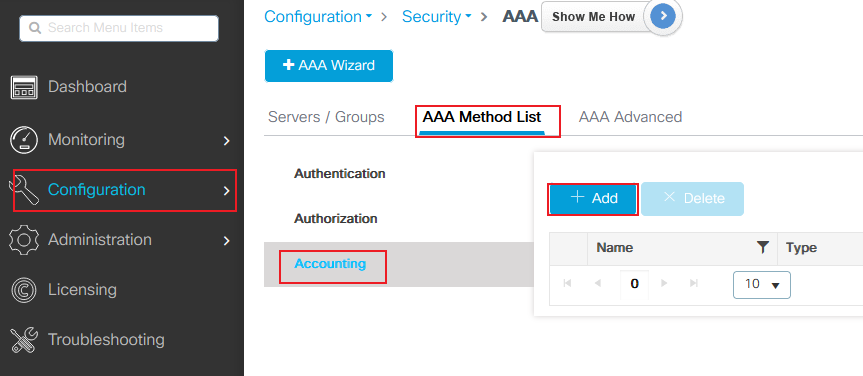 9800 add account list
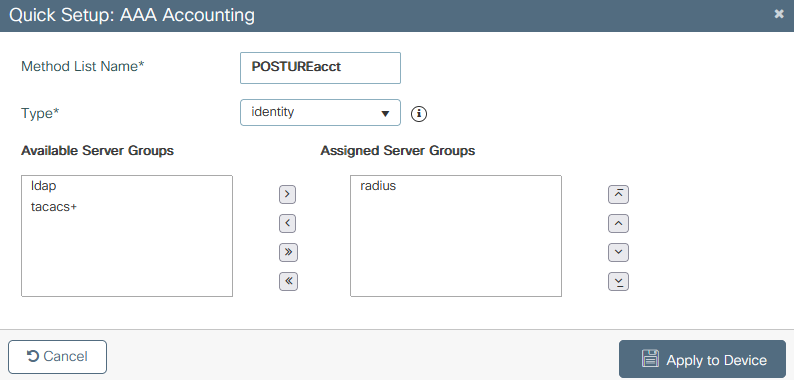 9800 create acct list details
WLAN Configuration
Step 1. Create the WLAN. Navigate to Configuration > Tags & Profiles > WLANs > + Add and configure the network as needed:
 9800 WLAN add
Step 2. Enter the WLAN general information.
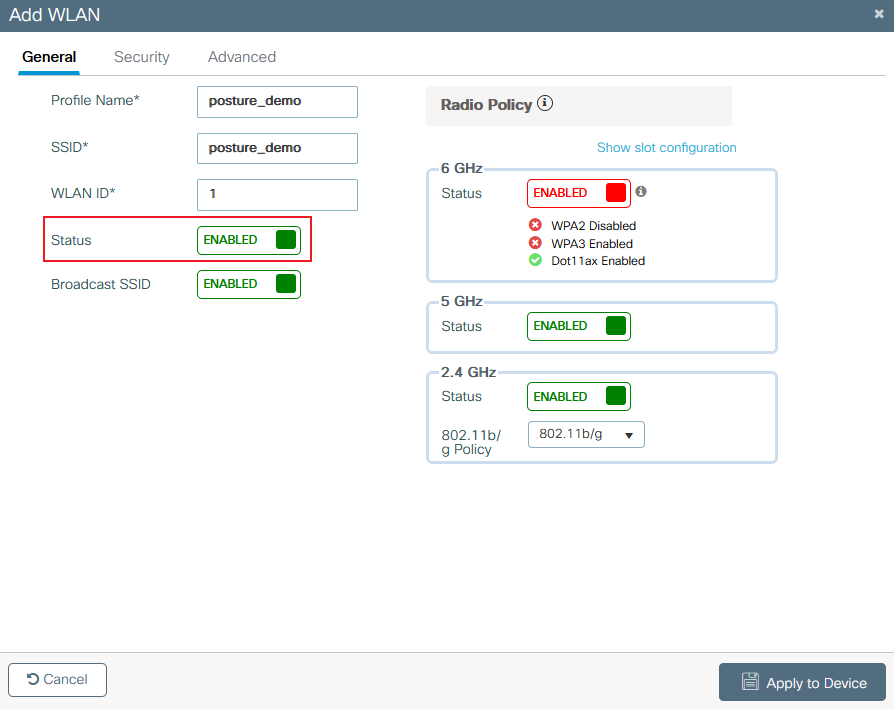 9800 create WLAN general
Step 3. Navigate to the Security tab and choose the needed security method. In this case, choose 802.1x and the AAA authentication list (that you created in Step 2. in the AAA Configuration section) are needed:
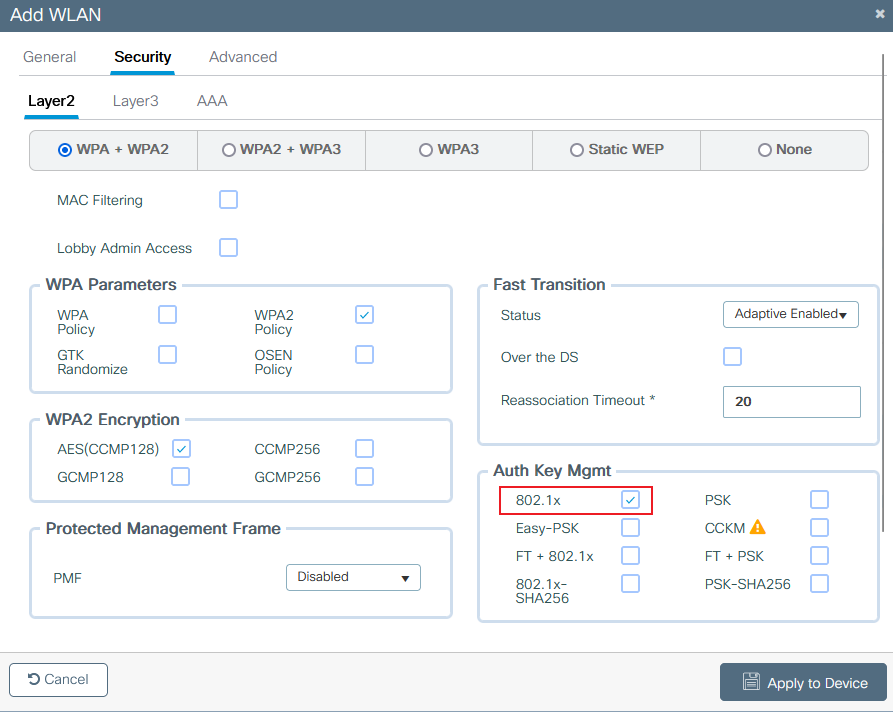 9800 create WLAN security L2
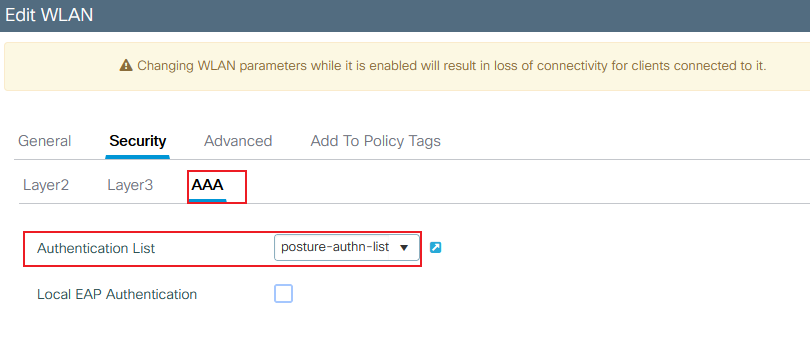 9800 create WLAN security AAA
Policy Profile Configuration
Inside a Policy Profile, you can decide to assign the clients to which VLAN, among other settings (like Access Controls List (ACLs), Quality of Service (QoS), Mobility Anchor, Timers, and so on). You can either use your default policy profile or you can create a new one.
Step 1. Create a new Policy Profile. Navigate to Configuration > Tags & Profiles > Policy and create a new one:
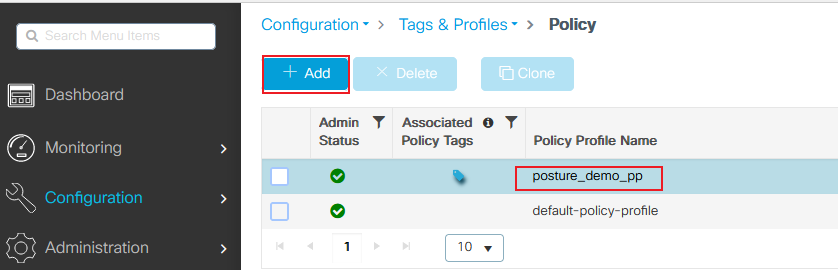 9800 add policy profile
Ensure the profile is enabled.
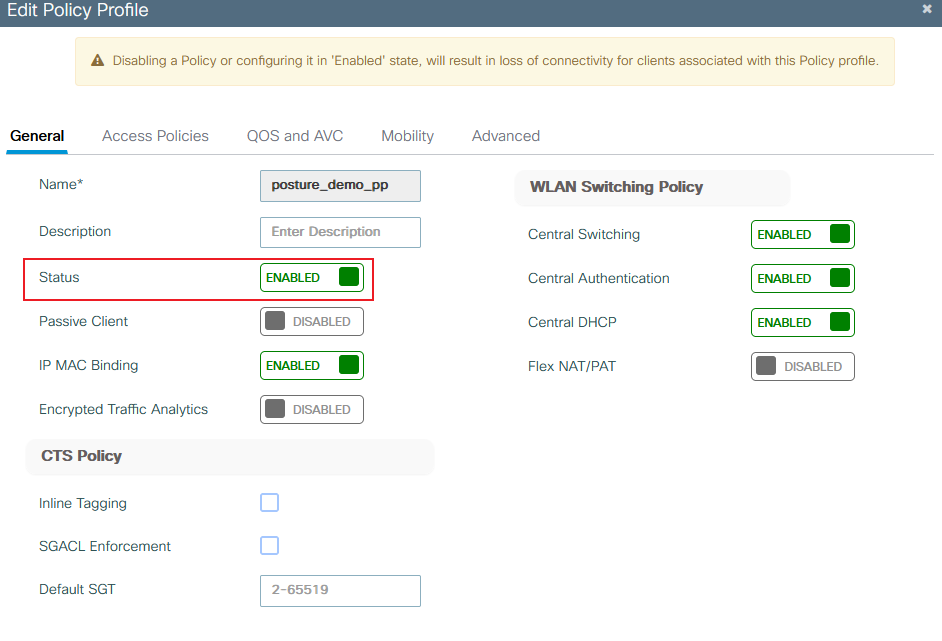 9800 create policy profile general
Step 2. Choose the VLAN. Navigate to the Access Policies tab and choose the VLAN name from the drop-down or manually type the VLAN-ID. Do not configure an ACL in the policy profile:
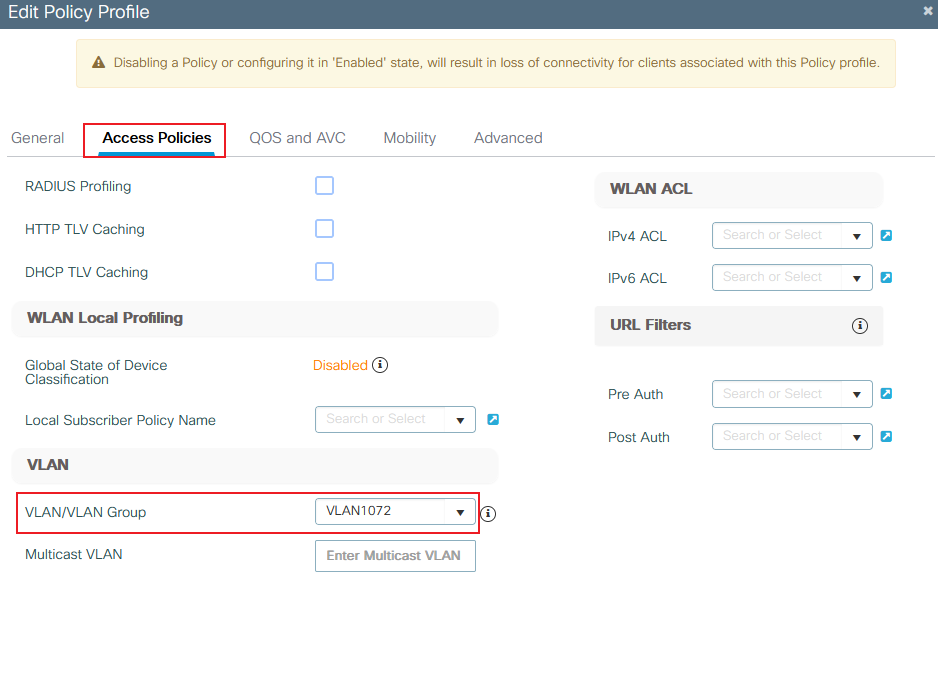 9800 create policy profile VLAN
Step 3. Configure the policy profile to accept ISE overrides (allow AAA override) and Change of Authorization (CoA) (NAC State). You can optionally specify an accounting method too:
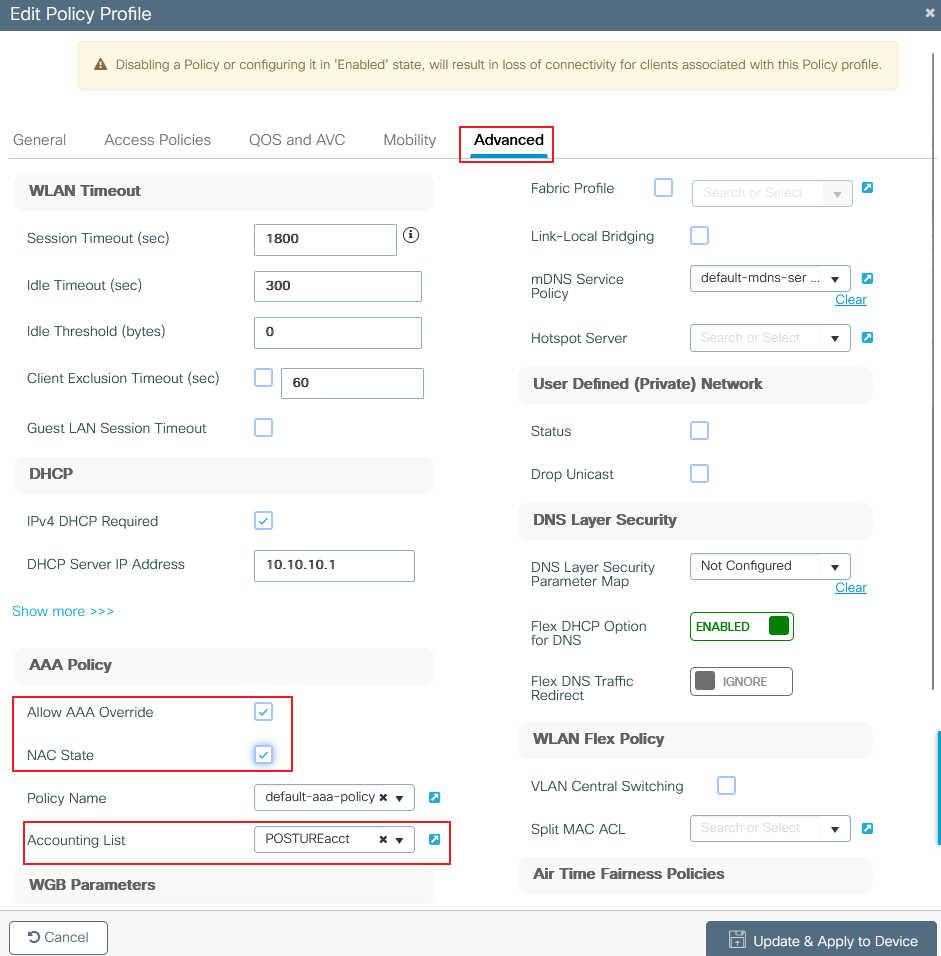 9800 create policy profile Advance
Policy Tag Configuration
Inside the Policy Tag is where you link your SSID with your Policy Profile. You can either create a new Policy Tag or use the default-policy tag.
Navigate to Configuration > Tags & Profiles > Tags > Policy and add a new one if needed as shown in the image:
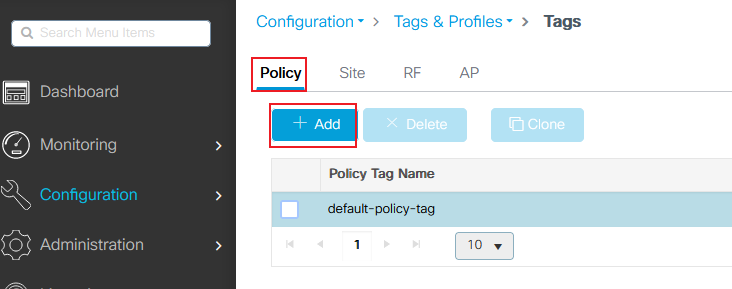 9800 policy tag add
Link your WLAN Profile to the desired Policy Profile:
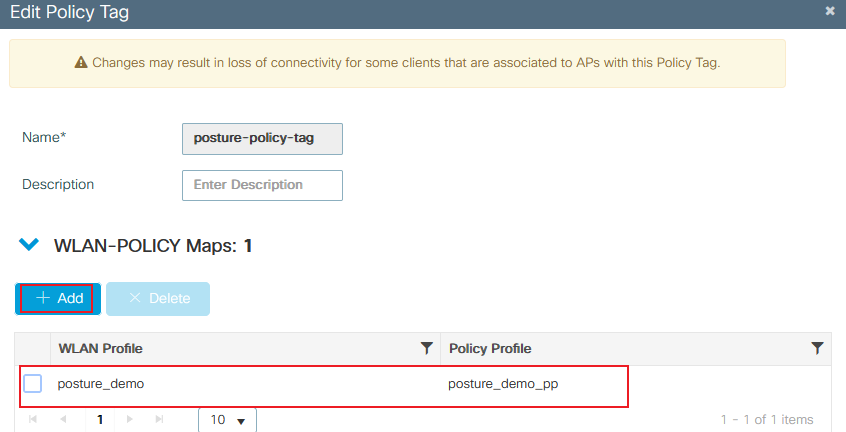 9800 policy tag details
Policy Tag Assignment
Assign the Policy Tag to the needed APs. Navigate to Configuration > Wireless > Access Points > AP Name > General Tags , make the needed assignment, and then click Update & Apply to Device .
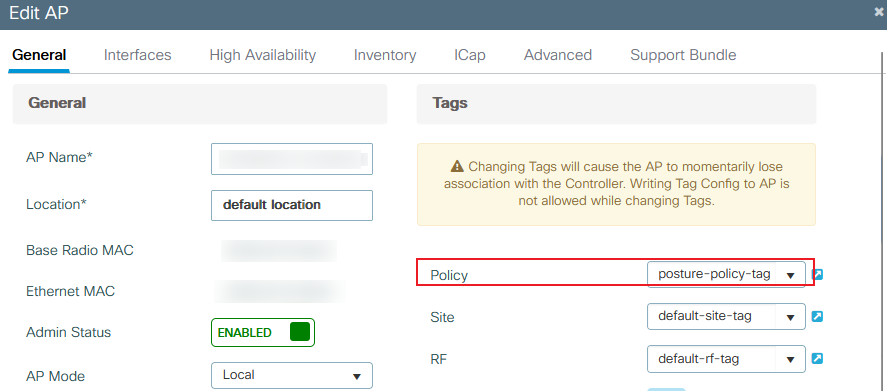 9800 policy tag assignment
Redirect ACL Configuration
Navigate to Configuration > Security > ACL > + Add in order to create a new ACL.
The ACL used for Posture Portal Redirect has the same requirements as the Central Web Authentication (CWA).
You need to deny traffic to your ISE PSNs nodes as well as deny DNS and permit all the rest. This redirect ACL is not a security ACL but a punt ACL that defines what traffic goes to the CPU (on permits) for further treatment (like redirection) and what traffic stays on the data plane (on deny) and avoids redirection. The ACL must look like this (replace 10.124.57.141 with your ISE IP address in this example):
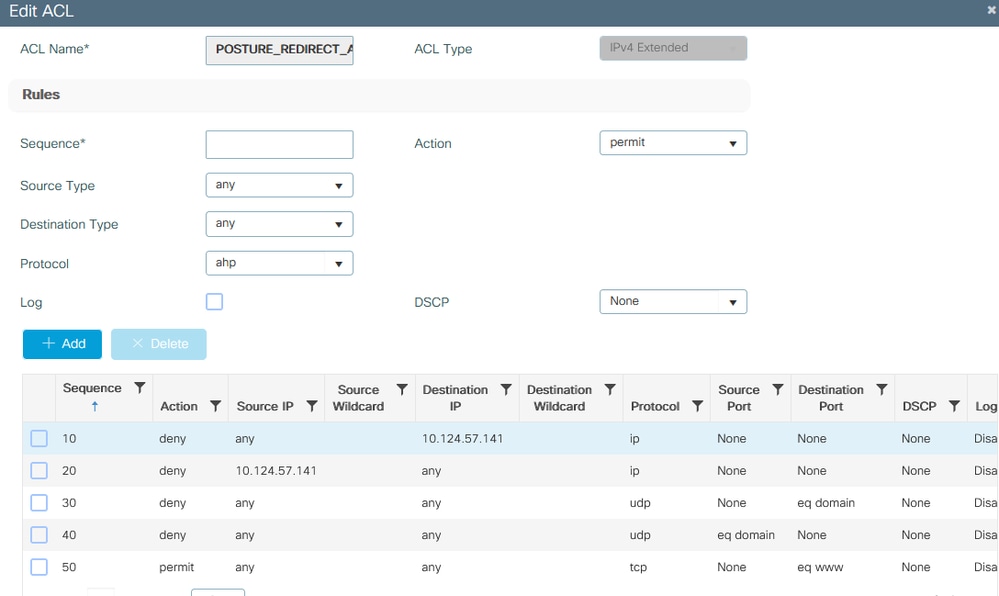 9800 redirect ACL details
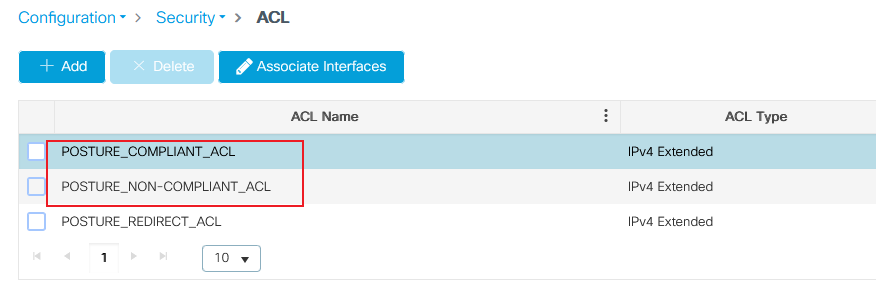
Policy ACL Configuration
In this case, you need to define separate ACLs on 9800 WLC for ISE to authorize the Compliant and Non-Compliant scenarios based on posture check result.
 9800 ACL general
For Compliant scenario, simply use permit all in this case. As another common configuration, you can also have ISE not to authorize any ACL in the compliant result, which is equivalent to permit all on the 9800 side:
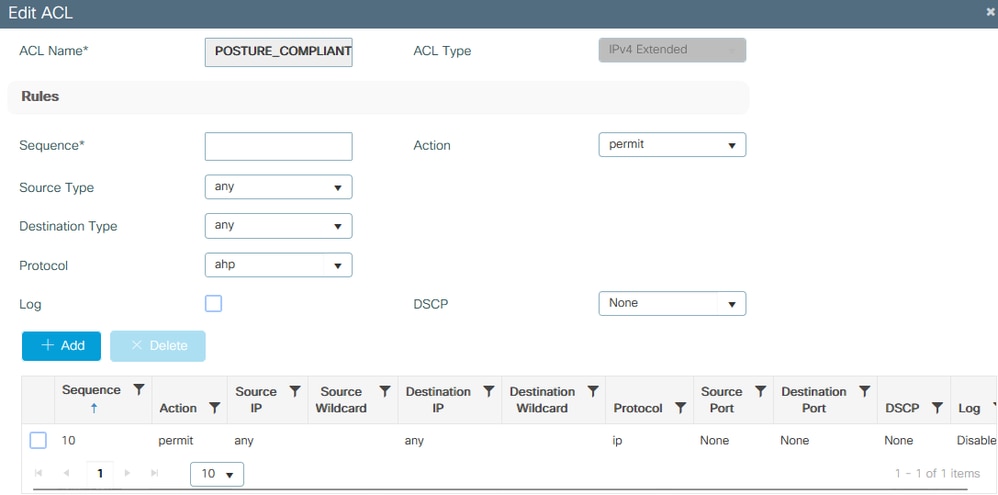 9800 ACL - Compliant
For Non-compliant scenario, the client only allows access to certain networks, usually the remediation server (ISE itself in this case):
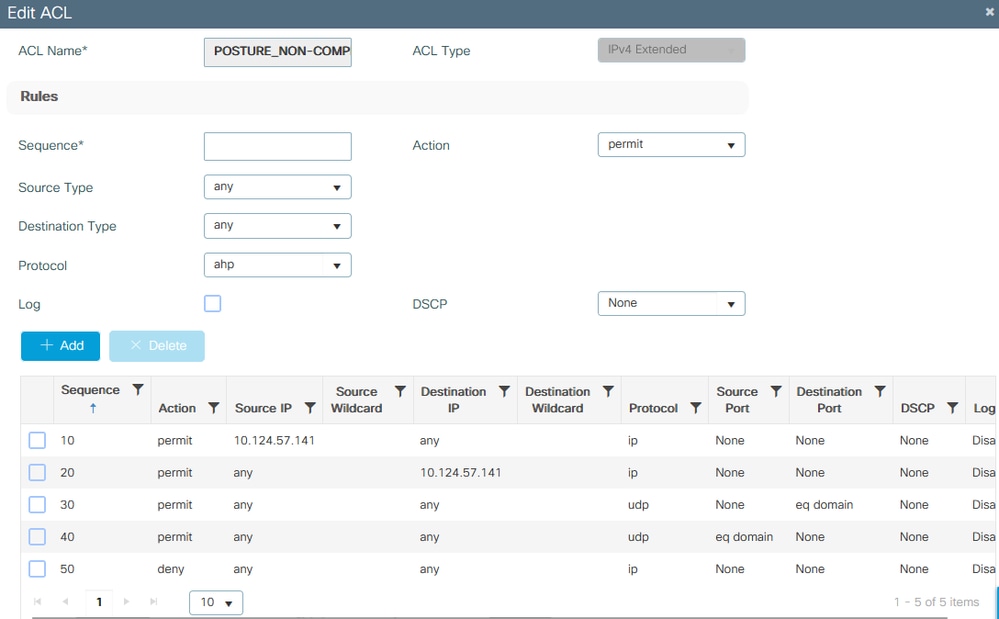 9800 ACL - Non-Compliant
AAA Configuration and Posture Setting on ISE
Posture Requirement: In this example, the requirement to determine compliance is to detect whether a specific test file exists on the desktop used to test Windows PC.
Step 1. Add WLC 9800 as NAD on the ISE. Navigate to Administration > Network Resources > Network Devices > Add:
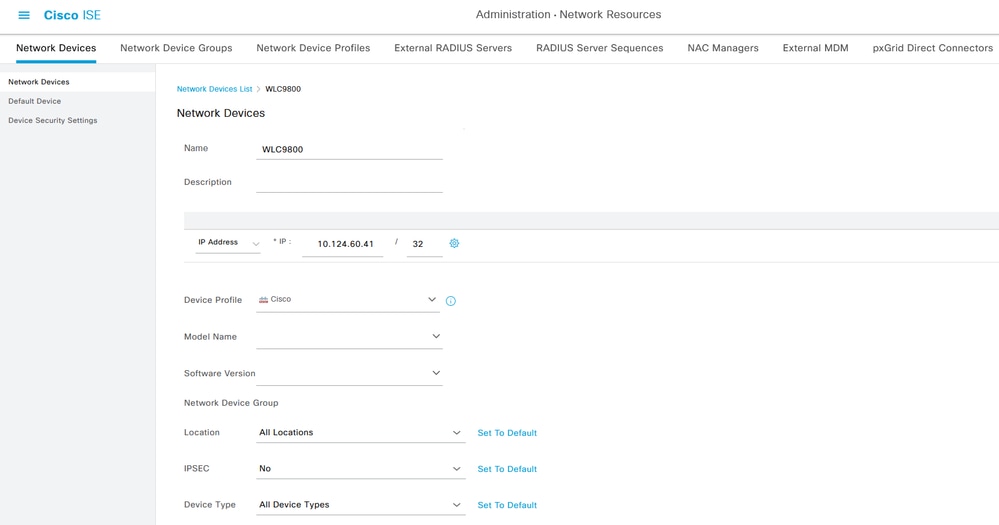 Add Network Device 01
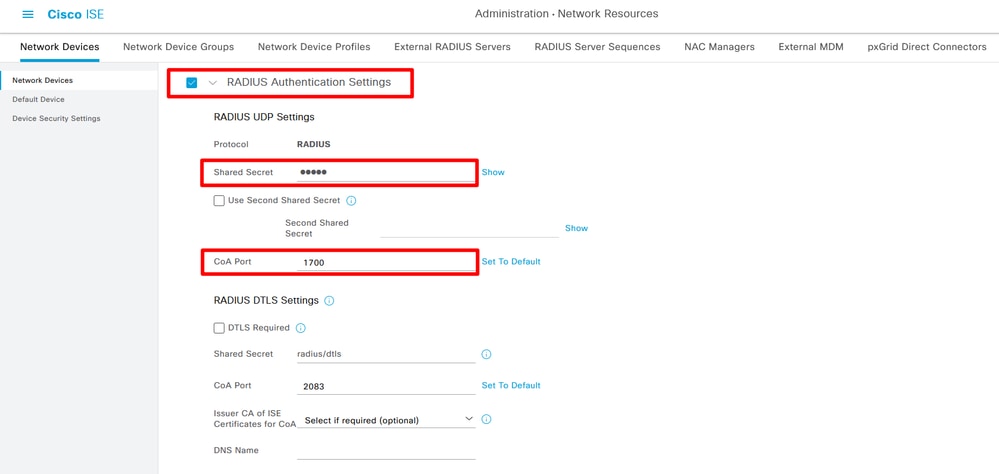 Add Network Device 02
Step 2. Download Cisco Secure Client Headend Deployment Package and Compliance module on Cisco Software CCO website.
Access Cisco Software Download and search Cisco Secure Client:
 Secure Client 5.1.2.42
 ISE Compliance module 4.3
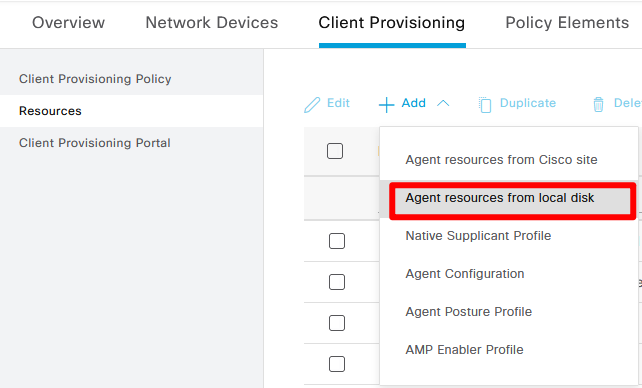
Step 3. Upload Cisco Secure Client Headend Deployment Package and Compliance module package to ISE Client Provisioning. Navigate to Work Centers > Posture > Client Provisioning > Resources. Click Add, Choose Agent resources from local disk from the drop-down box:
 Upload Secure Client
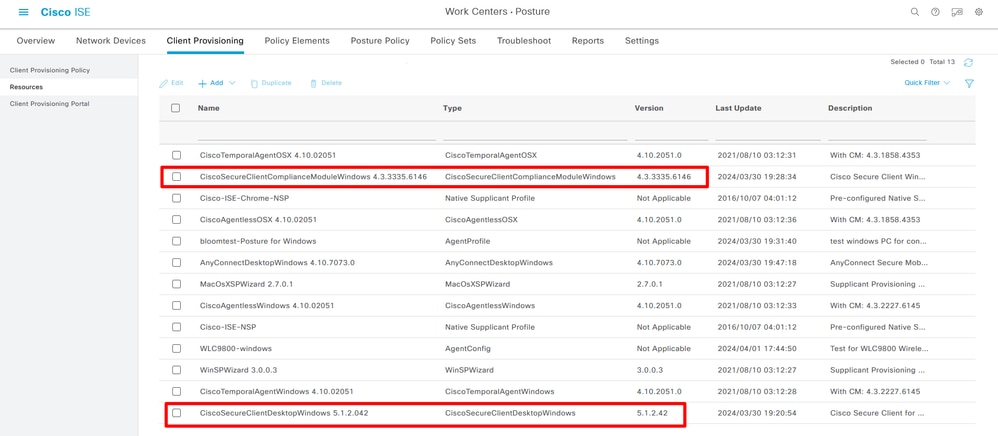 Upload Secure Client and Compliance Module successfully
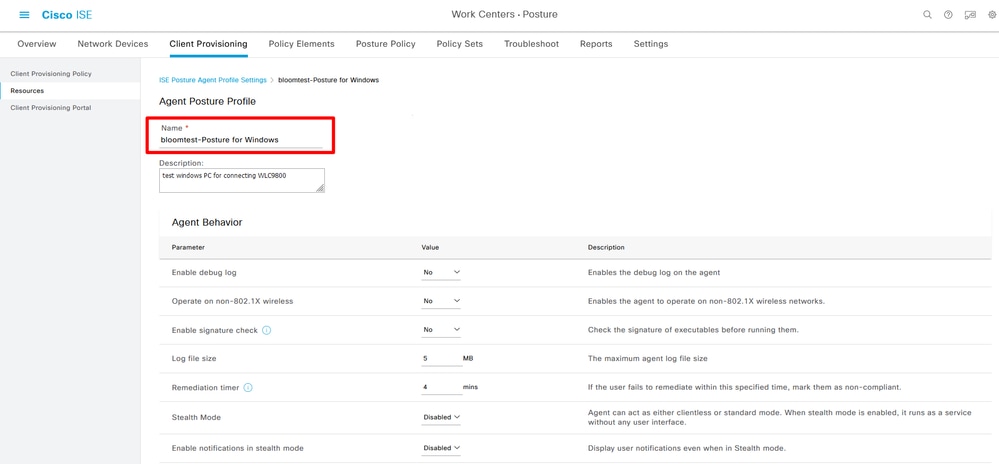
Step 4. Create Agent Posture Profile. Navigate to Work Centers> Posture > Client Provisioning > Resources > Add > Agent Posture Profile:
 Agent Posture Profile
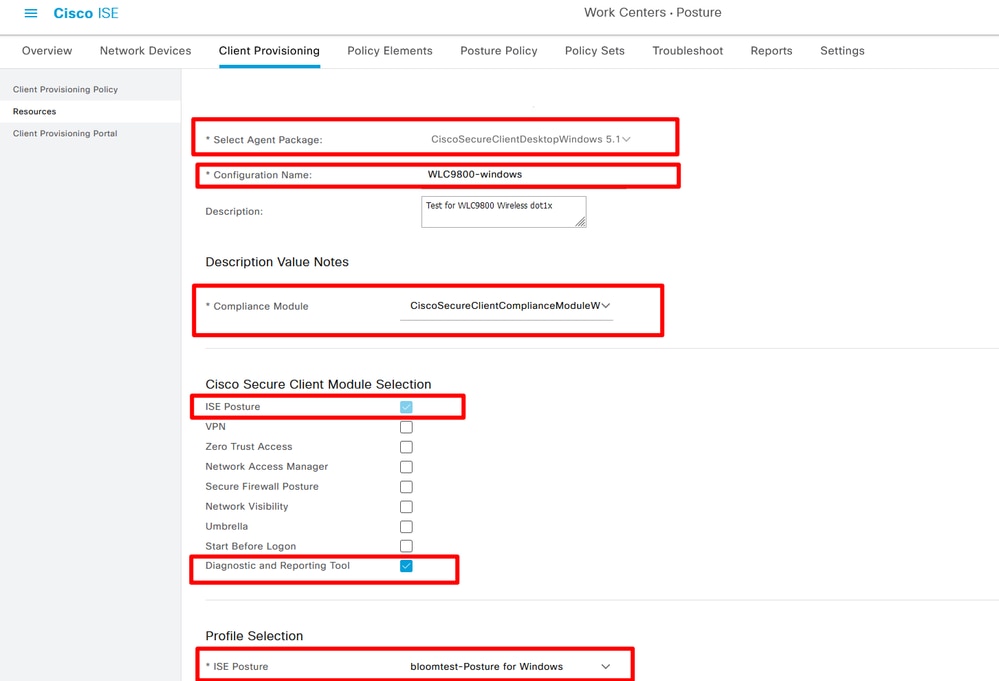
Step 5. Create Agent Configuration. Navigate to Work Centers > Posture > Client Provisioning > Resources > Add > Agent Configuration:
 Add Agent Configuration
Step 6. Confirm the Client Provisioning portal. It is OK to use default portal for testing. (Please generate CSR and Apply for an SSL certificate from the CA server, and replace Certificate Group tag on this portal, Settings, Otherwise, a certificate untrusted warning occurs during the test process.)
Navigate to Work Centers > Posture > Client Provisioning > Client Provisioning Portals:
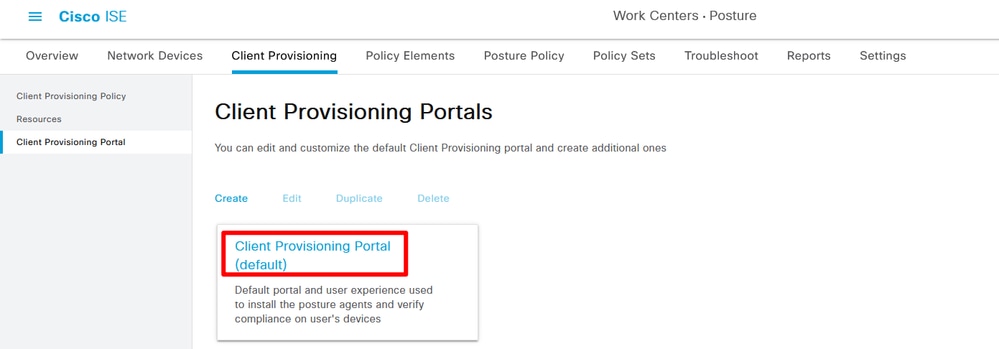 Choose Client Provisioning Portal 01
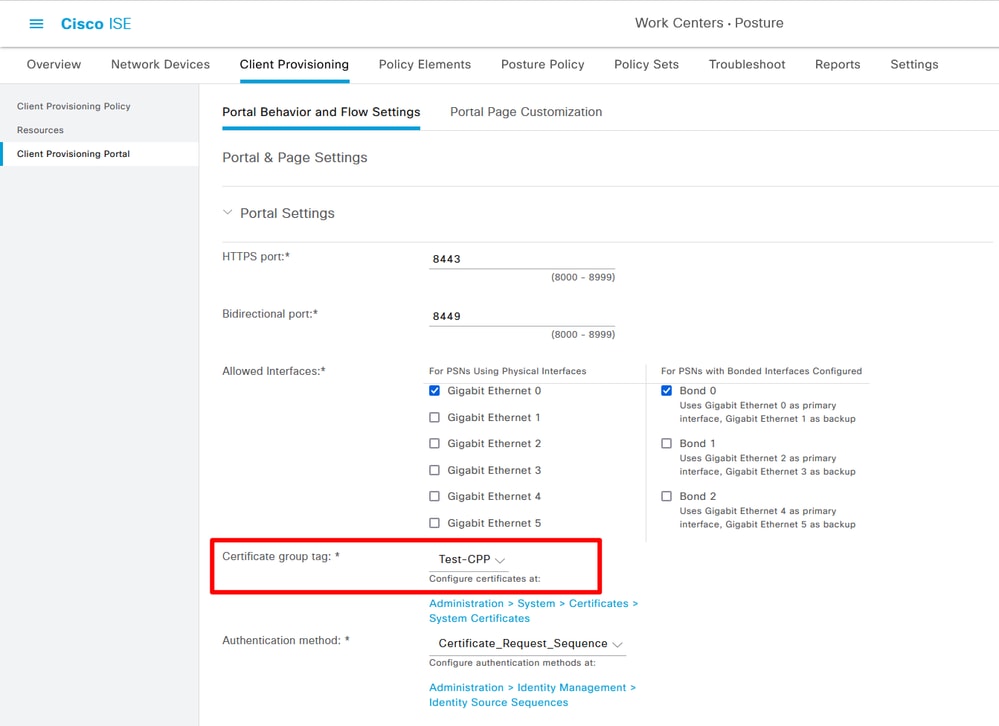 Choose Client Provisioning Portal 02
Step 7. Create Client Provisioning Policy. Navigate to Work Centers > Posture > Client Provisioning > Client Provisioning Policy > Edit > insert new policy above.
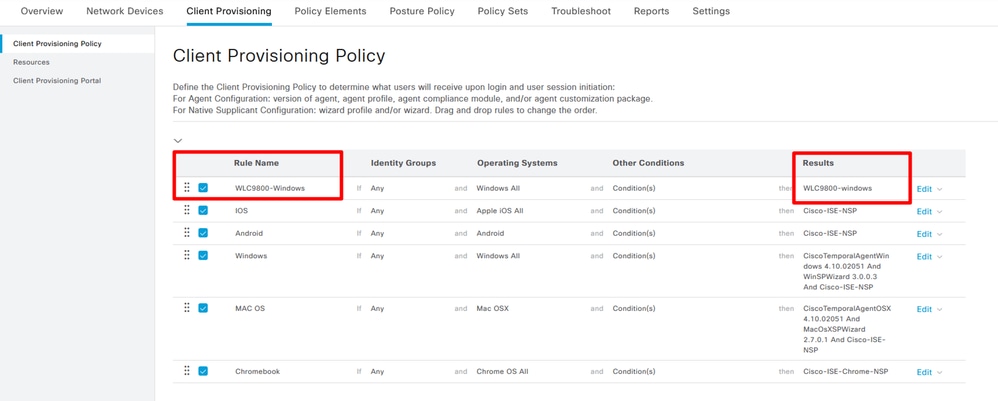 Create Client Provisioning Policy
Step 8. Create File Conditions. Navigate to Work Centers > Posture > Policy Elements > Conditions > File > File Conditions > Add:
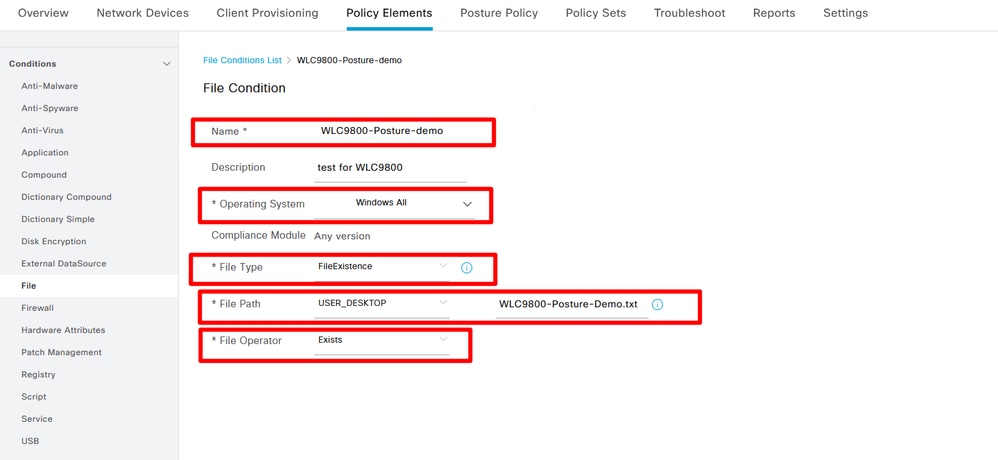 Create File Condition
Step 9. Create Remediations. Navigate to Work Centers > Posture > Policy Elements > Remediations > File > Add:
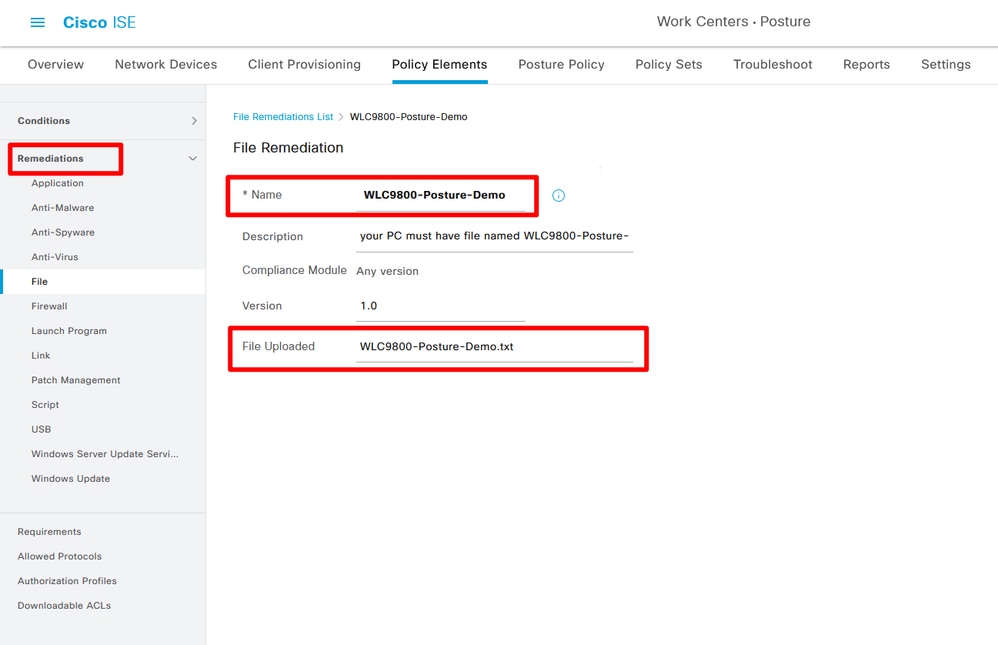 Create File Remediation
Step 10. Create Requirement. Navigate to Work Centers > Posture > Policy Elements > Requirements > Insert new Requirement:
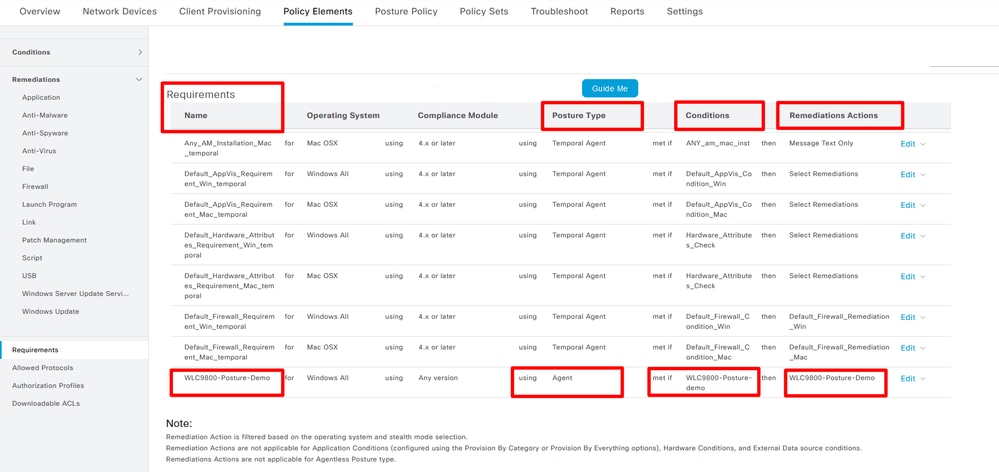 Create Posture Requirement
Step 11. Create Posture Policy. Navigate to Work Centers > Posture > Insert new policy:
 Create Posture Policy
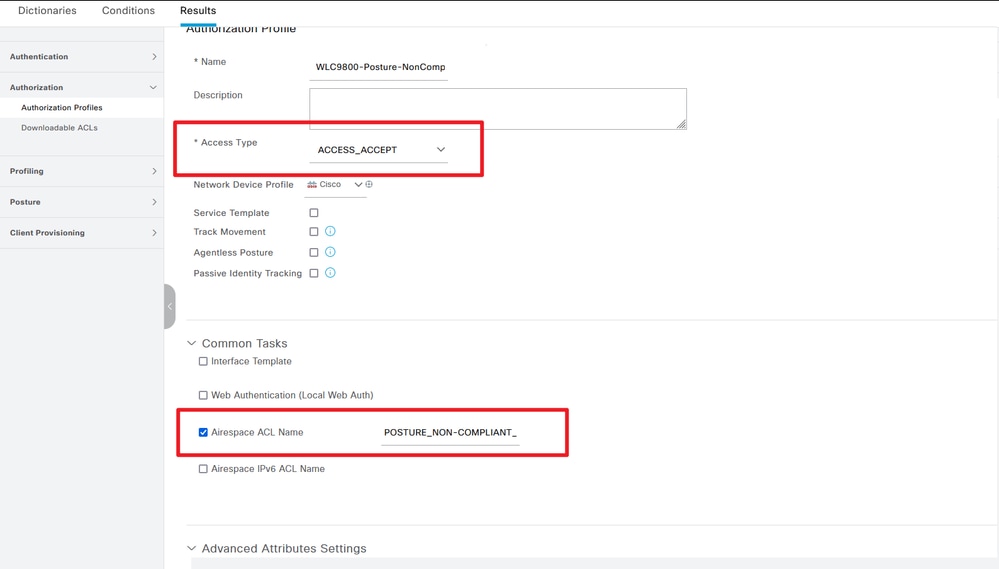
Step 12. Create three Authorization Profiles: Posture status is Unknown; Posture status is Non-Compliant; Posture Status is Compliant. Navigate to Policy > Policy Elements > Results > Authorization > Authorization Profiles > Add:
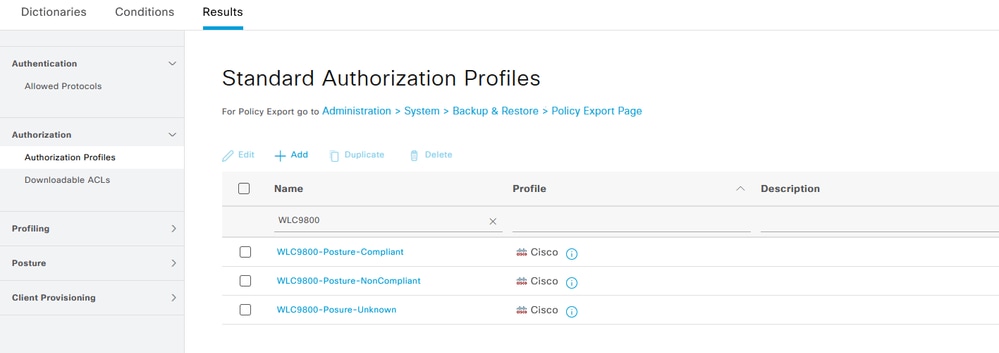 Create Authorization Profiles 01
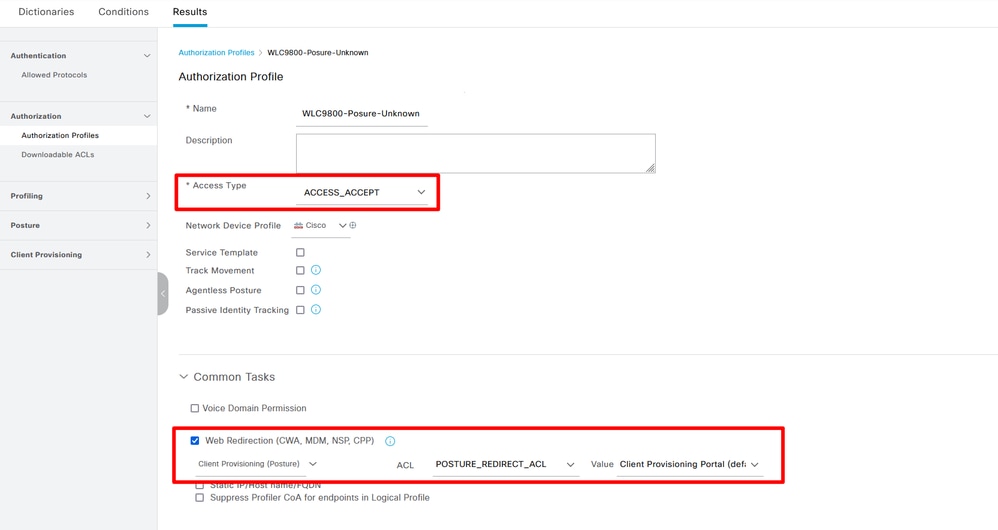 Create Authorization Profiles 02
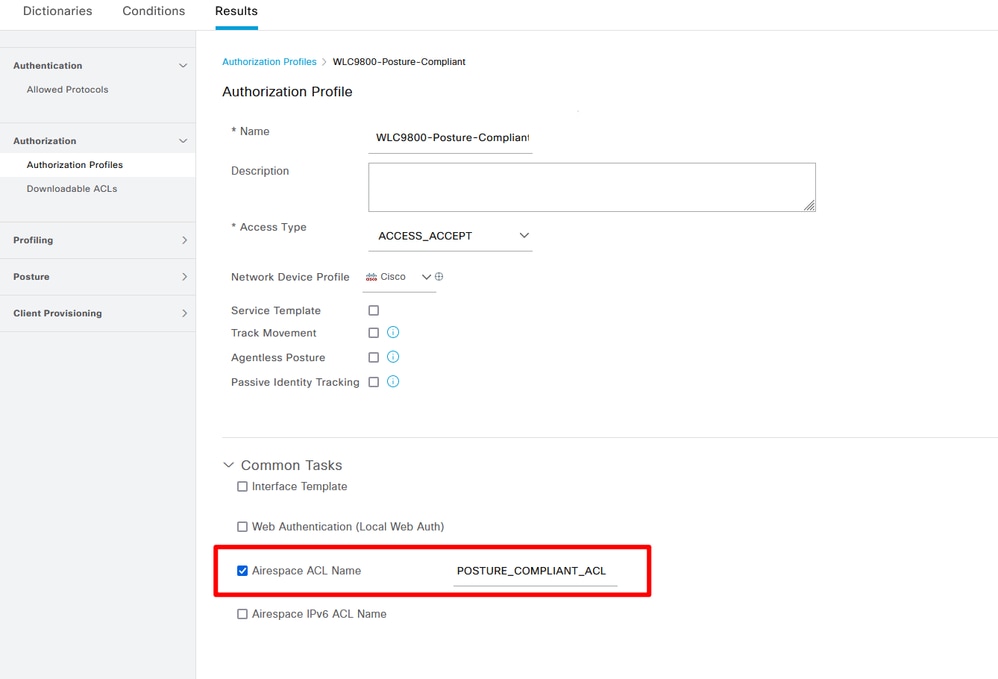 Create Authorization Profiles 03
Step 13. Create Policy Sets. Navigate to Policy > Policy.
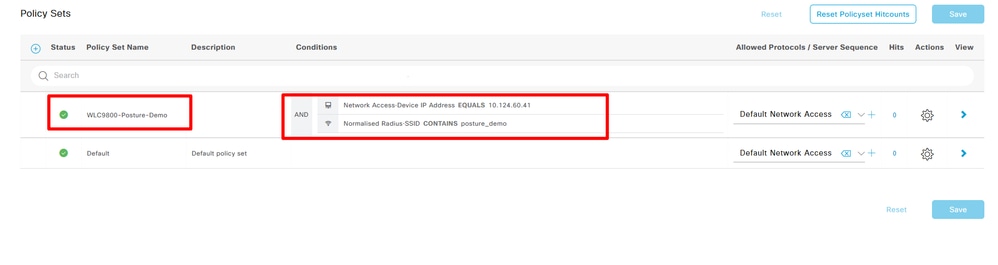 Create Policy Sets
Sets > Add Icon:
Step 14. Create Authentication Policy. Navigate to Policy > Policy Sets > Expand "WLC9800-Posture-Demo" > Authentication Policy > Add:
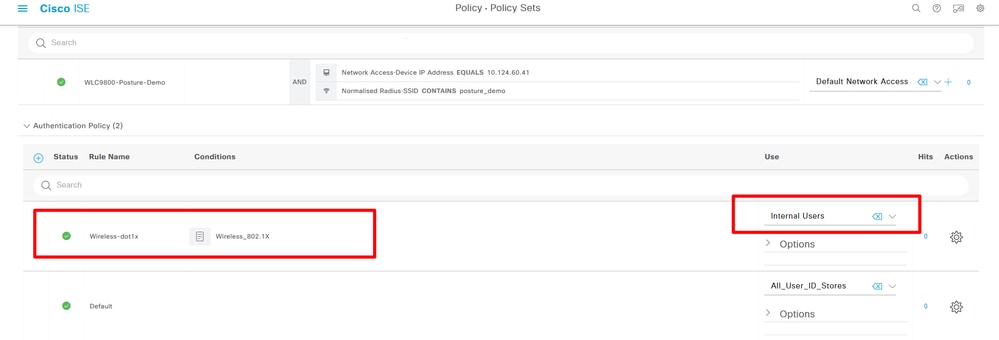 Create Authentication Policy
Step 15. Create Authorization Policy. Navigate to Policy > Policy Sets > Expand "WLC9800-Posture-Demo" > Authorization Policy > Add:
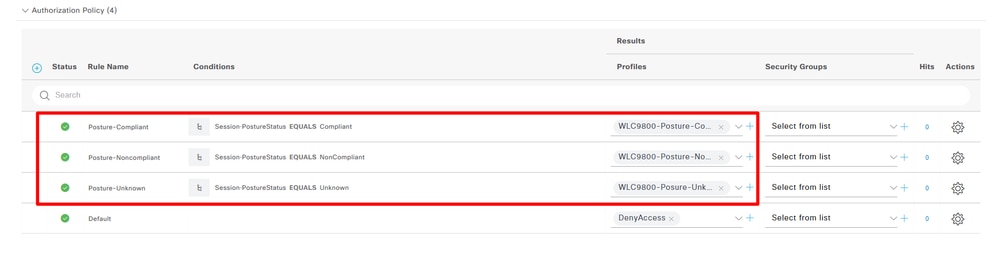 Create Authorization Policy
Examples
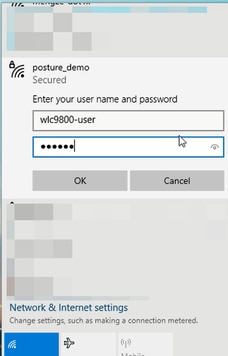
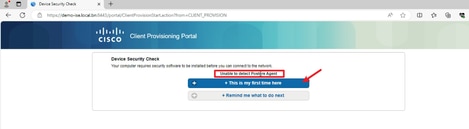
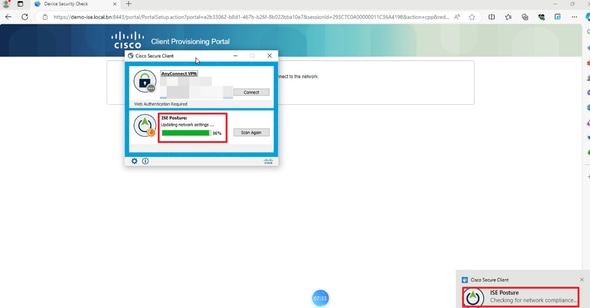
1. Connected test SSID posture_demo with correct 802.1X credentials.
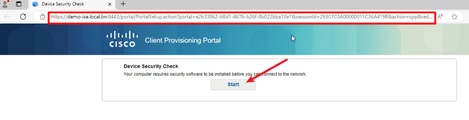
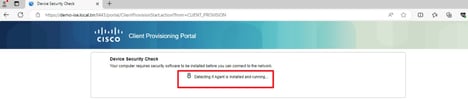
2. The browser pops up the Client Provisioning Portal URL. Click Start to detect Posture Agent. Waiting for the detect Posture Agent result, 10 seconds countdown.
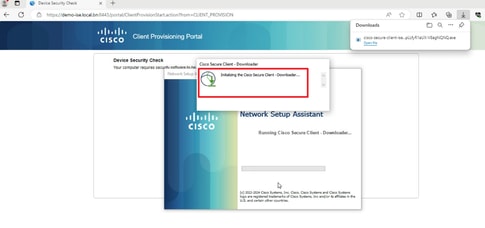
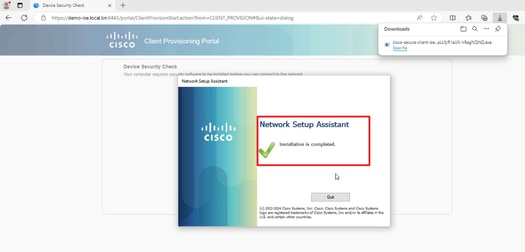
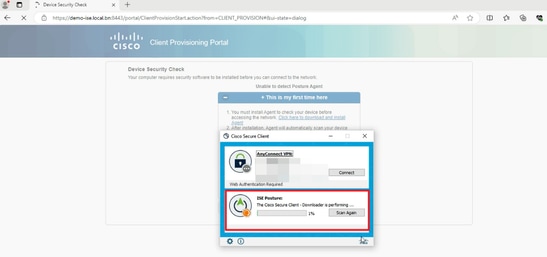
3. If the PC does not have any version of Posture Agent installed, you can see result "Unable to detect Posture Agent". Click This is my first time here. You need to download and install Agent.
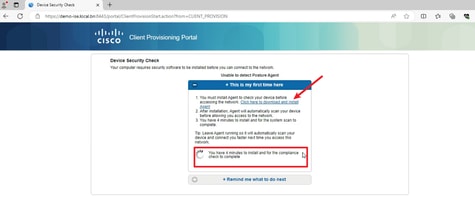
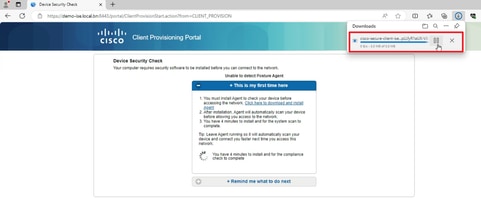
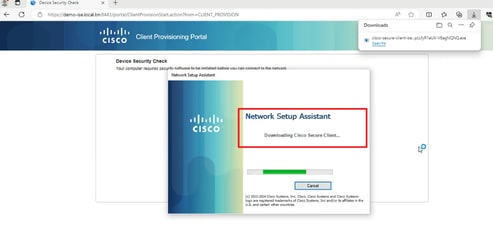

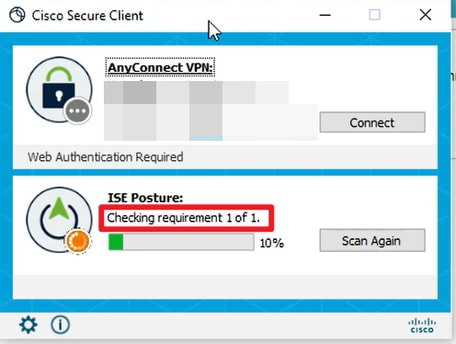
4. Posture Agent runs and gets the posture requirements from ISE.
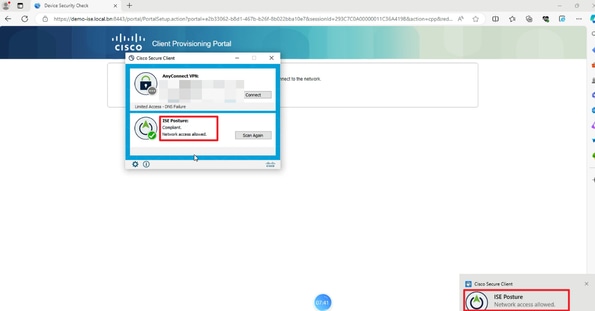
5. When the checking result meets the Posture requirement, the PC sends a Posture Compliant report to ISE. ISE triggers CoA because the Posture Status changed for this endpoint.
Verify
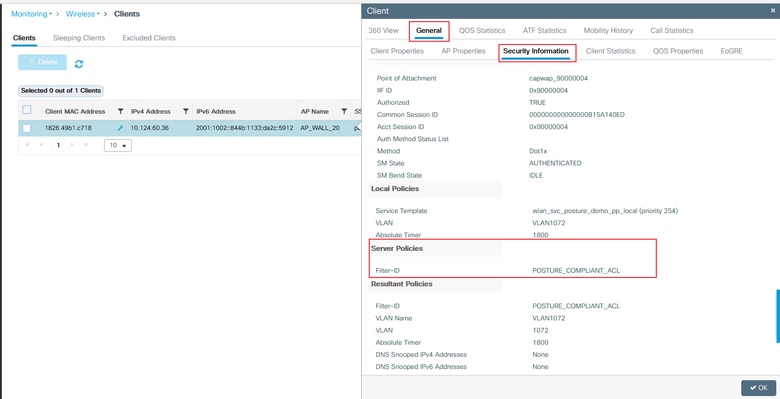
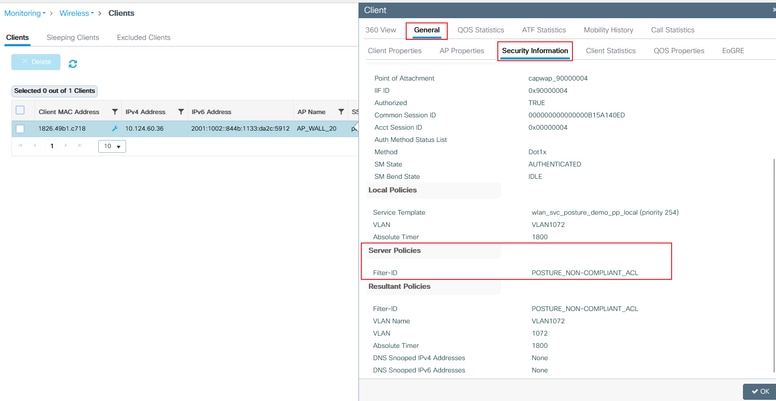
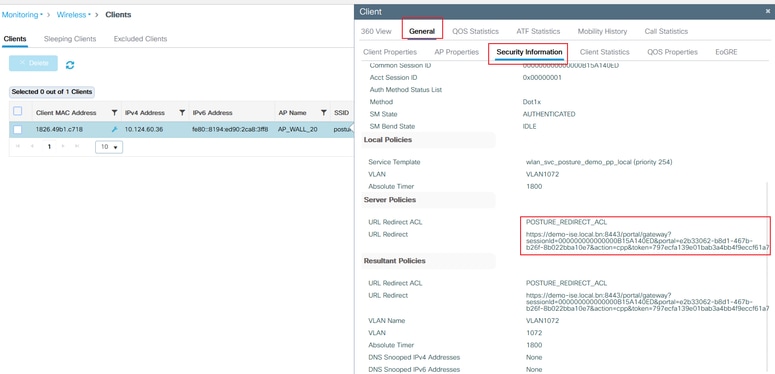
On C9800 GUI, verify that the client gets proper ACL based on Complaint / Non-Complaint posture result.
Compliant:
Non-Compliant:
On ISE, simply check the Radius live logs to confirm if correct policy matched.

Troubleshoot
Checklist
- Ensure the client connects and gets a valid IP address.
- Ensure that the WLC gets the correct redirect URL and ACL from ISE. You can check it via GUI:
- If the redirection is not automatic, open a browser and try a random IP address. For example, 10.0.0.1. If redirection works, it is possible that you have a DNS resolution problem. Verify that you have a valid DNS server provided via DHCP and that it can resolve hostnames.
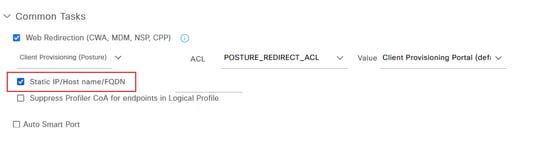
- If the broswer has been redirected to the ISE portal URL but the page cannot be loaded, check whether the ISE domain name is not added to the DNS server, hence the client cannot resolve the portal URL. To quickly resolve the this problem, check the Static IP/Host name/FQDN under the Authorization Profile to provide the IP address in redirect URL. However, this can be a security concern because it exposes the IP address of the ISE.
Collect Debugs
References
- Configure CWA on Catalyst 9800 WLC and ISE - Cisco
- Wireless BYOD with Identity Services Engine
- Deploy ISE Posture
- Troubleshoot ISE Session Management and Posture
- Compare ISE Posture Redirection Flow to ISE Posture Redirectionless Flow
Revision History
| Revision | Publish Date | Comments |
|---|---|---|
2.0 |
23-Jul-2026
|
Recertification - Updated Alt Text and Formatting. |
1.0 |
14-Mar-2025
|
Initial Release |
 Feedback
Contact Cisco
- Open a Support Case

- (Requires a Cisco Service Contract)