Introduction
This document describes how to generate and import certificates on AireOS WLCs.
Prerequisites
Requirements
Cisco recommends that you have knowledge of these topics:
- How to configure the WLC, the Lightweight Access Point (LAP), and the wireless client card for basic operation.
- How to use the OpenSSL application.
- Public key infrastructure and digital certificates
Components Used
The information in this document is based on these software and hardware versions:
- Cisco 5508 WLC that runs firmware Version 8.3.102
- OpenSSL application for Microsoft Windows
- Enrollment tool that is specific to the third-party Certification Authority (CA)
The information in this document was created from the devices in a specific lab environment. All of the devices used in this document started with a cleared (default) configuration. If your network is live, ensure that you understand the potential impact of any command.
Chained Certificates
A certificate chain is a sequence of certificates where each certificate in the chain is signed by the subsequent certificate.
The purpose of a certificate chain is to establish a chain of trust from a peer certificate to a trusted CA certificate. The CA vouches for the identity in the peer certificate when it is signed.
If the CA is one that you trust (indicated by the presence of a copy of the CA certificate in your root certificate directory), this implies you can trust the signed peer certificate as well.
Often, the clients do not accept the certificates because they were not created by a known CA. The client typically states that the validity of the certificate cannot be verified.
This is the case when the certificate is signed by an intermediate CA, which is not known to the client browser. In such cases, it is necessary to use a chained SSL certificate or certificate group.
Support for Chained Certificate
The controller allows for the device certificate to be downloaded as a chained certificate for web authentication.
Certificate Levels
- Level 0 - Use of only a server certificate on the WLC
- Level 1 - Use of a server certificate on the WLC and a CA root certificate
- Level 2 - Use of a server certificate on the WLC, one single CA intermediate certificate, and a CA root certificate
- Level 3 - Use of a server certificate on the WLC, two CA intermediate certificates, and a CA root certificate
The WLC does not support chained certificates more than 10KB in size on the WLC. However, this restriction has been removed in WLC Version 7.0.230.0 and later.
Note: Chained certificates are supported and actually required for web authentication and web admin.
Note: Wildcard certificates are fully supported for local EAP, management or web authentication.
Web authentication certificates can be any of these:
- Chained
- Unchained
- Auto-generated
Note: In WLC Version 7.6 and later, only chained certificates are supported (and therefore required).
To generate an unchained certificate for management purpose, this document and disregard the parts where the certificate is combined with the CA certificate.
This document discusses how to properly install a chained Secure Socket Layer (SSL) certificate to a WLC.
Step 1. Generate a CSR
There are two ways to generate a CSR. Either manually with OpenSSL (the only way possible in pre-8.3 WLC software) or go on the the WLC itself to generate the CSR (Available after 8.3.102).
Option A. CSR with OpenSSL
Note: Chrome version 58 and later does not trust the Common Name of the certificate alone and requires Subject Alternate Name to also be present. The next section explains how to add SAN fields to the OpenSSL CSR which is a new requirement for this browser.
Complete these steps in order to generate a CSR with OpenSSL:
- Install and open the OpenSSL .
In Microsoft Windows, by default, openssl.exe is located at C:\ > openssl > bin.
Note: OpenSSL Version 0.9.8 is the recommended version for old WLC releases; however, as of Version 7.5, support for OpenSSL Version 1.0 was also added (refer to Cisco bug ID CSCti65315 - Need Support for certificates generated with OpenSSL v1.0) and is the recommended version to use. OpenSSL 1.1 works was also tested and works on 8.x and later WLC releases.
- Locate your OpenSSL config file and make a copy of it in order to edit it for this CSR. Edit the copy to add the next sections:
-
[req]
req_extensions = v3_req

[ v3_req ]

# Extensions to add to a certificate request

basicConstraints = CA:FALSE
keyUsage = nonRepudiation, digitalSignature, keyEncipherment
subjectAltName = @alt_names

[alt_names]
DNS.1 = server1.example.com
DNS.2 = mail.example.com
DNS.3 = www.example.com
DNS.4 = www.sub.example.com
DNS.5 = mx.example.com
DNS.6 = support.example.com
The lines which start with "DNS.1", "DNS.2" (and so on) must contain all the alternate names of your certificates. Then write any possible URL utilized for the WLC. The lines in bold in the previous example were not present or were commented in our lab openSSL version. It can vary greatly with operating system and openssl version. We save this modified version of the config as openssl-san.cnf for this example.
- Enter this command in order to generate a new CSR:
OpenSSL>req -new -newkey rsa:3072 -nodes -keyout mykey.pem -out myreq.pem -config openssl-san.cnf
Note: WLCs support a maximum key size of 4096 bits as of 8.5 software version.
- There is a prompt for some information: country name, state, city, and so forth. Provide the required information.
Note: It is important to provide the correct Common Name. Ensure that the host name that is used to create the certificate (Common Name) matches the Domain Name System (DNS) host name entry for the virtual interface IP address on the WLC and that the name exists in the DNS as well. Also, after you make the change to the Virtual IP (VIP) interface, you must reboot the system in order for this change to take effect.
Here is an example:
OpenSSL>req -new -newkey rsa:3072 -nodes -keyout mykey.pem -out myreq.pem -config openssl-san.cnf
Loading 'screen' into random state - done
Generate a 1024 bit RSA private key
................................................................++++++
...................................................++++++
writing new private key to 'mykey.pem'
-----
You are about to be asked to enter information that is incorporated
into your certificate request.
What you are about to enter is what is called a Distinguished Name or a DN.
There are quite a few fields but you can leave some blank
For some fields there is a default value,
If you enter '.', the field is left blank.
-----
Country Name (2 letter code) [AU]:US
State or Province Name (full name) [Some-State]:CA
Locality Name (eg, city) []:San Jose
Organization Name (eg, company) [Internet Widgits Pty Ltd]:ABC
Organizational Unit Name (eg, section) []:CDE
Common Name (eg, YOUR name) []:XYZ.ABC
Email Address []:(email address)

Please enter the following 'extra' attributes
to be sent with your certificate request
A challenge password []:Test123
An optional company name []:OpenSSL>
- You can verify the CSR (especially for SAN attributes presencE) with openssl req -text -noout -in csrfilename.
- After you provide all of the required details, two files are generated:
- A new private key that includes the name mykey.pem.
- A CSR that includes the name myreq.pem.
Option B. CSR Generated by the WLC
If your WLC runs Software Version 8.3.102 or later, the more secure option is to use the WLC to generate the CSR. The advantage is that the key is generated on the WLC and never leaves the WLC; thus is never exposed in the outside world.
As of now, this method does not allow to configure SAN in the CSR which has been known to lead to issues with certain browsers which requires the presence of a SAN attribute. Some CA allow to insert SAN fields at signing time, so it is a good idea to check with your CA.
CSR generation by the WLC itself uses a 2048 bits key size and ecdsa key size is 256 bits.
Note: If you run the csr generation command and do not install the subsequent certificate yet, your WLC is rendered completely unreachable on HTTPS at the next reboot, as the WLC uses the newly generated CSR key after reboot but does not have the certificate that goes with it.
To generate a CSR for web authentication, enter this command:
(WLC) >config certificate generate csr-webauth BE BR Brussels Cisco TAC mywebauthportal.wireless.com tac@cisco.com
-----BEGIN CERTIFICATE REQUEST-----
MIICqjCCAZICAQAwZTELMAkGA1UECAwCQlIxETAPBgNVBAcMCEJydXNzZWxzMQ4w
DAYDVQQKDAVDaXNjbzEMMAoGA1UECwwDVEFDMSUwIwYDVQQDDBxteXdlYmF1dGhw
b3J0YWwud2lyZWxlc3MuY29tMIIBIjANBgkqhkiG9w0BAQEFAAOCAQ8AMIIBCgKC
AQEAnssc0BxlJ2ULa3xgJH5lAUtbd9CuQVqqf2nflh+V1tu82rzTvz38bjF3g+MX
JiaBbKMA27VJH1J2K2ycDMlhjyYpH9N59T4fXvZr3JNGVfmHIRuYDnCSdil0ookK
FU4sDwXyOxR6gfB6m+Uv5SCOuzfBsTz5bfQ1NlZqg1hNemnhqVgbXEd90sgJmaF2
0tsL0jUhbLosdwMLUbZ5LUa34mvufoI3VAKA0cmWZh2WzMJiaI2JpbO0afRO3kSg
x3XDkZiR7Z9a8rK6Xd8rwDlx0TcMFWdWVcKMDgh7Tw+Ba1cUjjIMzKT6OOjFGOGu
yNkgYefrrBN+WkDdc6c55bxErwIDAQABoAAwDQYJKoZIhvcNAQELBQADggEBAB0K
ZvEpAafoovphlcXIElL2DSwVzjlbd9u7T5JRGgqri1l9/0wzxFjTymQofga427mj
5dNqlCWxRFmKhAmO0fGQkUoP1YhJRxidu+0T8O46s/stbhj9nuInmoTgPaA0s3YH
tDdWgjmV2ASnroUV9oBNu3wR6RQtKDX/CnTSRG5YufTWOVf9IRnL9LkU6pzA69Xd
YHPLnD2ygR1Q+3Is4+5Jw6ZQAaqlPWyVQccvGyFacscA7L+nZK3SSITzGt9B2HAa
PQ8DQOaCwnqt2efYmaezGiHOR8XHOaWcNoJQCFOnb4KK6/1aF/7eOS4LMA+jSzt4
Wkc/wH4DyYdH7x5jzHc=
-----END CERTIFICATE REQUEST-----
In order to generate a CSR for the webadmin, the command changes to:
(WLC) >config certificate generate csr-webadmin BE BR Brussels Cisco TAC mywebauthportal.wireless.com tac@cisco.com
Note: The CSR is printed on the terminal after you enter the command. There are no other ways to retrieve it; it is not possible to upload it from the WLC nor is it possible to save it. You must copy/paste it to a file on your computer after you enter the command. The generated key stays on the WLC until the next CSR is generated (the key is thus overwritten). If you ever have to change the WLC hardware later on (RMA), you are not be able to reinstall the same certificate as a new key and CSR is generated on the new WLC.
You then have to hand over this CSR to your third-party signing authority or your enterprise Public Key Infrastructure (PKI).
Step 2. Get the Certificate Signed
Option A: Obtain the Final.pem File from your Enterprise CA
This example only showcases a current enterprise CA (Windows Server 2012 in this example) and does not cover the steps to set up a Windows Server CA from scratch.
- Go to your enteprrise CA page in the browser (usually https://<CA-ip>/certsrv) and click Request a certificate.

- Click advanced certificate request.

- Enter the CSR you obtained from the WLC or OpenSSL. In the Certificate Template drop-down list, choose Web Server.
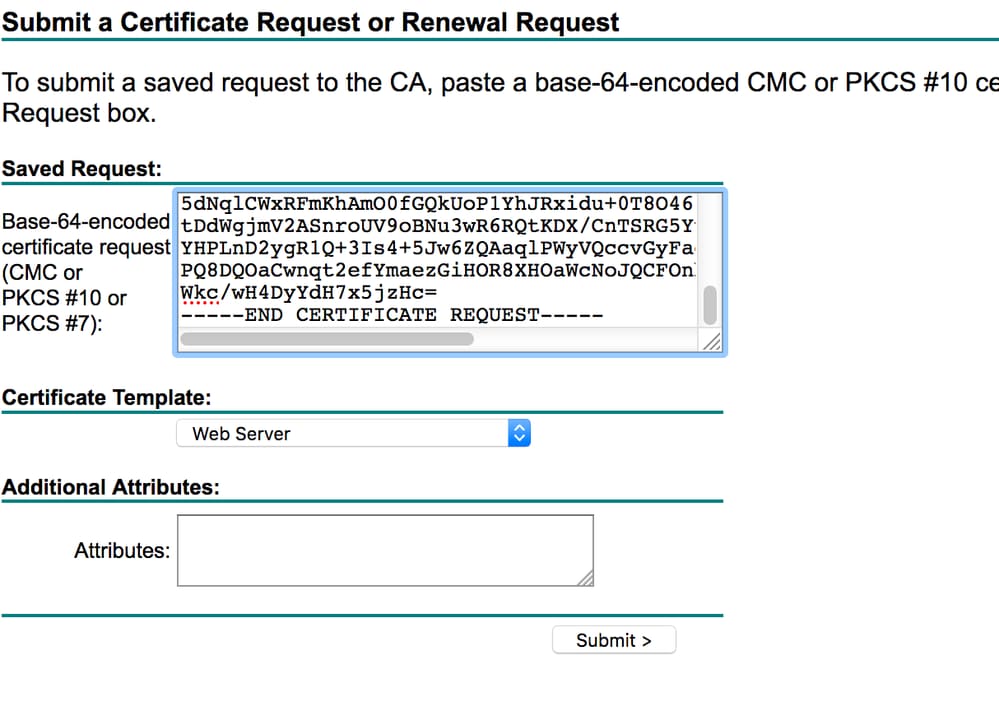
- Click the Base 64 encodedradio button.
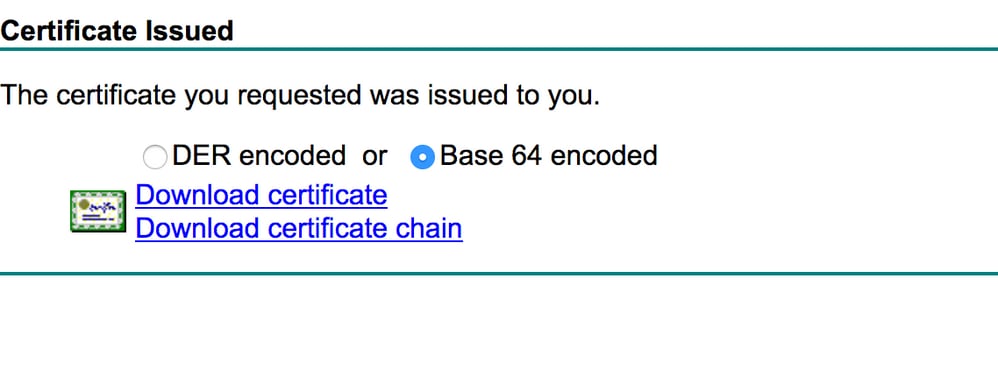
- If the downloaded certificate is of type PKCS7 (.p7b), convert it to PEM (in the next example the certificate chain was downloaded as filename "All-certs.p7b") :
openssl pkcs7 -print_certs -in All-certs.p7b -out All-certs.pem
6. Combine the certificate chain (in this example, it is named "All-certs.pem") certificates with the private key that was generated along with the CSR (the private key of the device certificate, which is mykey.pem in this example) if you went with option A (OpenSSL to generate the CSR), and save the file as final.pem. If you generated the CSR directly from the WLC (option B), skip this step.
Enter these commands in the OpenSSL application in order to create the All-certs.pem and final.pem files:
openssl>pkcs12 -export -in All-certs.pem -inkey mykey.pem
       -out All-certs.p12 -clcerts -passin pass:check123
       -passout pass:check123

openssl>pkcs12 -in All-certs.p12 -out final.pem
       -passin pass:check123 -passout pass:check123
Note: In this command, you must enter a password for the parameters -passin and -passout. The password that is configured for the -passout parameter must match the certpassword parameter that is configured on the WLC. In this example, the password that is configured for both the -passin and -passout parameters is check123.
Final.pem is the file to download to the WLC if you followed “Option A. CSR with OpenSSL”.
If you followed “Option B. CSR generated by the WLC itself”, then All-certs.pem is the file to download to the WLC. The next step is to download this file to the WLC.
Note: If the upload of the certificate to the WLC fails, verify that there is the whole chain in the pem file. Refer to the step 2 of option B (obtain the final.pem from a 3rd party CA) to see how it must look like. If you only see one certificate in the file, then you need to manually download all the intermediate and root CA certificate files and append them (by simple copy paste) to the file to create the chain.
Option B: Obtain the Final.pem File from a Third-Party CA
- Copy and paste the CSR information into any CA enrollment tool.
After you submit the CSR to the third-party CA, the third-party CA digitally signs the certificate and sends back the signed certificate chain through email. In the case of chained certificates, you receive the entire chain of certificates from the CA. If you only have one intermediate certificate as in this example, you receive these three certificates from the CA:
- Root certificate.pem
- Intermediate certificate.pem
- Device certificate.pem
Note: Make sure that the certificate is Apache-compatible with Secure Hash Algorithm 1 (SHA1) encryption.
- Once you have all three certificates, copy and paste the contents of each .pem file into another file in this order:
------BEGIN CERTIFICATE------
*Device cert*
------END CERTIFICATE------
------BEGIN CERTIFICATE------
*Intermediate CA cert *
------END CERTIFICATE--------
------BEGIN CERTIFICATE------
*Root CA cert *
------END CERTIFICATE------
- Save the file as All-certs.pem.
- Combine the All-certs.pem certificate with the private key that wasgenerated along with the CSR (the private key of the device certificate, which is mykey.pem in this example) if you used option A (OpenSSL to generate the CSR), and save the file as final.pem. If you generated the CSR directly from the WLC (option B), skip this step.
Enter these commands in the OpenSSL application in order to create the All-certs.pem and final.pem files:
openssl>pkcs12 -export -in All-certs.pem -inkey mykey.pem
       -out All-certs.p12 -clcerts -passin pass:check123
       -passout pass:check123

openssl>pkcs12 -in All-certs.p12 -out final.pem
       -passin pass:check123 -passout pass:check123
Note: In this command, you must enter a password for the parameters -passin and -passout. The password that is configured for the -passout parameter must match the certpassword parameter that is configured on the WLC. In this example, the password that is configured for both the -passin and -passout parameters is check123.
Final.pem is the file to download to the WLC if you followed “Option A. CSR with OpenSSL”. If you followed “Option B. CSR generated by the WLC itself”, then All-certs.pem is the file that you must download to the WLC. The next step is to download this file to the WLC.
Note: SHA2 is also supported. Cisco bug ID CSCuf20725 is a request for SHA512 support.
Step 3 CLI. Download the Third-Party Certificate to the WLC with the CLI
Complete these steps to download the chained certificate to the WLC with the CLI:
- Move the final.pem file to the default directory on your TFTP server.
- In the CLI, enter these commands in order to change the download settings:
    >transfer download mode tftp
    >transfer download datatype webauthcert
    >transfer download serverip <TFTP server IP address>
    >transfer download path <absolute TFTP server path to the update file>
    >transfer download filename final.pem
- Enter the password for the .pem file so that the operating system can decrypt the SSL key and certificate.
>transfer download certpassword password
Note: Be sure that the value for certpassword is the same as the -passout parameter password that was set in Step 4 (or 5) of the Generate a CSR section. In this example, the certpassword must be check123. If you had chosen option B (that is, use the WLC itself to generate the CSR), leave the certpassword field blank.
- Enter the
transfer download start command in order to view the updated settings. Then enter y at the prompt in order to confirm the current download settings and start the certificate and key download. Here is an example:
(Cisco Controller) >transfer download start

Mode............................................. TFTP
Data Type........................................ Site Cert
TFTP Server IP................................... 10.77.244.196
TFTP Packet Timeout.............................. 6
TFTP Max Retries................................. 10
TFTP Path........................................./
TFTP Filename.................................... final.pem

This might take some time.
Are you sure you want to start? (y/N) y

TFTP EAP Dev cert transfer start.

Certificate installed.
                        Reboot the switch to use new certificate.
- Reboot the WLC in order for the changes to take effect.
Step 3 GUI. Download the Third-Party Certificate to the WLC with the GUI
Complete these steps to download the chained certificate to the WLC with the GUI:
- Copy the device certificate final.pem to the default directory on your TFTP server.
- Choose Security > Web Auth > Cert to open the Web Authentication Certificate page.
- Check the Download SSL Certificate check box in order to view the Download SSL Certificate From TFTP Server parameters.
- In the IP Address field, enter the IP address of the TFTP server.

- In the File Path field, enter the directory path of the certificate.
- In the File Name field, enter the name of the certificate.
- In the Certificate Password field, enter the password that was used to protect the certificate.
- Click Apply.
- After the download is complete, choose Commands > Reboot > Reboot.
- If prompted to save your changes, click Save and Reboot.
- Click OK in order to confirm your decision to reboot the controller.
Troubleshoot
In order to troubleshoot the installation of the certificate on the WLC, open a command line on the WLC and enter debug transfer all enable and debug pm pki enable then complete the download certificate procedure.
In some cases, the logs only say that the certificate installation failed:

*TransferTask: Sep 09 08:37:17.415: RESULT_STRING: TFTP receive complete... Installing
 Certificate.

*TransferTask: Sep 09 08:37:17.415: RESULT_CODE:13


TFTP receive complete... Installing Certificate.

*TransferTask: Sep 09 08:37:21.418: Adding cert (1935 bytes) with certificate key password.

*TransferTask: Sep 09 08:37:21.421: RESULT_STRING: Error installing certificate.
Verify the certificate format and chain. Remember that WLCs later than version 7.6 require the whole chain to be present, so you cannot upload your WLC certificate alone. The chain up to the root CA must be present in the file.
Here is an example of debugs when the intermediate CA is incorrect :
*TransferTask: Jan 04 19:08:13.338: Add WebAuth Cert: Adding certificate & private key using password check123
*TransferTask: Jan 04 19:08:13.338: Add ID Cert: Adding certificate & private key using password check123
*TransferTask: Jan 04 19:08:13.338: Add Cert to ID Table: Adding certificate (name: bsnSslWebauthCert) to ID table using password check123
*TransferTask: Jan 04 19:08:13.338: Add Cert to ID Table: Decoding PEM-encoded Certificate (verify: YES)
*TransferTask: Jan 04 19:08:13.338: Decode & Verify PEM Cert: Cert/Key Length was 0, so taking string length instead
*TransferTask: Jan 04 19:08:13.338: Decode & Verify PEM Cert: Cert/Key Length 7148 & VERIFY
*TransferTask: Jan 04 19:08:13.342: Decode & Verify PEM Cert: X509 Cert Verification return code: 0
*TransferTask: Jan 04 19:08:13.342: Decode & Verify PEM Cert: X509 Cert Verification result text: unable to get local issuer certificate
*TransferTask: Jan 04 19:08:13.342: Decode & Verify PEM Cert: Error in X509 Cert Verification at 0 depth: unable to get local issuer certificate
*TransferTask: Jan 04 19:08:13.343: Add Cert to ID Table: Error decoding (verify: YES) PEM certificate
*TransferTask: Jan 04 19:08:13.343: Add ID Cert: Error decoding / adding cert to ID cert table (verifyChain: TRUE)
*TransferTask: Jan 04 19:08:13.343: Add WebAuth Cert: Error adding ID cert
High Availability (HA SSO) considerations
As explained in the WLC HA SSO deployment guide, certificates are not replicated from primary to secondary controller in a HA SSO scenario.
This means that you have to import all the certificates to the secondary before you form the HA pair.
Another caveat is that this does not work if you generated the CSR (and therefore created the key locally) on the primary WLC because that key cannot be exported.
The only way is to generate the CSR for the primary WLC with OpenSSL (and therefore have the key attached to the certificate) and import that certificate/key combination on both WLCs.
Related Information
 Feedback