Triggering Configuration File Copies to a TFTP Server via SNMP
Available Languages
Objective
The objective of this article it to outline the steps to trigger copying of configuration files from a Cisco Business switch via Simple Network Management Protocol (SNMP).
Applicable Devices
- Catalyst 1200 Series
- Catalyst 1300 Series
- CBS250 Series
- CBS350 Series
Introduction
Configuration files are typically copied from a switch using the graphical user interface (GUI) or the command line interface (CLI). A more unusual method is to trigger the copy task via SNMP.
Sensitive Data Handling
When copying a configuration file containing sensitive data, the copy task can exclude sensitive data, include it in encrypted form, include it as plaintext, or use a default method. Specifying sensitive data handling is optional and the default will be used if it’s not specified.
GUI
To access the sensitive data handling menu using the GUI, navigate to Administration > File Operations > File Management menu.
- Exclude - to exclude sensitive data
- Encrypt - to encrypt sensitive data
- Plaintext - to display sensitive data in plaintext.
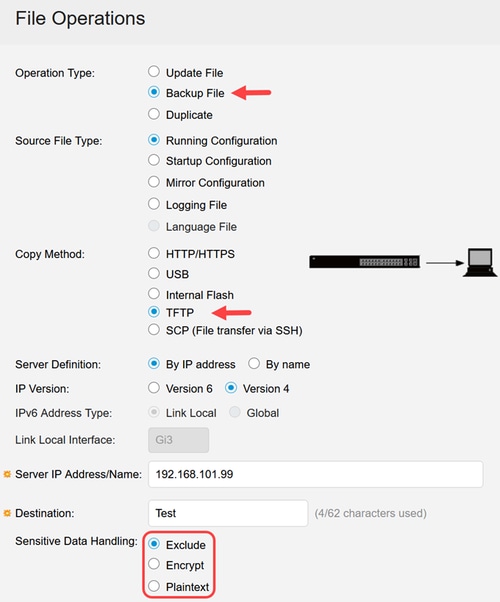
Sensitive Data Handling option only appears in Backup file mode for TFTP or SCP.
CLI
From the command line, the copy command may be used:
copy {running-config | startup-config} dst-url [exclude | include-encrypted | include-plaintext]
For example:
copy running-config tftp://192.168.101.99/destination-file.txt exclude
The default is whatever the Secure Sensitive Data (SSD) session read mode is set to. To see the current mode, enter show ssd session, or enter show running-config and look for the file SSD indicator. With factory default settings, the expected SSD session read mode is encrypted.
C1300# show ssd session
User Name / Level: user1 / Level 15
User Read Permission: Both
Current Session Read Mode: Encrypted
C1300# show running-config | include SSD
file SSD indicator encrypted
If the copy command was entered with no option specified, it would copy as though "include-encrypted" was chosen.
copy running-config tftp://192.168.101.99/destination-file.txt
However, the session read value can be changed:
ssd session read {exclude | encrypted | plaintext}
This command impacts the output of show running-config and show startup-config, as well as acting as the default value for the copy command's treatment of sensitive data.
For example:
C1300(config)# ssd session read plaintext
C1300(config)# exit
C1300# copy running-config tftp://192.168.101.99/destination-file.txt
The resulting file will include sensitive data in plaintext, as will the output of "show running-config" and "show startup-config", so care should be taken with the SSD session read mode. Leaving it at the default is safest.
If the output of show running-config or show startup-config does not show everything that's expected, for example, SNMP v3 users with encrypted credentials that are visible in the GUI, make sure that the SSD session read value is not set to "exclude".
SNMP
The Catalyst 1200/Catalyst 1300/CBSx50 series switches use the SNMP object identifier (OID) called rlCopyOptionsRequestedSsdAccess to control the sensitive data option. The object is an integer and at first glance, the values it accepts look equivalent to those for the copy command:
- 1: exclude
- 2: include-encrypted
- 3: include-decrypted (same as "include-plaintext" at the command line)
- 4: default
Option 3, which copies the sensitive data in plaintext, cannot be used with SNMP v2c at all, nor can it be used with SNMP v3 unless both authentication and privacy (authPriv) are used.
Setting the plaintext option to copy the file using an insecure protocol like TFTP is not a good idea.
SNMP v3 with authPriv is only used to trigger the copy, so its privacy settings are not helpful for protection of the configuration file itself during transfer. Copying with Secure Copy Protocol (SCP), for example, would be more secure.
Option 4, the "default" option, does not behave as might be expected. It does not act like the copy command, and the SSD read session value has no bearing at all on the copy result when using SNMP. Instead, option 4 is the same as option 1 (exclude), with one exception: If using SNMP v3 with authPriv, option 4 is the same as option 3 (plaintext).
The behavior is summarized in the table below:
|
1 (exclude) |
2 (encrypted) |
3 (plaintext) |
default |
|
|
CLI copy |
excluded |
encrypted |
plaintext |
SSD value |
|
SNMP v2c |
excluded |
encrypted |
fails |
excluded |
|
SNMP v3 authPriv |
excluded |
encrypted |
plaintext |
plaintext |
|
SNMP v3 authNoPriv |
excluded |
encrypted |
fails |
excluded |
|
SNMP v3 noAuthNoPriv |
excluded |
encrypted |
fails |
excluded |
Switch Configuration for SNMP v3
SNMP v3 with authPriv is not specifically required to trigger the copy task, but since it provides greater flexibility and security, it is recommended over the other SNMP variants and will be the one used for the following examples.
Example configuration:
snmp-server server
snmp-server engineID local 8000000903f01d2da99341
snmp-server group snmpAdmin v3 priv write Default
encrypted snmp-server user sbscadmin snmpAdmin v3 auth sha [authentication_password] priv [privacy_password]
The above configuration allows the user named sbscadmin to send SNMP v3 commands to the switch to trigger the file copy. User sbscadmin is a member of the snmpAdmin group, which has been given full SNMP v3 write privileges on the switch.
Note that the user has both an authentication (auth) password and a privacy (priv) password, i.e., authPriv, and the snmpAdmin group has "priv" set (which also includes authentication since privacy cannot be used without it).
Triggering the Copy Task
The following is an example of snmpset command that triggers the copy task. It's long as it must set several object values. The command is entered all in one line, but a backslash can be used as an escape character to separate each item onto its own line if desired. This was done below to improve readability. Input is shown in blue, and the output is in white.
blake@MintBD:~$ snmpset -v 3 -u snmpuser -l authPriv \
-a SHA -A [authentication_password] \
-x AES -X [privacy_password] -m +CISCOSB-COPY-MIB 192.168.111.253 \
rlCopyOptionsRequestedSsdAccess.1 = include-encrypted \
rlCopyRowStatus.1 = createAndGo \
rlCopySourceLocation.1 = local \
rlCopySourceIpAddress.1 = 0.0.0.0 \
rlCopySourceUnitNumber.1 = 1 \
rlCopySourceFileType.1 = runningConfig \
rlCopyDestinationLocation.1 = tftp \
rlCopyDestinationIpAddress.1 = 192.168.111.18 \
rlCopyDestinationFileName.1 = v3-2.txt \
rlCopyDestinationFileType.1 = backupConfig
CISCOSB-COPY-MIB::rlCopyOptionsRequestedSsdAccess.1 = INTEGER: include-encrypted(2)
CISCOSB-COPY-MIB::rlCopyRowStatus.1 = INTEGER: createAndGo(4)
CISCOSB-COPY-MIB::rlCopySourceLocation.1 = INTEGER: local(1)
CISCOSB-COPY-MIB::rlCopySourceIpAddress.1 = IpAddress: 0.0.0.0
CISCOSB-COPY-MIB::rlCopySourceUnitNumber.1 = INTEGER: 1
CISCOSB-COPY-MIB::rlCopySourceFileType.1 = INTEGER: runningConfig(2)
CISCOSB-COPY-MIB::rlCopyDestinationLocation.1 = INTEGER: tftp(3)
CISCOSB-COPY-MIB::rlCopyDestinationIpAddress.1 = IpAddress: 192.168.111.18
CISCOSB-COPY-MIB::rlCopyDestinationFileName.1 = STRING: v3-2.txt
CISCOSB-COPY-MIB::rlCopyDestinationFileType.1 = INTEGER: backupConfig(4)
- Each OID has ".1" appended, representing the row in the table being used for the task.
- "rlCopyRowStatus.1" is used to insert the entry into rlCopyTable. It is set to "createAndGo", i.e., create the row and set it to active so it can be used by the switch.
- The SSD access value is set to "include-encrypted" (for this copy only).
- The running-config file is copied to the TFTP server at 192.168.111.18 with a destination file name of "v3-2.txt".
Once the copy task is executed, the value of rlCopyOptionsRequestedSsdAccess reverts to 4 (default).
The use of symbolic names for the objects and their values is made possible by CISCOSB-COPY-MIB, which is described in detail in the file "CISCOSB-copy.mib", included with the MIB files on the download page for the switch.
The following table matches the symbolic name for each object to its OID.
|
Symbolic Name |
Object Identifier (OID) |
|
rlCopyOptionsTable |
1.3.6.1.4.1.9.6.1.101.87.12 |
|
rlCopyOptionsRequestedSsdAccess |
1.3.6.1.4.1.9.6.1.101.87.12.1.2 |
|
rlCopyTable |
1.3.6.1.4.1.9.6.1.101.87.2 |
|
rlCopyRowStatus |
1.3.6.1.4.1.9.6.1.101.87.2.1.17 |
|
rlCopySourceLocation |
1.3.6.1.4.1.9.6.1.101.87.2.1.3 |
|
rlCopySourceIpAddress |
1.3.6.1.4.1.9.6.1.101.87.2.1.4 |
|
rlCopySourceUnitNumber |
1.3.6.1.4.1.9.6.1.101.87.2.1.5 |
|
rlCopySourceFileType |
1.3.6.1.4.1.9.6.1.101.87.2.1.7 |
|
rlCopyDestinationLocation |
1.3.6.1.4.1.9.6.1.101.87.2.1.8 |
|
rlCopyDestinationIpAddress |
1.3.6.1.4.1.9.6.1.101.87.2.1.9 |
|
rlCopyDestinationFileName |
1.3.6.1.4.1.9.6.1.101.87.2.1.11 |
|
rlCopyDestinationFileType |
1.3.6.1.4.1.9.6.1.101.87.2.1.12 |
If MIB files are not used, the file copy may be triggered using the OIDs instead of the symbolic names, although the input and output are less intuitive.
blake@MintBD:~$ snmpset -v 3 -u sbscadmin -l authPriv \
-a SHA -A [authentication_password] \
-x AES -X [privacy_password] 192.168.111.253 \
1.3.6.1.4.1.9.6.1.101.87.12.1.2.1 i 1 \
1.3.6.1.4.1.9.6.1.101.87.2.1.17.1 i 4 \
1.3.6.1.4.1.9.6.1.101.87.2.1.3.1 i 1 \
1.3.6.1.4.1.9.6.1.101.87.2.1.4.1 a 0.0.0.0 \
1.3.6.1.4.1.9.6.1.101.87.2.1.5.1 i 1 \
1.3.6.1.4.1.9.6.1.101.87.2.1.7.1 i 2 \
1.3.6.1.4.1.9.6.1.101.87.2.1.8.1 i 3 \
1.3.6.1.4.1.9.6.1.101.87.2.1.9.1 a 192.168.111.18 \
1.3.6.1.4.1.9.6.1.101.87.2.1.11.1 s destination-file.txt \
1.3.6.1.4.1.9.6.1.101.87.2.1.12.1 i 4
iso.3.6.1.4.1.9.6.1.101.87.12.1.2.1 = INTEGER: 1
iso.3.6.1.4.1.9.6.1.101.87.2.1.17.1 = INTEGER: 4
iso.3.6.1.4.1.9.6.1.101.87.2.1.3.1 = INTEGER: 1
iso.3.6.1.4.1.9.6.1.101.87.2.1.4.1 = IpAddress: 0.0.0.0
iso.3.6.1.4.1.9.6.1.101.87.2.1.5.1 = INTEGER: 1
iso.3.6.1.4.1.9.6.1.101.87.2.1.7.1 = INTEGER: 2
iso.3.6.1.4.1.9.6.1.101.87.2.1.8.1 = INTEGER: 3
iso.3.6.1.4.1.9.6.1.101.87.2.1.9.1 = IpAddress: 192.168.111.18
iso.3.6.1.4.1.9.6.1.101.87.2.1.11.1 = STRING: "destination-file.txt"
iso.3.6.1.4.1.9.6.1.101.87.2.1.12.1 = INTEGER: 4
A simple "=" symbol was not used to set the values because, without the MIB, the command must explicitly set each object type ("i" for integer, "a" for address, and "s" for string). The names for the values ("local", "runningConfig", etc.) also cannot be used since they are defined by the MIB, so the integers representing those options must be set directly.
Net-SNMP and Switch MIB Files
SNMP management tools can be helpful for testing and troubleshooting purposes. This article uses the snmpset command included with Net-SNMP, a suite of free and open-source SNMP tools.
In order to use the switch MIB files with Net-SNMP, first ensure that Net-SNMP's own MIB files are placed in a location where Net-SNMP will look for them, e.g., $HOME/.snmp/mibs. Without Net-SNMP's own MIB files installed, the switch MIBs will not work properly.
The switch MIB files may be unzipped and placed in the same location as Net-SNMP's MIB files, but to avoid compatibility issues, do not overwrite the Net-SNMP versions of any that overlap between the two sets.
Once all the MIB files are in an appropriate location, the relevant MIB(s) can be called using the "-m" argument with the desired command.
For example:
snmpget -v 3 -u snmpuser -l authPriv \
-a SHA -A [authentication_password] \
-x AES -X [privacy_password] \
-m +CISCOSB-COPY-MIB 192.168.111.253 rlCopyOptionsRequestedSsdAccess.1
"CISCOSB-COPY-MIB" is the name of the MIB itself and not the file that describes it, which is CISCOSB-copy.mib.
For further information on how to use the Net-SNMP tools, see the documentation and tutorials available at the Net-SNMP website.
Conclusion
Now you know all about the steps to trigger copying of configuration files from a Cisco Business switch to a TFTP server via SNMP.
Revision History
| Revision | Publish Date | Comments |
|---|---|---|
1.0 |
28-Mar-2025
|
Initial Release |
 Feedback
Contact Cisco
- Open a Support Case

- (Requires a Cisco Service Contract)