Introduction
This document describes the configuration steps to enable CPU Hyperthreading in a UCS server.
Prerequisites
Requirements
Cisco recommends that you have knowledge of these topics.
- Basic understanding of UCSM, Service Porfiles and Bios Policy settings.
- Basic understanding of CIMC Bios settings.
- Basic understanding of vmware vCenter and ESXi administration.
Components Used
The information in this document is based on these software and hardware versions:
- UCS Family Servers M5, M6, M7 and higher.
- vmware vCenter 7.0(x) and higher
- vmware ESXi 7.0(x) and higher
The information in this document was created from the devices in a specific lab environment. All of the devices used in this document started with a cleared (default) configuration. If your network is live, ensure that you understand the potential impact of any command.
Background Information
Hyperthreading technology allows a single physical processor core to behave like two logical processors. The processor can run two independent applications at the same time.
Intel Corporation developed hyperthreading technology to enhance the performance of its Pentium IV and Xeon processor lines. Hyperthreading technology allows a single processor core to execute two independent threads simultaneously.
While hyperthreading does not double the performance of a system, it can increase performance by better utilizing idle resources leading to greater throughput for certain important workload types. An application running on one logical processor of a busy core can expect slightly more than half of the throughput that it obtains while running alone on a non-hyperthreaded processor. Hyperthreading performance improvements are highly application-dependent, and some applications can see performance degradation with hyperthreading because many processor resources (such as the cache) are shared between logical processors.
Configure
Enable Hyperthreading in the Bios
Ensure that the Intel Hyperthreading feature is enabled at Bios Policy when the host are UCSM managed or Advance Bios settings at CIMC for stand-alone hosts.
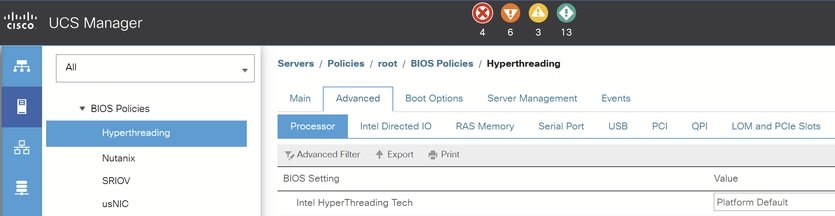
UCSM Bios Policy Configuration for Hyperthreading
- In the Navigation pane, click the Servers tab.
- Expand Bios policies menu and select your current Bios policy.
- Click on Advanced tab and then Processor.
- Under the Processor tab, locate Intel Hyperthreading Tech.
- Ensure the value is set to Enabled or Platform Default.
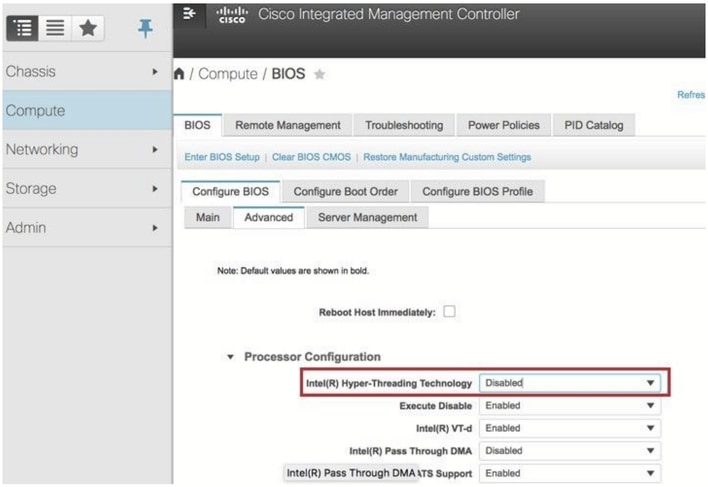
CIMC Bios Configuration for Hyperthreading
- In the Navigation pane, click the Compute tab.
- In the Bios tab, click the Configure Bios tab.
- Click on the advanced tab and ensure the Intel Hyperthreading Technology combo is Enabled.

Note: When you change any of these options, a server reboot it´s required for the changes to take effect.
Note: Cisco recommends making these changes during a planned maintenance window since a reboot it´s required for the changes to take effect.
Enable Hyperthreading in the Host
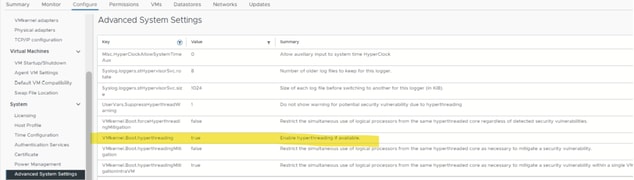
Ensure that hyperthreading is enabled for the ESXi host.
- Browse to the host in the vSphere Client.
- Click Configure.
- Under System, click Advanced System Settings and select VMkernel.Boot.hyperthreading.
4. Proceed to restart the ESXi host for the setting to take effect.
5. Hyperthreading is enabled if the value is set to true.
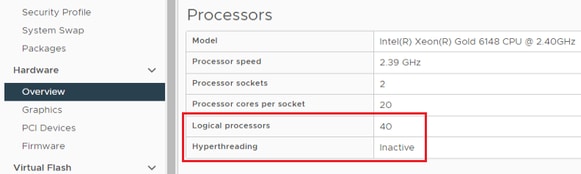
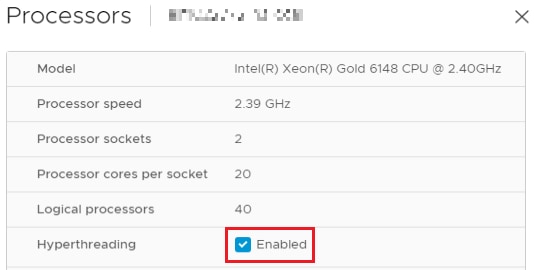
For this scenario, this host has 2 Processor sockets, and 20 Processor cores per socket. As we can see, the Hyperthreading configuration is shown as Inactive.
> Select the ESXi host > Hardware > Overview > Processors > Hyperthreading
6. Select the ESXi host > Hardware > Overview > Processors > Hyperthreading. Click Edit Hyperthreading and select the checkbox for Hyperthreading, then check the box to enable it.

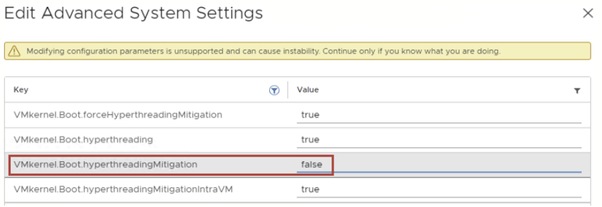
7. Browse to the host in the vSphere Client; Click Configure; Under System, click Advanced System Settings and change the VMkernel.Boot.hyperthreadingMitigation metric to false.
8. Now reboot the ESXi host for the changes to take effect.
Verify
After the reboot, the Logical Processor count has doubled. and the Hyperthreading status has changed to ACTIVE.
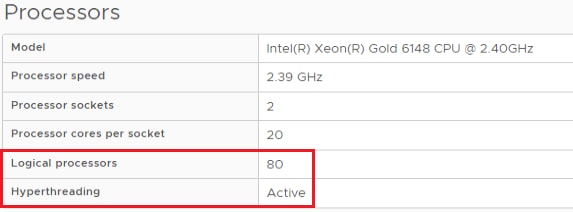
Now the Logical processors have been increased from 40 to 80 since the Hyperthreading has been successfully enabled on the required ESXi host.
Related Info
 Feedback