Migrate FTD HA (Failover) to Another FMC
Available Languages
Download Options
Bias-Free Language
The documentation set for this product strives to use bias-free language. For the purposes of this documentation set, bias-free is defined as language that does not imply discrimination based on age, disability, gender, racial identity, ethnic identity, sexual orientation, socioeconomic status, and intersectionality. Exceptions may be present in the documentation due to language that is hardcoded in the user interfaces of the product software, language used based on RFP documentation, or language that is used by a referenced third-party product. Learn more about how Cisco is using Inclusive Language.
Contents
Introduction
This document describes the procedure to migrate an FTD HA from an existing FMC to another FMC.
For a standalone firewall migration to a new FMC check https://www.cisco.com/c/en/us/support/docs/security/secure-firewall-threat-defense/222480-migrate-an-ftd-from-one-fmc-to-another-f.html
Abbreviations
ACP = Access Control Policy
ARP = Address Resolution Protocol
CLI = Command Line Interface
FMC = Secure Firewall Management Center
FTD = Secure Firewall Threat Defense
GARP = Gratuitous ARP
HA = High Availability
MW = Maintenance Window
UI = User Interface
Prerequisites
Before starting the migration process, ensure that you have these prerequisites in place:
- UI and CLI access to both the source and destination FMCs.
- Administrative credentials for both FMCs and firewalls.
- Console access to both firewalls.
- Access to the L3 upstream and downstream devices (in case you need to clear the ARP cache).
- Ensure that the destination/target FMC has the same version as the source/old FMC.
- Ensure that the destination/target FMC has the same licenses as the source/old FMC.
- Ensure you arrange a MW to perform the migration since it is going to impact the transit traffic.
Components Used
The information in this document is based on these software and hardware versions:
- Cisco Secure Firewall 31xx, FTD version 7.4.2.2.
- Secure Firewall Management Center version 7.4.2.2.
- The information in this document was created from the devices in a specific lab environment. All of the devices used in this document started with a cleared (default) configuration. If your network is live, ensure that you understand the potential impact of any command.
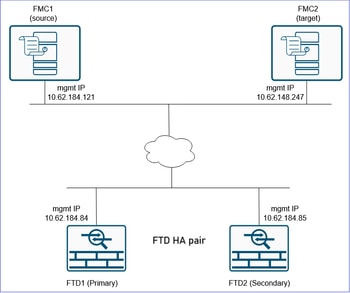
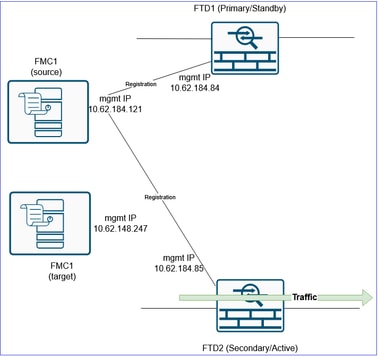
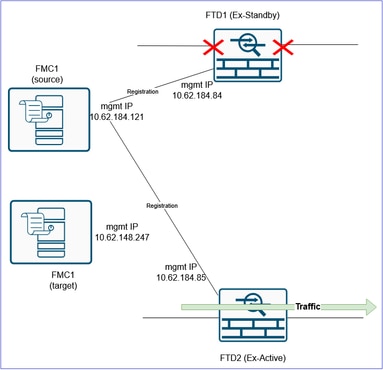
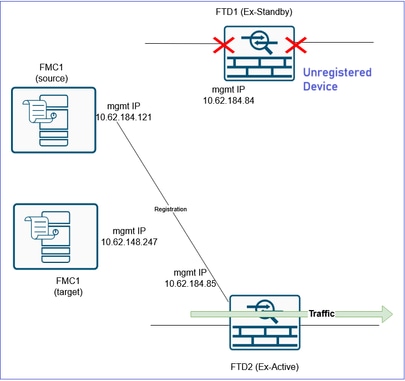
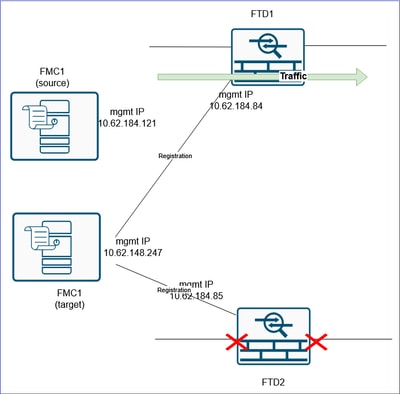
Topology
Configure
Migration Steps
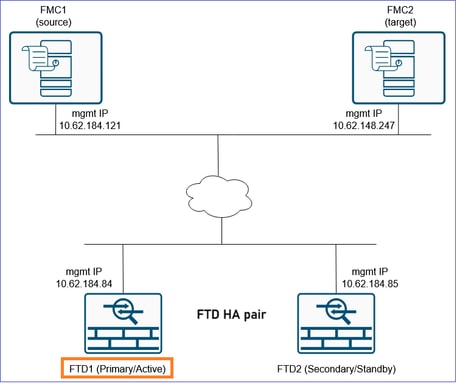
For this scenario we consider these states:
FTD1: Primary/Active
FTD2: Secondary/Standby
Caution: You must ensure to consider changes related to FTD HA unregistration and registration in versions 7.4 and later.
Consider Changes Related to FTD HA Unregistration and Registration in Versions 7.4 and Later
Before you continue with the steps you must familiarize with these important points:
1. In software versions 7.4 and later, FTD in HA can be registered to FMC without breaking the HA first. The user must always register the primary FTD to FMC. During the registration of the primary unit, the FMC automatically discovers and registers the secondary unit.
Refer to the section "Delete (Unregister) a High Availability Pair and Register to a New Firewall Management Center" in the Cisco Secure Firewall Management Center Device Configuration Guide, 7.4.
2. In software versions earlier than 7.4, the HA must be broken in the source FMC and units must be independently registered to the target FMC. Then the user can configure HA in the target FMC.
3. If you migrate devices running software versions earlier than 7.4, then continue with the steps starting from "Step 1. Export the Device Configuration from the Primary Firewall".
4. If you migrate devices running software versions 7.4 and later, then you have 2 options:
- a) Continue with the steps but skip the steps that involve breaking and creating HA. This implies that without breaking HA, FTD HA as a whole is unregistered from the source FMC, and registered to the target FMC as shown in point 1.
- b) Continue with all the steps. This implies HA must be broken in the source FMC, units must be independently registered to the target FMC and HA must be created in the target FMC.
5. Both options have advantages and disadvantages. This table summarizes the 2 options:
|
Options |
Advantages |
Disadvantages |
|
a) Do not break HA, unregister HA from the source FMC and register to the target FMC |
|
|
|
b) Break HA in the source FMC, register units to the target FMC and create FTD HA |
|
|
6. If you opted for option a, then proceed with the steps with these adjustments:
- Skip steps 2-4.
- At step 6 unregister the FTD HA from the source FMC.
- At step 8 register the primary FTD HA to target FMC. The FMC discovers and automatically registers the secondary unit.
- Skip steps 12-14.
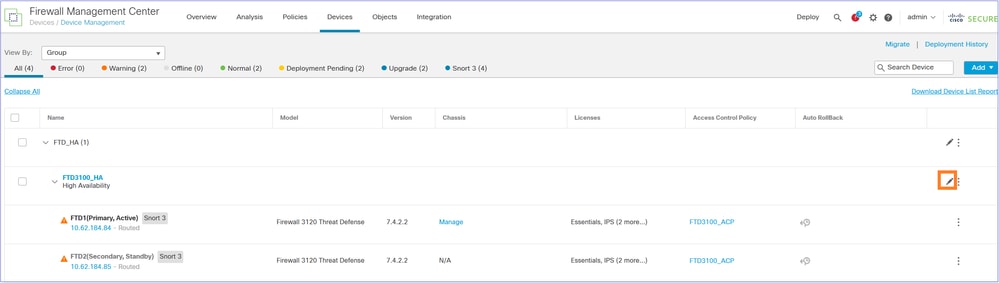
Step 1. Export the Device Configuration from the Primary Firewall
On the FMC1 (source FMC) navigate to Devices > Device Management. Select the FTD HA pair and select Edit:
Navigate to the Device tab. Ensure that the Primary/Active FTD (FTD1 in this case) is selected and select Export to export the Device configuration:
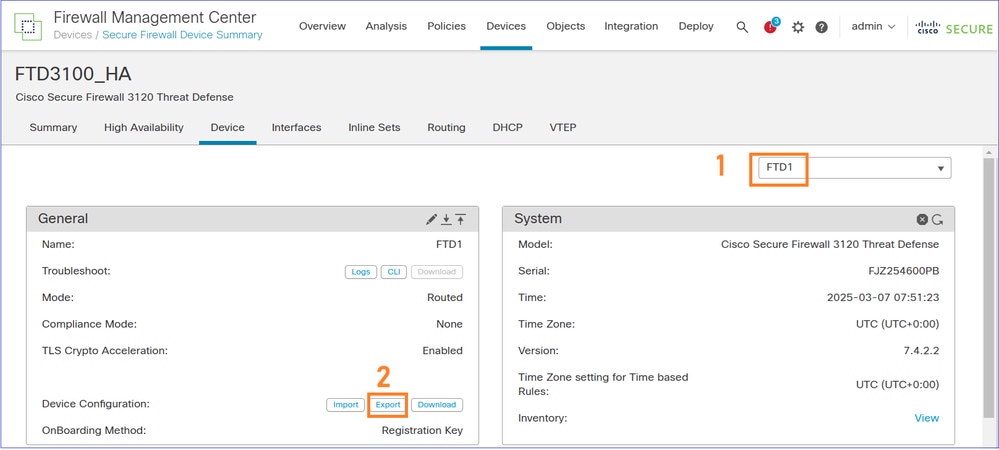
Note: The Export option is available as of 7.1 software release and later.
You can navigate to Notifications > Tasks page to ensure that the export has completed. Then, select the Download Export Package:
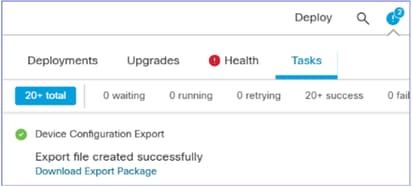
Alternatively, you can click the Download button in the General area. You get an sfo file, for example DeviceExport-cc3fdc40-f9d7-11ef-bf7f-6c8e2fc106f6.sfo
The file contains device-related configuration such as:
- Routed Interfaces
- Inline Sets
- Routing
- DHCP
- VTEP
- Associated objects
Note: The exported configuration file can be imported back only to same FTD. The UUID of the FTD must match with imported sfo file’s content. The same FTD can be registered on another FMC and sfo file can be imported.
Reference: 'Export and Import the Device Configuration' https://www.cisco.com/c/en/us/td/docs/security/secure-firewall/management-center/device-config/760/management-center-device-config-76/get-started-device-settings.html#Cisco_Task.dita_7ccc8e87-6522-4ba9-bb00-eccc8b72b7c8
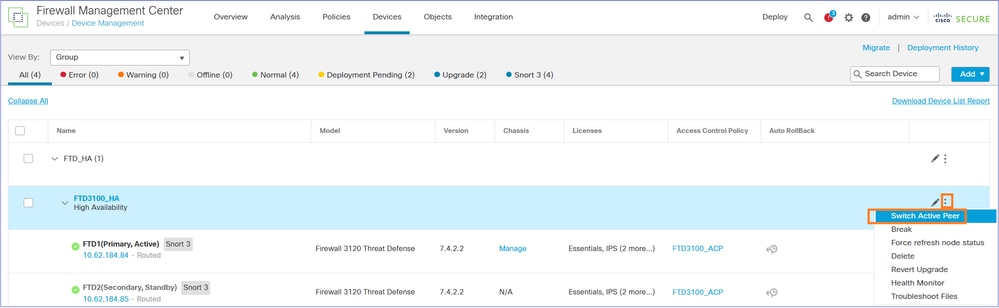
Step 2. Make the Secondary FTD Active
Navigate to Devices > Device Management, select the FTD HA pair, and select Switch Active Pair:
The result is FTD1 (Primary/Standby) and FTD (Secondary/Active):
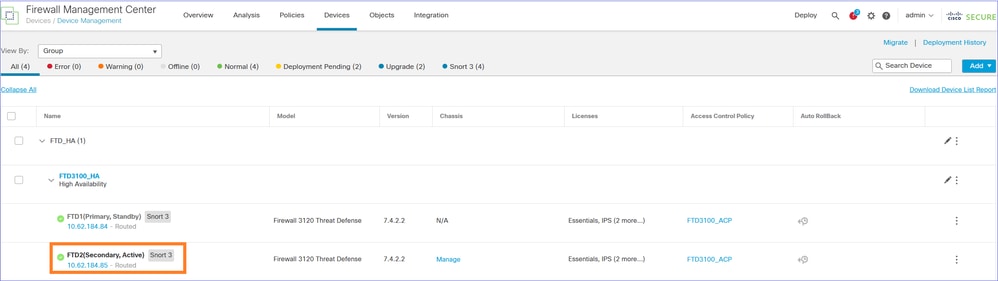
Now the traffic is handled by the Secondary/Active FTD:
Step 3. Break the FTD HA
Navigate to Devices > Device Management and Break the FTD HA:
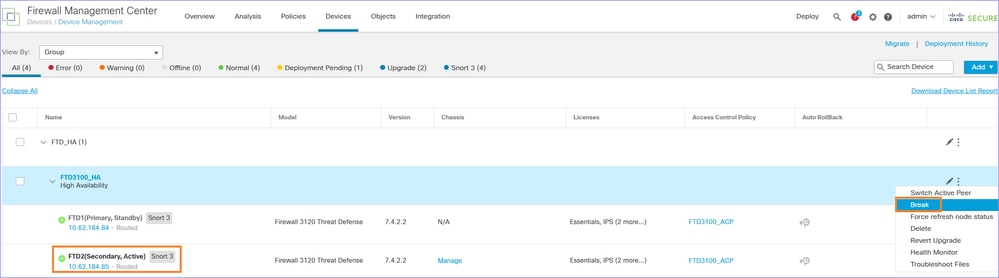
This window appears. Select Yes
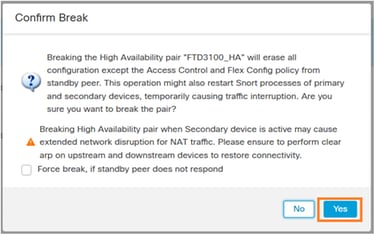
Note: At this point you can experience some traffic interruption for a few seconds since the Snort engine restarts during the HA break. Also, as the message mentions, if you use NAT and experience a prolonged traffic outage consider clearing the ARP cache on upstream and downstream devices.
After breaking the FTD HA, you have two standalone FTDs on FMC.
From configuration point of view, the FTD2 (ex-Active) still has the configuration in place except the failover-related configuration and is handling the traffic:
FTD3100-4# show failover
Failover Off
Failover unit Secondary
Failover LAN Interface: not Configured
Reconnect timeout 0:00:00
Unit Poll frequency 1 seconds, holdtime 15 seconds
Interface Poll frequency 5 seconds, holdtime 25 seconds
Interface Policy 1
Monitored Interfaces 1 of 1288 maximum
MAC Address Move Notification Interval not set
FTD3100-4# show interface ip brief
Interface                  IP-Address      OK?           Method Status      Protocol
Internal-Data0/1           unassigned      YES           unset  up          up
Port-channel1              unassigned      YES           unset  up          up
Port-channel1.200          10.0.200.70     YES           manual up          up
Port-channel1.201          10.0.201.70     YES           manual up          up
The FTD1 (ex-Standby) has all the configuration removed:
FTD3100-3# show failover
Failover Off
Failover unit Secondary
Failover LAN Interface: not Configured
Reconnect timeout 0:00:00
Unit Poll frequency 1 seconds, holdtime 15 seconds
Interface Poll frequency 5 seconds, holdtime 25 seconds
Interface Policy 1
Monitored Interfaces 1 of 1288 maximum
MAC Address Move Notification Interval not set
FTD3100-3# show interface ip brief
Interface                  IP-Address      OK?           Method Status      Protocol
Internal-Data0/1           unassigned      YES           unset  up          up
Ethernet1/1                unassigned      YES           unset  admin down  down
Ethernet1/2                unassigned      YES           unset  admin down  down
Ethernet1/3                unassigned      YES           unset  admin down  down
Ethernet1/4                unassigned      YES           unset  admin down  down
Ethernet1/5                unassigned      YES           unset  admin down  down
Ethernet1/6                unassigned      YES           unset  admin down  down
Ethernet1/7                unassigned      YES           unset  admin down  down
Ethernet1/8                unassigned      YES           unset  admin down  down
Ethernet1/9                unassigned      YES           unset  admin down  down
Ethernet1/10               unassigned      YES           unset  admin down  down
Ethernet1/11               unassigned      YES           unset  admin down  down
Ethernet1/12               unassigned      YES           unset  admin down  down
Ethernet1/13               unassigned      YES           unset  admin down  down
Ethernet1/14               unassigned      YES           unset  admin down  down
Ethernet1/15               unassigned      YES           unset  admin down  down
Ethernet1/16               unassigned      YES           unset  admin down  down
Step 4. Isolate the FTD1 (ex-Primary) data interfaces
Disconnect the data cables from the FTD1 (ex-Primary). Leave only the FTD management port connected.
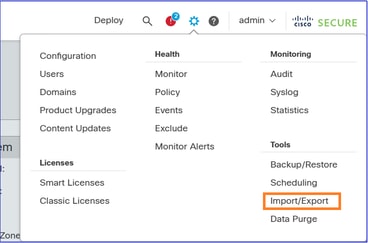
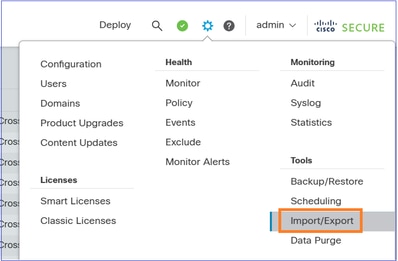
Step 5. Export the FTD Shared Policies
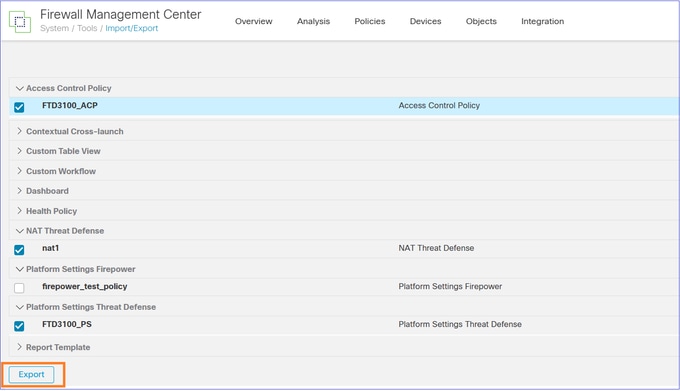
Navigate to System > Tools and select Import/Export:
Export the various policies attached to the device. Ensure you export all the policies attached to the FTD such as:
- Access Control Policy (ACP)
- Network Address Translation (NAT) policy
- Health Policy (if custom)
- FTD Platform Settings
and so on.
Note: At the time of this writing, exporting VPN-related configuration is not supported. You need to manually reconfigure the VPN on the FMC2 (target FMC) after the device registration.
Related enhancement Cisco bug ID CSCwf05294  .
.
The outcome is an .sfo file, for example ObjectExport_20250306082738.sfo
Step 6. Delete/Unregister the FTD1 (ex-Primary) from the old/source FMC
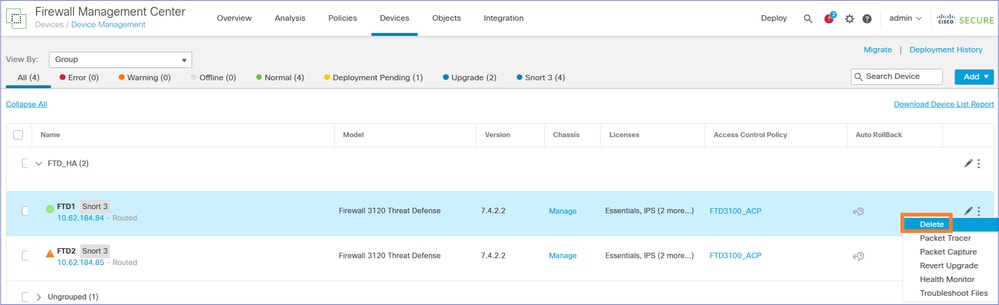
Confirm the device deletion:

FTD1 CLI verification:
> show managers
No managers configured.

>
The current status after the FTD1 device deletion:
Step 7. Import the FTD Policy configuration object into the FMC2 (target FMC)
Note: The document focuses on the migration of a single FTD HA pair to a new FMC. On the other hand, if you plan to migrate multiple firewalls that share the same policies (for example, ACP, NAT) and objects and you want to do this in phases you need to consider these points.
- If you have an existing policy on the target FMC with the same name, you are asked if you:
a. Want to replace the policy or
b. Create a new one with a different name. This creates duplicate objects with different names (suffix _1).
- If you go with option 'b', in Step 9 ensure you reassing the newly-created objects to the migrated policies (ACP Security Zones, NAT Security Zones, Routing, Platform Settings, and so on.).
Login to the FMC2 (target FMC) and import the FTD Policies sfo object that you exported in step 5:
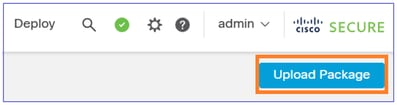
Select Upload Packege:
Upload the file:

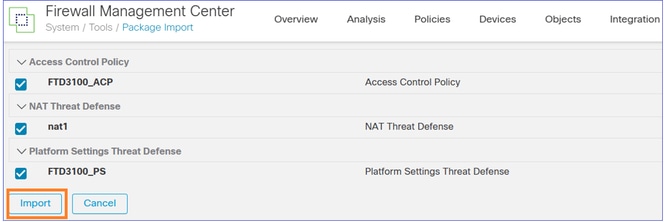
Import the policies:
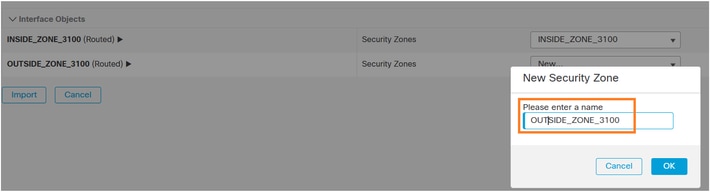
Create the Interface Objects/Security Zones on the FMC2 (target FMC):
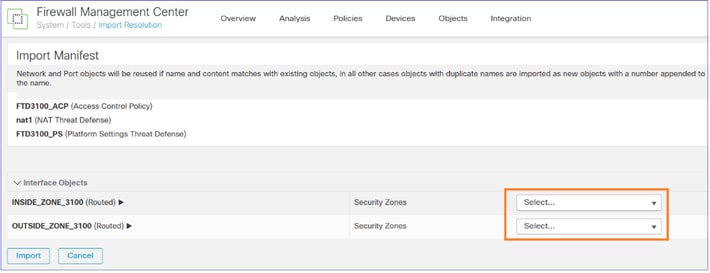
You can give the same names they had on the FMC1 (source FMC):
Once you select Import, a Task starts to import the related policies into the FMC2 (target FMC):

The Task is done:

Step 8. Register the FTD1 (ex-Primary) into the FMC2
Go to the FTD1 (ex-Primary) CLI and configure the new manager:
> configure manager add 10.62.148.247 cisco
Manager 10.62.148.247 successfully configured.
Please make note of reg_key as this will be required while adding Device in FMC.

>
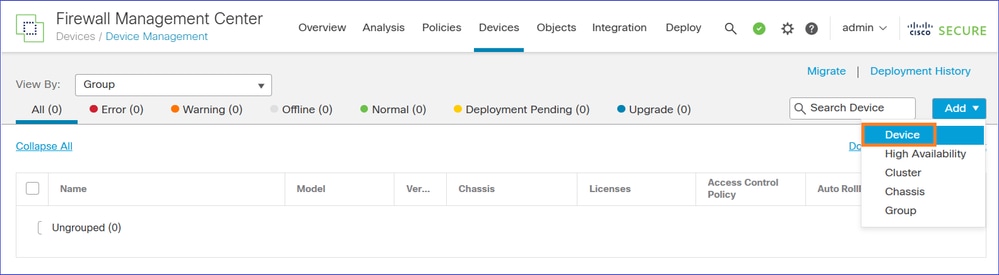
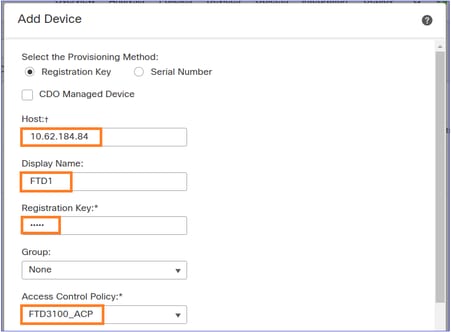
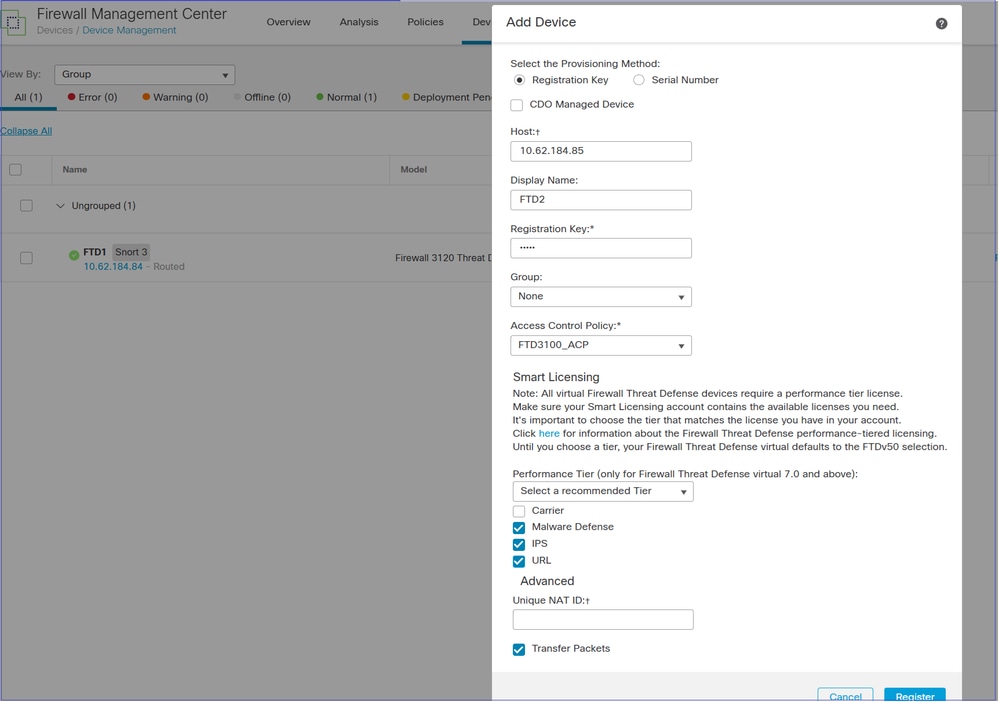
Navigate to the FMC2 (target FMC) UI Devices > Device Management and Add the FTD device:
If the device registration fails refer to this document to troubleshoot the problem: https://www.cisco.com/c/en/us/support/docs/security/firepower-ngfw/215540-configure-verify-and-troubleshoot-firep.html
Assign the Access Control Policy you imported in the previous step:
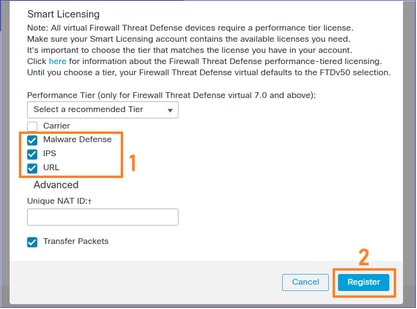
Apply the needed licenses and register the device:
The result:

Step 9. Import the FTD Device configuration object into the FMC2 (target FMC)
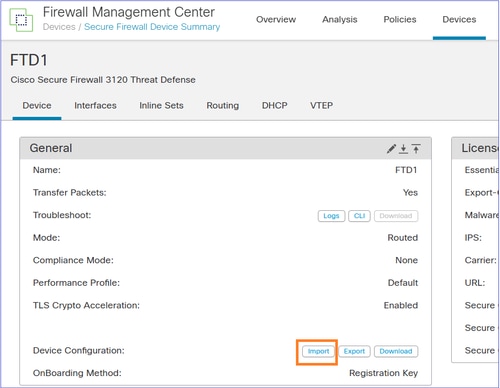
Login to the FMC2 (target FMC), navigate to the Devices > Device Management and Edit the FTD device that you registered in the previous step.
Navigate to the Device tab and Import the FTD Policies sfo object that you exported in step 2:
Note: In case in Step 7 you went with option 'b' (Create a new policy), ensure you reassing the newly-created objects to the migrated policies (ACP Security Zones, NAT Security Zones, Routing, Platform Settings, and so on.).
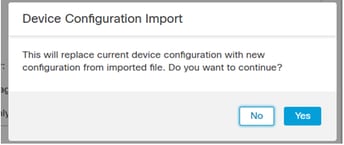
An FMC task is initiated.

The device configuration is applied on the FTD1, for example, Security Zones, ACP, NAT, and so on:
Caution: If you have an ACP that expands to many Access Control Elements, the ACP compilation process (tmatch compile) can take time several minutes to complete. You can use this command to verify the ACP compilation status:
FTD3100-3# show asp rule-engine
Rule compilation Status: Completed
Step 10. Finish the FTD Configuration
At this point the goal is the configure all the features that can be still missing from FTD1 after the registration to the FMC2 (target FMC) and the import of the Device policy.
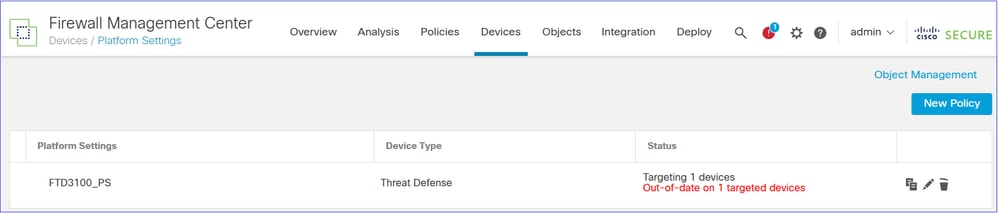
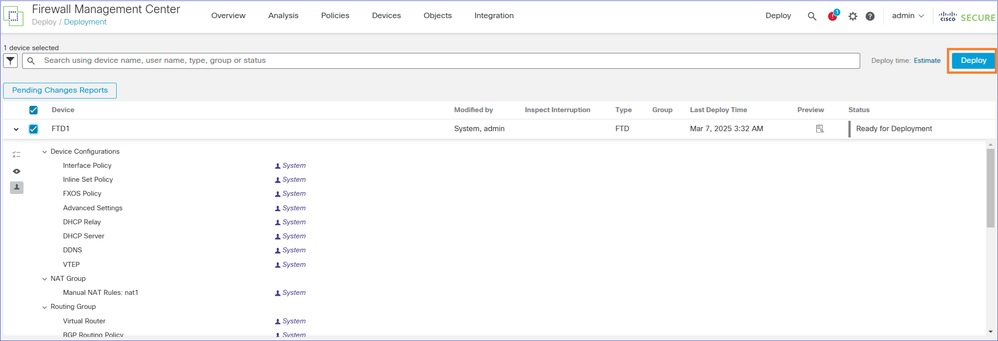
Ensure that policies like NAT, Platform Settings, QoS, and so on. are assigned to the FTD. You see that the policies are assigned but pending deployment.
For example, Platform Settings are imported and assigned to the device, but pending the deployment:
If NAT is configured, the NAT policy is imported and assigned to the device, but pending the deployment:

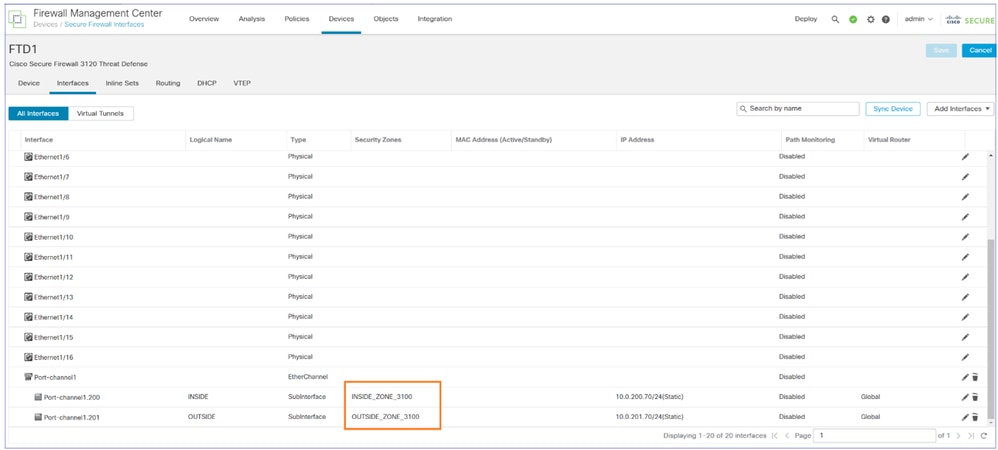
Security Zones are applied to the interfaces:

Routing configuration is applied to the FTD device:

Note: Now is the time to configure the policies that could not be migrated automatically (for example, VPNs).
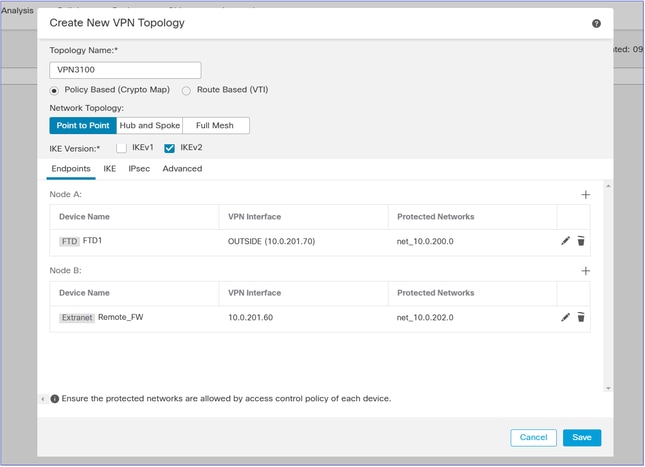
Note: If the FTD that is migrated has S2S VPN peers that are also migrated to the target FMC, you have to configure the VPN after moving all FTDs to the target FMC.
Deploy the pending changes:
Step 11. Verify the deployed FTD Configuration
At this point the goal is to check from the FTD CLI that all the configuration is in place.
The suggestion is to compare the ‘show running-config’ output from both FTDs. You can use tools like WinMerge or diff for the comparison.
Differences that you see and are normal are:
- Device Serial Number
- Interface descriptions
- ACL rule-ids
- Configuration Cryptochecksum
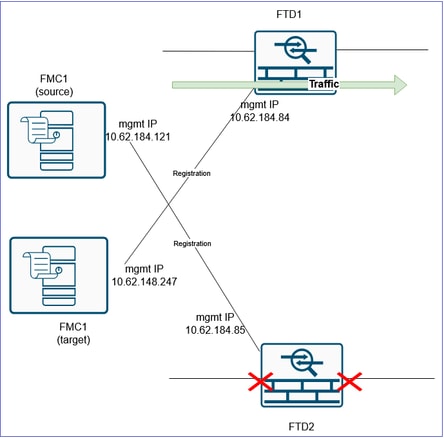
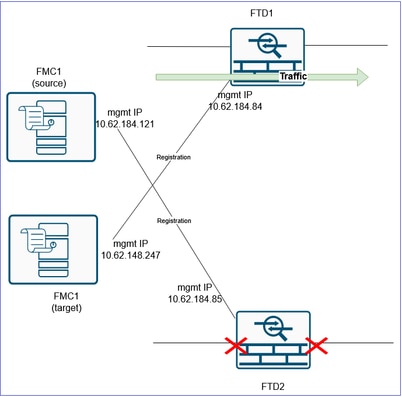
Step 12. Do the Cutover
At this step the goal is to switch the traffic from the FTD2 that is currently handling the traffic and is still registered to the old/source FMC, to the FTD1 that is registered to the target FMC.
Before:
After:
Caution: Arrange a MW to do the cutover. During the cutover you are going to have some traffic interruption until all the traffic is diverted to the FTD1, VPNs are re-established, and so on.
Caution: Do not initiate the cutover unless the ACP compilation is completed (see step 10 above).
Warning: Make sure you either disconnect the data cables from the FTD2 or shutdown the related switchports. Otherwise, you can end-up with both devices handling the traffic!
Caution: Since both devices use the same IP configuration there is a need for the ARP cache of the adjacent L3 devices to be updated. Consider clearing manually the ARP cache of the adjacent devices to expedite the traffic cutover.
Tip: You can also send a GARP packet and update the ARP cache of the adjacent devices using the FTD CLI command:
FTD3100-3# debug menu ipaddrutl 5 10.0.200.70
Gratuitous ARP sent for 10.0.200.70
You have to repeat this command for every IP the FW owns. Thus, it can be faster to just clear the ARP cache of the adjacent devices than sending GARP packets for every IP the firewall owns.
Step 13. Migrate the second FTD to the FMC2 (target FMC)
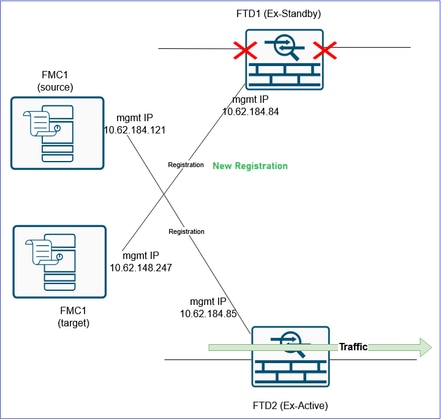
The last item is to reform the HA pair. To do this, you first need to delete the FTD2 from the FMC1 (source FMC) and register it to the FMC2 (target FMC).
Before:
After:
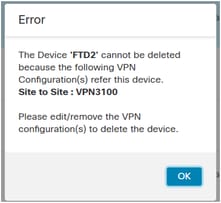
If you have a VPN configuration attached to the FTD2, you have to remove it first before deleting the FTD. In different case, a message similar to this is shown:
CLI verification:
> show managers

No managers configured.
It is a good practice to wipe-out all the FTD configuration before registering it to the target FMC. A quick way to do this is to switch between the firewall modes.
For example if you have routed mode, switch to transparent and then back to routed:
> configure firewall transparent
And then:
> configure firewall routed
Then, register it to the FMC2 (target FMC):
> configure manager add 10.62.148.247 cisco
Manager 10.62.148.247 successfully configured.
Please make note of reg_key as this will be required while adding Device in FMC.
>
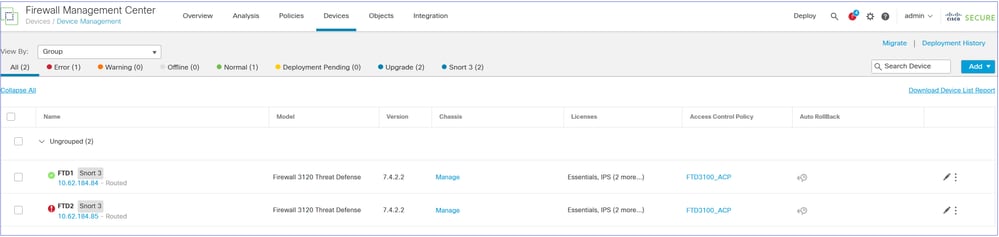
The result:
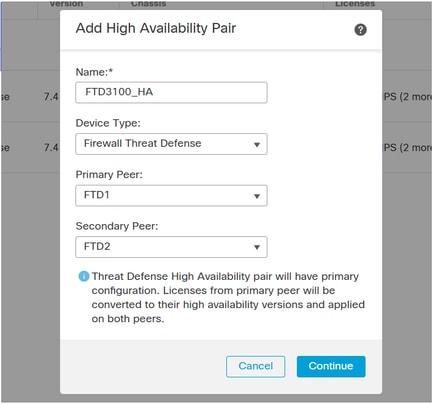
Step 14. Re-form the FTD HA
Note: This task (as any HA-related task) must also be performed during a MW. During the HA negotiation there is going to be a traffic outage for ~1 minute since the data interfaces go down.
On the target FMC navigate to Devices > Device Management and Add > High Availability.
Caution: Ensure that you select as Primary Peer the FTD that is handling the traffic (FTD1 in this scenario):
Reconfigure the HA settings including Monitored Interfaces, Standby IPs, virtual MAC addresses, and so on.
Verification from FTD1 CLI:
FTD3100-3# show failover | include host
        This host: Primary - Active
        Other host: Secondary - Standby Ready
Verification from FTD2 CLI:
FTD3100-3# show failover | include host
        This host: Secondary - Standby Ready
        Other host: Primary – Active
FMC UI verification:

Finally, bring up/reconnect the data interfaces of the FTD2 device.

References
Revision History
| Revision | Publish Date | Comments |
|---|---|---|
2.0 |
08-Dec-2025
|
Updated the Configure section. |
1.0 |
20-Mar-2025
|
Initial Release |
Contributed by Cisco Engineers
- Mikis ZafeiroudisCisco TAC Engineer
- Ilkin GasimovCisco TAC Engineer
 Feedback
Contact Cisco
- Open a Support Case

- (Requires a Cisco Service Contract)