Introduction
This document describes how to handle options keys on a cloud-registered endpoint.
Prerequisites
Requirements
It is recommended that you have some familiarity with these topics:
- Control Hub Platform
- Endpoint Administration via the Graphical User Interface (GUI) of the endpoint and Control Hub Devices section
- Room OS
Components Used
The equipment listed here has been used to make the tests and produce the results described in this document:
- Control Hub Organization
- SX80 endpoint
- Codec Pro endpoint
The information in this document was created from the devices in a specific lab environment. All of the devices used in this document started with a cleared (default) configuration. If your network is live, ensure that you understand the potential impact of any command.
What is an Option Key
Option keys are alphanumeric string values that can be applied on an endpoint to enhance its capabilities. The alphanumeric parts of the key (usually 3 parts) are separated with dashes (-). An example of an option key is 1S050-1-79FDE3AC.

Caution: The Option Key value shown in the example is not usable and does not correspond to a real Option Key generated in the past. It is a random string of alphanumeric numbers used as an example.
The option keys are not used from the endpoint to download new capabilities from the Internet. When the endpoint is shipped to you, it comes with all the available features and has all the capabilities its hardware and software allow it to perform. However, depending on parameters like your contract, the purchase options made by you as a customer when reaching out to your sales representative, and some country-specific restrictions that apply, some of the features the endpoint is capable of using are not available and have been turned off.
This can happen, for instance, when you decide to purchase an endpoint but you are sure that some of the optional features offered along with it are not going to be used in your environment. Then, you can decide to proceed with the purchase of the endpoint without paying for the extra options offered. You can proceed with the purchase of an option key that enables any additional capability that you need to have in the future.
It is important to note that you do not need to purchase every option key separately. Some of them can be obtained without any additional charge. For additional information about option key charges, you need to reach out to your Customer Success Manager, Sales representative, or Partner or you can reach out to a Licensing team agent by opening a ticket with the Licensing Team or TAC.
In addition, many endpoints come with option keys pre-installed and ready out of the box. This means that endpoints have already some option keys applied to them.
How Can an Option Key be Obtained
You can obtain an option key by reaching out to the Licensing team or TAC. Before that, you can reach out and discuss any potential charging costs with your assigned Customer Success Manager (CSM), DSM, or Partner.

Warning: Seasoned administrators remember that the Licensing team can be reached at the email address licensing@cisco.com. This can also be mentioned in older endpoint administration guides. However, this email address has been decommissioned and is currently not used anymore. You need to contact Licensing by directly opening a ticket with proper licensing keywords.
If you have questions about a specific option key or need help to apply it from a technical perspective, you need to open a case with TAC.
How does TAC or Licensing Verify eligibility for Option Keys
When contacting TAC or Licensing team to obtain an option key, you are expected to provide some basic information like your Sales Order Number, Contract Number, or PAK. When making an order, the option keys that you have obtained, along with any other additional services, are part of your contract and thus they are associated with these unique identifiers. Your Sales point of contact can share these IDs with you upon request.
Caution: If TAC or Licensing informs you that you are not eligible to obtain a licensing key, then the three most common reasons are:
1) You have not purchased the option key that you are requesting to obtain and thus is not part of your contract.
2) You have purchased the option key, but it has not been associated with your contract or PAK.
3) You have purchased the option key but you have provided an invalid contract or PAK. Make sure that you have shared with TAC or Licensing the correct IDs associated with the purchased option key.
For clarifications, contact your Sales representative. This falls outside TAC or Licensing scope and the agents involved are not be able to help to clarify this.
How Do You Receive the Option Key once the Request Procedure has been Completed
Once the licensing team has approved your request to obtain an option key, you are going to receive an email that contains detailed information of the request. It looks like this picture (only a part of the email is provided for demonstration purposes, the rest has been omitted):
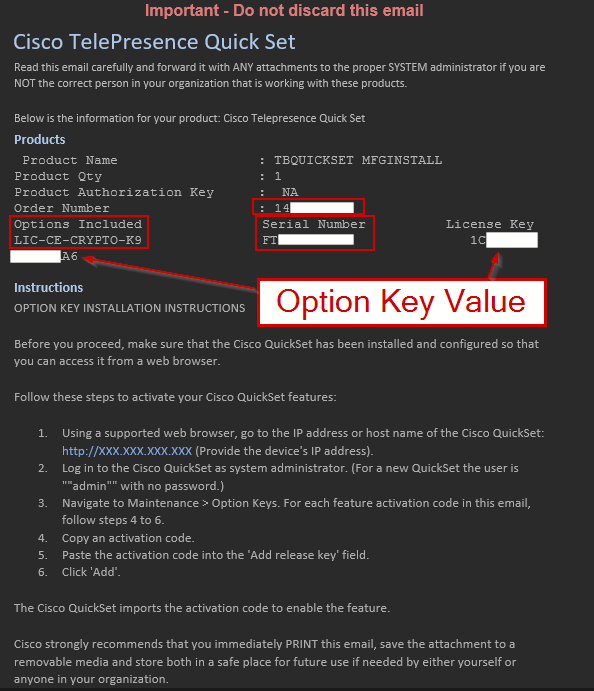 Email Containing the Option Key Value
Warning: Only a part of the email is shared in the previous picture. Make sure to read the whole email before performing any changes and applying the key to your endpoint. In addition, the Option Key Value in the picture is truncated and it is shown on two separate lines.
In this email, important information is provided: The Product name, the Order Number associated with the order of the option key, the Options/features that the key is enabling, the serial number of the endpoint that this key is associated with, and the option key value. In addition, instructions on how to apply the key and links related to documentation are included (documentation is not shown in this picture, this part has been omitted).

Note: If you have opened a case with TAC, TAC can collaborate with an agent from the Licensing team who can be actively involved and send you an email to share the information directly about the status of your request and the details needed to generate the Option Key.
Are There Any Cases that an Option Key Cannot Be Applied
Yes, there are certain circumstances under which an option key can not be applied to an endpoint:
- Each Option Key is associated with the Serial Number of a specific endpoint. You must apply each Option Key to the endpoint for which you have requested it. If you try to apply the Option Key to another endpoint then it is not going to work.
- You must reach out to official Cisco resources to obtain the Option Keys for the features you wish to enable. You must not use Option Keys from the Internet from unverified entities.
- As the Option Key is associated with a specific endpoint, you cannot transfer it to a new endpoint. If a feature enabled by an option key is not needed anymore for a certain endpoint, because for example, you moved it to another location, you cannot use this option key on another endpoint. You need to request an option key for each endpoint separately. (There is an exception to this mentioned later on.)
- If your endpoint supports a feature already and has an option key installed on it by default, you cannot use another option key that enables the same feature. For example, many devices support encryption out of the box. The encryption option key that gives the device the capability to use encryption is installed on the device by default. You cannot request an Option Key for enabling encryption and apply it on this endpoint. Option keys are not stackable.
- Some endpoints do not support some specific features. For instance, some endpoints do not support encryption. You cannot use an encryption option key on those endpoints. There are hardware and software limitations that prevent the endpoint from using this capability. It is suggested that you check your specific device's datasheet before you try to apply any option keys to it.
- For some features, you need to be on a specific minimum OS version for them to be available. If you have just received a device via RMA, make sure the device is on the latest software before proceeding with applying an option key to it.
Note: To check if a device supports encryption, you need to check the product ID of the device you have. If the product ID contains the alphanumeric characters K9, this means it supports encryption and either it has encryption enabled by default (no option key needs to be applied on the device, usually for newer devices) or the device needs an Option Key to be capable of using encryption (usually for older devices). If the product ID contains the alphanumeric characters K7, the device does not support encryption and this is a hardware limitation. Option keys can not be used to make the endpoint capable of encryption.
For old devices in the SX,MX series that do not have neither K7 nor K9 in their Product ID, you can verify if they support encryption by checking the device logs and the device GUI by navigating to Software > Option Keys > Installed Option Keys section. Both of these ways are discussed later in this article.
Note: Options Keys installed on your endpoint by default (not added by you) and option keys that are added by your administrator are not going to be removed when doing a factory reset. Once the endpoint boots up again, it keeps having the same capabilities as before.
How to Check if an Endpoint Supports a Specific Option Key
There are three different ways to find the supported Option Keys by an endpoint.
Check The Endpoint's Data Sheet
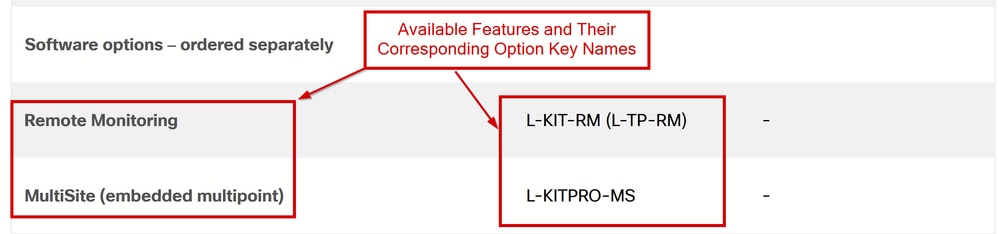
To check if your endpoint has any additional capabilities that you would like to enable with an option key you can check the Data Sheet of the endpoint. For demonstration purposes, the datasheet of Codec Pro endpoint is used:
 Software Options Section on the Endpoint's Data Sheet
Under the section Ordering Information, navigate to Software options - ordered separately, where you see the additional features that can be added to your endpoint. From the screenshot provided, you can see the name of the Feature on the left side and the name of the Option Key on the right side. You can notice that the encryption Option Key is not mentioned because it comes pre-installed on the Codec Pro.

Tip: Data Sheets of older endpoints can contain this information under different sections. Make sure you read through them to locate where the additional software options are described.
Check the Endpoint GUI
You must access the endpoint GUI either by typing its IP address on your browser or by logging in to Control Hub and navigating to Devices. Select the device you want from the list, and under the section Support click Launch next to Local Device Controls. The GUI of the endpoint is going to open in a new tab on your browser. Both of these ways of accessing the endpoint GUI require you to have direct network access to the endpoint.
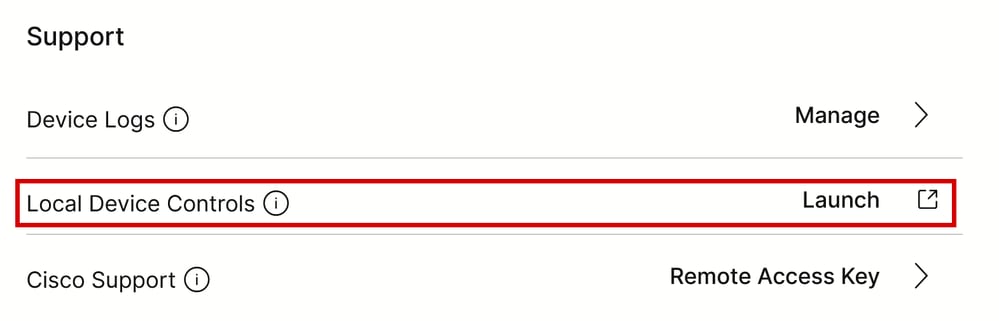 Accessing Endpoint GUI via Control Hub - Support Section
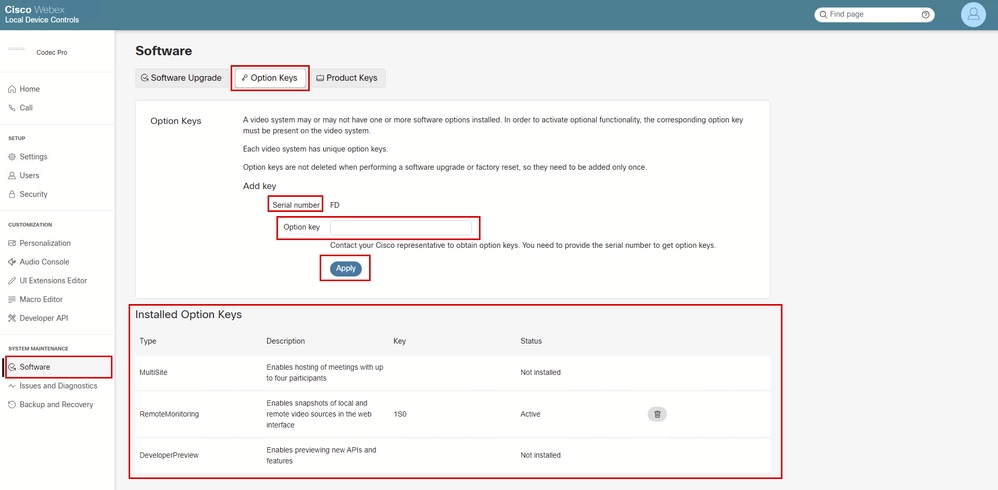
Navigate to Software under the System Maintenance section. Click Option Keys. From this menu, you can add the Option Key value in the text box and click Apply.
 Locating Option Keys from the Endpoint GUI
Note: After an option key is applied, it is suggested to reboot the endpoint.
Under the section Installed Option Keys, you can see all the Option Keys that your endpoint is eligible to have installed. Under the Status column, you see which of these keys are Active, which means you have already installed them.
You also have the option to delete an option key from this section by clicking on the trash bin icon next to each installed key.
Check The Endpoint Logs
Access the device GUI and navigate to Issues and Diagnostics under the System Maintenance section. Click System Logs. Then, click the down arrow next to Download logs and click Full logs (recommended). A compressed log bundle is going to be downloaded to your computer.
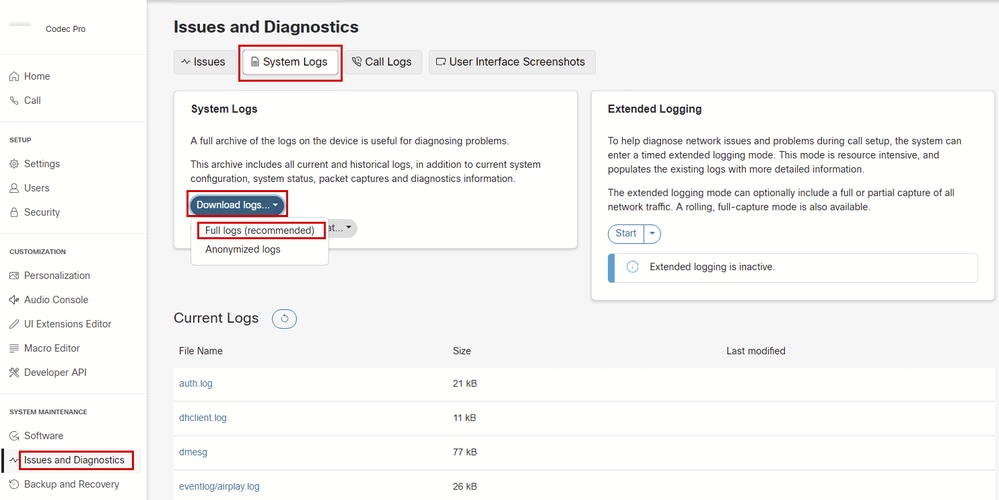 Log Collection from Endpoint GUI
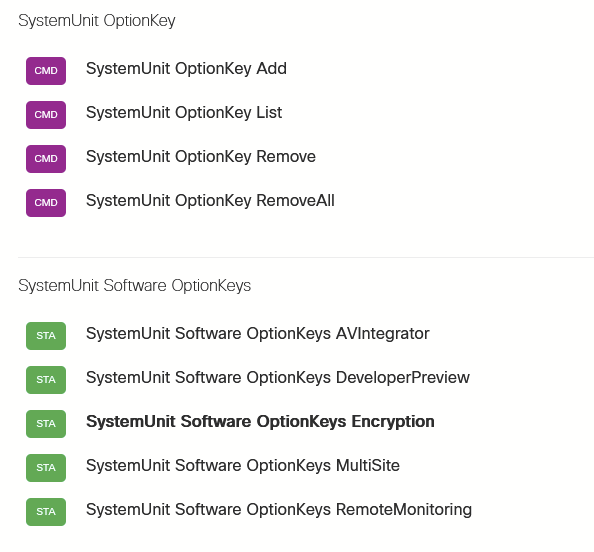
Unzip the log bundle collected and locate the xstatus.txt file. Open this file in a note application of your choice and search for the keyword OptionKeys. You can find all Option Keys available for your endpoint and see which of them have been added and are active, which is indicated by the True or False value next to the corresponding log line:
 Option Key Log Lines from Collected Log Bundle
Why are some Option Keys not Listed under the Option Key Section on Endpoint GUI
This is a picture of the Option Keys reported in the log files of a Codec Pro with Product ID that contains the K9 character. This means the endpoint does support encryption.
 Option Key Log Lines from Collected Log Bundle
Notice the snippet:
*s SystemUnit Software OptionKeys Encryption: True
You can see that the Encryption Option Key is set to True. This means that the option key has been applied to the endpoint.
From the endpoint GUI, navigate to Software under the System Maintenance section. Click Option Keys. This is the Installed Option Keys section of this endpoint:
 Insatlled Option Keys Section on Endpoint's GUI
You can see that the Encryption Option key, which the logs show, is not present in this section. Not only it is not seen as installed but it is absent from the list.
This is an expected behavior. Some Option Keys are pre-installed on the endpoints, like Encryption Option Keys. Because they are pre-installed out of the box, they are not listed under the section Installed Option Keys of the Endpoint GUI. The Installed Option Keys section shows only the option keys that an administrator can manually add. Encryption is available by default and thus is not seen in this section.
In these situations, the only source of truth is the logs of the endpoint, if you wish to verify if a specific option key is enabled or not. If you factory reset a device the default option keys are not removed. Options keys that your administrator installs, and are not there by default, are also not removed after factory reset.
Caution: For older endpoints, the result is not always identical to what was described above. Small differences can exist depending on the OS version and the device type. For example, on an SX80 device that is cloud-registered, the Encryption Key is visible under the Installed Option Keys section on the endpoint GUI, whereas for Codec Pro it was not:
 Encryption Option Key on Endpoint's GUI
On SX and MX series endpoints, the option keys were handled differently, thus those minor differences can be noticed.
General Rule for Encryption Option Keys
Encryption Option Keys are a type of exception as the encryption capabilities are controlled by hardware and software characteristics of the endpoints. There is a general rule that you can use to identify if your endpoint supports encryption and if it is enabled or not, in cases where you are not sure what the product ID number is. It is assumed that you have read through the previous sections of this article to be able to perform the steps described:
- First, look for the OptionKeys keyword in the xstatus.txt log file of the endpoint.
- If the Encryption Option Key is set to True, then it supports encryption and it is enabled. If it is set to False, there is a chance that the endpoint supports encryption but it is not enabled.
- Then, look at the GUI of the endpoint under the Installed Option Keys section.
- If the Encryption key is installable in the GUI then you need to obtain a key and apply it to enable encryption.
- If the Encryption key cannot be installed in the GUI (you do not see it listed at all among the available option keys), then your endpoint does not support encryption and there is no possibility to use an Option Key to enable it.
To summarize, in order to conclude that an endpoint does not support encryption when Product ID is not available:
What Happens after an RMA is Performed
In a previous section, it was mentioned that the option keys that are generated and provided to you are uniquely associated with your endpoint's Serial Number. In cases where an endpoint is facing a hardware issue and is eligible for the Return Material Authorization (RMA) process, you have to return your device back to Cisco and receive a new one. The new endpoint that you receive is not going to have on it any option keys from the ones that you have manually added. You need to add them again.
In such cases, contact the Licensing team or TAC and explain the situation either on a new ticket or on the existing ticket that the RMA was approved. The licensing team is going to share with you a new key that is associated with your new device. You need to apply this key to the device. The old key becomes obsolete and can not be used anymore. Any attempt to use the old option key on the new device received from RMA is not going to be successful and is not suggested.
How to Open a Case with the Licensing Team
Navigate to Support Case Manager. Log in with your Cisco Account and click Open New Case. Navigate to Software Licensing and select Generate License. Then click Generate Traditional or Classic License through Enterprise Agreement Portal. Click Open Case.
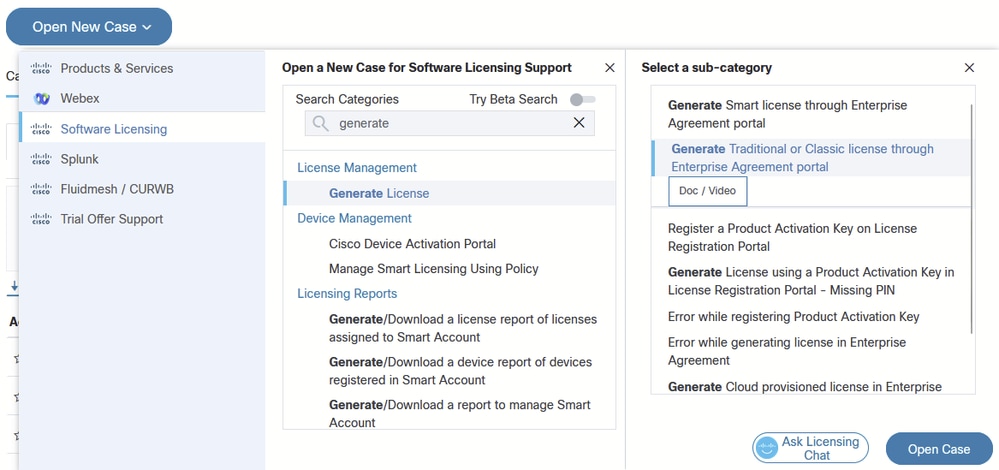 Opening a Case Related to Licensing
Managing Option Keys with xAPI Commands
You can visit this link to read through the xAPI documentation listing the available commands that can be used to manage option keys on an endpoint. Notice that apart from adding and removing each key individually, there is the option to delete all option keys from an endpoint: SystemUnit OptionKey RemoveAll. There is no option to add multiple keys at once. The addition of keys needs to happen one by one manually.
 xAPI command for Managing Option Keys
Product Keys vs Option Keys
A product key is different from an option key. Product keys are used to turn a certain endpoint device, into another endpoint device that has different behavior and sometimes has different capabilities too. For example, a product key can be used to turn a Room Kit Mini into a Room USB. With product keys, you are not adding new features to a device. You are turning a product into a different type of product. This is not supported by all endpoints. Many devices have the option to switch products from within their configuration settings.
Product keys are associated with the device's Serial Number.
Related Information
 Feedback