Introduction
This document describes how to integrate Cisco ISE 3.4 with MS Excel over Data Connect to retrieve reporting data from ISE database directly.
Prerequisites
Requirements
Cisco recommends that you have knowledge of these topics:
- Cisco Identity Services Engine (ISE) 3.4
- Basic knowledge about Oracle queries
- Microsoft Excel
Components Used
The information in this document is based on these software and hardware versions:
- Cisco ISE Version: 3.4
- MS Excel - Microsoft office 365
- Windows 11 - 21H2
- ODAC Version -23.7.0.25.01
The information in this document was created from the devices in a specific lab environment. All of the devices used in this document started with a cleared (default) configuration. If your network is live, ensure that you understand the potential impact of any command.
ISE deployment used in this setup:
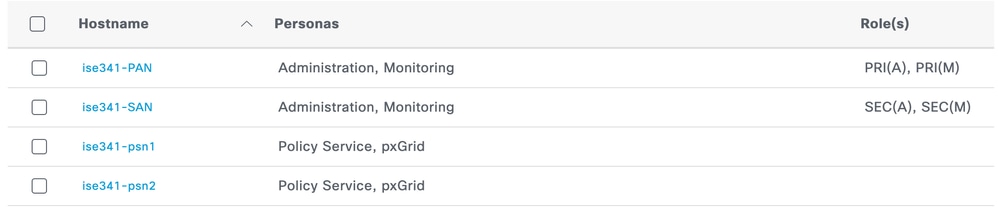 ISE Deployment
Background Information
Data Connect is a feature that exposes views from both cepm and mnt ISE db schema. Only read-only access to the data is provided. The Data Connect feature is supported from Cisco ISE release 3.2. You can extract any configuration or operational data about your network depending on your business requirement and use it to generate insightful reports and dashboards.
Configure
Step 1: Configure ISE Data Connect Settings
Enable Data Connect
On ISE, navigate toAdministration > System > Settings > Data Connect > Settingsand toggle the button next toData Connect.Enter the password. Then clickSave.
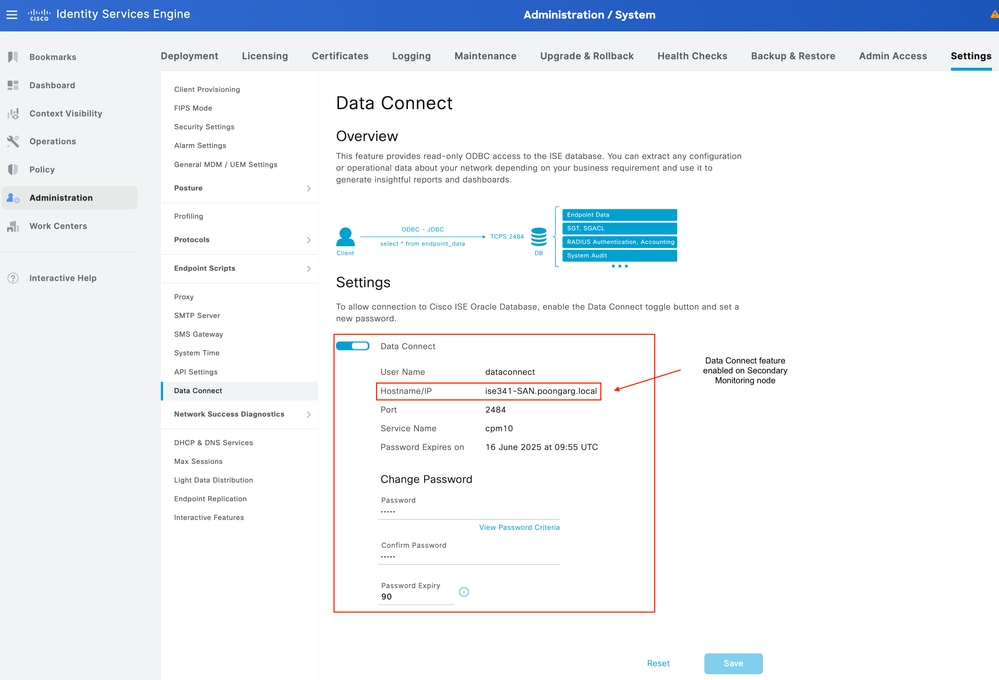 Enable Data Connect Feature on ISE
Make a note of Data Connect settings, which includeUser Name, Hostname, Port, and Service Name.Data Connect by default is enabled on Secondary MNT node in a distributed deployment, more information about failover scenarios can be found in the Administrator Guide.
Export Admin Certificate of the Secondary MNT node (Node as per Data Connect Settings)
ISE certificate needs to be trusted by the clients querying ISE over Data Connect. In order to export the certificate, navigate to Administration> System > Certificates > Certificate Management > System Certificates > Select the node > Select the Certificate with Admin usage. Click Export.
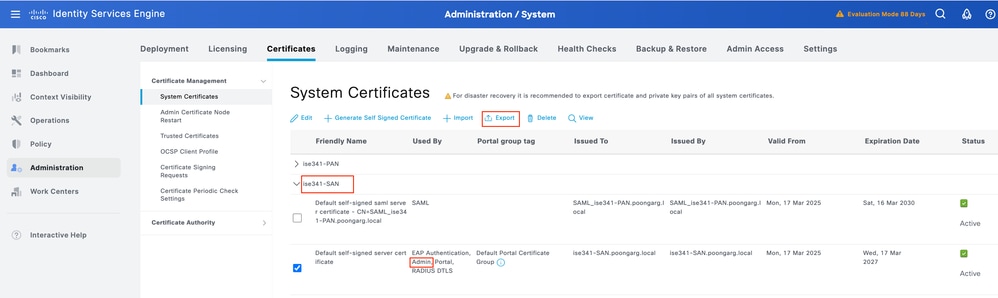 Export the Admin Certificate
Certificate is exported in PEM format.
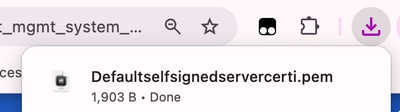 Certificate Format
Step 2: Configure Windows Machine
Install ODBC Driver and Oracle 64-bit Client from the Oracle Website
- Download the appropriate Instant Client packages for your platform. All installations require the Basic or Basic Light package. Here we are using version 23.7.0.25.01
- Extract and move the files to the default location for the Oracle client as C:\instantclient_23_7, but if you are changing the location then make sure the location is added to system variable.
- Add this directory path to the user and System PATH environment variable. In the Windows Control Panel, navigate to Environment variable.
- Download the ODBC package for the same version.
- Install the ODBC driver: Extract the ZIP file and copy its contents to the directory where you had installed the Instant Client (Example: C:\instantclient_23_7)
- Run the odbc_install.exe file in the instant client directory. If you get a security warning, click More and allow it to run anyway.
Install JDeveloper Studio for Windows 64-bit from the Oracle Website
In this Lab, we have used jdev_suite_121300_win64.exe file.
Configure ODAC Files
- In your Windows Control Panel, navigate to Environment Variables.
- Add a new system variable for storing ODAC files.
- The variable name to be used is TNS_ADMIN and the variable value is the path of the storage files.
- Add the content as shown to sqlnet.ora located at your TNS_ADMIN variable (Lab TNS_ADMIN path: C:\instantclient_23_7\network\admin).
         #SQLNET.AUTHENTICATION_SERVICES= (NTS)
         NAMES.DIRECTORY_PATH= (TNSNAMES, EZCONNECT)

         WALLET_LOCATION =
             (SOURCE =
                 (METHOD = FILE)
                 (METHOD_DATA = (DIRECTORY = %path to wallet with the dataconnect certificate which we will be creating in future steps% ))
             )
         SSL_CLIENT_AUTHENTICATION=FALSE
5. Add the content as shown totnsnames.oralocated at your TNS_ADMIN variable Lab TNS_ADMIN path: C:\instantclient_23_7\network\admin). Replace the host IP with the Data Connect node IP address.

Note: Please take care of indentation of configuration of these files while modifying. For more details, refer to Oracle Website
Add New Data Source for ODBC
- The Microsoft ODBC Data Source Administrator manages database drivers and data sources. This application is located in the Windows Control Panel under Administrative Tools. Open ODBC data sources 64 bit application from the Windows start bar or search bar. Or you can directly open 64-bit application located under path “C:\windows\system32\odbcad32.exe”.
- Select either User DSN or System DSN tab, Click Add. Select the newly added oracle driver Oracle in instantclient_23_7 in the Create New Data Source window that opens up.
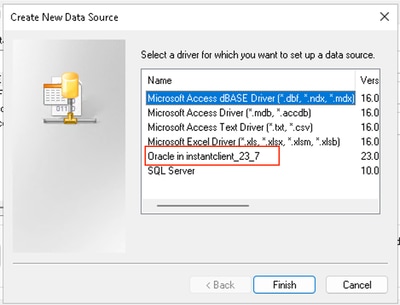 Add New Data Source
If you do not see this driver in ODBC window, check the Windows registry to confirm if it is showing there or not. Here is the path in the Windows registry:
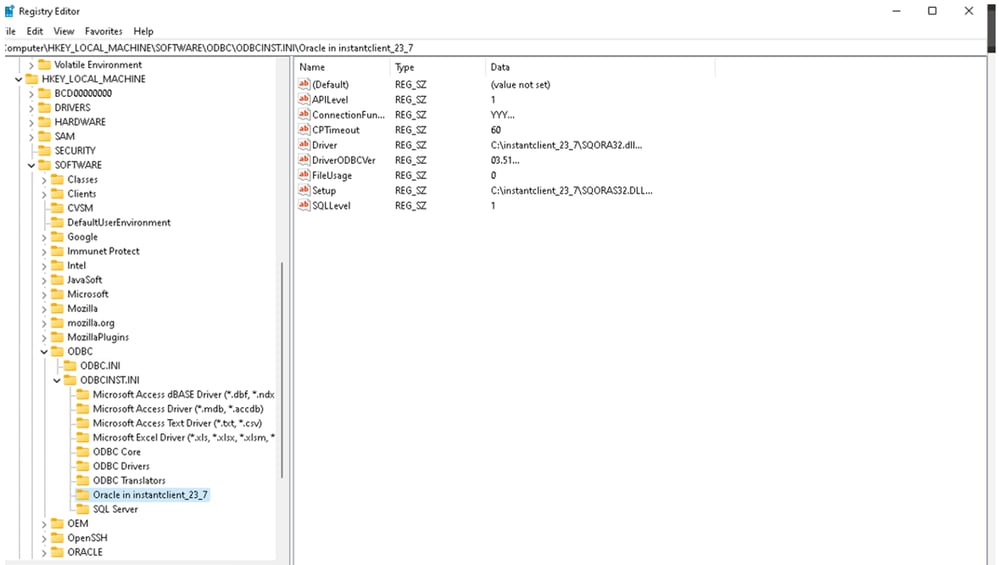 Registry Setting
If Registry do not show the drivers, try restarting the windows; otherwise, check the ODBC driver installation steps:
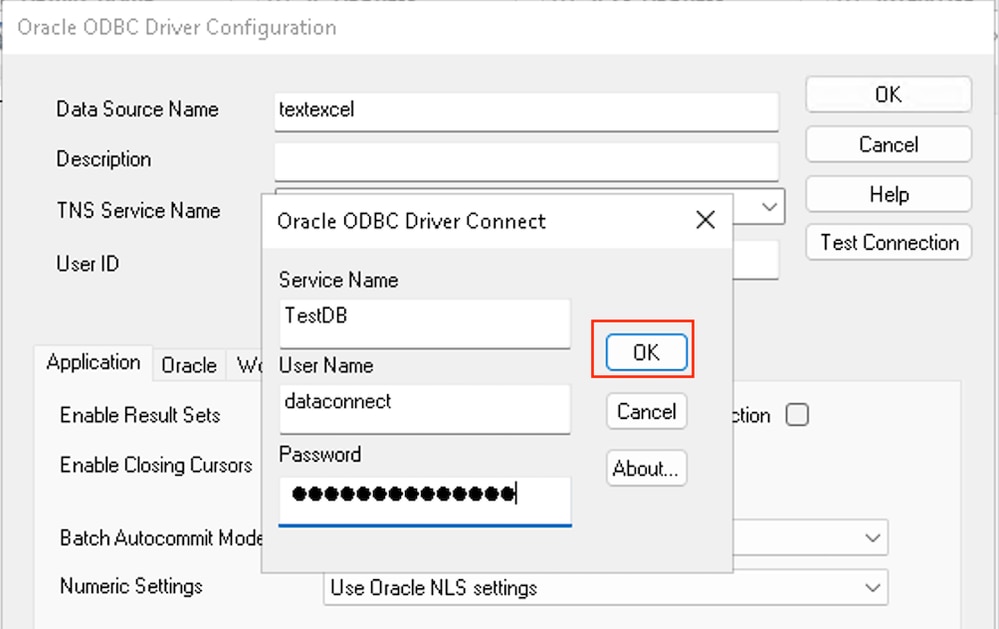
- Enter a Data Source Name. For example, textexcel.
- Enter the TNS Service name as given in tnsnames.ora. Example; TestDB is used in this document.
- Enter dataconnect as the User ID which is the default username to connect to ISE DB.
- Click OK.
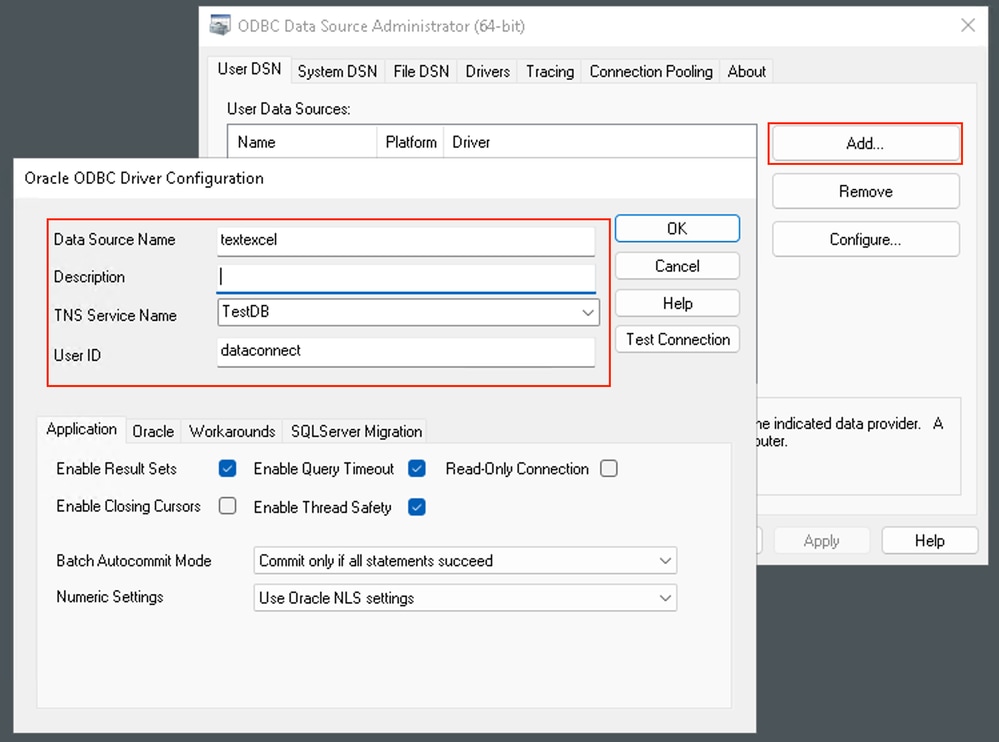 Oracle ODBC Driver Configuration
Create Wallet with Orapki Command Line Utility
After successful installation of JDeveloper, orapki become available atC:\Oracle\Middleware\Oracle_Home\oracle_common\bin.
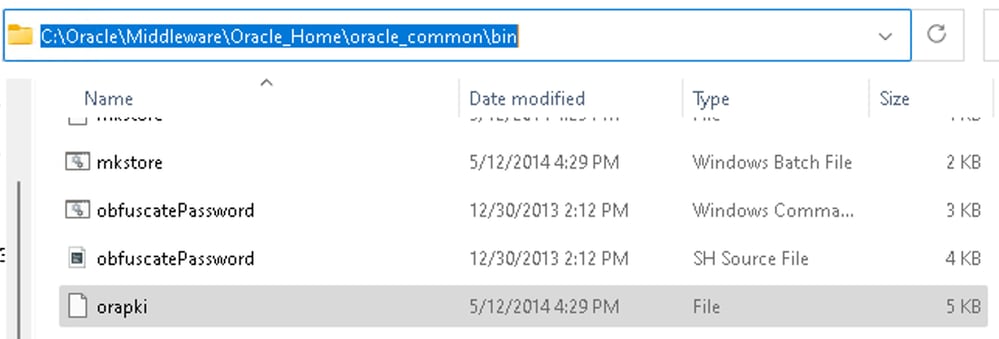 Orapki Path
- Add the path for orapki to the Windows path variable (optional).
- We have manually created a directory name Wallet as Orapki wallet in the path C:\Users\cisco\Documents\Wallet, before running the orapki command.
- Open power shell and runorapki wallet create -wallet %path to wallet% -auto_loginto create the orapki wallet.
- Enter a new trust store password when prompted for the same.
PS C:\Users\cisco> cd C:\Oracle\Middleware\Oracle_Home\oracle_common\bin
PS C:\Oracle\Middleware\Oracle_Home\oracle_common\bin> .\orapki wallet create -wallet C:\Users\cisco\Documents\Wallet -auto_login
Oracle PKI Tool : Version 12.1.3.0.0
Copyright (c) 2004, 2014, Oracle and/or its affiliates. All rights reserved.

Enter password:
Enter password again:
PS C:\Oracle\Middleware\Oracle_Home\oracle_common\bin>
Import Admin Certificate of Data Connect Node to Orapki Wallet
- Transfer the downloaded ISE certificate in Step 1 to local client and modify the cert name (optional) something easy to identify (In LAB, we have changed to secmoncert.pem) and add it to orapki client as per the snippet.
- Runorapki wallet add -wallet %Path to orapki wallet% -trusted_cert -cert %Path to certificate%on PowerShell.
- Enter a new trust store password when prompted for the same.
PS C:\Oracle\Middleware\Oracle_Home\oracle_common\bin> .\orapki wallet add -wallet C:\Users\cisco\Documents\Wallet -trusted_cert -cert C:\Users\cisco\Downloads\secmoncert.pem
Oracle PKI Tool : Version 12.1.3.0.0
Copyright (c) 2004, 2014, Oracle and/or its affiliates. All rights reserved.

Cannot modify auto-login (sso) wallet
Enter wallet password:
PS C:\Oracle\Middleware\Oracle_Home\oracle_common\bin>
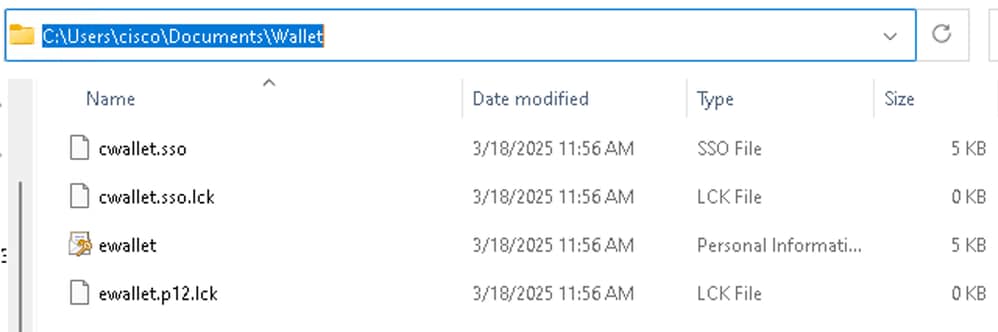 Verify Files in Wallet Path
4. Add the wallet path tosqlnet.ora file.
 Add the Wallet location in Sqlnet.ora File
Test Oracle ODBC Driver Configuration
Navigate to C:\windows\system32\odbcad32.exe and select the newly created Data Source testexcel. Click Configure. Click Test Connection. Add the password and click OK.
 Test ODBC Connection
The test connection is successful.
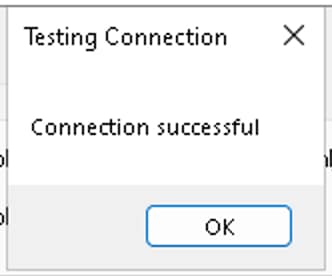 Successful Connection
Configure Windows MS Excel
- Restart/Start MS Excel.
- Navigate to the Data tab and click Get data > From other Sources > From ODBC.
 Using ODBC with MS Excel
3. Select the Data Source Name (DSN) created in the previous steps. For example, textexcel.
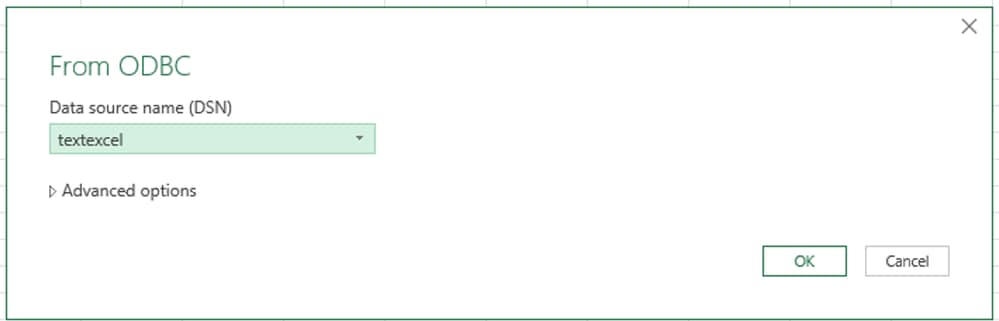 Data Source
4. Enter dataconnect as the user ID. Enter the password configured for the dataconnect user through openapi or UI when prompted. MS Excel now has direct access to the ISE. You can extract any configuration or operational data about your network depending on your business requirement and use it to generate insightful reports and dashboards. Select the required Database view and click Load or Transform data.
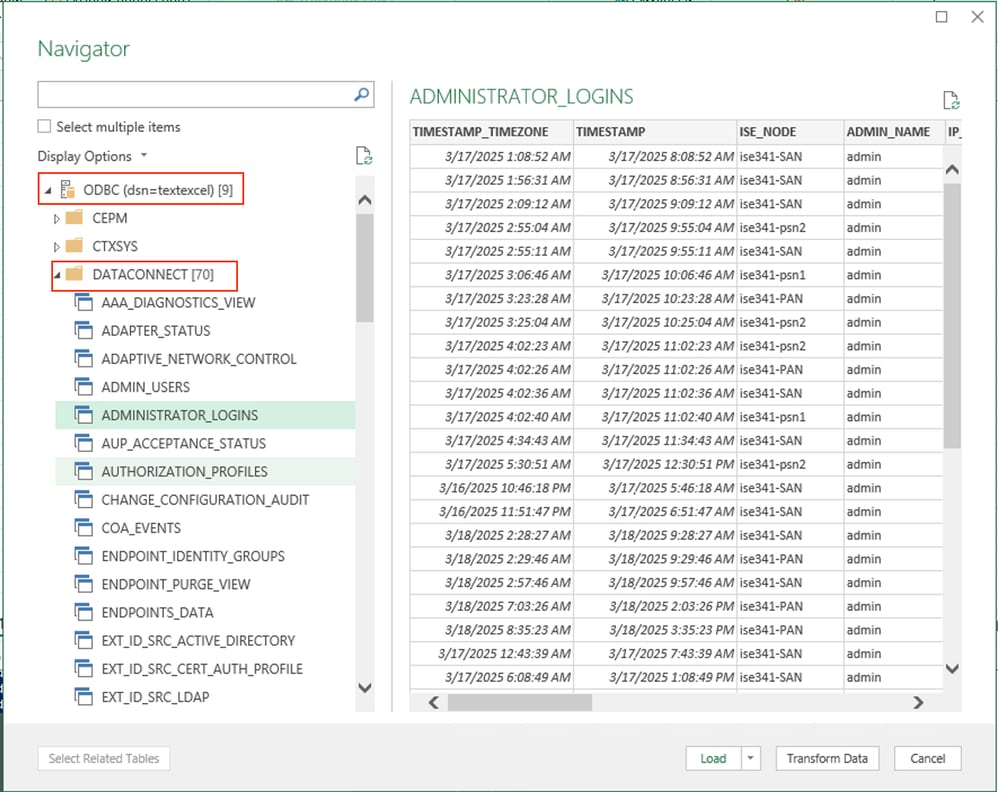 MS Excel connected to ISE Read onlyDatabase
5. Select the Transform Data option, and customize the data report as per your need. In this example, we are leveraging the RADIUS_AUTHENTICATION_SUMMARY view to filter Authentications by ISE Node.
Filter the column ISE_NODE and select the specific PSN.
Here is the query:
= Table.SelectRows(RADIUS_AUTHENTICATION_SUMMARY_View, each ([ISE_NODE] = "ise341-psn1"))
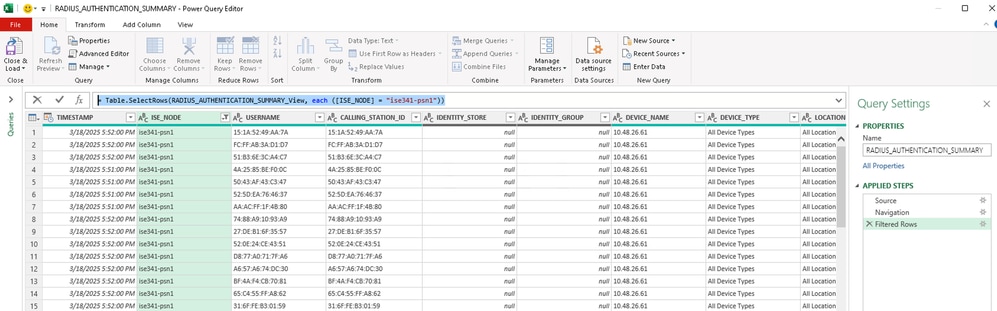 Filter Authentication by ISE Node
Troubleshoot
There is currently no specific troubleshooting information available for this configuration.
 Feedback