Configure SSO for SD-WAN Using Microsoft Entra ID
Available Languages
Download Options
Bias-Free Language
The documentation set for this product strives to use bias-free language. For the purposes of this documentation set, bias-free is defined as language that does not imply discrimination based on age, disability, gender, racial identity, ethnic identity, sexual orientation, socioeconomic status, and intersectionality. Exceptions may be present in the documentation due to language that is hardcoded in the user interfaces of the product software, language used based on RFP documentation, or language that is used by a referenced third-party product. Learn more about how Cisco is using Inclusive Language.
Contents
Introduction
This document describes how to configure Single Sign-On (SSO) for Cisco Catalyst Software-Defined Wide-Area Networks (SD-WAN) with Microsoft Entra ID.
Prerequisites
Requirements
Cisco recommends that you have general knowledge of the these topics:
- Single Sign-On
- Cisco Catalyst SD-WAN solution
Components Used
The information in this document is based on:
- Cisco Catalyst SD-WAN Manager release 20.15.3.1
- Microsoft Entra ID

Note: The solution formerly known as Azure Active Directory (Azure AD) is now called Microsoft Entra ID.
The information in this document was created from the devices in a specific lab environment. All of the devices used in this document started with a cleared (default) configuration. If your network is live, ensure that you understand the potential impact of any command.
Background Information
Single Sign-On is an authentication method that allows users to securely access multiple independent applications or websites using a single set of credentials. With SSO, users no longer need to sign in separately to each application—once authenticated, they can seamlessly access all permitted resources.
One common way to implement SSO is through federation, which establishes trust between an identity provider (IdP) and a service provider (SP) using protocols such as SAML 2.0, WS-Federation, or OpenID Connect. Federation improves security, reliability, and the user experience by centralizing authentication.
Microsoft Entra ID is a widely used cloud-based identity provider that supports these federation protocols. In an SSO setup with Cisco Catalyst SD-WAN, Microsoft Entra ID acts as the IdP, and Cisco SD-WAN Manager acts as the service provider.
The integration works as follows:
- A network administrator attempts to log in to the Cisco SD-WAN Manager.
- Cisco SD-WAN Manager sends an authentication request to Microsoft Entra ID.
- Microsoft Entra ID prompts the administrator to authenticate with their Entra ID (Microsoft) account.
- Once credentials are validated, Microsoft Entra ID sends a secure response back to the Cisco SD-WAN Manager confirming the authentication.
- Cisco SD-WAN Manager grants access without requiring separate credentials.
In this model:
- Identity Provider (IdP) – Stores user data, validates credentials (for example, Microsoft Entra ID, Okta, PingID, ADFS).
- Service Provider – Hosts the application to be accessed (for example, Cisco SD-WAN Manager).
- Users – Have an account in the IdP directory and are authorized to access the service provider.
Cisco Catalyst SD-WAN is compatible with any SAML 2.0-compliant IdP when configured according to industry standards.
Benefits of Using Single Sign-On
- Centralizes credential management through the Identity Provider.
- Strengthens authentication security by eliminating multiple weak passwords.
- Streamlines secure access for administrators.
- Enables one-click access to Cisco Catalyst SD-WAN Manager and other authorized applications.
Configure
Note: Minimum supported release: Cisco Catalyst SD-WAN Manager release 20.8.1.
Step 1. Obtain the Cisco SD-WAN Manager SAML Metadata
-
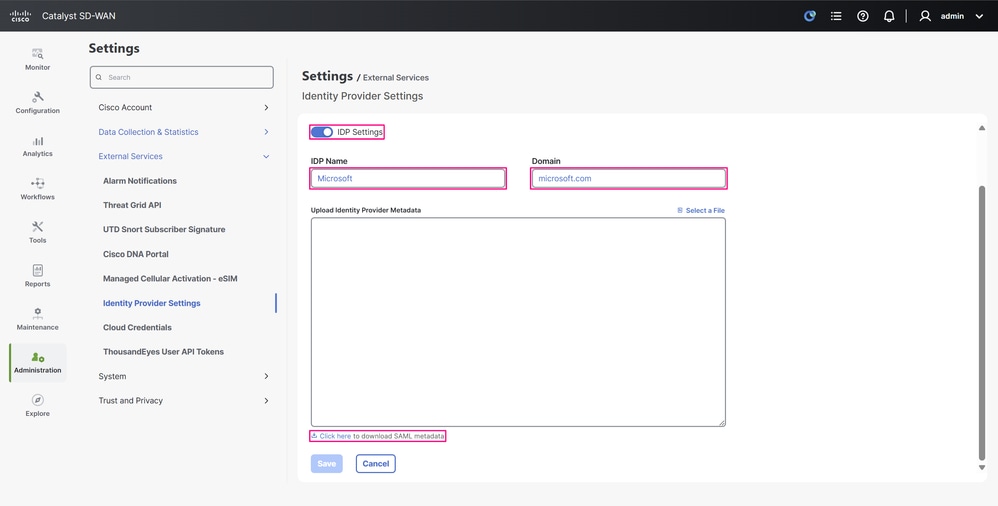
In Cisco SD-WAN Manager, navigate to Administration > Settings > External Services > Identity Provider Settings and click Add New IDP Settings.
 Cisco SD-WAN Manager UI
-
Toggle IDP Settings to enable the identity provider settings. In the IDP Name field, enter a name that references the IdP you are using, and in the Domain field, enter a domain that matches the domain names used by the users in your organization’s enterprise application. Click Click here to download the SAML metadata and save the metadata XML file to your computer. This file is used to configure SSO in Microsoft Entra ID in the next step.
Note: In this example, the metadata XML file points directly to the IP address of the Cisco SD-WAN Manager, but in many production environments, it points to its Fully Qualified Domain Name (FQDN). For a standalone Cisco SD-WAN Manager, the Entity ID contained in the metadata matches the URL you use to log in to the Cisco SD-WAN Manager at the time you download it. This means it functions with either the IP address or the FQDN, since it is a single-node setup.
For a Cisco SD-WAN Manager cluster, the same principle applies in that the FQDN points to one of the cluster nodes, and the metadata includes this domain as the Entity ID. The difference is that, whether you use metadata with the cluster’s FQDN or from a specific node using its IP address, once the SSO integration with Microsoft Entra ID is successfully completed, the other nodes also redirect to the IdP sign-in prompt.
The main requirement in both scenarios is that the Entity ID you use in Cisco SD-WAN Manager—whether an IP address or an FQDN—matches the identifier configured on the IdP side.
 IdP Settings Configuration Page
Step 2. Configure an Enterprise Application for SSO in Microsoft Entra ID
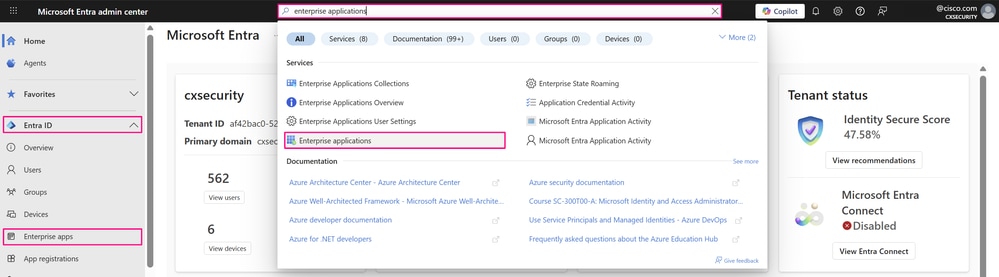
- Log in to the Microsoft Entra admin center portal with one of these roles: Cloud Application Administrator, Application Administrator, or owner of the service principal.
 Microsoft Entra Admin Center Portal
- Navigate to Entra ID > Enterprise apps, or you can also access this service when you enter enterprise applications in the search bar at the top of the portal and then choose Enterprise Applications.
 Microsoft Entra Admin Center Portal
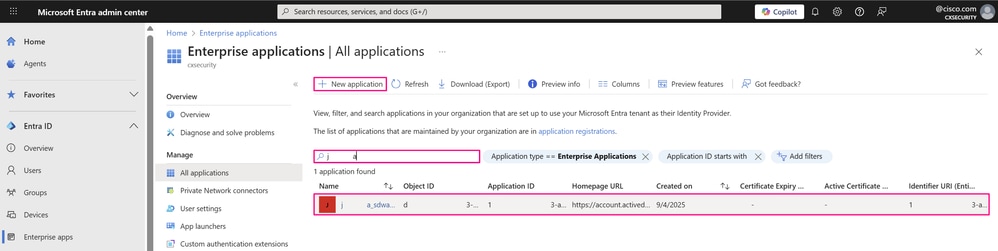
- The All applications page opens. Enter the name of your existing application in the search box, and then choose the application from the search results.
Note: On this same page, you can create a custom enterprise application based on your organization’s requirements and to configure it with SSO authentication if you do not already have, when you click New application.
 Enterprise Applications Dashboard
-
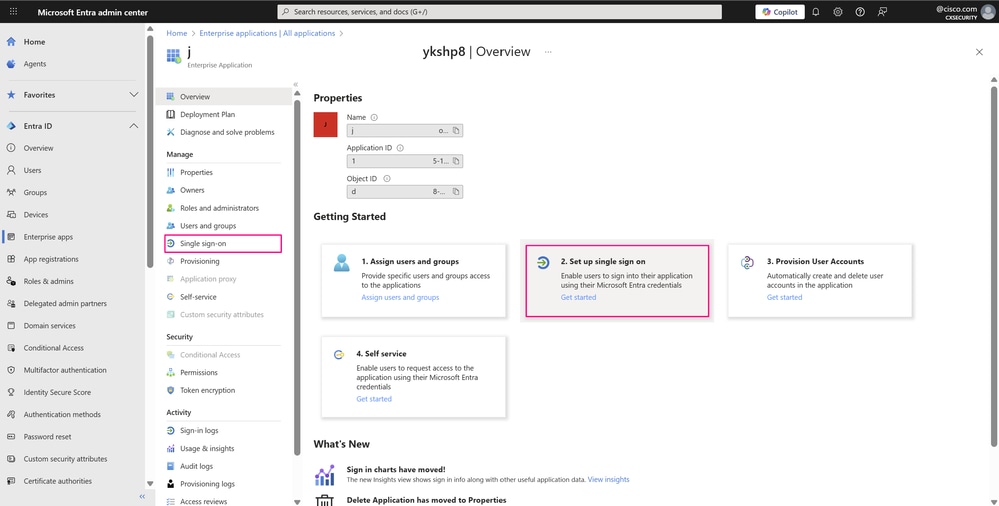
In the Manage section of the left menu, click Single sign-on, or in the Getting Started pane within the Overview section, click 2. Set up single sign-on to open the Single sign-on pane for editing.
 Enterprise Applications Overview
-
Select SAML to open the SSO configuration page.
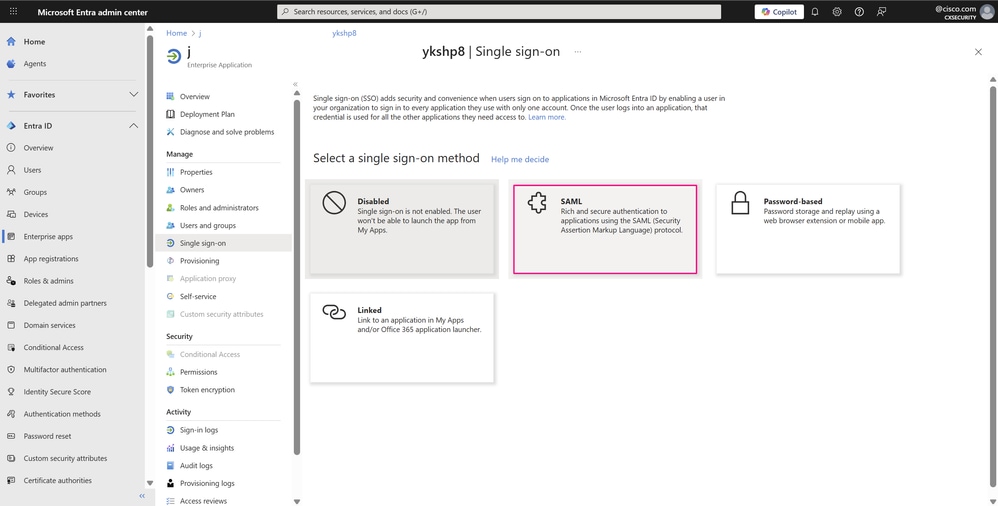 Single Sign-On Pane
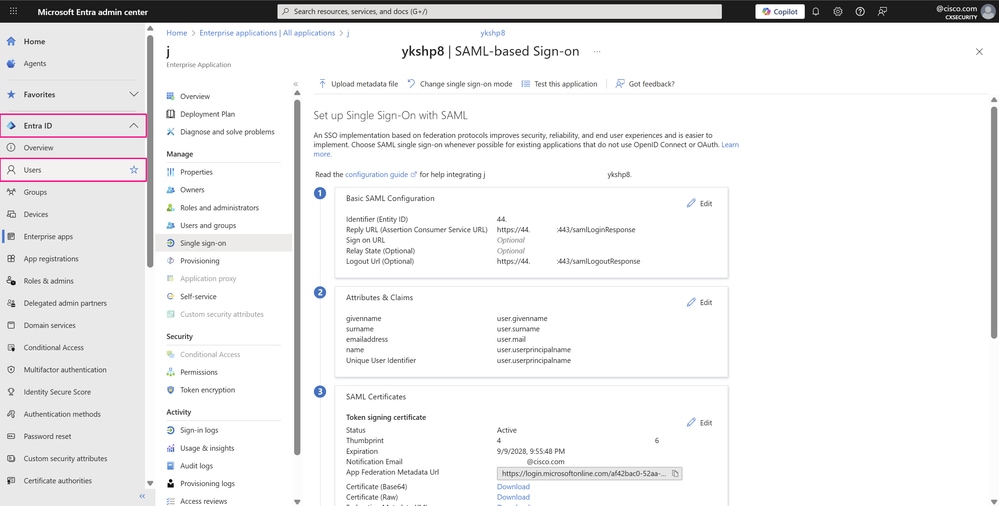
- On the Set up Single Sign-On with SAML page, click Upload metadata file.
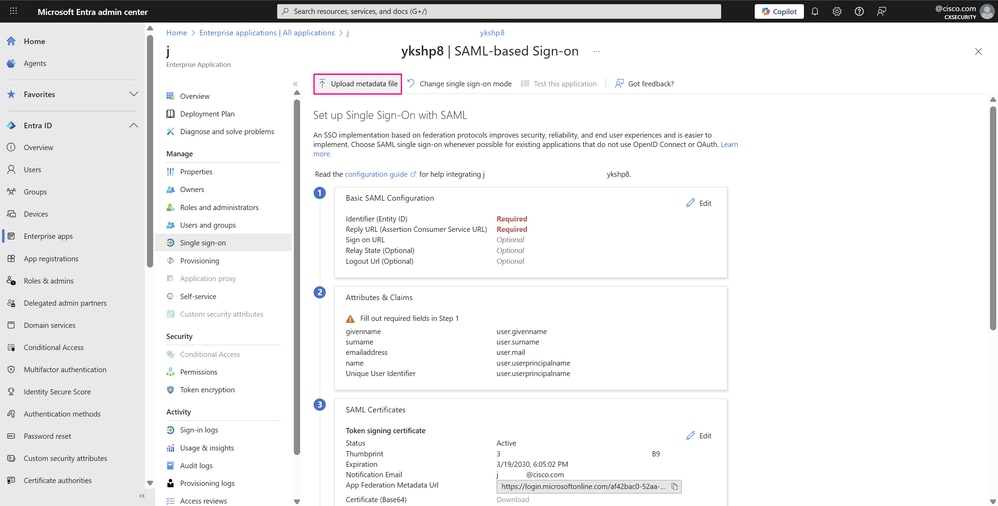 SSO with SAML Configuration Page
-
In the Upload metadata file window, browse to and click the metadata XML file you previously downloaded, and then click Add.
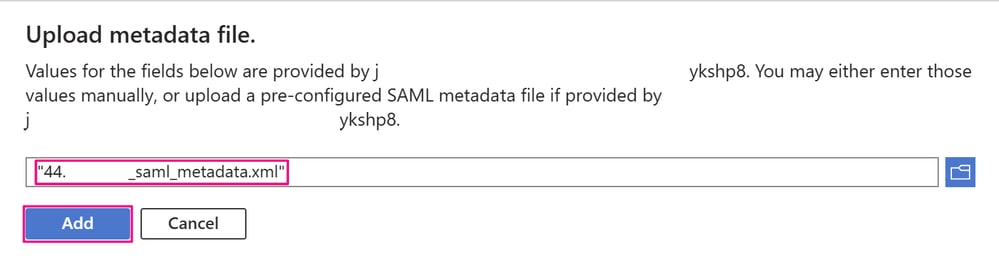 Upload Metadata File Window
-
In the Basic SAML Configuration window, the Identifier (Entity ID) is typically the URL specific to the application—in this case, the Cisco SD-WAN Manager—you are integrating with (as explained in the previous step). The Reply URL and Logout URL values populate automatically once the file is successfully uploaded. To continue, click Save.
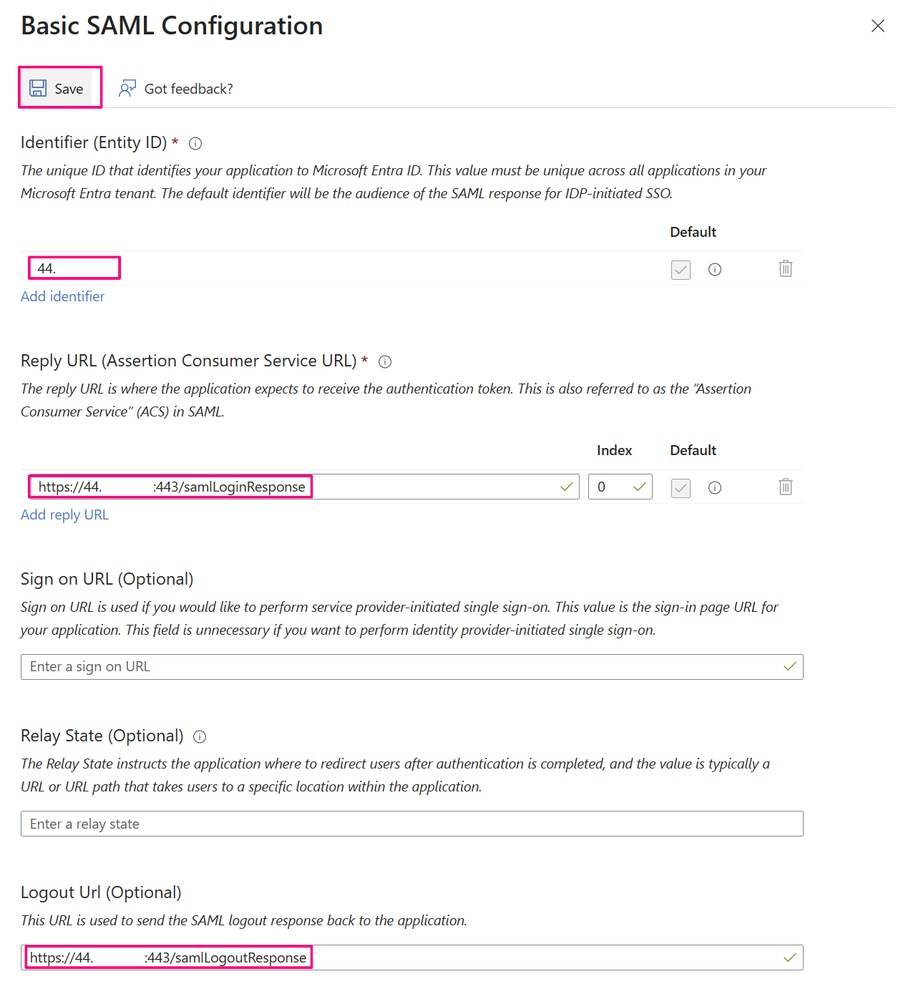 Basic SAML Configuration Window
Step 3. Add a User or Group Account to the Enterprise Application
- With the SAML configuration parameters of the application defined, you proceed to add the users or groups in the enterprise application that sign in to the application. To do this, first navigate to Entra ID > Users, or you can also access this service when you search the service name in the search bar at the top of the portal, as shown in a previous step.
 SSO with SAML Configuration Page
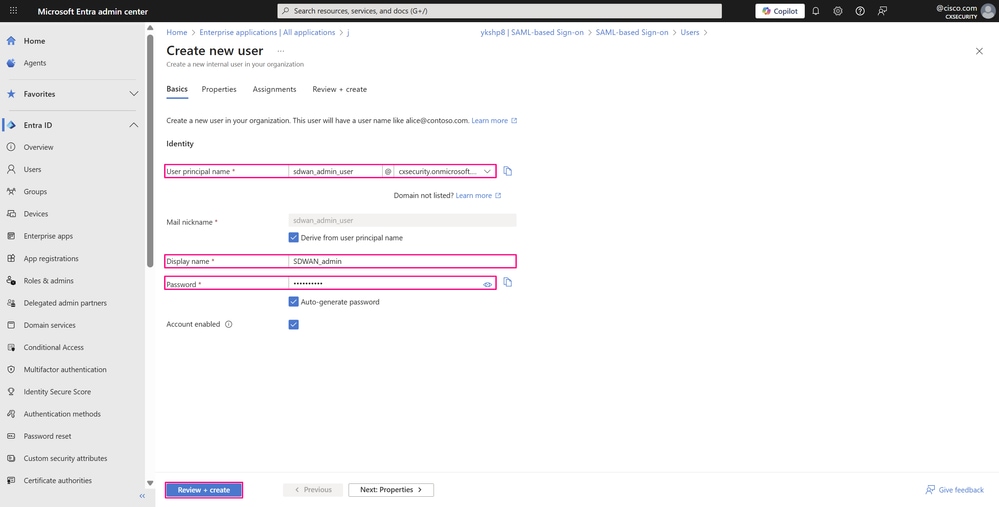
- Create a user that you associate with a group to illustrate SSO authentication with Cisco SD-WAN Manager and one of its user groups, netadmin, which is the most common in production environments. To do this, navigate to Entra ID > Users. Next, click New user and choose Create new user.
 Users Dashboard
- The Basics tab contains the core fields required to create a new user.
- For the User principal name, enter a unique username and choose a domain from the drop-down list of domains available in your organization.
- Enter a Display name for the user.
- Uncheck Auto-generate password if you want to enter a custom password, or leave this option checked to have one generated automatically.
- You can add the user to a group in the Assignments tab, but since the group membership has not yet been created, click Review + create.
 User Creation Page
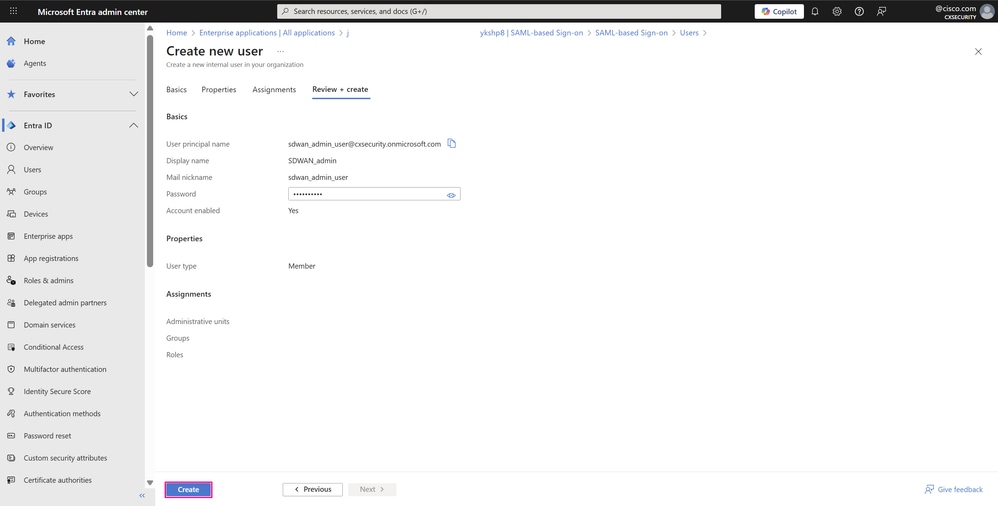
- The final tab shows the key details from the user creation workflow. Review the details and click Create to complete the process.
 User Creation Page
-
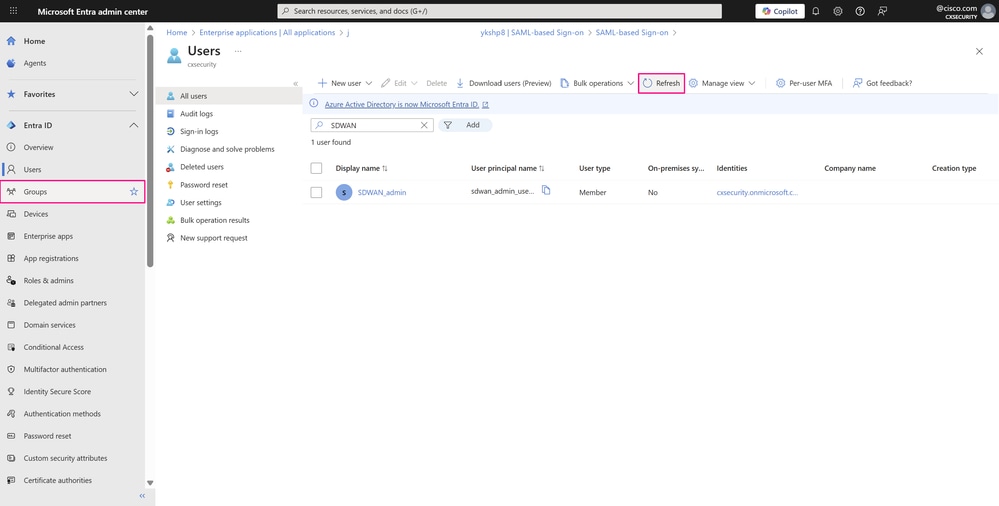
The new user appears shortly after. If it does not, click Refresh and search for the user using the search bar within the service. Next, navigate to Entra ID > Groups > All groups in order to create the new group.
 Users Dashboard
-
On this page, you manage the different groups and their permissions within your organization. Click New group to create the group that has network administrator privileges.
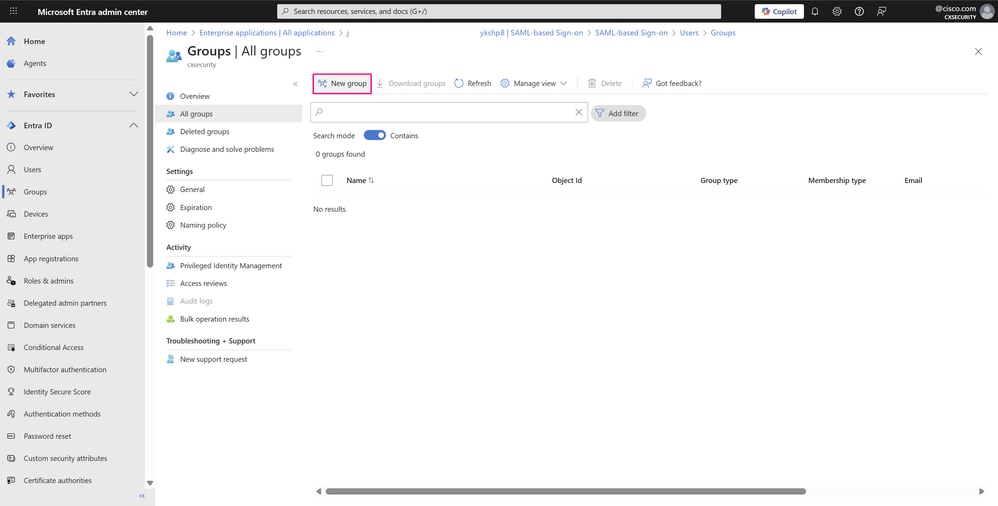 All Groups Page
-
Choose a Group type from the drop-down list — in this case, Security, since only access to shared resources is required. Enter a Group name of your choice that references the role or permissions of the group. At this point, associate users with the group when you click the selected members in the Members field.
-
In the Add members window, browse and choose the users you want to add — in our example, the user you just created — and then click Select.
-
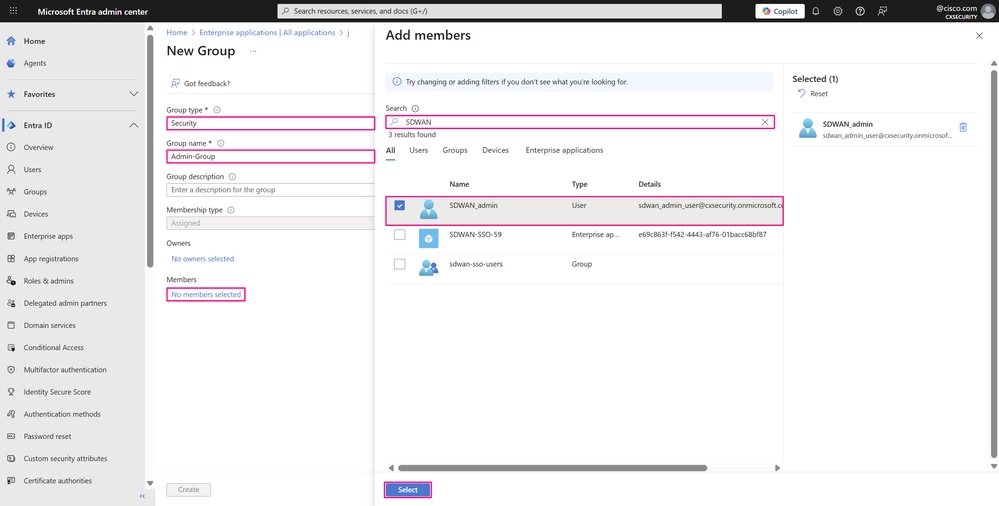 Group Creation Page
- Click Create to create the group.
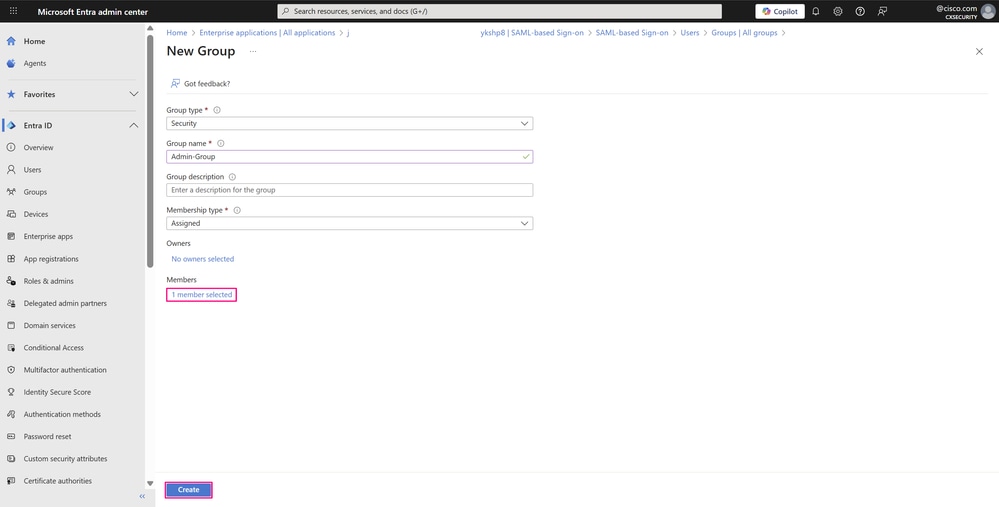 Group Creation Page
- The new group appears shortly after. If it does not, click Refresh and search for the group name with the search bar within the service. Repeat the previous steps to create another user and add it to a different group membership to validate SSO sign-in with the application and one of its other user groups, such as operator.
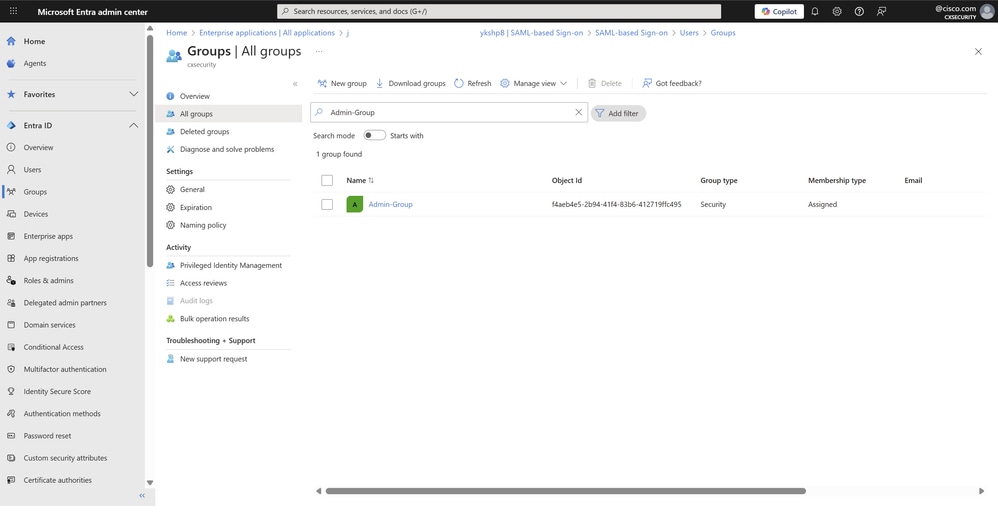 All Groups Page
Step 4. Configure SAML Group Provisioning for Microsoft Entra ID
-
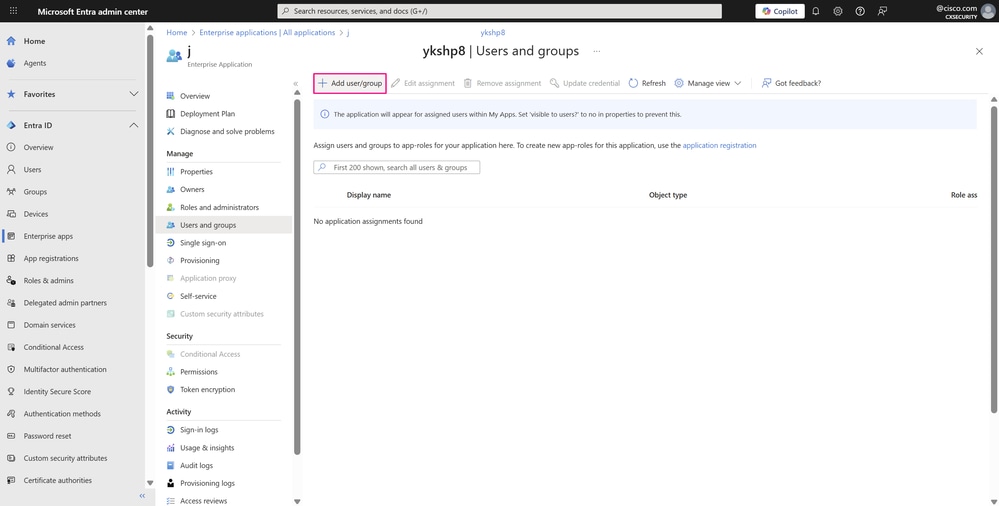
To provision the groups or the users associated with them in the SAML configuration, you need to assign them to your enterprise application so they have log in permissions for your application, for example, the Cisco SD-WAN Manager. Navigate back to Entra ID > Enterprise apps and open your enterprise application. In the Manage section of the left menu, click Users and groups.
 SSO with SAML Configuration Page
-
Next, click Add user/group.
 User and Groups Page
-
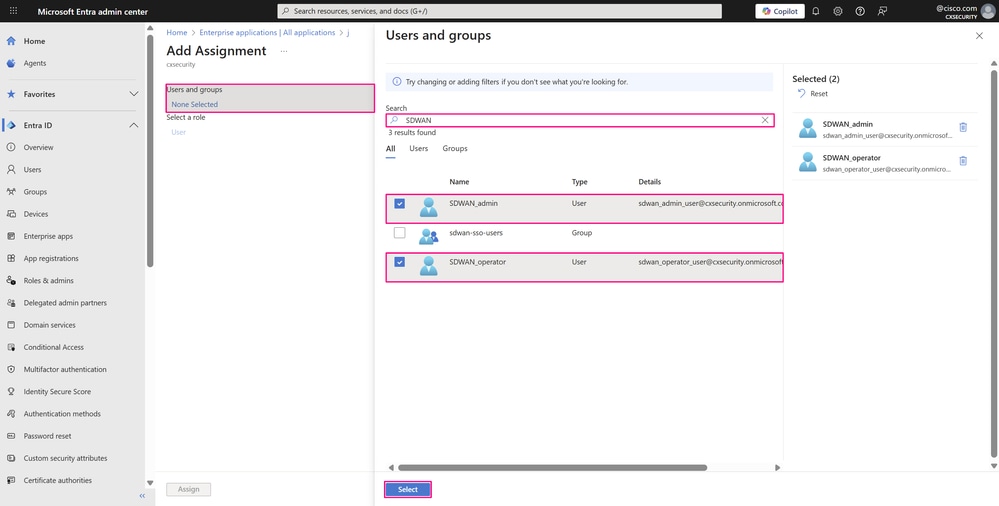
In the Add Assignment pane, click None Selected under Users and groups field. Search for and choose the user or group you want to assign to your application — in our example, the two users created in the previous steps — and then click Select.
 User/Group Assignment Pane
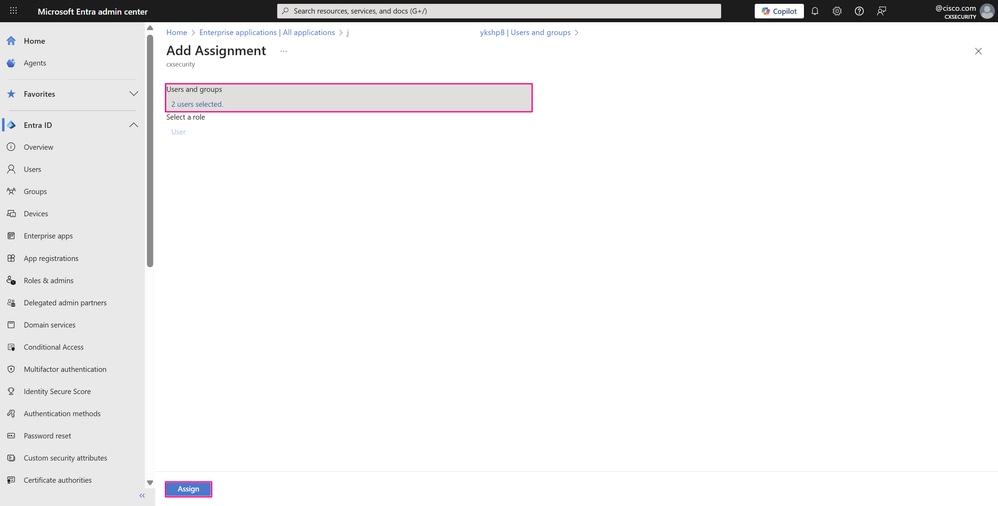
- Click Assign to assign the user or group to the application.
 User/Group Assignment Pane
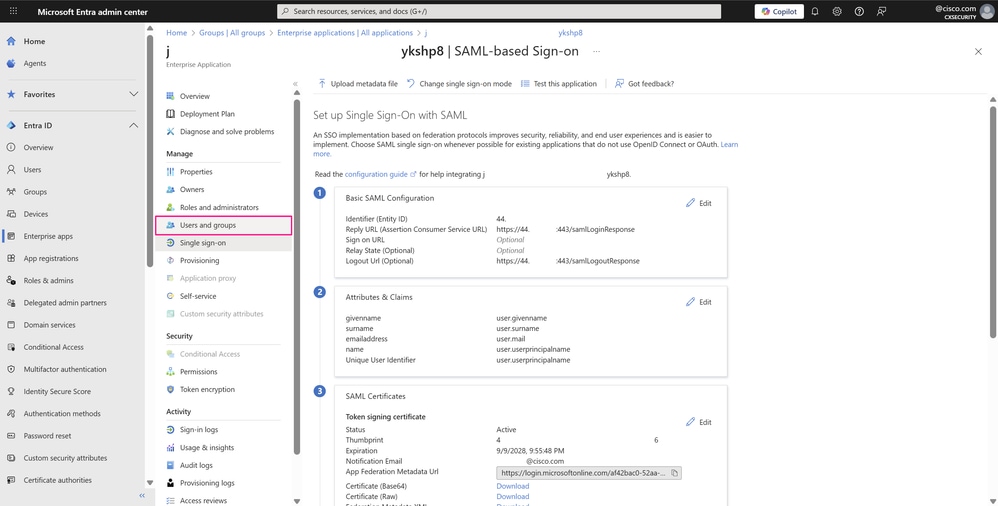
- The users assigned to your enterprise application are listed shortly after assignment. Click Single sign-on in the Manage section of the left menu to access your application’s SSO SAML configuration and complete the remaining required configuration.
 User and Groups Page
- On the Set up Single Sign-On with SAML page, under Attributes & Claims, click Edit.
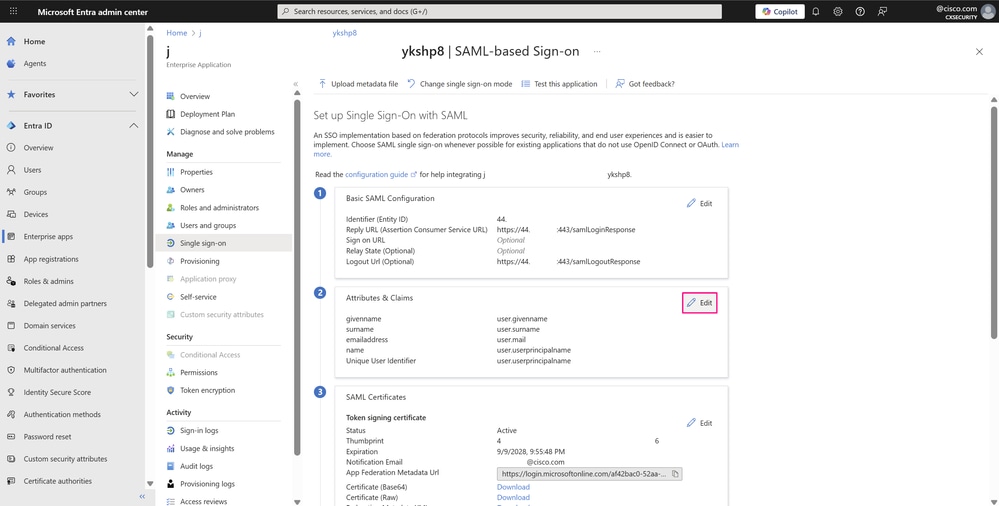 SSO with SAML Configuration Page
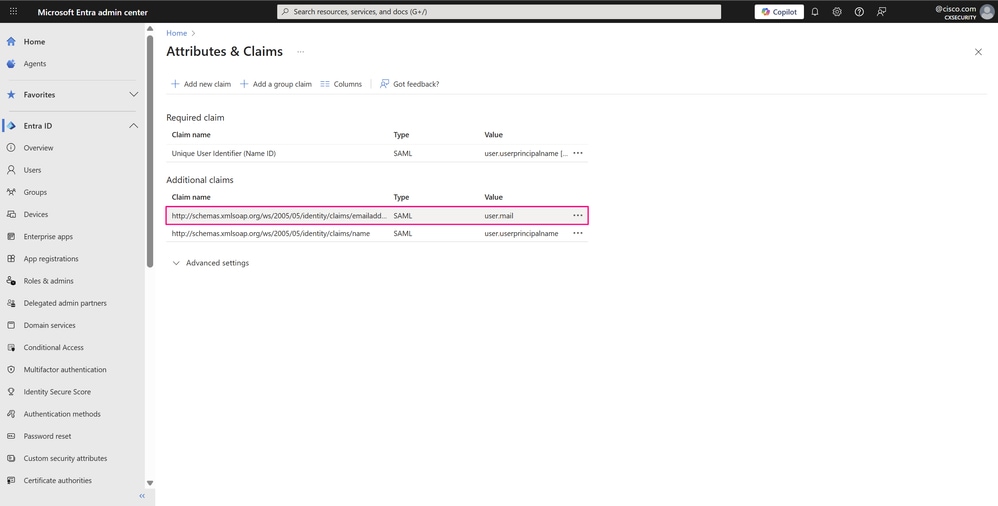
-
On the Attributes & Claims page, click the three-dot icon and then Delete to remove the claim with the value user.givenname and the claim with the value user.surname, as they are not needed for this example.Only the next claims are required for basic SSO authentication with your application:
- Email address of the user –user.mail
- User principal name (UPN) of the user –user.userprincipalname
Note: Your organization can require additional claims depending on its specific needs.
 Attributes and Claims Page
- In the Claim deletion window, click OK to delete the claim.
 Claim Deletion Window
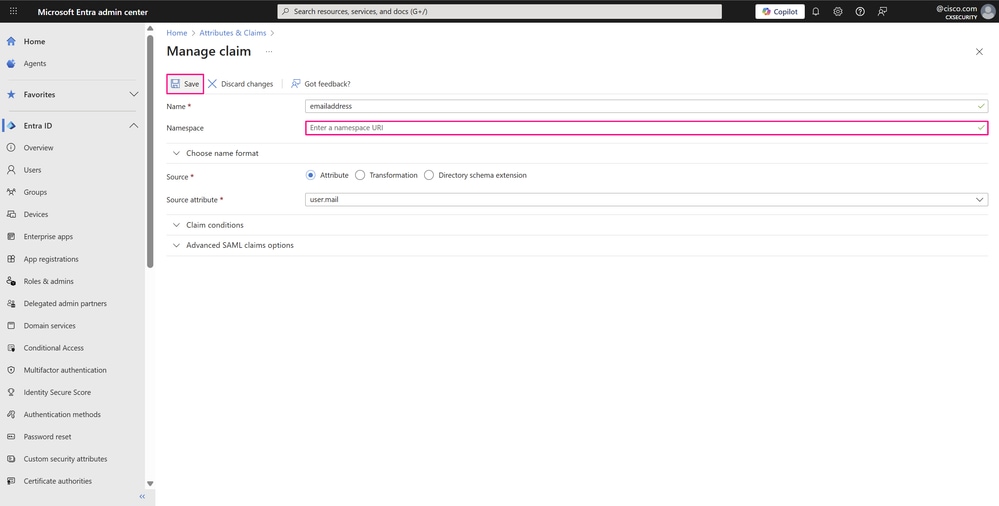
- Next, remove the namespace from the Claim name in the two remaining claims, as this field is optional. This change allows the actual name of each to be displayed on this page for easier identification. Hover over each claim and click it to access its settings.
 Attributes and Claims Page
- On the Manage claim page, delete the Namespace field and click Save to apply the changes.
 Manage Claim Page
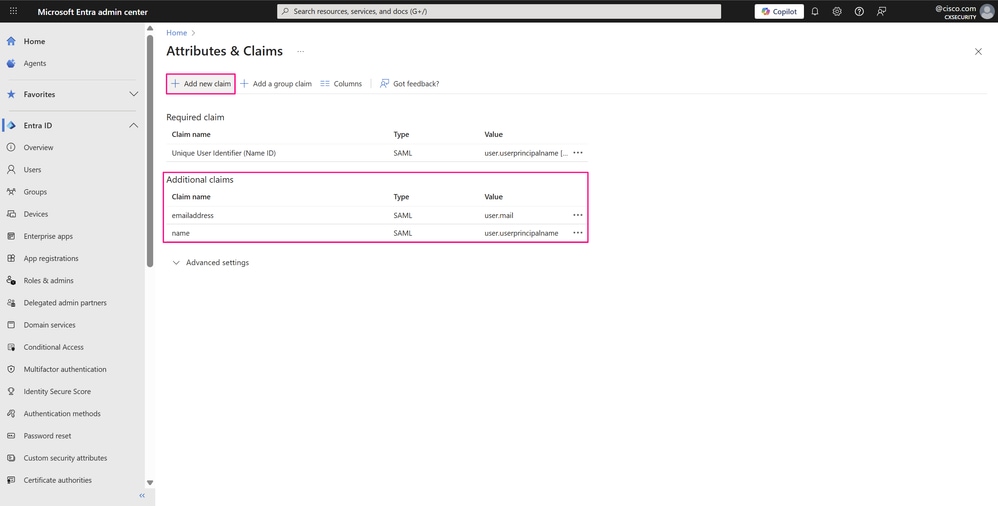
- The names of the two required claims can now be seen. However, one more additional claim is still required to define the groups the users belong to and that are authorized to access application resources. To do this, click Add new claim.
Note: In this example, user is chosen as the UPN Claim name to display the user’s email address instead of the SAML NameID format in the profile details within the Cisco SD-WAN Manager UI.
 Attributes and Claims Page
-
Enter a Name to identify this claim. Next to Source, select Attribute. Then click Claim conditions to expand the options and configure multiple conditions.
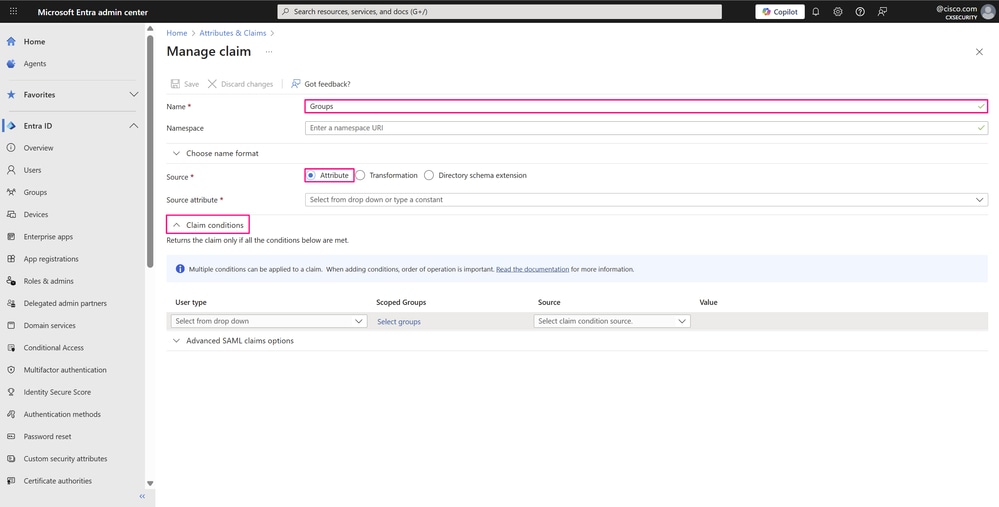 Manage Claim Page
-
In the claim condition, choose Members from the User type drop-down list and click Select Groups to choose the group(s) to which the user must belong, then click Select.
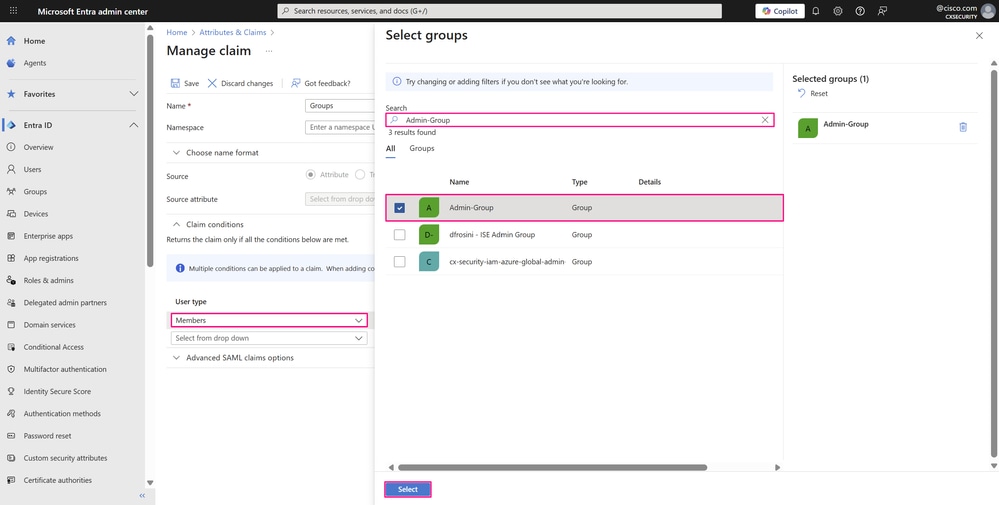 Manage Claim Page
-
Choose Attribute from the Source drop-down list where the claim retrieves its value. In the Value field, enter the custom attribute of the user that references the user group defined in your application. In this example, netadmin is one of the standard user groups in Cisco SD-WAN Manager. Enter the attribute value without quotes and press Enter.
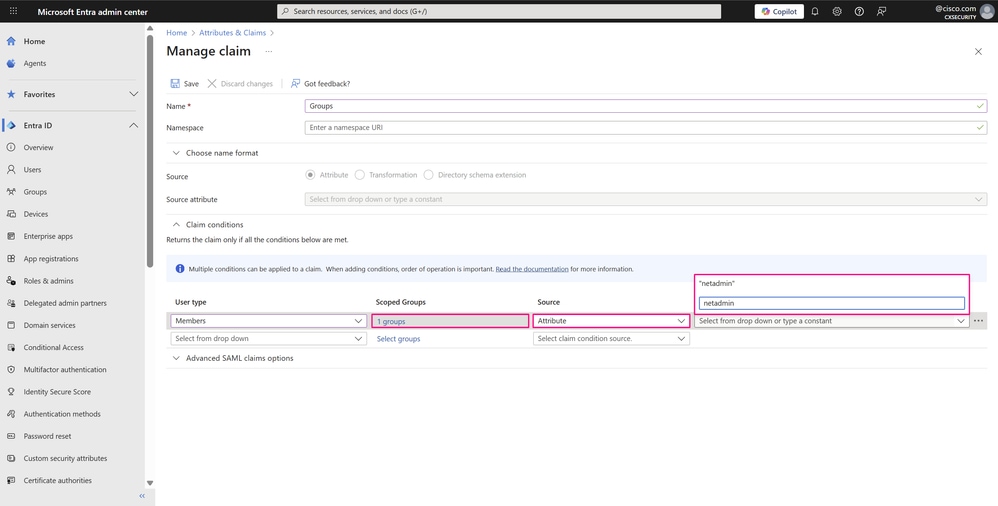 Manage Claim Page
-
Immediately after, the attribute value appears with quotes because Microsoft Entra ID handles this value as a string.
Note: These parameters within the claim conditions are highly relevant in the SSO SAML configuration of the enterprise application, since these custom attributes must always match the user groups defined in Cisco SD-WAN Manager. This match determines the privileges or permissions granted to users based on the group to which they belong on Microsoft Entra ID.
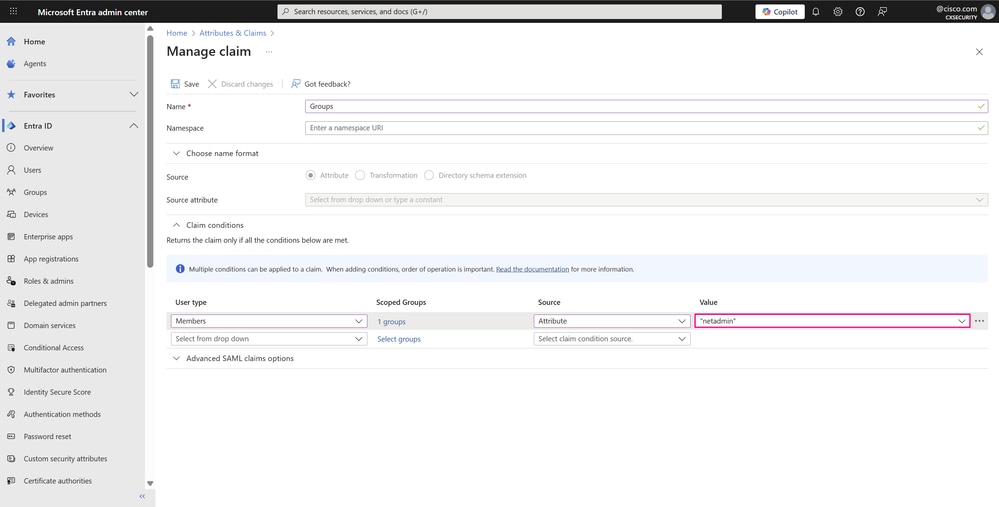 Manage Claim Page
- Repeat the same steps for a second claim condition for the second group created, that maps to the operator user group in Cisco SD-WAN Manager. This process is required for each different group with specific permissions that you want to sign in to the application. You can also add multiple groups within a single condition. Click Save to save the changes.
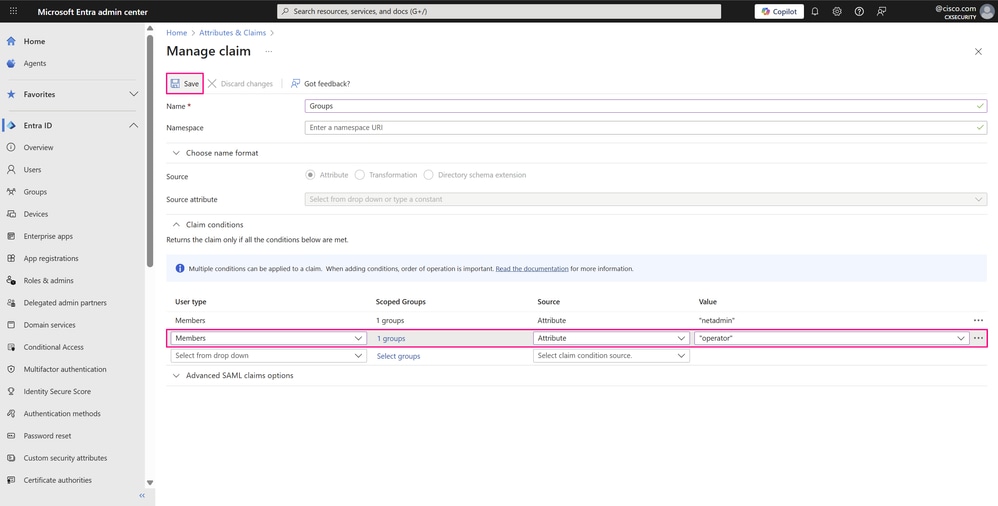 Manage Claim Page
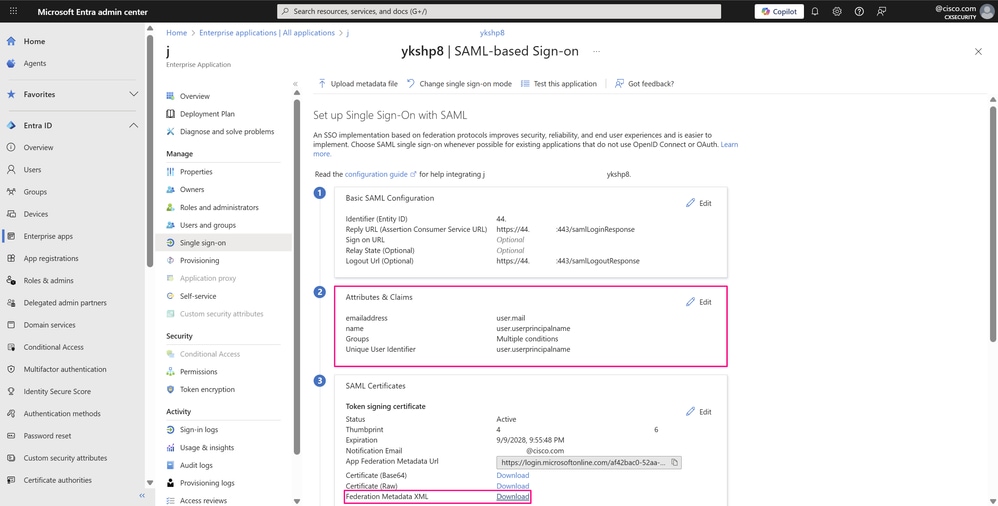
- On the Set up Single Sign-On with SAML page, the Attributes & Claims section shows the new changes made. To conclude the configuration in the Microsoft Entra ID, under SAML Certificates, click Download next to Federation Metadata XML to download the XML file that provides identity services to the application.
 SSO with SAML Configuration Page
Step 5. Import the Microsoft Entra ID SAML Metadata File into Cisco SD-WAN Manager
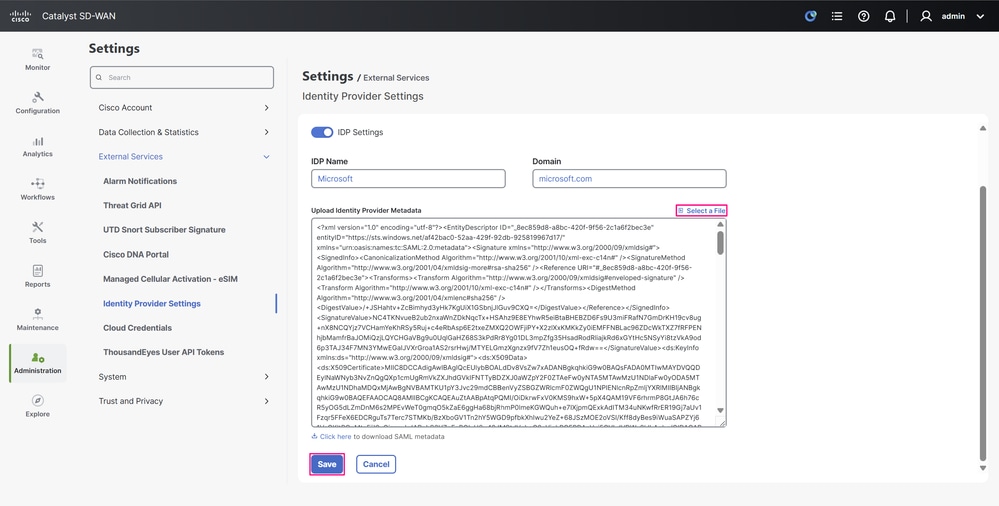
- To upload the federation metadata into the Cisco SD-WAN Manager, navigate to Administration > Settings > External Services > Identity Provider Settings and click Select a file. Choose the file you just downloaded from Microsoft Entra ID, then click Save.
 IdP Settings Configuration Page
-
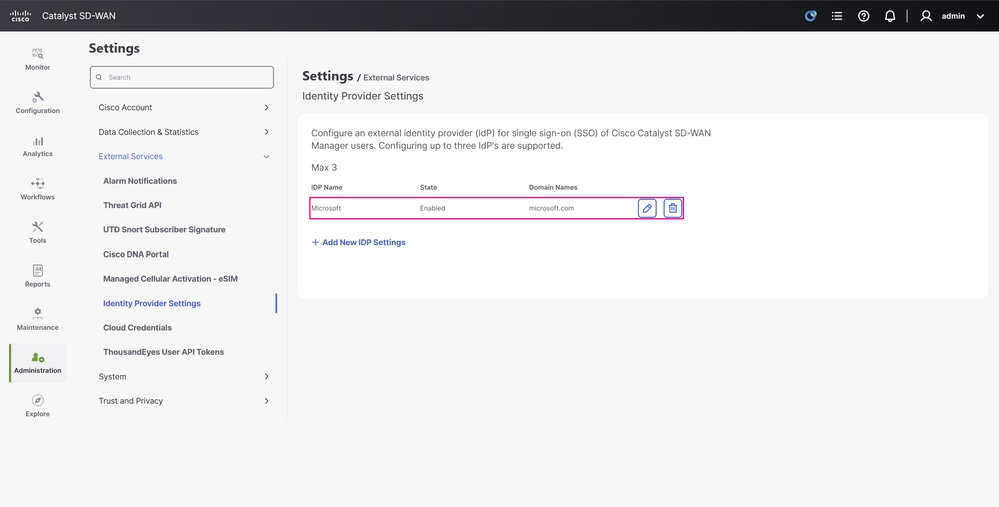
The IdP settings and metadata are now saved.
 IdP Settings Configuration Page
Verify
-
Click your profile name in the upper-right corner of the UI to expand the options, from there click Log Out to sign out of the portal.
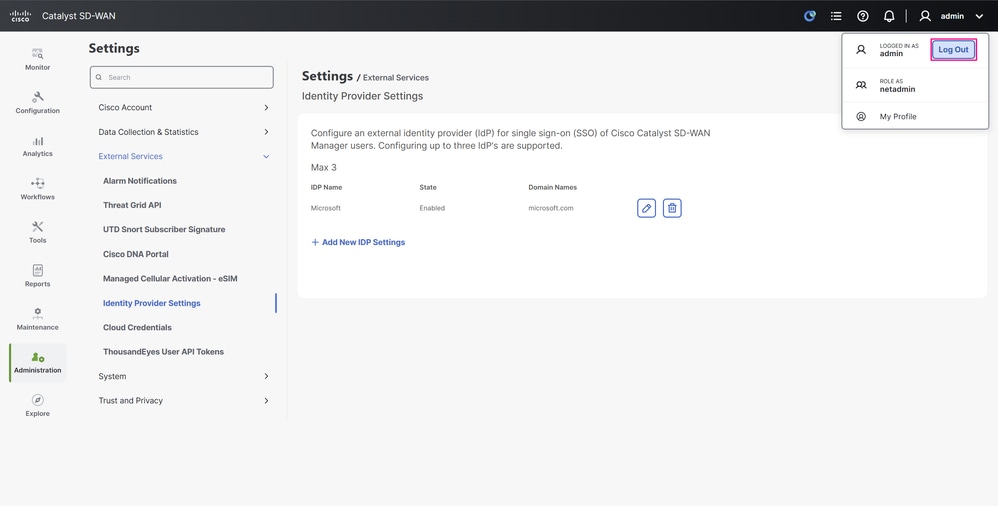 Profile Menu
-
You are immediately redirected to the Microsoft authentication screen, where you sign in with the credentials of the Microsoft Entra ID SSO users.
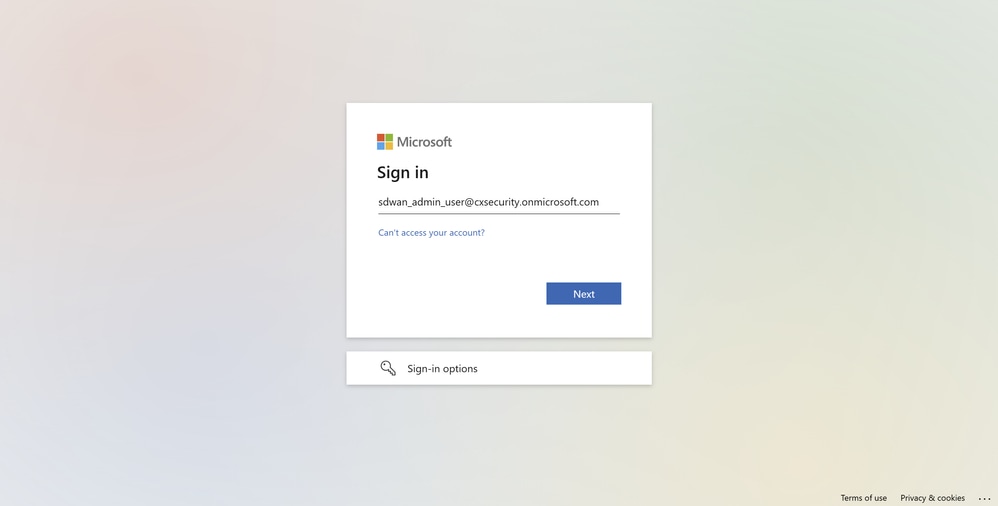
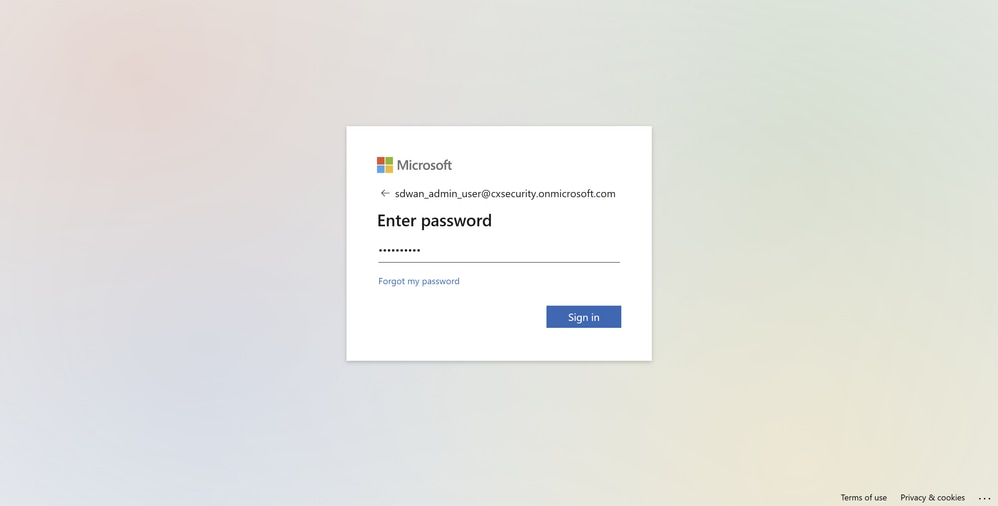 Microsoft Log In Screen
-
Because this is the first time the SSO user logs in, the prompt requests a password change.
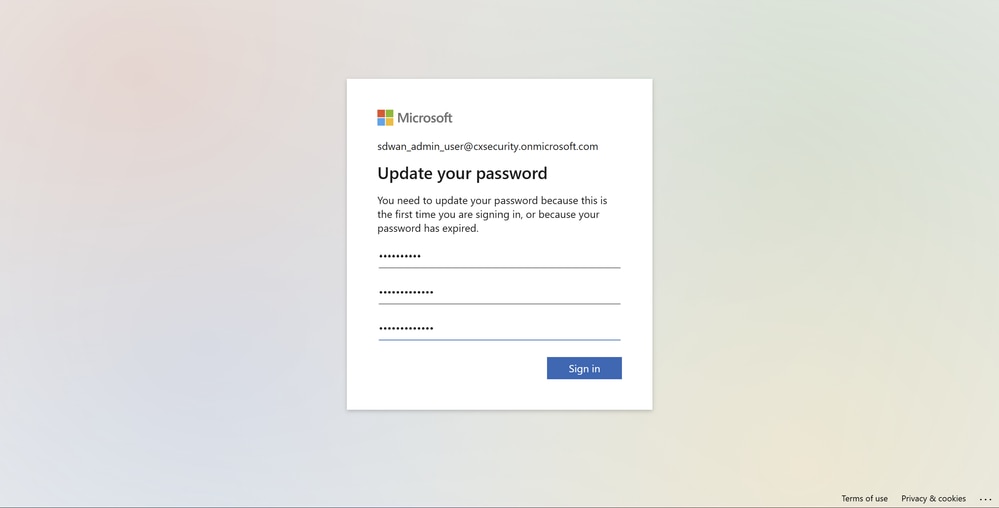 Microsoft Log In Screen
-
After a successful sign-in, expand the details of your profile again in the upper-right corner of the dashboard, and you can confirm that the user is detected with a netadmin role, exactly as configured in Microsoft Entra ID.
 Cisco SD-WAN Manager UI
-
Finally, perform the same sign-in test with the other user. You see the same behavior — the user is now identified with the operator role.
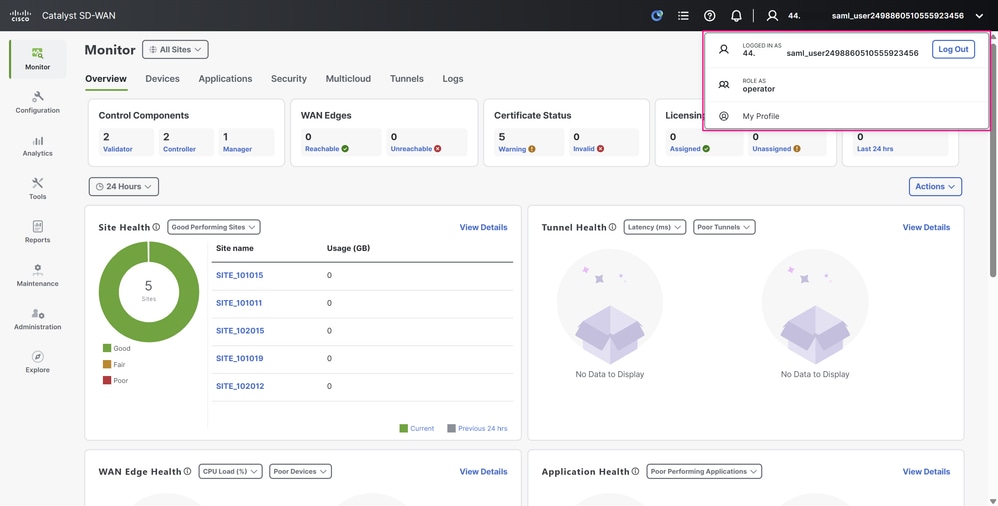 Cisco SD-WAN Manager UI
Related Information
Revision History
| Revision | Publish Date | Comments |
|---|---|---|
1.0 |
23-Sep-2025
|
Initial Release |
Contributed by Cisco Engineers
- Jordan Morales PonceTechnical Consulting Engineer
 Feedback
Contact Cisco
- Open a Support Case

- (Requires a Cisco Service Contract)