Generate and Extract the RCA File from the Catalyst Center
Available Languages
Contents
Introduction
This document describes how to create and extract the RCA file (Support Bundle) from Cisco Catalyst Center (formerly Cisco DNA Center).
Background Information
The Root Cause Analysis (RCA) file is a support bundle generated on the Catalyst Center. It includes the outputs of multiple commands and service logs, essentially giving a snapshot of the Catalyst Center. It allows support engineers to troubleshoot and resolve issues faster. It does not include outputs from the databases. Earlier, the RCA file was generated and downloaded from the CLI only, but this has changed from version 2.3.7.6. All command outputs in this document are relevant from release 2.3.3.x.
Generating the Root Cause Analysis File (RCA or Support Bundle)
The first step is to generate the RCA file. This can be generated either from the User Interface (UI) or the Command Line Interface (CLI).
Any Physical Appliance Deployment (UI Option)
Starting with 2.3.7.6 there is a new option to generate the RCA file from the Catalyst Center UI, also referred to as the Support Bundle in the UI. Also, there are new options provided in the UI such as the ability to choose the time frame of the logs or to choose an application specific log bundle. These options are available for all physical appliance deployments.
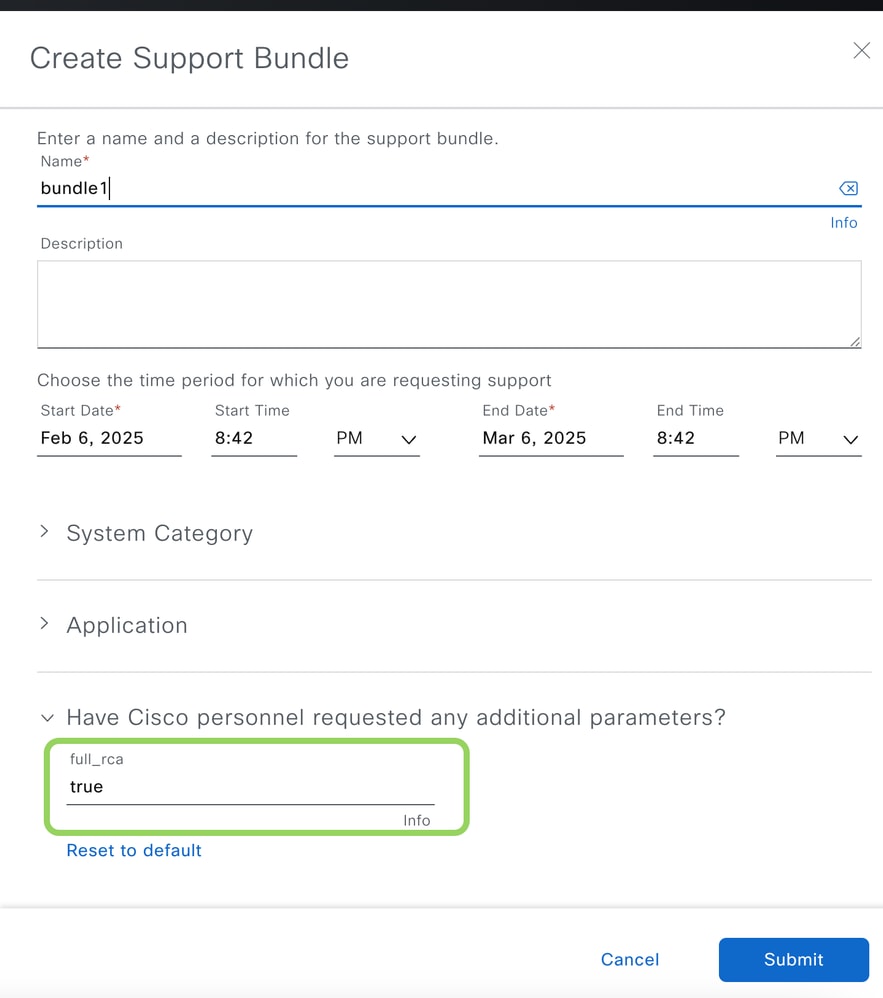
Step 1: Click the Support Bundle option in the Help menu in the top bar.
Step 2: A new pop-up shows a list of support bundles that have been generated earlier or just the option to create a new one if this is the first one.
Step 3: Click Create Support Bundle and another new pop-up appears. A time period can be selected for the support bundle. If the issue was seen 2 days ago, then please choose at least a day prior as the start date for the support bundle. The maximum time period is set for one month by default from the current time. Please ensure System Category is always selected. Based on the type of issue, an additional application category can be selected (optional). The file can take up to 30 minutes to generate (can take more time for scaled deployments).

Step 4: Ensure that a full RCA file is captured for your issue. Type true in the last option prior to clicking the Submit button as this ensures additional outputs are captured.
Single-Node Cluster / Virtual Appliance (CLI Option)
Log in to the Catalyst Center CLI on port 2222 and use maglevas the username. Then execute the rcacommand to generate the RCA file. The RCA file is generated and stored in data/rca. It usually takes around 30 minutes to create the file. The file name has the format maglev-<cluster link IP address>-rca-<date and time>.tar.gz.
Sample RCA command help menu.
$ rca --help

Help:
rca - root cause analysis collection utilities

Usage: rca [COMMAND] [ARGS]...
Commands:
     clear - clear RCA files
      copy - copy rca files to specified location
      exec - collect RCA
      view - restricted filesystem view
Example of an RCA being generated on a physical appliance.
$ rca
===============================================================
VERIFYING SSH/SUDO ACCESS
===============================================================
[sudo] password for maglev:
Done
changed ownership of '/data/rca/maglev-10.78.9.21-rca-2025-03-11_04-27-49_UTC.tar.gz' from root:root to maglev:maglev
===============================================================
VERIFYING ADMINISTRATION ACCESS
Please note that after 3 failed login attempts, diagnostic
collection will proceed, but not all diagnostics will be
collected.
===============================================================
WARNING: Current token has expired (2025-01-24T22:03:05+00:00Z).
The current time is: 2025-03-11T04:27:54Z
Continuing with login
[administration] password for 'admin':
User 'admin' logged into 'kong-frontend.maglev-system.svc.cluster.local' successfully
===============================================================
RCA package created on Tue Mar 11 04:28:02 UTC 2025
===============================================================
2025-03-11 04:28:02 | INFO | Generating log for 'date'...
2025-03-11 04:28:02 | INFO | Node ISO type: full-iso

...

Created RCA package: /data/rca/maglev-10.78.9.21-rca-2025-03-11_04-27-49_UTC.tar.gz
2025-03-11 04:58:28 | INFO | Cleaning up RCA temp files...
[Tuesday Mar 11 04:58:30 UTC] maglev@10.78.9.21 (maglev-master-10-78-9-21)
$
Example of an RCA being generated on a ESXi Virtual Appliance.
$ rca
===============================================================
VERIFYING SSH/SUDO ACCESS
===============================================================
Done
===============================================================
RCA package created on Tue Mar 11 07:04:15 UTC 2025
===============================================================
2025-03-11 07:04:15 | INFO | Generating log for 'date'...
2025-03-11 07:04:15 | INFO | Generating log for 'sudo cat /root/.bash_history'...
2025-03-11 07:04:15 | INFO | Node ISO type: mks
/usr/local/bin/rca_scripts/network_diag.sh
...

Created RCA package: /data/rca/maglev-10.78.9.122-rca-2025-03-11_07-04-15_UTC.tar.gz
2025-03-11 07:23:23 | INFO | Cleaning up RCA temp files...
[Tuesday Mar 11 07:23:23 UTC] maglev@10.78.9.122 (maglev-master-10-78-9-122)
$
Three Node Cluster (CLI Option)
Log in to the Catalyst Center CLI on port 2222 and use maglevas the username. Then execute the rcacommand to generate the RCA file. The RCA file is generated and stored in data/rca. It usually takes around 30 minutes to create the file. The file name has the format maglev-<cluster link IP address>-rca-<date and time>.tar.gz. Please ensure an RCA file is collected from all nodes as services are distributed across the nodes. If the Catalyst Center prompts for a cluster IP address then this can be any reachable node/cluster IP address. This is required to get the admin token which is in turn required for some of the command outputs.
[Wed May 30 18:24:26 UTC] maglev@10.1.1.2 (maglev-master-10) ~
$  rca

===============================================================
Verifying ssh/sudo access
===============================================================
Done

===============================================================
Verifying administration access
===============================================================
Cluster: 10.1.1.3 <any reachable cluster/node IP address>
[administration] username for 'https://10.1.1.3:443': admin
[administration] password for 'admin': <type your admin password>
User 'admin' logged into '10.1.1.3' successfully

===============================================================
RCA package created on Wed May 30 18:24:44 UTC 2018
===============================================================

2018-05-30 18:24:44 | INFO | Generating log for 'date'...
tar: Removing leading `/' from member names
/etc/cron.d/
/etc/cron.d/run-remedyctl
...
After the rca command is executed, the cluster IP address is cached in /home/maglev/.maglevconf (not visible from magshell) on that node. The next time the rca command is executed, Catalyst Center uses the same cluster IP address for that node.
[Wed May 30 18:23:37 UTC] maglev@10.1.1.2 (maglev-master-10) ~
$ rca
[sudo] password for maglev:

===============================================================
Verifying ssh/sudo access
===============================================================
Done

===============================================================
Verifying administration access
===============================================================
[administration] password for 'admin': <type the admin password>
User 'admin' logged into '10.1.1.3' successfully <-- it automatically logged into the cluster previously defined as the inter-cluster IP address

===============================================================
RCA package created on Wed May 30 18:23:46 UTC 2018
===============================================================

2018-05-30 18:23:46 | INFO | Generating log for 'date'...
tar: Removing leading `/' from member names
/etc/cron.d/
…
Viewing the Root Cause Analysis File (RCA or Support Bundle)
The RCA/Support Bundles files can be viewed either from the CLI or the UI.
Viewing the RCA/Support Bundles (UI Option)
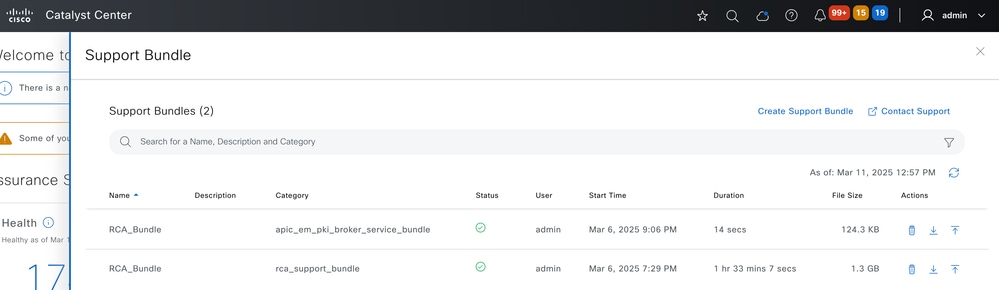
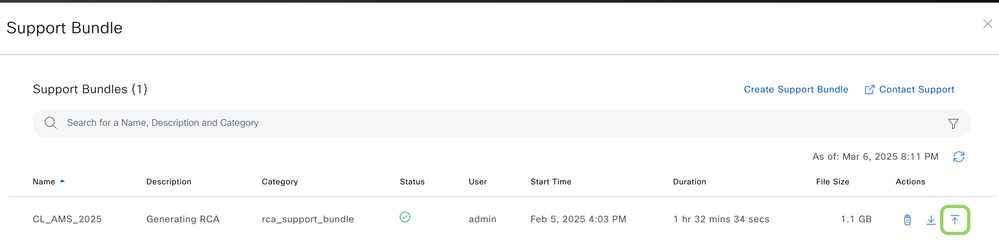
Click the Support Bundle option in the help menu which is available in the top bar to view any existing Support Bundles and to view the status of that file. If the file is still being created, then the status displays an in progress icon. The file is available for download or upload once the status is green.
Viewing the RCA/Support Bundles (CLI Option)
The RCA/Support Bundles are stored in the folder /data/rca. They can be viewed via the rca view command or this Linux command.
$ rca view
total 1124652
-rwxr-xr-x 1 root root 1151639341 Feb 26 15:19 maglev-192.168.5.11-rca-2025-02-26_14-52-52_UTC.tar.gz

[Tuesday Mar 11 07:22:46 UTC] maglev@192.168.5.11 (maglev-master-192-168-5-11)
$

$ ls -lt data/rca/
total 1124652
-rwxr-xr-x 1 0 0 1151639341 Feb 26 15:19 maglev-192.168.5.11-rca-2025-02-26_14-52-52_UTC.tar.gz

[Tuesday Mar 11 07:23:06 UTC] maglev@192.168.5.11 (maglev-master-192-168-5-11)
$
Extracting the Root Cause Analysis File (RCA or Support Bundle)
There are multiple ways to extract the file from the Catalyst Center based on whether the file was generated from the UI or the CLI.
Initiating the Copy from the Catalyst Center to a Cisco Support Case (UI Option)
There are 2 options available to upload the file from the UI. For the second option, the Cisco Support Assistant Extension (CSAE) Chrome plugin/extension is used.
Option 1: Upload from the UI
Three action buttons are presented for every file generated from the UI. The action to the right is to upload the file to the Cisco Support Case. Here the password to access CXD is needed. The username is the Cisco Support Case number and the password is a token unique to every Cisco Support case. The username/password is always present in a note at the start of your Cisco Support case and can also be retrieved from the Support Case Manager. For more details on the token, refer to Customer File Uploads to Cisco Technical Assistance Center.
 FileUpload1
Option 2: Upload from the UI with the CSAE Extension Installed
Install the CSAE extension on your Chrome or Edge browser. This reprograms the capability of the up arrow action button and allows the file to be uploaded to a Cisco Support Case without any credentials. For more details, check out CSAE documentation.
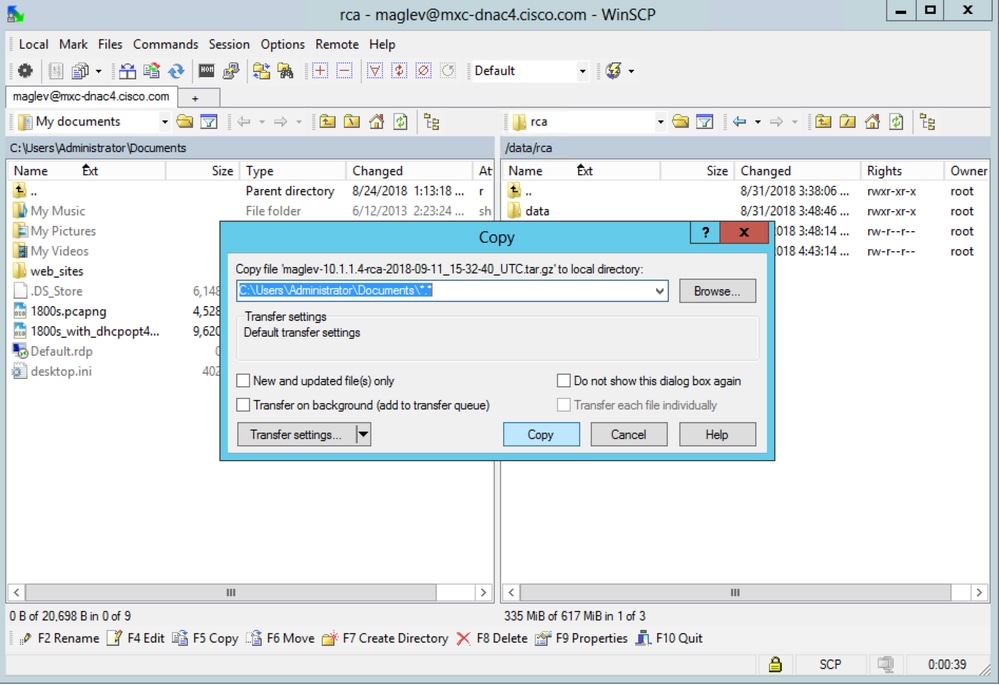
Initiating the File Copy from a Windows, Mac or Linux Machine (UI Option)
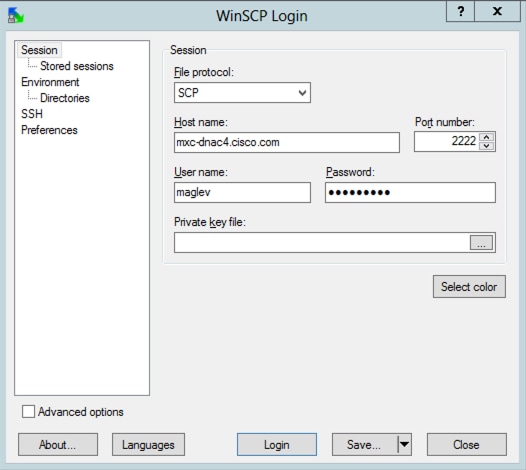
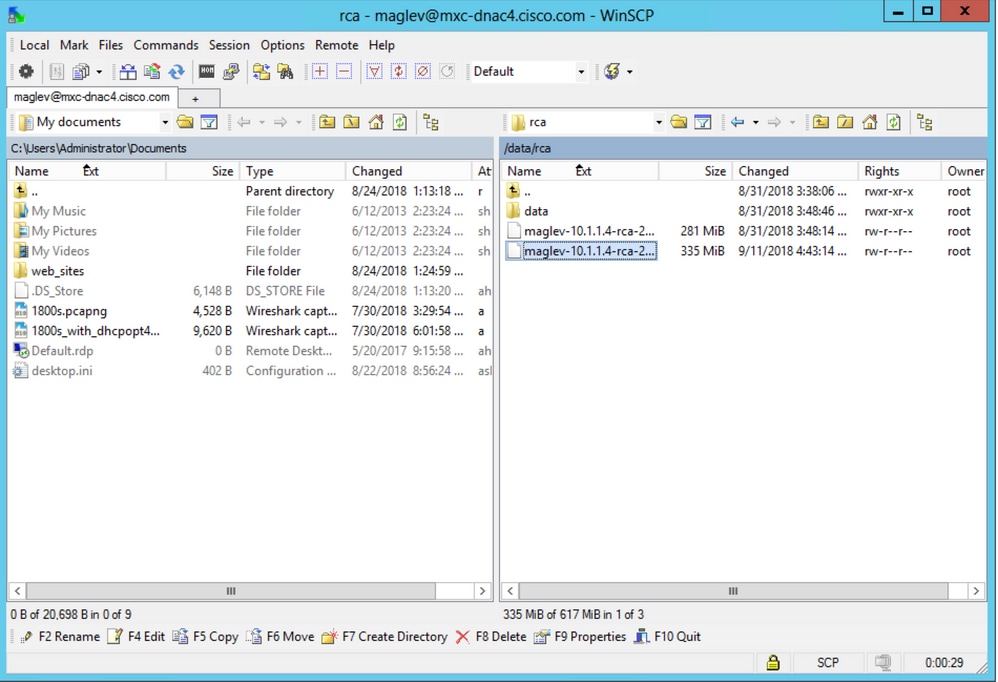
Step 1. Download WinSCP (windows only), FileZilla, or your favorite SCP/SFTP client.
Step 2. Provide your Catalyst Center IP address with your CLI credentials, choose SCP or SFTP as the file protocol, and choose the port number 2222.

Step 3. Navigate to the data/rca folder.
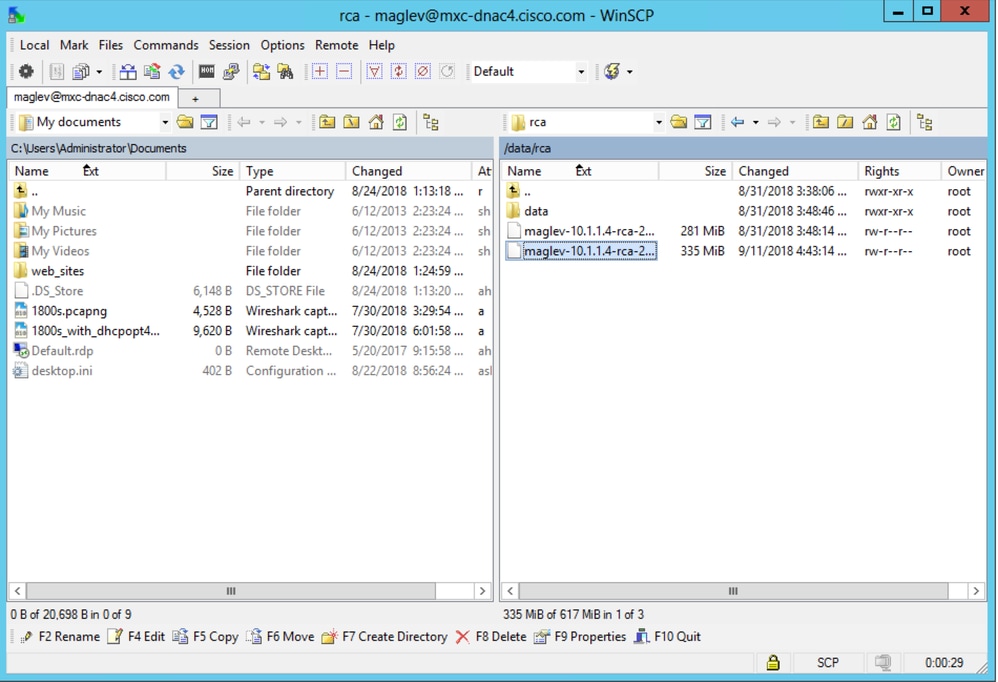
Step 4. Copy the RCA file to your local computer.
Initiating the File Copy from a Mac or Linux Machine (CLI Option)
Step 1. Open a terminal session, then perform these steps to copy the RCA file named maglev-10.78.9.21-rca-2025-01-14_08-48-51_UTC.tar.gz stored on the Catalyst Center appliance in the data/rcadirectory to the present working directory on your computer.
rrahul@MY-MACBOOK ~ % scp -P 2222 maglev@10.78.9.21:data/rca/maglev-10.78.9.21-rca-2025-01-14_08-48-51_UTC.tar.gz .
Welcome to the Cisco DNA Center Appliance
maglev@10.78.9.21's password:
maglev-10.78.9.21-rca-2025-01-14_08-48-51_UTC.tar.gz                                                                                                  100%  1485MB  32.3MB/s  00:45
rrahul@MY-MACBOOK ~ %
Initiating the File Copy from a Catalyst Center to a Mac or Linux Machine (CLI Option)
From the CLI of the Catalyst Center appliance, use one of these commands to copy the file, both of them use SCP. There is a little difference in the command syntax as shown in these examples:
 $ scp data/rca/<RCA file name> <Mac/Linux username>@<Mac/Linux IP address>:<path to save the file>
OR
 $ rca copy
Help:
copy - copy rca files to specified location
Usage: rca copy [scp-options] --files file1 ... user@host2:file2
Here are examples of the two commands to copy from a Catalyst Center to a server:
$ scp data/rca/maglev-10.78.9.21-rca-2025-01-14_08-48-51_UTC.tar.gz rrahul@10.105.192.135:
rrahul@10.105.192.135's password: <Enter the destination password>
maglev-10.78.9.21-rca-2025-01-14_08-48-51_UTC.tar.gz                                                                                                100%  1485MB  106.6MB/s  00:13
[Thursday Mar 06 13:02:01 UTC] maglev@10.78.9.21 (maglev-master-10-78-9-21)
$

$ rca copy --files maglev-10.78.9.21-rca-2025-01-14_08-48-51_UTC.tar.gz rrahul@10.105.192.135:
rrahul@10.105.192.135's password: <Enter the destination password>
maglev-10.78.9.21-rca-2025-01-14_08-48-51_UTC.tar.gz                                                                                                100%  1485MB  106.1MB/s  00:13
[Thursday Mar 06 13:10:31 UTC] maglev@10.78.9.21 (maglev-master-10-78-9-21)
$
Initiating the File Copy from the Catalyst Center to a Cisco Support Case (CLI Option)
This is similar to the previous option, which leverages SCP to perform a secure file transfer to cxd.cisco.com (the restricted shell prevents the use of other commands). The username is the Cisco Support Case number and the password is a token unique to every Cisco Support case. The username/password is always present in a note at the start of your Cisco Support case and can also be retrieved from the Support Case Manager. For more details on the token, refer to Customer File Uploads to Cisco Technical Assistance Center.
$ rca copy --files maglev-10.1.1.233-rca-2024-03-06_14-07-36_UTC.tar.gz 6969XXXXX@cxd.cisco.com:/
FIPS mode initialized
Warning: Permanently added the ECDSA host key for IP address '10.209.135.105' to the list of known hosts.
6969XXXXX6@cxd.cisco.com's password:
maglev-10.1.1.233-rca-2024-03-06_14-07-36_UTC.tar.gz
Initiating the File Copy from a Mac or Linux Machine to a Cisco Support Case (CLI Option)
There are two options in order to upload any file (including the RCA) from your Mac or Linux machine. In both options, the username is the Cisco Support Case number and the password is a token unique to every Cisco Support case. The username/password is always present in a note at the start of your Cisco Support case and can also be retrieved from the Support Case Manager. For more details on the token, refer to Customer File Uploads to Cisco Technical Assistance Center.
Sample output from a Cisco Support Case:
Subject: 688046089: CXD Upload Credentials

You can now upload files to the case using FTP/FTPS/SCP/SFTP/HTTPS protocols and the following details:
Hostname: cxd.cisco.com
Username: 688046089
Password: gX***********P7
Option 1. Upload the File via HTTPS (Fastest Option and Uses Port 443)
Step 1. Test whether you have connectivity from your your Mac or Linux machine to cxd.cisco.com via port 443. Here is one way to perform the test:
$ nc -zv cxd.cisco.com 443
Connection to cxd.cisco.com 443 port [tcp/https] succeeded!
$
Step 2. If the test succeeds upload the file via HTTPS with the use of this command (this does not work from a Catalyst Center appliance):
$ curl -T “<filename with path>” -u <Cisco Support Case number> https://cxd.cisco.com/home/
(If you want to see a more detailed view of the upload, then add the -v option. For example, "curl -vT…")
For example:
$ curl -T "./test.txt" -u 688046089 https://cxd.cisco.com/home/
Enter host password for user '688046089': <Type your CXD Upload password, unique to a Service Request, here>
[Tue Dec 10 13:35:47 UTC] maglev@10.1.1.1(maglev-master-1) ~
$
Option 2. Upload the File via SCP (Uses Port 22)
Step 1. Test whether you have connectivity from your Mac or Linux machine to cxd.cisco.com via port 22. Here is one way to perform the test:
$ nc -zv cxd.cisco.com 22
Connection to cxd.cisco.com 22 port [tcp/ssh] succeeded!
$
Step 2. If the test succeeds upload the file via SCP with the use of this command:
$ scp <local filename with path> <Cisco Support Case number>@cxd.cisco.com:
For example:
$ scp ./test.txt 688046089@cxd.cisco.com:
The authenticity of host 'cxd.cisco.com (X.X.X.X)' can't be established.
RSA key fingerprint is SHA256:3c8Vi3Ms2AITZlNzkBccR1pvE5ie9oMs64Uh0uhRado.
Are you sure you want to continue connecting (yes/no)? yes
Warning: Permanently added 'cxd.cisco.com,X.X.X.X' (RSA) to the list of known hosts.
688046089@cxd.cisco.com's password: <Type your CXD Upload password, unique to a service request, here>
test.txt                                                                                                                                                                                                        100%   39     0.0KB/s   00:00

[Tue Dec 10 13:44:27 UTC] maglev@10.1.1.1  (maglev-master-1) ~
$
Revision History
| Revision | Publish Date | Comments |
|---|---|---|
5.0 |
23-Apr-2026
|
Updated Title, Alt Text, Style Requirements, and Formatting. |
4.0 |
12-Mar-2025
|
Updated introduction section, corrected links, corrected links to open to new page, reviewed user comments and scanned for PII. |
2.0 |
17-Feb-2022
|
Corrected product name issues. |
1.0 |
13-Aug-2021
|
Initial Release |
 Feedback
Contact Cisco
- Open a Support Case

- (Requires a Cisco Service Contract)